Ajax MultiTransmitter Jeweller 3EOL 18-zone Wireless Module, IP40, IK06, Black
SKU: 367309047
€149,99
Unit price
Available for pickup at
Out of stock at
Added to compare
Reached count_product-product limit
Added to compare
Reached count_product-product limit
{"id":53505646494031,"title":"Default Title","option1":"Default Title","option2":null,"option3":null,"sku":"367311712","requires_shipping":true,"taxable":true,"featured_image":null,"available":true,"name":"AJAX DomeCam Mini (5 Mp\/2.8 mm) black- IP network camera (black) with 110° ~ 110° viewing angle.","public_title":null,"options":["Default Title"],"price":15999,"weight":0,"compare_at_price":17000,"inventory_management":"shopify","barcode":null,"requires_selling_plan":false,"selling_plan_allocations":[],"quantity_rule":{"min":1,"max":null,"increment":1}}
AJAX DomeCam Mini (5 Mp/2.8 mm) black- IP network camera (black) with 110° ~ 110° viewing angle.
SKU: 367311712
€159,99€170,00
Unit price
The AJAX DomeCam Mini (5 Mp/2.8 mm) is an IP network camera (product colour: black) with a resolution of up to 2880 × 1620 px and a built-in 2.8 mm fixed lens with a viewing angle of 100° ~ 110°. This IP camera features true WDR image processing, intelligent infrared (IR) backlighting up to 15 metres and object recognition. Users can view archived and live video in the Ajax Security System application. The AJAX DomeCam Mini can operate without an Ajax NVR by recording the archive to an SD card (sold separately).
Wired IP surveillance camera with AI support, 110° viewing angle, infrared (IR) illumination, True WDR, microphone and PoE/12V power supply. Suitable for both indoor and outdoor installations.
Models
5 Mp/4 mm
Resolution up to 2880 × 1620 px
Frame rate up to 25 FPS
Viewing angle 100°-110°
Video stream
Video protocol: JetSparrow (encrypted P2P protocol developed by Ajax Systems)
Memory:
NVR: HDD up to 16 TB (SATA, 3.5"), not included
microSD: up to 256 GB, V30 or faster, not included
Video codecs: H.265, H.264
Dynamic Range: True WDR
Communication channel
Ethernet: up to 100 Mbps
Key features
Motion detection (software level)
AI object detection: people, animals, vehicles
Intelligent IR illumination up to 50 m, automatic brightness adjustment
Visual verification of Ajax alarms (scenario configuration)
ONVIF support: Profile S, Profile T (partial)
Microphone with sound recording
Audio codecs: G711-ULAW, G711-ALAW, G726, G722
Power
Power supply: 12 V⎓ ± 20%, 1 A
Power consumption up to 15 W
Ethernet port: PoE Standard 802.3at/af
Protection against sabotage
mTLS - encrypted connection
Authentication via Cloud
Secure Boot - protection against firmware tampering
Wired IP surveillance camera with AI support, 110° viewing angle, infrared illumination (IR), True WDR, microphone and PoE/12V power supply. Suitable for both indoor and outdoor installations.
Models
5 Mp/2.8 mm
Resolution up to 2880 × 1620 px
Frame rate up to 25 FPS
Viewing angle 100°-110°
Video stream
Video protocol: JetSparrow (encrypted P2P protocol developed by Ajax Systems)
Memory:
NVR: HDD up to 16 TB (SATA, 3.5"), not included
microSD: up to 256 GB, V30 or faster, not included
Video codecs: H.265, H.264
Dynamic Range: True WDR
Communication channel
Ethernet: up to 100 Mbps
Key features
Motion detection (software level)
AI object detection: people, animals, vehicles
Intelligent IR illumination up to 50 m, automatic brightness adjustment
Visual verification of Ajax alarms (scenario configuration)
ONVIF support: Profile S, Profile T (partial)
Microphone with sound recording
Audio codecs: G711-ULAW, G711-ALAW, G726, G722
Power
Power supply: 12 V⎓ ± 20%, 1 A
Power consumption up to 15 W
Ethernet port: PoE Standard 802.3at/af
Protection against sabotage
mTLS - encrypted connection
Authentication via Cloud
Secure Boot - protection against firmware tampering
Digital signature verification for OTA updates
User and operator access rights distribution
Corpus
Dimensions: 103 × 98 × 98 mm
Weight: 496 g
Operating temperature: -30 °C ... +60 °C
Humidity: up to 90%
Protection class: IP65, IK08
Colour: black
Set
TurretCam (5 Mp/2.8 mm)
Mounting template
Mounting accessories kit
Quick Installation Guide
Available for pickup at
Out of stock at
Added to compare
Reached count_product-product limit
Added to compare
Reached count_product-product limit
{"id":55845026758991,"title":"Default Title","option1":"Default Title","option2":null,"option3":null,"sku":"367311713","requires_shipping":true,"taxable":true,"featured_image":null,"available":true,"name":"AJAX DomeCam Mini (5 Mp\/2.8 mm) (8EU) ASP white","public_title":null,"options":["Default Title"],"price":16230,"weight":0,"compare_at_price":20700,"inventory_management":"shopify","barcode":null,"requires_selling_plan":false,"selling_plan_allocations":[],"quantity_rule":{"min":1,"max":null,"increment":1}}
Wired IP surveillance camera with AI support, 110° viewing angle, infrared illumination (IR), True WDR, microphone and PoE/12V power supply. Suitable for both indoor and outdoor installations.
Models
5 Mp/2.8 mm
Resolution up to 2880 × 1620 px
Frame rate up to 25 FPS
Viewing angle 100°-110°
Video stream
Video protocol: JetSparrow (encrypted P2P protocol developed by Ajax Systems)
Memory:
NVR: HDD up to 16 TB (SATA, 3.5"), not included
microSD: up to 256 GB, V30 or faster, not included
Video codecs: H.265, H.264
Dynamic Range: True WDR
Communication channel
Ethernet: up to 100 Mbps
Key features
Motion detection (software level)
AI object detection: people, animals, vehicles
Intelligent IR illumination up to 15 m, automatic brightness adjustment
Visual verification of Ajax alarms (scenario configuration)
ONVIF support: Profile S, Profile T (partial)
Microphone with sound recording
Audio codecs: G711-ULAW, G711-ALAW, G726, G722
Power
Power supply: 12 V⎓ ± 20%, 1 A
Power consumption up to 15 W
Ethernet port: PoE Standard 802.3at/af
Protection against sabotage
mTLS - encrypted connection
Authentication via Cloud
Secure Boot - protection against firmware tampering
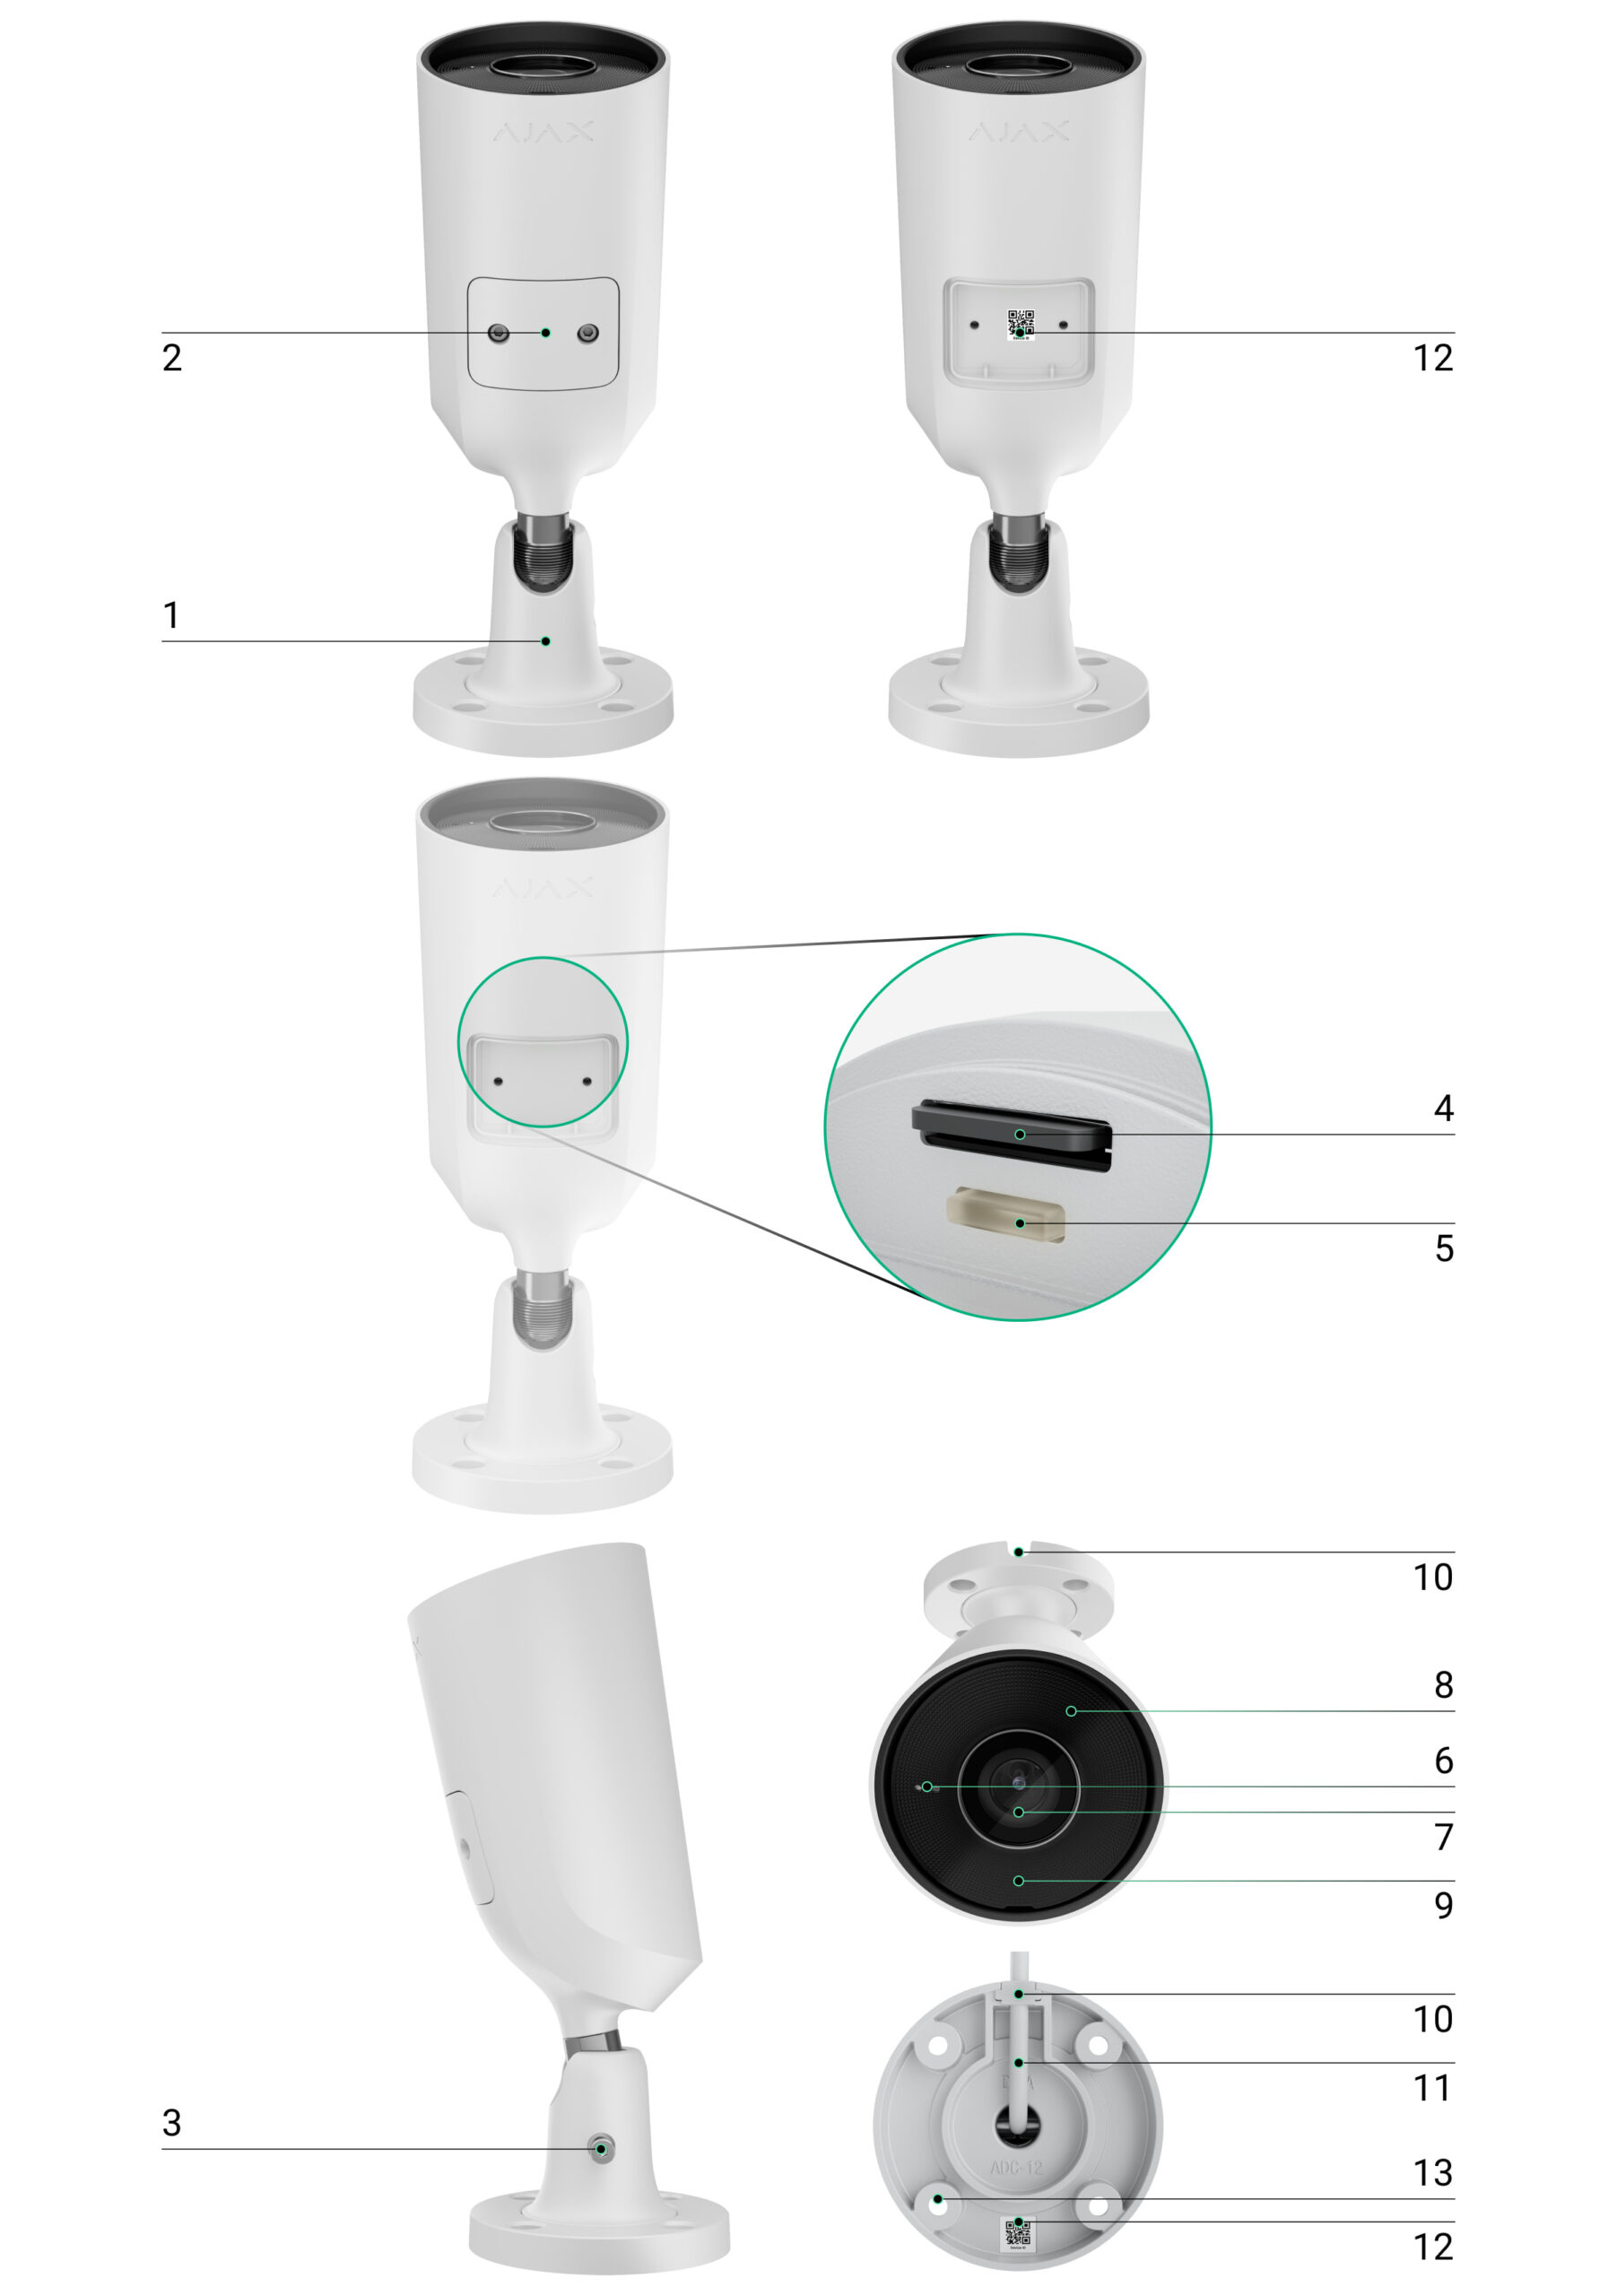
Prismatic lens (covers the IR LED and diffuses the light)
IR illumination (for recording in the dark and in low light)
Cable channel for the connector output from the camera
Cable connector
QR code with device ID (for connecting the BulletCam to the Ajax system)
Mounting holes for attaching the camera to a surface
How It Works
BulletCam is an IP camera that uses artificial intelligence (AI) for object recognition. Its algorithms can identify moving objects and distinguish between people, animals, and vehicles.
The device is equipped with smart IR illumination, which ensures high-quality images even in low-light conditions. The camera automatically adjusts the lighting intensity in real time, preventing overexposure and allowing for a clear view of both near and distant objects.
IP65 protection rating—suitable for outdoor installation.
A durable metal housing protects against tampering.
microSD card: 32 GB to 256 GB (V30 or faster; not included).
Can also operate without a memory card when used with an NVR.
Using the video storage calculator, you can estimate the required storage capacity and recording time based on your video stream settings.
BulletCam features:
Real-time video viewing with zoom.
Access to archived video by timeline or calendar (via microSD or NVR).
Configuration of motion zones and sensitivity adjustment.
Video wall (combines images from all cameras).
Quick access to automation device control from the video player menu.
Video scenarios: a short video clip sent to the Ajax app when a security detector is triggered.
Downloading archive clips to a smartphone or computer (via microSD or NVR).
Videos with firmware version 2.309 or later are signed with an Ajax digital signature (the Ajax media player can be used for verification).
ONVIF integration
Supported by BulletCam firmware version 2.356 or later.
Compatible with VMS (Milestone, Genetec, Axxon, Digifort).
Setup can be performed by an administrator or a PRO user with the following permissions:
Ajax Security System (v. 3.25+),
Ajax PRO: Tool for Engineers (v. 2.25+),
Ajax PRO Desktop (v. 4.20+),
Ajax Desktop (v. 4.21+).
Video Scenarios In the Ajax system, IP cameras can be used for alarm verification. Cameras can respond to alarms from a single detector, multiple detectors, or all detectors.
You can configure the siren to activate when motion is detected or an object is recognized by AI.
Video Wall Available on the Video Wall tab after at least one camera has been added.
In the Ajax mobile apps, you can:
Switch between cameras;
Search for a camera by name;
Control a PTZ camera.
In Ajax PRO Desktop, you can:
Switch between cameras;
Search for a camera by name;
Organize cameras by room, NVR, or group;
Control a PTZ camera;
Save custom layouts;
Change the camera display order;
Create slideshow templates.
The system allowsyou to hide part of the frame. For example, if a safe is visible, you can set up a zone so that activity around it is recorded without revealing its contents. Motion and objects will not be detected in these zones.
To configure this in the Ajax app:
Open the Devices tab.
Select a camera (or NVR → Cameras).
Go to Settings (by tapping the gear icon twice).
Select the Privacy Zones menu.
Open Configure Privacy Zones and mark the desired area.
Tap the icon. Return to the camera settings.
The user can create up to four privacy zones.
Choosing a Location
When choosing the best location to install the BulletCam, consider the camera’s field of view and any potential obstacles that could block the view.
How to install an Ajax camera for better AI recognition
When designing a security system, follow the installation recommendations. Security systems may only be designed and installed by professionals. A list of recommended partners is available here.
The camera must not be installed:
indoors or outdoors where the temperature and humidity do not meet the specified operating parameters;
in locations where objects or structures obstruct the camera’s field of view;
in direct bright light or facing bright objects (such as a white wall), as this reduces image quality. A bright surface reflects IR lighting and can blind the camera in the dark.
Installation
Connect the Ethernet cable to the camera. If the camera is powered via PoE, an external power supply is not required; otherwise, connect both the external power supply and the Ethernet cable.
Turn on the camera’s power supply. The LED indicator on the cable connector will light up green.
Connect the camera to the system, and then disconnect the Ethernet and power cables from the camera.
Using the included hex key (Ø 2 mm), unscrew the screws securing the protective cover. Insert a microSD card (not included) into the appropriate slot. Replace the protective cover and tighten the screws.
After connecting the BulletCam to the system, format the memory card in the camera settings.
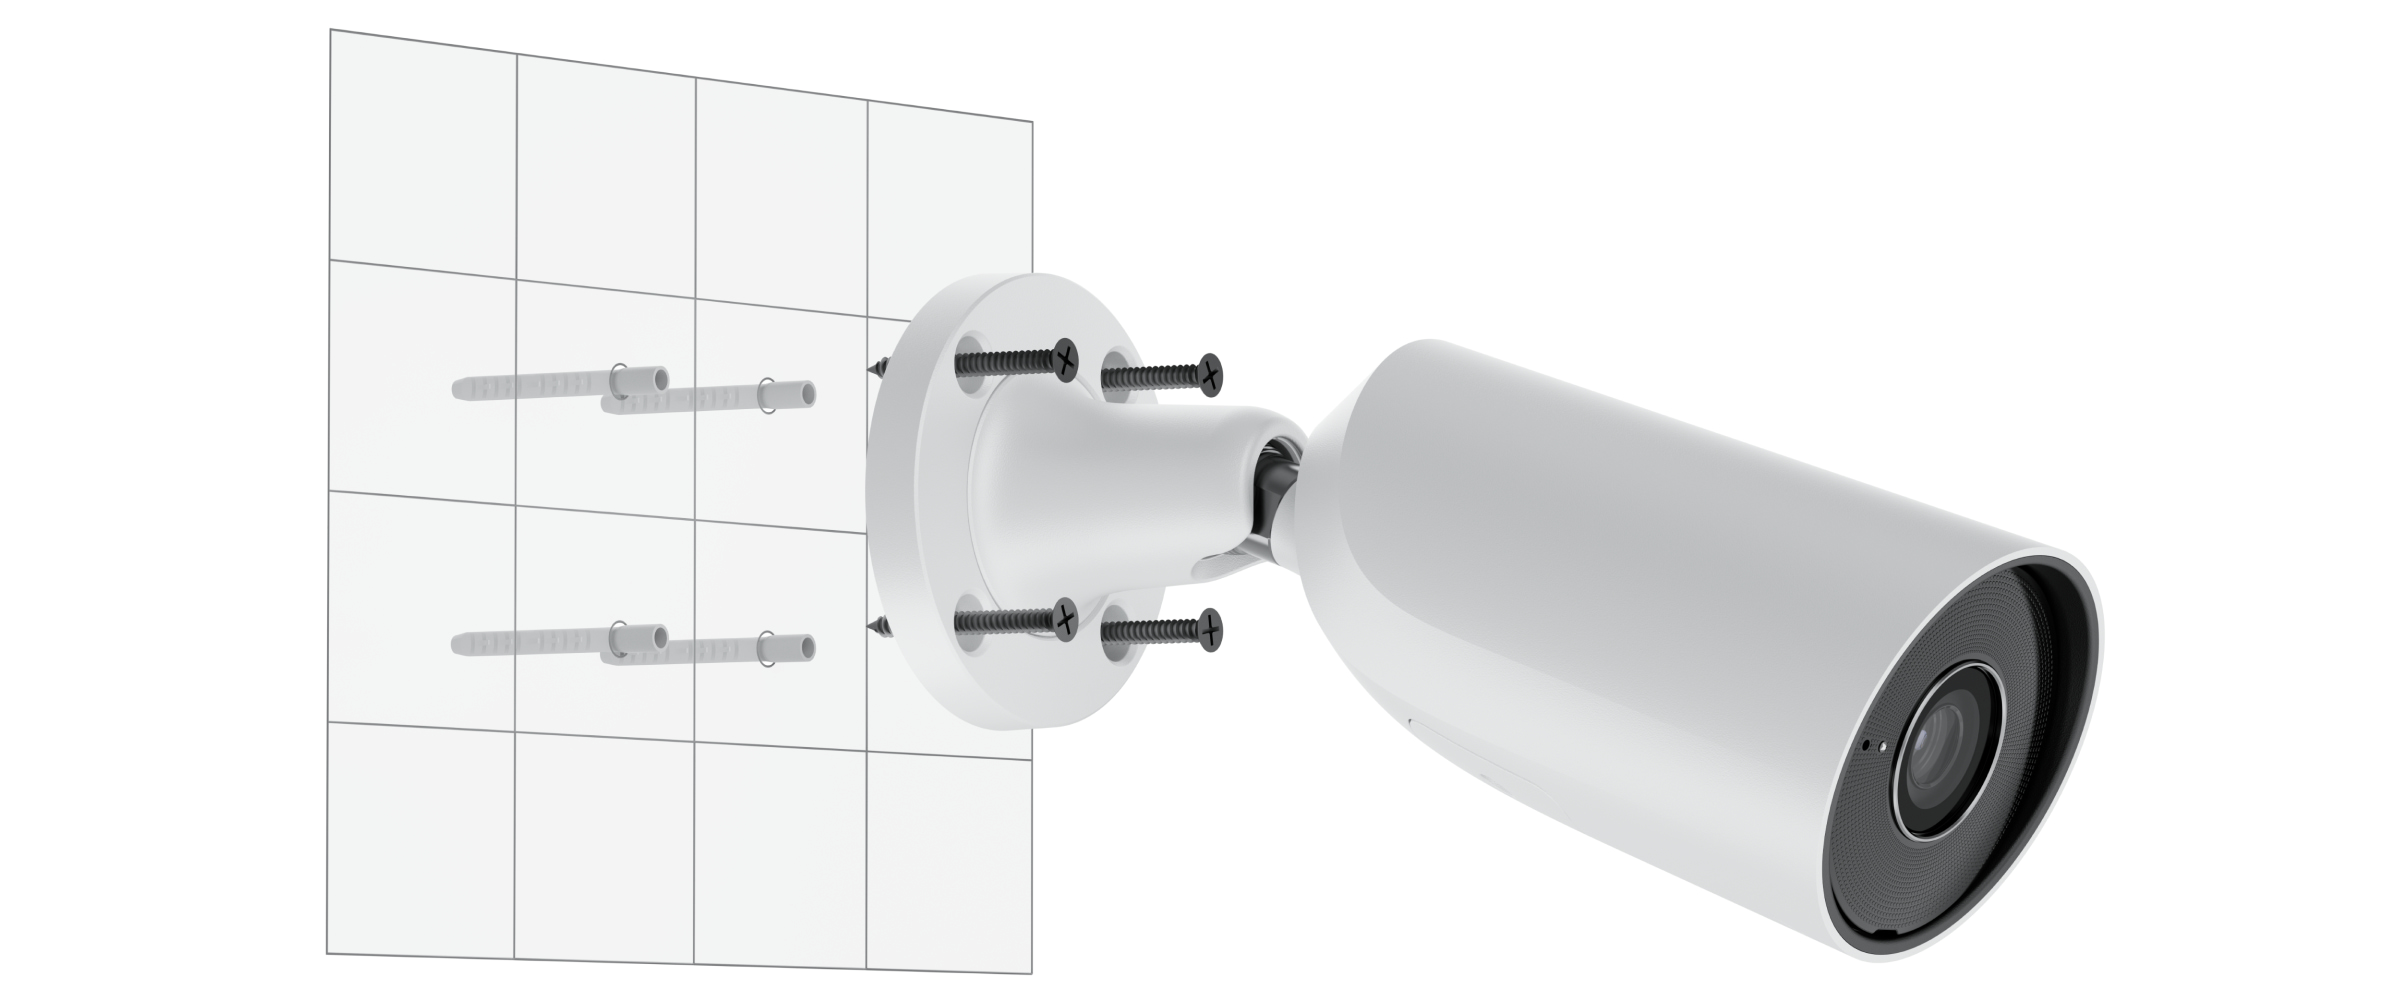
Using the mounting template, mark the drill holes on the surface where you plan to mount the camera. Secure the template in the selected location with adhesive tape and drill four holes as indicated on the template.
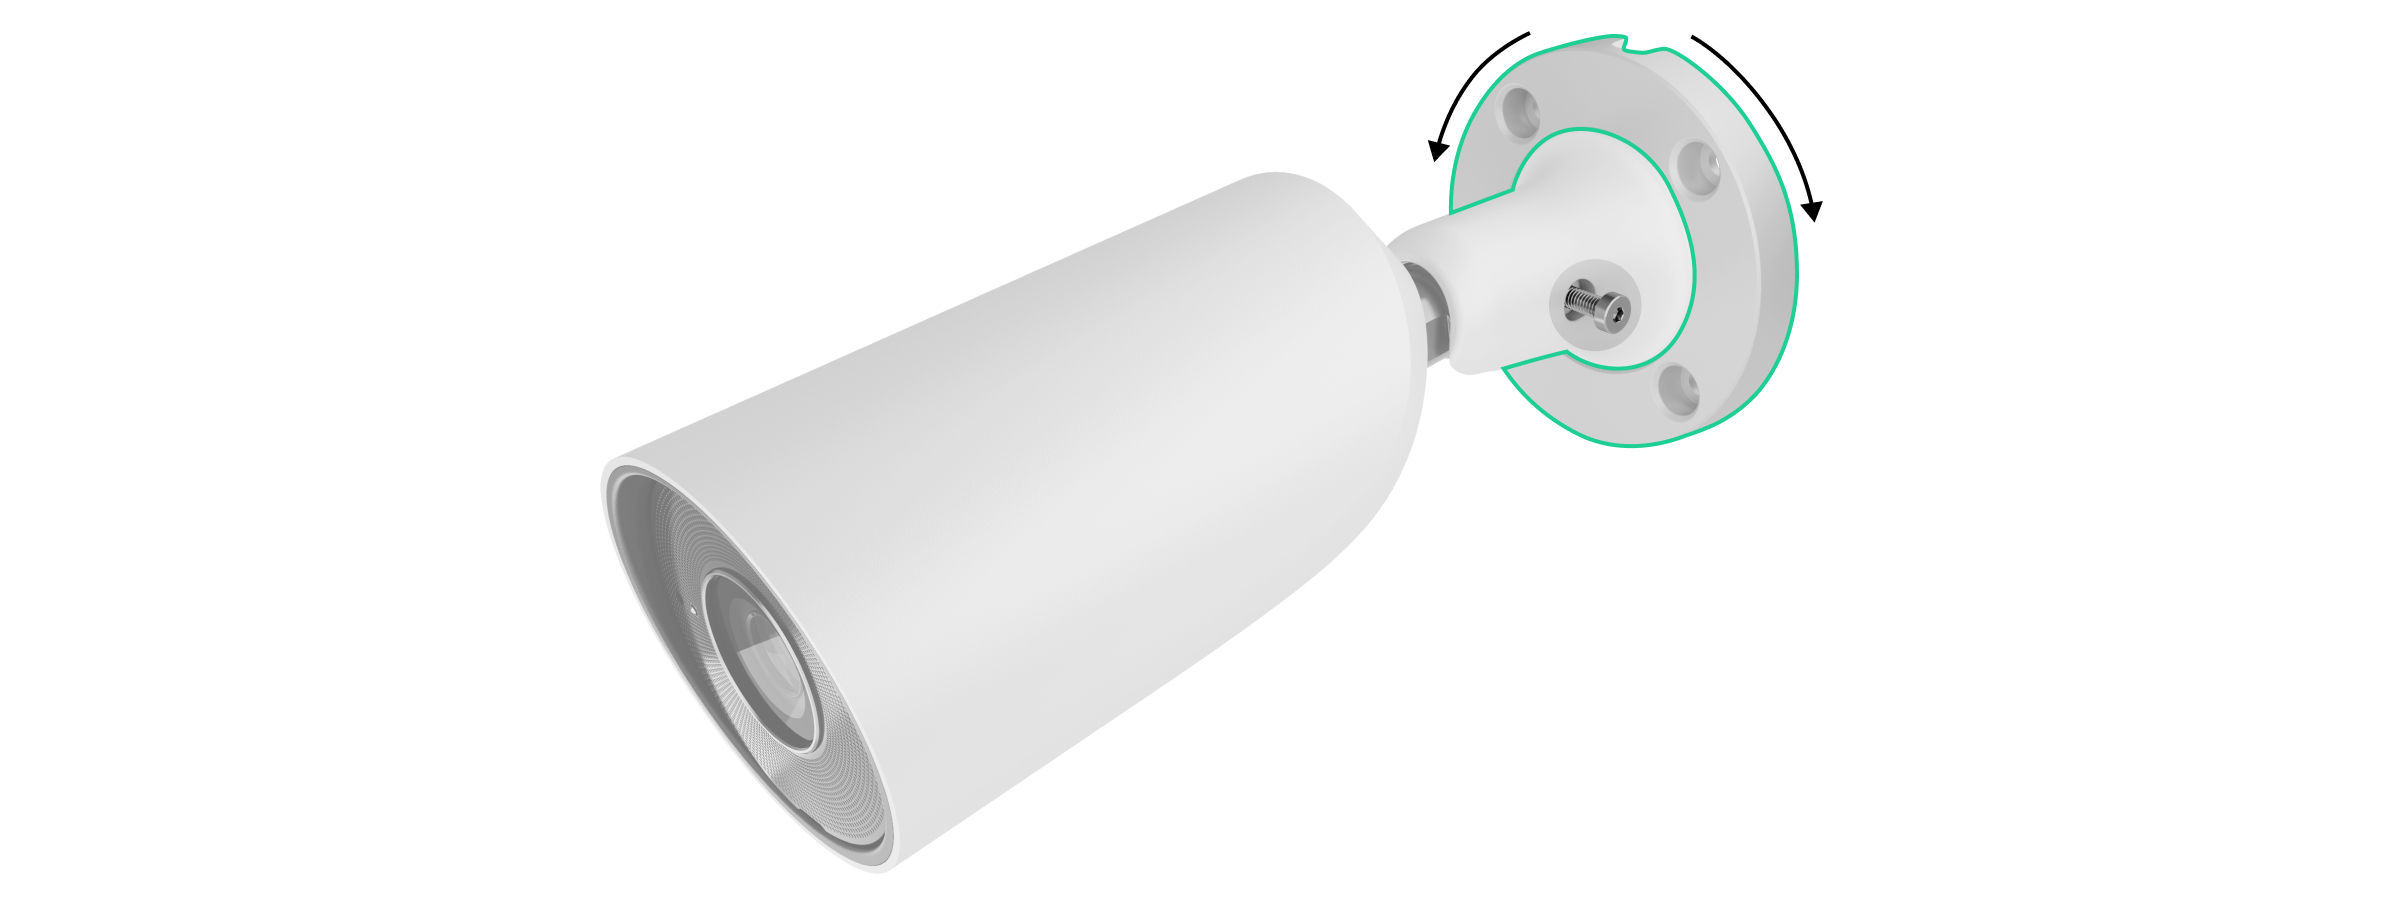
Unscrew the screw on the swivel mounting bracket using the included hex key (Ø 2 mm) and rotate the bracket if you need to adjust the position of the cable channel. Screw the screw back in.
Route the cable through the cable channel and secure the swivel mounting bracket to the surface using the screws included in the kit.
Unscrew the screw on the swivel mounting bracket to adjust the camera's tilt and rotation.
Make sure the camera lens is pointed toward the area to be monitored. Secure it by tightening the screw on the swivel mounting bracket.
Connect the Ethernet and power cables to the camera. Install a waterproof connector if the camera is used indoors where humidity levels exceed the operating specifications, or outdoors.
Recommended power supply specifications: 12 V⎓ ± 20% with a current of at least 1 A.
Turn on the camera’s power supply. The LED indicator on the cable connector will light up green.
Connecting to the System
Before connecting the device:
Install the Ajax app.
Sign in to your account or create a new one.
Select a room or create a new one.
Add at least one virtual room.
Make sure the room is disarmed.
Only a PRO user or a room administrator with system configuration rights can add a device to a room.
Account Types and Their Permissions How to Add a BulletCam
Restore to Factory Settings
To reset the camera to its factory settings:
Turn off the camera by disconnecting the external power source or the Ethernet cable (if power is supplied via PoE).
Press and hold the reset button.
Connect the camera to a power source while holding down the reset button, and wait until the LED indicator on the button lights up purple. This will take about 50 seconds.
The LED indicator lights up blue for 20 seconds after the camera is turned on while the reset button is held down. It then turns off for 30 seconds and lights up purple. This means the camera has been restored to its factory settings.
Release the button.
Icons
In the Ajax app, icons indicate the device's status. To view them:
Select a room in the Ajax app.
Open the Devices tab.
Find BulletCam in the list.
Icon — Meaning
Additional services have been activated in accordance with the subscription.
The device is operating in Night Mode.
No microSD card is installed.
The microSD card is installed.
A microSD card error has been detected—formatting is recommended.
The microSD card is being formatted.
A new firmware version is available.
Firmware update in progress: downloading/installing.
Firmware update error.
The device has lost its connection to the Ajax Cloud server.
Connection enabled via ONVIF.
You do not have access to the video.
Statuses
The status section provides information about the device and its operating parameters. You can view this information in the Ajax apps:
Select a room.
Open the Devices tab.
Select BulletCam from the list. If BulletCam is connected to a video recorder, select NVR and then Cameras.
(The following is a detailed list of parameters: Errors, Firmware Update, Connection, Connection to NVR, Memory Location, Memory Card, Resolution, Frame Rate, Bit Rate, Video Codec, Motion Detection, Object Detection, Uptime, ONVIF Integration, Viewing Permissions, Firmware, ID, etc.)
Settings
To change the camera settings in the Ajax app:
Open the Devices tab.
Select BulletCam (or NVR → Cameras).
Go to Settings.
Set the necessary parameters.
Tap Back to save.
(The following is a detailed list of settings: Name, Room, Night Mode, Recording Modes, Detector Alerts, Video Stream Settings, Image Quality Settings, Audio, Privacy Zones, Firmware Updates, Connection, Memory Card, Monitoring, Service, etc.)
Indications
A green LED indicator is located on the cable connector.
Event
Indications
Note
The camera is powered.
The green light is on.
Errors
If a BulletCam detects an error, an error counter appears on the device icon in the Ajax app. All errors are visible in the camera's Status section. Fields containing errors are highlighted in red.
Errors are displayed if:
The camera loses its connection to the server;
There is an error with the storage device (press the camera's reset button or format the storage device in the settings);
The storage device needs to be formatted.
Maintenance
Check the camera's operation regularly. If you notice a decline in image quality, blurriness, or darkening, inspect the camera. Clean the housing to remove dust, cobwebs, and other debris. Use soft, dry wipes designed for cleaning electronics.
Do not use substances containing alcohol, acetone, gasoline, or other harsh solvents. Clean the lens carefully—scratches can result in poor image quality and damage to the camera.
Technical Specifications
BulletCam (5 MP/2.8 mm)
BulletCam (5 MP/4 mm)
BulletCam (8 MP/2.8 mm)
BulletCam (8 MP/4 mm)
Compliance with Standards
Warranty
The product warranty for Ajax Systems Manufacturing, Ltd. is valid for 2 years from the date of purchase.
If you encounter any issues with the device's operation, please contact Ajax technical support first. In most cases, issues can be resolved remotely.
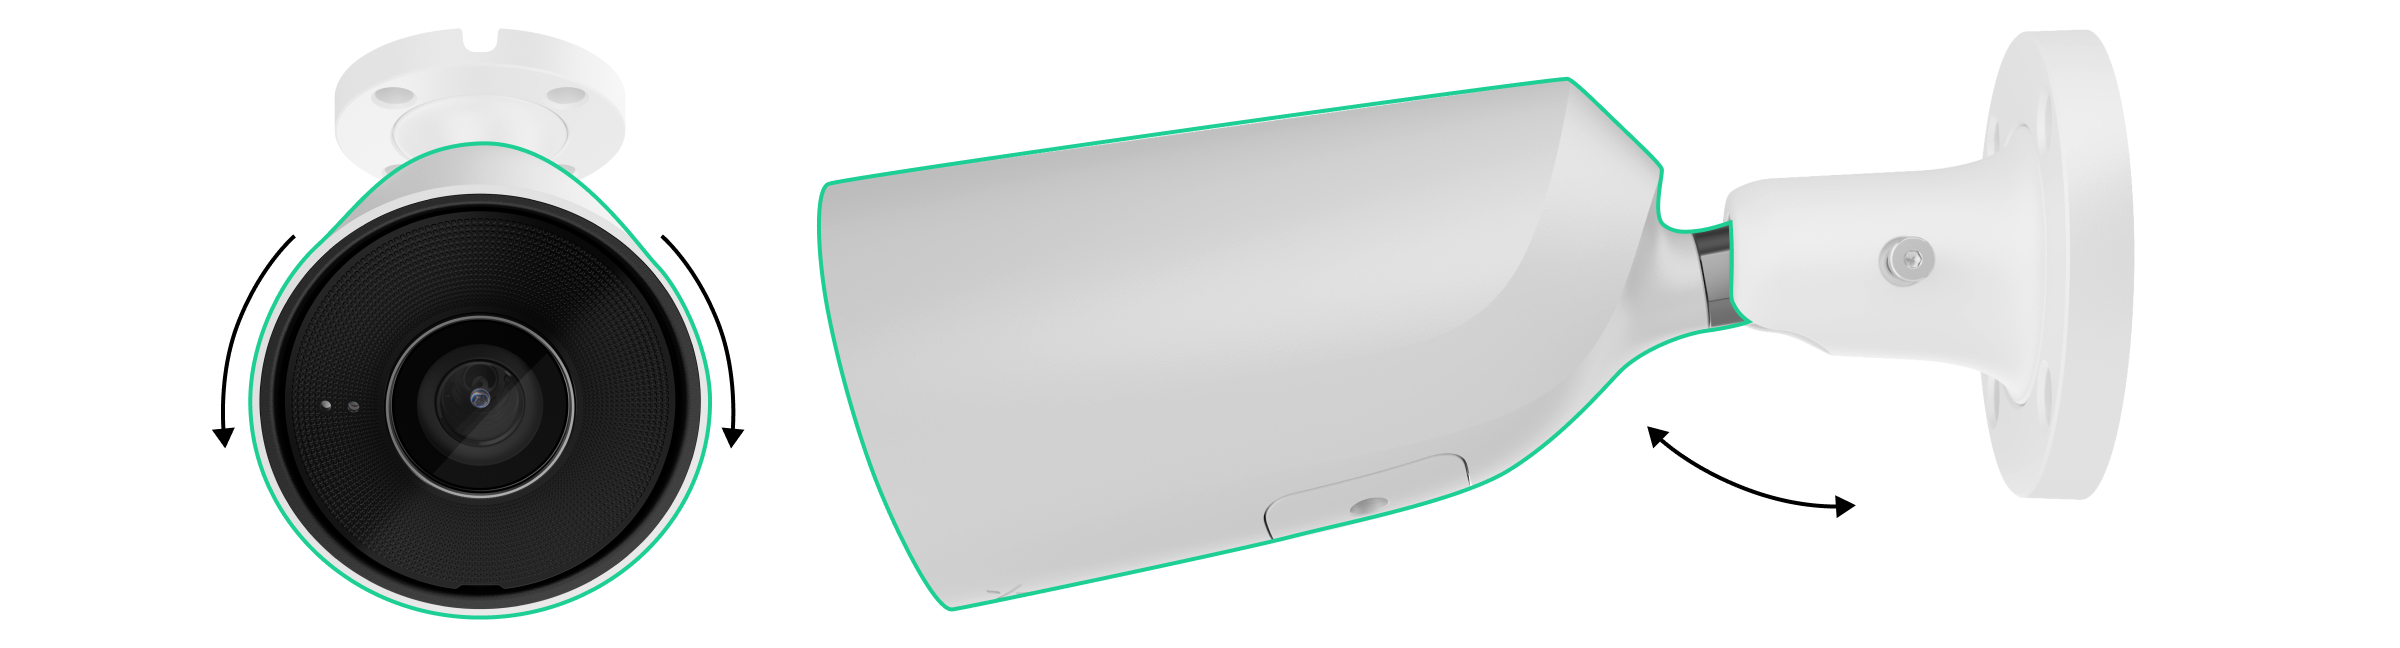
Prismatic lens (covers the IR LED and diffuses the light)
IR illumination (for recording in the dark and in low light)
Cable channel for the connector output from the camera
Cable connector
QR code with device ID (for connecting the BulletCam to the Ajax system)
Mounting holes for attaching the camera to a surface
How It Works
BulletCam is an IP camera that uses artificial intelligence (AI) for object recognition. Its algorithms can identify moving objects and distinguish between people, animals, and vehicles.
The device is equipped with smart IR illumination, which ensures high-quality images even in low-light conditions. The camera automatically adjusts the lighting intensity in real time, preventing overexposure and allowing for clear visibility of both near and distant objects.
IP65 protection rating—suitable for outdoor installation.
A durable metal housing protects against tampering.
microSD card: 32 GB to 256 GB (V30 or faster, not included).
Can also operate without a memory card when used with an NVR.
Using the video storage calculator, you can estimate the required storage capacity and recording time based on video stream settings.
BulletCam features:
Real-time video viewing with zoom.
Access to archived video by chronology or calendar (via microSD or NVR).
Configuration of motion zones and sensitivity adjustment.
Video wall (combines images from all cameras).
Quick access to automation device control from the video player menu.
Video scenarios: a short video clip sent to the Ajax app when a security detector is triggered.
Downloading archive clips to a smartphone or computer (via microSD or NVR).
Videos with firmware version 2.309 or later are signed with an Ajax digital signature (the Ajax media player can be used for verification).
ONVIF integration
Supported by BulletCam firmware version 2.356 and later.
Compatible with VMS (Milestone, Genetec, Axxon, Digifort).
Setup can be performed by an administrator or a PRO user with the following permissions in the following applications:
Ajax Security System (v. 3.25+),
Ajax PRO: Tool for Engineers (v. 2.25+),
Ajax PRO Desktop (v. 4.20+),
Ajax Desktop (v. 4.21+).
Video Scenarios In the Ajax system, IP cameras can be used for alarm verification. Cameras can respond to alarms from a single detector, multiple detectors, or all detectors.
You can configure the siren to activate when motion is detected or an object is recognized by AI.
Video Wall Available on the Video Wall tab after at least one camera has been added.
In the Ajax mobile apps, you can:
Switch between cameras;
Search for a camera by name;
Control a PTZ camera.
In Ajax PRO Desktop, you can:
Switch between cameras;
Search for a camera by name;
Organize cameras by room, NVR, or group;
Control a PTZ camera;
Save custom layouts;
Change the camera display order;
Create slideshow templates.
The system allowsyou to hide part of the frame. For example, if a safe is visible, you can set up a zone so that activity around it is recorded without revealing its contents. Motion and objects will not be detected in these zones.
To configure this in the Ajax app:
Open the Devices tab.
Select a camera (or NVR → Cameras).
Go to Settings (by tapping the gear icon twice).
Select the Privacy Zones menu.
Open Configure Privacy Zones and mark the desired area.
Tap the icon. Return to the camera settings.
The user can create up to four privacy zones.
Choosing a Location
When choosing the best location to install the BulletCam, consider the camera’s field of view and any potential obstacles that could block the view.
How to install an Ajax camera for better AI recognition
When designing a security system, follow the installation recommendations. Security systems may only be designed and installed by professionals. A list of recommended partners is available here.
The camera must not be installed:
indoors or outdoors where the temperature and humidity do not meet the specified operating parameters;
in locations where objects or structures obstruct the camera’s field of view;
in direct bright light or facing bright objects (such as a white wall), as this reduces image quality. A bright surface reflects IR illumination and dazzles the camera in the dark.
Installation
Connect the Ethernet cable to the camera. If the camera is powered via PoE, an external power supply is not required; otherwise, connect both the external power supply and the Ethernet cable.
Turn on the camera’s power supply. The LED indicator on the cable connector will light up green.
Connect the camera to the system, and then disconnect the Ethernet and power cables from the camera.
Using the included hex wrench (Ø 2 mm), unscrew the screws securing the protective cover. Insert a microSD card (not included) into the appropriate slot. Replace the protective cover and tighten the screws.
After connecting the BulletCam to the system, format the memory card in the camera settings.
Using the mounting template, mark the drill holes on the surface where you plan to mount the camera. Secure the template in the selected location with adhesive tape and drill four holes as indicated on the template.
Unscrew the screw on the swivel mounting bracket using the included hex key (Ø 2 mm) and rotate the bracket if you need to adjust the position of the cable channel. Screw the screw back in.
Route the cable through the cable channel and secure the swivel mounting bracket to the surface using the screws provided.
Unscrew the screw on the swivel mounting bracket to adjust the camera's tilt and rotation.
Make sure the camera lens is pointed toward the area to be monitored. Secure it by tightening the screw on the swivel mounting bracket.
Connect the Ethernet and power cables to the camera. Install a waterproof connector if the camera is used indoors where humidity levels exceed the operating parameters or outdoors.
Recommended power supply specifications: 12 V⎓ ± 20% with a current of at least 1 A.
Turn on the camera’s power supply. The LED indicator on the cable connector will light up green.
Connecting to the System
Before connecting the device:
Install the Ajax app.
Sign in to your account or create a new one.
Select a room or create a new one.
Add at least one virtual room.
Make sure the room is disarmed.
Only a PRO user or a room administrator with system configuration rights can add a device to a room.
Account Types and Their Permissions How to Add a BulletCam
Restore to Factory Settings
To reset the camera to its factory settings:
Turn off the camera by disconnecting the external power source or the Ethernet cable (if power is supplied via PoE).
Press and hold the reset button.
Connect the camera to a power source while holding down the reset button, and wait until the LED indicator on the button turns purple. This will take about 50 seconds.
The LED indicator lights up blue for 20 seconds after the camera is turned on while the reset button is held down. It then turns off for 30 seconds and lights up purple. This means the camera has been restored to its factory settings.
Release the button.
Icons
In the Ajax app, icons indicate the device's status. To view them:
Select a room in the Ajax app.
Open the Devices tab.
Find BulletCam in the list.
Icon — Meaning
Additional services have been activated in accordance with the subscription.
The device is operating in Night Mode.
No microSD card is installed.
The microSD card is installed.
A microSD card error has been detected—formatting is recommended.
The microSD card is being formatted.
A new firmware version is available.
Firmware update in progress: downloading/installing.
Firmware update error.
The device has lost its connection to the Ajax Cloud server.
Connection enabled via ONVIF.
You do not have access to the video.
Statuses
The status section provides information about the device and its operating parameters. You can view this information in the Ajax apps:
Select a room.
Open the Devices tab.
Select BulletCam from the list. If BulletCam is connected to a video recorder, select NVR and then Cameras.
(The following is a detailed list of parameters: Errors, Firmware Update, Connection, Connection to NVR, Memory Location, Memory Card, Resolution, Frame Rate, Bit Rate, Video Codec, Motion Detection, Object Detection, Uptime, ONVIF Integration, Viewing Permissions, Firmware, ID, etc.)
Settings
To change the camera settings in the Ajax app:
Open the Devices tab.
Select BulletCam (or NVR → Cameras).
Go to Settings.
Set the necessary parameters.
Tap Back to save.
(The following is a detailed list of settings: Name, Room, Night Mode, Recording Modes, Detector Alerts, Video Stream Settings, Image Quality Settings, Audio, Privacy Zones, Firmware Updates, Connection, Memory Card, Monitoring, Service, etc.)
Indications
A green LED indicator is located on the cable connector.
Event
Indications
Note
The camera is powered.
The green light is on.
Errors
If a BulletCam detects an error, an error counter appears on the device icon in the Ajax app. All errors are visible in the camera's Status section. Fields with errors are highlighted in red.
Errors are displayed if:
The camera loses its connection to the server;
There is an error with the storage device (press the camera's reset button or format the storage device in the settings);
The storage device needs to be formatted.
Maintenance
Check the camera's operation regularly. If you notice a decline in image quality, blurriness, or darkening, inspect the camera. Clean the housing of dust, cobwebs, and other debris. Use soft, dry wipes designed for cleaning electronics.
Do not use substances containing alcohol, acetone, gasoline, or other harsh solvents. Clean the lens carefully—scratches can result in poor image quality and damage to the camera.
Technical Specifications
BulletCam (5 MP/2.8 mm)
BulletCam (5 MP/4 mm)
BulletCam (8 MP/2.8 mm)
BulletCam (8 MP/4 mm)
Compliance with Standards
Warranty
The product warranty for Ajax Systems Manufacturing, Ltd. is valid for 2 years from the date of purchase.
If you encounter any issues with the device's operation, please contact Ajax technical support first. In most cases, issues can be resolved remotely.
Available for pickup at
Out of stock at
Added to compare
Reached count_product-product limit
Added to compare
Reached count_product-product limit
{"id":49985983709519,"title":"Default Title","option1":"Default Title","option2":null,"option3":null,"sku":"367311721","requires_shipping":true,"taxable":true,"featured_image":null,"available":true,"name":"AJAX TURRETCAM 5Mp 2.8MM white 12V.For outdoor and indoor use. Powered IP security camera with 110° viewing angle","public_title":null,"options":["Default Title"],"price":16230,"weight":0,"compare_at_price":20700,"inventory_management":"shopify","barcode":null,"requires_selling_plan":false,"selling_plan_allocations":[],"quantity_rule":{"min":1,"max":null,"increment":1}}
Wired IP surveillance camera with AI support, 85° viewing angle, infrared (IR) illumination, True WDR, microphone and PoE/12V power supply. Suitable for both indoor and outdoor installations.
Models
5 Mp/4 mm
Resolution up to 2880 × 1620 px
Frame rate up to 25 FPS
Viewing angle 75°-85°
Video stream
Video protocol: JetSparrow (encrypted P2P protocol developed by Ajax Systems)
Memory:
NVR: HDD up to 16 TB (SATA, 3.5"), not included
microSD: up to 256 GB, V30 or faster, not included
Video codecs: H.265, H.264
Dynamic Range: True WDR
Communication channel
Ethernet: up to 100 Mbps
Key features
Motion detection (software level)
AI object detection: people, animals, vehicles
Intelligent IR illumination up to 50 m, automatic brightness adjustment
Visual verification of Ajax alarms (scenario configuration)
ONVIF support: Profile S, Profile T (partial)
Microphone with sound recording
Audio codecs: G711-ULAW, G711-ALAW, G726, G722
Power
Power supply: 12 V⎓ ± 20%, 1 A
Power consumption up to 15 W
Ethernet port: PoE Standard 802.3at/af
Protection against sabotage
mTLS - encrypted connection
Authentication via Cloud
Secure Boot - protection against firmware tampering
AJAX ReX 2 Jeweller Wireless Repeater - Photo verification / Ethernet connection, - Compatible with HUB 2, Hub 2 Plus, White
SKU: 367308690
€165,52€211,11
Unit price
ReX 2 Jeweller
ReX 2 Jeweller is a radio amplifier with support for alarm photo verification. It communicates with the hub via radio and Ethernet and is intended for indoor installation only.
It is equipped with tamper protection and a built-in backup battery that provides up to 38 h of operation without external power supply.
The amplifier works only with compatible Ajax hubs. Connection to other hubs, other amplifiers, uartBridge and ocBridge Plus is not guaranteed.
Connection and configuration is done via iOS, Android, macOS and Windows apps. Users receive push notifications, SMS and calls (if activated) for ReX 2 Jeweller events.
👉 Buy ReX 2 Jeweller radio signal booster
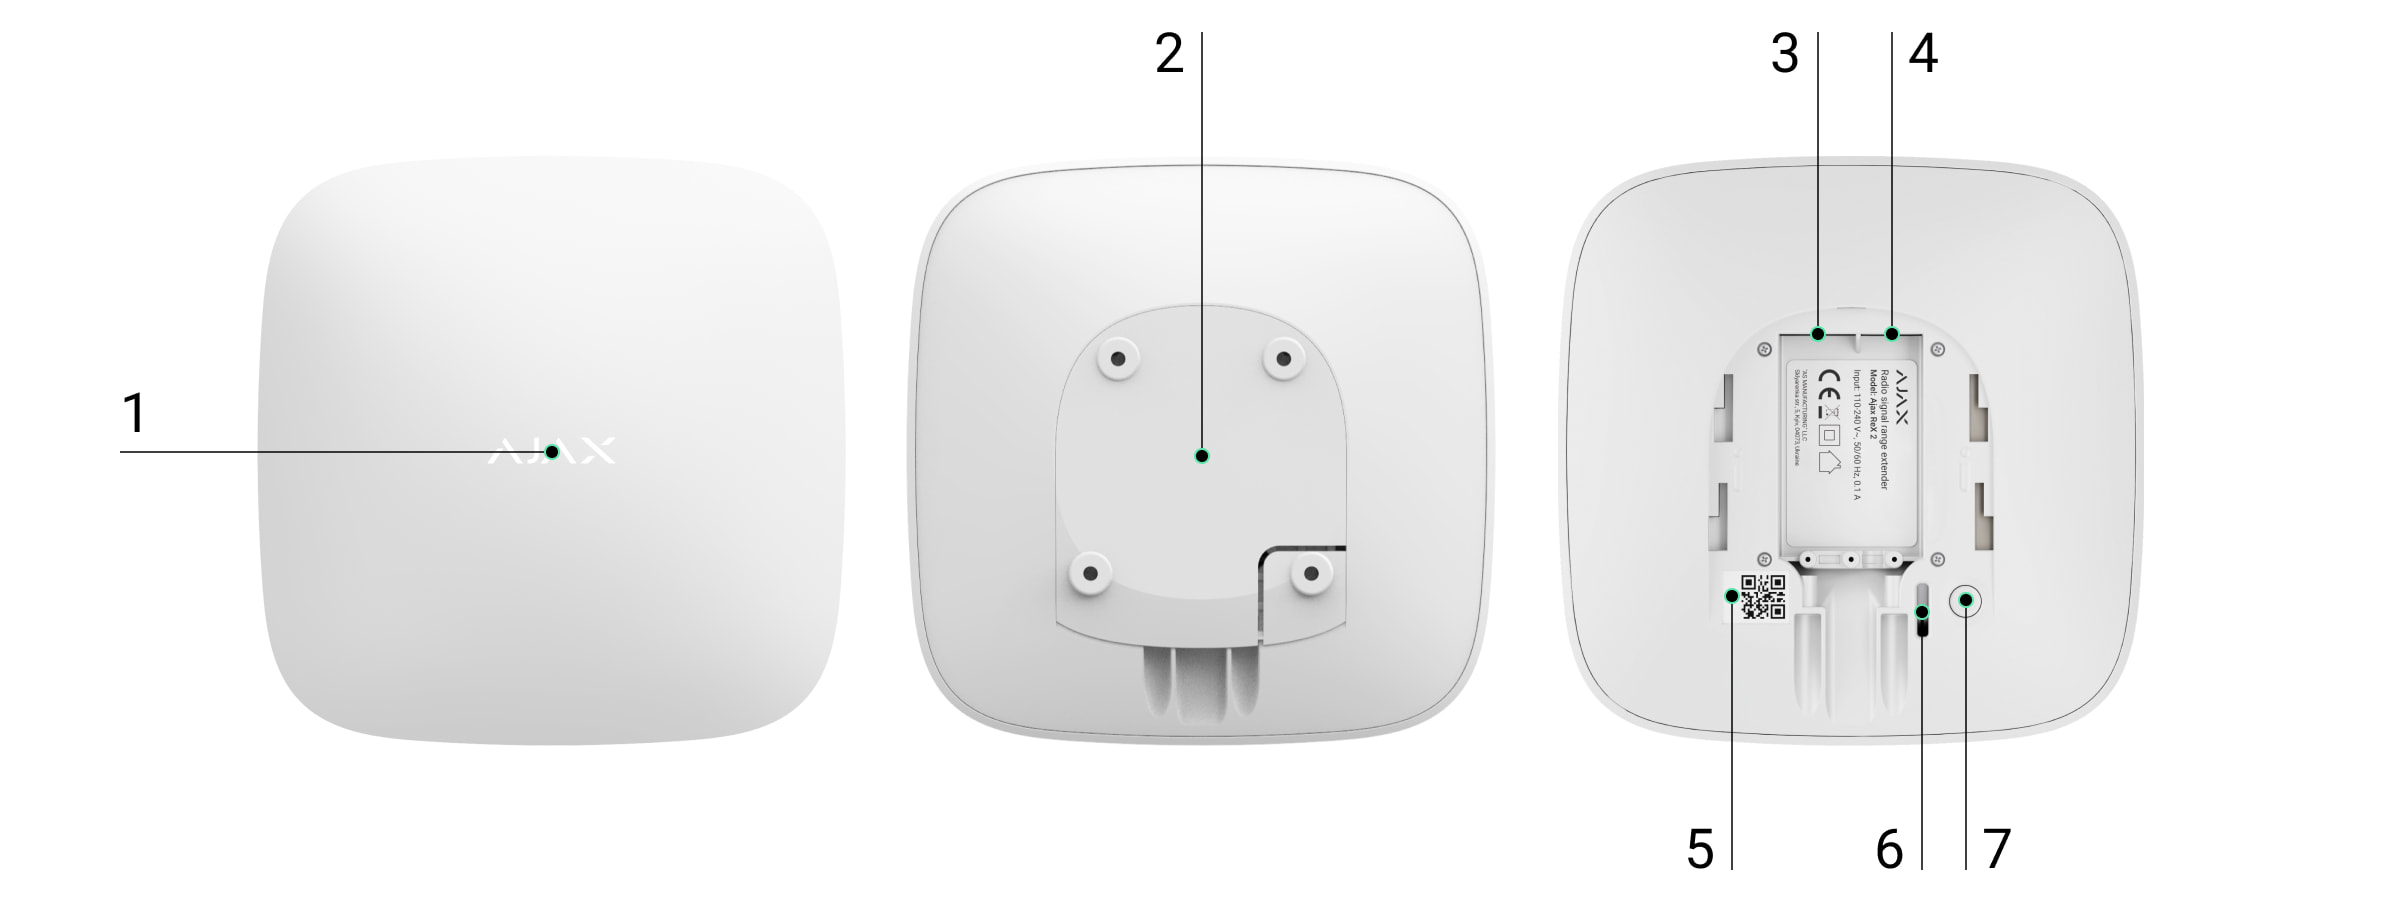
Functional elements
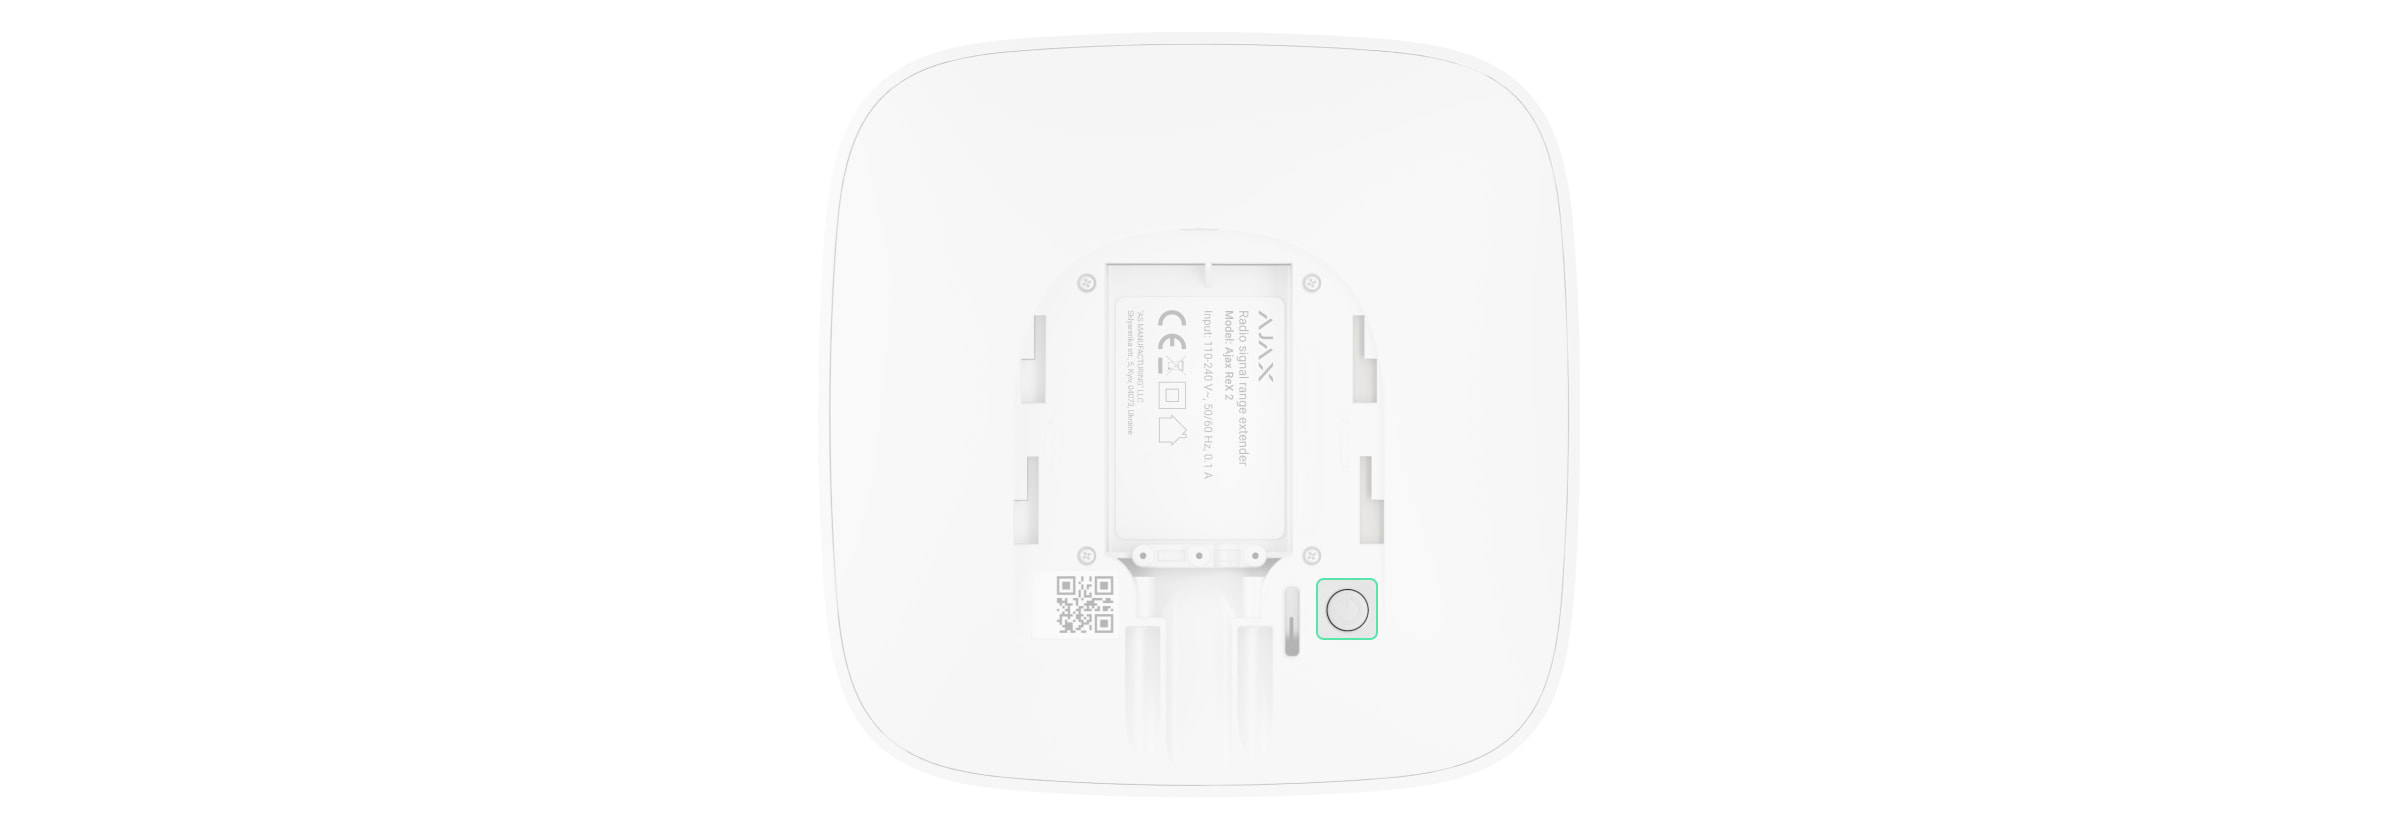
Ajax logo with LED indicator
SmartBracket mounting panel (perforated part for tamper activation)
Power connector
Ethernet port
QR code
Tamper button
Power button
Functional elements
Logo with LED indicator
SmartBracket mounting panel (opens by sliding down forcefully)
The perforated part is needed to activate the tamper when trying to remove the amplifier from the surface. Do not remove!
Power cable connector
Ethernet cable connector
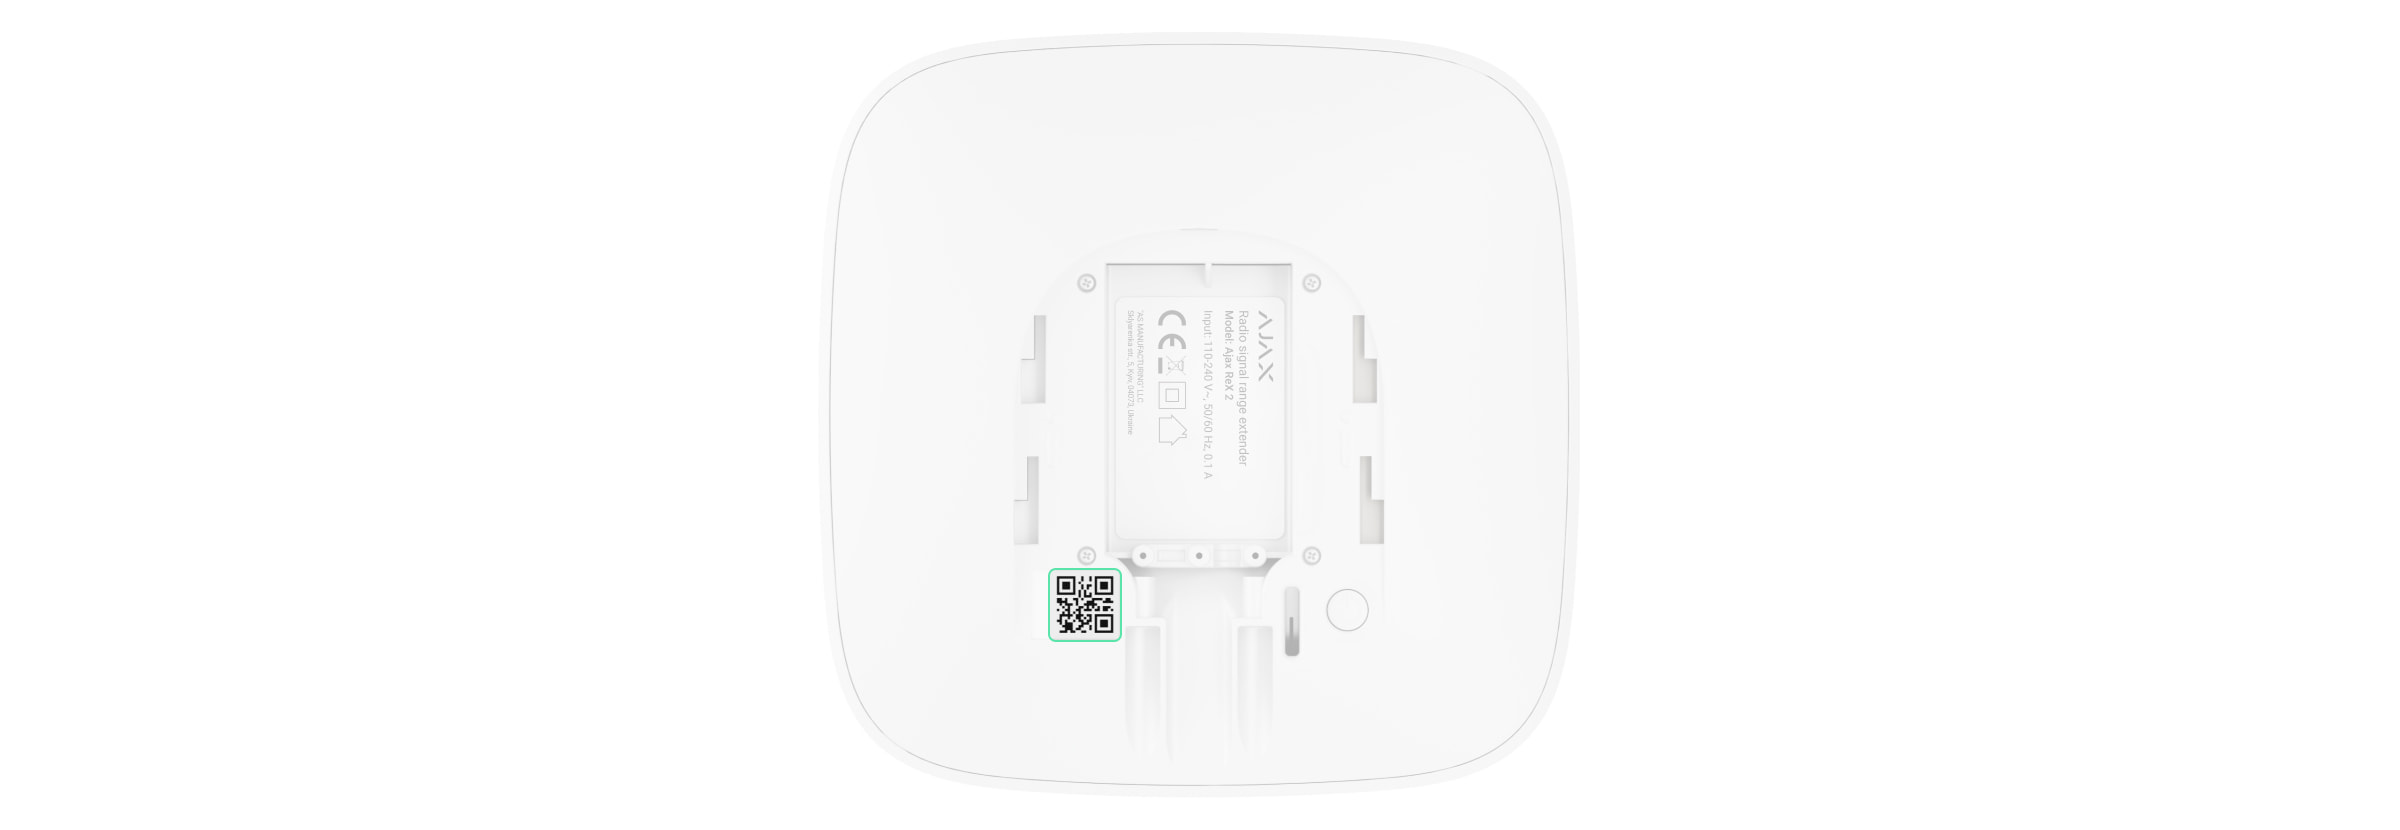
QR code with amplifier identifier (service number)
Tamper button
Power button
Operating principle
The ReX 2 Jeweller extends the radio range of the security system and provides photo verification transmission. It receives signals from the hub and sends them to the connected devices, and forwards the devices' signals back to the hub.
Principle of operation
The ReX 2 Jeweller extends the radio range of the security system by allowing Ajax devices to be installed at a greater distance from the hub.
ReX 2 Jeweller can communicate with the hub via radio (Jeweller and Wings protocols) or Ethernet cable if the devices are on the same network.
The amplifier receives signals from the hub, forwards them to the connected devices and sends the devices' signals back to the hub.
The hub polls the ReX 2 Jeweller every 12 to 300 seconds (by settings, default value is 36 seconds).
The ReX 2 Jeweller polls all connected devices with the same frequency.
Regardless of the settings, all alarms are transmitted within 0.3 seconds.
The communication range between the ReX 2 Jeweller and the device is limited by the radio signal range of the device itself. The radio signal range is indicated on the device page on the website and in the User Manual.
If the device loses connection to a signal amplifier for any reason, it will not automatically connect to another amplifier or hub.
Jeweller and Wings communication protocols
The signal booster uses Jeweller technology for alarm and event transmission and Wings technology for photo transmission. These are bi-directional wireless data transfer technologies that provide fast and reliable communication between the hub, the signal booster and the connected system devices.
The protocols support block encryption with dynamic keying and device identification in each communication session to protect against sabotage and tampering.
The Ajax application shall provide a 'hub-to-device' polling system at intervals of 12 to 300 seconds to monitor communications with system devices and display their status. The polling interval can be adjusted by the user or by a PRO with administrator rights.
Learn more Connection via Ethernet
ReX 2 Jeweller with OS Malevich 2.13 firmware supports connection to the hub via radio and Ethernet. Using a cable connection, a single Ajax system can cover sites such as an office centre with underground parking, a metal hangar or a warehouse complex of several large buildings. Ethernet can be the only communication channel or run in parallel with Jeweller and Wings. If ReX 2 Jeweller is connected to the hub via both Ethernet and radio channels, Ethernet is preferred.
The Hub and the ReX 2 Jeweller must be connected to the same network via a router for this communication channel to work. The router is needed to determine the IP address of the signal booster. The network to which the ReX 2 Jeweller connects shall support broadcast requests and provide an open port 4269 for all data transmissions.
A direct connection to the hub via Ethernet cable is not foreseen.
The ReX 2 Jeweller can operate with both static and dynamic IP addresses. If the signal booster fails to establish an Ethernet connection to the hub, an error will be displayed in the ReX 2 Jeweller status. For convenience, the MAC address of the signal booster is also available in the error information to help find and fix the problem.
A connection loss notification is sent in two cases: if the hub loses connection to the signal booster completely or if the connection to the booster is lost over the photo transmission channel. If the connection is lost only via Jeweller or only via Wings (if Ethernet is connected), no notification is sent.
Photo verification support
The ReX 2 Jeweller radio signal booster supports the addition of detectors with photo verification. ReX 2 Jeweller can not only transmit events and alarms, but also photos taken by the detector.
The photo delivery time through the amplifier depends on the communication channel with the hub, the type of detector and the resolution of the image.
Photo delivery time via Wings radio protocol:
Detector
Photo resolution, px
Delivery time through amplifier¹, s
Superior MotionCam AM (PhOD) Jeweller, Superior MotionCam HD (PhOD) Jeweller
160 × 120
up to 11
320 × 240
up to 18
640 × 480 (default)
up to 39
960 × 720
up to 53
MotionCam (PhOD) Jeweller, Superior MotionCam (PhOD) Jeweller, MotionCam Jeweller
160 × 120
up to 8
320 × 240 (default)
up to 18
640 × 480
up to 31
MotionCam Outdoor Jeweller
320 × 176 (default)
up to 13
640 × 352
up to 30
MotionCam Outdoor (PhOD) Jeweller
320 × 176 (default)
up to 37
640 × 352
up to 50
MotionCam Outdoor HighMount (PhOD) Jeweller
320 × 176 (default)
up to 20
640 × 352
up to 38
¹ Values are calculated assuming the hub is running over Ethernet or 4G and the signal level between the ReX 2 Jeweller and the detector and between the hub and the ReX 2 Jeweller is three bars. When using the "Photo on Demand" function, there may be a slight delay (up to 3 seconds) before the detector takes a photo.
Photo delivery time via Ethernet:
Detector
Photo resolution, px
Delivery time via amplifier², s
Superior MotionCam AM (PhOD) Jeweller, Superior MotionCam HD (PhOD) Jeweller
160 × 120
up to 4
320 × 240
up to 5.5
640 × 480 (default)
up to 13
960 × 720
up to 17,5
MotionCam (PhOD) Jeweller, Superior MotionCam (PhOD) Jeweller
160 × 120
up to 6
320 × 240 (default)
up to 10
640 × 480
up to 16
MotionCam Jeweller
160 × 120
up to 6
320 × 240 (default)
up to 10
640 × 480
up to 17
MotionCam Outdoor Jeweller
320 × 176 (default)
up to 10
640 × 352
up to 21
MotionCam Outdoor (PhOD) Jeweller
320 × 176 (default)
up to 24
640 × 352
up to 32
MotionCam Outdoor HighMount (PhOD) Jeweller
320 × 176 (default)
up to 11
640 × 352
up to 18
² Values are calculated assuming the hub is running over Ethernet or 4G and the signal level between the ReX 2 Jeweller and the detector is three bars. When using the "Photo on Demand" function, there may be a slight delay (up to 3 seconds) before the detector takes a photo.
Photo verification features in Ajax
Number of connected signal amplifiers and devices
Depending on the model, the following number of signal amplifiers can be connected to the hub:
Hub model
ReX 2 Number of Jeweller
Hub 2 (2G)
5
Hub 2 (4G)
5
Hub 2 Plus
5
Superior Hub Hybrid (2G)
5
Superior Hub Hybrid (4G)
5
It does not matter which type of amplifier is used: ReX Jeweller or ReX 2 Jeweller. They can be connected in any combination, subject to hub restrictions.
ReX 2 Jeweller connects to the hub directly only. Connection to another amplifier is not foreseen.
ReX 2 Jeweller does not increase the number of devices connected to the hub. The maximum number of devices depends on the hub model:
Hub model
Number of devices connected
Hub 2 (2G)
99
Hub 2 (4G)
99
Hub 2 Plus
199
Superior Hub Hybrid (2G)
99
Superior Hub Hybrid (4G)
99
Sending events to a monitoring station
The Ajax system can be connected to the CMS and transmit alarms and events in SurGard (Contact ID), SIA (DC-09), ADEMCO 685 and other proprietary protocols. A full list of supported protocols is available at the following link.
Ajax connection to monitoring software
The ReX 2 Jeweller loop (zone) number is available in the device status. To obtain it:
Log in to the Ajax app.
Select a zone if there are several.
Open the "Devices" menu.
Select ReX 2 Jeweller. The loop (zone) number is displayed at the very bottom of the page.
The ReX 2 Jeweller loop (zone) number is also available in the "Groups" menu (Ajax app → Devices → Hub → Settings → Groups). The device number corresponds to the loop (zone) number.
Compatible hub models
A hub is required for ReX 2 Jeweller operation.
Connection
The signal booster only works with compatible Ajax hubs. Connection to other hubs, signal boosters, uartBridge and ocBridge Plus is not provided.
Hub and device operating on different radio frequencies are not compatible. The radio frequency range of the device may vary depending on the region. We recommend that you purchase and use Ajax devices in the same region. For frequency ranges, please contact technical support.
Before connecting the device:
Install the Ajax or Ajax PRO app.
Sign in to your account or create a new one.
Select a room or create a new one.
Add at least one virtual space.
Add a compatible hub to the room. Make sure it is switched on and has access to the internet via Ethernet, Wi-Fi and/or a mobile network.
Make sure the room is disarmed and the hub is not updating by checking the status in the Ajax app.
To connect the ReX 2 Jeweller to the hub:
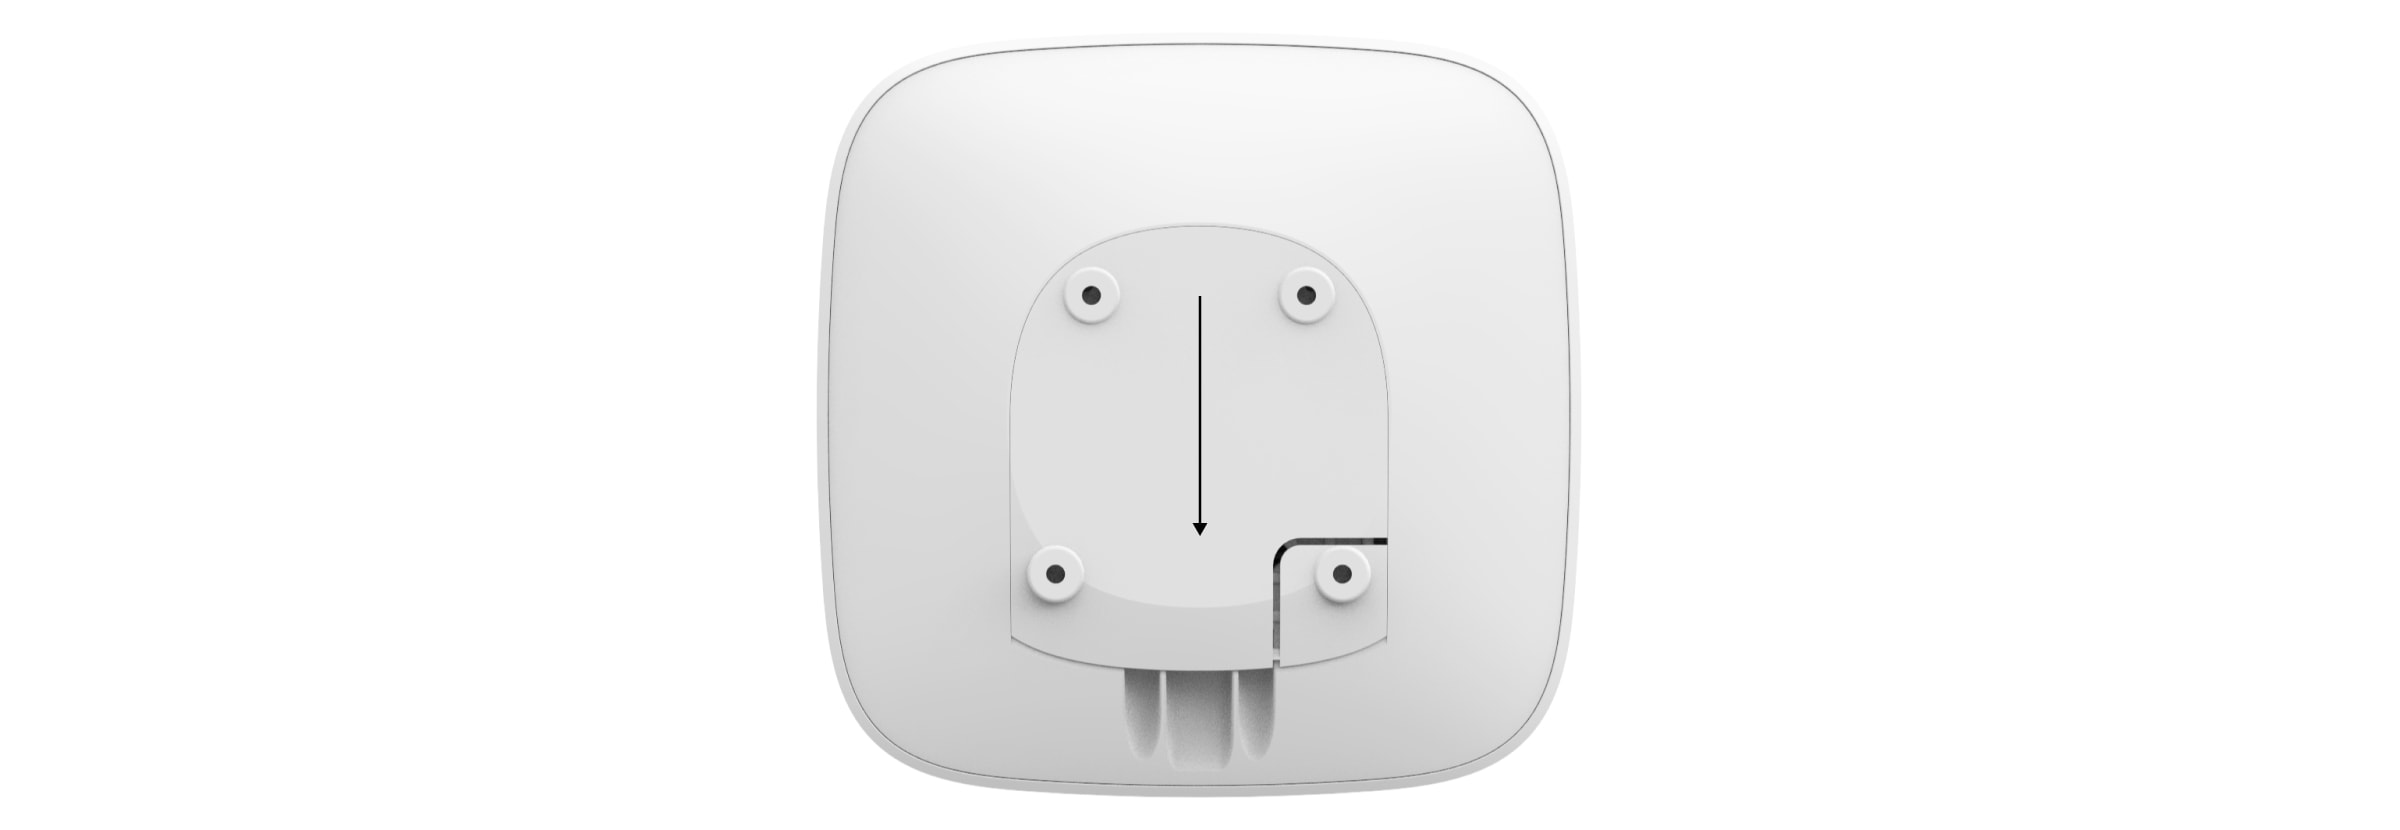
Remove the SmartBracket mounting panel by sliding it down forcefully. Do not touch the perforated part as it is needed to operate the sabotage sensor that protects the signal amplifier from disassembly.
Click Add; the countdown will start. Switch on the ReX 2 Jeweller by holding the power button down for 3 seconds.
To ensure that the ReX 2 Jeweller is connected to the hub, the signal booster must be located in the same protected area as the system (within range of the hub radio network).
Once connected to the hub, the colour of the logo will change from red to white within 30 seconds. The connected signal booster will appear in the list of hub devices in the Ajax app. The frequency of the status update depends on the Jeweller settings (or Jeweller/Fibre for hybrid Ajax hubs); the default value is 36 seconds.
If the connection fails, turn off the ReX 2 Jeweller and try again after 5 seconds. If the maximum number of devices connected to the hub (depending on the hub model) has already been reached when you try to connect a device, you will receive a corresponding message in the Ajax app.
ReX 2 Jeweller only works with one hub. When connecting to a new hub, the signal booster stops sending commands to the old one. After connecting to a new hub, ReX 2 Jeweller is not automatically removed from the device list of the old hub. This needs to be done in the Ajax app.
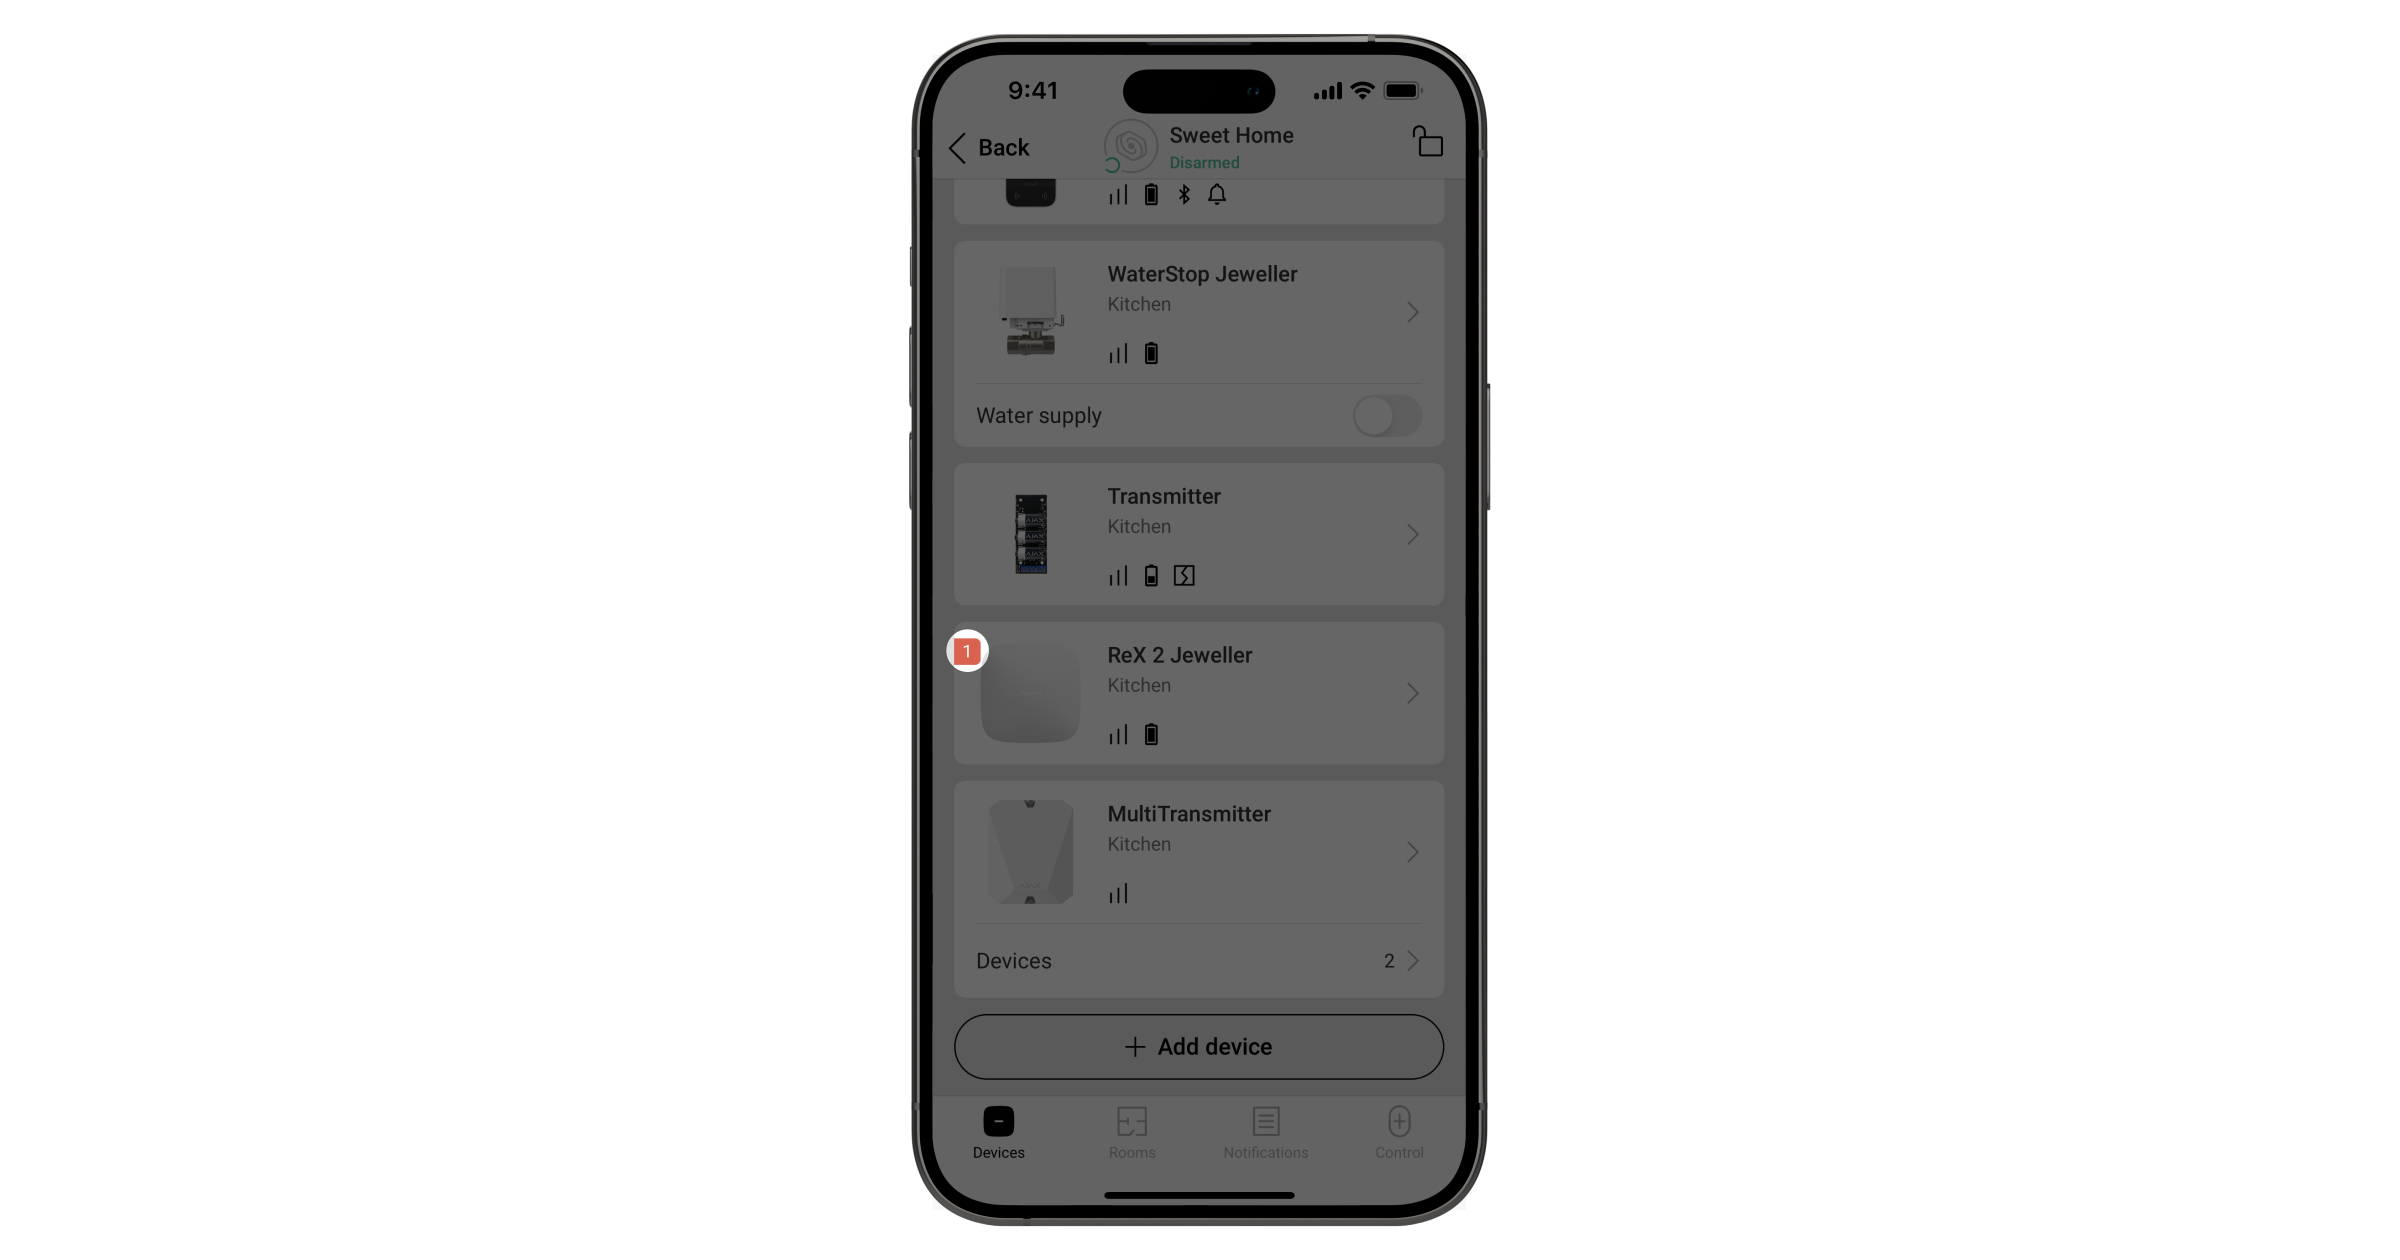
Error icon
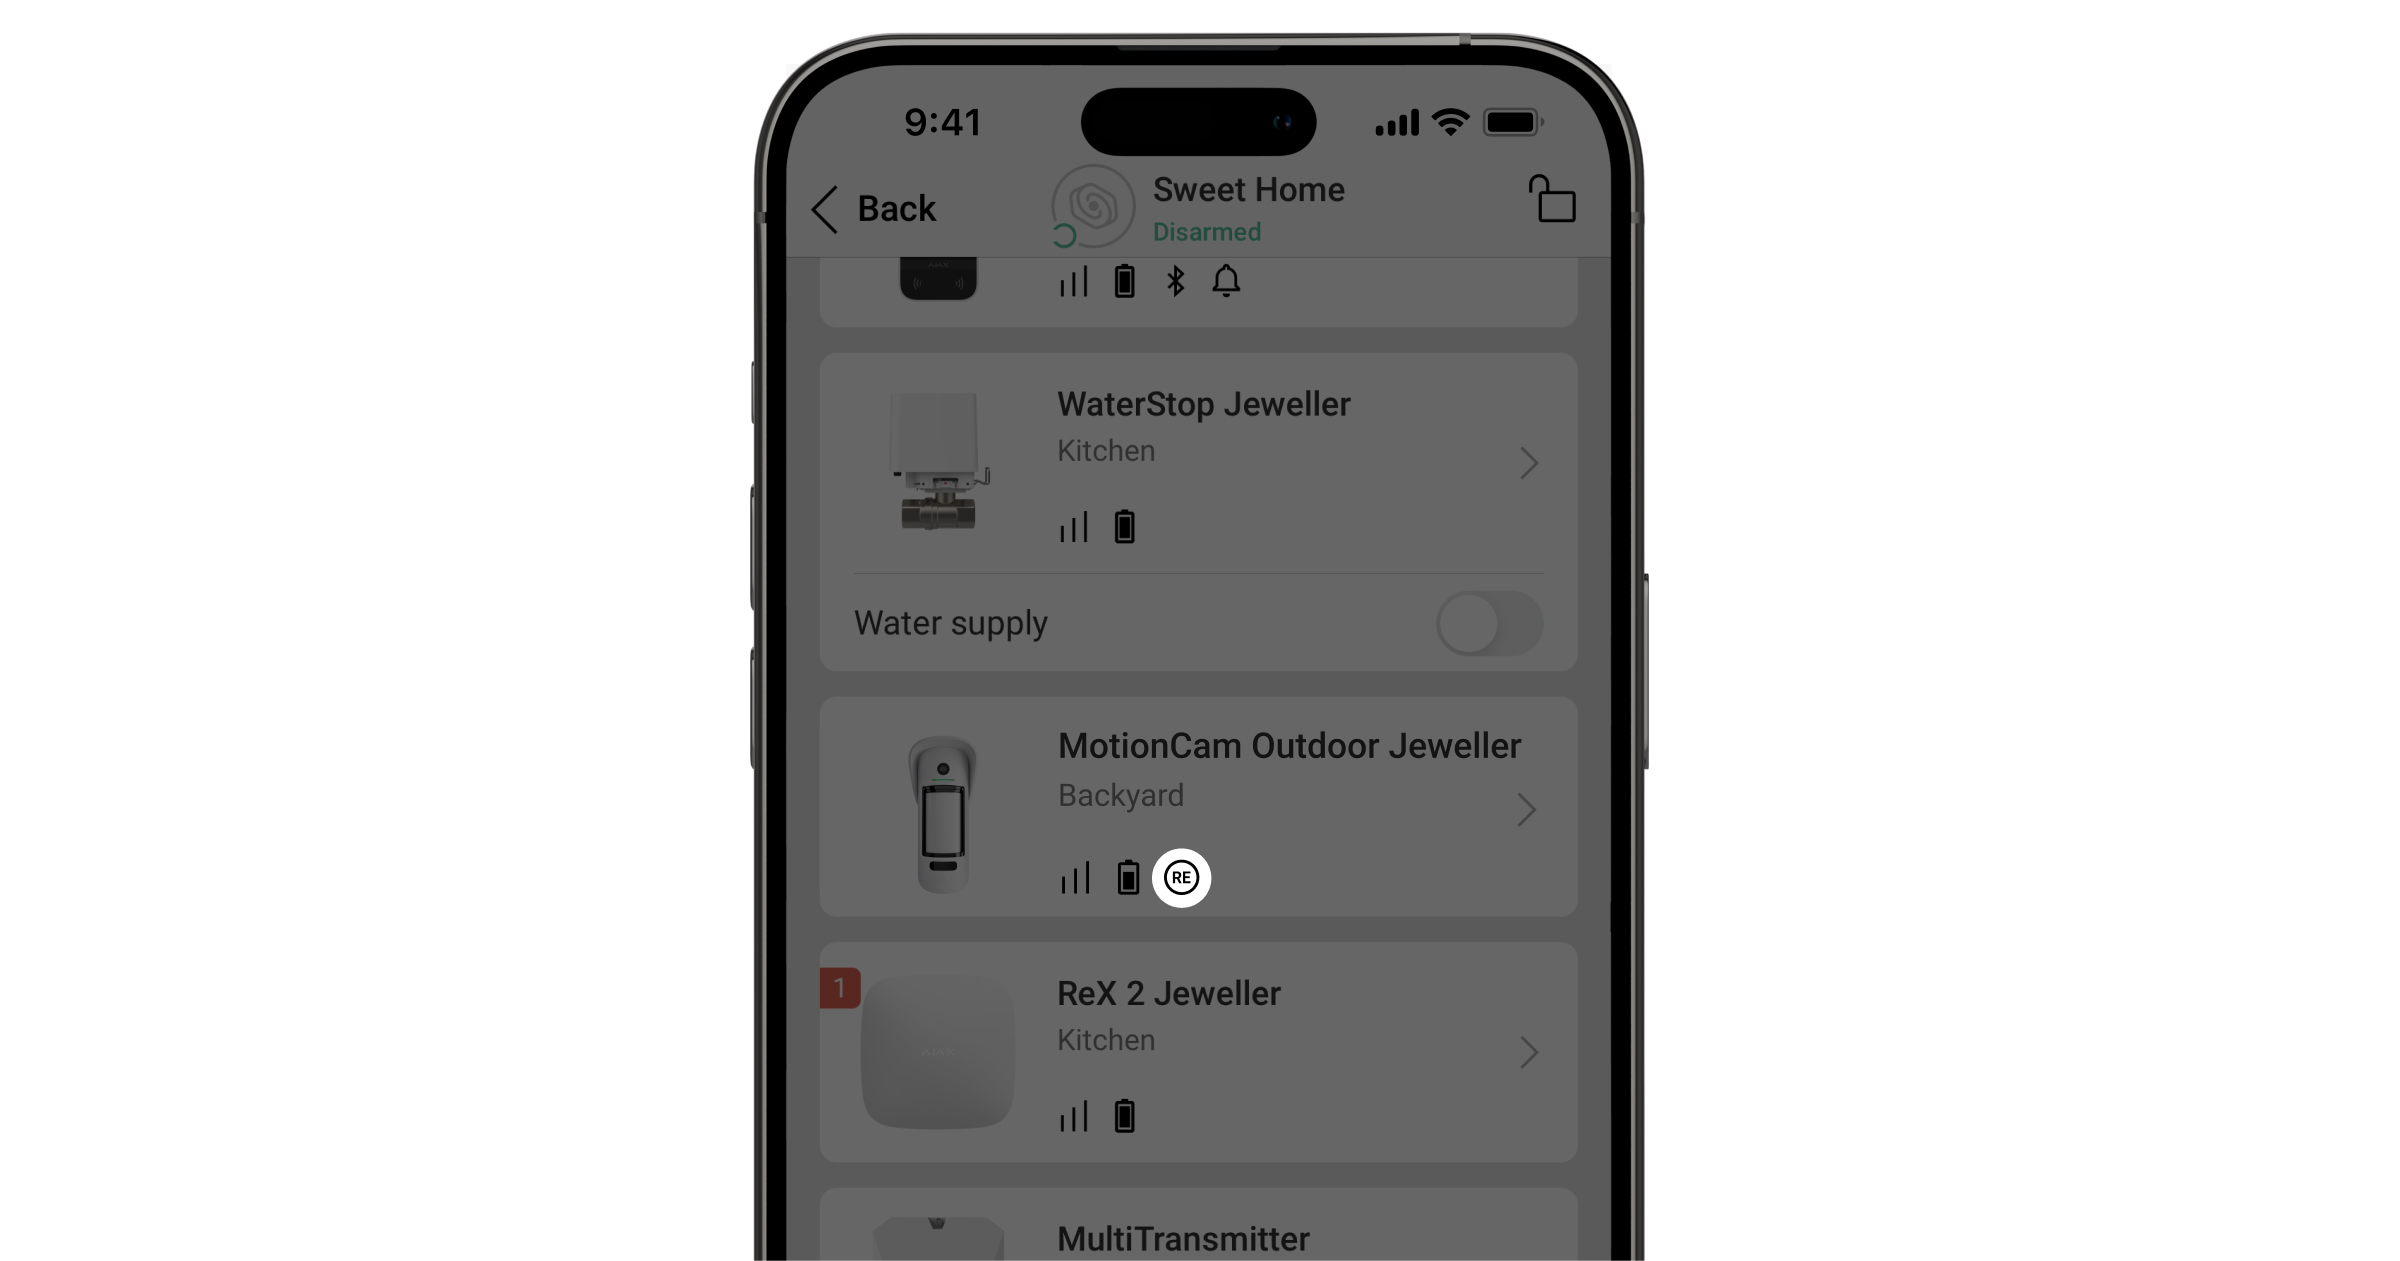
When the signal booster detects a failure (e.g. no external power supply), the Ajax app displays an emblem with a counter in the upper left corner of the device icon.
All failures are displayed in the statuses of the signal amplifier. Fields with errors will be highlighted in red.
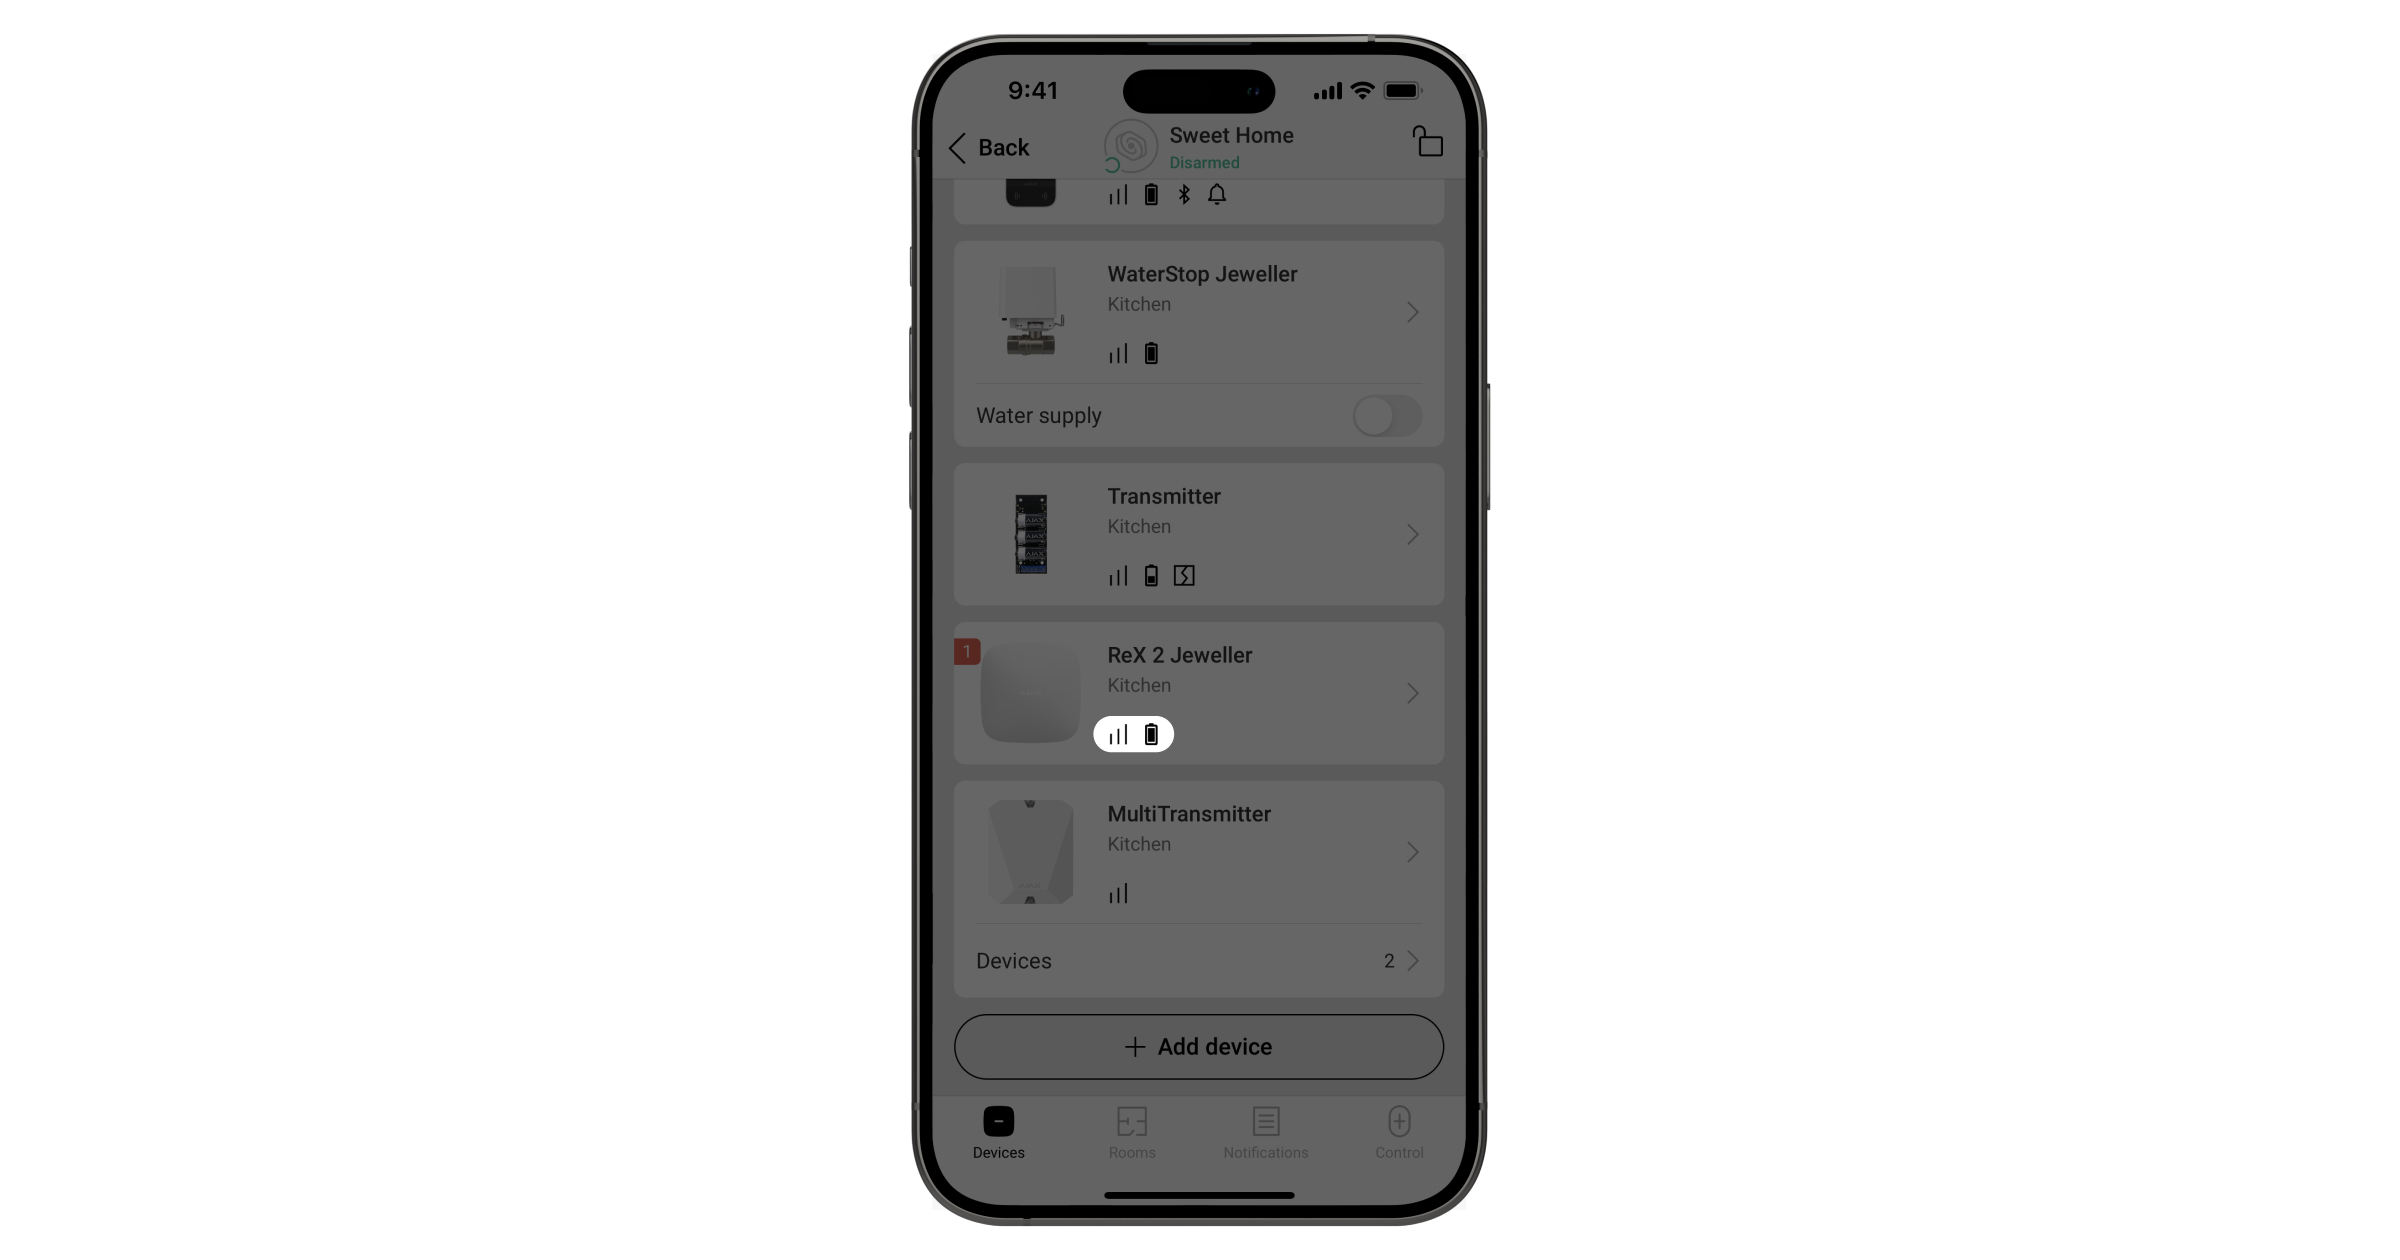
Icons
The icons represent some of the ReX 2 Jeweller statuses. These can be viewed in the Devices tab of the Ajax app.
Icon - Meaning
Jeweller signal strength. Displays the signal strength between the hub and the signal amplifier. The recommended value is 2-3 bars. Learn more
Battery charge level. Learn more
Fault detected. A list of faults and their description is available in the signal amplifier statuses.
The device is in signal suppression test mode. Learn more
ReX 2 Jeweller is deactivated. Learn more
ReX 2 Jeweller has been deactivated for sabotage sensor trigger notifications. Learn more
The device has lost connection to the hub or the hub has lost connection to the Ajax Cloud server.
The device has not been transferred to the new hub. Learn more
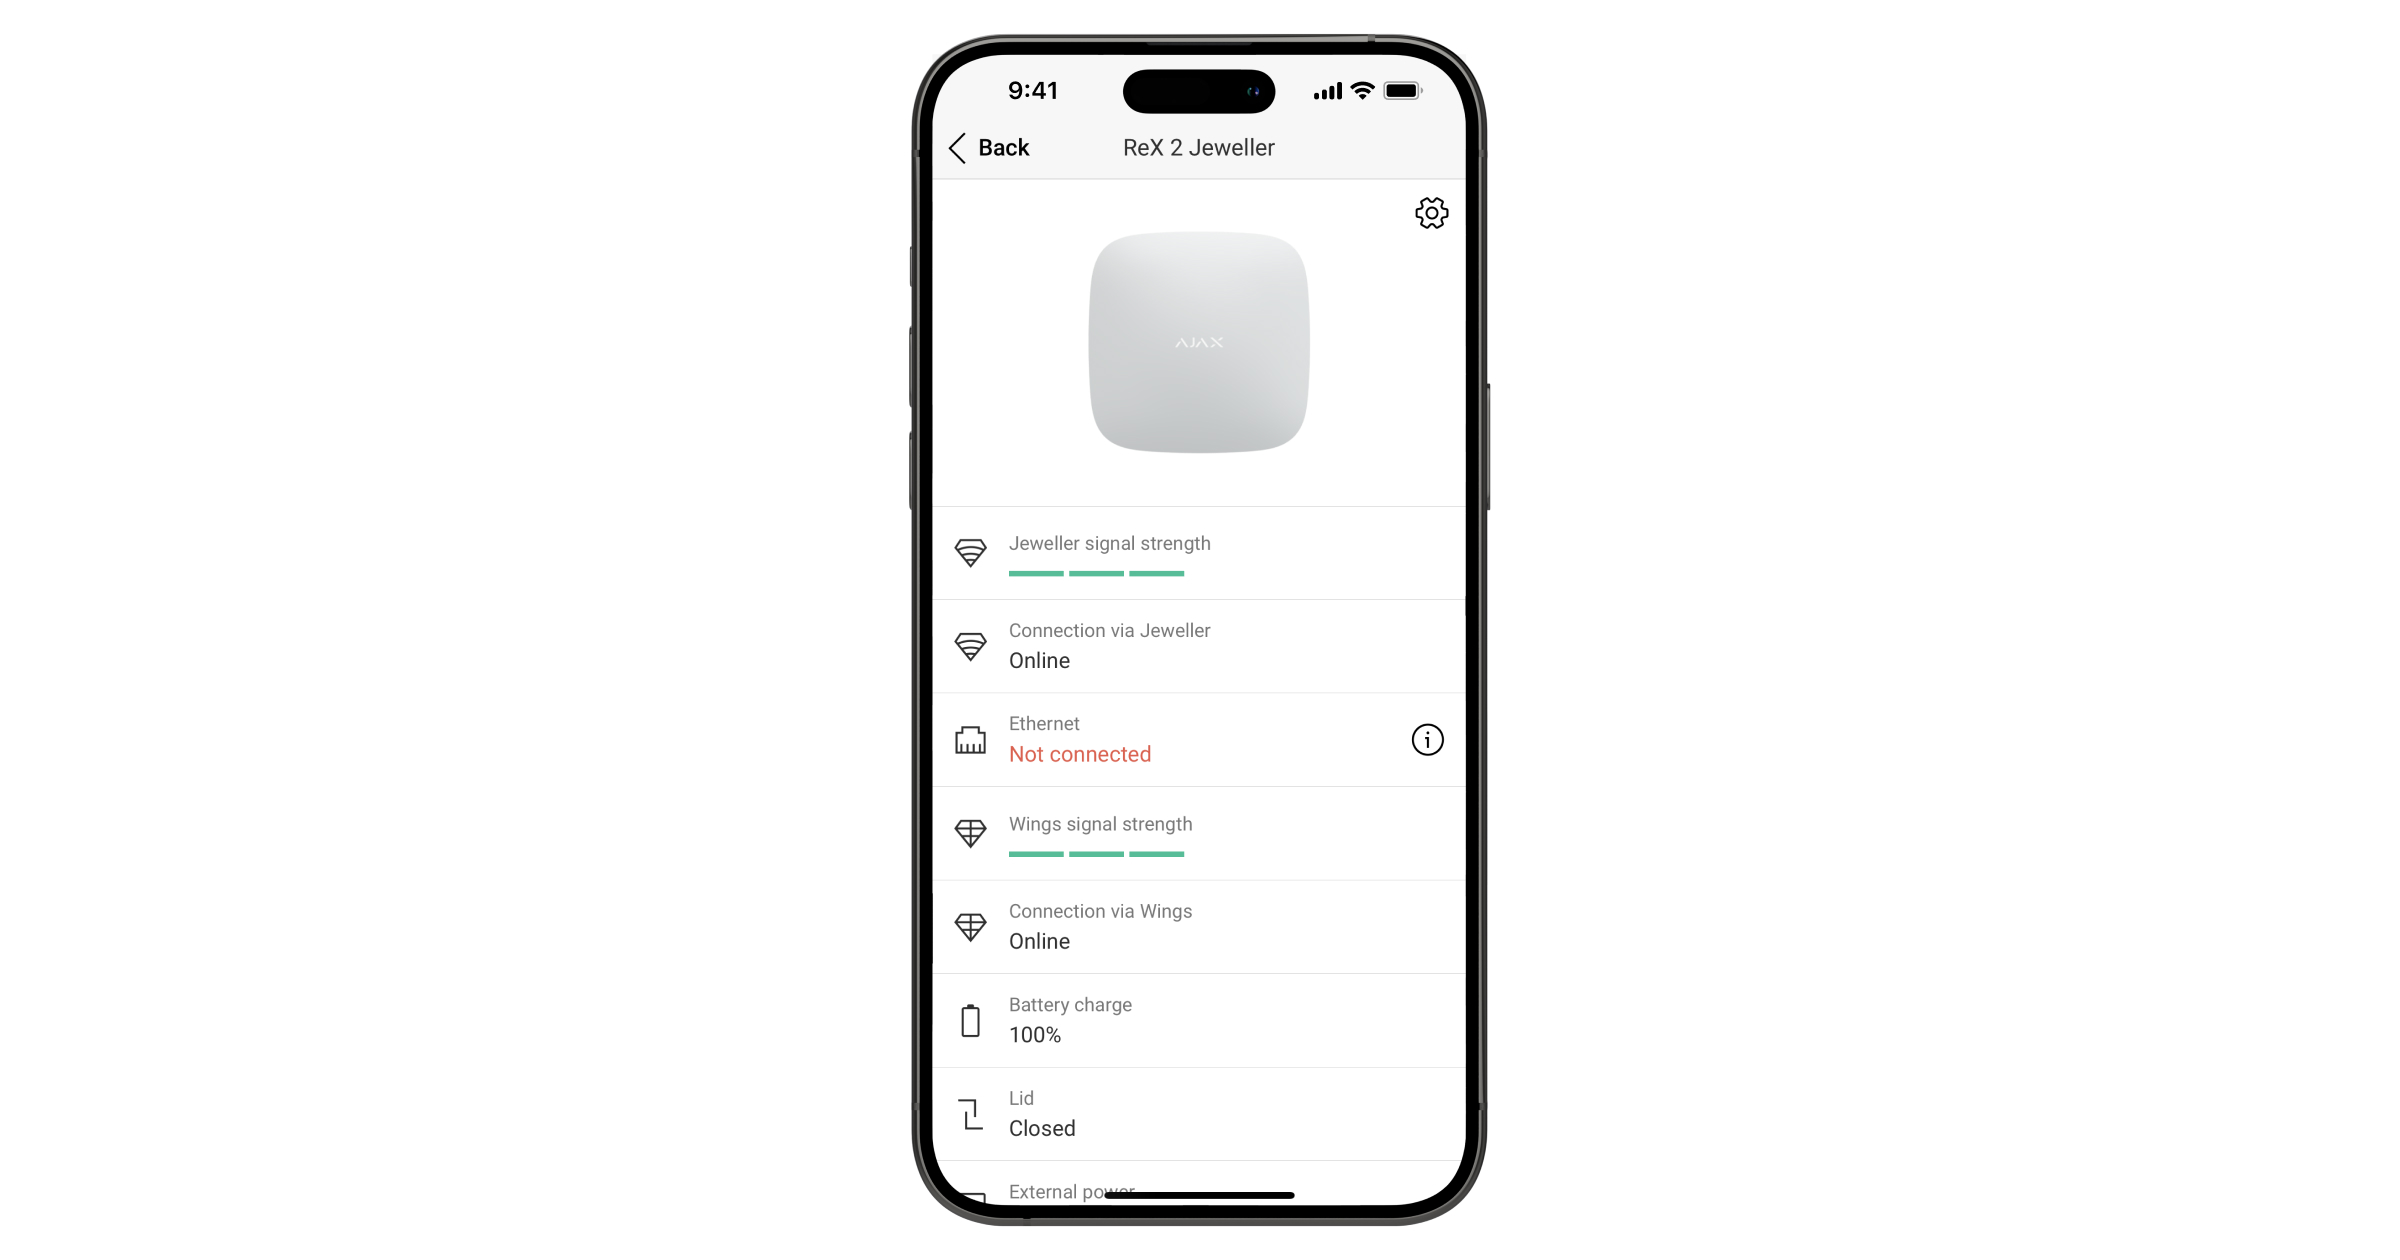
Status
Statuses contain information about the device and its operating parameters. ReX 2 Jeweller statuses can be viewed in the Ajax app:
Select a room if there are several.
Open the Devices tab.
Select ReX 2 Jeweller from the list.
Parameter - Meaning
Data import Indicates an error when data is transferred to the new hub:
Failed - device has not been transferred to the new hub. Learn more
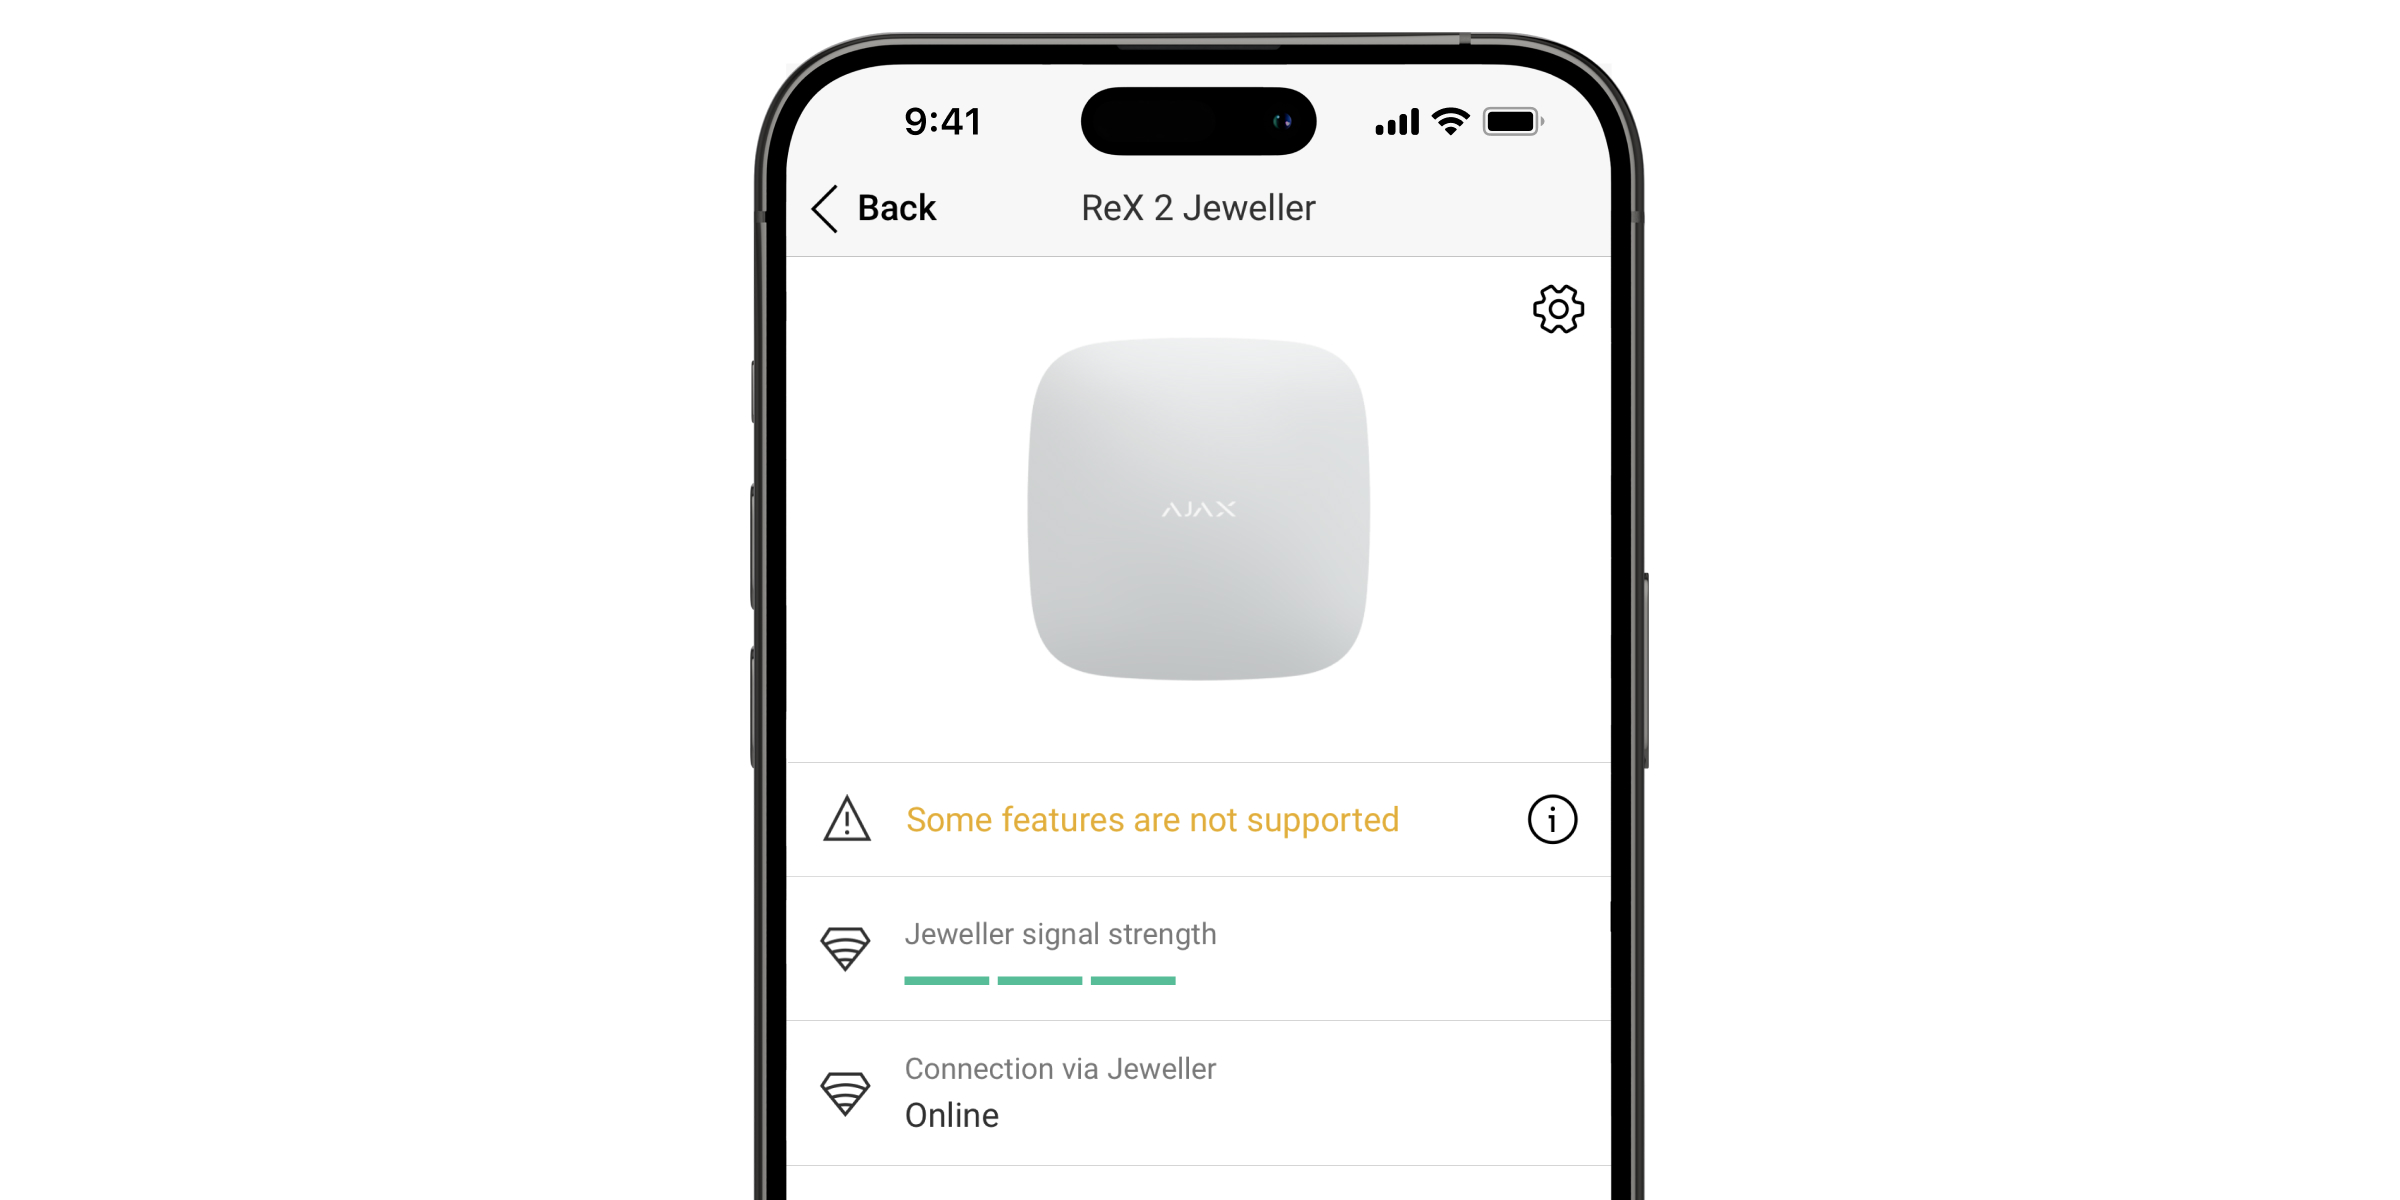
Some functions do not work The field is displayed if the versions of the hub and ReX 2 Jeweller firmware do not match.
ReX 2 Jeweller is updated within half an hour if the system is disarmed. Firmware update requires stable:
External power supply for hub and signal amplifier,
a connection between the hub and ReX 2 Jeweller,
connection of the hub to the Internet.
How to update the OS Malevich
Jeweller signal strength Jeweller signal strength between hub and ReX 2 Jeweller. Recommended value is 2-3 columns. Jeweller is a protocol for transferring alarms and events. Learn more
Connection via Jeweller Connection status between hub and ReX 2 Jeweller via Jeweller:
Online - Signal booster is connected.
Offline - no connection to the signal booster.
Ethernet Connection status between hub and ReX 2 Jeweller via Ethernet:
Connected - the signal amplifier is connected.
Not connected - no connection to the signal amplifier.
Disabled - Ethernet connection is disabled in the signal amplifier settings.
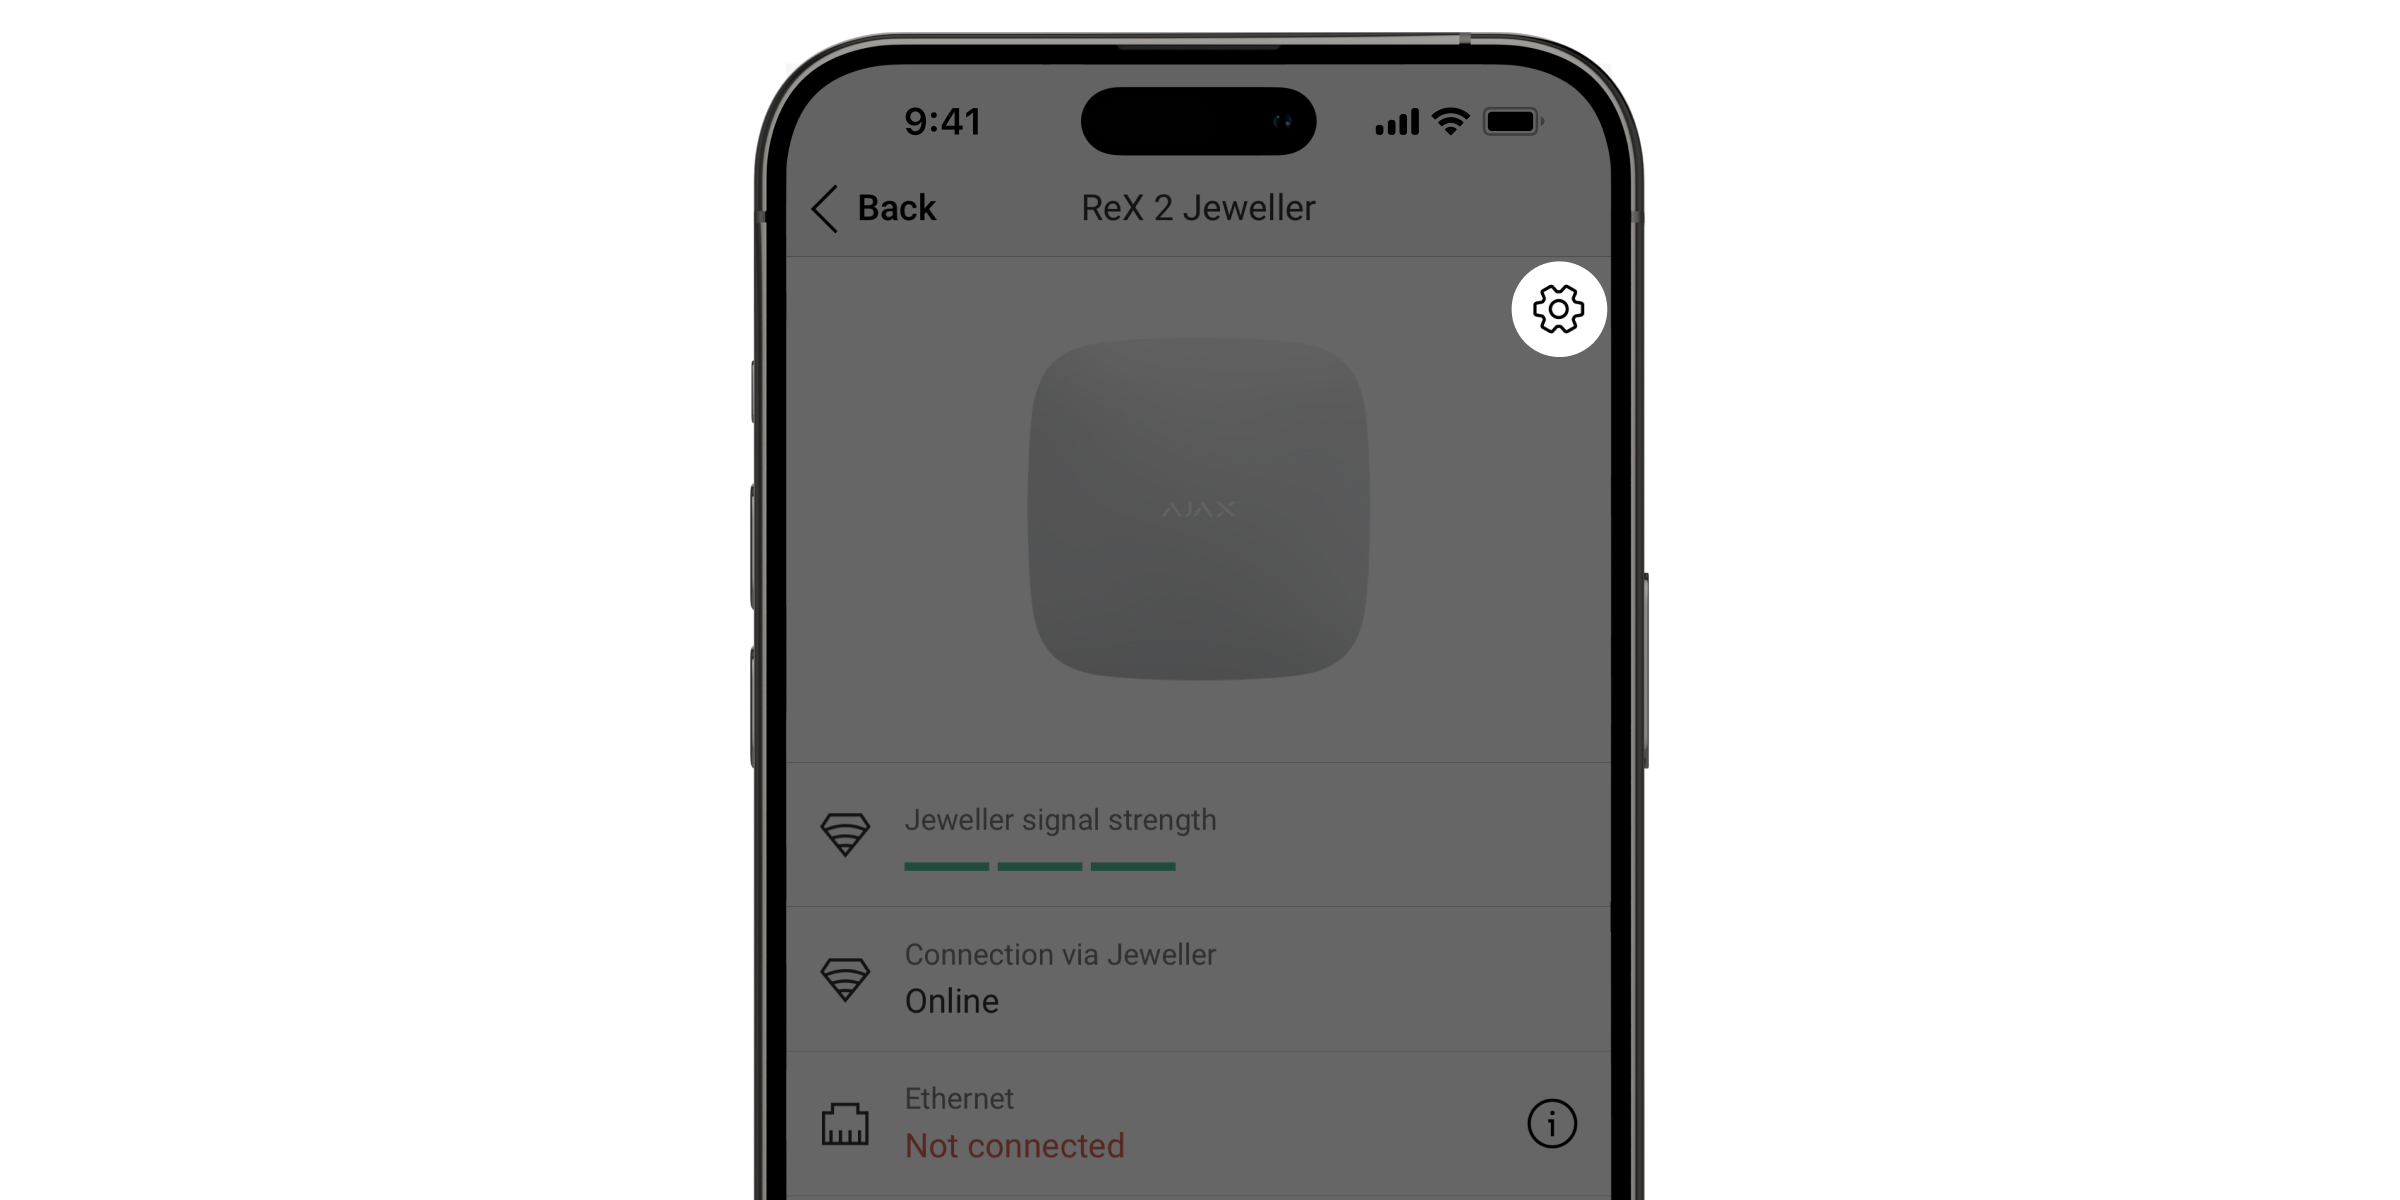
When the button is pressed, the connection information is displayed: IP address, subnet mask, gateway and MAC address of the signal amplifier.
Wings signal strength Wings signal strength between hub and ReX 2 Jeweller. Recommended value is 2-3 bars. Wings is a protocol for transferring photos taken by detectors with photo verification. Learn more
Connection via Wings Connection status between hub and ReX 2 Jeweller via Wings:
Online - ReX 2 Jeweller can transfer photos to the hub.
Offline - ReX 2 Jeweller cannot transfer the photo to the hub.
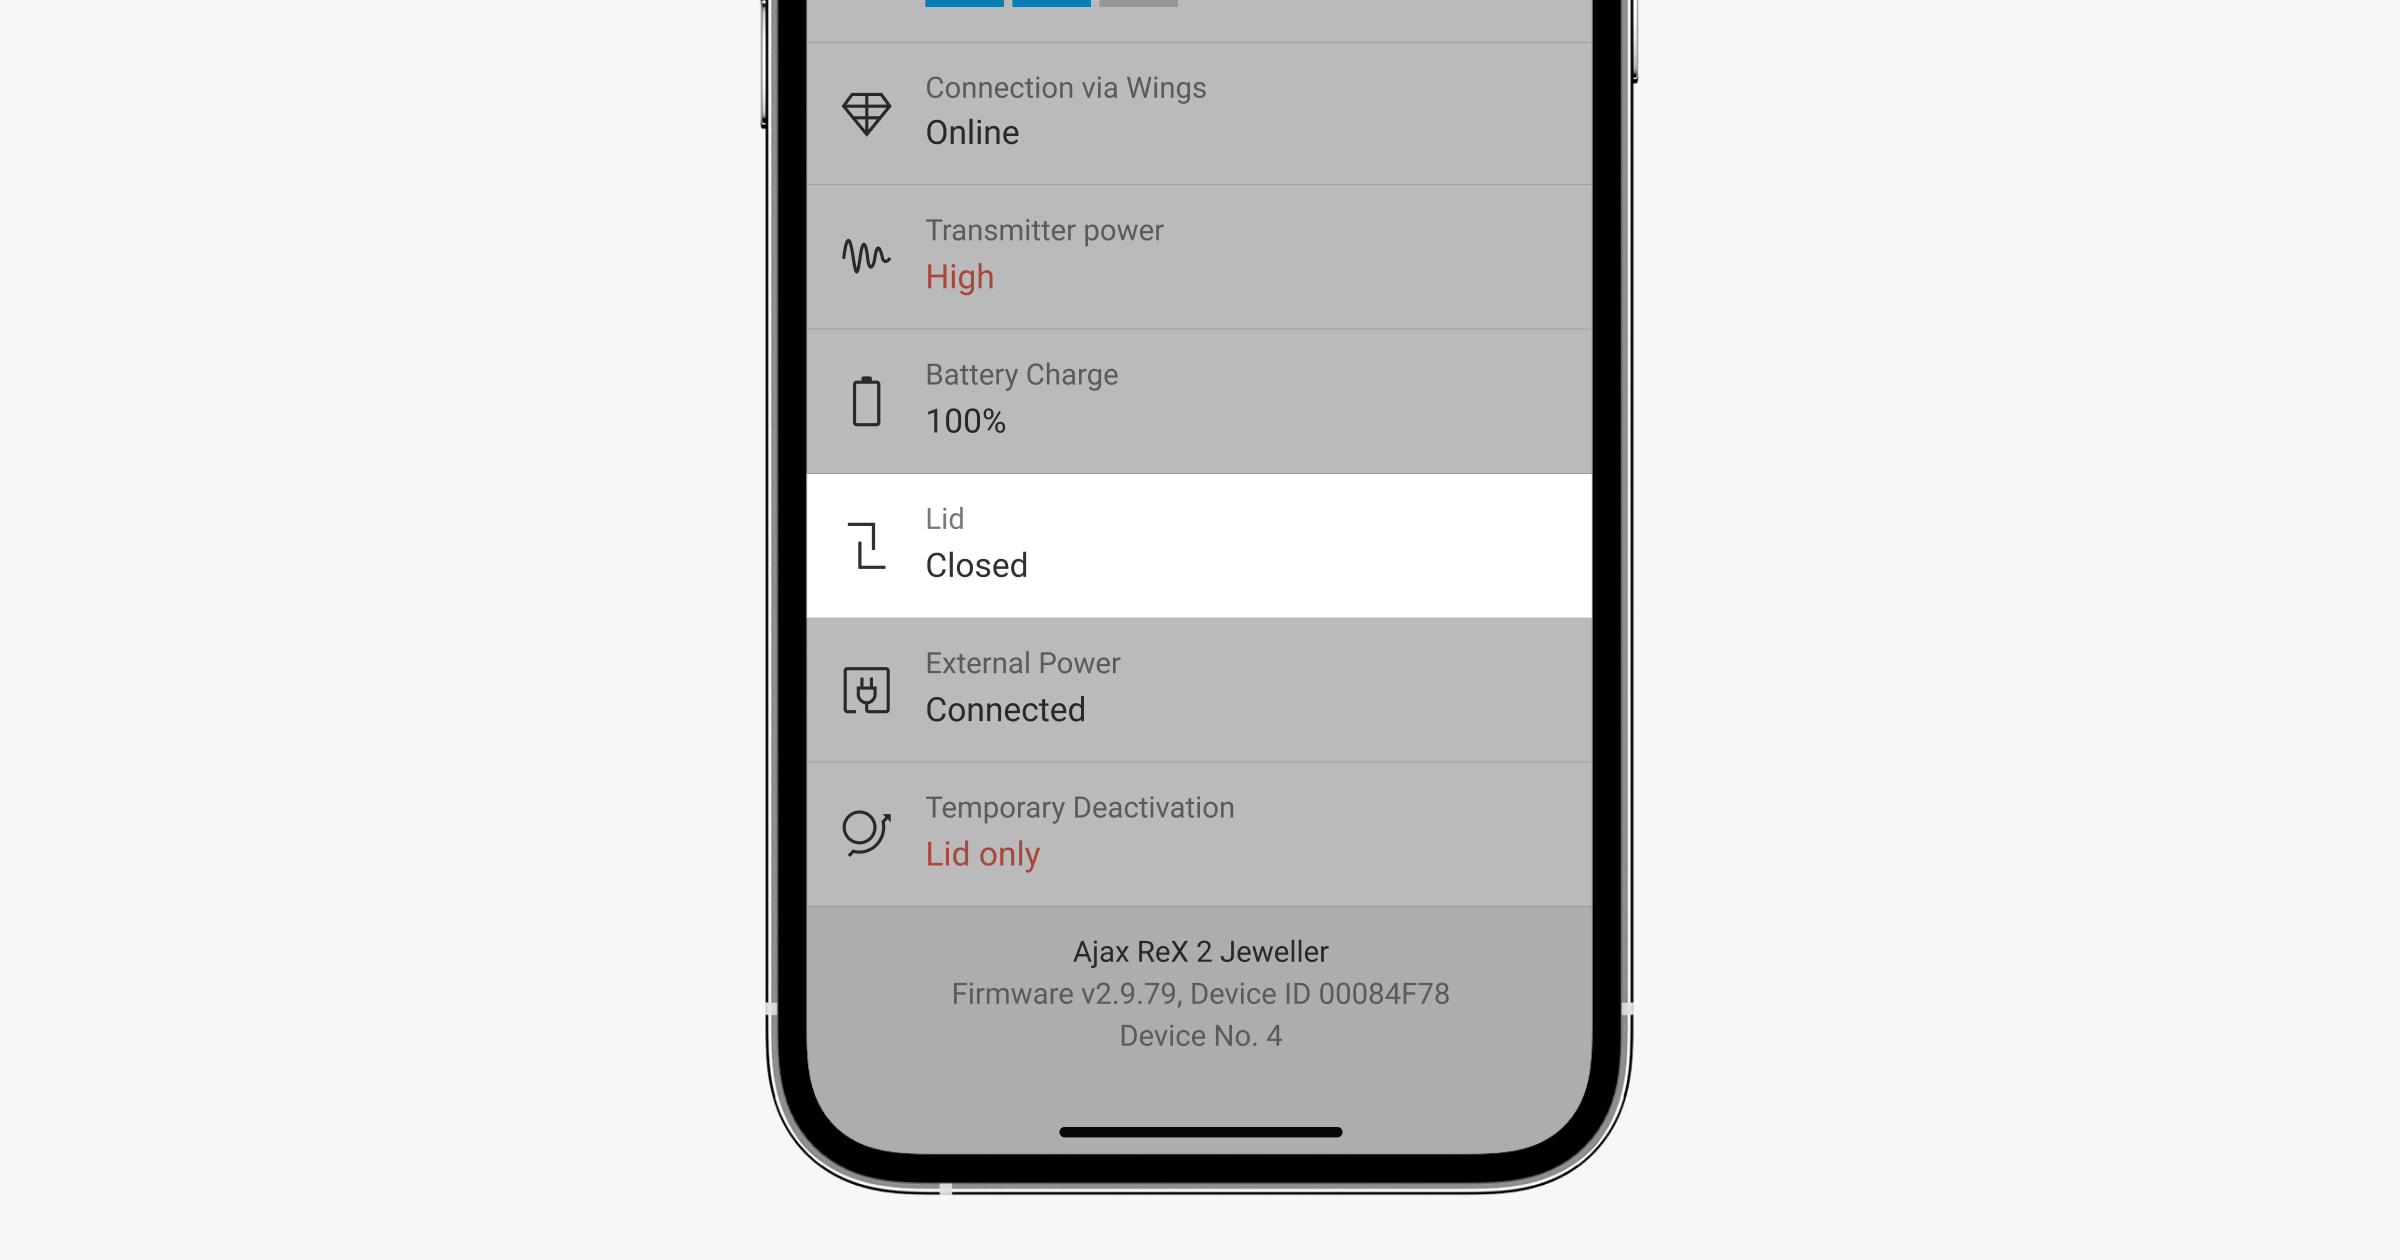
Transmitter power Displays the selected transmitter power. This parameter appears when Max or Damping is selected in the Signal Damping Test menu. Learn more
Battery Charge ReX 2 Jeweller backup battery charge level. Displayed in 5% increments. Learn more
Enclosure Status of the Signal Amplifier Sabotage Sensor, which responds to enclosure removal or damage:
Open - Signal Amplifier Mounting Panel removed or housing integrity compromised.
Closed - amplifier mounted on mounting panel. Learn more
External power supply Status of external power supply (110-240 V):
Connected - External power supply is connected.
Disconnected - the external power supply is disconnected.
Permanent deactivation Displays the status of the permanent deactivation function of the device:
No - the device operates normally and transmits all events.
Enclosure only - the hub administrator has disabled notifications for triggering the tamper sensor.
Completely - the device has been completely deactivated from system operation by the Hub Administrator.
If the signal booster is fully disabled, connected devices continue to operate normally via ReX 2 Jeweller. Learn more
One-time deactivation Shows the status of the one-time deactivation settings of the device:
No - the device operates normally.
Hull only - Sabotage sensor notifications are disabled until first disarm.
Completely - the device is completely disabled from system operation until the first disarm. The device does not execute system commands and does not report alarms or other events.
If the signal amplifier is fully deactivated, connected devices continue to operate normally through the ReX 2 Jeweller. Learn more
Firmware ReX 2 Jeweller firmware version. Updates remotely as soon as an update becomes available on the Ajax Cloud server. Learn more
Device ID ReX 2 Jeweller ID/serial number. Also indicated on the device box, circuit board and case (under the SmartBracket mount).
Device No. Device loop (zone) number.
Settings
ReX 2 Jeweller settings can be changed in the Ajax app:
Select a room if there are several.
Open the Devices tab.
Select ReX 2 Jeweller from the list.
Go to Settings by clicking on the gear icon in the top right corner.
Set the required parameters.
Click Back to save the new settings.
Setting - Meaning
Name ReX 2 Jeweller Name. Appears in SMS text and notifications in the event feed. To change the name, click the pencil icon. The name can contain up to 12 Cyrillic characters or up to 24 Latin characters.
Room Select the virtual room to which ReX 2 Jeweller is connected. The room name is displayed in SMS text and notifications in the event stream.
Ethernet settings Menu for connecting to the hub via Ethernet:
Connection via Ethernet - enables or disables the connection via Ethernet.
Connection type - allows you to customize the connection type: DHCP or static IP address.
MAC address - shows and allows copying the MAC address of the signal booster.
Charging mode Available only in Ajax PRO apps. Available for ReX 2 Jeweller running on hubs with OS Malevich 2.24 or later. Sets the charging rate of the built-in battery from an external source.
Two options are available:
Continuous - the battery charges continuously until fully charged. Compatible with most external power supplies.
Intermittent - the battery charges intermittently. Recommended for zinc-air power supplies.
Mark Jeweller/Wings connection loss with failure icons Available for ReX 2 Jeweller with OS Malevich 2.18 or later. Activates a failure icon in the device list when the signal booster loses connection over radio channels. This setting is available only when Ethernet connection is enabled. Deactivating this setting does not turn off connection loss notifications and does not fail the system integrity check.
LED brightness Setting the brightness of the Ajax logo illumination on the signal amplifier. Adjustable from 0 to 10 in increments of 1. Default value is 10.
Paired with a device Menu for selecting devices that work through the signal amplifier. Learn more
Jeweller Signal Strength Test Switches the ReX 2 Jeweller into Jeweller Signal Strength Test mode. The test checks the signal strength between the hub and the ReX 2 Jeweller over the alarm and event transmission channel and helps determine the optimum installation location. Learn more
Wings Signal Strength Test Switches the ReX 2 Jeweller into Wings Signal Strength Test mode. The test checks the signal strength between the hub and the ReX 2 Jeweller over the photo channel and helps determine the optimal installation location. Learn more
Signal attenuation test Switches the device into signal attenuation test mode. The test reduces or increases the power of the radio transmitter to simulate environmental changes and to test the stability of the connection between the signal amplifier and the hub. Learn more
User Guide Open the ReX 2 Jeweller User Guide in the Ajax app.
Permanent deactivation Allows the hub administrator to deactivate the device without disconnecting it from the system.
Three options are available:
No - the device operates normally and forwards all events.
Full - the device does not execute system commands and does not participate in automation scenarios, and the system ignores alarms and other notifications.
Enclosure only - only notifications of the triggering of a tamper sensor are ignored by the system.
Learn more The system will only ignore a deactivated device. Devices connected via ReX 2 Jeweller will continue to operate normally.
One-time deactivation Allows the user to deactivate device events until the first disarm.
Three options are available:
No - the device operates normally.
Completely - the device is completely deactivated from system operation until the first disarm. The device does not execute system commands and does not report alarms or other events.
Hull only - Sabotage sensor notifications are deactivated until first disarm.
Learn more The system will ignore only the deactivated device. Devices connected via ReX 2 Jeweller will continue to operate normally.
Delete device Disconnects ReX 2 Jeweller from the hub and deletes its settings. If detectors are connected to ReX 2 Jeweller, they will try to reconnect to the hub after disconnection.
Connecting devices to the ReX 2 Jeweller
To assign a device to a signal booster, in the Ajax app:
Select a room, if there are several.
Open the Devices tab.
Select ReX 2 Jeweller from the list.
Go to Settings by clicking on the gear icon in the top right corner.
Select the Pair with device menu.
Select the devices that are to work through the signal booster.
Click Back to save your settings.
After pairing the selected devices, the icon appears in the Ajax app. A device can only be connected to one ReX 2 Jeweller. When a device is assigned to one signal amplifier, it is automatically disconnected from the other connected amplifier.
To assign a device to a hub, in the Ajax app:
Select a room, if there are several.
Open the Devices tab.
Select ReX 2 Jeweller from the list.
Go to Settings by clicking on the gear icon in the top right corner.
Select the Pair with device menu.
Uncheck the devices to be added back to the hub.
Click Back to save the settings.
Errors
ReX 2 Jeweller may report detected failures. The Errors field is available in the Device Status section. Clicking , opens a list of all faults. The field is only displayed if a failure has been detected.
Fault - Description - Solution
Some functions do not work. The field is displayed if the huba and ReX 2 Jeweller firmware versions do not match. Solution: make sure that automatic updates are enabled in the huba settings. ReX 2 Jeweller is updated within half an hour if the system is disarmed and a new firmware version is available on the server.
Indication
The ReX 2 Jeweller LED indicator may be white, red or green depending on the status of the device and the Ethernet connection.
Indication when Ethernet connection is disabled
Indication
Event
Note
White.
Connected to the hub via at least one of Jeweller and/or Wings.
If the external power supply is switched off, the indicator flashes every 10 seconds.
On red.
No connection to the hub.
If the external power supply is switched off, the indicator flashes every 10 seconds.
On for 3 minutes, then flashing every 10 seconds.
The external power supply is disconnected.
The colour of the indication depends on the presence of a connection to the hub.
Indication when Ethernet connection is activated
Indication
Event
Note
White.
Connection established to hub via two channels: Jeweller and/or Wings, Ethernet.
If the external power supply is switched off, the indicator flashes every 10 seconds.
Green.
Connected to the hub via at least one of two channels: Jeweller and/or Wings, Ethernet.
If the external power supply is switched off, the indicator flashes every 10 seconds.
On red.
No connection to the hub.
If the external power supply is switched off, the indicator flashes every 10 seconds.
On for 3 minutes, then flashing every 10 seconds.
The external power supply is disconnected.
The colour of the indication depends on the presence of a connection to the hub.
Functionality testing
Functionality tests of the ReX 2 Jeweller do not start immediately, but at the latest within one ping between the hub and the detector (36 seconds with the default settings of the hub). The ping period of the devices can be changed in the Jeweller menu of the hub settings.
To run a test in the Ajax app:
Select a room if there are several.
Open the Devices tab.
Select ReX 2 Jeweller.
Go to Settings.
Select one of the available tests:
Jeweller Signal Strength Test
Wings signal strength test
Signal attenuation test
Selecting the installation location
There are 2 main factors to consider when selecting an installation site:
Jeweller signal strength.
Wings signal strength.
The signal strength between the hub and the signal amplifier and between the signal amplifier and all connected devices must be assessed.
Place the ReX 2 in a Jeweller location with stable Jeweller and Wings signal strength (2-3 bars in the Ajax app). When choosing the installation location, take into account the distance between the signal booster and the hub, as well as obstacles between the devices that prevent the radio signal from propagating: walls, ceilings or large objects in the room.
ReX 2 Jeweller should be placed between the hub and a device with a weak signal. The signal booster does not increase the power of radio signals, so placing it next to a hub or device with a signal level of 1 or 0 bars will not give the desired result. Use our radio signal range calculator to estimate the signal level at the installation site.
Check the signal strength of Jeweller and Wings at the installation site. If the signal strength is low (one pole), we cannot guarantee stable operation of the security system. Moving the device even 20 cm can significantly improve signal reception.
If there is no stable signal level (2-3 bars) between the signal booster and the hub at the installation site via Jeweller and Wings, use Ethernet as the main communication channel. This feature allows signal boosters to be installed in basements, metal hangars and other locations where radio signals are not available.
Ethernet can be the only communication channel or run in parallel with radio protocols. Connection via both cable and radio will increase system reliability and operational reliability. In this configuration, the Ethernet channel is preferred.
The ReX 2 Jeweller shall be positioned so that it is not directly visible. This will help reduce the likelihood of sabotage or interference. Remember that the device is intended for indoor use only.
Do not install the ReX 2 Jeweller:
Outdoors. This may cause the device to malfunction or completely stop working.
Close to metal objects or mirrors (e.g. in a metal cabinet). These can obscure and weaken the radio signal.
In rooms where the temperature and humidity exceed the permissible limits. This may cause the device to malfunction or completely stop working.
Close to sources of radio interference: closer than 1 metre from the router and power cables. This may cause loss of connection to the hub or devices connected to the signal amplifier.
In areas with low or unstable signal strength, if Ethernet is not used as the main communication channel. This may cause loss of connectivity to the hub or devices connected to the signal booster.
Installation
Before installing the signal booster, make sure that you have selected the optimum location and that it meets the requirements of this manual.
When installing and operating the device, observe the general rules for electrical safety in the use of electrical appliances and the requirements of the electrical safety regulations.
To install the ReX 2 Jeweller:
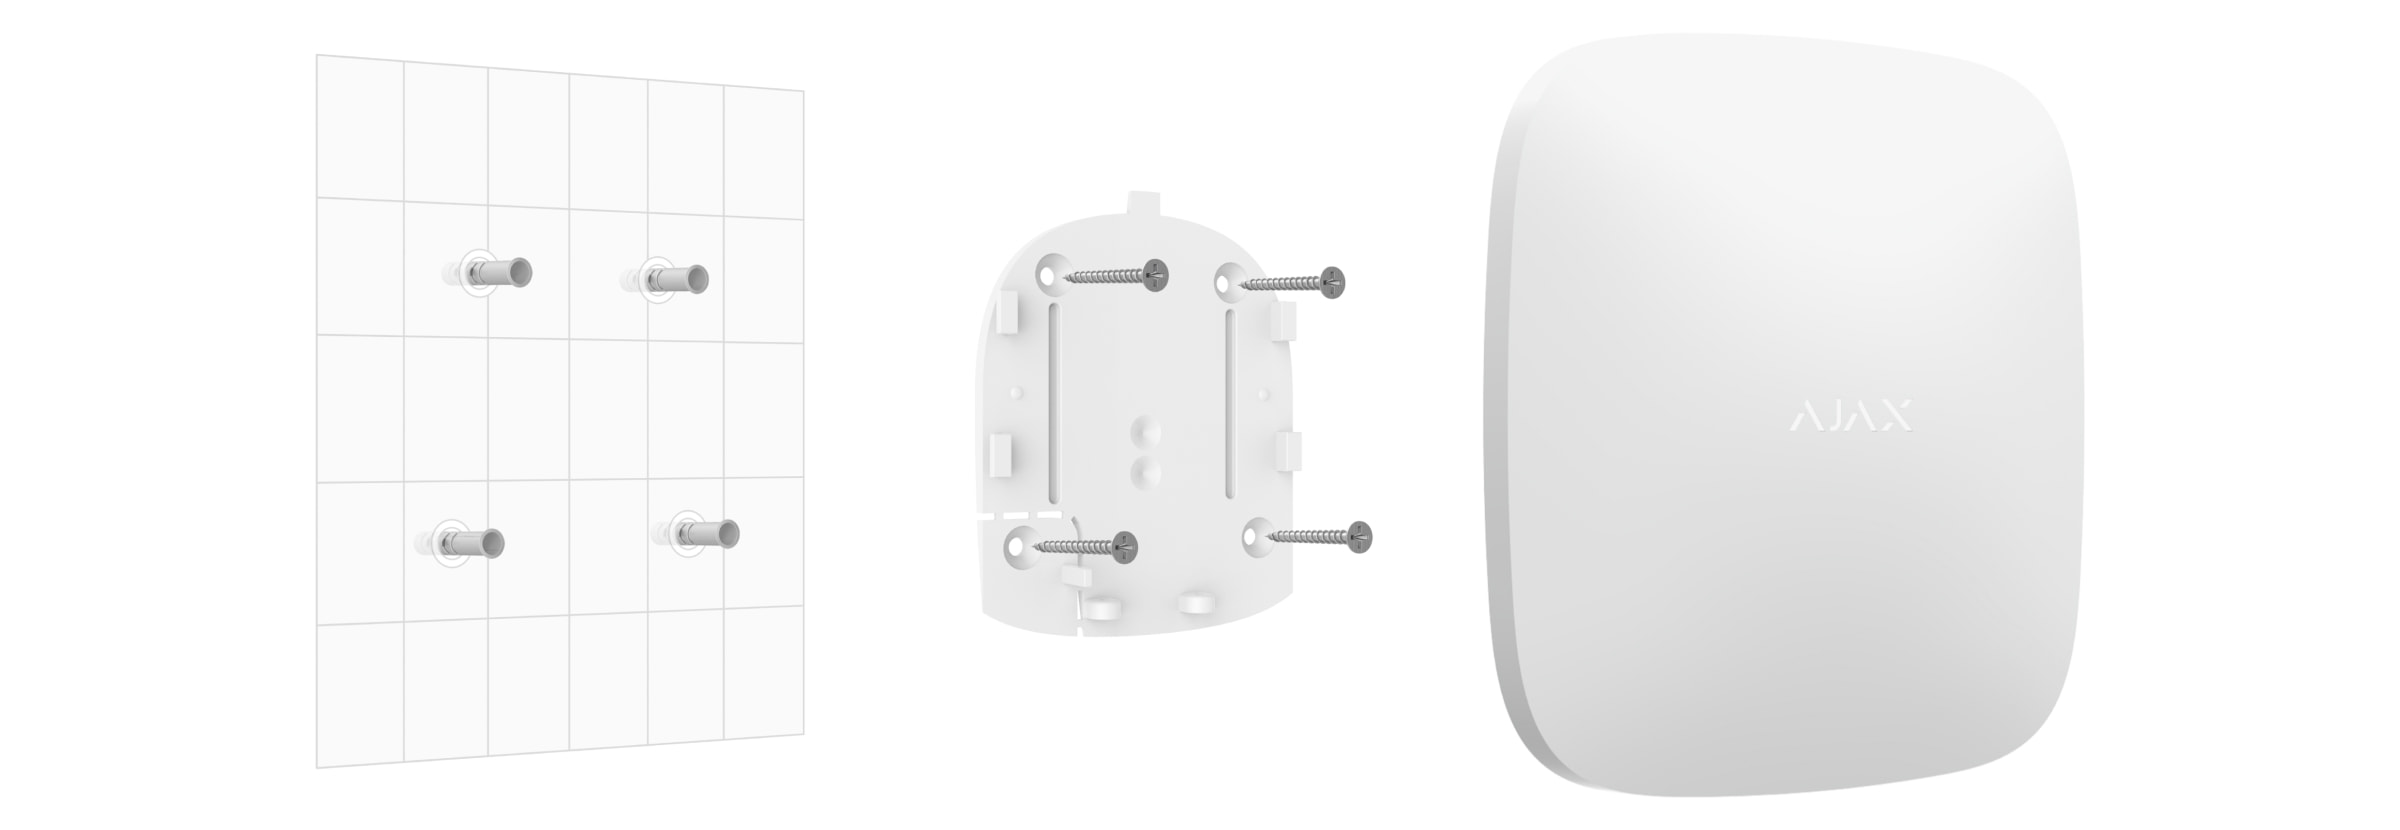
Secure the SmartBracket mounting panel with the screws provided. When using other fasteners, make sure that they do not damage or deform the panel.
Use all fixing points when attaching.
Be sure to secure the SmartBracket's perforated corner so that the sabotage sensor responds to attempts to disconnect the device.
Do not use double-sided adhesive tape for mounting. This can cause the signal amplifier to fall off. The device may be damaged by impact.
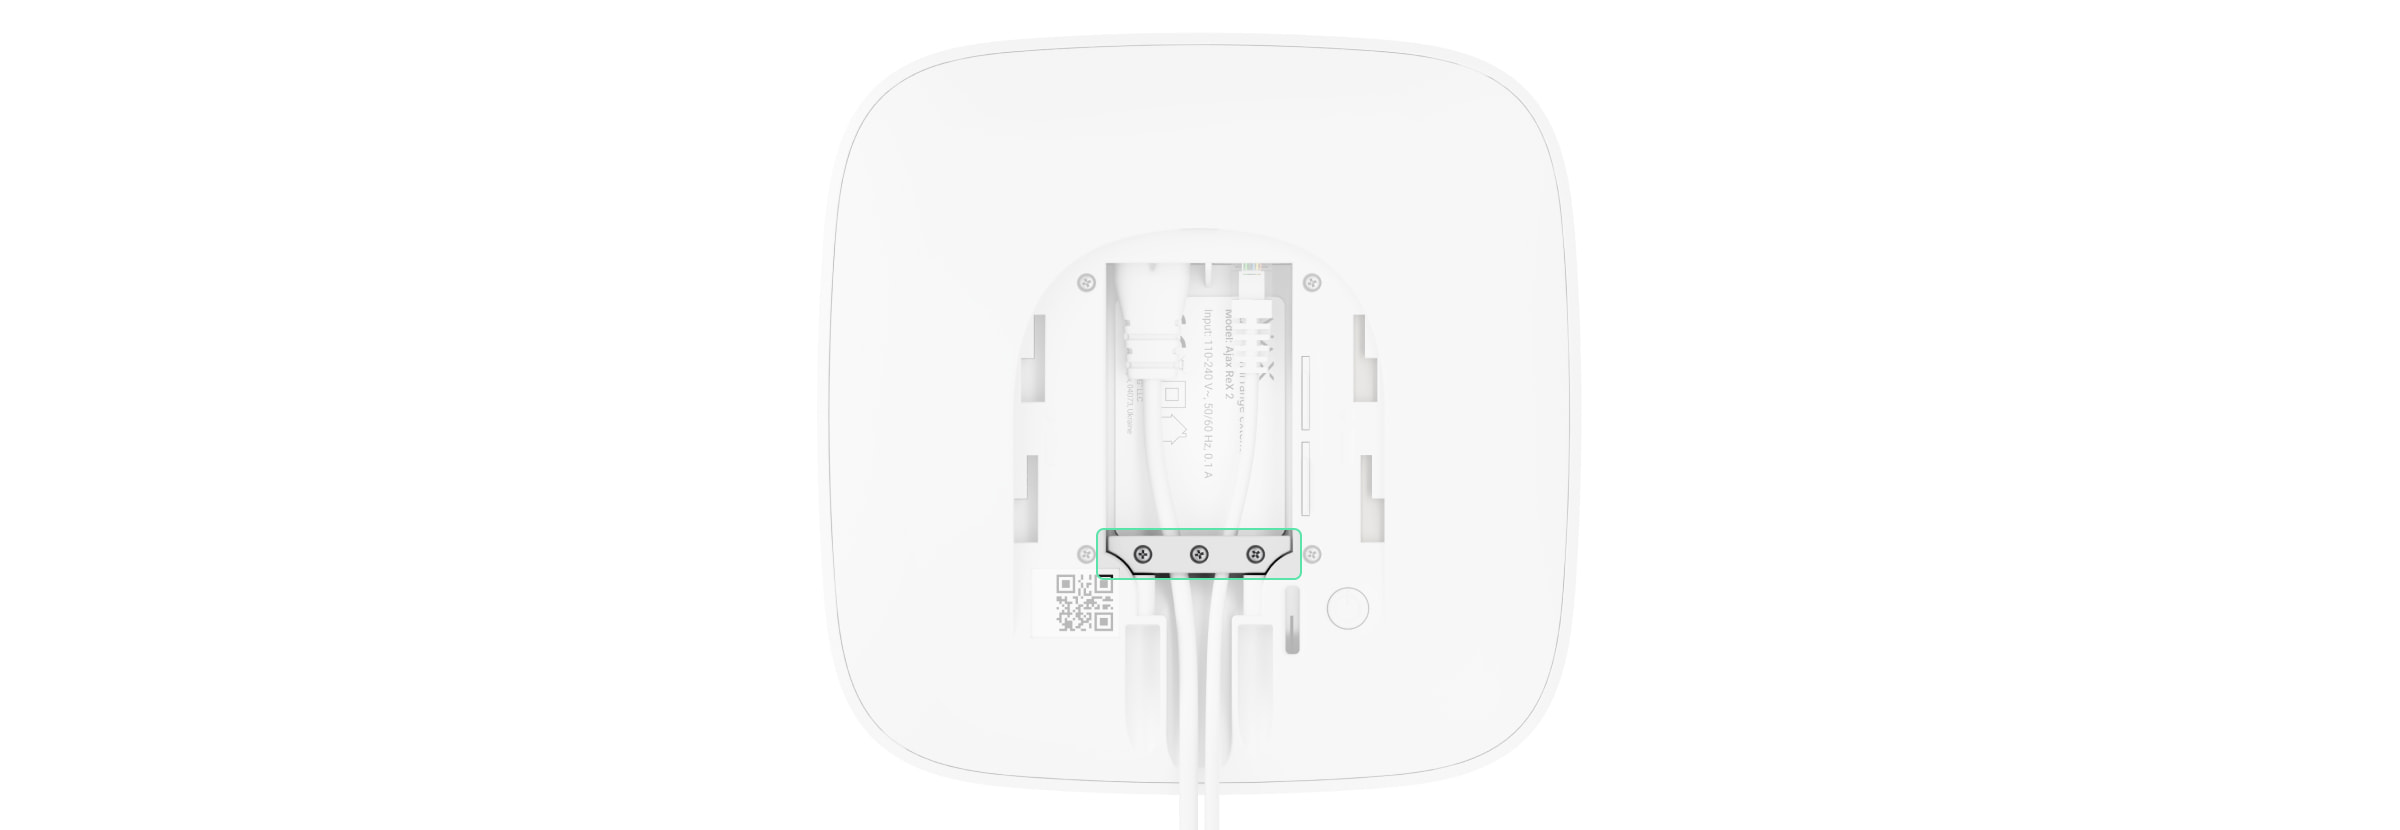
Connect the power cable and, if necessary, the Ethernet cable to the signal amplifier. Switch on the device.
Secure the cable with the plastic locking plate. This will reduce the risk of sabotage as it is much more difficult to tear off a fixed cable.
Slide the ReX 2 Jeweller onto the mounting panel. After installation, check the status of the sabotage sensor in the Ajax app and then the quality of the fixing of the panel. You will receive a notification if an attempt is made to pull the signal amplifier off the surface or remove it from the mounting panel.
Secure the ReX 2 Jeweller to the SmartBracket panel with the screws provided.
Do not install the signal amplifier inverted or sideways if it is mounted vertically (e.g. on a wall). When properly mounted, the Ajax logo is readable horizontally.
Maintenance
Check the operation of the ReX 2 Jeweller regularly. The optimum frequency is every three months. Clean the housing of dust, cobwebs and other dirt as it appears. Use a soft, dry cloth designed for the care of machinery.
Do not use substances containing alcohol, acetone, benzine or other active solvents for cleaning.
If the ReX 2 Jeweller battery becomes damaged and you wish to replace it, use the following instructions:
Technical Specifications - ReX 2 Jeweller
Connection
Jeweller, Wings, Ethernet
Maximum range: up to 1700 m (open area)
Ethernet priority if available in parallel with radio channels
Supports DHCP and static IP
Photo verification
Supports detectors with photo verification
Image transmission via Wings and/or Ethernet
Delivery time depends on resolution and channel (e.g. 640×480 px up to 39 s via Wings, up to 17 s via Ethernet)
Compatibility
Works with Hub 2, Hub 2 (2G/4G), Hub 2 Plus, Superior Hub Hybrid (2G/4G)
Up to 5 ReX 2 Jeweller per Hub
Device count: up to 99 or 199 (depending on hub model)
AJAX ReX 2 Jeweller Wireless Repeater - Photo verification / Ethernet connection, - Compatible with HUB 2, Hub 2 Plus, Black
SKU: 367305115
(1)
€165,52€211,11
Unit price
ReX 2 Jeweller
ReX 2 Jeweller is a radio amplifier with support for alarm photo verification. It communicates with the hub via radio and Ethernet and is intended for indoor installation only.
It is equipped with tamper protection and a built-in backup battery that provides up to 38 h of operation without external power supply.
The amplifier works only with compatible Ajax hubs. Connection to other hubs, other amplifiers, uartBridge and ocBridge Plus is not guaranteed.
Connection and configuration is done via iOS, Android, macOS and Windows apps. Users receive push notifications, SMS and calls (if activated) for ReX 2 Jeweller events.
👉 Buy ReX 2 Jeweller radio signal booster
Functional elements
Ajax logo with LED indicator
SmartBracket mounting panel (perforated part for tamper activation)
Power connector
Ethernet port
QR code
Tamper button
Power button
Functional elements
Logo with LED indicator
SmartBracket mounting panel (opens by sliding down forcefully)
The perforated part is needed to activate the tamper when trying to remove the amplifier from the surface. Do not remove!
Power cable connector
Ethernet cable connector
QR code with amplifier identifier (service number)
Tamper button
Power button
Operating principle
The ReX 2 Jeweller extends the radio range of the security system and provides photo verification transmission. It receives signals from the hub and sends them to the connected devices, and forwards the devices' signals back to the hub.
Principle of operation
The ReX 2 Jeweller extends the radio range of the security system by allowing Ajax devices to be installed at a greater distance from the hub.
ReX 2 Jeweller can communicate with the hub via radio (Jeweller and Wings protocols) or Ethernet cable if the devices are on the same network.
The amplifier receives signals from the hub, forwards them to the connected devices and sends the devices' signals back to the hub.
The hub polls the ReX 2 Jeweller every 12 to 300 seconds (by settings, default value is 36 seconds).
The ReX 2 Jeweller polls all connected devices with the same frequency.
Regardless of the settings, all alarms are transmitted within 0.3 seconds.
The communication range between the ReX 2 Jeweller and the device is limited by the radio signal range of the device itself. The radio signal range is indicated on the device page on the website and in the User Manual.
If the device loses connection to a signal amplifier for any reason, it will not automatically connect to another amplifier or hub.
Jeweller and Wings communication protocols
The signal booster uses Jeweller technology for alarm and event transmission and Wings technology for photo transmission. These are bi-directional wireless data transfer technologies that provide fast and reliable communication between the hub, the signal booster and the connected system devices.
The protocols support block encryption with dynamic keying and device identification in each communication session to protect against sabotage and tampering.
The Ajax application shall provide a 'hub-to-device' polling system at intervals of 12 to 300 seconds to monitor communications with system devices and display their status. The polling interval can be adjusted by the user or by a PRO with administrator rights.
Learn more Connection via Ethernet
ReX 2 Jeweller with OS Malevich 2.13 firmware supports connection to the hub via radio and Ethernet. Using a cable connection, a single Ajax system can cover sites such as an office centre with underground parking, a metal hangar or a warehouse complex of several large buildings. Ethernet can be the only communication channel or run in parallel with Jeweller and Wings. If ReX 2 Jeweller is connected to the hub via both Ethernet and radio channels, Ethernet is preferred.
The Hub and the ReX 2 Jeweller must be connected to the same network via a router for this communication channel to work. The router is needed to determine the IP address of the signal booster. The network to which the ReX 2 Jeweller connects shall support broadcast requests and provide an open port 4269 for all data transmissions.
A direct connection to the hub via Ethernet cable is not foreseen.
The ReX 2 Jeweller can operate with both static and dynamic IP addresses. If the signal booster fails to establish an Ethernet connection to the hub, an error will be displayed in the ReX 2 Jeweller status. For convenience, the MAC address of the signal booster is also available in the error information to help find and fix the problem.
A connection loss notification is sent in two cases: if the hub loses connection to the signal booster completely or if the connection to the booster is lost over the photo transmission channel. If the connection is lost only via Jeweller or only via Wings (if Ethernet is connected), no notification is sent.
Photo verification support
The ReX 2 Jeweller radio signal booster supports the addition of detectors with photo verification. ReX 2 Jeweller can not only transmit events and alarms, but also photos taken by the detector.
The photo delivery time through the amplifier depends on the communication channel with the hub, the type of detector and the resolution of the image.
Photo delivery time via Wings radio protocol:
Detector
Photo resolution, px
Delivery time through amplifier¹, s
Superior MotionCam AM (PhOD) Jeweller, Superior MotionCam HD (PhOD) Jeweller
160 × 120
up to 11
320 × 240
up to 18
640 × 480 (default)
up to 39
960 × 720
up to 53
MotionCam (PhOD) Jeweller, Superior MotionCam (PhOD) Jeweller, MotionCam Jeweller
160 × 120
up to 8
320 × 240 (default)
up to 18
640 × 480
up to 31
MotionCam Outdoor Jeweller
320 × 176 (default)
up to 13
640 × 352
up to 30
MotionCam Outdoor (PhOD) Jeweller
320 × 176 (default)
up to 37
640 × 352
up to 50
MotionCam Outdoor HighMount (PhOD) Jeweller
320 × 176 (default)
up to 20
640 × 352
up to 38
¹ Values are calculated assuming the hub is running over Ethernet or 4G and the signal level between the ReX 2 Jeweller and the detector and between the hub and the ReX 2 Jeweller is three bars. When using the "Photo on Demand" function, there may be a slight delay (up to 3 seconds) before the detector takes a photo.
Photo delivery time via Ethernet:
Detector
Photo resolution, px
Delivery time via amplifier², s
Superior MotionCam AM (PhOD) Jeweller, Superior MotionCam HD (PhOD) Jeweller
160 × 120
up to 4
320 × 240
up to 5.5
640 × 480 (default)
up to 13
960 × 720
up to 17,5
MotionCam (PhOD) Jeweller, Superior MotionCam (PhOD) Jeweller
160 × 120
up to 6
320 × 240 (default)
up to 10
640 × 480
up to 16
MotionCam Jeweller
160 × 120
up to 6
320 × 240 (default)
up to 10
640 × 480
up to 17
MotionCam Outdoor Jeweller
320 × 176 (default)
up to 10
640 × 352
up to 21
MotionCam Outdoor (PhOD) Jeweller
320 × 176 (default)
up to 24
640 × 352
up to 32
MotionCam Outdoor HighMount (PhOD) Jeweller
320 × 176 (default)
up to 11
640 × 352
up to 18
² Values are calculated assuming the hub is running over Ethernet or 4G and the signal level between the ReX 2 Jeweller and the detector is three bars. When using the "Photo on Demand" function, there may be a slight delay (up to 3 seconds) before the detector takes a photo.
Photo verification features in Ajax
Number of connected signal amplifiers and devices
Depending on the model, the following number of signal amplifiers can be connected to the hub:
Hub model
ReX 2 Number of Jeweller
Hub 2 (2G)
5
Hub 2 (4G)
5
Hub 2 Plus
5
Superior Hub Hybrid (2G)
5
Superior Hub Hybrid (4G)
5
It does not matter which type of amplifier is used: ReX Jeweller or ReX 2 Jeweller. They can be connected in any combination, subject to hub restrictions.
ReX 2 Jeweller connects to the hub directly only. Connection to another amplifier is not foreseen.
ReX 2 Jeweller does not increase the number of devices connected to the hub. The maximum number of devices depends on the hub model:
Hub model
Number of devices connected
Hub 2 (2G)
99
Hub 2 (4G)
99
Hub 2 Plus
199
Superior Hub Hybrid (2G)
99
Superior Hub Hybrid (4G)
99
Sending events to a monitoring station
The Ajax system can be connected to the CMS and transmit alarms and events in SurGard (Contact ID), SIA (DC-09), ADEMCO 685 and other proprietary protocols. A full list of supported protocols is available at the following link.
Ajax connection to monitoring software
The ReX 2 Jeweller loop (zone) number is available in the device status. To obtain it:
Log in to the Ajax app.
Select a zone if there are several.
Open the "Devices" menu.
Select ReX 2 Jeweller. The loop (zone) number is displayed at the very bottom of the page.
The ReX 2 Jeweller loop (zone) number is also available in the "Groups" menu (Ajax app → Devices → Hub → Settings → Groups). The device number corresponds to the loop (zone) number.
Compatible hub models
A hub is required for ReX 2 Jeweller operation.
Connection
The signal booster only works with compatible Ajax hubs. Connection to other hubs, signal boosters, uartBridge and ocBridge Plus is not provided.
Hub and device operating on different radio frequencies are not compatible. The radio frequency range of the device may vary depending on the region. We recommend that you purchase and use Ajax devices in the same region. For frequency ranges, please contact technical support.
Before connecting the device:
Install the Ajax or Ajax PRO app.
Sign in to your account or create a new one.
Select a room or create a new one.
Add at least one virtual space.
Add a compatible hub to the room. Make sure it is switched on and has access to the internet via Ethernet, Wi-Fi and/or a mobile network.
Make sure the room is disarmed and the hub is not updating by checking the status in the Ajax app.
To connect the ReX 2 Jeweller to the hub:
Remove the SmartBracket mounting panel by sliding it down forcefully. Do not touch the perforated part as it is needed to operate the sabotage sensor that protects the signal amplifier from disassembly.
Click Add; the countdown will start. Switch on the ReX 2 Jeweller by holding the power button down for 3 seconds.
To ensure that the ReX 2 Jeweller is connected to the hub, the signal booster must be located in the same protected area as the system (within range of the hub radio network).
Once connected to the hub, the colour of the logo will change from red to white within 30 seconds. The connected signal booster will appear in the list of hub devices in the Ajax app. The frequency of the status update depends on the Jeweller settings (or Jeweller/Fibre for hybrid Ajax hubs); the default value is 36 seconds.
If the connection fails, turn off the ReX 2 Jeweller and try again after 5 seconds. If the maximum number of devices connected to the hub (depending on the hub model) has already been reached when you try to connect a device, you will receive a corresponding message in the Ajax app.
ReX 2 Jeweller only works with one hub. When connecting to a new hub, the signal booster stops sending commands to the old one. After connecting to a new hub, ReX 2 Jeweller is not automatically removed from the device list of the old hub. This needs to be done in the Ajax app.
Error icon
When the signal booster detects a failure (e.g. no external power supply), the Ajax app displays an emblem with a counter in the upper left corner of the device icon.
All failures are displayed in the statuses of the signal amplifier. Fields with errors will be highlighted in red.
Icons
The icons represent some of the ReX 2 Jeweller statuses. These can be viewed in the Devices tab of the Ajax app.
Icon - Meaning
Jeweller signal strength. Displays the signal strength between the hub and the signal amplifier. The recommended value is 2-3 bars. Learn more
Battery charge level. Learn more
Fault detected. A list of faults and their description is available in the signal amplifier statuses.
The device is in signal suppression test mode. Learn more
ReX 2 Jeweller is deactivated. Learn more
ReX 2 Jeweller has been deactivated for sabotage sensor trigger notifications. Learn more
The device has lost connection to the hub or the hub has lost connection to the Ajax Cloud server.
The device has not been transferred to the new hub. Learn more
Status
Statuses contain information about the device and its operating parameters. ReX 2 Jeweller statuses can be viewed in the Ajax app:
Select a room if there are several.
Open the Devices tab.
Select ReX 2 Jeweller from the list.
Parameter - Meaning
Data import Indicates an error when data is transferred to the new hub:
Failed - device has not been transferred to the new hub. Learn more
Some functions do not work The field is displayed if the versions of the hub and ReX 2 Jeweller firmware do not match.
ReX 2 Jeweller is updated within half an hour if the system is disarmed. Firmware update requires stable:
External power supply for hub and signal amplifier,
a connection between the hub and ReX 2 Jeweller,
connection of the hub to the Internet.
How to update the OS Malevich
Jeweller signal strength Jeweller signal strength between hub and ReX 2 Jeweller. Recommended value is 2-3 columns. Jeweller is a protocol for transferring alarms and events. Learn more
Connection via Jeweller Connection status between hub and ReX 2 Jeweller via Jeweller:
Online - Signal booster is connected.
Offline - no connection to the signal booster.
Ethernet Connection status between hub and ReX 2 Jeweller via Ethernet:
Connected - the signal amplifier is connected.
Not connected - no connection to the signal amplifier.
Disabled - Ethernet connection is disabled in the signal amplifier settings.
When the button is pressed, the connection information is displayed: IP address, subnet mask, gateway and MAC address of the signal amplifier.
Wings signal strength Wings signal strength between hub and ReX 2 Jeweller. Recommended value is 2-3 bars. Wings is a protocol for transferring photos taken by detectors with photo verification. Learn more
Connection via Wings Connection status between hub and ReX 2 Jeweller via Wings:
Online - ReX 2 Jeweller can transfer photos to the hub.
Offline - ReX 2 Jeweller cannot transfer the photo to the hub.
Transmitter power Displays the selected transmitter power. This parameter appears when Max or Damping is selected in the Signal Damping Test menu. Learn more
Battery Charge ReX 2 Jeweller backup battery charge level. Displayed in 5% increments. Learn more
Enclosure Status of the Signal Amplifier Sabotage Sensor, which responds to enclosure removal or damage:
Open - Signal Amplifier Mounting Panel removed or housing integrity compromised.
Closed - amplifier mounted on mounting panel. Learn more
External power supply Status of external power supply (110-240 V):
Connected - External power supply is connected.
Disconnected - the external power supply is disconnected.
Permanent deactivation Displays the status of the permanent deactivation function of the device:
No - the device operates normally and transmits all events.
Enclosure only - the hub administrator has disabled notifications for triggering the tamper sensor.
Completely - the device has been completely deactivated from system operation by the Hub Administrator.
If the signal booster is fully disabled, connected devices continue to operate normally via ReX 2 Jeweller. Learn more
One-time deactivation Shows the status of the one-time deactivation settings of the device:
No - the device operates normally.
Hull only - Sabotage sensor notifications are disabled until first disarm.
Completely - the device is completely disabled from system operation until the first disarm. The device does not execute system commands and does not report alarms or other events.
If the signal amplifier is fully deactivated, connected devices continue to operate normally through the ReX 2 Jeweller. Learn more
Firmware ReX 2 Jeweller firmware version. Updates remotely as soon as an update becomes available on the Ajax Cloud server. Learn more
Device ID ReX 2 Jeweller ID/serial number. Also indicated on the device box, circuit board and case (under the SmartBracket mount).
Device No. Device loop (zone) number.
Settings
ReX 2 Jeweller settings can be changed in the Ajax app:
Select a room if there are several.
Open the Devices tab.
Select ReX 2 Jeweller from the list.
Go to Settings by clicking on the gear icon in the top right corner.
Set the required parameters.
Click Back to save the new settings.
Setting - Meaning
Name ReX 2 Jeweller Name. Appears in SMS text and notifications in the event feed. To change the name, click the pencil icon. The name can contain up to 12 Cyrillic characters or up to 24 Latin characters.
Room Select the virtual room to which ReX 2 Jeweller is connected. The room name is displayed in SMS text and notifications in the event stream.
Ethernet settings Menu for connecting to the hub via Ethernet:
Connection via Ethernet - enables or disables the connection via Ethernet.
Connection type - allows you to customize the connection type: DHCP or static IP address.
MAC address - shows and allows copying the MAC address of the signal booster.
Charging mode Available only in Ajax PRO apps. Available for ReX 2 Jeweller running on hubs with OS Malevich 2.24 or later. Sets the charging rate of the built-in battery from an external source.
Two options are available:
Continuous - the battery charges continuously until fully charged. Compatible with most external power supplies.
Intermittent - the battery charges intermittently. Recommended for zinc-air power supplies.
Mark Jeweller/Wings connection loss with failure icons Available for ReX 2 Jeweller with OS Malevich 2.18 or later. Activates a failure icon in the device list when the signal booster loses connection over radio channels. This setting is available only when Ethernet connection is enabled. Deactivating this setting does not turn off connection loss notifications and does not fail the system integrity check.
LED brightness Setting the brightness of the Ajax logo illumination on the signal amplifier. Adjustable from 0 to 10 in increments of 1. Default value is 10.
Paired with a device Menu for selecting devices that work through the signal amplifier. Learn more
Jeweller Signal Strength Test Switches the ReX 2 Jeweller into Jeweller Signal Strength Test mode. The test checks the signal strength between the hub and the ReX 2 Jeweller over the alarm and event transmission channel and helps determine the optimum installation location. Learn more
Wings Signal Strength Test Switches the ReX 2 Jeweller into Wings Signal Strength Test mode. The test checks the signal strength between the hub and the ReX 2 Jeweller over the photo channel and helps determine the optimal installation location. Learn more
Signal attenuation test Switches the device into signal attenuation test mode. The test reduces or increases the power of the radio transmitter to simulate environmental changes and to test the stability of the connection between the signal amplifier and the hub. Learn more
User Guide Open the ReX 2 Jeweller User Guide in the Ajax app.
Permanent deactivation Allows the hub administrator to deactivate the device without disconnecting it from the system.
Three options are available:
No - the device operates normally and forwards all events.
Full - the device does not execute system commands and does not participate in automation scenarios, and the system ignores alarms and other notifications.
Enclosure only - only notifications of the triggering of a tamper sensor are ignored by the system.
Learn more The system will only ignore a deactivated device. Devices connected via ReX 2 Jeweller will continue to operate normally.
One-time deactivation Allows the user to deactivate device events until the first disarm.
Three options are available:
No - the device operates normally.
Completely - the device is completely deactivated from system operation until the first disarm. The device does not execute system commands and does not report alarms or other events.
Hull only - Sabotage sensor notifications are deactivated until first disarm.
Learn more The system will ignore only the deactivated device. Devices connected via ReX 2 Jeweller will continue to operate normally.
Delete device Disconnects ReX 2 Jeweller from the hub and deletes its settings. If detectors are connected to ReX 2 Jeweller, they will try to reconnect to the hub after disconnection.
Connecting devices to the ReX 2 Jeweller
To assign a device to a signal booster, in the Ajax app:
Select a room, if there are several.
Open the Devices tab.
Select ReX 2 Jeweller from the list.
Go to Settings by clicking on the gear icon in the top right corner.
Select the Pair with device menu.
Select the devices that are to work through the signal booster.
Click Back to save your settings.
After pairing the selected devices, the icon appears in the Ajax app. A device can only be connected to one ReX 2 Jeweller. When a device is assigned to one signal amplifier, it is automatically disconnected from the other connected amplifier.
To assign a device to a hub, in the Ajax app:
Select a room, if there are several.
Open the Devices tab.
Select ReX 2 Jeweller from the list.
Go to Settings by clicking on the gear icon in the top right corner.
Select the Pair with device menu.
Uncheck the devices to be added back to the hub.
Click Back to save the settings.
Errors
ReX 2 Jeweller may report detected failures. The Errors field is available in the Device Status section. Clicking , opens a list of all faults. The field is only displayed if a failure has been detected.
Fault - Description - Solution
Some functions do not work. The field is displayed if the huba and ReX 2 Jeweller firmware versions do not match. Solution: make sure that automatic updates are enabled in the huba settings. ReX 2 Jeweller is updated within half an hour if the system is disarmed and a new firmware version is available on the server.
Indication
The ReX 2 Jeweller LED indicator may be white, red or green depending on the status of the device and the Ethernet connection.
Indication when Ethernet connection is disabled
Indication
Event
Note
White.
Connected to the hub via at least one of Jeweller and/or Wings.
If the external power supply is switched off, the indicator flashes every 10 seconds.
On red.
No connection to the hub.
If the external power supply is switched off, the indicator flashes every 10 seconds.
On for 3 minutes, then flashing every 10 seconds.
The external power supply is disconnected.
The colour of the indication depends on the presence of a connection to the hub.
Indication when Ethernet connection is activated
Indication
Event
Note
White.
Connection established to hub via two channels: Jeweller and/or Wings, Ethernet.
If the external power supply is switched off, the indicator flashes every 10 seconds.
Green.
Connected to the hub via at least one of two channels: Jeweller and/or Wings, Ethernet.
If the external power supply is switched off, the indicator flashes every 10 seconds.
On red.
No connection to the hub.
If the external power supply is switched off, the indicator flashes every 10 seconds.
On for 3 minutes, then flashing every 10 seconds.
The external power supply is disconnected.
The colour of the indication depends on the presence of a connection to the hub.
Functionality testing
Functionality tests of the ReX 2 Jeweller do not start immediately, but at the latest within one ping between the hub and the detector (36 seconds with the default settings of the hub). The ping period of the devices can be changed in the Jeweller menu of the hub settings.
To run a test in the Ajax app:
Select a room if there are several.
Open the Devices tab.
Select ReX 2 Jeweller.
Go to Settings.
Select one of the available tests:
Jeweller Signal Strength Test
Wings signal strength test
Signal attenuation test
Selecting the installation location
There are 2 main factors to consider when selecting an installation site:
Jeweller signal strength.
Wings signal strength.
The signal strength between the hub and the signal amplifier and between the signal amplifier and all connected devices must be assessed.
Place the ReX 2 in a Jeweller location with stable Jeweller and Wings signal strength (2-3 bars in the Ajax app). When choosing the installation location, take into account the distance between the signal booster and the hub, as well as obstacles between the devices that prevent the radio signal from propagating: walls, ceilings or large objects in the room.
ReX 2 Jeweller should be placed between the hub and a device with a weak signal. The signal booster does not increase the power of radio signals, so placing it next to a hub or device with a signal level of 1 or 0 bars will not give the desired result. Use our radio signal range calculator to estimate the signal level at the installation site.
Check the signal strength of Jeweller and Wings at the installation site. If the signal strength is low (one pole), we cannot guarantee stable operation of the security system. Moving the device even 20 cm can significantly improve signal reception.
If there is no stable signal level (2-3 bars) between the signal booster and the hub at the installation site via Jeweller and Wings, use Ethernet as the main communication channel. This feature allows signal boosters to be installed in basements, metal hangars and other locations where radio signals are not available.
Ethernet can be the only communication channel or run in parallel with radio protocols. Connection via both cable and radio will increase system reliability and operational reliability. In this configuration, the Ethernet channel is preferred.
The ReX 2 Jeweller shall be positioned so that it is not directly visible. This will help reduce the likelihood of sabotage or interference. Remember that the device is intended for indoor use only.
Do not install the ReX 2 Jeweller:
Outdoors. This may cause the device to malfunction or completely stop working.
Close to metal objects or mirrors (e.g. in a metal cabinet). These can obscure and weaken the radio signal.
In rooms where the temperature and humidity exceed the permissible limits. This may cause the device to malfunction or completely stop working.
Close to sources of radio interference: closer than 1 metre from the router and power cables. This may cause loss of connection to the hub or devices connected to the signal amplifier.
In areas with low or unstable signal strength, if Ethernet is not used as the main communication channel. This may cause loss of connectivity to the hub or devices connected to the signal booster.
Installation
Before installing the signal booster, make sure that you have selected the optimum location and that it meets the requirements of this manual.
When installing and operating the device, observe the general rules for electrical safety in the use of electrical appliances and the requirements of the electrical safety regulations.
To install the ReX 2 Jeweller:
Secure the SmartBracket mounting panel with the screws provided. When using other fasteners, make sure that they do not damage or deform the panel.
Use all fixing points when attaching.
Be sure to secure the SmartBracket's perforated corner so that the sabotage sensor responds to attempts to disconnect the device.
Do not use double-sided adhesive tape for mounting. This can cause the signal amplifier to fall off. The device may be damaged by impact.
Connect the power cable and, if necessary, the Ethernet cable to the signal amplifier. Switch on the device.
Secure the cable with the plastic locking plate. This will reduce the risk of sabotage as it is much more difficult to tear off a fixed cable.
Slide the ReX 2 Jeweller onto the mounting panel. After installation, check the status of the sabotage sensor in the Ajax app and then the quality of the fixing of the panel. You will receive a notification if an attempt is made to pull the signal amplifier off the surface or remove it from the mounting panel.
Secure the ReX 2 Jeweller to the SmartBracket panel with the screws provided.
Do not install the signal amplifier inverted or sideways if it is mounted vertically (e.g. on a wall). When properly mounted, the Ajax logo is readable horizontally.
Maintenance
Check the operation of the ReX 2 Jeweller regularly. The optimum frequency is every three months. Clean the housing of dust, cobwebs and other dirt as it appears. Use a soft, dry cloth designed for the care of machinery.
Do not use substances containing alcohol, acetone, benzine or other active solvents for cleaning.
If the ReX 2 Jeweller battery becomes damaged and you wish to replace it, use the following instructions:
Technical Specifications - ReX 2 Jeweller
Connection
Jeweller, Wings, Ethernet
Maximum range: up to 1700 m (open area)
Ethernet priority if available in parallel with radio channels
Supports DHCP and static IP
Photo verification
Supports detectors with photo verification
Image transmission via Wings and/or Ethernet
Delivery time depends on resolution and channel (e.g. 640×480 px up to 39 s via Wings, up to 17 s via Ethernet)
Compatibility
Works with Hub 2, Hub 2 (2G/4G), Hub 2 Plus, Superior Hub Hybrid (2G/4G)
Up to 5 ReX 2 Jeweller per Hub
Device count: up to 99 or 199 (depending on hub model)
Backup battery: rechargeable, with choice of charging modes (continuous/interval)
LED indication
White: connection active
Green: connection via at least one channel + Ethernet
Red: no connection
Flashes every 10 s: no external power supply
Installation
Indoor only
Optimum signal strength: 2-3 bars
Not to be installed outdoors, near metal objects or sources of interference (<1 m from router/cables)
Maintenance
Functionality check: every 3 months
Cleaning with a dry, soft cloth
Alcohol, acetone, petrol and other solvents are prohibited
Available for pickup at
Out of stock at
Added to compare
Reached count_product-product limit
Added to compare
Reached count_product-product limit
{"id":57844839186767,"title":"Default Title","option1":"Default Title","option2":null,"option3":null,"sku":"367314030","requires_shipping":true,"taxable":true,"featured_image":null,"available":true,"name":"Ajax TurretCam HL 5MP IP Camera with 2.8 mm Lens, White","public_title":null,"options":["Default Title"],"price":17999,"weight":0,"compare_at_price":19999,"inventory_management":"shopify","barcode":null,"requires_selling_plan":false,"selling_plan_allocations":[],"quantity_rule":{"min":1,"max":null,"increment":1}}
Ajax TurretCam HL 5MP IP Camera with 2.8 mm Lens, White
SKU: 367314030
€179,99€199,99
Unit price
The Ajax TurretCam HL 5 MP with a 2.8 mm lens is a professional dome-style IP camera designed for reliable video surveillance in residential, commercial, and industrial environments.
The camera is equipped with a 5-megapixel CMOS sensor, which ensures detailed images and stable performance in a variety of lighting conditions. True WDR 120 dB technology ensures balanced images in challenging lighting conditions, while the wide viewing angle allows for effective monitoring of large areas.
Hybrid lighting (IR and white light) provides visibility up to 50 meters and automatically adjusts brightness to ensure optimal image quality even at night.
The built-in artificial intelligence (AI) algorithms are capable of recognizing people, vehicles, and animals, thereby improving the accuracy of event detection and reducing the number of false alarms.
The camera supports:
PoE (Power over Ethernet) power supply;
microSD cards up to 256 GB;
integration with Ajax NVR and other video surveillance systems using the ONVIF protocol.
Available for pickup at
Out of stock at
Added to compare
Reached count_product-product limit
Added to compare
Reached count_product-product limit
{"id":57844851114319,"title":"Default Title","option1":"Default Title","option2":null,"option3":null,"sku":"367314029","requires_shipping":true,"taxable":true,"featured_image":null,"available":true,"name":"Ajax TurretCam HL 5MP IP Camera with 2.8 mm Lens, Black","public_title":null,"options":["Default Title"],"price":17999,"weight":0,"compare_at_price":19999,"inventory_management":"shopify","barcode":null,"requires_selling_plan":false,"selling_plan_allocations":[],"quantity_rule":{"min":1,"max":null,"increment":1}}
Ajax TurretCam HL 5MP IP Camera with 2.8 mm Lens, Black
SKU: 367314029
€179,99€199,99
Unit price
The Ajax TurretCam HL 5 MP with a 2.8 mm lens is a professional dome-style IP camera designed for reliable video surveillance in residential, commercial, and industrial environments.
The camera is equipped with a 5-megapixel CMOS sensor, which ensures detailed images and stable performance in a variety of lighting conditions. True WDR 120 dB technology ensures balanced images in challenging lighting conditions, while the wide viewing angle allows for effective monitoring of large areas.
Hybrid lighting (IR and white light) provides visibility up to 50 meters and automatically adjusts brightness to ensure optimal image quality even at night.
The built-in artificial intelligence (AI) algorithms are capable of recognizing people, vehicles, and animals, thereby improving the accuracy of event detection and reducing the number of false alarms.
The camera supports:
PoE (Power over Ethernet) power supply;
microSD cards up to 256 GB;
integration with Ajax NVR and other video surveillance systems using the ONVIF protocol.
AJAX Wireless indoor motion detector MotionCam PhOD with photo verification Black
SKU: 367308963
(1)
€188,96
Unit price
Wireless motion detector with photo verification option MotionCam PhOD (photo on demand). It is possible to send a request at any time to take a picture of what is happening on your property.
Works only with AJAX CentralHub 2orHub 2 Plus .
Sends a verification image to the user in 9 seconds.
With MotionCam, you will learn about the actual situation at home even before the thieves realize that they have been caught. An animated series of photos is sent immediately after motion is detected.
MotionCam is designed to monitor your safety, not your personal life. The motion detector cannot take pictures on demand. The camera only activates in response to a motion alarm. Data is encrypted throughout the transmission and storage process. You don't have to watch the video cameras all the time to know why the alarm went off.
The detector does not react to animals up to 20 kg and 50 cm. But if a particularly curious pet manages to set off the alarm (especially a cat), the photo report will confirm that the house is safe.
Easy to add by scanning the machine's QR code in the Ajax app.
Installation: Indoors
Motion detection distance: Up to 12m
Immunity against animals: Weight up to 20 kg, 50 cm
Power supply: Batteries CR123A (×2), 3 V, duration of work up to 4 years, or up to 2.5 years if the "Entry delay" function is turned on
There is no warranty for the batteries.
Operating temperature: from -10°C to +40°C
Size: 135 × 70 × 60 mm
Weight: 167 years
The installation instructions are available in the Ajax app, which will open by scanning the QR code of the detector at the time of installation. Easy installation and connection to the Ajax central Hub.
NVR is a network video recorder for home and office video surveillance. Ajax cameras and third party IP cameras can be connected to the device.
The user can view live and archived video in Ajax applications. The recorder saves the received video data on a hard disk (not included) with appropriate settings. If no hard disk is installed, the NVR only serves to integrate third party IP cameras into the Ajax system.
⚡ Important: Only use HDDs with a power consumption of up to 7 W.
The NVR requires an internet connection to connect to the Ajax Cloud. The device connects to the network with an Ethernet cable.
Available versions
NVR (8-ch)
NVR (16-ch)
NVR DC (8-ch)
NVR DC (16-ch)
Main features
Compatible with Ajax cameras and third party IP cameras.
Video alarm verification.
Archive video viewing and downloading in the app.
Support for HD drives up to 16 TB (not included).
Secure connection to Ajax Cloud via Ethernet.
Functional elements
Logo with LED indicator - shows the status of the device.
Mounting holes - for securing the SmartBracket panel to a surface.
SmartBracket mounting panel - for easy and secure installation.
Perforated part on the mounting panel - do not break off! It provides a tamper that reacts to attempts to disconnect the device from the surface.
Hole for HDD lock screw - for secure HDD fixation.
HDD lock.
HDD mounting space - supports HDD up to 16 TB.
QR code with device ID - required to connect the NVR to the Ajax system.
Power connector.
HDD connector.
Parameter reset button.
Ethernet connector - for network connection.
Cable lock - for secure cable fixing.
Operating principle
The NVR is a video recorder designed to connect third party IP cameras (with ONVIF and RTSP protocols) and Ajax cameras.
Supports hard disk installation up to 16 TB (not included).
Can also operate without HDD, for integration with cameras only.
Users can use the Video Archive Calculator to calculate the required storage capacity and recording duration.
NVR capabilities:
Add and configure IP cameras (resolution, brightness, contrast, etc.).
View video in real time with the ability to zoom in.
View and export archive video by chronology or calendar (if HDD attached).
Choose the type of motion detection: in the camera or in the NVR itself.
Configure motion detection on the NVR: zones, sensitivity.
Use the Video Wall, which combines the images of all connected cameras.
Create video scenarios that send a short video to the Ajax app when the detector is activated.
⚡ From firmware version 2.244, all videos downloaded from the NVR have an Ajax digital signature to authenticate them. Use the Ajax Media Player application for verification.
Integration with VMS
The NVR can be connected to third party video management systems(Milestone, Genetec, Axxon, Digifort) via ONVIF protocol (from firmware version 2.289 ).
Configuration is possible via:
Ajax Security System (v3.25+),
Ajax PRO: Tool for Engineers (v2.25+),
Ajax PRO Desktop (v4.20+),
Ajax Desktop (v4.21+).
NVR installation site selection
It is recommended to choose an installation location where the NVR is hidden from prying eyes, e.g. in the pantry. This will help to reduce the risk of sabotage. Note that the device is intended for indoor installation only.
The device is manufactured in a compact housing with passive cooling. If the NVR is installed in an insufficiently ventilated room, the operating temperature of the memory disk may exceed the permissible limits. Select a solid, level horizontal or vertical surface for installation and do not cover the device with other objects.
Follow the placement recommendations when designing the Ajax system for the site. The safety system must be designed and installed by professionals. A list of authorised Ajax partners is available here.
Where NVRs must not be installed
Outdoors. This may cause damage to the NVR. In rooms with temperature and humidity values that do not meet the operating parameters.
Installation
Installation of the NVR:
Remove the SmartBracket from the DVR by pulling down on the rear panel. Attach the SmartBracket to a solid, flat surface with the supplied screws. Use at least two fixing points. Be sure to secure the case in the perforated area so that the tamper responds to disassembly attempts.
Lift the hard disk latch by pressing the button.
When replacing the hard disk, wait 10 seconds after disconnecting the device from the power source. The hard disk contains fast-rotating disks. Sudden movements or shocks can damage the mechanism, causing physical damage and loss of data.
Do not move or rotate the NVR until the hard disk has stopped rotating.
Install the hard disk in the NVR enclosure so that the connectors line up.
Lower the hard disk latch.
Secure the hard disk in the NVR enclosure with the supplied screw using the fixing point provided.
Connect the external power supply and Ethernet connection. Connect the device to the system. Insert the video recorder into the SmartBracket holder.
The LED indicator turns yellow and turns green when connected to the Internet. If the connection to the Ajax Cloud server fails, the logo turns red.
Connecting to the system
Before connecting the device Install the Ajax app. Log in to your account or create a new one. Select a room or create a new one. Add at least one virtual room. Make sure the room is disarmed.
Only a PRO or room administrator with system configuration rights can add a device to a room.
Account types and rights
Adding a room Open the Ajax application. Select the room you want to add the NVR to. Go to the Devices tab and tap Add device. Scan the QR code or enter it manually. The QR code is located on the back of the case under the SmartBracket mounting panel and on the packaging. Give the device a name. Select a virtual room. Tap Add. Make sure the NVR is powered on and has internet access. The LED logo should be green. Tap Add.
The added device will appear in the device list of the Ajax app.
The NVR only works with one room. To connect a NVR to a new room, it must be manually deleted from the previous room in the Ajax app.
Adding an IP camera to the NVR
The video device calculator can be used to calculate how many cameras and NVRs can be added to a room.
Adding an IP camera automatically: Adding a third party IP camera manually: Open the Ajax app. Select the room where the NVR is connected. Go to the Devices tab. Find the NVR in the list and tap Cameras. Tap Add camera. Wait until the network is scanned and the IP cameras connected to the local network are displayed. Select a camera. Enter the username and password (specified in the camera documentation) if the camera is a third party and tap Add. If entered correctly, a video preview of the added camera will appear. In case of an error, check the correctness of the entered data and try again. Make sure the video matches the connected camera. Tap Next.
The IP camera connected to the video recorder will appear in the list of NVR cameras in the Ajax app.
Restore to factory settings
To restore the NVR to factory settings:
Turn off the device by disconnecting the power supply. Press and hold the reset button. Turn on the NVR while continuing to hold the reset button and wait for the LED to turn purple. This takes about 50 seconds.
After switching on the NVR with the reset button held down, the LED indicator will turn yellow for 20 s. Then it goes off for 30 s and turns purple. This means that the NVR has been restored to factory settings.
Release the reset button.
Icons
The icons indicate some statuses of the device. They can be viewed in the Ajax app:
Select a space in the Ajax app. Go to the Devices tab. Find the NVR in the list.
States
States displays information about the device and its operating parameters. They can be found in the Ajax app:
Select a room in the Ajax app. Go to the Devices tab. Locate the NVR in the list.
Settings
To change the settings of the NVR in the Ajax app:
Go to the Devices tab. Select NVR in the list. Go to Settings by tapping the gear icon. Set the required parameters. Tap Back to save the settings.
Indication
Event - Indication - Note
The NVR starts up when connected to power - Lights yellow. - If the NVR is connected to the Ajax Cloud, the indication changes to green. The NVR is powered on and connected to the Internet. - Lights green. The NVR is not connected to the Internet or is not connected to the Ajax Cloud server. - Lights red.
NVR does not have a hard drive installed. Hard drive is installed but not working properly (e.g. formatting errors or needs formatting). - Flashes green or red every second, depending on the connection status to the Ajax Cloud server. The indication will continue until one of the following conditions occurs: Hard disk is formatted/installed. All cameras connected to the NVR are configured not to write to the NVR hard disk.
Maintenance
The device is maintenance free.
Technical specifications
Technical specifications NVR (8-ch) Technical specifications NVR (16-ch) Technical specifications NVR DC (8-ch) Technical specifications NVR DC (16-ch)
Compliance with standards
Warranty
Ajax Systems Manufacturing Limited Liability Company's product warranty is valid for 2 years after purchase.
If the device fails to operate properly, please contact Ajax Technical Support first. In most cases, technical problems can be solved remotely.
Available for pickup at
Out of stock at
Added to compare
Reached count_product-product limit
Added to compare
Reached count_product-product limit
{"id":55861700067663,"title":"Default Title","option1":"Default Title","option2":null,"option3":null,"sku":"367313040","requires_shipping":true,"taxable":true,"featured_image":null,"available":true,"name":"Ajax IndoorCam, indoor camera 4MP\/ IR 8M\/ IP20 Cube white","public_title":null,"options":["Default Title"],"price":19600,"weight":0,"compare_at_price":21900,"inventory_management":"shopify","barcode":null,"requires_selling_plan":false,"selling_plan_allocations":[],"quantity_rule":{"min":1,"max":null,"increment":1}}
Ajax IndoorCam, indoor camera 4MP/ IR 8M/ IP20 Cube white
SKU: 367313040
€196,00€219,00
Unit price
Further information
Manufacturer AJAX
Technology IP
Resolution 4MP
Camera type Cube
PoE N/A
Connectivity Technology Wireless
Available for pickup at
Out of stock at
Added to compare
Reached count_product-product limit
Added to compare
Reached count_product-product limit
{"id":55923731398991,"title":"Default Title","option1":"Default Title","option2":null,"option3":null,"sku":"367313892","requires_shipping":true,"taxable":true,"featured_image":null,"available":true,"name":"AJAX IP Camera Ajax IndoorCam 4MP f4mm IR 8m IP20 Cube Black","public_title":null,"options":["Default Title"],"price":19600,"weight":0,"compare_at_price":21900,"inventory_management":"shopify","barcode":null,"requires_selling_plan":false,"selling_plan_allocations":[],"quantity_rule":{"min":1,"max":null,"increment":1}}
AJAX IP Camera Ajax IndoorCam 4MP f4mm IR 8m IP20 Cube Black
SKU: 367313892
€196,00€219,00
Unit price
IndoorCam is a Wi-Fi security camera with built-in AI, a PIR sensor, and control via Ajax apps. It features smart infrared (IR) backlighting, motion detection, and object recognition. The camera allows users to view archived videos and watch live streams. It is designed for indoor use only.
IndoorCam connects to the system via Wi-Fi and can be paired with a hub as a backup communication channel. The recorded videos can be stored on an Ajax NVR added to the same network or on the Ajax Cloud Storage archive, depending on the subscription.
Camera models with other housings are also available. All Ajax cameras— —areavailable here.
Functional elements
LED indicator.
Camera lens.
Microphone.
Motion-sensor lens.
Ambient light sensor.
Speaker.
Power supply connector.
Pairing button.
Hinge.
Use a screw to secure the device to the mounting panel.
Swivel mount.
The mounting panel of the swivel mount.
Holes for attaching the mounting panel of the swivel mount to the surface.
QR code with the device ID. Used to add the camera to a space.
Operating Principle
IndoorCam features a camera with IR illumination, an LED indicator, as well as a microphone and a speaker. The device is used to monitor the situation on the premises and record videos.
IndoorCam is an IP camera that uses artificial intelligence (AI) for object recognition. Its algorithms can identify moving objects and distinguish between people, animals, and vehicles.
The device features smart IR illumination, ensuring high-quality image capture even in low-light conditions. IndoorCam automatically adjusts the illumination intensity in real time to prevent overexposure, enabling clear visibility of objects that are either far away or too close to the camera in low-light conditions.
To save the recorded videos, you need to add IndoorCam to an Ajax NVR or activate the cloud archive.
IndoorCam allows you to:
Watch the video in real time and zoom in for a closer look.
Access archived videos and browse through them based on the recording timeline and the calendar (this feature is available if the device is connected to an Ajax NVR or the cloud archive is enabled).
Configure motion detection zones and adjust the sensitivity level.
View the"" video wall, which combines images from all connected cameras.
Quickly access automation devices control from the cameras’ video player menu.
Create video scenarios that send a short video from the selected camera to an Ajax app when the security detector is triggered.
Download the required segments of video recordings from the archive to smartphones or PCs (this feature is available if the device is connected to an Ajax NVR or the cloud archive is enabled).
Video recording segments downloaded from IndoorCam withfirmware version 2.279or later()include adigital signature from , which verifies the integrity of the exported video. To verify the authenticity of the downloaded video recordings, use theAjax media player software .
An Ajax system allows the use of IP cameras for alarm verification. Video scenarios make it possible to corroborate alarm triggers with the corresponding video footage from cameras installed at the facility.
Cameras can be configured to respond to alarms from a single device, multiple devices, or all connected devices. Combined detectors can trigger various types of alarms, allowing you to configure responses to a wide range of alarm types, whether it’s just one, several, or all of them.
You can also configure the sirens to activate when motion or a specific AI-recognized object is detected. When video devices detect motion or a specific AI-recognized object, the system automatically activates the sirens added to the hub to sound an alarm.
Users can manage videos on the Video Wall tab, which becomes available once at least one camera has been added. This feature provides quick access to all connected cameras, which are displayed in accordance with privacy settings.
In mobile Ajax apps, you can:
Switch between cameras.
Search for the desired camera by name.
Manage a PTZ camera.
In Ajax PRO Desktop, you can:
Switch between cameras.
Search for the desired camera by name.
Organize cameras by room, NVR, or group.
Manage a PTZ camera.
Save customized layouts for displaying video from cameras.
Change the order in which the camera video is displayed.
The system allows you to hide parts of the frame. For example, if a sensitive area or object is in view, activity around it can be recorded without revealing its contents by setting up the appropriate zone. No motion or object will be detected or recorded within the privacy zone.
To do this, in Ajax apps:
Go to the" " tab under "Devices .
Select the device from the list. If it is connected to the network video recorder, got , select "NVR" , and tap " Cameras.
Go to Settings by tapping the gear icon twice.
Select the " menu item under "Privacy Zones .
Go to the" " menu, then select "Configure privacy zones . Select the desired area.
Tap the icon. Return to the camera settings.
The user can create up to four private zones.
Firmware Update
If a new firmware version for IndoorCam is available, the icon appears in Ajax apps under the“Devices” tab. An admin or a PRO user with access to the system settings can initiate an update via the device states or settings. The on-screen instructions help ensure a successful firmware update.
Working with an Ajax hub
The system allows you to configure a backup communication channel for the device so that the device continues to transmit events and alarms if the Wi-Fi network is down or lost.
The backup communication channel involves adding the device to the hub, which allows it to communicate via the Jeweller and Wings radio protocols. The device can transmit alarms, events, and photo verifications using these protocols to keep you informed. However, live streams and archived recordings from the period when the Wi-Fi connection was lost will be unavailable.
When IndoorCam is added to the hub, it occupies one slot among the hub's devices.
Jeweller and Wings are wireless data transfer protocols that provide fast and reliable two-way communication between the hub and devices. The device uses (Jeweller) and (Wings) as a backup communication channel to transmit events and photos.
Take the installation recommendations into account when developing a project for the facility's system. Only specialists should design and install an Ajax system. A list of recommended partners isavailable here:.
Signal strength
Signal strength is determined by the number of undelivered or corrupted data packets over a certain period of time. In Ajax apps, under the"" > "Devices" > tab, the icon indicates the Wi-Fi signal strength, while the icon indicates the signal strength with the hub:
three bars — excellent signal strength;
two bars — good signal strength;
one bar — low signal strength; stable operation is not guaranteed;
grayed-out icon — no signal.
Do not install the device
In locations where the temperature and humidity exceed thepermissible limits set by the. This could damage the device.
In places where objects or structures may obstruct the device’s view.
In places with a weak or unstable Wi-Fi signal.
In areas with a weak or unstable Jeweller or Wings signal. This applies if the device is paired with a hub.
It is not recommended to install the device in direct sunlight. This may cause the device to overheat and damage its electrical components.
Installation
Before installing IndoorCam, make sure you have chosen the best location that meets the requirements in this manual.
When connecting an external power supply and using IndoorCam, follow the general electrical safety regulations for using electrical appliances, as well as the requirements of applicable laws and regulations regarding electrical safety.
The IndoorCam enclosure features a power supply connector for connecting a 12 V⎓ power supply unit (included in the camera kit).
To install the device:
Remove the mounting panel of the swivel mount from the device. To do this, slide the panel in the direction indicated on it.
Secure the mounting panel using temporary fasteners (e.g., double-sided adhesive tape).
Double-sided adhesive tape can only be used for temporary installation. The device attached with the tape may come unstuck from the surface at any time.
Connect the power supply unit (included in the camera package) to the corresponding connector.
Test the device's operation and check the camera's field of view. Adjust the camera's tilt and pan settings.
If the camera's field of view is correct and the device is functioning as expected, remove the device from the mounting panel.
Secure the mounting panel to the surface using the screws provided. Use all mounting points.
If using other fasteners, make sure they do not damage or deform the mounting panel.
Place the device on the mounting panel.
Tighten the retaining screw on the side of the device enclosure. The screw is needed to ensure a more secure attachment and to prevent the device from being quickly disassembled.
Before adding items to the system, make sure you have checked the following:
A Wi-Fi signal covers the IndoorCam installation site.
The IndoorCam external power supply is turned on.
You are near IndoorCam with your smartphone, which has the Ajax app installed.
You have the password to your Wi-Fi network right at your fingertips.
Please note that IndoorCam works only with 2.4 GHz Wi-Fi networks.
Open the Ajax app. Select a space to which you want to add the device.
Go to the" " tab under "Devices and tap"" "Add device."
Scan the QR code or enter the device ID manually. A QR code containing the ID is located on the device housing. It is also printed on the device packaging.
Assign a name to the device.
Select a virtual room and a security group ( ,Group mode is enabled). Tap"" and "Add device to continue.
Press the pairing button to add the device. Wait for IndoorCam to enter setup mode. When the LED is flashing blue, tap“” Next, to proceed:
If IndoorCam has not been connected to your Wi-Fi network before, the device will activate Access Point (AP) mode. Your smartphone will then prompt you to connect to the AP. Tap“” and “Connect” to allow the connection.
If IndoorCam was previously connected to your Wi-Fi network, the device will connect to Wi-Fi, and you will see the live image from the device. Go tostep 9 of the“ ” guide below.
Select the desired Wi-Fi network from the list.
Enter the password for the selected network to connect the device to Wi-Fi. Wait for IndoorCam to establish the connection. Once connected, you will see the live video feed from the device.
Tap"" and to add the device.
The connected device will now appear in the list of devices in an Ajax app.
Please note that IndoorCam is compatible with only one space. To connect the device to a new space, remove it from the device list of the old one. This removal process must be done manually in an Ajax app.
Pairing with an Ajax NVR
If IndoorCam has already been added to the space as a standalone device, you can easily pair it with an Ajax NVR. If not, refer to the"" section under "Adding to the space to learn how to add IndoorCam to the NVR or as a standalone device.
To pair IndoorCam with the NVR in an Ajax app:
Go to the" " tab under "Devices .
Select" " and "NVR from the list, then tap"" Cameras.
Got , select"Add camera , and wait until the network scan is complete and the available devices connected to the local network are displayed.
Note that IndoorCam must be connected to the same local network as the NVR.
Select the device.
Assign a name to the device, select a virtual room and a group, then tap"" "Finish."
Wait for the system to add the device, then tap"" "Close."
The device will now appear in the list of NVR cameras in an Ajax app.
Pairing with an Ajax hub
If the hub is added to your system, you can set up the backup communication channel between IndoorCam and the hub. Before adding it, check whether your hub is compatible with IndoorCam.
When IndoorCam is added to the hub, it occupies one slot among the hub's devices.
To pair IndoorCam with the hub, in the Ajax app:
Go to the" " tab under "Devices .
Select IndoorCam from the device list. If it is connected to the network video recorder, select NVR and tap on Cameras.
Go to Settings by tapping the gear icon twice.
Go to Connection.
Select the" " option and the "Backup radio channel option.
Go to" " and click "Set up." The hub added to the space will be displayed.
Go to Connect to pair IndoorCam with the hub.
Once IndoorCam is paired with the hub, it is recommended to run the Jeweller and Wings signal strength tests.
In an Ajax app, you can configure the Wi-Fi network connection for your IndoorCam. You can change the current Wi-Fi network settings or connect the device to another available Wi-Fi network.
Please note that IndoorCam works only with 2.4 GHz Wi-Fi networks.
To configure the Wi-Fi connection in an Ajax app:
Go to the" " tab under "Devices .
Select IndoorCam from the device list. If it is connected to the network video recorder, select NVR and tap on Cameras.
Go to Settings by tapping the gear icon twice.
Go to Connection.
Select the"" Wi-Fi option.
In the next menu, you can:
Change the settings for the current Wi-Fi network: select the current network and configure the necessary settings.
Connect to another Wi-Fi network: select the desired Wi-Fi network from the list of available networks and enter the password to connect.
Reset the Wi-Fi connection if the device is offline: tap"" Reset the Wi-Fi network , and follow the steps described in the app.
Resetting to the default settings
To reset the camera to its default settings:
Press and hold the pairing button.
Turn on the camera while holding down the pairing button, and wait until the LED indicator lights up violet. This will take about 50 seconds.
The button’s LED indicator glows blue for 20 seconds after turning on the camera while holding down the pairing button. Then it turns off for 30 seconds and glows violet. This means that the camera has been reset to its default settings.
Let go of the button.
Icons
Icons in an Ajax app display some of IndoorCam’s states. You can view the icons in the“” tab under“Devices” .
Icon
Meaning
The additional services are activated based on the subscription.
The statuses provide information about the device and its operating parameters. You can find IndoorCam statuses in Ajax apps:
Go to the" " tab under "Devices .
Select"" and "IndoorCam from the list.
Parameter
Meaning
Additional Services
The field is available in Ajax PRO apps, and is displayed when additional services are available or activated for the device based on the subscription.
Tapping on the field displays information about the assigned services and the contacts of the company providing those services.
Wi-Fi — configuring the Wi-Fi communication channel between the device and the network.
Backup radio channel — configuring the backup communication channel between the device and the hub. Communication is established via the Jeweller and Wings radio protocols.
Switches the device to the Jeweller signal strength test mode.
The test allows you to check the signal strength between the hub (or the radio signal range extender) and the device via the wireless Jeweller data transfer protocol in order to select the optimal installation location.
Switches the device to the Wings signal strength test mode.
The test allows you to check the signal strength between the hub (or the wireless signal range extender) and the device using the Wings wireless data transfer protocol in order to select the optimal installation location.
Allows a PRO with the appropriate permissions to configure the system to set up:
Zone number for CMS events — the unique identifier of the device in the events it reports to CMS;
Send event notifications to CMS — whether the device will send notifications to CMS when motion or an object is detected.
User Guide
Opens the IndoorCam user manual in an Ajax app.
Unpair from the NVR
Unpairs the device from the NVR to which it was paired.
This option is available if the device is paired with an NVR.
Delete device
It erases all device settings and removes the device from the system. It also unpairs the device from the NVR and the hub, if such connections have been established.
Notifications from camera detectors
Settings
Meaning
Notify if detected
The user can select the type of object or motion, and when it is detected, a notification is sent and sirens are activated:
Human
Pet
Vehicle
Any motion (based on frame analysis)
Any motion (with PIR)
Note that the corresponding object or motion types must be enabled in the"" and "Detection settings.
To specify whether motion detection should trigger the sirens, tap the desired type of object or motion and enable the": Activate sirens upon detection option.
This feature is available when the camera and at least one siren are added to an Ajax hub runningOS Malevich2.31 or later.
When this option is selected, the user receives notifications only when detections are captured by both the object/motion recognition system and the PIR sensor. If motion is detected by only one sensor, the system does not send notifications.
Available for the Human, Pet, and Any motion (by frame analysis) options.
When to Notify
Selecting the mode in which the camera sends notifications:
When the camera is armed
Always
Interval for reporting similar events
Selecting the time interval for reporting similar events: from 30 seconds to 8 hours.
The default interval is 3 minutes.
The selected time applies separately to each detection type and helps prevent repeated notifications regarding the same trigger.
Duration of object detection for notification
Selecting how long an object should remain in the camera’s field of view so that the system sends a notification about the detected object. The available values are : “Notify instantly” ,“” 2,“” 3, “” 4, or“” 5 seconds.
The default time is 2 seconds.
Detection settings
Settings
Meaning
Motion Detection with PIR
When this option is enabled, the device uses the built-in PIR sensor for motion detection.
PIR sensor sensitivity
The sensitivity level of the PIR motion sensor. It allows the device to be adjusted to the conditions at the site in order to filter out false triggers:
Low- —there are likely sources of false triggers within the device’s field of view.
Normal (by default) — recommended value, suitable for most facilities. Do not change it if the device is operating correctly.
High- —there are no obstacles in the device’s field of view; the device detects any motion.
This option is available when"" and "Motion detection with PIR are enabled.
Motion Detection via Frame Analysis
When this option is enabled, the camera detects motion using its built-in software.
Analyze image
The software algorithm for image analysis used for motion detection.
This option is available when"" and "Motion detection by frame analysis" ( ) are enabled.
Motion Detection Settings
Opens a menu with motion detection settings:
Adjust the activity zone — defines the specific area within the field of view where the camera should detect motion.
Sensitivity threshold — defines the device’s sensitivity to motion in the activity zone.
Area occupied by detectable objects — specifies the size of the area within the camera’s field of view that a moving object must occupy for the device to be triggered.
This option is available when"" and "Motion detection by frame analysis" ( ) are enabled.
Object Detection
When this option is enabled, the camera identifies the type of moving objects using a built-in algorithm. In the video, people, pets, and vehicles are highlighted with colored rectangles.
Object Detection Settings
Opens the menu with object detection settings:
Adjust the object detection zone — defines the specific area within the field of view where the camera should identify the type of moving objects.
Human detection — enables the detection of people in the video.
Pet detection — enables the detection of pets in the video.
Vehicle detection — enables the detection of vehicles in the video.
Sensitivity threshold — defines the accuracy of object recognition. This setting is available for each object type.
This option is available when Object detection is enabled.
Video stream settings
Settings for mainstream and substream parameters.
Settings
Meaning
Mainstream
Video codec
Selecting the video compression standard:
H.264
Resolution
Selecting the default resolution:
1024 × 576
1920 × 1080
2304 × 1296
2560 × 1440
2688 × 1520
Frame rate
Selecting the frame rate: from 3 to 25 in increments of 1 frames per second.
Bit Rate Type
Selecting the bit rate type:
Variable (VBR)
Constant (CBR)
Bit rate
Setting the bit rate in kbit/s.
GOP length
Selecting the GOP length: from 1 to 250 in increments of 1 frames.
VBR quality / CBR quality
Selecting the compression quality: from 0 to 100 in increments of 1.
Substream
Video codec
Selecting the video compression standard:
H.264
Resolution
Selecting the substream resolution:
720 × 480
720 × 576
1024 × 576
Frame rate
Selecting the frame rate: from 3 to 25 in increments of 1 frames per second.
Bit Rate Type
Selecting the bit rate type:
Variable (VBR)
Constant (CBR)
Bit rate
Setting the bit rate in kbit/s.
GOP length
Selecting the GOP length: from 1 to 250 in increments of 1 frames.
VBR quality / CBR quality
Selecting the compression quality: from 0 to 100 in increments of 1.
Image settings
Settings for camera image quality.
Settings
Meaning
Brightness
Adjusting the image brightness.
Color Saturation
Adjusting the image's color saturation.
Sharpness
Adjusting the image sharpness.
Contrast
Adjusting the image contrast.
Wide Dynamic Range (WDR)
Enabling or disabling WDR.
When WDR is enabled, it helps improve camera images that have areas that are too dark or too bright.
Day/Night Mode (IR-cut filter)
Selecting the camera's vision mode based on lighting conditions:
Day —the IR backlight is always off.
Night —the IR backlight is always on.
Auto — The IR backlight automatically adjusts based on the . The brightness threshold for switching modes is settings.
Lighting threshold for mode switching
Selecting the light threshold for switching between day and night mode:
Early in the morning, late at night.
Medium.
Late morning, early evening.
This setting is available if Day/Night mode (IR-cut filter) is set to Auto.
Infrared Illumination (IR)
Adjusting the intensity of the IR backlight:
Car
Custom
Off
This setting is used to capture clear images at night or in low light and ensures visibility using IR LEDs when conventional lighting is ineffective.
IR intensity
Adjusting the IR backlight intensity.
This setting is available if Infrared illumination (IR) is set to Custom.
Service Settings
Settings
Meaning
Time zone
Time zone selection.
It is configured by a user and is displayed when a user views video from the camera.
LED Indicator for Motion Detection
When this option is enabled, the device's LED flashes if motion is detected by the PIR sensor.
. The "Motion detection with PIR" option should be enabled in the"" and "Detection settings.
Connection via ONVIF
Configuring the device's connection via ONVIF to third-party VMSs.
The delay helps reduce the risk of a false alarm indicating a loss of server connection.
The delay can be set between 30 and 600 seconds.
Cloud polling interval, sec
The frequency at which the Ajax Cloud server is polled is set within the range of 30 to 300 seconds.
The shorter the interval, the faster the loss of the cloud connection will be detected.
Get notified of a lost server connection without an alarm
When the toggle is enabled, the system notifies users of a lost server connection using a standard notification sound instead of a siren alert.
Indication
Depending on the device's status, the IndoorCam LED indicator may light up in various colors and display different patterns.
Event
Indication
Note
Turning on the device.
The LED lights up green for about 2.5 s.
The device is starting up.
The LED flashes orange.
The indicator remains lit until the device is turned on.
The device is in Access Point (AP) mode.
The LED flashes blue continuously.
The indicator remains on until the device is connected to Wi-Fi.
The connection to Ajax Cloud was successful.
The LED lights up green for about 3.5 s.
This indication is only available during device setup.
The connection to Ajax Cloud has failed.
The LED lights up red for about 1 second.
This indication is only available during device setup.
Downloading a new firmware version for the device.
The LED flashes green twice and turns off every 3 seconds.
The device firmware is being updated.
The LED stays lit in green.
The indicator remains on until the firmware update is complete.
The device is being reset to its factory settings.
The LED flashes violet every 1.5 seconds.
Motion is detected by a PIR sensor.
The LED glows white for about 2.5 seconds at 50% brightness.
Two-way voice communication is currently in progress.
The LED stays lit in white at 50% brightness.
Malfunctions
When the device detects a malfunction, a malfunction counter appears in the Ajax app in the upper-left corner of the device icon. All malfunctions can be viewed in thedevice''s status. Fields with malfunctions will be highlighted in red.
No connection to the hub or radio signal range extender via Jeweller. This malfunction may occur if the device is paired with the hub.
No connection to the hub or radio signal range extender via Wings. This issue may occur if the device is paired with the hub.
Maintenance
Check the device's operation regularly. If you notice any deterioration in image quality, loss of clarity, or darkening, check the camera for dirt. Clean the device housing of dust, cobwebs, and other contaminants as they appear. Use soft, dry wipes suitable for equipment maintenance.
Do not use substances containing alcohol, acetone, gasoline, or other strong solvents to clean the device. Wipe the lens carefully, as scratches can result in poor-quality images and camera failure.
{"id":41592071848119,"title":"Default Title","option1":"Default Title","option2":null,"option3":null,"sku":"367308685","requires_shipping":true,"taxable":true,"featured_image":null,"available":true,"name":"AJAX MotionProtect Outdoor Wireless outdoor motion detector with advanced anti-masking system and immunity to pets","public_title":null,"options":["Default Title"],"price":20577,"weight":0,"compare_at_price":26244,"inventory_management":"shopify","barcode":"856963007590","requires_selling_plan":false,"selling_plan_allocations":[],"quantity_rule":{"min":1,"max":null,"increment":1}}
AJAX MotionProtect Outdoor Wireless outdoor motion detector with advanced anti-masking system and immunity to pets
SKU: 367308685
(1)
€205,77€262,44
Unit price
Intelligent anti-masking system An outdoor detector is a simple target. During the day, when the system is disarmed, intruders can damage the sensors or block their visibility to gain an advantage at night. To prevent sabotage, we have equipped MotionProtect Outdoor with a tamper button and an advanced anti-masking system that can remain active 24/7.
The MotionProtect Outdoor anti-masking system is automatically calibrated by analyzing the surrounding area when the device is mounted on the SmartBracket. Then, if an obstacle appears in the field of vision of the anti-masking sensors or they are painted, the detector quickly notices the tampering and raises the alarm. In addition, if someone tries to remove the detector from the SmartBracket, a sensitive manipulator is immediately activated.
Guaranteed alarm delivery We have developed the Jeweler radio protocol to ensure uninterrupted operation of all security system devices. The jeweler provides two-way communication between the hub and MotionProtect Outdoor up to 1,700 meters away and provides alarms in less than 0.15 seconds. The radio protocol uses time frames to synchronize the communication of connected devices, authentication to prevent spoofing, and encryption to protect against data leakage. In addition, Jeweler is energy efficient and allows detectors to run for years with pre-installed batteries.
Ready for heat and cold Ajax security systems protect users in all climate zones, from South Africa to Greenland. Hot or cold, snow or rain, MotionProtect Outdoor is ready for any weather. The outdoor detector operates up to 5 years from pre-installed batteries. In addition, to increase autonomy and simplify maintenance in extreme conditions, we have provided the possibility of using external power supply.
Detectors can be installed without a hood if they are installed under the hood
The detectors can be installed with a hood to protect the anti-masking system from rain and snow
Installation without mind games To connect MotionProtect Outdoor to the hub, simply scan the QR code with your smartphone camera. Thanks to the SmartBracket mounting plate, the device can be installed without disassembling the case. Use the Ajax app to test and configure the detector.
At the same time, installing outdoor detectors is a professional task. This requires assessing the landscape, understanding potential intrusion points, and anticipating potential disruptions. To ensure that MotionProtect Outdoor works effectively and to avoid false alarms, please contact a qualified engineer
Classification: Electro-optical radio channel security detector
Installation method: Outdoor/indoor
Recommended installation height: 0.8 - 1.3 m
Compatibility: Works with all Ajax hubs and range extenders
Operating temperature range: From -25°С to +60°С
Protection class: IP55
Sizes:183 × 70 × 65 mm
Weight: 322 g
Warranty:Replacement and repair within 24 months from the date of sale.Batteries are not covered by warranty.
Available for pickup at
Out of stock at
Added to compare
Reached count_product-product limit
Added to compare
Reached count_product-product limit
{"id":41592061722807,"title":"Default Title","option1":"Default Title","option2":null,"option3":null,"sku":"367307588","requires_shipping":true,"taxable":true,"featured_image":null,"available":true,"name":"AJAX Wireless outdoor motion curtain type two-way detector DualCurtain Outdoor for installation on the facade of the house White color","public_title":null,"options":["Default Title"],"price":20999,"weight":0,"compare_at_price":26244,"inventory_management":"shopify","barcode":"4820246099233","requires_selling_plan":false,"selling_plan_allocations":[],"quantity_rule":{"min":1,"max":null,"increment":1}}
AJAX Wireless outdoor motion curtain type two-way detector DualCurtain Outdoor for installation on the facade of the house White color
SKU: 367307588
€209,99€262,44
Unit price
Ajax wireless two-way outdoor motion detector, suitable for installation on the front of the house. The detector protects the perimeter of your property. 15m detection on both sides, but can disable either zone in the Ajax app. Does not react to animals. Only works with one of the Ajax security control panels. The tamper will prevent the device from being removed unnoticed from the mount. And even if the detector is damaged, it will take less than a minute for the hub to detect the loss of communication and inform the central monitoring station and users of the problem.
The batteries last up to 4 years. Works only with Hub 2 and Hub 2 Plus.
Alarm transmission speed: 0.15s
Operating temperature: -25°C to +60°C
Protection class: IP54
Size: 174 × 123 × 88 mm
Weight: 615 g
Available for pickup at
Out of stock at
Added to compare
Reached count_product-product limit
Added to compare
Reached count_product-product limit
{"id":54702103888207,"title":"Default Title","option1":"Default Title","option2":null,"option3":null,"sku":"367309046","requires_shipping":true,"taxable":true,"featured_image":null,"available":true,"name":"AJAX WATERSTOP cordless electric 1\/2\" water valve, White, IP56","public_title":null,"options":["Default Title"],"price":21497,"weight":0,"compare_at_price":27417,"inventory_management":"shopify","barcode":null,"requires_selling_plan":false,"selling_plan_allocations":[],"quantity_rule":{"min":1,"max":null,"increment":1}}
AJAX WATERSTOP cordless electric 1/2" water valve, White, IP56
SKU: 367309046
€214,97€274,17
Unit price
Description No problem WaterStop allows remote shut-off of water on site with the Ajax security system. The device combines a high-quality valve and a powerful electrical actuator with a control unit connected to an Ajax hub via the Jeweller encrypted radio protocol. You can control the WaterStop from anywhere in the world. Check the status of the device and change the valve position at any time - all you need is an internet connection and the Ajax app.
If LeaksProtect or a third-party leak detector is activated, the WaterStop will automatically shut off the water after 5 seconds. At the same time, all Ajax users and the security company receive notification of the alarm and scenario activation. In addition to the water leakage alarm scenario, it is possible to set the water to be switched off at a certain time or when the security system is switched on.
Wired IP surveillance camera with AI support, 110° viewing angle, infrared illumination (IR), True WDR, microphone and PoE/12V power supply. Suitable for both indoor and outdoor installations.
Models
8 Mp/2.8 mm
Resolution up to 3840 × 2160 px
Frame rate up to 20 FPS
Viewing angle 100°-110°
Video stream
Video protocol: JetSparrow (encrypted P2P protocol developed by Ajax Systems)
Memory:
NVR: HDD up to 16 TB (SATA, 3.5"), not included
microSD: up to 256 GB, V30 or faster, not included
Video codecs: H.265, H.264
Dynamic Range: True WDR
Communication channel
Ethernet: up to 100 Mbps
Key features
Motion detection (software level)
AI object detection: people, animals, vehicles
Intelligent IR illumination up to 50 m, automatic brightness adjustment
Visual verification of Ajax alarms (scenario configuration)
ONVIF support: Profile S, Profile T (partial)
Microphone with sound recording
Audio codecs: G711-ULAW, G711-ALAW, G726, G722
Power
Power supply: 12 V⎓ ± 20%, 1 A
Power consumption up to 15 W
Ethernet port: PoE Standard 802.3at/af
Protection against sabotage
mTLS - encrypted connection
Authentication via Cloud
Secure Boot - protection against firmware tampering
Digital signature verification for OTA updates
User and operator access rights distribution
Corpus
Dimensions: 103 × 98 × 98 mm
Weight: 496 g
Operating temperature: -30 °C ... +60 °C
Humidity: up to 90%
Protection class: IP65, IK08
Colours: black
Set
TurretCam (8 Mp/2.8 mm)
Mounting template
Mounting accessories kit
Quick Installation Guide
Available for pickup at
Out of stock at
Added to compare
Reached count_product-product limit
Added to compare
Reached count_product-product limit
{"id":55845245616463,"title":"Default Title","option1":"Default Title","option2":null,"option3":null,"sku":"367311718","requires_shipping":true,"taxable":true,"featured_image":null,"available":true,"name":"AJAX DomeCam Mini (8 Mp\/4 mm) (8EU) ASP black","public_title":null,"options":["Default Title"],"price":21641,"weight":0,"compare_at_price":27600,"inventory_management":"shopify","barcode":null,"requires_selling_plan":false,"selling_plan_allocations":[],"quantity_rule":{"min":1,"max":null,"increment":1}}
Wired IP surveillance camera with AI support, 110° viewing angle, infrared illumination (IR), HDR/True WDR, microphone and PoE/12V power supply. Suitable for both indoor and outdoor installations.
Models
8 Mp/4 mm
Resolution up to 3840 × 2160 px
Frame rate up to 20 FPS
Viewing angle 100°-110°
Video stream
Video protocol: JetSparrow (encrypted P2P protocol developed by Ajax Systems)
Memory:
NVR: HDD up to 16 TB (SATA, 3.5"), not included
microSD: up to 256 GB, V30 or faster, not included
Video codecs: H.265, H.264
Dynamic Range: HDR, WDR
Communication channel
Ethernet: up to 100 Mbps
Key features
Motion detection (software level)
AI object detection: people, animals, vehicles
Intelligent IR illumination up to 15 m, automatic brightness adjustment
Visual verification of Ajax alarms (scenario configuration)
ONVIF support: Profile S, Profile T (partial)
Microphone with sound recording
Audio codecs: G711-ULAW, G711-ALAW, G726, G722
Power
Power supply: 12 V⎓ ± 20%, 1 A
Power consumption up to 15 W
Ethernet port: PoE Standard 802.3at/af
Protection against sabotage
mTLS - encrypted connection
Authentication via Cloud
Secure Boot - protection against firmware tampering
Digital signature verification for OTA updates
User and operator access rights distribution
Corpus
Dimensions: 113 × 60 mm
Weight: 360 g
Operating temperature: -30 °C ... +60 °C
Humidity: up to 90%
Protection class: IP65
Colour: black
Set
DomeCam Mini (8 Mp/4 mm)
Mounting template
Mounting accessories kit
Quick Installation Guide
Available for pickup at
Out of stock at
Added to compare
Reached count_product-product limit
Added to compare
Reached count_product-product limit
{"id":55845077778767,"title":"Default Title","option1":"Default Title","option2":null,"option3":null,"sku":"367311717","requires_shipping":true,"taxable":true,"featured_image":null,"available":true,"name":"AJAX DomeCam Mini (8 Mp\/2.8 mm) (8EU) ASP white","public_title":null,"options":["Default Title"],"price":21641,"weight":0,"compare_at_price":27600,"inventory_management":"shopify","barcode":null,"requires_selling_plan":false,"selling_plan_allocations":[],"quantity_rule":{"min":1,"max":null,"increment":1}}
Wired IP surveillance camera with AI support, 110° viewing angle, infrared illumination (IR), HDR/True WDR, microphone and PoE/12V power supply. Suitable for both indoor and outdoor installations.
Models
8 Mp/2.8 mm
Resolution up to 3840 × 2160 px
Frame rate up to 20 FPS
Viewing angle 100°-110°
Video stream
Video protocol: JetSparrow (encrypted P2P protocol developed by Ajax Systems)
Memory:
NVR: HDD up to 16 TB (SATA, 3.5"), not included
microSD: up to 256 GB, V30 or faster, not included
Video codecs: H.265, H.264
Dynamic Range: HDR, WDR
Communication channel
Ethernet: up to 100 Mbps
Key features
Motion detection (software level)
AI object detection: people, animals, vehicles
Intelligent IR illumination up to 15 m, automatic brightness adjustment
Visual verification of Ajax alarms (scenario configuration)
ONVIF support: Profile S, Profile T (partial)
Microphone with sound recording
Audio codecs: G711-ULAW, G711-ALAW, G726, G722
Power
Power supply: 12 V⎓ ± 20%, 1 A
Power consumption up to 15 W
Ethernet port: PoE Standard 802.3at/af
Protection against sabotage
mTLS - encrypted connection
Authentication via Cloud
Secure Boot - protection against firmware tampering
Wired IP surveillance camera with AI support, 110° viewing angle, infrared illumination (IR), True WDR, microphone and PoE/12V power supply. Suitable for both indoor and outdoor installations.
Models
8 Mp/4 mm
Resolution up to 3840 × 2160 px
Frame rate up to 20 FPS
Viewing angle 100°-110°
Video stream
Video protocol: JetSparrow (encrypted P2P protocol developed by Ajax Systems)
Memory:
NVR: HDD up to 16 TB (SATA, 3.5"), not included
microSD: up to 256 GB, V30 or faster, not included
Video codecs: H.265, H.264
Dynamic Range: True WDR
Communication channel
Ethernet: up to 100 Mbps
Key features
Motion detection (software level)
AI object detection: people, animals, vehicles
Intelligent IR illumination up to 50 m, automatic brightness adjustment
Visual verification of Ajax alarms (scenario configuration)
ONVIF support: Profile S, Profile T (partial)
Microphone with sound recording
Audio codecs: G711-ULAW, G711-ALAW, G726, G722
Power
Power supply: 12 V⎓ ± 20%, 1 A
Power consumption up to 15 W
Ethernet port: PoE Standard 802.3at/af
Protection against sabotage
mTLS - encrypted connection
Authentication via Cloud
Secure Boot - protection against firmware tampering
Wired IP surveillance camera with AI support, 110° viewing angle, infrared illumination (IR), True WDR, microphone and PoE/12V power supply. Suitable for both indoor and outdoor installations.
Models
8 Mp/4 mm
Resolution up to 3840 × 2160 px
Frame rate up to 20 FPS
Viewing angle 100°-110°
Video stream
Video protocol: JetSparrow (encrypted P2P protocol developed by Ajax Systems)
Memory:
NVR: HDD up to 16 TB (SATA, 3.5"), not included
microSD: up to 256 GB, V30 or faster, not included
Video codecs: H.265, H.264
Dynamic Range: True WDR
Communication channel
Ethernet: up to 100 Mbps
Key features
Motion detection (software level)
AI object detection: people, animals, vehicles
Intelligent IR illumination up to 50 m, automatic brightness adjustment
Visual verification of Ajax alarms (scenario configuration)
ONVIF support: Profile S, Profile T (partial)
Microphone with sound recording
Audio codecs: G711-ULAW, G711-ALAW, G726, G722
Power
Power supply: 12 V⎓ ± 20%, 1 A
Power consumption up to 15 W
Ethernet port: PoE Standard 802.3at/af
Protection against sabotage
mTLS - encrypted connection
Authentication via Cloud
Secure Boot - protection against firmware tampering
Wired IP surveillance camera with AI support, 110° viewing angle, infrared illumination (IR), True WDR, microphone and PoE/12V power supply. Suitable for both indoor and outdoor installations.
Models
8 Mp/2.8 mm
Resolution up to 3840 × 2160 px
Frame rate up to 20 FPS
Viewing angle 100°-110°
Video stream
Video protocol: JetSparrow (encrypted P2P protocol developed by Ajax Systems)
Memory:
NVR: HDD up to 16 TB (SATA, 3.5"), not included
microSD: up to 256 GB, V30 or faster, not included
Video codecs: H.265, H.264
Dynamic Range: True WDR
Communication channel
Ethernet: up to 100 Mbps
Key features
Motion detection (software level)
AI object detection: people, animals, vehicles
Intelligent IR illumination up to 50 m, automatic brightness adjustment
Visual verification of Ajax alarms (scenario configuration)
ONVIF support: Profile S, Profile T (partial)
Microphone with sound recording
Audio codecs: G711-ULAW, G711-ALAW, G726, G722
Power
Power supply: 12 V⎓ ± 20%, 1 A
Power consumption up to 15 W
Ethernet port: PoE Standard 802.3at/af
Protection against sabotage
mTLS - encrypted connection
Authentication via Cloud
Secure Boot - protection against firmware tampering
Digital signature verification for OTA updates
User and operator access rights distribution
Corpus
Dimensions: 198 × 76 × 76 mm
Weight: 550 g
Operating temperature: -30 °C ... +60 °C
Humidity: up to 90%
Protection class: IP65
Colour: white
Set
BulletCam (8 Mp/2.8 mm)
Mounting template
Mounting accessories kit
Quick Installation Guide
Available for pickup at
Out of stock at
Added to compare
Reached count_product-product limit
Added to compare
Reached count_product-product limit
{"id":41613546258615,"title":"Default Title","option1":"Default Title","option2":null,"option3":null,"sku":"367304835","requires_shipping":true,"taxable":true,"featured_image":null,"available":true,"name":"AJAX Security Central Hub 2 with detector monitoring function, sending alarm signals and connecting photo verification detectors Black color","public_title":null,"options":["Default Title"],"price":22341,"weight":0,"compare_at_price":28494,"inventory_management":"shopify","barcode":"856963007767","requires_selling_plan":false,"selling_plan_allocations":[],"quantity_rule":{"min":1,"max":null,"increment":1}}
AJAX Security Central Hub 2 with detector monitoring function, sending alarm signals and connecting photo verification detectors Black color
SKU: 367304835
(1)
€223,41€284,94
Unit price
AJAX Security Control Panel Hub 2, which manages all connected Ajax devices in your system to notify the user of alarms in case of doors/windows opening, fire or flood threats.
Currently only available in black.
Remote system control.
If the power goes out, the control panel will continue to work for 16 hours.
Possibility to connect MotionCam or MotionCam Outdoor detectors that support photo verification from the scene, sending a series of images to the system user.
The reliability and stability ofHub 2 guarantees timely alarm transmission to the security company, if the system is connected to a control panel, and to the users.
The Hub can use 3 modes of communication simultaneously - Ethernet and 2 SIM cards 2G.
100 devices and 50 users can be connected.
Hub 2 allows 32 scenarios to be created and reduces the impact of the human factor on security. Can arm and disarm a site or area on a schedule. Activate the smoke machine immediately if someone enters the premises. Darken rooms and switch on emergency lighting in case of fire. Or shut off the water in case of a leak.
If anything happens to Hub 2, the security company and users will be informed. No one can disarm the Hub unnoticed, even if the equipment is disarmed. If an intruder tries to dismantle the unit, this will immediately trigger an alarm. The Ajax Cloud server can notify a loss of connection to the control panel within 60 seconds. Even if the building is de-energised, the control panel will protect the site for up to 16 hours thanks to a built-in backup battery.
Maximum number of video cameras that can be connected: 25
If MotionCam detector with photo verification is connected, a photo of the event is sent within 9 seconds
Photo resolution: 640×480
Supports communication with security companies using Sur-Gard (Contact ID), SIA (DC-09), proprietary protocols. You can connect to the security panel in the Ajax app by selecting the security company.
OS Malevich
Power supply: 110-240 V, 50/60 Hz
Power consumption: up to 10 W
Backup battery: 2 Ah lithium (up to 16 hours)
Learn more about Jeweller
Auto-regulated radio signal power: ≤ 20 mW
Blocking encryption based on the AES algorithm
Operating temperature: -10°C to +40°C
Size: 163 × 163 × 36 mm
Weight: 362 g
Installation instructions are available in the Ajax app, which will open when you scan the detector's QR code during installation. Simple installation and connection to the Ajax Hub.
Available for pickup at
Out of stock at
Added to compare
Reached count_product-product limit
Added to compare
Reached count_product-product limit
{"id":55853459145039,"title":"Default Title","option1":"Default Title","option2":null,"option3":null,"sku":"367309045","requires_shipping":true,"taxable":true,"featured_image":null,"available":true,"name":"Ajax LifeQuality (8EU), Ajax LifeQuality - smart indoor air sensor that measures CO₂, temperature and humidity,White","public_title":null,"options":["Default Title"],"price":22660,"weight":0,"compare_at_price":28900,"inventory_management":"shopify","barcode":null,"requires_selling_plan":false,"selling_plan_allocations":[],"quantity_rule":{"min":1,"max":null,"increment":1}}
Ajax LifeQuality (8EU), Ajax LifeQuality - smart indoor air sensor that measures CO₂, temperature and humidity,White
SKU: 367309045
€226,60€289,00
Unit price
LifeQuality Jeweller User manual
LifeQuality Jewelleris a wireless air quality detector. Measures temperature, humidity, andCO2(carbon dioxide) concentration in the room. Reports air pollution using an LED indicator and notifications in Ajax apps, enables automation scenarios.
A hub is required for the detector to operate. The list of compatible hubs and range extenders isavailable here.
LifeQuality operates as part of the Ajax system, communicating with the hub over two secure radio protocols:Jewellerand Wings: the detector uses Jeweller to transmit measurements, while Wings transmits data backups. The hub communication range is up to 1,700 meters without obstacles.
LED indicator with a touch button. Reports the air quality and other detector events.
SmartBracket mounting panel. To remove the panel, turn it counterclockwise.
Power button.
Device QR code and ID (serial number). It is used to connect the device to Ajax system.
Operating principle
LifeQuality Jewelleris a wireless air quality detector. The detector monitors the temperature, humidity, andCO2(carbon dioxide) concentration, measuring them once a minute.
LifeQuality measurements are available in Ajax apps in theDevices tab. APRO or a user with system configuration rightscan set up comfort thresholds of temperature, humidity, andCO2(carbon dioxide) concentration. When values go beyond the specified limits, hub users receive notifications pointing out which indicator is outside the norm. This allows you to create an optimal microclimate in the room, reacting in time to the detector measurements.
Ajax automation devicesrespond to changes in LifeQuality indicators and perform user-defined actions usingautomation scenarios. For example,WallSwitchturns on the heating system when the specified minimum temperature is reached. Using LifeQuality with Ajax automation devices, supply systems, humidifiers, and air conditioning, it's easy to maintain a comfortable microclimate inside.
Temperature and humidity sensor
Temperature and humidity are measured using a built-in combined SHT40 detector with digital sensors from the Swiss manufacturer Sensirion. The detector is installed in an isolated part of the main board. This excludes the influence of other board components and ensures measurement accuracy: the temperature measurement accuracy is ±0.2°C, and humidity is ±1.8%.
LifeQuality provides more accurate temperature measurements than other Ajax devices. Therefore, if the system includes LifeQuality, theRooms tab in Ajax apps displays only the temperature measured by LifeQuality. The temperature measurements of other devices are ignored. Microclimate measurements will only consider data from other LifeQuality devices added to the room.
CO2sensor
CO2concentration is measured using a built-in Sunrise non-dispersive infrared (NDIR) detector from the Swedish manufacturer Senseair. This detector type is protected from measurement errors that may occur due to aerosols, perfumes or vapour of other substances.
The operating principle of the detector is based on detecting changes in the intensity of infrared radiation. Air naturally enters the detector chamber, through which the infrared lamp transmits radiation. The chamber walls allow the infrared beam to reflect and migrate to the infrared sensor, which absorbs radiation. With a special coating technology inside the chamber, the measurement accuracy is ± (30 + 3%) ppm.
In the migration process through the chamber, the radiation intensity changes due to the absorption of radiation part by carbon dioxide molecules. When the radiation reaches the endpoint and is absorbed by the infrared sensor, the detector accurately detectsCO2concentration in the air.
Data storage
The detector measures temperature, humidity level andCO2concentration once every minute. In Ajax apps, users can view current LifeQuality measurements and their history. The history of measurements is presented by charts. Charts show the trend of the selected air quality value over the last hour, day, week, month, or year. The Ajax system stores this data on the Ajax Cloud server for up to 2 years.
LifeQuality also has built-in memory that allows the detector to store measurements for up to 72 hours if communication with the hub or radio signal range extender is lost. As soon as the connection is restored, all values are sent to Ajax apps and synchronized with the charts.
LifeQuality features automatic calibration of theCO2sensor. This feature allows the sensor continuously transmit the most accurate measurements of the carbon dioxide concentration in the room. At the same time, the temperature and humidity sensor is calibrated at the production stage and does not require additional calibration.
The built-inCO2sensor is calibrated at the production stage and automatically every 15 days without user or installer interaction. The automatic calibration mode is effective for ventilated rooms whereCO2concentration is reduced to 400 ppm at least once every 15 days. If the detector is used in an unventilated space, we recommend calibrating it manually once a year. You can run the calibration manually in Ajax apps.
TheCO2sensor calibration cannot be reset to the production or previous version. It takes effect as soon as the calibration process is completed. If it is interrupted, the device retains the result of the previous calibration.
Jeweller and Wings data transfer protocols
Jewellerand Wingsare two-way wireless protocols for fast and reliable two-sided connection between the hub and connected devices. Jeweller technology is used to transmit events and measured values. If connection is lost, Wings allows you to send data backups from the detector to the hub when connection is restored.
The protocols support floating key block encryption and device recognition on every session to prevent sabotage and spoofing.
To monitor connection with system devices and display their statuses Ajax apps have a system of hub-detector polls with a frequency of 12 to 300 seconds. The polling frequency is set by aPRO or a user with system setup rightsin the hub settings.
The Ajax system can transmit events and alarms to thePRO Desktopmonitoring app as well as the Central Monitoring Station (CMS) viaSurGard (Contact ID), SIA DC-09 (ADM-CID), ADEMCO 685, and other protocols. The list of supported protocols isavailable here.
Only communication loss events between LifeQuality and the hub (or the radio signal range extender) are transmitted to the CMS. Use PRO Desktop to receive all smart air quality detector events.
Addressability of Ajax devices allows you to send not only events but also the type of the device, the name, virtual room, and security group assigned to it to the PRO Desktop and to the CMS. The list of transmitted parameters may differ depending on the type of the CMS and the selected communication protocol.
The ID and detector loop (zone) number are available in the detectorStates.
LifeQuality should be within the coverage area of the hub radio network. To operate via aradio signal range extenderReX 2, connect LifeQuality to the hub first. Then connect the detector to the range extender in its settings.
Note that LifeQuality does not work with the ReX radio signal range extender.
If the maximum number of devices is added to the hub, you will be notified about exceeding the hub limit. The number of devices connected to the hub depends on thehub model.
Turn on LifeQuality by holding the power button for 3 seconds. The hub connection request is sent only if the detector is enabled. If the detector fails to connect to the hub, try again in 5 seconds.
The detector cannot connect to the hub if they operate on different radio frequencies. The radio frequency range of the device may vary by region. Please contacttechnical supportfor information on the operating frequency range of your devices.
Once connected, LifeQuality will appear in the device list in the Ajax app. Device status update depends on the polling interval set in theJewellerorJeweller/Fibrasettings. The default value is 36 seconds.
When connected to a new hub, the detector stops transmitting data to the old hub. Once added to a new hub, LifeQuality is not removed from the list of devices of the old hub. This must be done manually in Ajax apps.
Indication
LifeQuality LED indication can report detector's status as well as air quality with a backlight.
LED indication
Event
Notes
Lights up slowly and goes out slowly after tapping on the device LED.
Level of the selected parameter display: temperature, humidity, theCO2level, worsening of any indicator.
The colour of the device LED depends on the value of the selected parameter.
When temperature, humidity level, or worsening of any indicator is selected:
Green- the selected parameter is within acceptable values.
Yellow- the selected parameter goes beyond acceptable values.
When theCO2(carbon dioxide) concentration in the air is selected:
Red- 1400-1999 ppm (adverse health effects expected by prolonged exposure).
Purple- more than 2000 ppm (increased risks for health expected by prolonged exposure).
The sensor logo briefly lights up if theBlink on abnormal valuesoption is enabled in thesettings.
Lights up green for 1 second.
Turning the detector on.
Lights up red, then blinks three times.
Turning the detector off.
Lights up red.
Pressing the power button when the detector is on.
Appears only while the power button is pressed. If the button is pressed for more than 2 seconds, the detector briefly lights up three times and turns off.
Blinks red six times then blinks three more times but quicker.
The detector has been removed from the hub.
Lights up when the detector receives information that it has been removed from the hub.
Lights up green for 1 second. Blinks red six times then blinks three more times but quicker.
Turning on a detector not added to the hub.
Lights up red slowly three times.
Battery is low.
Lights up after tapping on the device LED.
Slowly lights up blue with an interval of 6 seconds.
Calibration of theCO2(carbon dioxide) sensor.
Calibration takes up to 20 minutes.
Lights up red for 1 second.
Accelerometer is triggered, the detector is displaced.
Functionality testing
The Ajax system provides several tests for choosing the installation place with a stable signal for the devices.Jewellerand Wingssignal strength testsare available for LifeQuality. The tests determine the strength and stability of the signal at the intended location of the device.
To run a test in the Ajax app:
Select the hub if you have several of them or if you are using thePRO app.
Go to theDevices tab.
SelectLifeQuality.
Go to the settings by clicking on the gear icon .
Select the test.
Perform the test following the tips in the app.
Tests do not start immediately, but not later than over a single hub-device ping interval (36 seconds by default). You can change the device ping interval in theJeweller(orJeweller/Fibra) menu in the hub settings.
Icons
Icons show some of the LifeQuality states as well as measured air quality indicators. You can view them in Ajax apps in theDevices tab.
State icons
Icon
Value
Jeweller signal strength between LifeQuality and the hub (or range extender). The recommended value is two or three bars.
Air temperature in the room where LifeQuality is installed. Measured in Celsius or Fahrenheit depending on the app settings.
In the normal state, the text is colored black. The text changes color to yellow when the temperature is outside the comfort limits set in the settings.
Humidity level in the room where LifeQuality is installed. Measured in percentages.
In the normal state, the text is colored black. The text changes color to yellow when the humidity is outside the comfort limits set in the settings.
Level ofCO2(carbon dioxide) concentration in the room where LifeQuality is installed. Measured in ppm (parts per million).
The colour of the text depends on the concentration:
Up to 350 ppm - gray (theCO2sensor calibration is required).
1400-1999 ppm - red (adverse health effects expected by prolonged exposure).
More than 2000 ppm - purple (increased risks for health expected by prolonged exposure).
Jeweller Signal Strength
Signal strength between LifeQuality and the hub or radio signal range extender via Jeweller. The recommended value is two or three bars.
Jeweller is a protocol for transmitting LifeQuality events and alarms.
Connection via Jeweller
Connection status between LifeQuality and the hub or range extender via Jeweller:
Online- the detector is connected to the hub or range extender. Normal state.
Offline- no connection between the detector and hub (or range extender). Check the detector connection.
Wings Signal Strength
Signal strength between LifeQuality and the hub or the range extender via the Wings channel. The recommended value is two or three bars.
Wings is a protocol for transmitting LifeQuality backup data.
Connection via Wings
Connection status between LifeQuality and the hub or the range extender via Wings:
Online- the detector is connected to the hub or the range extender. Normal state.
Offline- no connection between the detector and the hub or the range extender. Check the detector connection.
Battery Charge
The battery charge level of the device:
OK- batteries have sufficient charge. Normal state.
Battery low- batteries are discharged. We recommend replacing the batteries with new ones.
When the charge level is low, the Ajax apps and the security company receive a related notification.
After receiving the low battery notification, the detector can operate for several months more under normal conditions. However, we recommend replacing the batteries immediately upon notification.
LifeQuality ID (serial number). It is also located on the enclosure under the QR code and the device packaging.
Device No.
LifeQuality loop (zone) number. Events are sent to the monitoring station with this number.
Settings
To change LifeQuality settings in the Ajax app:
Open the Ajax app.
Select the hub if you have several of them or if you are using thePRO app.
Go to theDevices tab.
Select LifeQuality from the list.
Go toSettingsby clicking on the gear icon .
Set the required settings.
ClickBackto save the new settings.
Settings
Value
Name
Detector name. Displayed in the list of hub devices, SMS text, and notifications in the events feed.
To change the name, click on the text field. The name can contain up to 12 Cyrillic characters or up to 24 Latin characters.
Room
The virtual room to which LifeQuality is assigned.
To change the room, click on the field.
The room name is displayed in the text of SMS and notifications in the events feed.
Air monitor settings
Temperature
The settings of the lower and upper limits of a comfortable temperature. If the temperature goes beyond these limits, users will receive notifications.
The temperature can be set within the range between 0°C and +50°C.
Humidity
The settings of the lower and upper limits of a comfortable humidity level. If the humidity goes beyond these limits, users will receive notifications.
Humidity can be set within the range from 0% to 100%.
CO2level
The settings of the lower and upper limits of a comfortable carbon dioxide concentration in the air. If the concentration goes beyond these limits, users will receive notifications.
The concentration ofCO2can be set within the range from 400 ppm to 2500 ppm.
Notifications
Notifications that users receive from LifeQuality:
When the device is moved- if enabled, users will receive a notification once the device is moved or detached from the mounting panel.
Temperature- if enabled, users will receive a notification once the temperature value goes beyond the specified limits.
Humidity- if enabled, users will receive notifications once the humidity value goes beyond the specified limits.
CO2level- if enabled, users will receive notifications once the carbon dioxide concentration goes beyond the specified limits.
Sensitivity
The settings of the threshold of sensitivity for device sensors and the period of time after which users will be notified about worsening of air quality:
Temperature- if enabled, users can set the acceptable fluctuation from 0.1°C to 10°C.
Humidity- if enabled, users can set the acceptable fluctuation from 0.1% to 10%.
CO2level- if enabled, users can set the acceptable fluctuation from 5 to 250 ppm.
LED Indication
The settings of the parameter which will be indicated after tapping on the device LED:
Temperature.
Humidity.
CO2level.
Worsening of any indicator.
If the toggleBlink on abnormal valuesis enabled, the device will flash with its LED once the selected parameter goes beyond acceptable values specified in device settings.
Enabling the option affects the battery life of the device.
Scenarios
The menu for setting up automation scenarios by temperature, humidity, andCO2level.
Switches the device to the Jeweller signal strength test mode.
The test helps to check the signal strength between the device and the hub or range extender to determine the optimal installation place for LifeQuality.
Switches the device to the Wings signal strength test mode.
The test helps to check the signal strength between the device and the hub or the range extender to determine the optimal installation place for LifeQuality.
Starts manual calibration of the carbon dioxide sensor. Calibration is required if the detector is installed in an unventilated area. In these conditions it should be manually calibrated once a year.
Unpairs LifeQuality from the hub and deletes its settings.
How to set up scenarios
Open the Ajax app.
Select the hub if you have several of them or if you are using thePRO app.
Go to theDevices tab.
Select LifeQuality from the list.
Go toSettingsby clicking on the gear icon .
Go to theScenariosmenu.
Choose one of the indicators:
Temperature
Humidity
CO2
Specify the value of the parameters:
Higher ThanorLower Thanto define the event that runs the scenario.
To create a scenario for both options, you should create two different scenarios, one forHigher Thanand another forLower Than.
The value upon which the scenario is triggered.
Values set as comfort limits in the LifeQuality settings are selected by default. You can change them for the scenario. It will not affect the notification settings upon exceeding the comfort limits.
ClickNext.
Select the necessary automation devices that should trigger when the measurements goes beyond the specified in the scenario limit.
Specify:
Name of the scenario
Action of the automation device
ClickSave.
If the device is offline, it will not execute the scenario as it misses the scenario trigger (e.g., during a power outage or when the connection between the hub and device is lost).
Use case: The automated action is scheduled for 10 a.m., so it must start at 10 a.m. The electrical power goes out at 9:55 a.m. and is restored ten minutes later. The automation scenario won't start at 10 a.m. and will not start immediately after the power is back on. This scheduled action is missed.
Charts are available with firmware version from OS Malevich 2.15 and in apps of the following versions and higher:
Ajax Security System 2.23.1 for iOS
Ajax Security System 2.26.1 for Android
Ajax PRO: Tool for Engineers 1.17.1 for iOS
Ajax PRO: Tool for Engineers 1.17.1 for Android
Ajax PRO Desktop 3.6.1 for macOS
Ajax PRO Desktop 3.6.1 for Windows
Open the Ajax app.
Select the hub if you have several of them or if you are using thePRO app.
Go to theDevices tab.
SelectLifeQuality.
Select an indicator:
Temperature
Humidity
CO2
Select an interval:
Hour
Day
Week
Month
Year
You can also switch between detector measurements inside the screen. To do this, select the indicator in the menu above.
To view the values of measurements for the specified period, click on the corresponding column of the chart.
Charts may have gaps if at that time the connection between LifeQuality and the hub was lost for more than 72 hours or LifeQuality was disabled.
How to startCO2sensor calibration manually
Locate the detector outdoors and leave it for 10-15 minutes before starting the calibration. For example, take it outside or leave it by an open window. TheCO2sensor is calibrated at the operating temperature of 0°C to +50°C.
To start calibration:
Open the Ajax app.
Select the hub if you have several of them or if you are using thePRO app.
Go to theDevices tab.
Select LifeQuality from the list.
Go toSettingsby clicking on the gear icon .
Go toСО2Sensor Calibrationmenu.
ClickStartand wait for the calibration to finish.
TheCO2sensor is calibrated for up to 20 minutes. After clicking theStartbutton, the timer in the app will start the countdown. Calibration ends automatically after the countdown is completed - return LifeQuality to the selected installation place.
Selecting the installation place
The device is for indoor use only.
LifeQuality can be mounted on a vertical surface using an included installation kit. The device can also be placed on a horizontal surface without mounting. We recommend mounting the device on a vertical surface or on a ceiling. It will prevent the device from being displaced or accidentally dropped.
We recommend installing the detector at the height of a human airway. For example, locate it in the office at the sitting person's head level or in the bedroom next to the bedhead. LifeQuality installs in every room in areas that are expected to be crowded. One detector operates effectively in one room, regardless of its size.
When choosing the location of the detector, consider the parameters that affect its operation:
Jeweller signal strength.
Wings signal strength.
Distance between the detector and the hub.
Presence of barriers for radio signal passage between devices: walls, interfloor ceilings, large objects located in the room.
Consider the placement recommendations when designing your Ajax system for the object. The security system must be designed and installed by specialists. The list of recommended Ajax partners isavailable here.
Signal strength
The Jeweller/Wings signal strength is determined by the ratio of the number of undelivered or corrupted data packets to expected ones that are exchanged between the hub and the detector within a certain period of time. Signal strength is indicated by the icon on theDevices tab:
Three bars- excellent signal strength.
Two bars- good signal strength.
One bar- low signal strength; stable operation is not guaranteed.
Crossed out icon- no signal; stable operation is not guaranteed.
Check the Jeweller and Wings signals strength at the installation place. We cannot guarantee stable operation if the signal strength is as low as one or zero bars. In this case, move the device. Repositioning even by 20 cm can significantly improve signal reception.
If the detector still has a low or unstable signal after it was moved, useReX 2.
LifeQuality is not compatible withReX. The list of compatible range extenders isavailable here.
Do not install the detector
Outdoors. This could damage the detector.
In places with fast air circulation. For example, near fans, open windows, or doors. This can lead to incorrect measurements.
Opposite any objects with rapidly changing temperature. For example, near electric and gas heaters. This can lead to incorrect temperature measurements.
In places where the detector has low or unstable signal strength. This can lead to a connection loss between the detector and the hub or radio signal range extender.
Inside premises with temperature and humidity outside the device's operation limits. This could damage the detector.
In closed botanic gardens, greenhouses, and rooms with a large number of plants. The detector is not suitable for operation in such conditions.
Installation
Remove the SmartBracket mounting panel from the detector. To remove the panel, turn it counterclockwise.
Fix the SmartBracket panel to a vertical surface using double-sided adhesive tape or other temporary fastener. The mounting panel has an UP sign, which indicates the correct position of the panel.
Use double-sided adhesive tape for temporary fixation only. The device fixed permanently with adhesive tape can peel off the surface at any time, leading to damage if the device is dropped.
Run theJewellerand Wingssignal strength tests. The recommended value is two or three bars.
If the signal strength is a single bar or lower, we cannot guarantee the stable operation of the system. Move the device as repositioning even by 20 cm can significantly improve the signal reception. If low or unstable signal strength is still reported after relocation, use theReX 2radio signal range extender.
Remove the detector from the mount.
Fasten the SmartBracket panel with bundled screws using all fixation points. If using other fasteners, ensure they do not damage or deform the mounting panel.
Place the detector on the SmartBracket mounting panel.
Malfunctions
If malfunction is detected (for example, there is no connection with the hub or range extender), the Ajax app displays a malfunction counter in the device field.
Malfunctions are displayed in the detectorStates. Fields with malfunctions are highlighted in red.
The device can report malfunctions to the monitoring station of the security company, as well as to users through push notifications and SMS.
LifeQuality malfunctions
CO2sensor calibration is required.
No connection to the hub or radio signal range extender.
The detector registered the fault of one or several built-in sensors.
The battery charge level is low.
Maintenance
Regularly check the functioning of the detector. The optimal frequency of check-ups is once every three months. Clean the enclosure from dust, cobwebs, and other contaminants as they emerge. Use a soft dry cloth suitable for equipment care. Do not use substances that contain alcohol, acetone, gasoline, and other active solvents to clean the device.
{"id":57835080286543,"title":"Default Title","option1":"Default Title","option2":null,"option3":null,"sku":"367314033","requires_shipping":true,"taxable":true,"featured_image":null,"available":true,"name":"Ajax TurretCam HL 8MP 2.8 mm IP Camera — 8 MP, 2.8 mm lens, black","public_title":null,"options":["Default Title"],"price":22999,"weight":0,"compare_at_price":null,"inventory_management":"shopify","barcode":null,"requires_selling_plan":false,"selling_plan_allocations":[],"quantity_rule":{"min":1,"max":null,"increment":1}}
Ajax TurretCam HL 8MP 2.8 mm IP Camera — 8 MP, 2.8 mm lens, black
SKU: 367314033
€229,99
Unit price
The TurretCam HL (8 MP/2.8 mm) is a wired IP surveillance camera with a 110° field of view, hybrid IR+LED lighting, TrueWDR, a built-in microphone, and support for PoE or 12 V power. The camera is suitable for indoor and outdoor use, providing AI-based recognition of people, vehicles, and animals, color recording in low light, and secure transmission via JetSparrow. The device integrates with the Ajax system and supports ONVIF and RTSP compatibility with third-party VMS. Note: The microSD card and NVR drives are sold separately.
The hybrid lighting system automatically switches between infrared and white light, providing a clear, colorful image at night and in low-light conditions, and the white light can also serve as a deterrent. The camera’s built-in AI reduces the number of false alarms and the amount of storage required by recording only significant events. Privacy zones and pixel motion detection allow you to exclude sensitive areas from view and activate recording only in specified zones. JetSparrow provides fast, encrypted P2P streaming, while mTLS authentication and Secure Boot enhance security. ONVIF and RTSP support make integration with existing video management systems simple.
Key Specifications
Image sensor: 8 MP CMOS
Lens: 2.8 mm; horizontal field of view: 100–110°
Maximum resolution: 3840 × 2160 (up to 20 FPS)
Video compression: H.265, H.264
Dynamic Range: True WDR
Lighting: Smart IR up to 50 m; white light up to 50 m
Motion Detection: Analysis of Pixel Movement in Software
Network: RJ45 Ethernet up to 100 Mb/s; JetSparrow protocol (encrypted P2P)
Local storage: microSD up to 256 GB (V30 or faster; not included)
NVR support: HDD up to 16 TB (3.5" SATA; not included)
Power supply: 8–14 V or PoE (802.3at/af); power consumption up to 8.5 W
Security: mTLS, cloud authentication, Secure Boot, OTA signature verification, user access control
Operating conditions: -30°C to +60°C; up to 90% humidity (non-condensing)
Protection class: IP65, IK08
Dimensions and weight: 103 × 98 × 98 mm; 475 g
Color: black
Warranty: 24 months
Install the camera indoors or outdoors using the included mount, and connect it to a power source via PoE or 12 V. Add the device to an Ajax room via the Ajax app, which guides you step by step through the setup process; registration is performed using mTLS with encrypted certificates. Set up privacy zones and a pixel detector so that recordings are made only in designated areas, and create scenarios where Ajax detectors trigger the camera to record for visual alarm verification. To integrate with third-party VMS or NVR systems, enable ONVIF/RTSP in the app and use the setup wizard to import network data. Video wall and archive search tools allow you to view live video, navigate to events by timestamp, and export clips.
Available for pickup at
Out of stock at
Added to compare
Reached count_product-product limit
Added to compare
Reached count_product-product limit
{"id":58447102280015,"title":"Default Title","option1":"Default Title","option2":null,"option3":null,"sku":"367314237","requires_shipping":true,"taxable":true,"featured_image":null,"available":true,"name":"AJAX MotionCam (PhOD) Jeweller Wireless PIR Motion Detector with Camera and HDR Photo Verification, up to 12 m, white","public_title":null,"options":["Default Title"],"price":24006,"weight":0,"compare_at_price":24006,"inventory_management":"shopify","barcode":"4823114068713","requires_selling_plan":false,"selling_plan_allocations":[],"quantity_rule":{"min":1,"max":null,"increment":1}}
AJAX MotionCam (PhOD) Jeweller Wireless PIR Motion Detector with Camera and HDR Photo Verification, up to 12 m, white
SKU: 367314237
€240,06
Unit price
Description:
Motion Detection with Photo Verification
The AJAX MotionCam (PhOD) Jeweller is a wireless indoor PIR motion detector with a built-in camera. It not only detects motion but also allows you to visually verify an event by receiving images in the Ajax app. The PhOD ( Photo on Demand ) feature allows you to request a photo at any time, while the device also supports photo capture in the event of an alarm, scenario, or other system events.
HDR Images and Infrared Lighting
The built-in camera uses HDR technology, which helps produce more balanced and clearer images in various lighting conditions. The maximum photo resolution is 640 × 480 pixels, while the built-in infrared lighting allows for photo verification even in the dark or in low light.
Motion detection up to 12 m
The PIR sensor detects motion at a distance of up to 12 m, and the horizontal detection angle is approximately 88.5°. The SmartDetect algorithm analyzes the sensor signals and helps reduce the likelihood of false alarms.
Pet Ignore Feature
When the detector is properly installed and configured, it can ignore pets weighing up to 20 kg and standing up to 50 cm tall, thereby reducing the likelihood of false alarms in rooms where dogs or cats are present.
Jeweller and Wings Wireless Technologies
Jeweller radio communication technology ensures secure two-way communication with the Ajax control panel, while Wings technology is designed for transmitting photos. In open areas, the radio communication range between the device and the control panel can reach up to 1,700 m.
Long battery life
The detector is powered by 2 × CR123A 3 V batteries. Depending on the settings and use of the photo functions, battery life can be up to 4 years; active use of the on-demand photo function may reduce battery life.
Protection Against Sabotage
The device features tamper protection against opening the housing or removing it from its mount, device authentication, and mechanisms for detecting radio interference. This helps ensure secure operation within the Ajax security system.
Specifications:
Device type: wireless PIR motion detector with built-in camera Application: indoor use Motion detection range: up to 12 m Horizontal motion detection angle: 88.5° Vertical field of view: 80° Maximum image resolution: 640 × 480 pixels Image technology: HDR Night vision: infrared illumination Image verification: on alarm, on demand, by scenario Motion analysis: SmartDetect Pet immunity: up to 20 kg and up to 50 cm in height Wireless technologies: Jeweller, Wings Radio range: up to 1,700 m in open terrain Power supply: 2 × CR123A, 3 V batteries Battery life: up to 4 years Recommended installation height: 2.4 m Operating temperature: from -10 °C to +40 °C Permissible relative humidity: up to 75% Protection class: IP50 Dimensions: 135 × 70 × 60 mm Weight: approximately 170 g Color: white EAN: 4823114068713
Available for pickup at
Out of stock at
Added to compare
Reached count_product-product limit
Klientu Atbalsts
Vērsies pie mums ar savu jautājumu un mēs palīdzēsim
Piegāde visā Latvijā
Nodrošinām piegādes visā Latvijas teritorijā
Droši Maksājumi
Garantējam ērtus un drošus maksājumus
Choosing a selection results in a full page refresh.
Opens in a new window.
Ainejs Ancītis
Laipni
Laipni, operatīvi un precīzi.
KASTE 12 gab. x 12,15€ – 120cm 36W(4820Lm) LED CREE lineārais gaismeklis, V-TAC, IP65, neitrāli balta gaisma 4000K
Pēteris
Cena laba
Cena laba, pļāvējs vēl nav uzstādīts, jo tika nopirkts sezonas baigās, bet domāju ka problēmu nebūs!
Līdz 3000 m² – Mammotion LUBA 3 AWD 3000 pilnpiedziņas zāles pļāvējs robots bez perimetra vada
Anonīms
Esmu apmierināta ar piegādi un preci
Esmu apmierināta ar piegādi un preci.
Alcoscan Delta profesionālais alkometrs | elektroķīmiskais sensors, 0,00–5,00 ‰, sertificēts ISO 9001 / ISO 17020
Artis
Kvalitarīva prece ar ātru
Kvalitarīva prece ar ātru piegādi
AVAPOW T8MAX – auto starteris 6000 A | 12 V | benzīna un dīzeļdzinējiem, traktoriem un laivām | PD ātrā uzlāde
Janis SOMS
Ļoti(pagaidām)esmu apmierināts ar preci
Ļoti(pagaidām)esmu apmierināts ar preci,gan arī ar piegādi!