Cesvaines Street 15A, Riga
Mon–Fri 9:00 a.m.–6:00 p.m., Saturday 10:00 a.m.–3:00 p.m.
Search on Waze/Google Maps: LEDakcijas.lv
Cesvaines Street 15A, Riga
Mon–Fri 9:00 a.m.–6:00 p.m., Saturday 10:00 a.m.–3:00 p.m.
Search on Waze/Google Maps: LEDakcijas.lv
Cesvaines Street 15A, Riga
Mon–Fri 9:00 a.m.–6:00 p.m., Saturday 10:00 a.m.–3:00 p.m.
Search on Waze/Google Maps: LEDakcijas.lv
Cesvaines Street 15A, Riga
Mon–Fri 9:00 a.m.–6:00 p.m., Saturday 10:00 a.m.–3:00 p.m.
Search on Waze/Google Maps: LEDakcijas.lv
Cesvaines Street 15A, Riga
Mon–Fri 9:00 a.m.–6:00 p.m., Saturday 10:00 a.m.–3:00 p.m.
Search on Waze/Google Maps: LEDakcijas.lv
Cesvaines Street 15A, Riga
Mon–Fri 9:00 a.m.–6:00 p.m., Saturday 10:00 a.m.–3:00 p.m.
Search on Waze/Google Maps: LEDakcijas.lv
Welcome to Ledakcijas
Main menu
Your cart
-
LED apgaismojums tehnikai
-
Apgaismojums
-
Solārās sistēmas un enerģija
-
Videonovērošana un drošība
-
Autobraucējiem un tehnikai
-
Dārzam un pagalmam
-
Garāžai, servisam un instrumenti
-
Mājai, interjeram un sadzīvei
-
Mājdzīvnieku aprīkojums
-
Kabeļi, pagarinātāji, uzlāde
-
Kempings, atpūta un teltis
-
Sports, hobiji un spēles
-
Pārtikas un dzērienu iekārtas (HoReCa)
-
Industriālās iekārtas un lopkopība
Product Catalog
-
LED apgaismojums tehnikai
-
Apgaismojums
-
LED lentes un aksesuāri
-
Apkure, klimats un ūdens
-
Solārās sistēmas un enerģija
-
Dārza roboti un pļāvēji
-
Videonovērošana un drošība
-
Autobraucējiem un tehnikai
-
Dārzam un pagalmam
-
Garāžai, servisam un instrumenti
-
Mājai, interjeram un sadzīvei
-
Mājdzīvnieku aprīkojums
-
Elektronika un datorpreces
-
Kabeļi, pagarinātāji, uzlāde
-
Kempings, atpūta un teltis
-
Sports, hobiji un spēles
-
Pārtikas un dzērienu iekārtas (HoReCa)
-
Industriālās iekārtas un lopkopība
Choose your Location
-
Store
Free order pickup
We prepare orders for pickup within a few hours
15A Cesvaines Street, Riga, LV-1073
📞 +371 200 22 881
🕐
Monday–Friday: 9:00 a.m.–6:00 p. m.
Saturday: 10:00 a.m.–3:00 p.m.
Sunday: Closed
NVR ierakstītāji
14 products
14 products
Sort by:
- Featured
- Most relevant
- Best selling
- Alphabetically, A-Z
- Alphabetically, Z-A
- Price, low to high
- Price, high to low
- Date, old to new
- Date, new to old
€399,00
4 TB hard disk: N6MB01
Video/audio input
IP video input
PoE IP camera x 16
Audio input
Cameras with built-in microphone
Video/audio output
Video output
VGA, HDMI
Display resolution
- HDMI: 3840*2160, 1920*1080, 1280*1024, 1280*720, 1024*768
- VGA: 1920*1080, 1280*1024, 1280*720, 1024*768
Audio outputs
1-channel, RCA
HDD
SATA
2 x SATA interface (1 x 4 TB HDD included)
Capacity
Up to 12 TB (max. 6 TB capacity per HDD)
External HDD
No
NVR - Network Video Recorder
NVR is a network video recorder for home and office video surveillance. Ajax cameras and third party IP cameras can be connected to the device.
The user can view live and archived video in Ajax applications. The recorder saves the received video data on a hard disk (not included) with appropriate settings.
If no hard disk is installed, the NVR only serves to integrate third party IP cameras into the Ajax system.
⚡ Important: Only use HDDs with a power consumption of up to 7 W.
The NVR requires an internet connection to connect to the Ajax Cloud. The device connects to the network with an Ethernet cable.
Available versions
-
NVR (8-ch)
-
NVR (16-ch)
-
NVR DC (8-ch)
-
NVR DC (16-ch)
Main features
-
Compatible with Ajax cameras and third party IP cameras.
-
Video alarm verification.
-
Archive video viewing and downloading in the app.
-
Support for HD drives up to 16 TB (not included).
-
Secure connection to Ajax Cloud via Ethernet.
-
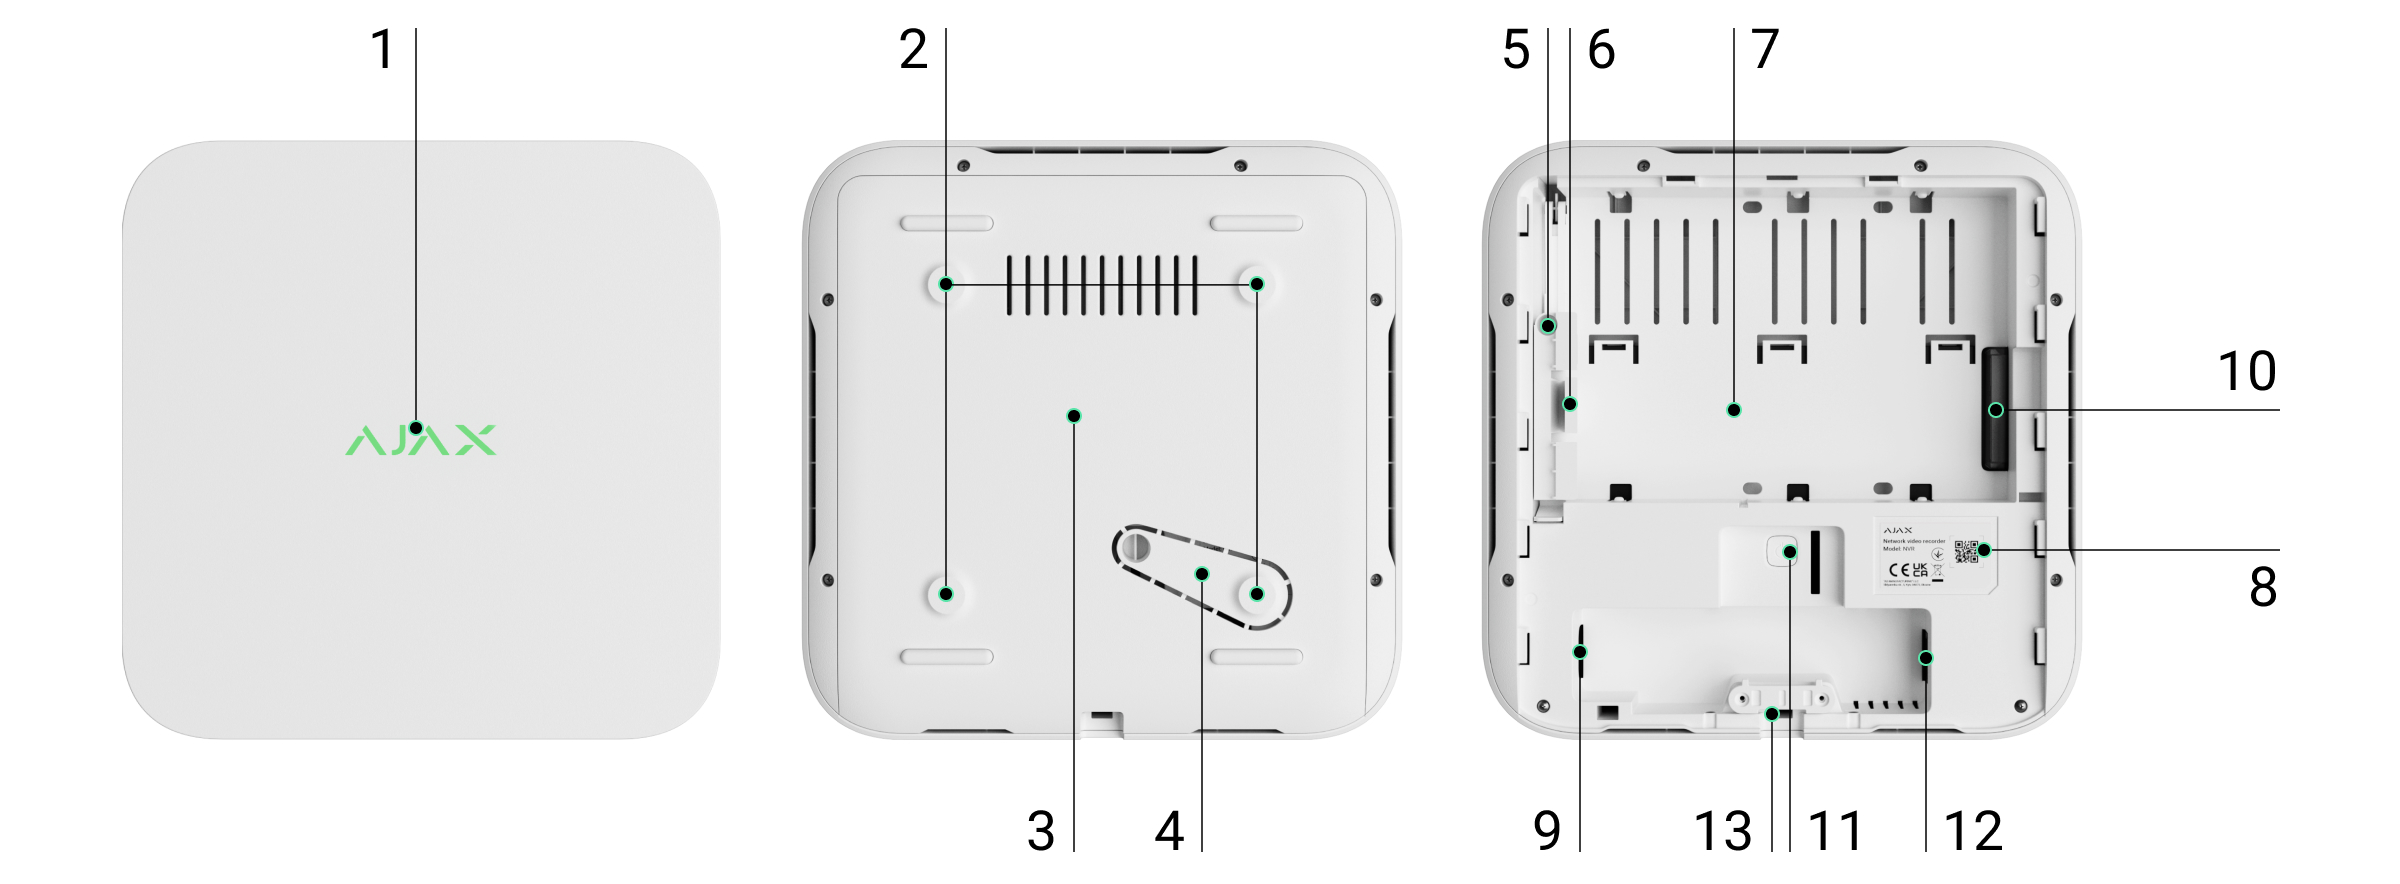
Functional elements
-
Logo with LED indicator - shows the status of the device.
-
Mounting holes - for securing the SmartBracket panel to a surface.
-
SmartBracket mounting panel - for easy and secure installation.
-
Perforated part on the mounting panel - do not break off! It provides a tamper that reacts to attempts to disconnect the device from the surface.
-
Hole for HDD lock screw - for secure HDD fixation.
-
HDD lock.
-
HDD mounting space - supports HDD up to 16 TB.
-
QR code with device ID - required to connect the NVR to the Ajax system.
-
Power connector.
-
HDD connector.
-
Parameter reset button.
-
Ethernet connector - for network connection.
-
Cable lock - for secure cable fixing.
Operating principle
The NVR is a video recorder designed to connect third party IP cameras (with ONVIF and RTSP protocols) and Ajax cameras.
-
Supports hard disk installation up to 16 TB (not included).
-
Can also operate without HDD, for integration with cameras only.
-
Users can use the Video Archive Calculator to calculate the required storage capacity and recording duration.
NVR capabilities:
-
Add and configure IP cameras (resolution, brightness, contrast, etc.).
-
View video in real time with the ability to zoom in.
-
View and export archive video by chronology or calendar (if HDD attached).
-
Choose the type of motion detection: in the camera or in the NVR itself.
-
Configure motion detection on the NVR: zones, sensitivity.
-
Use the Video Wall, which combines the images of all connected cameras.
-
Create video scenarios that send a short video to the Ajax app when the detector is activated.
⚡ From firmware version 2.244, all videos downloaded from the NVR have an Ajax digital signature to authenticate them. Use the Ajax Media Player application for verification.
Integration with VMS
The NVR can be connected to third party video management systems(Milestone, Genetec, Axxon, Digifort) via ONVIF protocol (from firmware version 2.289 ).
Configuration is possible via:
-
Ajax Security System (v3.25+),
-
Ajax PRO: Tool for Engineers (v2.25+),
-
Ajax PRO Desktop (v4.20+),
-
Ajax Desktop (v4.21+).
-
-
NVR installation site selection
It is recommended to choose an installation location where the NVR is hidden from prying eyes, e.g. in the pantry. This will help to reduce the risk of sabotage. Note that the device is intended for indoor installation only.
The device is manufactured in a compact housing with passive cooling. If the NVR is installed in an insufficiently ventilated room, the operating temperature of the memory disk may exceed the permissible limits. Select a solid, level horizontal or vertical surface for installation and do not cover the device with other objects.
Follow the placement recommendations when designing the Ajax system for the site. The safety system must be designed and installed by professionals. A list of authorised Ajax partners is available here.
Where NVRs must not be installed
Outdoors. This may cause damage to the NVR.
In rooms with temperature and humidity values that do not meet the operating parameters.
Installation
Installation of the NVR:
Remove the SmartBracket from the DVR by pulling down on the rear panel.
Attach the SmartBracket to a solid, flat surface with the supplied screws. Use at least two fixing points. Be sure to secure the case in the perforated area so that the tamper responds to disassembly attempts. -
Lift the hard disk latch by pressing the button.
When replacing the hard disk, wait 10 seconds after disconnecting the device from the power source. The hard disk contains fast-rotating disks. Sudden movements or shocks can damage the mechanism, causing physical damage and loss of data.
Do not move or rotate the NVR until the hard disk has stopped rotating.
- Install the hard disk in the NVR enclosure so that the connectors line up.
- Lower the hard disk latch.
- Secure the hard disk in the NVR enclosure with the supplied screw using the fixing point provided.
-
-
Connect the external power supply and Ethernet connection.
Connect the device to the system.
Insert the video recorder into the SmartBracket holder.The LED indicator turns yellow and turns green when connected to the Internet. If the connection to the Ajax Cloud server fails, the logo turns red.
Connecting to the system
Before connecting the device
Install the Ajax app.
Log in to your account or create a new one.
Select a room or create a new one.
Add at least one virtual room.
Make sure the room is disarmed.Only a PRO or room administrator with system configuration rights can add a device to a room.
Account types and rights
Adding a room
Open the Ajax application. Select the room you want to add the NVR to.
Go to the Devices tab and tap Add device.
Scan the QR code or enter it manually. The QR code is located on the back of the case under the SmartBracket mounting panel and on the packaging.
Give the device a name.
Select a virtual room.
Tap Add.
Make sure the NVR is powered on and has internet access. The LED logo should be green.
Tap Add.The added device will appear in the device list of the Ajax app.
The NVR only works with one room. To connect a NVR to a new room, it must be manually deleted from the previous room in the Ajax app.
Adding an IP camera to the NVR
The video device calculator can be used to calculate how many cameras and NVRs can be added to a room.
Adding an IP camera automatically:
Adding a third party IP camera manually:
Open the Ajax app. Select the room where the NVR is connected.
Go to the Devices tab.
Find the NVR in the list and tap Cameras.
Tap Add camera.
Wait until the network is scanned and the IP cameras connected to the local network are displayed.
Select a camera.
Enter the username and password (specified in the camera documentation) if the camera is a third party and tap Add.
If entered correctly, a video preview of the added camera will appear. In case of an error, check the correctness of the entered data and try again.
Make sure the video matches the connected camera. Tap Next.The IP camera connected to the video recorder will appear in the list of NVR cameras in the Ajax app.
Restore to factory settings
To restore the NVR to factory settings:
Turn off the device by disconnecting the power supply.
Press and hold the reset button.
Turn on the NVR while continuing to hold the reset button and wait for the LED to turn purple. This takes about 50 seconds.After switching on the NVR with the reset button held down, the LED indicator will turn yellow for 20 s. Then it goes off for 30 s and turns purple. This means that the NVR has been restored to factory settings.
Release the reset button.
Icons
The icons indicate some statuses of the device. They can be viewed in the Ajax app:
Select a space in the Ajax app.
Go to the Devices tab.
Find the NVR in the list.States
States displays information about the device and its operating parameters. They can be found in the Ajax app:
Select a room in the Ajax app.
Go to the Devices tab.
Locate the NVR in the list.Settings
To change the settings of the NVR in the Ajax app:
Go to the Devices tab.
Select NVR in the list.
Go to Settings by tapping the gear icon.
Set the required parameters.
Tap Back to save the settings.Indication
Event - Indication - Note
The NVR starts up when connected to power - Lights yellow. - If the NVR is connected to the Ajax Cloud, the indication changes to green.
The NVR is powered on and connected to the Internet. - Lights green.
The NVR is not connected to the Internet or is not connected to the Ajax Cloud server. - Lights red.NVR does not have a hard drive installed.
Hard drive is installed but not working properly (e.g. formatting errors or needs formatting). - Flashes green or red every second, depending on the connection status to the Ajax Cloud server. The indication will continue until one of the following conditions occurs:
Hard disk is formatted/installed.
All cameras connected to the NVR are configured not to write to the NVR hard disk.Maintenance
The device is maintenance free.
Technical specifications
Technical specifications NVR (8-ch)
Technical specifications NVR (16-ch)
Technical specifications NVR DC (8-ch)
Technical specifications NVR DC (16-ch)Compliance with standards
Warranty
Ajax Systems Manufacturing Limited Liability Company's product warranty is valid for 2 years after purchase.
If the device fails to operate properly, please contact Ajax Technical Support first. In most cases, technical problems can be solved remotely.
NVR - Network Video Recorder
NVR is a network video recorder for home and office video surveillance. Ajax cameras and third party IP cameras can be connected to the device.
The user can view live and archived video in Ajax applications. The recorder saves the received video data on a hard disk (not included) with appropriate settings.
If no hard disk is installed, the NVR only serves to integrate third party IP cameras into the Ajax system.
⚡ Important: Only use HDDs with a power consumption of up to 7 W.
The NVR requires an internet connection to connect to the Ajax Cloud. The device connects to the network with an Ethernet cable.
Available versions
-
NVR (8-ch)
-
NVR (16-ch)
-
NVR DC (8-ch)
-
NVR DC (16-ch)
Main features
-
Compatible with Ajax cameras and third party IP cameras.
-
Video alarm verification.
-
Archive video viewing and downloading in the app.
-
Support for HD drives up to 16 TB (not included).
-
Secure connection to Ajax Cloud via Ethernet.
-
Functional elements
-
Logo with LED indicator - shows the status of the device.
-
Mounting holes - for securing the SmartBracket panel to a surface.
-
SmartBracket mounting panel - for easy and secure installation.
-
Perforated part on the mounting panel - do not break off! It provides a tamper that reacts to attempts to disconnect the device from the surface.
-
Hole for HDD lock screw - for secure HDD fixation.
-
HDD lock.
-
HDD mounting space - supports HDD up to 16 TB.
-
QR code with device ID - required to connect the NVR to the Ajax system.
-
Power connector.
-
HDD connector.
-
Parameter reset button.
-
Ethernet connector - for network connection.
-
Cable lock - for secure cable fixing.
Operating principle
The NVR is a video recorder designed to connect third party IP cameras (with ONVIF and RTSP protocols) and Ajax cameras.
-
Supports hard disk installation up to 16 TB (not included).
-
Can also operate without HDD, for integration with cameras only.
-
Users can use the Video Archive Calculator to calculate the required storage capacity and recording duration.
NVR capabilities:
-
Add and configure IP cameras (resolution, brightness, contrast, etc.).
-
View video in real time with the ability to zoom in.
-
View and export archive video by chronology or calendar (if HDD attached).
-
Choose the type of motion detection: in the camera or in the NVR itself.
-
Configure motion detection on the NVR: zones, sensitivity.
-
Use the Video Wall, which combines the images of all connected cameras.
-
Create video scenarios that send a short video to the Ajax app when the detector is activated.
⚡ From firmware version 2.244, all videos downloaded from the NVR have an Ajax digital signature to authenticate them. Use the Ajax Media Player application for verification.
Integration with VMS
The NVR can be connected to third party video management systems(Milestone, Genetec, Axxon, Digifort) via ONVIF protocol (from firmware version 2.289 ).
Configuration is possible via:
-
Ajax Security System (v3.25+),
-
Ajax PRO: Tool for Engineers (v2.25+),
-
Ajax PRO Desktop (v4.20+),
-
Ajax Desktop (v4.21+).
-
-
NVR installation site selection
It is recommended to choose an installation location where the NVR is hidden from prying eyes, e.g. in the pantry. This will help to reduce the risk of sabotage. Note that the device is intended for indoor installation only.
The device is manufactured in a compact housing with passive cooling. If the NVR is installed in an insufficiently ventilated room, the operating temperature of the memory disk may exceed the permissible limits. Select a solid, level horizontal or vertical surface for installation and do not cover the device with other objects.
Follow the placement recommendations when designing the Ajax system for the site. The safety system must be designed and installed by professionals. A list of authorised Ajax partners is available here.
Where NVRs must not be installed
Outdoors. This may cause damage to the NVR.
In rooms with temperature and humidity values that do not meet the operating parameters.
Installation
Installation of the NVR:
Remove the SmartBracket from the DVR by pulling down on the rear panel.
Attach the SmartBracket to a solid, flat surface with the supplied screws. Use at least two fixing points. Be sure to secure the case in the perforated area so that the tamper responds to disassembly attempts. -
Lift the hard disk latch by pressing the button.
When replacing the hard disk, wait 10 seconds after disconnecting the device from the power source. The hard disk contains fast-rotating disks. Sudden movements or shocks can damage the mechanism, causing physical damage and loss of data.
Do not move or rotate the NVR until the hard disk has stopped rotating.
- Install the hard disk in the NVR enclosure so that the connectors line up.
- Lower the hard disk latch.
- Secure the hard disk in the NVR enclosure with the supplied screw using the fixing point provided.
-
-
Connect the external power supply and Ethernet connection.
Connect the device to the system.
Insert the video recorder into the SmartBracket holder.The LED indicator turns yellow and turns green when connected to the Internet. If the connection to the Ajax Cloud server fails, the logo turns red.
Connecting to the system
Before connecting the device
Install the Ajax app.
Log in to your account or create a new one.
Select a room or create a new one.
Add at least one virtual room.
Make sure the room is disarmed.Only a PRO or room administrator with system configuration rights can add a device to a room.
Account types and rights
Adding a room
Open the Ajax application. Select the room you want to add the NVR to.
Go to the Devices tab and tap Add device.
Scan the QR code or enter it manually. The QR code is located on the back of the case under the SmartBracket mounting panel and on the packaging.
Give the device a name.
Select a virtual room.
Tap Add.
Make sure the NVR is powered on and has internet access. The LED logo should be green.
Tap Add.The added device will appear in the device list of the Ajax app.
The NVR only works with one room. To connect a NVR to a new room, it must be manually deleted from the previous room in the Ajax app.
Adding an IP camera to the NVR
The video device calculator can be used to calculate how many cameras and NVRs can be added to a room.
Adding an IP camera automatically:
Adding a third party IP camera manually:
Open the Ajax app. Select the room where the NVR is connected.
Go to the Devices tab.
Find the NVR in the list and tap Cameras.
Tap Add camera.
Wait until the network is scanned and the IP cameras connected to the local network are displayed.
Select a camera.
Enter the username and password (specified in the camera documentation) if the camera is a third party and tap Add.
If entered correctly, a video preview of the added camera will appear. In case of an error, check the correctness of the entered data and try again.
Make sure the video matches the connected camera. Tap Next.The IP camera connected to the video recorder will appear in the list of NVR cameras in the Ajax app.
Restore to factory settings
To restore the NVR to factory settings:
Turn off the device by disconnecting the power supply.
Press and hold the reset button.
Turn on the NVR while continuing to hold the reset button and wait for the LED to turn purple. This takes about 50 seconds.After switching on the NVR with the reset button held down, the LED indicator will turn yellow for 20 s. Then it goes off for 30 s and turns purple. This means that the NVR has been restored to factory settings.
Release the reset button.
Icons
The icons indicate some statuses of the device. They can be viewed in the Ajax app:
Select a space in the Ajax app.
Go to the Devices tab.
Find the NVR in the list.States
States displays information about the device and its operating parameters. They can be found in the Ajax app:
Select a room in the Ajax app.
Go to the Devices tab.
Locate the NVR in the list.Settings
To change the settings of the NVR in the Ajax app:
Go to the Devices tab.
Select NVR in the list.
Go to Settings by tapping the gear icon.
Set the required parameters.
Tap Back to save the settings.Indication
Event - Indication - Note
The NVR starts up when connected to power - Lights yellow. - If the NVR is connected to the Ajax Cloud, the indication changes to green.
The NVR is powered on and connected to the Internet. - Lights green.
The NVR is not connected to the Internet or is not connected to the Ajax Cloud server. - Lights red.NVR does not have a hard drive installed.
Hard drive is installed but not working properly (e.g. formatting errors or needs formatting). - Flashes green or red every second, depending on the connection status to the Ajax Cloud server. The indication will continue until one of the following conditions occurs:
Hard disk is formatted/installed.
All cameras connected to the NVR are configured not to write to the NVR hard disk.Maintenance
The device is maintenance free.
Technical specifications
Technical specifications NVR (8-ch)
Technical specifications NVR (16-ch)
Technical specifications NVR DC (8-ch)
Technical specifications NVR DC (16-ch)Compliance with standards
Warranty
Ajax Systems Manufacturing Limited Liability Company's product warranty is valid for 2 years after purchase.
If the device fails to operate properly, please contact Ajax Technical Support first. In most cases, technical problems can be solved remotely.
8 channel NVR for 24/7 continuous recording
●Support up to 12MP Reolink cameras
●2 X SATA ports
● Supports up to 12 TB (max 6 TB HDD per SATA)
● 2 TB HDD included
€134,99
HiLook IKS-2044BH-PH/W Wireless Video Surveillance System with 4 MP Cameras and 30 m Night Vision
: A Reliable and Modern Security System The HiLook IKS-2044BH-PH/W is a high-quality wireless video surveillance system that combines performance, easy installation, and full control via a mobile app. The kit includes two 4 MP cameras—one bullet-style camera and one PT-Dome camera with a 94° field of view—ensuring clear and detailed images both day and night.
Built-in Data Storage
The system is equipped with NFS memory that supports MicroSD cards up to 512 GB, allowing for extended video recording without the need for an additional recorder.
Two-way audio communication
The built-in microphone and speaker allow you to communicate with people on the premises using the HiLookVision mobile app.
Night vision up to 30 m
Smart IR lighting and white light ensure clear visibility up to 30 m even in complete darkness.
Intelligent motion detection
The system can distinguish between people and vehicles, reducing false alarms.
Easy installation and remote control
Wireless installation and remote access via the app let you conveniently manage the system from anywhere.
Suitable for indoor and outdoor use; the IP66 rating (
) ensures weather resistance.
Key Features
2 × 4 MP cameras (Bullet and PT-Dome) with a 94° viewing angle
Built-in NVS memory with MicroSD up to 512 GB
Two-way audio with microphone and speaker
IR and white light with visibility up to 30 m
Motion detection with human and vehicle filtering
Quick wireless setup
Remote control via the HiLookVision app
IP66 protection for indoor and outdoor use
Specifications
Maximum resolution: 4 MP
Focal length: 2.8 mm
Power supply: 12 V
IP camera inputs: 4
PoE support: 4 x PoE
Storage support: MicroSD up to 512 GB
Night vision: Up to 30 m
Audio: Two-way (microphone + speaker)
Connectivity: Wireless, HiLookVision app
Protection rating: IP66
NVR - Network Video Recorder
NVR is a network video recorder for home and office video surveillance. Ajax cameras and third party IP cameras can be connected to the device.
The user can view live and archived video in Ajax applications. The recorder saves the received video data on a hard disk (not included) with appropriate settings.
If no hard disk is installed, the NVR only serves to integrate third party IP cameras into the Ajax system.
⚡ Important: Only use HDDs with a power consumption of up to 7 W.
The NVR requires an internet connection to connect to the Ajax Cloud. The device connects to the network with an Ethernet cable.
Available versions
-
NVR (8-ch)
-
NVR (16-ch)
-
NVR DC (8-ch)
-
NVR DC (16-ch)
Main features
-
Compatible with Ajax cameras and third party IP cameras.
-
Video alarm verification.
-
Archive video viewing and downloading in the app.
-
Support for HD drives up to 16 TB (not included).
-
Secure connection to Ajax Cloud via Ethernet.
-
Functional elements
-
Logo with LED indicator - shows the status of the device.
-
Mounting holes - for securing the SmartBracket panel to a surface.
-
SmartBracket mounting panel - for easy and secure installation.
-
Perforated part on the mounting panel - do not break off! It provides a tamper that reacts to attempts to disconnect the device from the surface.
-
Hole for HDD lock screw - for secure HDD fixation.
-
HDD lock.
-
HDD mounting space - supports HDD up to 16 TB.
-
QR code with device ID - required to connect the NVR to the Ajax system.
-
Power connector.
-
HDD connector.
-
Parameter reset button.
-
Ethernet connector - for network connection.
-
Cable lock - for secure cable fixing.
Operating principle
The NVR is a video recorder designed to connect third party IP cameras (with ONVIF and RTSP protocols) and Ajax cameras.
-
Supports hard disk installation up to 16 TB (not included).
-
Can also operate without HDD, for integration with cameras only.
-
Users can use the Video Archive Calculator to calculate the required storage capacity and recording duration.
NVR capabilities:
-
Add and configure IP cameras (resolution, brightness, contrast, etc.).
-
View video in real time with the ability to zoom in.
-
View and export archive video by chronology or calendar (if HDD attached).
-
Choose the type of motion detection: in the camera or in the NVR itself.
-
Configure motion detection on the NVR: zones, sensitivity.
-
Use the Video Wall, which combines the images of all connected cameras.
-
Create video scenarios that send a short video to the Ajax app when the detector is activated.
⚡ From firmware version 2.244, all videos downloaded from the NVR have an Ajax digital signature to authenticate them. Use the Ajax Media Player application for verification.
Integration with VMS
The NVR can be connected to third party video management systems(Milestone, Genetec, Axxon, Digifort) via ONVIF protocol (from firmware version 2.289 ).
Configuration is possible via:
-
Ajax Security System (v3.25+),
-
Ajax PRO: Tool for Engineers (v2.25+),
-
Ajax PRO Desktop (v4.20+),
-
Ajax Desktop (v4.21+).
-
-
NVR installation site selection
It is recommended to choose an installation location where the NVR is hidden from prying eyes, e.g. in the pantry. This will help to reduce the risk of sabotage. Note that the device is intended for indoor installation only.
The device is manufactured in a compact housing with passive cooling. If the NVR is installed in an insufficiently ventilated room, the operating temperature of the memory disk may exceed the permissible limits. Select a solid, level horizontal or vertical surface for installation and do not cover the device with other objects.
Follow the placement recommendations when designing the Ajax system for the site. The safety system must be designed and installed by professionals. A list of authorised Ajax partners is available here.
Where NVRs must not be installed
Outdoors. This may cause damage to the NVR.
In rooms with temperature and humidity values that do not meet the operating parameters.
Installation
Installation of the NVR:
Remove the SmartBracket from the DVR by pulling down on the rear panel.
Attach the SmartBracket to a solid, flat surface with the supplied screws. Use at least two fixing points. Be sure to secure the case in the perforated area so that the tamper responds to disassembly attempts. -
Lift the hard disk latch by pressing the button.
When replacing the hard disk, wait 10 seconds after disconnecting the device from the power source. The hard disk contains fast-rotating disks. Sudden movements or shocks can damage the mechanism, causing physical damage and loss of data.
Do not move or rotate the NVR until the hard disk has stopped rotating.
- Install the hard disk in the NVR enclosure so that the connectors line up.
- Lower the hard disk latch.
- Secure the hard disk in the NVR enclosure with the supplied screw using the fixing point provided.
-
-
Connect the external power supply and Ethernet connection.
Connect the device to the system.
Insert the video recorder into the SmartBracket holder.The LED indicator turns yellow and turns green when connected to the Internet. If the connection to the Ajax Cloud server fails, the logo turns red.
Connecting to the system
Before connecting the device
Install the Ajax app.
Log in to your account or create a new one.
Select a room or create a new one.
Add at least one virtual room.
Make sure the room is disarmed.Only a PRO or room administrator with system configuration rights can add a device to a room.
Account types and rights
Adding a room
Open the Ajax application. Select the room you want to add the NVR to.
Go to the Devices tab and tap Add device.
Scan the QR code or enter it manually. The QR code is located on the back of the case under the SmartBracket mounting panel and on the packaging.
Give the device a name.
Select a virtual room.
Tap Add.
Make sure the NVR is powered on and has internet access. The LED logo should be green.
Tap Add.The added device will appear in the device list of the Ajax app.
The NVR only works with one room. To connect a NVR to a new room, it must be manually deleted from the previous room in the Ajax app.
Adding an IP camera to the NVR
The video device calculator can be used to calculate how many cameras and NVRs can be added to a room.
Adding an IP camera automatically:
Adding a third party IP camera manually:
Open the Ajax app. Select the room where the NVR is connected.
Go to the Devices tab.
Find the NVR in the list and tap Cameras.
Tap Add camera.
Wait until the network is scanned and the IP cameras connected to the local network are displayed.
Select a camera.
Enter the username and password (specified in the camera documentation) if the camera is a third party and tap Add.
If entered correctly, a video preview of the added camera will appear. In case of an error, check the correctness of the entered data and try again.
Make sure the video matches the connected camera. Tap Next.The IP camera connected to the DVR will appear in the list of NVR cameras in the Ajax app.
Restore to factory settings
To restore the NVR to factory settings:
Turn off the device by disconnecting the power supply.
Press and hold the reset button.
Turn on the NVR while continuing to hold the reset button and wait for the LED to turn purple. This takes about 50 seconds.After switching on the NVR with the reset button held down, the LED indicator will turn yellow for 20 s. Then it goes off for 30 s and turns purple. This means that the NVR has been restored to factory settings.
Release the reset button.
Icons
The icons indicate some statuses of the device. They can be viewed in the Ajax app:
Select a space in the Ajax app.
Go to the Devices tab.
Find the NVR in the list.States
States displays information about the device and its operating parameters. They can be found in the Ajax app:
Select a room in the Ajax app.
Go to the Devices tab.
Locate the NVR in the list.Settings
To change the settings of the NVR in the Ajax app:
Go to the Devices tab.
Select NVR in the list.
Go to Settings by tapping the gear icon.
Set the required parameters.
Tap Back to save the settings.Indication
Event - Indication - Note
The NVR starts up when connected to power - Lights yellow. - If the NVR is connected to the Ajax Cloud, the indication changes to green.
The NVR is powered on and connected to the Internet. - Lights green.
The NVR is not connected to the Internet or is not connected to the Ajax Cloud server. - Lights red.NVR does not have a hard drive installed.
Hard drive is installed but not working properly (e.g. formatting errors or needs formatting). - Flashes green or red every second, depending on the connection status to the Ajax Cloud server. The indication will continue until one of the following conditions occurs:
Hard disk is formatted/installed.
All cameras connected to the NVR are configured not to write to the NVR hard disk.Maintenance
The device is maintenance free.
Technical specifications
Technical specifications NVR (8-ch)
Technical specifications NVR (16-ch)
Technical specifications NVR DC (8-ch)
Technical specifications NVR DC (16-ch)Compliance with standards
Warranty
Ajax Systems Manufacturing Limited Liability Company's product warranty is valid for 2 years after purchase.
If the device fails to operate properly, please contact Ajax Technical Support first. In most cases, technical problems can be solved remotely.
Product Specifications
Model Type: NVR DC (8 channels)
Video Stream: up to 4K (25/30 FPS)
Supported Cameras: ONVIF (Profile S/T), RTSP
Storage: hard drive up to 16 TB (SATA, 3.5”), HDD not included, max power consumption 7 W
Decoding Formats: H.265, H.264
Data throughput: up to 100 Mbit/s
Operating voltage: 9–16 V⎓ (with jumper: 12.1–16 V⎓; without jumper: 8–16 V⎓)
Max. current: up to 4 A
Power consumption: up to 24 W
Battery: CR2032, 3 V (for system clock)
Communication channels: Ethernet up to 100 Mbit/s, Bluetooth BLE (2.400–2.4835 GHz)
Radio signal power: 2.5 mW (limit 100 mW)
Tamper protection: tamper (removal/disconnection detection)
Dimensions: 193 × 193 × 47 mm
Weight: 583 g (without HDD)
Operating temperature: 0 °C to +40 °C
Humidity: up to 75%
Protection rating: IP20
Color: Black, White
Package contents: NVR DC, SmartBracket mounting panel, terminal adapter, Ethernet cable, installation kit, quick installation guide
NVR - Network Video Recorder
NVR is a network video recorder for home and office video surveillance. Ajax cameras and third party IP cameras can be connected to the device.
The user can view live and archived video in Ajax applications. The recorder saves the received video data on a hard disk (not included) with appropriate settings.
If no hard disk is installed, the NVR only serves to integrate third party IP cameras into the Ajax system.
⚡ Important: Only use HDDs with a power consumption of up to 7 W.
The NVR requires an internet connection to connect to the Ajax Cloud. The device connects to the network with an Ethernet cable.
Available versions
-
NVR (8-ch)
-
NVR (16-ch)
-
NVR DC (8-ch)
-
NVR DC (16-ch)
Main features
-
Compatible with Ajax cameras and third party IP cameras.
-
Video alarm verification.
-
Archive video viewing and downloading in the app.
-
Support for HD drives up to 16 TB (not included).
-
Secure connection to Ajax Cloud via Ethernet.
-
Functional elements
-
Logo with LED indicator - shows the status of the device.
-
Mounting holes - for securing the SmartBracket panel to a surface.
-
SmartBracket mounting panel - for easy and secure installation.
-
Perforated part on the mounting panel - do not break off! It provides a tamper that reacts to attempts to disconnect the device from the surface.
-
Hole for HDD lock screw - for secure HDD fixation.
-
HDD lock.
-
HDD mounting space - supports HDD up to 16 TB.
-
QR code with device ID - required to connect the NVR to the Ajax system.
-
Power connector.
-
HDD connector.
-
Parameter reset button.
-
Ethernet connector - for network connection.
-
Cable lock - for secure cable fixing.
Operating principle
The NVR is a video recorder designed to connect third party IP cameras (with ONVIF and RTSP protocols) and Ajax cameras.
-
Supports hard disk installation up to 16 TB (not included).
-
Can also operate without HDD, for integration with cameras only.
-
Users can use the Video Archive Calculator to calculate the required storage capacity and recording duration.
NVR capabilities:
-
Add and configure IP cameras (resolution, brightness, contrast, etc.).
-
View video in real time with the ability to zoom in.
-
View and export archive video by chronology or calendar (if HDD attached).
-
Choose the type of motion detection: in the camera or in the NVR itself.
-
Configure motion detection on the NVR: zones, sensitivity.
-
Use the Video Wall, which combines the images of all connected cameras.
-
Create video scenarios that send a short video to the Ajax app when the detector is activated.
⚡ From firmware version 2.244, all videos downloaded from the NVR have an Ajax digital signature to authenticate them. Use the Ajax Media Player application for verification.
Integration with VMS
The NVR can be connected to third party video management systems(Milestone, Genetec, Axxon, Digifort) via ONVIF protocol (from firmware version 2.289 ).
Configuration is possible via:
-
Ajax Security System (v3.25+),
-
Ajax PRO: Tool for Engineers (v2.25+),
-
Ajax PRO Desktop (v4.20+),
-
Ajax Desktop (v4.21+).
-
-
NVR installation site selection
It is recommended to choose an installation location where the NVR is hidden from prying eyes, e.g. in the pantry. This will help to reduce the risk of sabotage. Note that the device is intended for indoor installation only.
The device is manufactured in a compact housing with passive cooling. If the NVR is installed in an insufficiently ventilated room, the operating temperature of the memory disk may exceed the permissible limits. Select a solid, level horizontal or vertical surface for installation and do not cover the device with other objects.
Follow the placement recommendations when designing the Ajax system for the site. The safety system must be designed and installed by professionals. A list of authorised Ajax partners is available here.
Where NVRs must not be installed
Outdoors. This may cause damage to the NVR.
In rooms with temperature and humidity values that do not meet the operating parameters.
Installation
Installation of the NVR:
Remove the SmartBracket from the DVR by pulling down on the rear panel.
Attach the SmartBracket to a solid, flat surface with the supplied screws. Use at least two fixing points. Be sure to secure the case in the perforated area so that the tamper responds to disassembly attempts. -
Lift the hard disk latch by pressing the button.
When replacing the hard disk, wait 10 seconds after disconnecting the device from the power source. The hard disk contains fast-rotating disks. Sudden movements or shocks can damage the mechanism, causing physical damage and loss of data.
Do not move or rotate the NVR until the hard disk has stopped rotating.
- Install the hard disk in the NVR enclosure so that the connectors line up.
- Lower the hard disk latch.
- Secure the hard disk in the NVR enclosure with the supplied screw using the fixing point provided.
-
-
Connect the external power supply and Ethernet connection.
Connect the device to the system.
Insert the video recorder into the SmartBracket holder.The LED indicator turns yellow and turns green when connected to the Internet. If the connection to the Ajax Cloud server fails, the logo turns red.
Connecting to the system
Before connecting the device
Install the Ajax app.
Log in to your account or create a new one.
Select a room or create a new one.
Add at least one virtual room.
Make sure the room is disarmed.Only a PRO or room administrator with system configuration rights can add a device to a room.
Account types and rights
Adding a room
Open the Ajax application. Select the room you want to add the NVR to.
Go to the Devices tab and tap Add device.
Scan the QR code or enter it manually. The QR code is located on the back of the case under the SmartBracket mounting panel and on the packaging.
Give the device a name.
Select a virtual room.
Tap Add.
Make sure the NVR is powered on and has internet access. The LED logo should be green.
Tap Add.The added device will appear in the device list of the Ajax app.
The NVR only works with one room. To connect a NVR to a new room, it must be manually deleted from the previous room in the Ajax app.
Adding an IP camera to the NVR
The video device calculator can be used to calculate how many cameras and NVRs can be added to a room.
Adding an IP camera automatically:
Adding a third party IP camera manually:
Open the Ajax app. Select the room where the NVR is connected.
Go to the Devices tab.
Find the NVR in the list and tap Cameras.
Tap Add camera.
Wait until the network is scanned and the IP cameras connected to the local network are displayed.
Select a camera.
Enter the username and password (specified in the camera documentation) if the camera is a third party and tap Add.
If entered correctly, a video preview of the added camera will appear. In case of an error, check the correctness of the entered data and try again.
Make sure the video matches the connected camera. Tap Next.The IP camera connected to the DVR will appear in the list of NVR cameras in the Ajax app.
Restore to factory settings
To restore the NVR to factory settings:
Turn off the device by disconnecting the power supply.
Press and hold the reset button.
Turn on the NVR while continuing to hold the reset button and wait for the LED to turn purple. This takes about 50 seconds.After switching on the NVR with the reset button held down, the LED indicator will turn yellow for 20 s. Then it goes off for 30 s and turns purple. This means that the NVR has been restored to factory settings.
Release the reset button.
Icons
The icons indicate some statuses of the device. They can be viewed in the Ajax app:
Select a space in the Ajax app.
Go to the Devices tab.
Find the NVR in the list.States
States displays information about the device and its operating parameters. They can be found in the Ajax app:
Select a room in the Ajax app.
Go to the Devices tab.
Locate the NVR in the list.Settings
To change the settings of the NVR in the Ajax app:
Go to the Devices tab.
Select NVR in the list.
Go to Settings by tapping the gear icon.
Set the required parameters.
Tap Back to save the settings.Indication
Event - Indication - Note
The NVR starts up when connected to power - Lights yellow. - If the NVR is connected to the Ajax Cloud, the indication changes to green.
The NVR is powered on and connected to the Internet. - Lights green.
The NVR is not connected to the Internet or is not connected to the Ajax Cloud server. - Lights red.NVR does not have a hard drive installed.
Hard drive is installed but not working properly (e.g. formatting errors or needs formatting). - Flashes green or red every second, depending on the connection status to the Ajax Cloud server. The indication will continue until one of the following conditions occurs:
Hard disk is formatted/installed.
All cameras connected to the NVR are configured not to write to the NVR hard disk.Maintenance
The device is maintenance free.
Technical specifications
Technical specifications NVR (8-ch)
Technical specifications NVR (16-ch)
Technical specifications NVR DC (8-ch)
Technical specifications NVR DC (16-ch)Compliance with standards
Warranty
Ajax Systems Manufacturing Limited Liability Company's product warranty is valid for 2 years after purchase.
If the device fails to operate properly, please contact Ajax Technical Support first. In most cases, technical problems can be solved remotely.
Description:
General Information
Product Name
AJAX NVR HAC, 16 channels.
Description
A network video recorder with an HDMI output and the ability to connect up to 16 IP cameras. Designed for recording, managing, live viewing, and playback of archived footage from a video surveillance system.
Supported Cameras
Compatible with AJAX video surveillance devices, as well as third-party IP cameras that support the ONVIF or RTSP protocols.
Video stream resolution
Supports video streaming from cameras with resolutions up to 4K. The HDMI output supports resolutions up to Full HD.
Decoding Formats
Supports the H.265 and H.264 video compression formats, which allow for more efficient use of storage space and network bandwidth.
Embedded software
An integrated video management system with motion detection and the ability to visually verify alarms from the AJAX security system.
Local Image Output
The HDMI output allows you to connect a monitor and view the camera's live feed directly or play back recorded footage.
Data storage up to 16 TB
The NVR supports one 3.5-inch SATA hard drive with a capacity of up to 16 TB. The hard drive is not included in the package.
Network connection
The Ethernet RJ-45 port supports data transfer rates of up to 80 Mbps for incoming traffic and up to 40 Mbps for outgoing traffic.
USB ports
Two USB Type-A ports are provided for connecting a mouse, keyboard, or USB flash drive.
Security and Privacy
TLS encryption is used for video streams. The system supports multi-factor authentication, session control, and owner-only access to the data repository. The device complies with NDAA requirements.
Remote Management
The NVR can be managed using AJAX applications via the JetSparrow protocol. It offers access to the event archive and a customizable video wall feature.
Easy installation
The device uses a SmartBracket mount, QR code pairing, and local automatic camera discovery on the network.
Package Contents
The kit includes an NVR, a SmartBracket mounting panel, a power cable, an Ethernet cable, an installation kit, and a quick start guide.
Specifications:
Type: Network Video Recorder (NVR)
Series: HAC
Number of channels: 16
Supported cameras: AJAX video surveillance devices, ONVIF/RTSP-compatible third-party IP cameras
Maximum camera video resolution: up to 4K
HDMI output resolution: Full HD
Video compression: H.265/H.264
Video output: HDMI
Hard drive support: up to 16 TB
Hard drive type: SATA, 3.5 inches
Hard drive included: no
Network connection: Ethernet RJ-45
Inbound data rate: up to 80 Mbps
Outbound data rate: up to 40 Mbps
USB ports: 2 × USB Type-A
Power supply: 110–240 V AC, 50/60 Hz, 0.6 A
Maximum power consumption: up to 24 W
Operating temperature: 0–40 °C
Operating humidity: up to 75%
Video stream encryption: TLS
Authentication: multi-factor
Remote management: AJAX apps, JetSparrow
Mounting: SmartBracket
Dimensions: 212 × 212 × 64 mm
Weight: 782 g without hard drive
Protection class: IP20
Color: black
Package contents: NVR, SmartBracket mounting panel, power cable, Ethernet cable, installation kit, quick start guide
€309,57
Apraksts
Ajax NVR H2DAC (8-ch) ir profesionāls 8 kanālu tīkla videoierakstītājs Ajax videonovērošanas sistēmām un saderīgām trešo pušu IP kamerām. Tas nodrošina 4K HDMI video izvadi, divu cieto disku atbalstu un attālinātu video pārvaldību Ajax lietotnēs.
8 videonovērošanas kanāli
Videoierakstītājs ļauj pieslēgt un pārvaldīt līdz 8 IP kamerām. Tas ir saderīgs gan ar Ajax videokamerām, gan trešo pušu IP kamerām, kas izmanto ONVIF vai RTSP protokolus.
4K HDMI video izvade
Iebūvētā HDMI izeja ar izšķirtspēju līdz 3840 × 2160 ļauj pieslēgt monitoru vai televizoru un izmantot ierakstītāju kā lokālu videonovērošanas darba staciju.
Divi Hot-Swap HDD sloti
NVR ir aprīkots ar 2 SATA cieto disku slotiem, kas atbalsta disku nomaiņu darbības laikā jeb Hot-Swap. Katram diskam iespējama ietilpība līdz 16 TB, nodrošinot kopējo uzglabāšanas ietilpību līdz 32 TB. Cietie diski komplektā nav iekļauti.
Divi ierakstīšanas režīmi
Pieejams Redundancy režīms, kurā video tiek dublēts abos diskos drošākai datu saglabāšanai, un Split režīms, kurā ieraksts tiek sadalīts starp abiem diskiem, efektīvāk izmantojot pieejamo ietilpību.
Video līdz 12 MP
Ierīce atbalsta augstas izšķirtspējas kameru video ierakstīšanu un atskaņošanu līdz 12 MP, tostarp 4K video.
H.265 un H.264 kompresija
Atbalstītie H.265 un H.264 video kompresijas formāti samazina nepieciešamo datu apjomu un palīdz efektīvāk izmantot disku ietilpību un tīkla joslas platumu.
Līdz 160 Mbit/s datu caurlaidība
Ienākošā un izejošā video datu plūsma sasniedz līdz 160 Mbit/s, nodrošinot stabilu vairāku augstas izšķirtspējas kameru darbību vienlaikus.
JetSparrow tehnoloģija
Ajax JetSparrow tehnoloģija nodrošina ātru un šifrētu video pārraidi, vienmērīgu pārvietošanos pa video arhīvu un ātru pāreju no drošības sistēmas paziņojuma uz atbilstošo video ierakstu.
Lokāla un attālināta video pārvaldība
Video iespējams skatīt un pārvaldīt gan Ajax lietotnēs attālināti, gan lokāli ar iebūvēto video pārvaldības sistēmu. Pieejama video siena, arhīva pārlūkošana, notikumu filtrēšana un video eksportēšana.
3 USB pieslēgvietas
Ierīcei ir 3 × USB 2.0 Type-A pieslēgvietas – viena priekšpusē un divas aizmugurē. Tām iespējams pieslēgt USB datu nesēju, peli, tastatūru vai citas saderīgas vadības ierīces.
Gigabit Ethernet savienojums
Iebūvētā RJ45 Gigabit Ethernet pieslēgvieta nodrošina tīkla ātrumu līdz 1 Gbit/s.
Droša video datu aizsardzība
Video straumes tiek aizsargātas ar šifrēšanu. Sistēma atbalsta lietotāju piekļuves tiesību kontroli, divu faktoru autentifikāciju un citus Ajax drošības mehānismus.
Montāža 19 collu statnē
Komplektā ir 2 stiprinājumi montāžai statnē, kas padara NVR piemērotu profesionālām videonovērošanas instalācijām un serveru skapjiem.
Specifikācija
Ražotājs: Ajax
Sērija: Baseline
Modelis: NVR H2DAC (8-ch)
Ražotāja kods: 140908.122.BL1
Preces kods: 367314419
EAN: 4823114087004
Preces tips: tīkla videoierakstītājs NVR
Videokanālu skaits: 8
Maksimālā ieraksta izšķirtspēja: līdz 12 MP
HDMI izvade: 1 × HDMI
Maksimālā HDMI izšķirtspēja: 3840 × 2160, 4K
Video kompresija: H.265, H.264
Video pārraides tehnoloģija: JetSparrow
Ienākošā datu plūsma: līdz 160 Mbit/s
Izejošā datu plūsma: līdz 160 Mbit/s
Tīkla pieslēgums: RJ45 Gigabit Ethernet
Ethernet ātrums: līdz 1 Gbit/s
USB: 3 × USB 2.0 Type-A
HDD sloti: 2
Diska interfeiss: SATA
Atbalstītais HDD formāts: 3,5"
Maksimālā viena diska ietilpība: līdz 16 TB
Maksimālā kopējā ietilpība: līdz 32 TB
Hot-Swap disku nomaiņa: jā
HDD komplektā: nav
Ierakstīšanas režīmi: Redundancy, Split
Atbalstītās kameras: Ajax un trešo pušu IP kameras
Protokoli: ONVIF Profile S, daļēji Profile T un M, RTSP
PoE porti: nav
Iebūvēta video pārvaldības sistēma: jā
Kustības noteikšana: jā
Ajax Cloud: jā
Attālināta vadība: Ajax lietotnēs
Barošana: 100–240 V AC
Frekvence: 50/60 Hz
Ieejas strāva: 0,6 A
Maksimālais enerģijas patēriņš: 85 W
Aizsardzības klase: IP20
Darba temperatūra: 0–50 °C
Pieļaujamais relatīvais mitrums: līdz 75 %
Izmēri: 330 × 330 × 44 mm
Svars bez HDD: 3,3 kg
Krāsa: melna
Komplektā: NVR, 2 statnes stiprinājumi, barošanas kabelis, Ethernet kabelis, montāžas komplekts, īsā lietošanas pamācība
€309,57
Apraksts
Ajax NVR H2DAC (8-ch) ir profesionāls 8 kanālu tīkla videoierakstītājs Ajax videonovērošanas sistēmām un saderīgām trešo pušu IP kamerām. Tas nodrošina 4K HDMI video izvadi, divu cieto disku atbalstu un attālinātu video pārvaldību Ajax lietotnēs.
8 videonovērošanas kanāli
Videoierakstītājs ļauj pieslēgt un pārvaldīt līdz 8 IP kamerām. Tas ir saderīgs gan ar Ajax videokamerām, gan trešo pušu IP kamerām, kas izmanto ONVIF vai RTSP protokolus.
4K HDMI video izvade
Iebūvētā HDMI izeja ar izšķirtspēju līdz 3840 × 2160 ļauj pieslēgt monitoru vai televizoru un izmantot ierakstītāju kā lokālu videonovērošanas darba staciju.
Divi Hot-Swap HDD sloti
NVR ir aprīkots ar 2 SATA cieto disku slotiem, kas atbalsta disku nomaiņu darbības laikā jeb Hot-Swap. Katram diskam iespējama ietilpība līdz 16 TB, nodrošinot kopējo uzglabāšanas ietilpību līdz 32 TB. Cietie diski komplektā nav iekļauti.
Divi ierakstīšanas režīmi
Pieejams Redundancy režīms, kurā video tiek dublēts abos diskos drošākai datu saglabāšanai, un Split režīms, kurā ieraksts tiek sadalīts starp abiem diskiem, efektīvāk izmantojot pieejamo ietilpību.
Video līdz 12 MP
Ierīce atbalsta augstas izšķirtspējas kameru video ierakstīšanu un atskaņošanu līdz 12 MP, tostarp 4K video.
H.265 un H.264 kompresija
Atbalstītie H.265 un H.264 video kompresijas formāti samazina nepieciešamo datu apjomu un palīdz efektīvāk izmantot disku ietilpību un tīkla joslas platumu.
Līdz 160 Mbit/s datu caurlaidība
Ienākošā un izejošā video datu plūsma sasniedz līdz 160 Mbit/s, nodrošinot stabilu vairāku augstas izšķirtspējas kameru darbību vienlaikus.
JetSparrow tehnoloģija
Ajax JetSparrow tehnoloģija nodrošina ātru un šifrētu video pārraidi, vienmērīgu pārvietošanos pa video arhīvu un ātru pāreju no drošības sistēmas paziņojuma uz atbilstošo video ierakstu.
Lokāla un attālināta video pārvaldība
Video iespējams skatīt un pārvaldīt gan Ajax lietotnēs attālināti, gan lokāli ar iebūvēto video pārvaldības sistēmu. Pieejama video siena, arhīva pārlūkošana, notikumu filtrēšana un video eksportēšana.
3 USB pieslēgvietas
Ierīcei ir 3 × USB 2.0 Type-A pieslēgvietas – viena priekšpusē un divas aizmugurē. Tām iespējams pieslēgt USB datu nesēju, peli, tastatūru vai citas saderīgas vadības ierīces.
Gigabit Ethernet savienojums
Iebūvētā RJ45 Gigabit Ethernet pieslēgvieta nodrošina tīkla ātrumu līdz 1 Gbit/s.
Droša video datu aizsardzība
Video straumes tiek aizsargātas ar šifrēšanu. Sistēma atbalsta lietotāju piekļuves tiesību kontroli, divu faktoru autentifikāciju un citus Ajax drošības mehānismus.
Montāža 19 collu statnē
Komplektā ir 2 stiprinājumi montāžai statnē, kas padara NVR piemērotu profesionālām videonovērošanas instalācijām un serveru skapjiem.
Specifikācija
Ražotājs: Ajax
Sērija: Baseline
Modelis: NVR H2DAC (8-ch)
Ražotāja kods: 140908.122.BL1
Preces kods: 367314419
EAN: 4823114087004
Preces tips: tīkla videoierakstītājs NVR
Videokanālu skaits: 8
Maksimālā ieraksta izšķirtspēja: līdz 12 MP
HDMI izvade: 1 × HDMI
Maksimālā HDMI izšķirtspēja: 3840 × 2160, 4K
Video kompresija: H.265, H.264
Video pārraides tehnoloģija: JetSparrow
Ienākošā datu plūsma: līdz 160 Mbit/s
Izejošā datu plūsma: līdz 160 Mbit/s
Tīkla pieslēgums: RJ45 Gigabit Ethernet
Ethernet ātrums: līdz 1 Gbit/s
USB: 3 × USB 2.0 Type-A
HDD sloti: 2
Diska interfeiss: SATA
Atbalstītais HDD formāts: 3,5"
Maksimālā viena diska ietilpība: līdz 16 TB
Maksimālā kopējā ietilpība: līdz 32 TB
Hot-Swap disku nomaiņa: jā
HDD komplektā: nav
Ierakstīšanas režīmi: Redundancy, Split
Atbalstītās kameras: Ajax un trešo pušu IP kameras
Protokoli: ONVIF Profile S, daļēji Profile T un M, RTSP
PoE porti: nav
Iebūvēta video pārvaldības sistēma: jā
Kustības noteikšana: jā
Ajax Cloud: jā
Attālināta vadība: Ajax lietotnēs
Barošana: 100–240 V AC
Frekvence: 50/60 Hz
Ieejas strāva: 0,6 A
Maksimālais enerģijas patēriņš: 85 W
Aizsardzības klase: IP20
Darba temperatūra: 0–50 °C
Pieļaujamais relatīvais mitrums: līdz 75 %
Izmēri: 330 × 330 × 44 mm
Svars bez HDD: 3,3 kg
Krāsa: melna
Komplektā: NVR, 2 statnes stiprinājumi, barošanas kabelis, Ethernet kabelis, montāžas komplekts, īsā lietošanas pamācība
€329,39
Ajax NVR 16 kanālu tīkla videoierakstītājs, 4K, HDD līdz 16TB, balts
EAN: 4823114044113
Preces kods: 367311238
Ražotāja kods: 70934.122.WH
Modelis: NVR (16-ch)
Apraksts
Ajax NVR (16-ch) ir 16 kanālu tīkla videoierakstītājs mājas, biroja un komerciālām videonovērošanas sistēmām. Ierīce atbalsta Ajax videokameras, kā arī saderīgas trešo pušu IP kameras, nodrošinot video ierakstīšanu, arhīva glabāšanu un attālinātu pārvaldību Ajax lietotnēs.
Līdz 16 IP kamerām
NVR iespējams pieslēgt līdz 16 IP kamerām, nodrošinot centralizētu videonovērošanas sistēmas pārvaldību vienā ierīcē.
Video līdz 4K izšķirtspējai
Ierīce atbalsta video straumes līdz 4K izšķirtspējai ar 25/30 kadriem sekundē, nodrošinot detalizētu attēlu un ērtu arhīva pārskatīšanu.
H.265 un H.264 kompresija
Atbalstītie H.265 un H.264 video kompresijas formāti palīdz efektīvāk izmantot cietā diska ietilpību un tīkla joslas platumu, saglabājot augstu attēla kvalitāti.
HDD līdz 16 TB
Ierīcei ir 1 SATA ligzda 3,5 collu HDD vai SSD uzstādīšanai ar ietilpību līdz 16 TB. Datu nesējs komplektā nav iekļauts. Ieteicams izmantot disku ar elektroenerģijas patēriņu līdz 7 W.
Ajax un trešo pušu kameru atbalsts
NVR atbalsta Ajax videokameras, kā arī trešo pušu IP kameras ar ONVIF Profile S/T un RTSP protokolu atbalstu.
Ajax Cloud un attālināta vadība
Videoierakstītājs darbojas kopā ar Ajax Cloud, ļaujot Ajax lietotnēs skatīt tiešraides, arhīva ierakstus, notikumus un video trauksmju apstiprinājumus.
JetSparrow tehnoloģija
Ajax JetSparrow tehnoloģija nodrošina ātru un aizsargātu video straumēšanu, ērtu pārvietošanos pa video arhīvu un ātru piekļuvi nepieciešamajiem ierakstiem.
Droša datu aizsardzība
Tiek izmantota šifrēta datu pārraide un lietotāju piekļuves tiesību pārvaldība. Ierīce atbalsta arī divu faktoru autentifikāciju un aizsardzību pret nesankcionētu noņemšanu no montāžas virsmas.
SmartBracket stiprinājums
Komplektā esošais SmartBracket montāžas panelis ļauj ierīci ērti un droši uzstādīt. NVR paredzēts lietošanai iekštelpās.
Specifikācija
Ražotājs: Ajax
Modelis: NVR (16-ch)
Ražotāja kods: 70934.122.WH
Preces kods: 367311238
EAN: 4823114044113
Preces tips: tīkla videoierakstītājs NVR
Kanālu skaits: 16
Maksimālā video izšķirtspēja: 4K
Kadru ātrums: līdz 25/30 kad./s
Video kompresija: H.265, H.264
Kameru saderība: Ajax un trešo pušu IP kameras
Protokoli: ONVIF Profile S/T, RTSP
Video straumēšanas tehnoloģija: JetSparrow
Atmiņas disku skaits: 1
Diska interfeiss: SATA
Atbalstītais diska izmērs: 3,5 collas
Maksimālā diska ietilpība: 16 TB
HDD/SSD komplektā: nav
Maksimālais datu nesēja patēriņš: 7 W
Tīkla pieslēgums: Ethernet RJ-45
Ethernet ātrums: līdz 100 Mbit/s
Savienojums ar mākoni: Ajax Cloud
Barošana: 110–240 V AC
Frekvence: 50/60 Hz
Maksimālais enerģijas patēriņš: 24 W
Rezerves baterija: CR2032, 3 V, sistēmas pulkstenim
Aizsardzības klase: IP20
Uzstādīšana: iekštelpās
Montāža: SmartBracket
Darba temperatūra: 0–40 °C
Pieļaujamais relatīvais mitrums: līdz 75 %
Izmēri: 193 × 193 × 47 mm
Svars: 700 g
Krāsa: balta
Garantija: 2 gadi
€285,37
Up to 4 IP camera input channels
H.265+/H.265/H.264+/H.264 video formats
Decoding capacity: up to 1 channel @ 12 MP or 2 channels @ 8 MP or 4 channels @ 4 MP or 8 channels @ 1080p
Up to 40 Mbps incoming data stream
Uses Hikvision Acusense technology to reduce manual effort and security costs
Basic Specifications
Brand: Hikvision
Manufacturer Code: DS-7604NXI-K1
Net Weight: 1.125 kg
Gross Weight: 1.84 kg
Key Features
Wireless: N/A
Artificial Intelligence (AI): Yes
Number of IP Channels: 4 Channels
Hard Disk Drive (HDD) Interface: 1
PoE Interface: N/A
Decoding Capacity: 8 Channels @ 1080p
External Interface: HDMI, VGA
RAID: No
Enclosure: 1U
Video & Audio
Ingress: 40 Mbps
Outgress: 80 Mbps
Video Output Mode: HDMI1/VGA simultaneous output
Decoding
Decoding Format: H.265/H.265+/H.264+/H.264
Network
Network interface: 1 × RJ-45 10/100/1000 Mbps self-adaptive Ethernet interface
Remote connection: 128
General
Power supply: 12 V DC, 1.5 A
Operating humidity: 10% to 90%
Operating temperature: -10 °C to +55 °C
Power consumption: ≤ 10 W (without hard disk)
Additional interfaces
SATA: 1 × SATA interface
USB interface: Front panel - 1 × USB 2.0; Rear panel - 1 × USB 2.0
Related product categories
Customer Support
Contact us with your question, and we'll help you
Delivery throughout Latvia
We provide delivery throughout Latvia
Secure Payments
We guarantee convenient and secure payments
- Choosing a selection results in a full page refresh.
- Opens in a new window.