IndoorCam is a Wi-Fi security camera with built-in AI, a PIR sensor, and control via Ajax apps. It features smart infrared (IR) backlighting, motion detection, and object recognition. The camera allows users to view archived videos and watch live streams. It is designed for indoor use only.
IndoorCam connects to the system via Wi-Fi and can be paired with a hub as a backup communication channel. The recorded videos can be stored on an Ajax NVR added to the same network or on the Ajax Cloud Storage archive, depending on the subscription.
Camera models with other housings are also available. All Ajax cameras— —areavailable here.
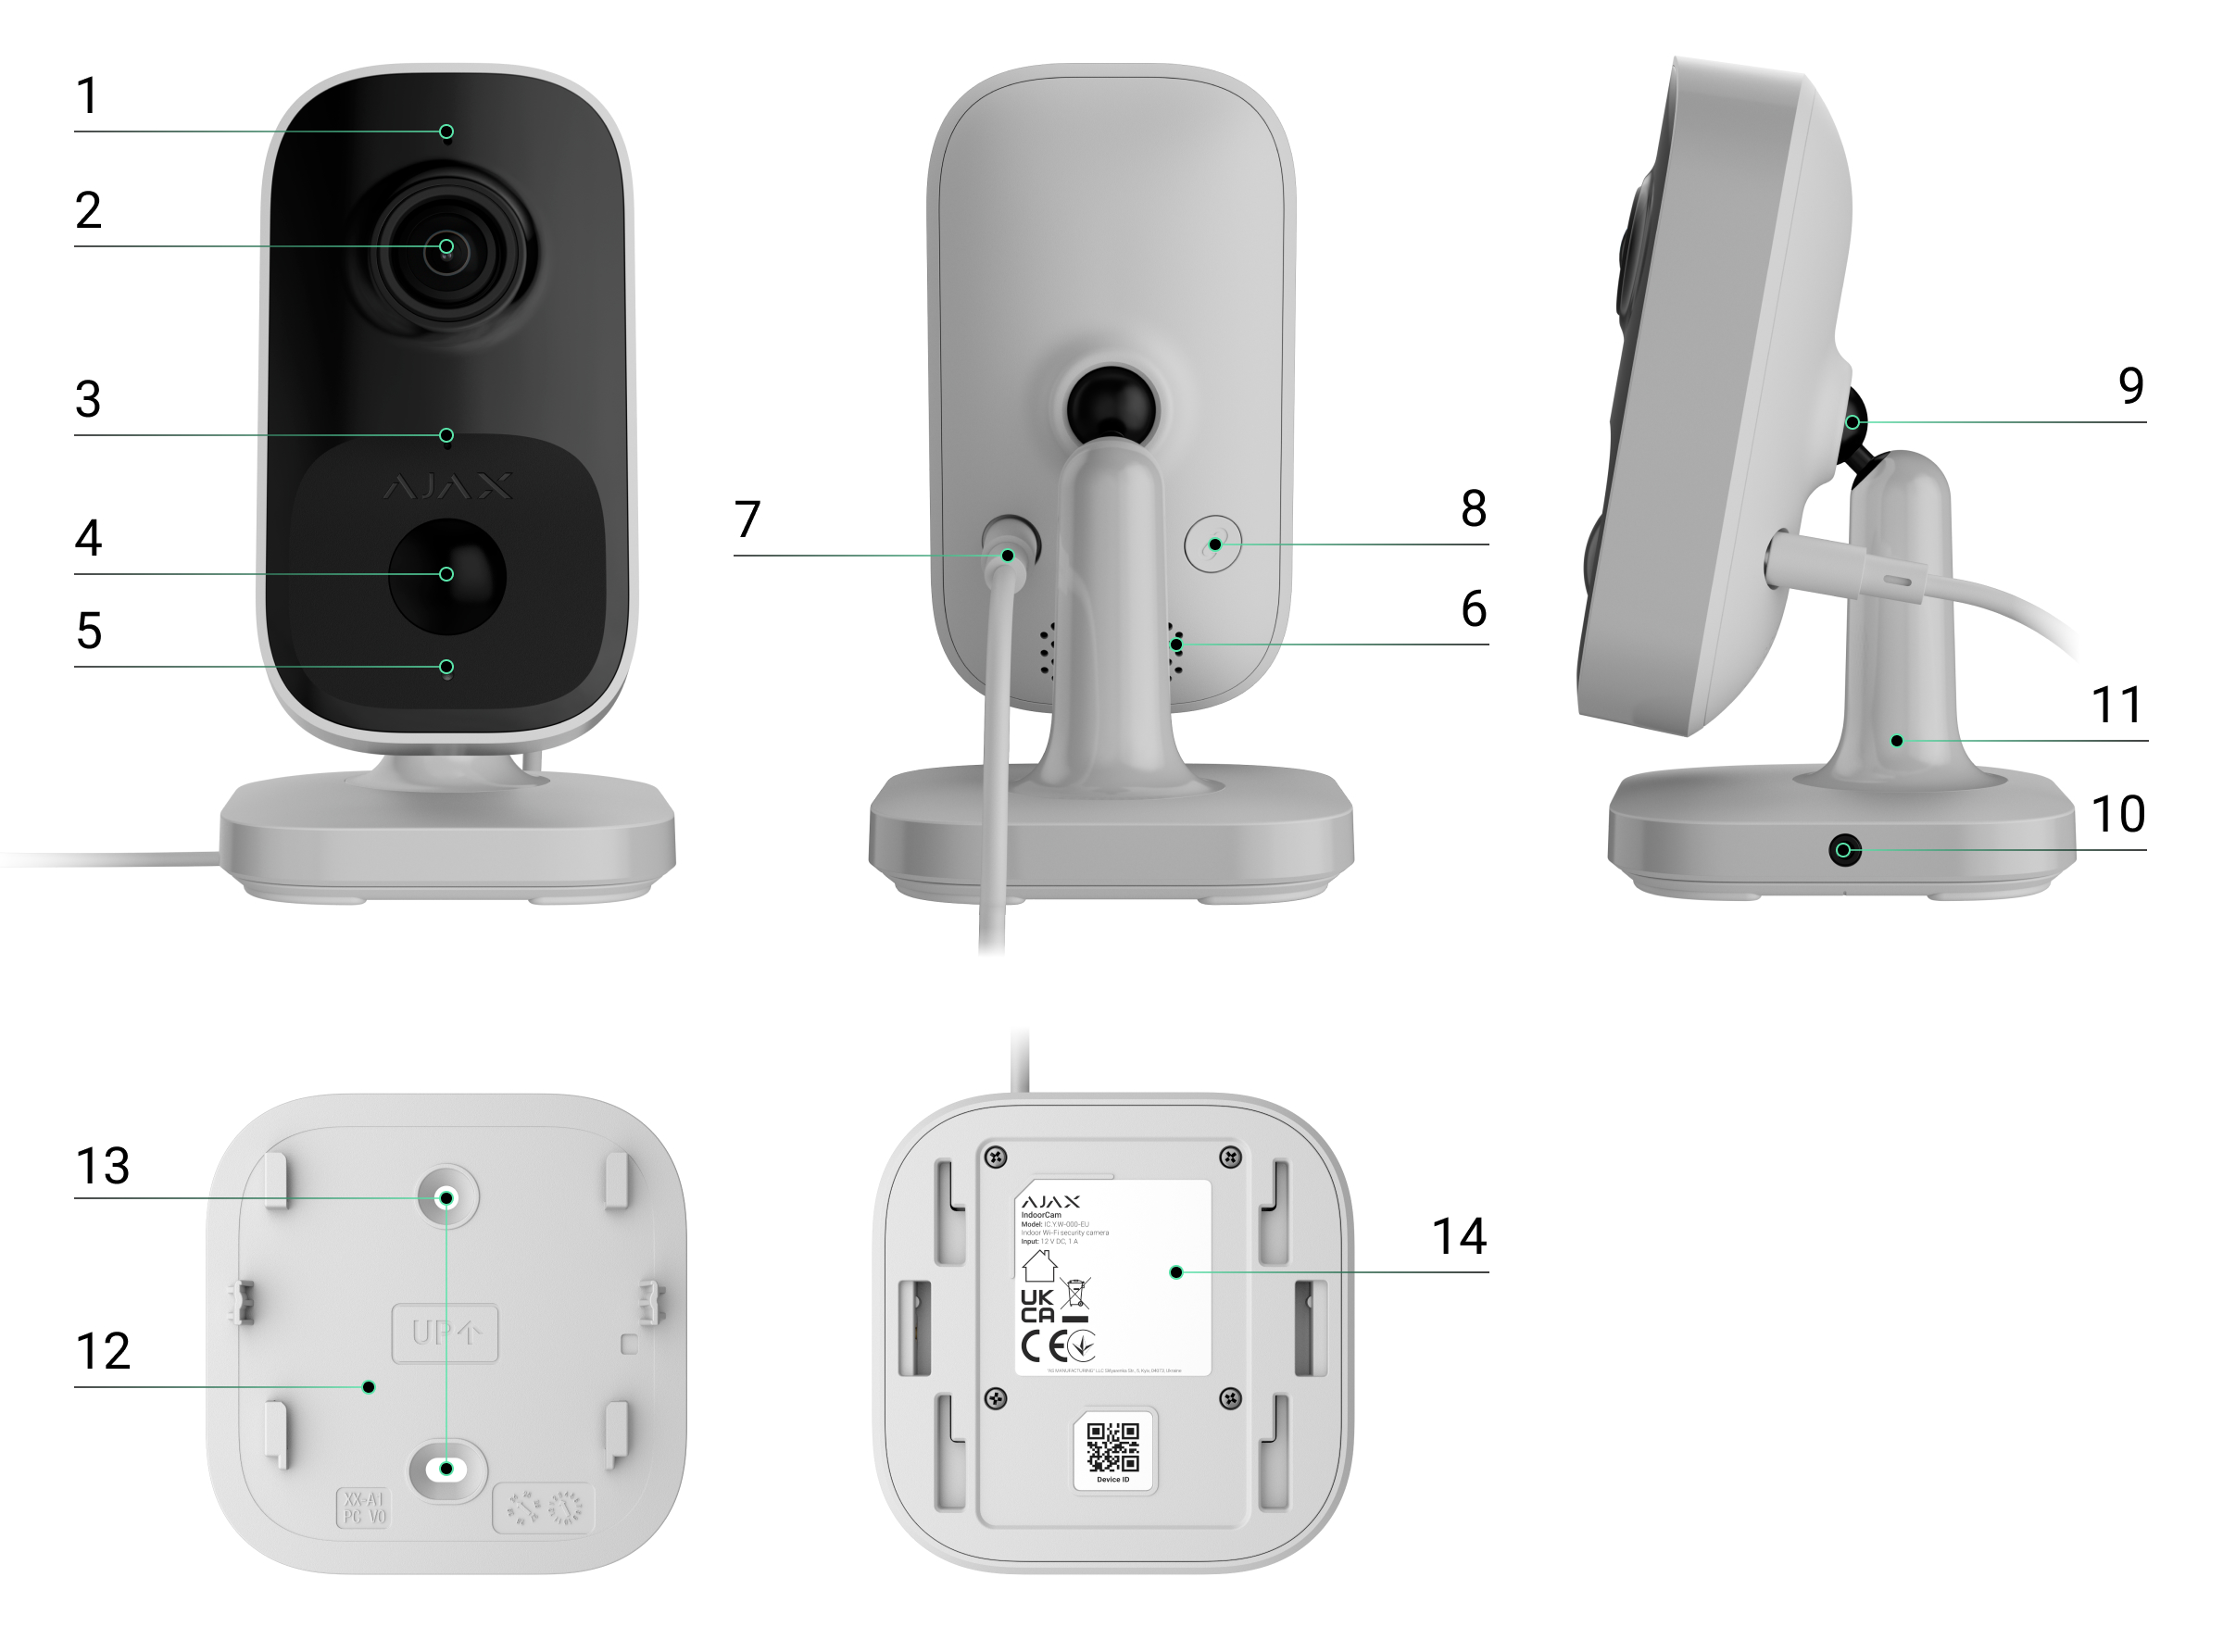
Functional elements
- LED indicator.
- Camera lens.
- Microphone.
- Motion-sensor lens.
- Ambient light sensor.
- Speaker.
- Power supply connector.
- Pairing button.
- Hinge.
- Use a screw to secure the device to the mounting panel.
- Swivel mount.
- The mounting panel of the swivel mount.
- Holes for attaching the mounting panel of the swivel mount to the surface.
- QR code with the device ID. Used to add the camera to a space.
Operating Principle
IndoorCam features a camera with IR illumination, an LED indicator, as well as a microphone and a speaker. The device is used to monitor the situation on the premises and record videos.
IndoorCam is an IP camera that uses artificial intelligence (AI) for object recognition. Its algorithms can identify moving objects and distinguish between people, animals, and vehicles.
The device features smart IR illumination, ensuring high-quality image capture even in low-light conditions. IndoorCam automatically adjusts the illumination intensity in real time to prevent overexposure, enabling clear visibility of objects that are either far away or too close to the camera in low-light conditions.
To save the recorded videos, you need to add IndoorCam to an Ajax NVR or activate the cloud archive.
IndoorCam allows you to:
- Watch the video in real time and zoom in for a closer look.
- Access archived videos and browse through them based on the recording timeline and the calendar (this feature is available if the device is connected to an Ajax NVR or the cloud archive is enabled).
- Configure motion detection zones and adjust the sensitivity level.
- View the" " video wall, which combines images from all connected cameras.
- Quickly access automation devices control from the cameras’ video player menu.
- Create video scenarios that send a short video from the selected camera to an Ajax app when the security detector is triggered.
- Download the required segments of video recordings from the archive to smartphones or PCs (this feature is available if the device is connected to an Ajax NVR or the cloud archive is enabled).
Video recording segments downloaded from IndoorCam withfirmware version 2.279or later( )include adigital signature from , which verifies the integrity of the exported video. To verify the authenticity of the downloaded video recordings, use theAjax media player software .
- Configure the connection via ONVIF to integrate the device with video management systems (VMS) such as Milestone, Genetec, Axxon, and Digifort.
ONVIF authorization is supported by IndoorCam with firmware version 2.377 or later.
An admin or PRO user with permissions to configure the system can set up a connection via ONVIF in:
- Ajax Security System with app version 3.25 or later.
- Ajax PRO: Tool for Engineers with app version 2.25 or later.
- Ajax PRO Desktop with app version 4.20 or later.
- Ajax Desktop s with app version 4.21 or later.
Video Scenarios
An Ajax system allows the use of IP cameras for alarm verification. Video scenarios make it possible to corroborate alarm triggers with the corresponding video footage from cameras installed at the facility.
Cameras can be configured to respond to alarms from a single device, multiple devices, or all connected devices. Combined detectors can trigger various types of alarms, allowing you to configure responses to a wide range of alarm types, whether it’s just one, several, or all of them.
You can also configure the sirens to activate when motion or a specific AI-recognized object is detected. When video devices detect motion or a specific AI-recognized object, the system automatically activates the sirens added to the hub to sound an alarm.
Video wall
Users can manage videos on the Video Wall
In mobile Ajax apps, you can:
- Switch between cameras.
- Search for the desired camera by name.
- Manage a PTZ camera.
In Ajax PRO Desktop, you can:
- Switch between cameras.
- Search for the desired camera by name.
- Organize cameras by room, NVR, or group.
- Manage a PTZ camera.
- Save customized layouts for displaying video from cameras.
- Change the order in which the camera video is displayed.
- Create templates for displaying videos in a slideshow.
Privacy Zones
The system allows you to hide parts of the frame. For example, if a sensitive area or object is in view, activity around it can be recorded without revealing its contents by setting up the appropriate zone. No motion or object will be detected or recorded within the privacy zone.
To do this, in Ajax apps:
- Go to the" " tab under "Devices
. - Select the device from the list. If it is connected to the network video recorder, got , select "NVR" , and tap " Cameras.
- Go to Settings by tapping the gear icon
twice. - Select the " menu item under "Privacy Zones .
- Go to the" " menu, then select "Configure privacy zones . Select the desired area.
- Tap the
icon. Return to the camera settings.
The user can create up to four private zones.
Firmware Update
If a new firmware version for IndoorCam is available, the
Working with an Ajax hub
The system allows you to configure a backup communication channel for the device so that the device continues to transmit events and alarms if the Wi-Fi network is down or lost.
The backup communication channel involves adding the device to the hub, which allows it to communicate via the Jeweller and Wings radio protocols. The device can transmit alarms, events, and photo verifications using these protocols to keep you informed. However, live streams and archived recordings from the period when the Wi-Fi connection was lost will be unavailable.
When IndoorCam is added to the hub, it occupies one slot among the hub's devices.
Compatible hubs and range extenders
An Ajax hub with OS Malevich 2.28 and later versions is required for the device to operate.
Jeweller and Wings Data Transfer Protocol
Jeweller and Wings are wireless data transfer protocols that provide fast and reliable two-way communication between the hub and devices. The device uses (Jeweller) and (Wings) as a backup communication channel to transmit events and photos.
Selecting the installation site
When choosing where to place IndoorCam, consider the factors that affect its operation:
- Wi-Fi signal strength.
- Jeweller and Wings signal strength. This applies if the device is paired with the hub.
- The presence of objects or structures that may obstruct the device’s view.
Take the installation recommendations into account when developing a project for the facility's system. Only specialists should design and install an Ajax system. A list of recommended partners isavailable here: .
Signal strength
Signal strength is determined by the number of undelivered or corrupted data packets over a certain period of time. In Ajax apps, under the" " > "Devices" >
- three bars — excellent signal strength;
- two bars — good signal strength;
- one bar — low signal strength; stable operation is not guaranteed;
- grayed-out icon — no signal.
Do not install the device
- In locations where the temperature and humidity exceed thepermissible limits set by the . This could damage the device.
- In places where objects or structures may obstruct the device’s view.
- In places with a weak or unstable Wi-Fi signal.
- In areas with a weak or unstable Jeweller or Wings signal. This applies if the device is paired with a hub.
It is not recommended to install the device in direct sunlight. This may cause the device to overheat and damage its electrical components.
Installation
Before installing IndoorCam, make sure you have chosen the best location that meets the requirements in this manual.
When connecting an external power supply and using IndoorCam, follow the general electrical safety regulations for using electrical appliances, as well as the requirements of applicable laws and regulations regarding electrical safety.
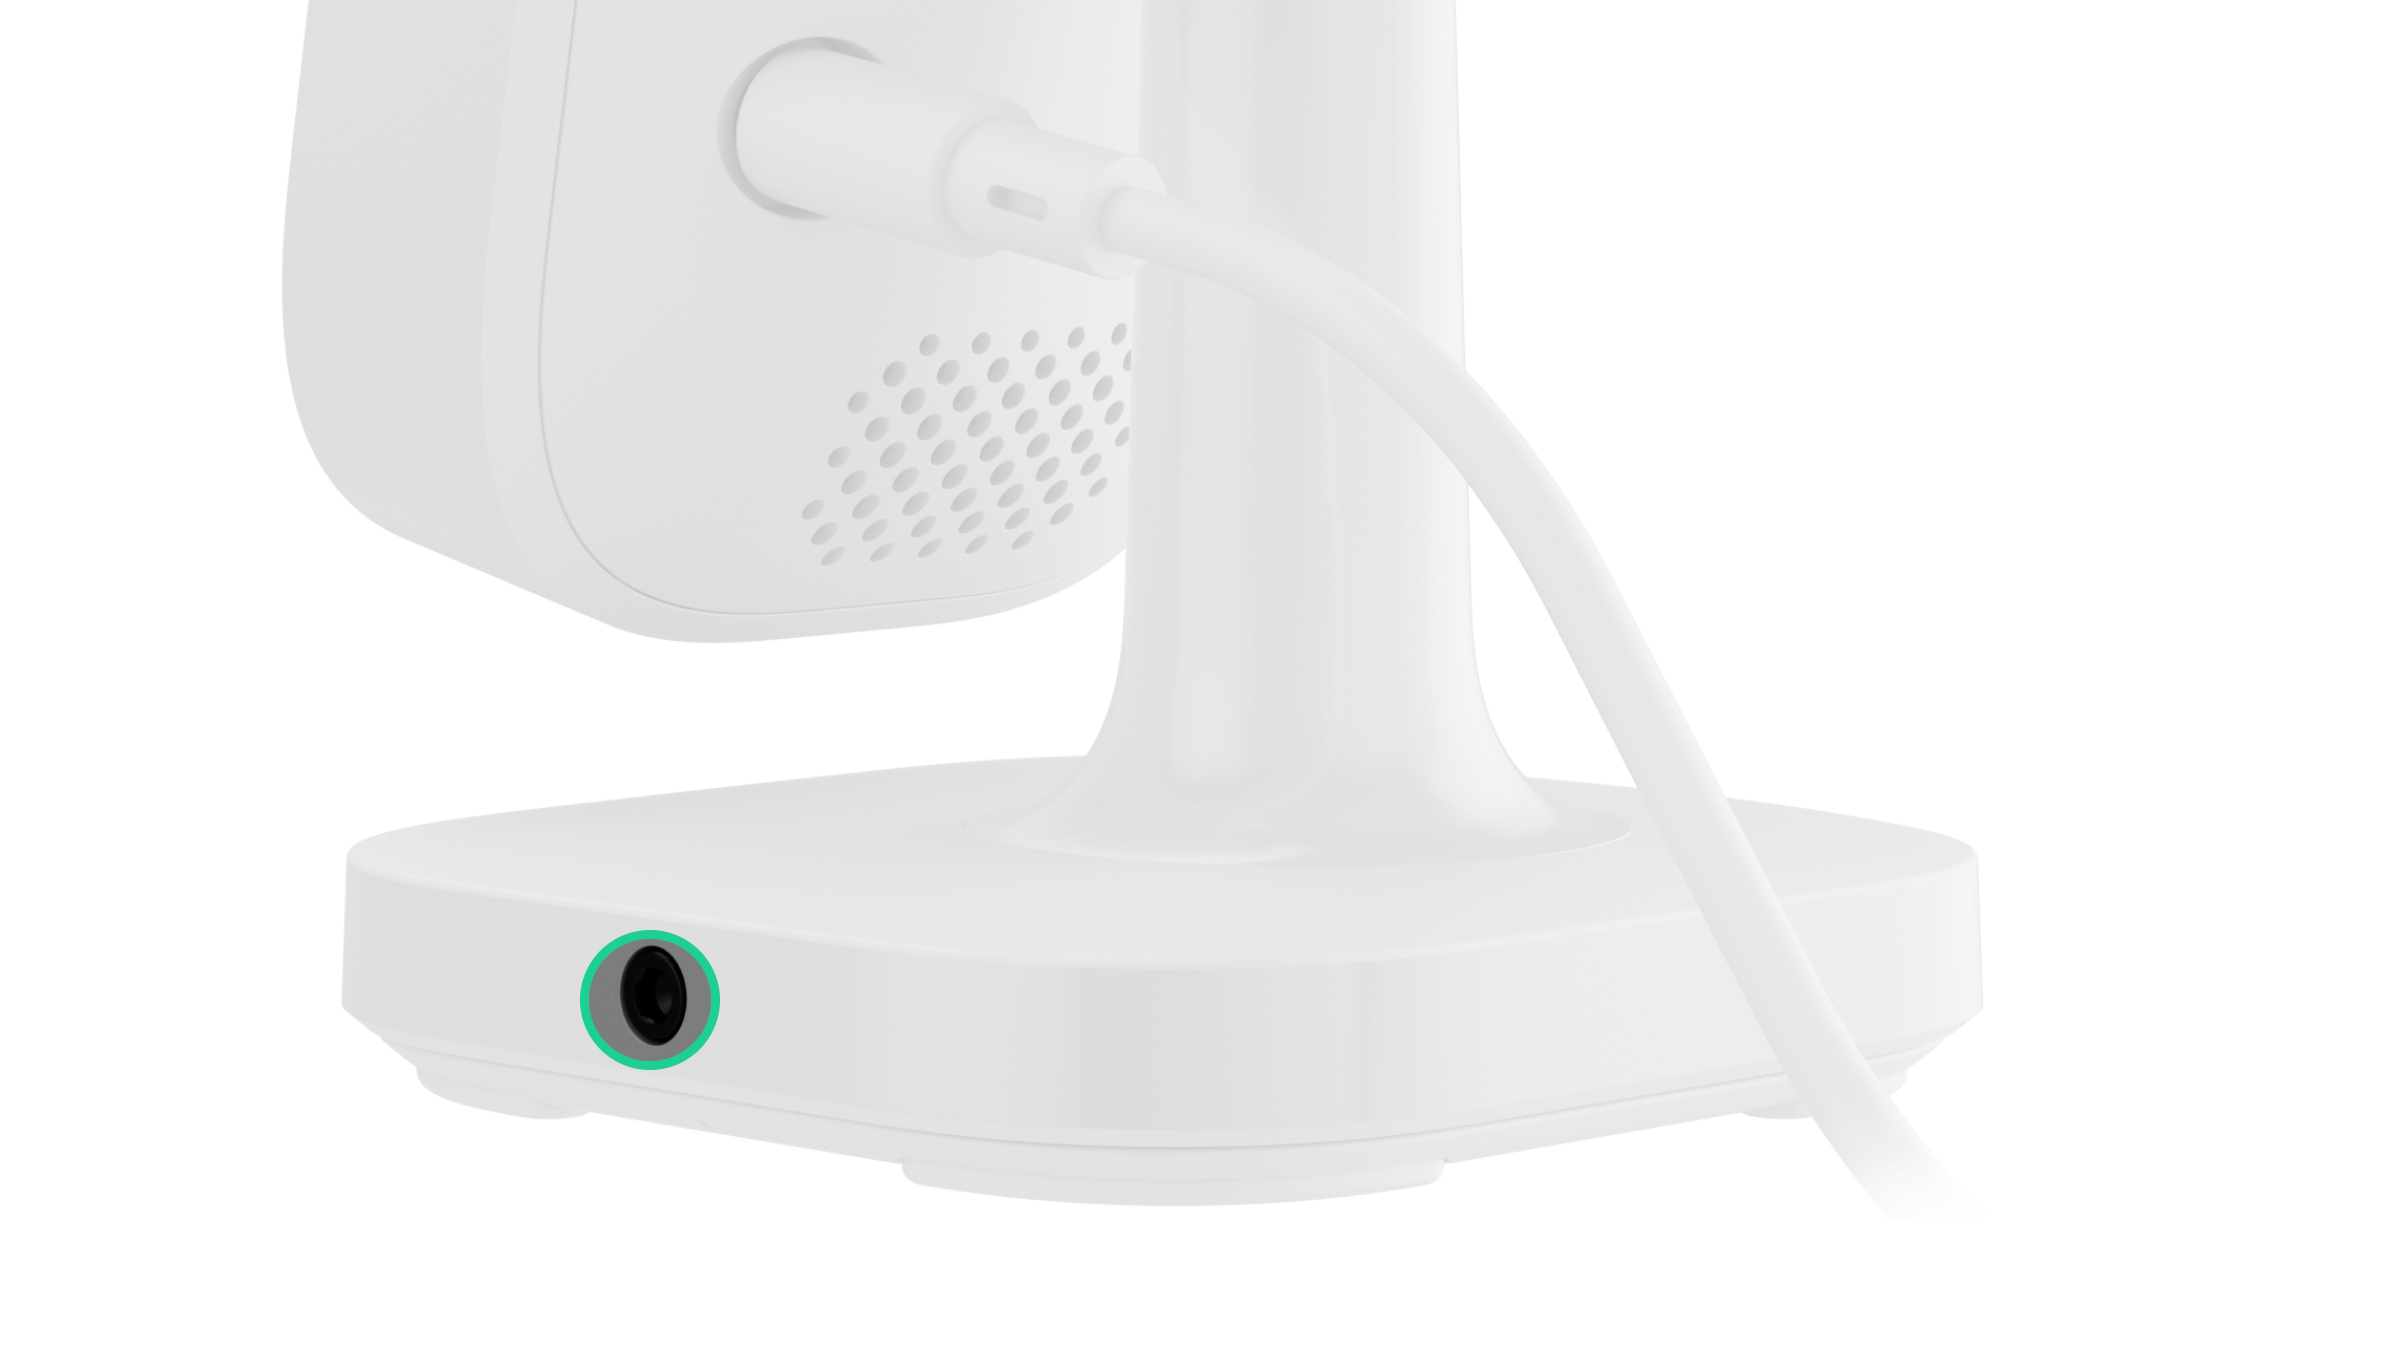
The IndoorCam enclosure features a power supply connector for connecting a 12 V⎓ power supply unit (included in the camera kit).
To install the device:
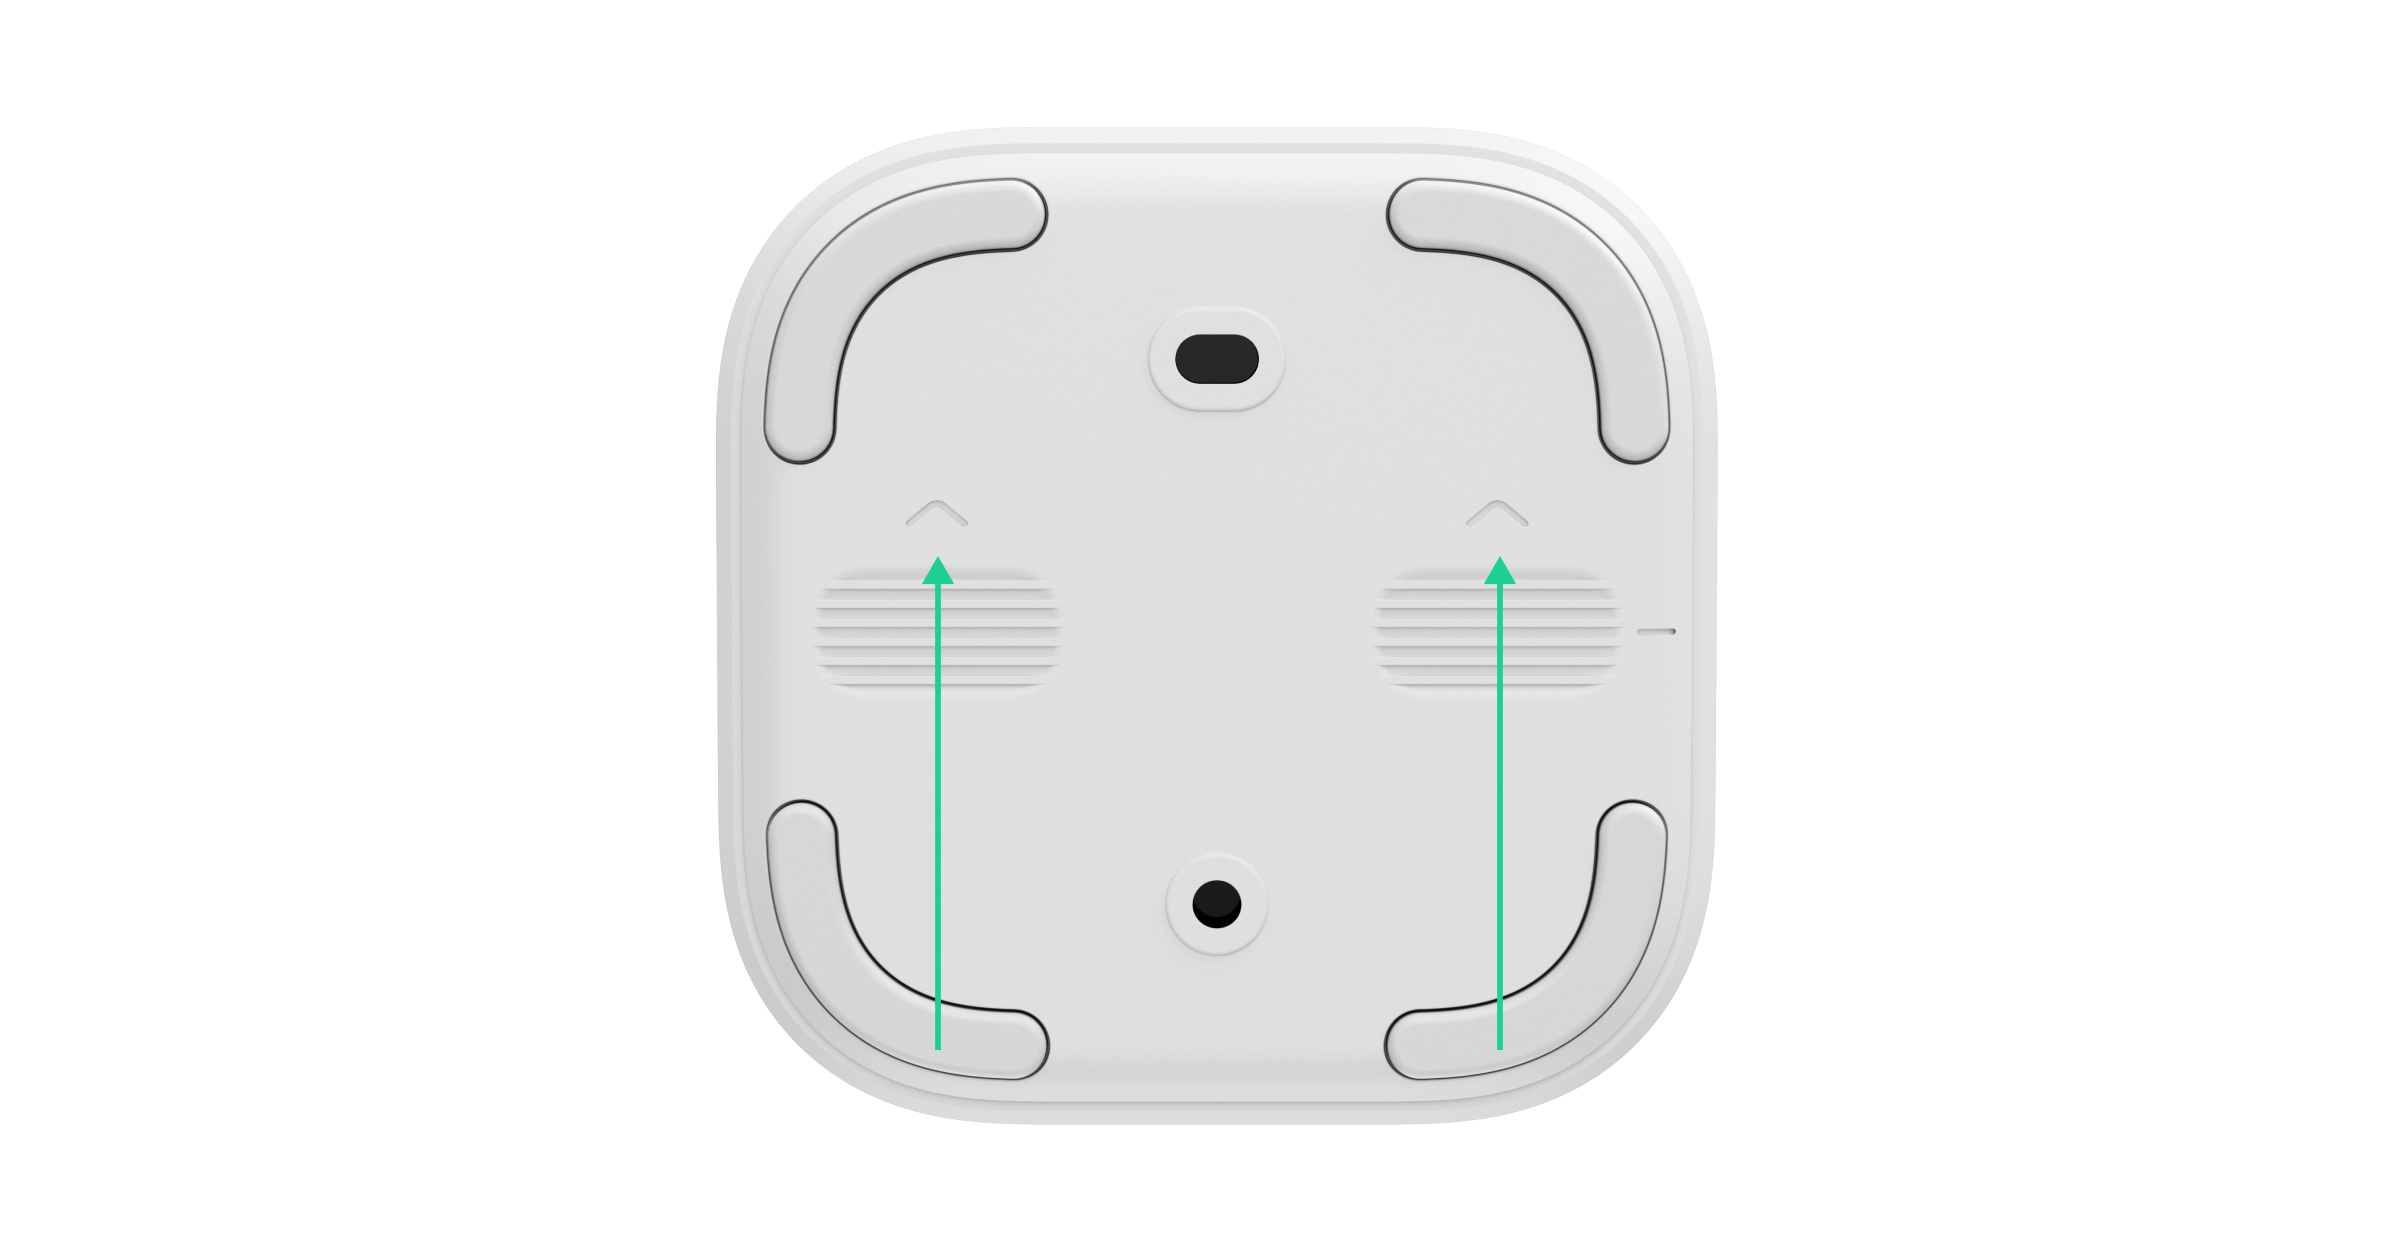
- Remove the mounting panel of the swivel mount from the device. To do this, slide the panel in the direction indicated on it.
- Secure the mounting panel using temporary fasteners (e.g., double-sided adhesive tape).
Double-sided adhesive tape can only be used for temporary installation. The device attached with the tape may come unstuck from the surface at any time.
- Connect the power supply unit (included in the camera package) to the corresponding connector.
- Turn on the external power.
- Add IndoorCam to the system.
- Place the device on the mounting panel.
- Test the device's operation and check the camera's field of view. Adjust the camera's tilt and pan settings.
- If the camera's field of view is correct and the device is functioning as expected, remove the device from the mounting panel.
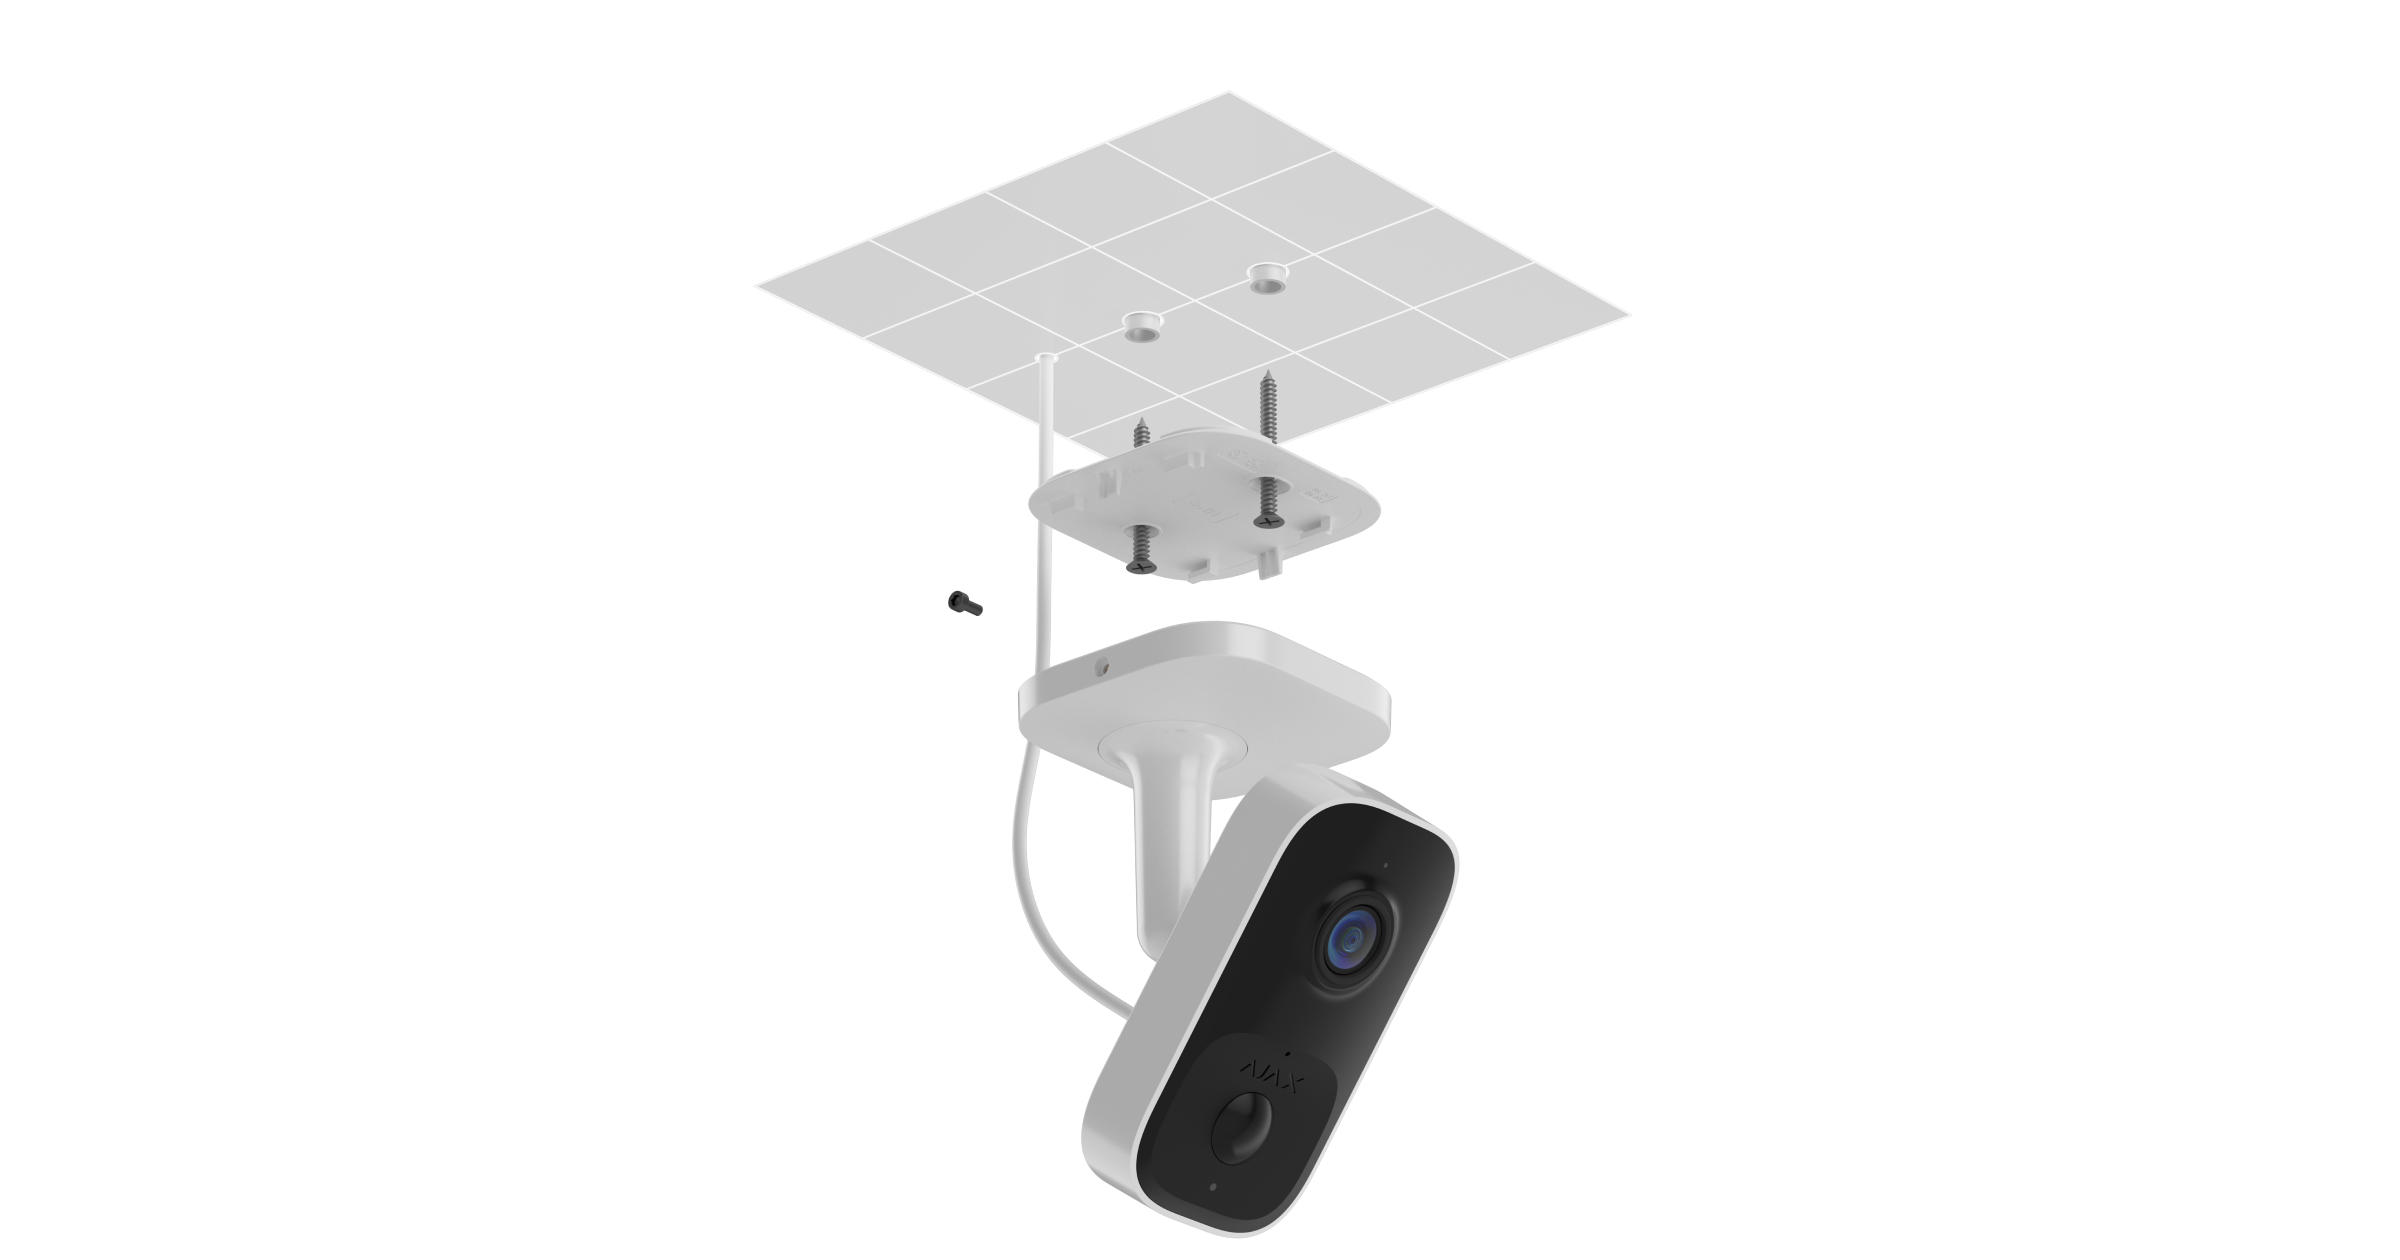
- Secure the mounting panel to the surface using the screws provided. Use all mounting points.
If using other fasteners, make sure they do not damage or deform the mounting panel.
- Place the device on the mounting panel.
- Tighten the retaining screw on the side of the device enclosure. The screw is needed to ensure a more secure attachment and to prevent the device from being quickly disassembled.
Adding to the system
Before adding the device
- Install an Ajax app.
- Log in to your account at or create a new one.
- Select a space or create a new one.
- Add at least one virtual room.
- Make sure the area is secured.
Only a PRO or a space admin with the rights to configure the system can add the device to the space.
Adding to the space
Before adding items to the system, make sure you have checked the following:
- A Wi-Fi signal covers the IndoorCam installation site.
- The IndoorCam external power supply is turned on.
- You are near IndoorCam with your smartphone, which has the Ajax app installed.
- You have the password to your Wi-Fi network right at your fingertips.
Please note that IndoorCam works only with 2.4 GHz Wi-Fi networks.
- Open the Ajax app. Select a space to which you want to add the device.
- Go to the" " tab under "Devices
and tap" " "Add device." - Scan the QR code or enter the device ID manually. A QR code containing the ID is located on the device housing. It is also printed on the device packaging.
- Assign a name to the device.
- Select a virtual room and a security group ( ,Group mode is enabled). Tap" " and "Add device to continue.
- Press the pairing button to add the device. Wait for IndoorCam to enter setup mode. When the LED is flashing blue, tap“ ” Next, to proceed:
- If IndoorCam has not been connected to your Wi-Fi network before, the device will activate Access Point (AP) mode. Your smartphone will then prompt you to connect to the AP. Tap“ ” and “Connect” to allow the connection.
- If IndoorCam was previously connected to your Wi-Fi network, the device will connect to Wi-Fi, and you will see the live image from the device. Go tostep 9 of the“ ” guide below.
- Select the desired Wi-Fi network from the list.
- Enter the password for the selected network to connect the device to Wi-Fi. Wait for IndoorCam to establish the connection. Once connected, you will see the live video feed from the device.
- Tap" " and to add the device.
The connected device will now appear in the list of devices in an Ajax app.
Please note that IndoorCam is compatible with only one space. To connect the device to a new space, remove it from the device list of the old one. This removal process must be done manually in an Ajax app.
Pairing with an Ajax NVR
If IndoorCam has already been added to the space as a standalone device, you can easily pair it with an Ajax NVR. If not, refer to the" " section under "Adding to the space to learn how to add IndoorCam to the NVR or as a standalone device.
To pair IndoorCam with the NVR in an Ajax app:
- Go to the" " tab under "Devices
. - Select" " and "NVR from the list, then tap" " Cameras.
- Got , select"Add camera , and wait until the network scan is complete and the available devices connected to the local network are displayed.
Note that IndoorCam must be connected to the same local network as the NVR.
- Select the device.
- Assign a name to the device, select a virtual room and a group, then tap" " "Finish."
- Wait for the system to add the device, then tap" " "Close."
The device will now appear in the list of NVR cameras in an Ajax app.
Pairing with an Ajax hub
If the hub is added to your system, you can set up the backup communication channel between IndoorCam and the hub. Before adding it, check whether your hub is compatible with IndoorCam.
When IndoorCam is added to the hub, it occupies one slot among the hub's devices.
To pair IndoorCam with the hub, in the Ajax app:
- Go to the" " tab under "Devices
. - Select IndoorCam from the device list. If it is connected to the network video recorder, select NVR and tap on Cameras.
- Go to Settings by tapping the gear icon
twice. - Go to Connection.
- Select the" " option and the "Backup radio channel option.
- Go to" " and click "Set up." The hub added to the space will be displayed.
- Go to Connect to pair IndoorCam with the hub.
Once IndoorCam is paired with the hub, it is recommended to run the Jeweller and Wings signal strength tests.
Configuring a Wi-Fi Network
In an Ajax app, you can configure the Wi-Fi network connection for your IndoorCam. You can change the current Wi-Fi network settings or connect the device to another available Wi-Fi network.
Please note that IndoorCam works only with 2.4 GHz Wi-Fi networks.
To configure the Wi-Fi connection in an Ajax app:
- Go to the" " tab under "Devices
. - Select IndoorCam from the device list. If it is connected to the network video recorder, select NVR and tap on Cameras.
- Go to Settings by tapping the gear icon
twice. - Go to Connection.
- Select the" " Wi-Fi option.
- In the next menu, you can:
- Change the settings for the current Wi-Fi network: select the current network and configure the necessary settings.
- Connect to another Wi-Fi network: select the desired Wi-Fi network from the list of available networks and enter the password to connect.
- Reset the Wi-Fi connection if the device is offline: tap" " Reset the Wi-Fi network , and follow the steps described in the app.
Resetting to the default settings
To reset the camera to its default settings:
- Press and hold the pairing button.
- Turn on the camera while holding down the pairing button, and wait until the LED indicator lights up violet. This will take about 50 seconds.
The button’s LED indicator glows blue for 20 seconds after turning on the camera while holding down the pairing button. Then it turns off for 30 seconds and glows violet. This means that the camera has been reset to its default settings.
- Let go of the button.
Icons
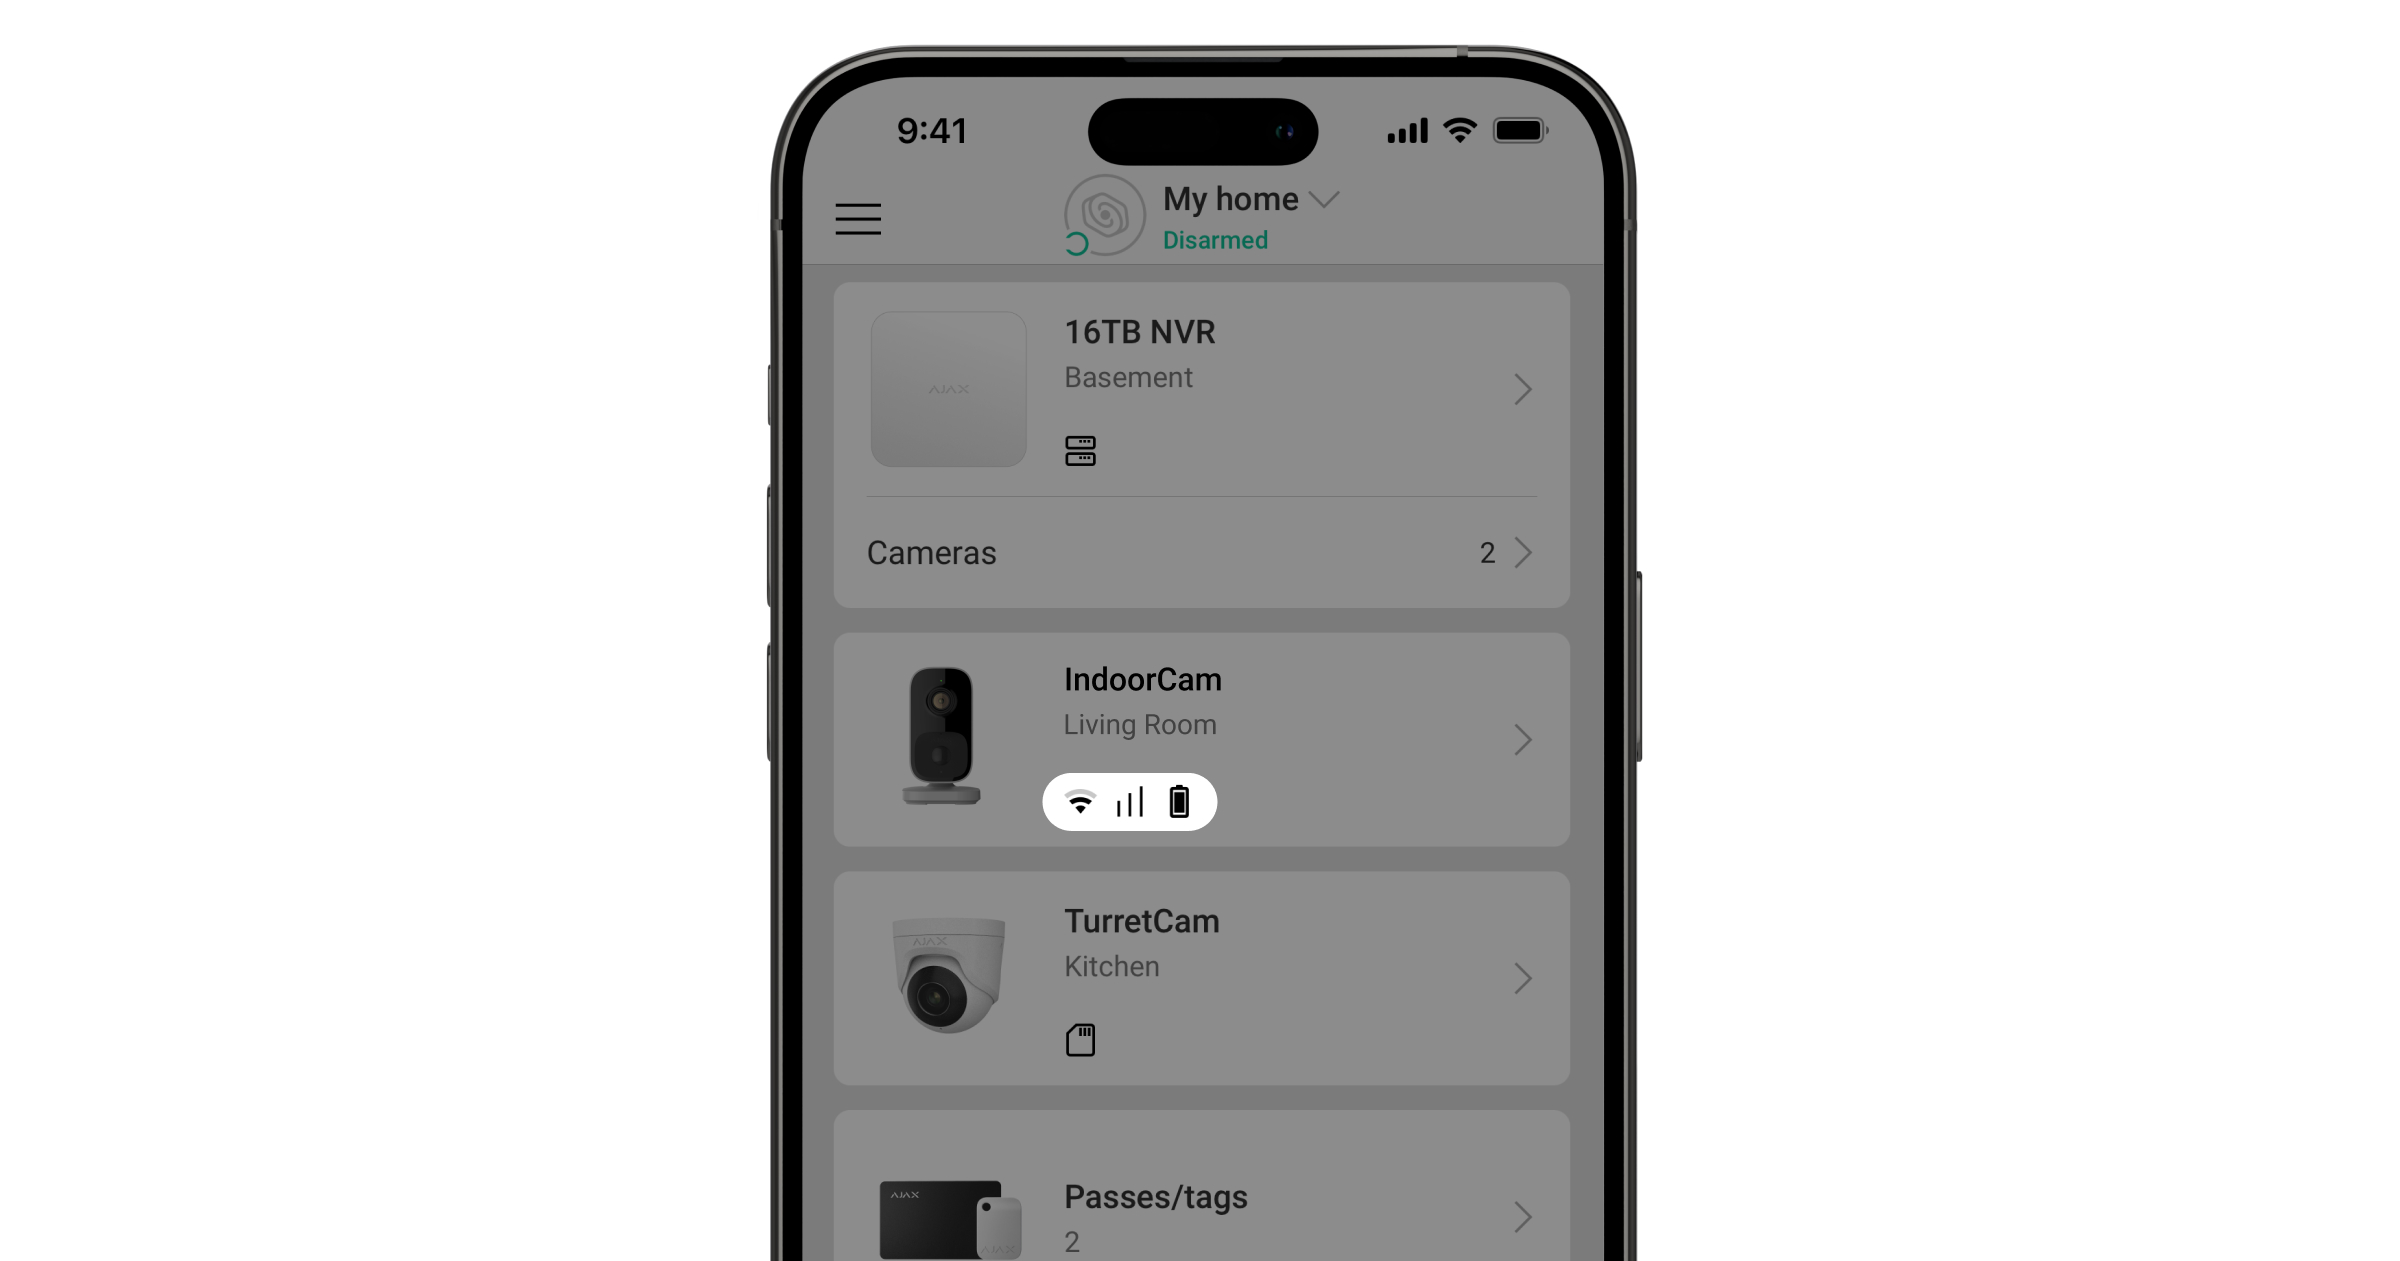
Icons in an Ajax app display some of IndoorCam’s states. You can view the icons in the“ ” tab under“Devices”
| Icon | Meaning |
|
The additional services are activated based on the subscription. |
|
| Wi-Fi signal strength. It displays the signal strength over the Wi-Fi communication channel. The recommended values are 2–3 bars. | |
|
Backup channel signal strength. It displays the signal strength between the hub and the device. The recommended values are 2–3 bars. |
|
|
The device operates in Night mode. |
|
| You do not have access to view the device's video. | |
|
Other users can view the device's video. |
|
| The device operates via theradio signal range extender at . | |
| A firmware update is available. Go to the device status or settings to view the description and start the update. | |
| The installation of the new firmware failed. | |
| The device has lost connection with the Ajax Cloud server. | |
|
The device connection via ONVIF is enabled. |
States
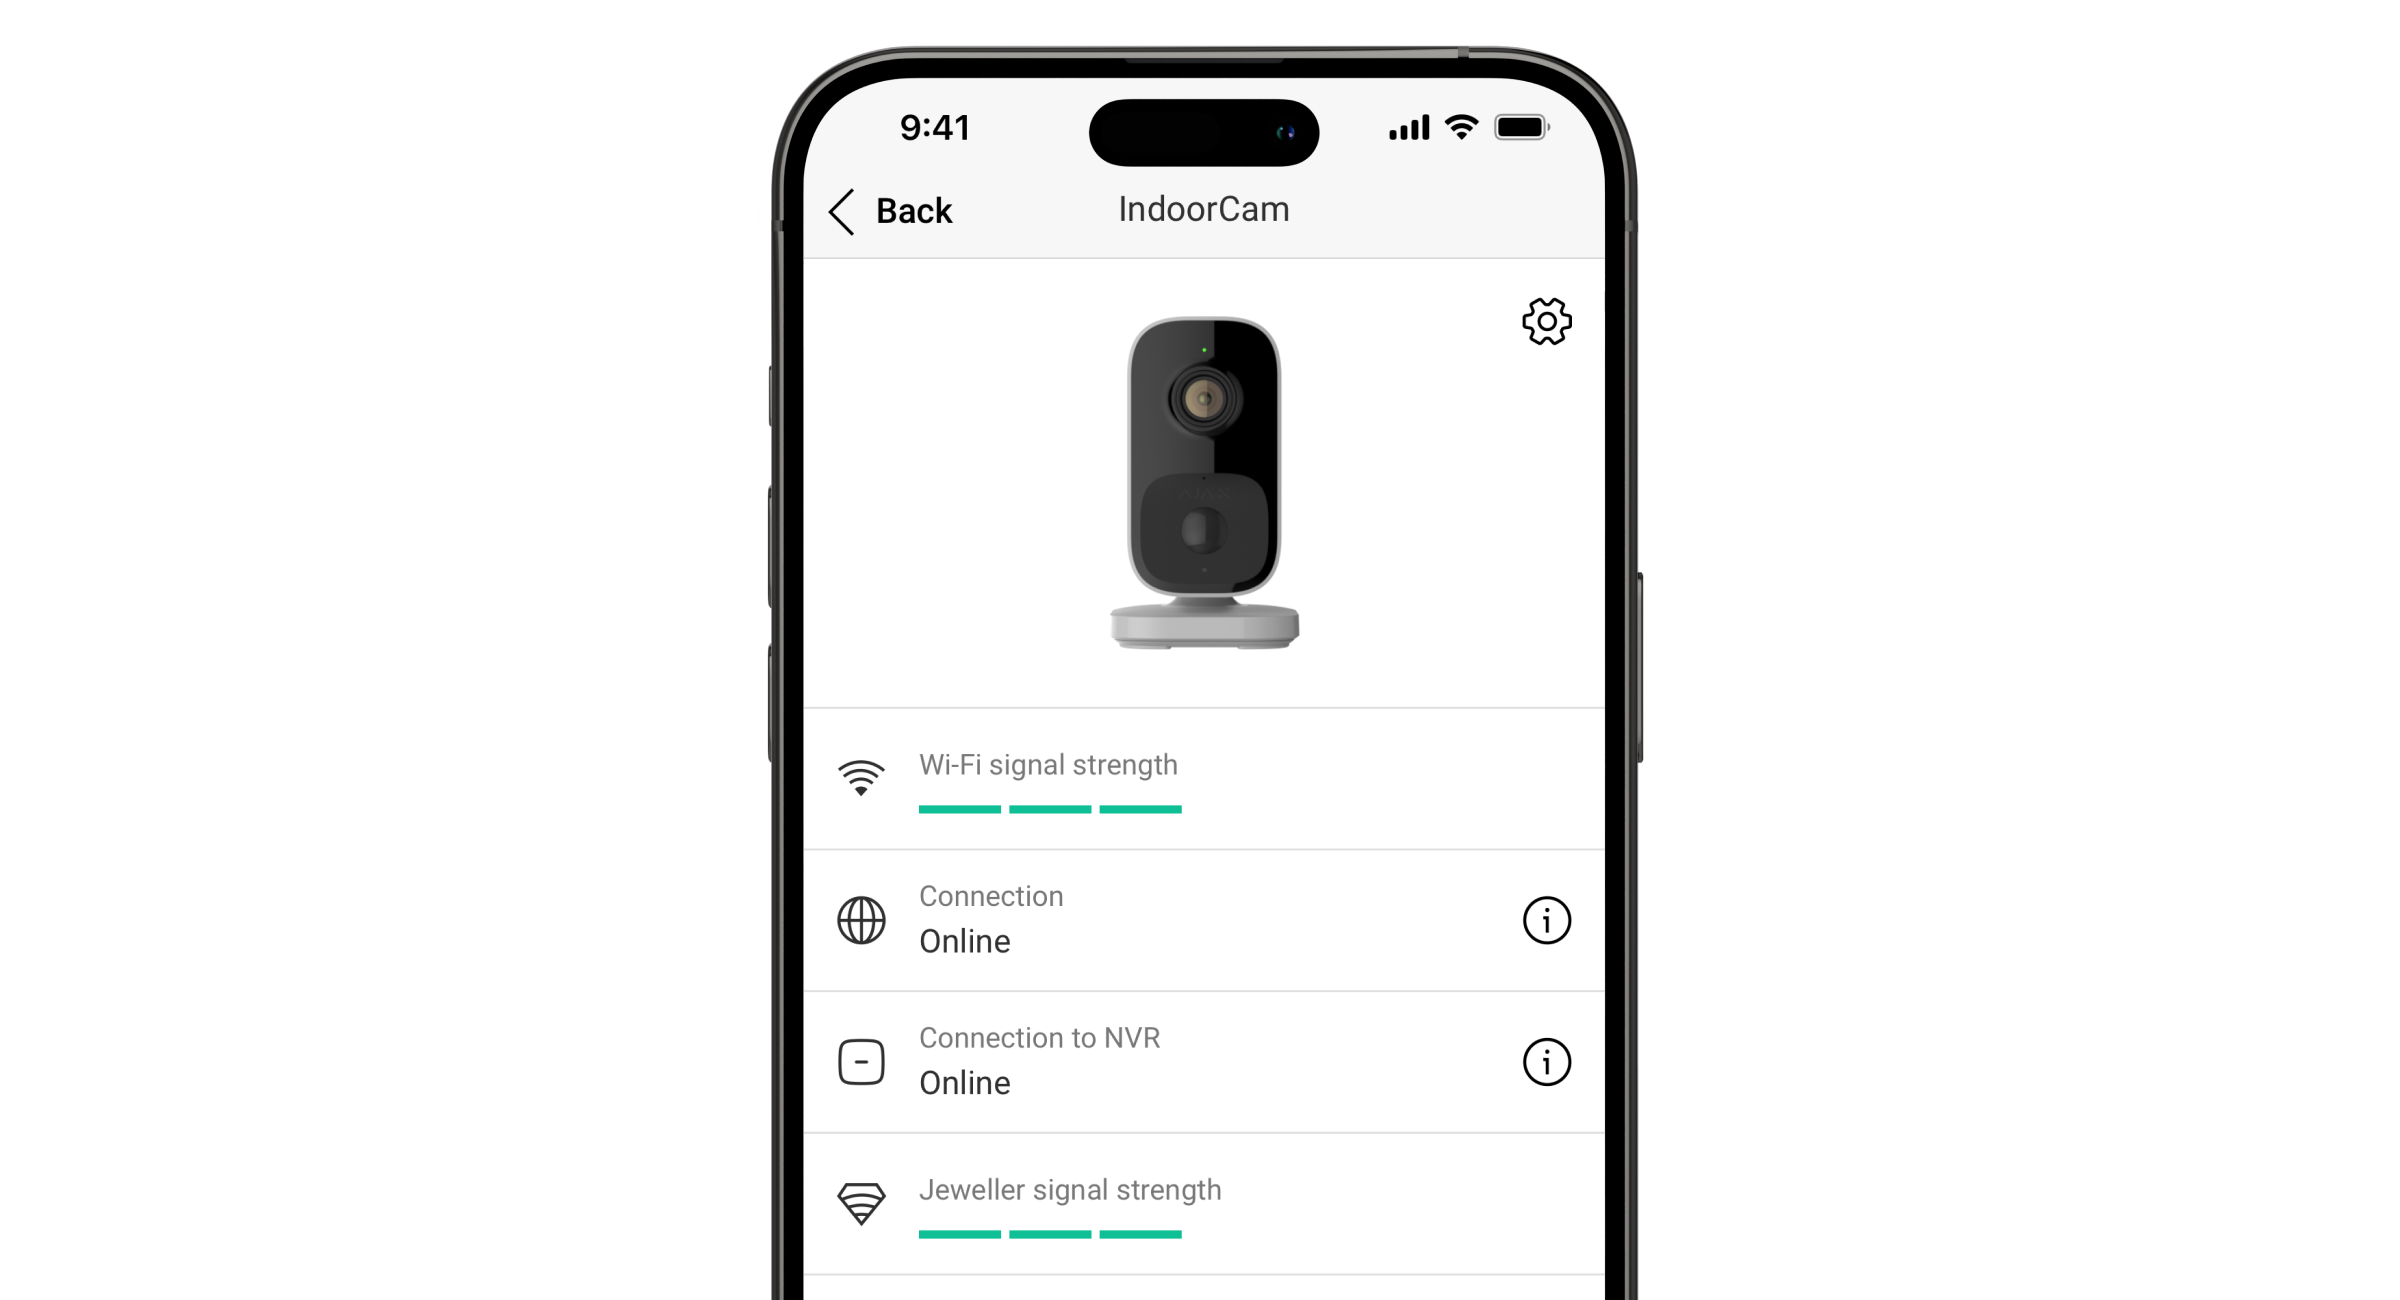
The statuses provide information about the device and its operating parameters. You can find IndoorCam statuses in Ajax apps:
- Go to the" " tab under "Devices
. - Select" " and "IndoorCam from the list.
| Parameter | Meaning |
| Additional Services |
The field is available in Ajax PRO apps, and is displayed when additional services are available or activated for the device based on the subscription. Tapping on the field displays information about the assigned services and the contacts of the company providing those services. |
| Malfunction |
Tapping on This field is displayed only if a malfunction is detected. |
| Firmware Update | This field appears when a firmware update is available:
Tapping on |
| Wi-Fi signal strength | Wi-Fi signal strength via the Wi-Fi communication channel. The recommended value is 2–3 bars. |
| Connection | The device's connection status to the Internet via Wi-Fi:
Tap on |
| Connection to the NVR |
Displayed when the device is connected to the NVR. The device's connection status to the NVR:
Tap on |
| Jeweler signal strength |
Check the signal strength between the device and the hub (or the wireless signal range extender). The recommended value is 2–3 bars. Jeweller is a protocol for transmitting events. The field appears when the device is added to the hub. |
| Connection via Jeweller | Connection status on the Jeweller channel between the device and the hub (or the range extender):
The field appears when the device is added to the hub. |
| Wings signal strength |
Wings signal strength between the device and the hub (or the range extender). The recommended value is 2–3 bars. Wings is a protocol for transmitting photo verifications. The field appears when the device is added to the hub. |
| Connection via Wings | Connection status on the Wings channel between the device and the hub (or the range extender):
The field appears when the device is added to the hub. |
| Status of the device's connection to the radio signal range extender:
This field is displayed if the device is operating via the radio signal range extender. |
|
| Storage location | Displays the list of storage devices connected to IndoorCam:
Tapping on |
| Cloud Archive | Displays the status of Ajax Cloud Storage:
|
| Resolution | The current camera resolution. |
| Frame rate | The current camera frame rate. |
| Bit rate | The current camera bit rate. |
| Video codec | The current video codec:
|
| Motion Detection via Frame Analysis | Motion detection feature status:
|
| Object Detection | Object detection feature settings:
|
| Motion Detection with PIR | :Motion detection with PIR feature status:
|
| Permissions to view |
Displays the number of users who can view video from the device. Tapping on |
| Uptime | The device's operating time since the last reboot. |
| Firmware | Device firmware version. |
| Device ID | Device ID. It is also printed on the QR code on the device's casing and its packaging box. |
| Device No. | Device number. This number is transmitted to the CMS in the event of an alarm or incident. |
Settings
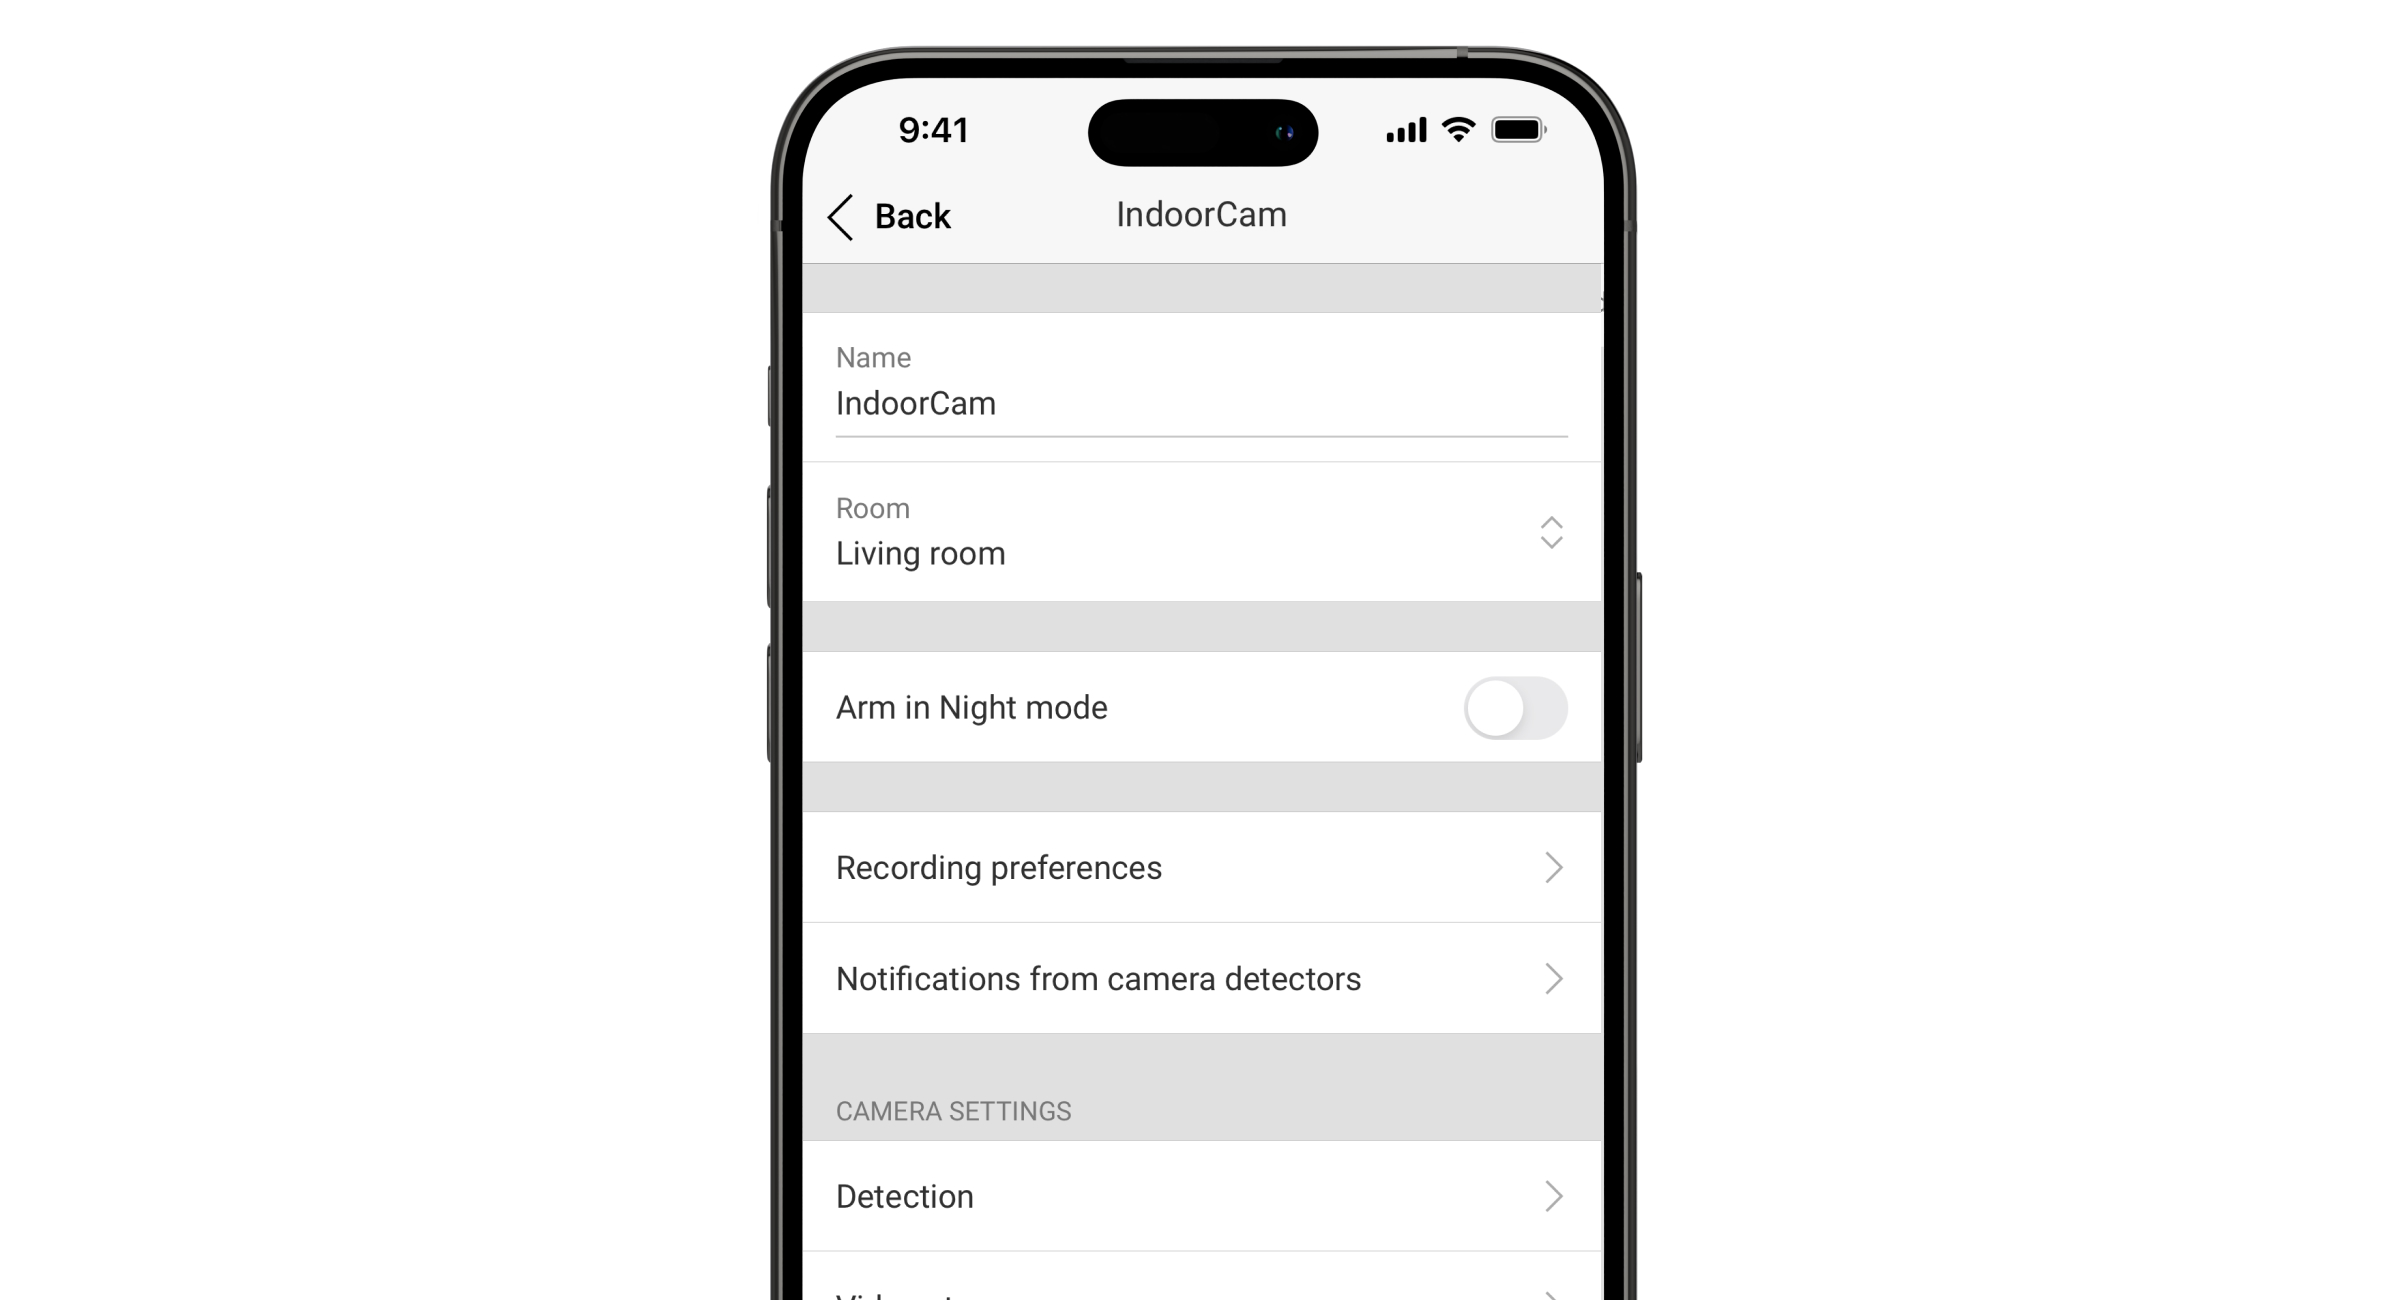
To change camera settings in an Ajax app:
- Go to the" " tab under "Devices
. - Select IndoorCam from the list. If IndoorCam is connected to the video recorder, select NVR and click Cameras.
- Go to Settings by clicking on the gear icon
. - Set the required parameters.
- Tap" " and then to save the new settings.
| Settings | Value |
| Name |
Device name. It appears in the list of hub devices, in the text of SMS messages, and in notifications in the events feed. To change the device name, tap the text field. The name can contain up to 24 Latin characters or up to 12 Cyrillic characters. |
| Room |
Selecting the virtual room to which IndoorCam is assigned. The room name appears in the text of text messages and notifications in the events feed. |
| Arm in Night Mode |
When enabled, the device will switch to armed mode whenever the system is set to“ ” or “Night mode.” |
| Recording Preferences | Selection of the Recording mode for each storage device:
Selecting the armed mode when the camera is recording video:
|
| Notifications from camera detectors |
Opens a menu with Notifications from camera detectors 's settings. |
| Detection |
Opens a menu withthe " detection settings. |
| Video stream |
Opens a menu with settings for the" " video stream ." |
| Image |
Opens a menu with Image settings. |
| Audio | Settings for audio capture and playback.
|
| Privacy Zones |
Allows the user to select zones that are not shown in the camera video. Instead, the user sees a black rectangle. |
| Firmware Update |
Switches the device to firmware update mode if a new version is available. |
| Connection | Opens a menu with settings forthe " connection :
|
| Archive |
Selection of the maximum archive depth. It can be set to a value between 1 and 360 days or can be unlimited. Allows the user to format the cloud archive. |
| Service |
Opens a menu with settings for" " and services. |
| Jeweler Signal Strength Test |
Switches the device to the Jeweller signal strength test mode. The test allows you to check the signal strength between the hub (or the radio signal range extender) and the device via the wireless Jeweller data transfer protocol in order to select the optimal installation location. Available if the device is paired with the hub. |
| Wings Signal Strength Test |
Switches the device to the Wings signal strength test mode. The test allows you to check the signal strength between the hub (or the wireless signal range extender) and the device using the Wings wireless data transfer protocol in order to select the optimal installation location. Available if the device is paired with the hub. |
| Report a problem | Allows the user to describe a problem and submit a report. |
| Monitoring |
This setting is available only in Ajax Pro apps. Allows a PRO with the appropriate permissions to configure the system to set up:
|
| User Guide | Opens the IndoorCam user manual in an Ajax app. |
| Unpair from the NVR |
Unpairs the device from the NVR to which it was paired. This option is available if the device is paired with an NVR. |
| Delete device | It erases all device settings and removes the device from the system. It also unpairs the device from the NVR and the hub, if such connections have been established. |
Notifications from camera detectors
| Settings | Meaning |
| Notify if detected | The user can select the type of object or motion, and when it is detected, a notification is sent and sirens are activated:
Note that the corresponding object or motion types must be enabled in the" " and "Detection settings. To specify whether motion detection should trigger the sirens, tap the desired type of object or motion and enable the" : Activate sirens upon detection option. This feature is available when the camera and at least one siren are added to an Ajax hub runningOS Malevich 2.31 or later. |
| Confirm detections using the PIR sensor |
When this option is selected, the user receives notifications only when detections are captured by both the object/motion recognition system and the PIR sensor. If motion is detected by only one sensor, the system does not send notifications. Available for the Human, Pet, and Any motion (by frame analysis) options. |
| When to Notify | Selecting the mode in which the camera sends notifications:
|
| Interval for reporting similar events |
Selecting the time interval for reporting similar events: from 30 seconds to 8 hours. The default interval is 3 minutes. The selected time applies separately to each detection type and helps prevent repeated notifications regarding the same trigger. |
| Duration of object detection for notification |
Selecting how long an object should remain in the camera’s field of view so that the system sends a notification about the detected object. The available values are : “Notify instantly” ,“ ” 2,“ ” 3, “ ” 4, or“ ” 5 seconds. The default time is 2 seconds. |
Detection settings
| Settings | Meaning |
| Motion Detection with PIR | When this option is enabled, the device uses the built-in PIR sensor for motion detection. |
| PIR sensor sensitivity | The sensitivity level of the PIR motion sensor. It allows the device to be adjusted to the conditions at the site in order to filter out false triggers:
This option is available when" " and "Motion detection with PIR are enabled. |
| Motion Detection via Frame Analysis | When this option is enabled, the camera detects motion using its built-in software. |
| Analyze image |
The software algorithm for image analysis used for motion detection. This option is available when" " and "Motion detection by frame analysis" ( ) are enabled. |
| Motion Detection Settings | Opens a menu with motion detection settings:
This option is available when" " and "Motion detection by frame analysis" ( ) are enabled. |
| Object Detection | When this option is enabled, the camera identifies the type of moving objects using a built-in algorithm. In the video, people, pets, and vehicles are highlighted with colored rectangles. |
| Object Detection Settings | Opens the menu with object detection settings:
This option is available when Object detection is enabled. |
Video stream settings
Settings for mainstream and substream parameters.
| Settings | Meaning |
| Mainstream | |
| Video codec | Selecting the video compression standard:
|
| Resolution | Selecting the default resolution:
|
| Frame rate | Selecting the frame rate: from 3 to 25 in increments of 1 frames per second. |
| Bit Rate Type | Selecting the bit rate type:
|
| Bit rate | Setting the bit rate in kbit/s. |
| GOP length | Selecting the GOP length: from 1 to 250 in increments of 1 frames. |
| VBR quality / CBR quality | Selecting the compression quality: from 0 to 100 in increments of 1. |
| Substream | |
| Video codec | Selecting the video compression standard:
|
| Resolution | Selecting the substream resolution:
|
| Frame rate | Selecting the frame rate: from 3 to 25 in increments of 1 frames per second. |
| Bit Rate Type | Selecting the bit rate type:
|
| Bit rate | Setting the bit rate in kbit/s. |
| GOP length | Selecting the GOP length: from 1 to 250 in increments of 1 frames. |
| VBR quality / CBR quality | Selecting the compression quality: from 0 to 100 in increments of 1. |
Image settings
Settings for camera image quality.
| Settings | Meaning |
| Brightness | Adjusting the image brightness. |
| Color Saturation | Adjusting the image's color saturation. |
| Sharpness | Adjusting the image sharpness. |
| Contrast | Adjusting the image contrast. |
| Wide Dynamic Range (WDR) |
Enabling or disabling WDR. When WDR is enabled, it helps improve camera images that have areas that are too dark or too bright. |
| Day/Night Mode (IR-cut filter) | Selecting the camera's vision mode based on lighting conditions:
|
| Lighting threshold for mode switching | Selecting the light threshold for switching between day and night mode:
This setting is available if Day/Night mode (IR-cut filter) is set to Auto. |
| Infrared Illumination (IR) | Adjusting the intensity of the IR backlight:
This setting is used to capture clear images at night or in low light and ensures visibility using IR LEDs when conventional lighting is ineffective. |
| IR intensity |
Adjusting the IR backlight intensity. This setting is available if Infrared illumination (IR) is set to Custom. |
Service Settings
| Settings | Meaning |
| Time zone |
Time zone selection. It is configured by a user and is displayed when a user views video from the camera. |
| LED Indicator for Motion Detection |
When this option is enabled, the device's LED flashes if motion is detected by the PIR sensor. . The "Motion detection with PIR" option should be enabled in the" " and "Detection settings. |
| Connection via ONVIF |
Configuring the device's connection via ONVIF to third-party VMSs. |
| Server connection | |
| Delay for cloud connection loss alarm, sec |
The delay helps reduce the risk of a false alarm indicating a loss of server connection. The delay can be set between 30 and 600 seconds. |
| Cloud polling interval, sec |
The frequency at which the Ajax Cloud server is polled is set within the range of 30 to 300 seconds. The shorter the interval, the faster the loss of the cloud connection will be detected. |
| Get notified of a lost server connection without an alarm | When the toggle is enabled, the system notifies users of a lost server connection using a standard notification sound instead of a siren alert. |
Indication
Depending on the device's status, the IndoorCam LED indicator may light up in various colors and display different patterns.
| Event | Indication | Note |
| Turning on the device. | The LED lights up green for about 2.5 s. | |
| The device is starting up. | The LED flashes orange. | The indicator remains lit until the device is turned on. |
| The device is in Access Point (AP) mode. | The LED flashes blue continuously. | The indicator remains on until the device is connected to Wi-Fi. |
| The connection to Ajax Cloud was successful. | The LED lights up green for about 3.5 s. | This indication is only available during device setup. |
| The connection to Ajax Cloud has failed. | The LED lights up red for about 1 second. | This indication is only available during device setup. |
| Downloading a new firmware version for the device. | The LED flashes green twice and turns off every 3 seconds. | |
| The device firmware is being updated. | The LED stays lit in green. | The indicator remains on until the firmware update is complete. |
| The device is being reset to its factory settings. | The LED flashes violet every 1.5 seconds. | |
| Motion is detected by a PIR sensor. | The LED glows white for about 2.5 seconds at 50% brightness. | |
| Two-way voice communication is currently in progress. | The LED stays lit in white at 50% brightness. |
Malfunctions
When the device detects a malfunction, a malfunction counter appears in the Ajax app in the upper-left corner of the device icon. All malfunctions can be viewed in thedevice' 's status. Fields with malfunctions will be highlighted in red.
A malfunction is indicated if:
- The device has lost its connection to the server.
- The device temperature is outsidethe acceptable limits set b .
- No connection to the hub or radio signal range extender via Jeweller. This malfunction may occur if the device is paired with the hub.
- No connection to the hub or radio signal range extender via Wings. This issue may occur if the device is paired with the hub.
Maintenance
Check the device's operation regularly. If you notice any deterioration in image quality, loss of clarity, or darkening, check the camera for dirt. Clean the device housing of dust, cobwebs, and other contaminants as they appear. Use soft, dry wipes suitable for equipment maintenance.
Do not use substances containing alcohol, acetone, gasoline, or other strong solvents to clean the device. Wipe the lens carefully, as scratches can result in poor-quality images and camera failure.
Warranty
The warranty for products manufactured by “Ajax Systems Manufacturing” Limited Liability Company is valid for 2 years after purchase.
If the device does not work properly, we recommend contacting support first, as most technical issues can be resolved remotely.