Wired IP surveillance camera with AI support, 110° viewing angle, infrared illumination (IR), True WDR, microphone and PoE/12V power supply. Suitable for both indoor and outdoor installations.
Models
5 Mp/2.8 mm
Resolution up to 2880 × 1620 px
Frame rate up to 25 FPS
Viewing angle 100°-110°
Video stream
Video protocol: JetSparrow (encrypted P2P protocol developed by Ajax Systems)
Memory:
NVR: HDD up to 16 TB (SATA, 3.5"), not included
microSD: up to 256 GB, V30 or faster, not included
Video codecs: H.265, H.264
Dynamic Range: True WDR
Communication channel
Ethernet: up to 100 Mbps
Key features
Motion detection (software level)
AI object detection: people, animals, vehicles
Intelligent IR illumination up to 15 m, automatic brightness adjustment
Visual verification of Ajax alarms (scenario configuration)
ONVIF support: Profile S, Profile T (partial)
Microphone with sound recording
Audio codecs: G711-ULAW, G711-ALAW, G726, G722
Power
Power supply: 12 V⎓ ± 20%, 1 A
Power consumption up to 15 W
Ethernet port: PoE Standard 802.3at/af
Protection against sabotage
mTLS - encrypted connection
Authentication via Cloud
Secure Boot - protection against firmware tampering
Digital signature verification for OTA updates
User and operator access rights distribution
Corpus
Dimensions: 113 × 60 mm
Weight: 360 g
Operating temperature: -30 °C ... +60 °C
Humidity: up to 90%
Protection class: IP65
Colour: white
Set
DomeCam Mini (5 Mp/2.8 mm)
Mounting template
Mounting accessories kit
Quick Installation Guide
Available for pickup at
Out of stock at
Added to compare
Reached count_product-product limit
Added to compare
Reached count_product-product limit
{"id":55845049893199,"title":"Default Title","option1":"Default Title","option2":null,"option3":null,"sku":"367311715","requires_shipping":true,"taxable":true,"featured_image":null,"available":true,"name":"AJAX DomeCam Mini (5 Mp\/4 mm) (8EU) ASP white","public_title":null,"options":["Default Title"],"price":16230,"weight":0,"compare_at_price":20700,"inventory_management":"shopify","barcode":null,"requires_selling_plan":false,"selling_plan_allocations":[],"quantity_rule":{"min":1,"max":null,"increment":1}}
Wired IP surveillance camera with AI support, 110° viewing angle, infrared illumination (IR), True WDR, microphone and PoE/12V power supply. Suitable for both indoor and outdoor installations.
Models
5 Mp/2.8 mm
Resolution up to 2880 × 1620 px
Frame rate up to 25 FPS
Viewing angle 100°-110°
Video stream
Video protocol: JetSparrow (encrypted P2P protocol developed by Ajax Systems)
Memory:
NVR: HDD up to 16 TB (SATA, 3.5"), not included
microSD: up to 256 GB, V30 or faster, not included
Video codecs: H.265, H.264
Dynamic Range: True WDR
Communication channel
Ethernet: up to 100 Mbps
Key features
Motion detection (software level)
AI object detection: people, animals, vehicles
Intelligent IR illumination up to 15 m, automatic brightness adjustment
Visual verification of Ajax alarms (scenario configuration)
ONVIF support: Profile S, Profile T (partial)
Microphone with sound recording
Audio codecs: G711-ULAW, G711-ALAW, G726, G722
Power
Power supply: 12 V⎓ ± 20%, 1 A
Power consumption up to 15 W
Ethernet port: PoE Standard 802.3at/af
Protection against sabotage
mTLS - encrypted connection
Authentication via Cloud
Secure Boot - protection against firmware tampering
Digital signature verification for OTA updates
User and operator access rights distribution
Corpus
Dimensions: 113 × 60 mm
Weight: 360 g
Operating temperature: -30 °C ... +60 °C
Humidity: up to 90%
Protection class: IP65
Colour: white
Set
DomeCam Mini (5 Mp/4 mm)
Mounting template
Mounting accessories kit
Quick Installation Guide
Available for pickup at
Out of stock at
Added to compare
Reached count_product-product limit
Added to compare
Reached count_product-product limit
{"id":55845060051279,"title":"Default Title","option1":"Default Title","option2":null,"option3":null,"sku":"367311714","requires_shipping":true,"taxable":true,"featured_image":null,"available":true,"name":"AJAX DomeCam Mini (5 Mp\/4 mm) (8EU) ASP black","public_title":null,"options":["Default Title"],"price":16230,"weight":0,"compare_at_price":20700,"inventory_management":"shopify","barcode":null,"requires_selling_plan":false,"selling_plan_allocations":[],"quantity_rule":{"min":1,"max":null,"increment":1}}
Wired IP surveillance camera with AI support, 110° viewing angle, infrared illumination (IR), True WDR, microphone and PoE/12V power supply. Suitable for both indoor and outdoor installations.
Models
5 Mp/4 mm
Resolution up to 2880 × 1620 px
Frame rate up to 25 FPS
Viewing angle 100°-110°
Video stream
Video protocol: JetSparrow (encrypted P2P protocol developed by Ajax Systems)
Memory:
NVR: HDD up to 16 TB (SATA, 3.5"), not included
microSD: up to 256 GB, V30 or faster, not included
Video codecs: H.265, H.264
Dynamic Range: True WDR
Communication channel
Ethernet: up to 100 Mbps
Key features
Motion detection (software level)
AI object detection: people, animals, vehicles
Intelligent IR illumination up to 15 m, automatic brightness adjustment
Visual verification of Ajax alarms (scenario configuration)
ONVIF support: Profile S, Profile T (partial)
Microphone with sound recording
Audio codecs: G711-ULAW, G711-ALAW, G726, G722
Power
Power supply: 12 V⎓ ± 20%, 1 A
Power consumption up to 15 W
Ethernet port: PoE Standard 802.3at/af
Protection against sabotage
mTLS - encrypted connection
Authentication via Cloud
Secure Boot - protection against firmware tampering
Wired IP surveillance camera with AI support, 110° viewing angle, infrared (IR) illumination, True WDR, microphone and PoE/12V power supply. Suitable for both indoor and outdoor installations.
Models
5 Mp/4 mm
Resolution up to 2880 × 1620 px
Frame rate up to 25 FPS
Viewing angle 100°-110°
Video stream
Video protocol: JetSparrow (encrypted P2P protocol developed by Ajax Systems)
Memory:
NVR: HDD up to 16 TB (SATA, 3.5"), not included
microSD: up to 256 GB, V30 or faster, not included
Video codecs: H.265, H.264
Dynamic Range: True WDR
Communication channel
Ethernet: up to 100 Mbps
Key features
Motion detection (software level)
AI object detection: people, animals, vehicles
Intelligent IR illumination up to 50 m, automatic brightness adjustment
Visual verification of Ajax alarms (scenario configuration)
ONVIF support: Profile S, Profile T (partial)
Microphone with sound recording
Audio codecs: G711-ULAW, G711-ALAW, G726, G722
Power
Power supply: 12 V⎓ ± 20%, 1 A
Power consumption up to 15 W
Ethernet port: PoE Standard 802.3at/af
Protection against sabotage
mTLS - encrypted connection
Authentication via Cloud
Secure Boot - protection against firmware tampering
Wired IP surveillance camera with AI support, 110° viewing angle, infrared (IR) illumination, True WDR, microphone and PoE/12V power supply. Suitable for both indoor and outdoor installations.
Models
5 Mp/2.8 mm
Resolution up to 2880 × 1620 px
Frame rate up to 25 FPS
Viewing angle 100°-110°
Video stream
Video protocol: JetSparrow (encrypted P2P protocol developed by Ajax Systems)
Memory:
NVR: HDD up to 16 TB (SATA, 3.5"), not included
microSD: up to 256 GB, V30 or faster, not included
Video codecs: H.265, H.264
Dynamic Range: True WDR
Communication channel
Ethernet: up to 100 Mbps
Key features
Motion detection (software level)
AI object detection: people, animals, vehicles
Intelligent IR illumination up to 50 m, automatic brightness adjustment
Visual verification of Ajax alarms (scenario configuration)
ONVIF support: Profile S, Profile T (partial)
Microphone with sound recording
Audio codecs: G711-ULAW, G711-ALAW, G726, G722
Power
Power supply: 12 V⎓ ± 20%, 1 A
Power consumption up to 15 W
Ethernet port: PoE Standard 802.3at/af
Protection against sabotage
mTLS - encrypted connection
Authentication via Cloud
Secure Boot - protection against firmware tampering
Digital signature verification for OTA updates
User and operator access rights distribution
Corpus
Dimensions: 103 × 98 × 98 mm
Weight: 496 g
Operating temperature: -30 °C ... +60 °C
Humidity: up to 90%
Protection class: IP65, IK08
Colour: white
Set
TurretCam (5 Mp/4 mm)
Mounting template
Mounting accessories kit
Quick Installation Guide
Available for pickup at
Out of stock at
Added to compare
Reached count_product-product limit
Added to compare
Reached count_product-product limit
{"id":55845077778767,"title":"Default Title","option1":"Default Title","option2":null,"option3":null,"sku":"367311717","requires_shipping":true,"taxable":true,"featured_image":null,"available":true,"name":"AJAX DomeCam Mini (8 Mp\/2.8 mm) (8EU) ASP white","public_title":null,"options":["Default Title"],"price":21641,"weight":0,"compare_at_price":27600,"inventory_management":"shopify","barcode":null,"requires_selling_plan":false,"selling_plan_allocations":[],"quantity_rule":{"min":1,"max":null,"increment":1}}
Wired IP surveillance camera with AI support, 110° viewing angle, infrared illumination (IR), HDR/True WDR, microphone and PoE/12V power supply. Suitable for both indoor and outdoor installations.
Models
8 Mp/2.8 mm
Resolution up to 3840 × 2160 px
Frame rate up to 20 FPS
Viewing angle 100°-110°
Video stream
Video protocol: JetSparrow (encrypted P2P protocol developed by Ajax Systems)
Memory:
NVR: HDD up to 16 TB (SATA, 3.5"), not included
microSD: up to 256 GB, V30 or faster, not included
Video codecs: H.265, H.264
Dynamic Range: HDR, WDR
Communication channel
Ethernet: up to 100 Mbps
Key features
Motion detection (software level)
AI object detection: people, animals, vehicles
Intelligent IR illumination up to 15 m, automatic brightness adjustment
Visual verification of Ajax alarms (scenario configuration)
ONVIF support: Profile S, Profile T (partial)
Microphone with sound recording
Audio codecs: G711-ULAW, G711-ALAW, G726, G722
Power
Power supply: 12 V⎓ ± 20%, 1 A
Power consumption up to 15 W
Ethernet port: PoE Standard 802.3at/af
Protection against sabotage
mTLS - encrypted connection
Authentication via Cloud
Secure Boot - protection against firmware tampering
Digital signature verification for OTA updates
User and operator access rights distribution
Corpus
Dimensions: 113 × 60 mm
Weight: 360 g
Operating temperature: -30 °C ... +60 °C
Humidity: up to 90%
Protection class: IP65
Colour: white
Set
DomeCam Mini (8 Mp/2.8 mm)
Mounting template
Mounting accessories kit
Quick Installation Guide
Available for pickup at
Out of stock at
Added to compare
Reached count_product-product limit
Added to compare
Reached count_product-product limit
{"id":55845245616463,"title":"Default Title","option1":"Default Title","option2":null,"option3":null,"sku":"367311718","requires_shipping":true,"taxable":true,"featured_image":null,"available":true,"name":"AJAX DomeCam Mini (8 Mp\/4 mm) (8EU) ASP black","public_title":null,"options":["Default Title"],"price":21641,"weight":0,"compare_at_price":27600,"inventory_management":"shopify","barcode":null,"requires_selling_plan":false,"selling_plan_allocations":[],"quantity_rule":{"min":1,"max":null,"increment":1}}
Wired IP surveillance camera with AI support, 110° viewing angle, infrared illumination (IR), HDR/True WDR, microphone and PoE/12V power supply. Suitable for both indoor and outdoor installations.
Models
8 Mp/4 mm
Resolution up to 3840 × 2160 px
Frame rate up to 20 FPS
Viewing angle 100°-110°
Video stream
Video protocol: JetSparrow (encrypted P2P protocol developed by Ajax Systems)
Memory:
NVR: HDD up to 16 TB (SATA, 3.5"), not included
microSD: up to 256 GB, V30 or faster, not included
Video codecs: H.265, H.264
Dynamic Range: HDR, WDR
Communication channel
Ethernet: up to 100 Mbps
Key features
Motion detection (software level)
AI object detection: people, animals, vehicles
Intelligent IR illumination up to 15 m, automatic brightness adjustment
Visual verification of Ajax alarms (scenario configuration)
ONVIF support: Profile S, Profile T (partial)
Microphone with sound recording
Audio codecs: G711-ULAW, G711-ALAW, G726, G722
Power
Power supply: 12 V⎓ ± 20%, 1 A
Power consumption up to 15 W
Ethernet port: PoE Standard 802.3at/af
Protection against sabotage
mTLS - encrypted connection
Authentication via Cloud
Secure Boot - protection against firmware tampering
Digital signature verification for OTA updates
User and operator access rights distribution
Corpus
Dimensions: 113 × 60 mm
Weight: 360 g
Operating temperature: -30 °C ... +60 °C
Humidity: up to 90%
Protection class: IP65
Colour: black
Set
DomeCam Mini (8 Mp/4 mm)
Mounting template
Mounting accessories kit
Quick Installation Guide
Available for pickup at
Out of stock at
Added to compare
Reached count_product-product limit
Added to compare
Reached count_product-product limit
{"id":55845262098767,"title":"Default Title","option1":"Default Title","option2":null,"option3":null,"sku":"367311719","requires_shipping":true,"taxable":true,"featured_image":null,"available":true,"name":"AJAX DomeCam Mini (8 Mp\/4 mm) (8EU) ASP white","public_title":null,"options":["Default Title"],"price":21641,"weight":0,"compare_at_price":27600,"inventory_management":"shopify","barcode":null,"requires_selling_plan":false,"selling_plan_allocations":[],"quantity_rule":{"min":1,"max":null,"increment":1}}
Wired IP surveillance camera with AI support, 110° viewing angle, infrared illumination (IR), HDR/True WDR, microphone and PoE/12V power supply. Suitable for both indoor and outdoor installations.
Models
8 Mp/4 mm
Resolution up to 3840 × 2160 px
Frame rate up to 20 FPS
Viewing angle 100°-110°
Video stream
Video protocol: JetSparrow (encrypted P2P protocol developed by Ajax Systems)
Memory:
NVR: HDD up to 16 TB (SATA, 3.5"), not included
microSD: up to 256 GB, V30 or faster, not included
Video codecs: H.265, H.264
Dynamic Range: HDR, WDR
Communication channel
Ethernet: up to 100 Mbps
Key features
Motion detection (software level)
AI object detection: people, animals, vehicles
Intelligent IR illumination up to 15 m, automatic brightness adjustment
Visual verification of Ajax alarms (scenario configuration)
ONVIF support: Profile S, Profile T (partial)
Microphone with sound recording
Audio codecs: G711-ULAW, G711-ALAW, G726, G722
Power
Power supply: 12 V⎓ ± 20%, 1 A
Power consumption up to 15 W
Ethernet port: PoE Standard 802.3at/af
Protection against sabotage
mTLS - encrypted connection
Authentication via Cloud
Secure Boot - protection against firmware tampering
Digital signature verification for OTA updates
User and operator access rights distribution
Corpus
Dimensions: 113 × 60 mm
Weight: 360 g
Operating temperature: -30 °C ... +60 °C
Humidity: up to 90%
Protection class: IP65
Colour: white
Set
DomeCam Mini (8 Mp/4 mm)
Mounting template
Mounting accessories kit
Quick Installation Guide
Available for pickup at
Out of stock at
Added to compare
Reached count_product-product limit
Added to compare
Reached count_product-product limit
{"id":55845590761807,"title":"Default Title","option1":"Default Title","option2":null,"option3":null,"sku":"367313039","requires_shipping":true,"taxable":true,"featured_image":null,"available":true,"name":"Ajax Doorbell wireless video doorbell in graphite","public_title":null,"options":["Default Title"],"price":28238,"weight":0,"compare_at_price":36015,"inventory_management":"shopify","barcode":null,"requires_selling_plan":false,"selling_plan_allocations":[],"quantity_rule":{"min":1,"max":null,"increment":1}}
A video doorbell with built-in artificial intelligence (AI), a PIR sensor, and app-based control. Equipped with two-way audio, motion detection, and object recognition. With DoorBell, users can view archived videos, watch live streams, and talk to visitors at the door.
DoorBell connects to the system via Wi-Fi and can be connected to the hub as a backup communication channel. Recorded videos can be stored on an Ajax NVR connected to the same network or in the Ajax Cloud Storage archive, depending on the subscription plan.
Buy DoorBell
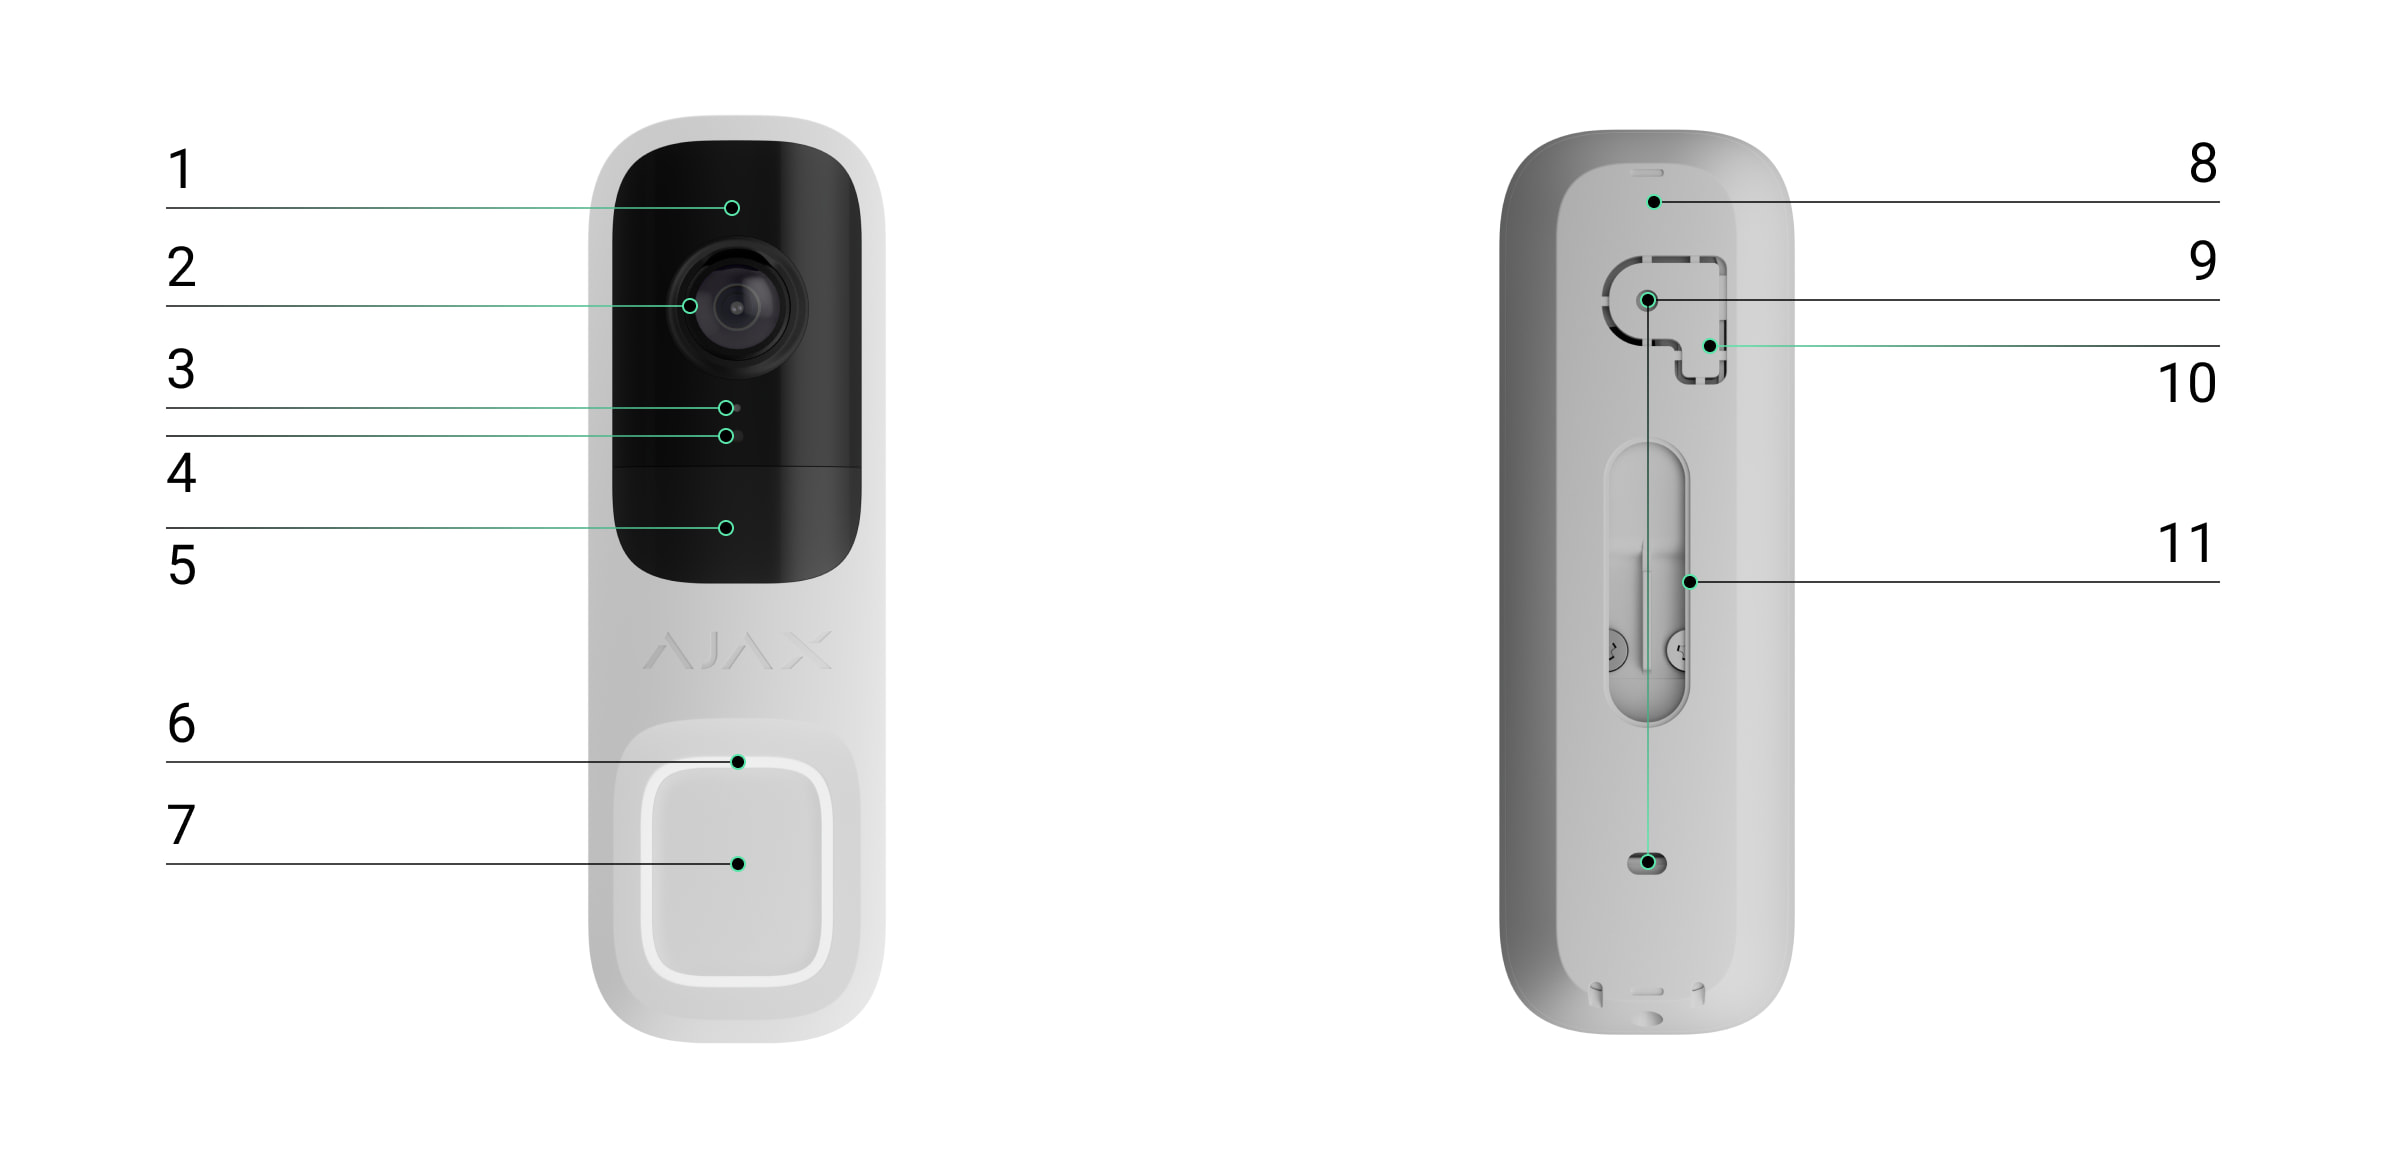
Functional elements
DoorBell
Functional Elements — DoorBell
Infrared (IR) lighting — used for video recording in the dark and in low-light conditions.
Camera.
Microphone.
Ambient light sensor.
Motion sensor lens.
Circular LED indicator around the button.
DoorBell button.
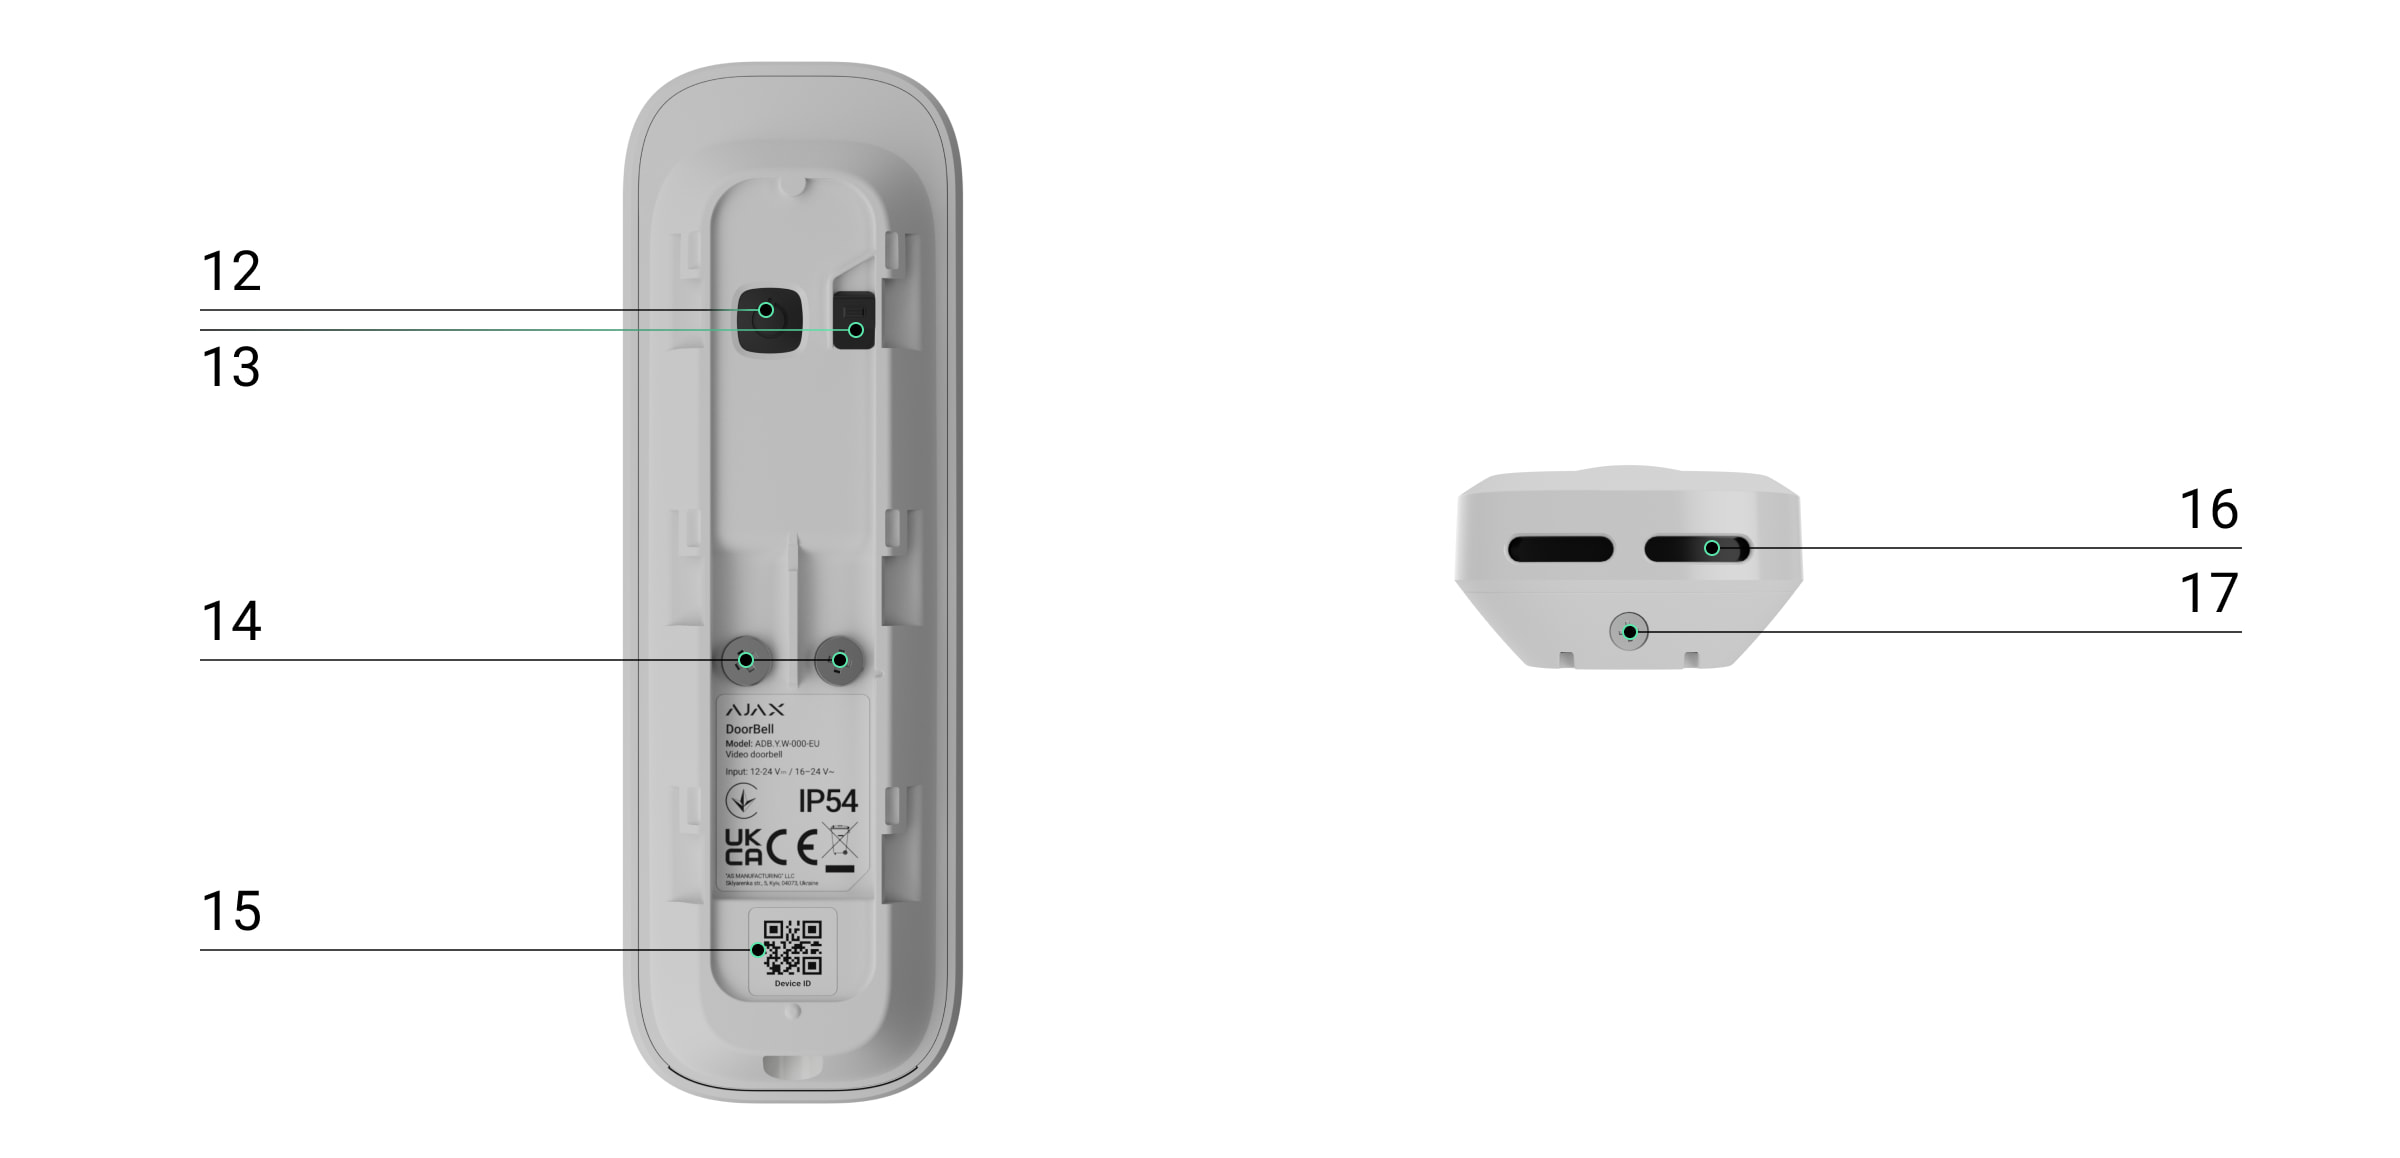
SmartBracket mounting panel—to remove the panel, slide it down.
Holes for attaching the SmartBracket to a surface or a wedge-shaped bracket.
Perforated section of the mounting panel—the tamper is triggered if an attempt is made to detach the device from the surface. Do not tear it off.
Hole for routing the external power cable.
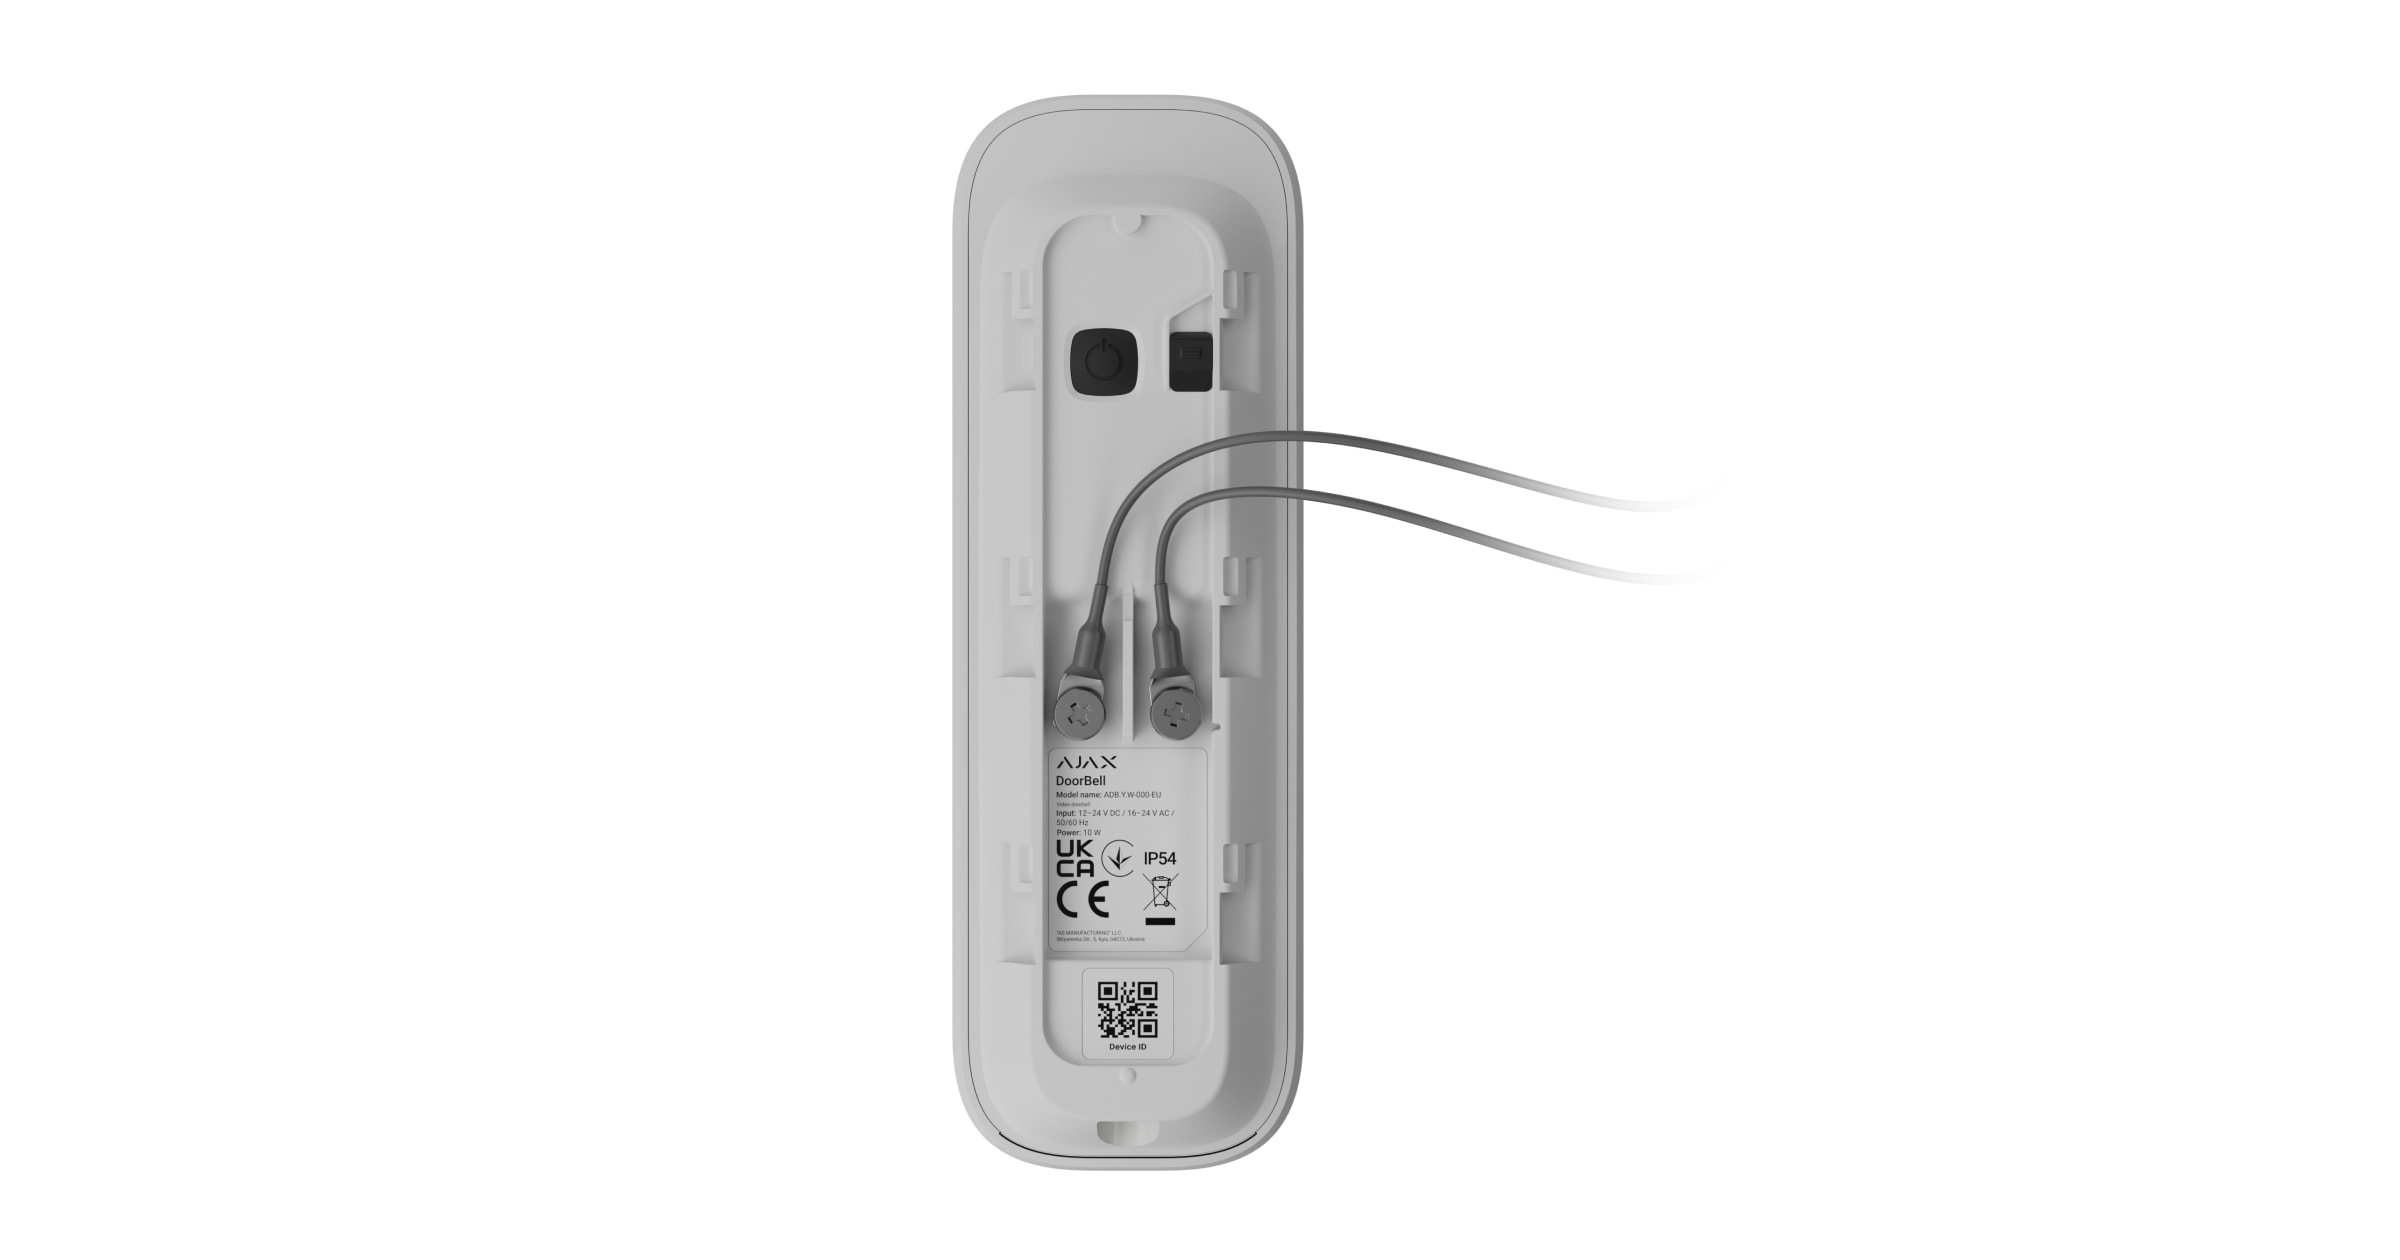
Power button.
Tamper button.
Terminals for connecting the external power supply.
QR code with the device ID—use this to add the device to a room.
Speaker for two-way voice communication.
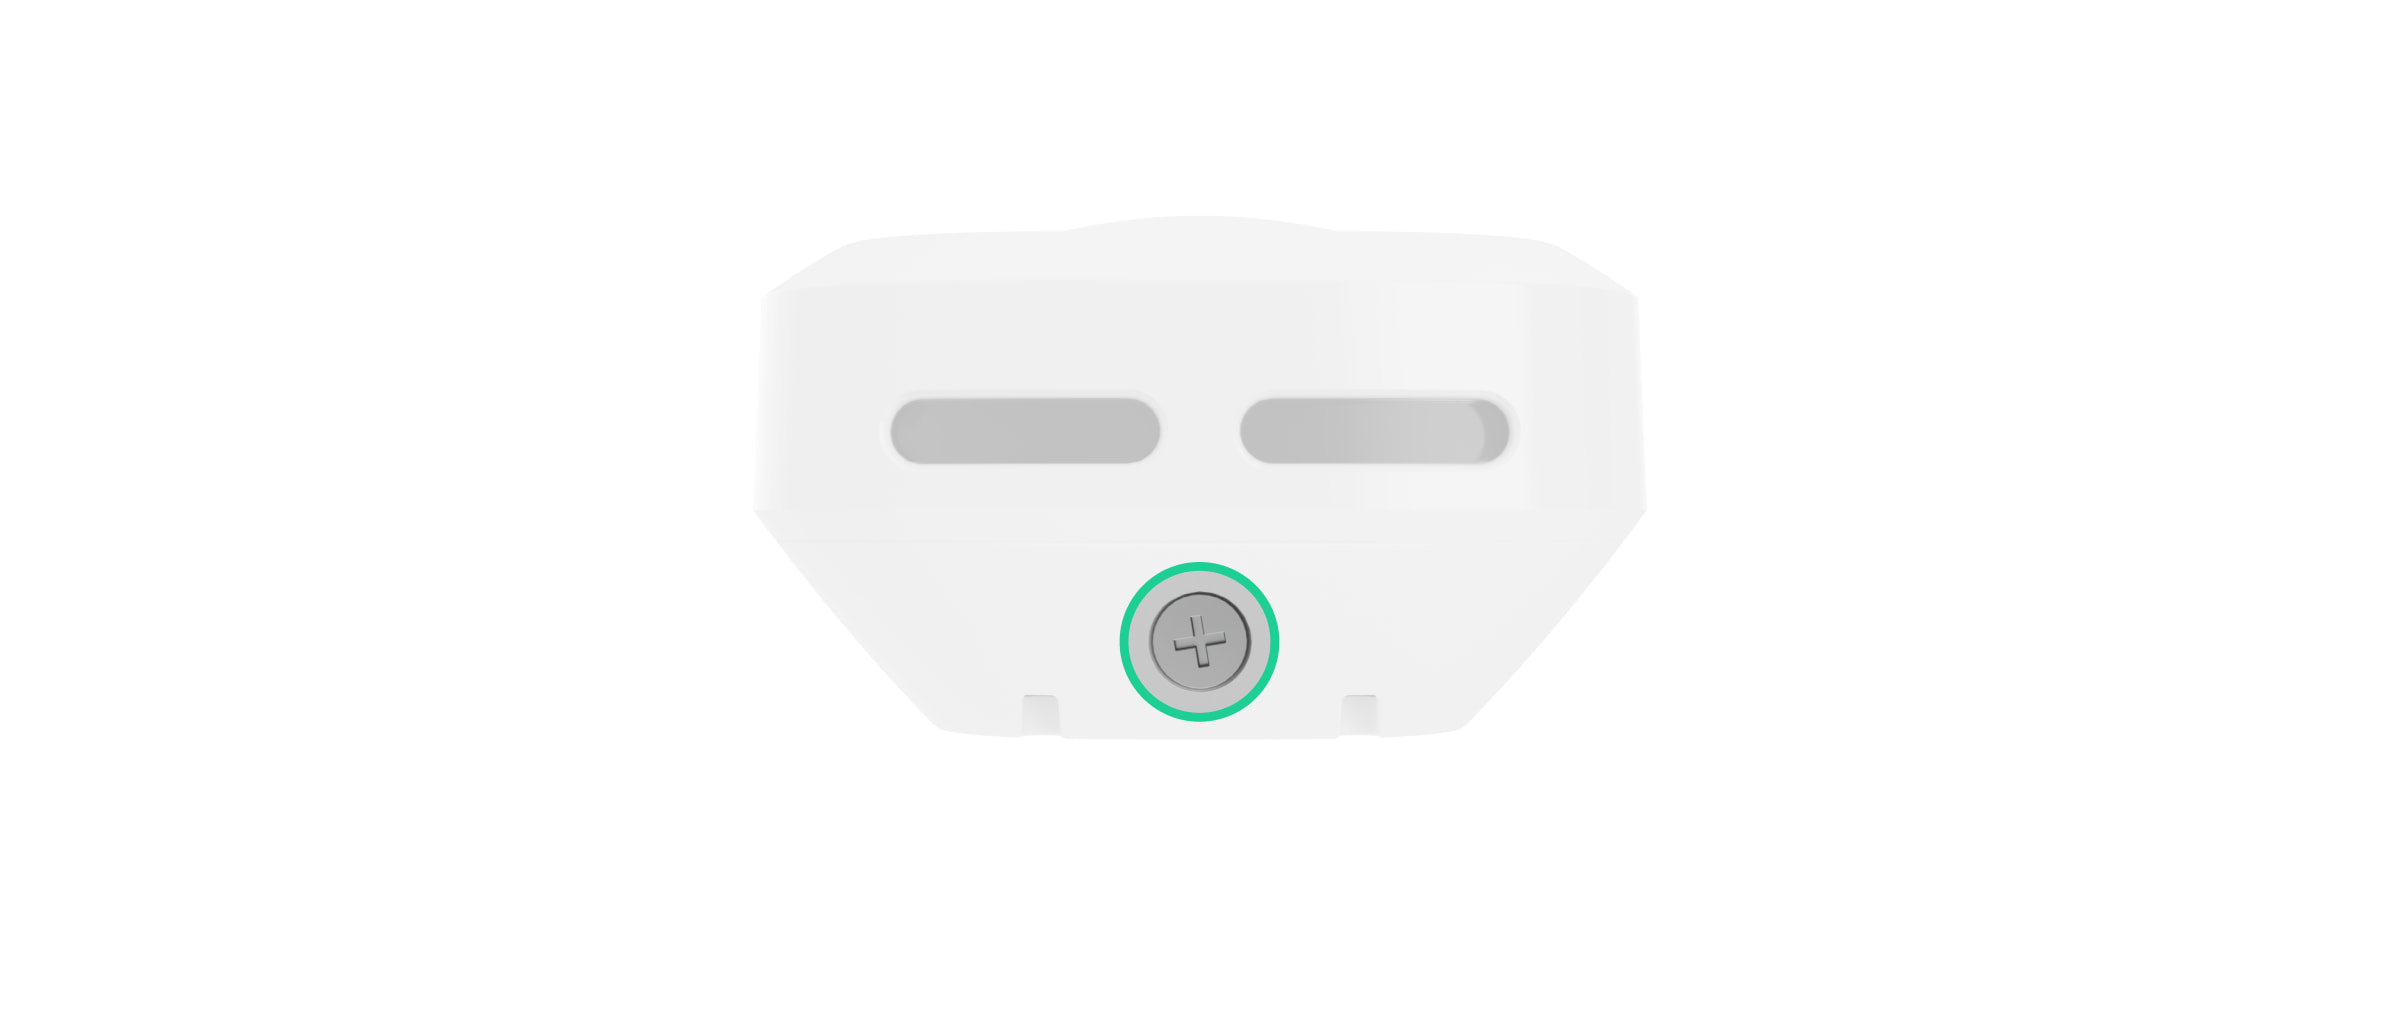
Mounting screw—for securing the device to the SmartBracket mounting panel.
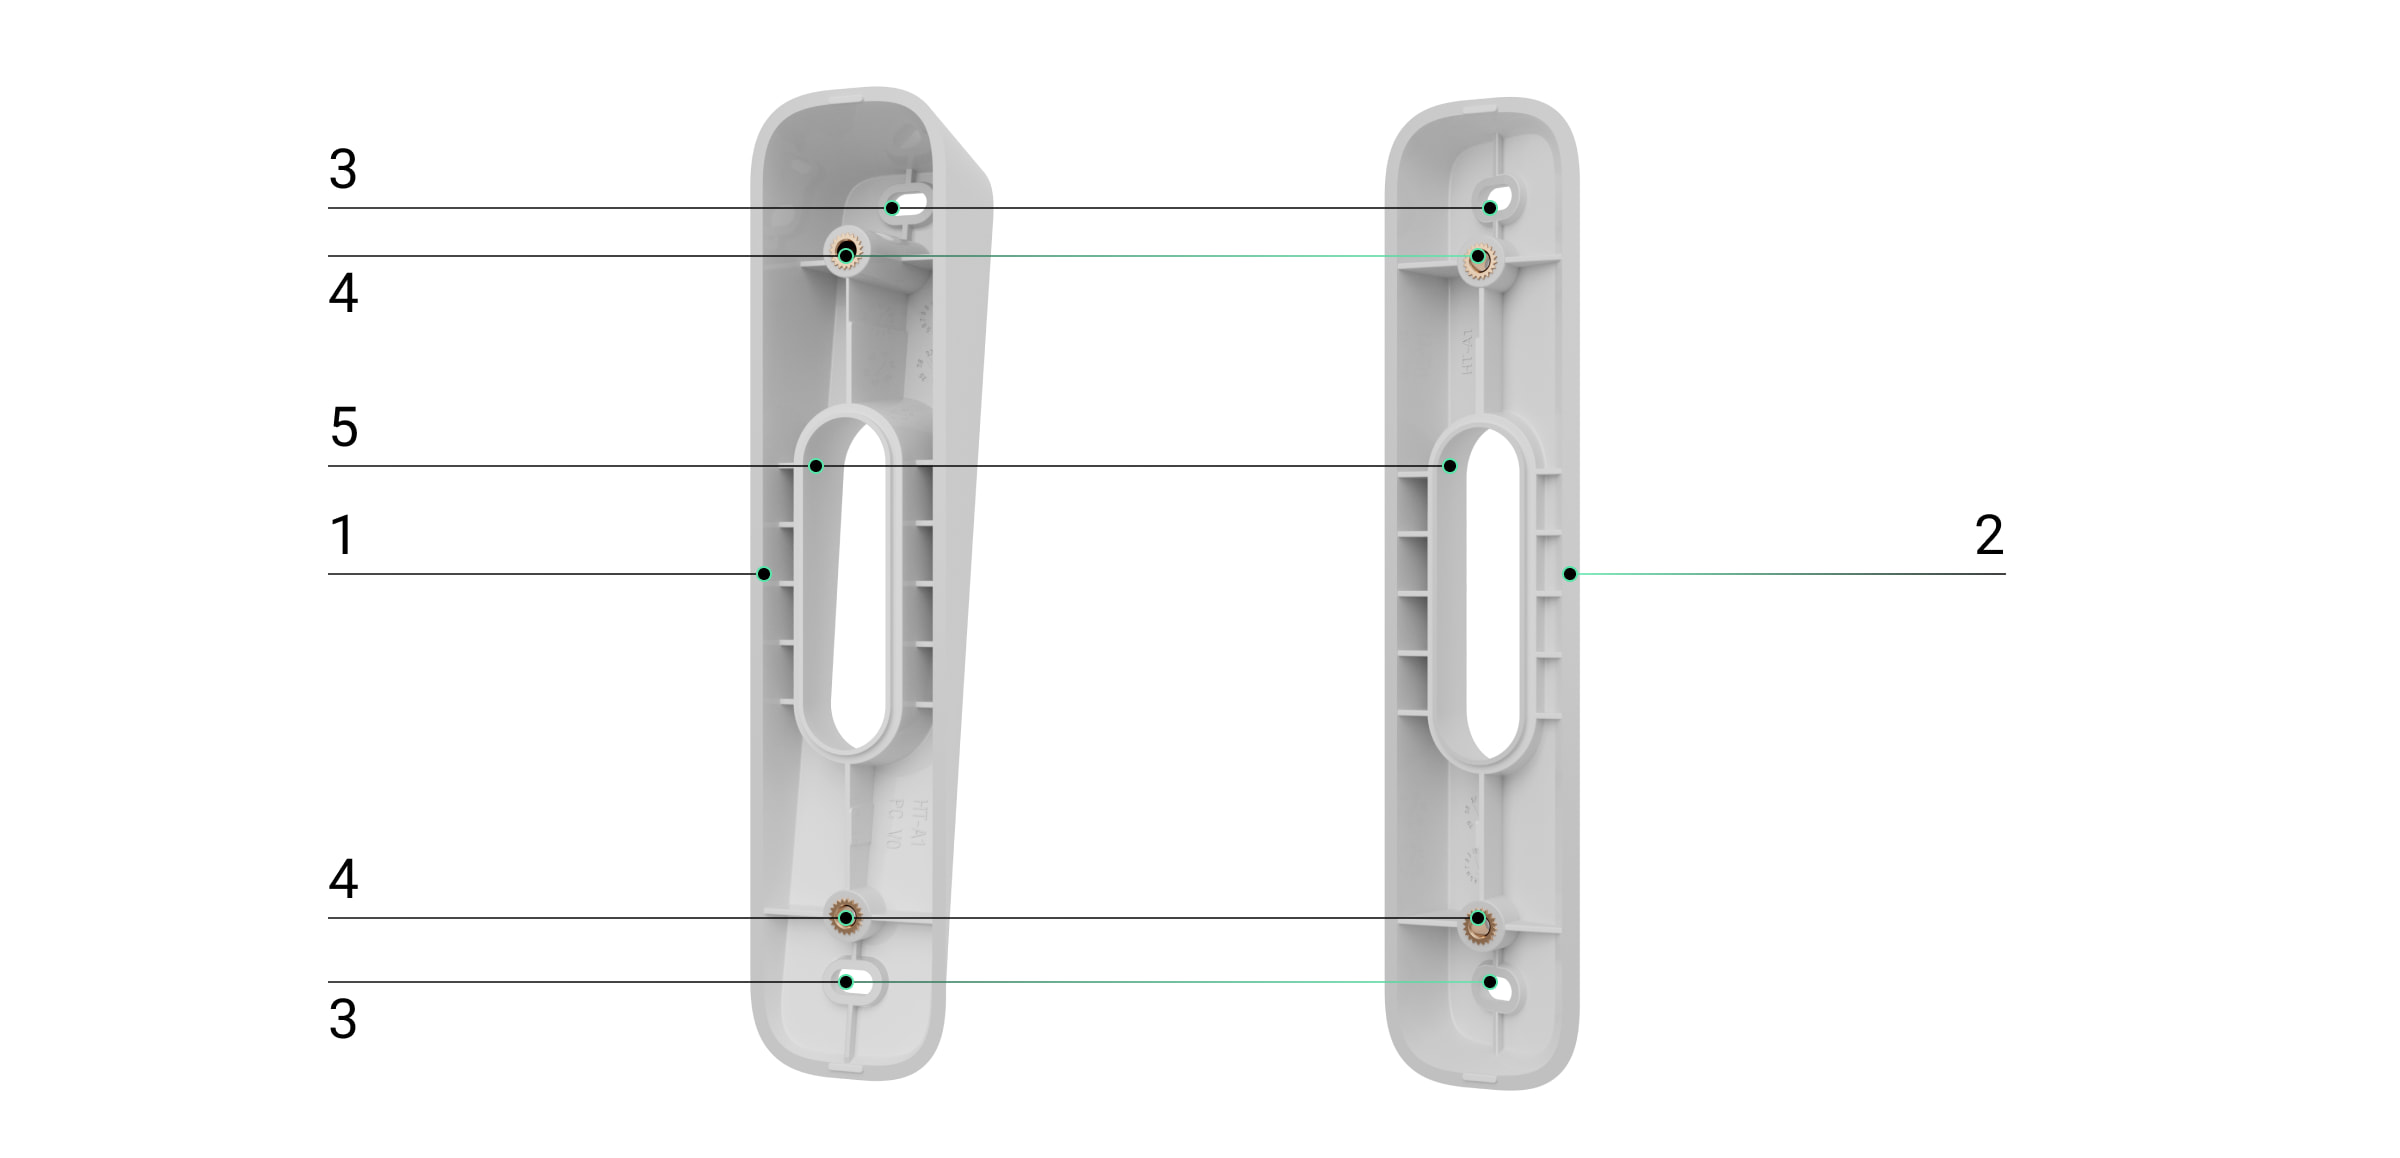
Wedge-shaped brackets.
Wedge-shaped brackets
DoorBell wedge-shaped bracket for tilting 10° up or down.
Wedge-shaped bracket for rotating the DoorBell 25° to the right or left.
Holes for mounting the wedge-shaped brackets to a surface.
Mounting points for securing the SmartBracket to the wedge-shaped brackets with screws.
Holes for routing the external power cable.
How It Works
DoorBell is equipped with a large mechanical button, a camera with IR illumination, an LED indicator, as well as a microphone and speaker for two-way communication. The device allows you to see and speak with a visitor who has pressed the doorbell, as well as monitor the situation at the entrance.
DoorBell uses a camera with artificial intelligence (AI) support for object recognition. The algorithms can identify moving objects and distinguish between people, animals, and vehicles.
The device is equipped with smart IR lighting, which ensures high-quality images even in low light. DoorBell automatically adjusts the lighting intensity in real time, preventing overexposure and allowing you to clearly see objects both near and far.
To save recorded videos, DoorBell must be connected to an Ajax NVR or cloud storage must be enabled.
DoorBell Features
Communicate with visitors who have pressed the DoorBell button.
View live video with the ability to zoom in.
Access archives using the recording timeline and calendar (available if an Ajax NVR is connected or cloud storage is enabled).
Configure motion detection zones and adjust sensitivity levels.
View the Video Wall, which combines the images from all connected cameras.
Quickly access automation device controls from the video player menu.
Create video scenarios that send a short video clip from a selected camera to the Ajax app when a security detector is triggered.
Download the necessary video clip segments to your smartphone or computer (available if an Ajax NVR is connected or cloud storage is enabled).
Video clips downloaded from DoorBell with firmware version 2.228 or later bear an Ajax digital signature that certifies the video’s integrity. Authenticity can be verified using the Ajax media player software.
ONVIF Integration
DoorBell with firmware version 2.377 or later supports ONVIF authorization and integration with VMS systems (such as Milestone, Genetec, Axxon, and Digifort).
You can configure ONVIF:
In theAjax Security System app (version 3.25 or later).
Ajax PRO: Tool for Engineers (version 2.25 or later).
Ajax PRO Desktop (version 4.20 or later).
Ajax Desktop (version 4.21 or later).
Video Scenarios
The Ajax system supports the use of IP cameras for alarm verification. Video scenarios allow you to link alarms to corresponding video feeds from cameras at the site.
Cameras can be configured to respond to alarms from one, several, or all connected devices. If a moving object is detected or an AI-classified object is identified, the system can automatically activate sirens.
Video Wall
On theVideo Wall tab, the user can:
Switch between cameras.
Search for cameras by name.
Control PTZ cameras.
Save custom layouts for viewing video.
Change the video display order.
Create slideshows.
Privacy Zones
The system allows you to hide parts of the frame (such as a safe or private objects). Motion and objects within a privacy zone will neither be detected nor recorded.
Configuration in the Ajax app:
Open the Devices tab.
Select a device or NVR → Cameras.
Open Settings → Privacy Zones.
Specify the desired area.
Privacy Zones
Tap the icon to return to the camera settings.
You can create up to four privacy zones.
Firmware Update
If a new firmware version is available for DoorBell, an icon appears on the Devices tab in the Ajax apps. An administrator or PRO user with access to system settings can initiate the update via the device’s status or settings. The on-screen instructions will help you successfully complete the update.
Working with the Ajax Hub
The system allows you to configure a backup communication channel so that the device continues to transmit events and alarms even if the Wi-Fi network is down or lost.
The backup communication channel is established by connecting the device to a hub that provides connectivity via the Jeweller and Wings radio protocols. In this mode, the device can transmit alarms, events, and photo verifications, but the live stream and archived recordings will not be available during a Wi-Fi outage.
When connected to the DoorBell hub, it occupies one device slot.
Compatible Hubs and Repeaters
For the device to work, an Ajax hub with OS Malevich 2.27 or later is required.
Jeweller and Wings data transmission protocols
Jeweller and Wings are wireless data transmission protocols that ensure fast and reliable two-way communication between the hub and devices. DoorBell uses these protocols as a backup communication channel for transmitting events and photos.
Choosing an Installation Location
DoorBell is best placed at the entrance to a building or a secured area. This allows visitors to ring the bell, while users can see and communicate with visitors, as well as monitor the situation at the entrance.
The device is designed to be installed at a height of 1.2–1.5 m above the floor. It must be installed on a flat, vertical surface. This ensures a secure mounting and helps prevent false tamper alarms.
Depending on the installation location and height, wedge-shaped brackets can be used to adjust the device's angle. This is necessary to ensure that the motion sensor and camera provide proper coverage.
When choosing where to install the DoorBell, consider the following factors:
Wi-Fi signal strength.
Jeweller and Wings signal strength (if the device is connected to a hub).
The presence of objects or structures that may obstruct the device's line of sight.
Only certified specialists may design and install the system.
Signal Strength
Signal strength is determined based on the number of data packets that were not transmitted or were corrupted during a specific time period.
In Ajax apps, on the Devices tab:
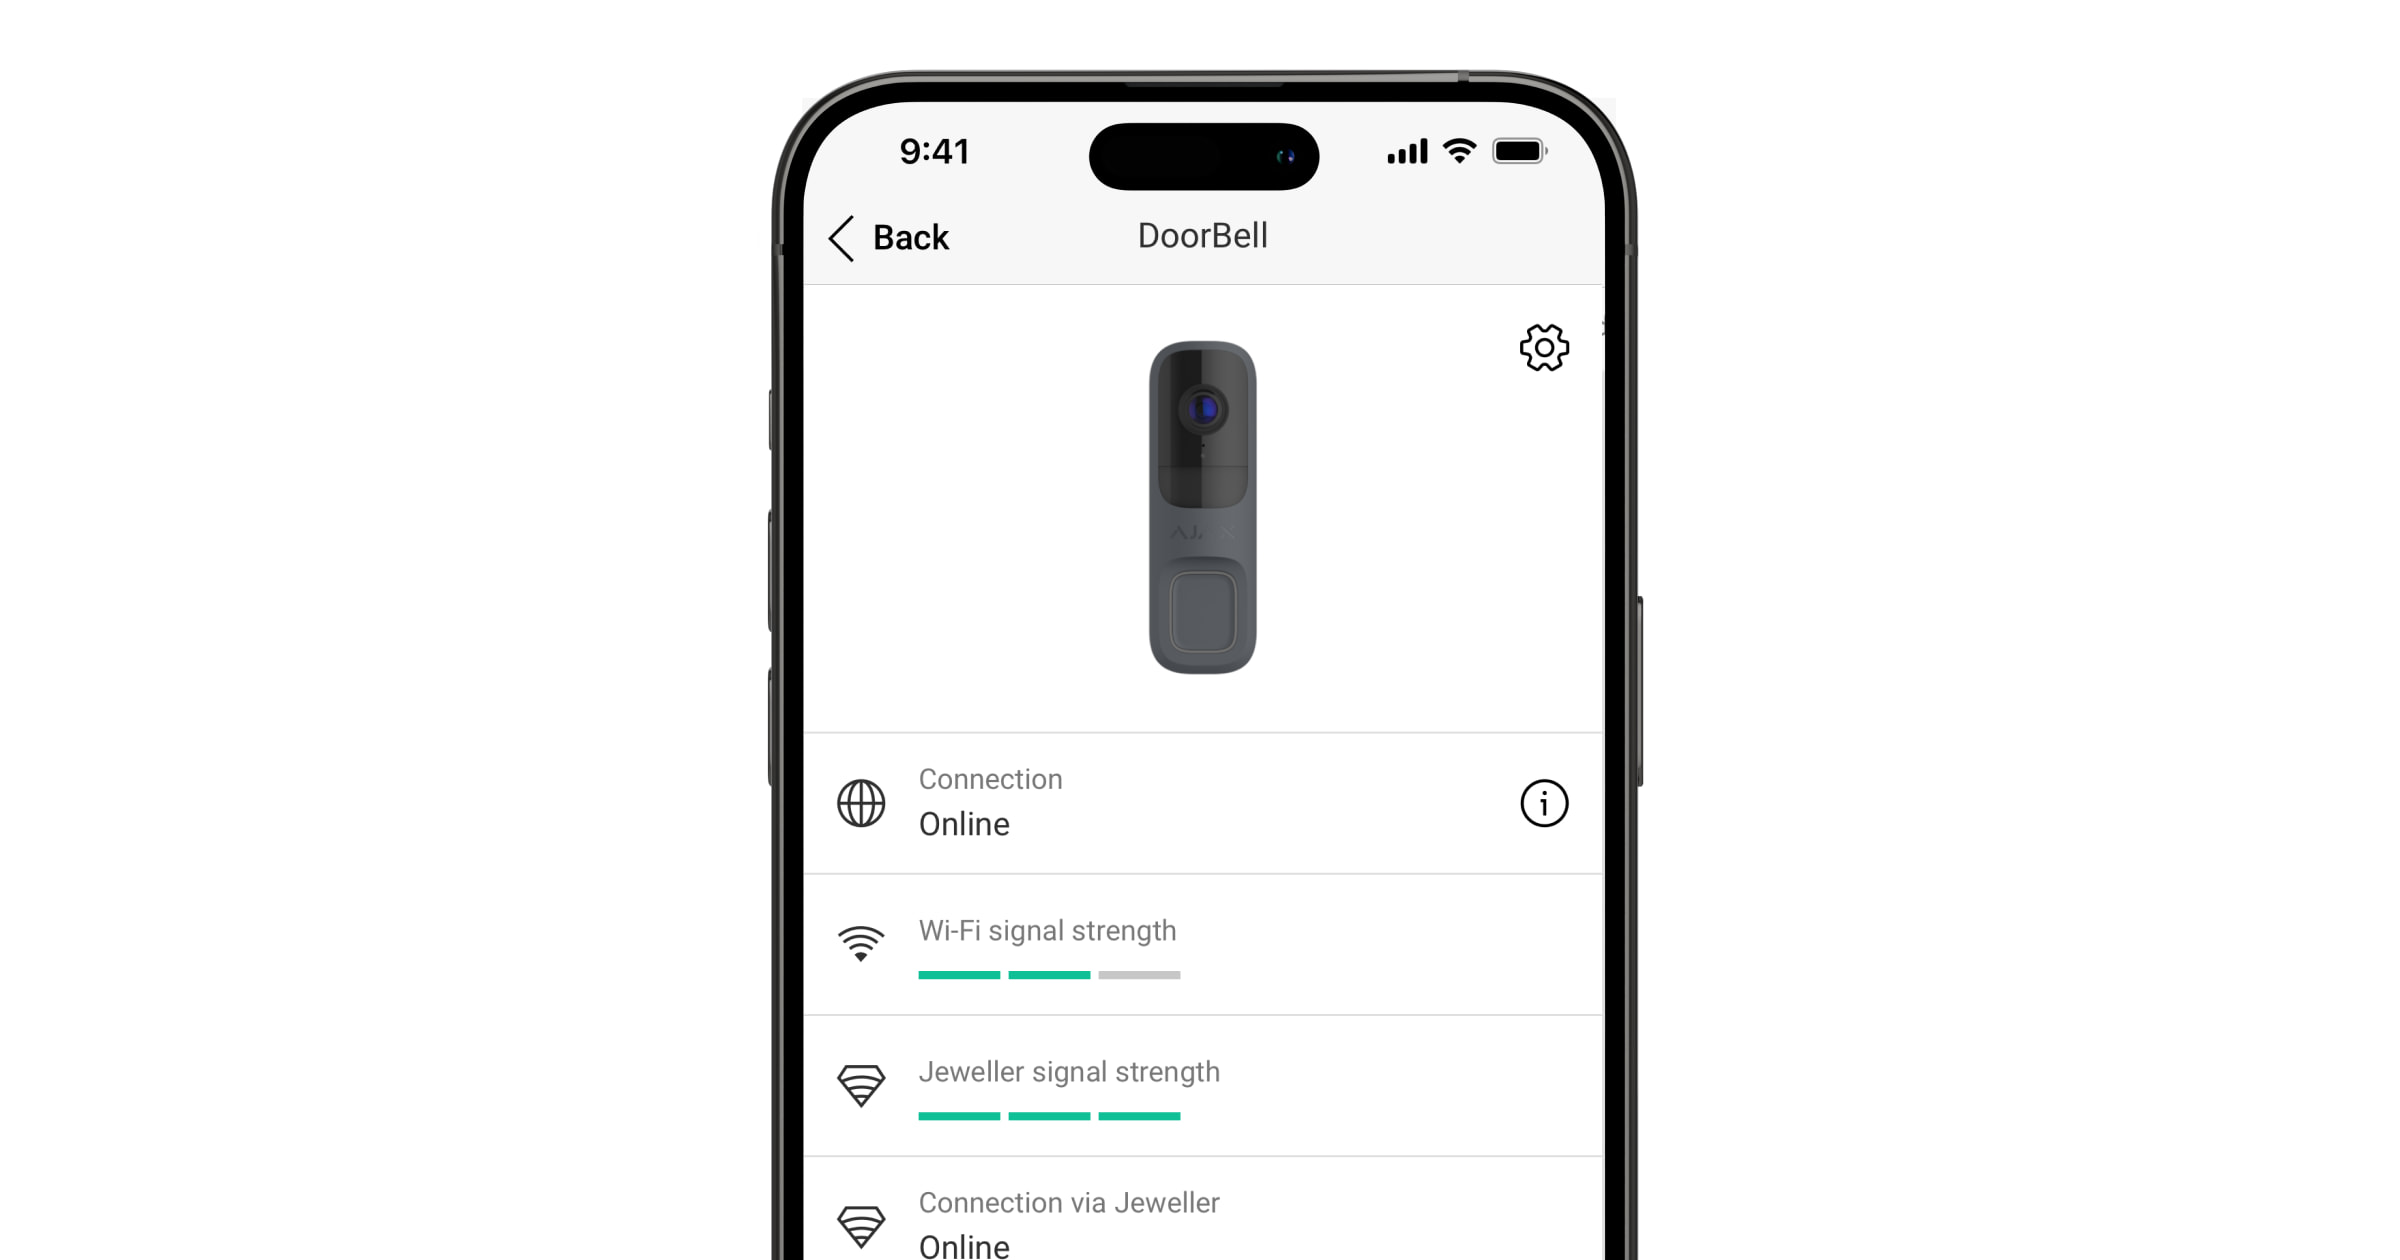
The Wi-Fi signal strength is indicated by the icon.
The signal strength of the connection to the hub is indicated by the icon .
Signal levels:
3 bars — a great signal.
2 bars — good signal.
1 bar — weak signal; stable performance is not guaranteed.
Gray icon — no signal.
Do not install the device:
In locations where the temperature or humidity exceeds the permissible limits (this may damage the device).
In areas where objects or structures obstruct the camera's field of view.
In areas with a weak or unstable Wi-Fi signal.
In areas with a weak or unstable Jeweller or Wings signal (when connected to a hub).
In direct sunlight (this can cause overheating and damage to the electronics).
Installation
Before installing the DoorBell, make sure you have chosen the best location that meets the requirements in this manual.
When connecting an external power source and using DoorBell, follow the general safety guidelines for electrical equipment, as well as the requirements of applicable regulations regarding electrical safety.
DoorBell is equipped with terminals for connecting an external power source:
12–24 V⎓
16–24 V AC, 50/60 Hz
Feeding Parameters
Parameter
12 V⎓
24 V⎓
16 V~
24 V~
Wireless connection
Min. current, A
1
0,5
0,6
0,4
Min. power, W or VA
12
12
10
10
Max. cable resistance, Ω
3
5
3
5
Max. cable length (2 strands, 22 AWG), m
57
94
57
94
Max. cable length (2 strands, 20 AWG), m
90
150
90
150
Max. cable length (2 strands, 18 AWG), m
143
239
143
239
Wired connection
Min. current, A
3
3
0,6
0,4
Min. power, W or VA
36
72
10
10
Max. cable resistance, Ω
1
3
1
3
Max. cable length (2 strands, 22 AWG), m
19
57
19
57
Max. cable length (2 strands, 20 AWG), m
30
90
30
90
Max. cable length (2 strands, 18 AWG), m
48
143
48
143
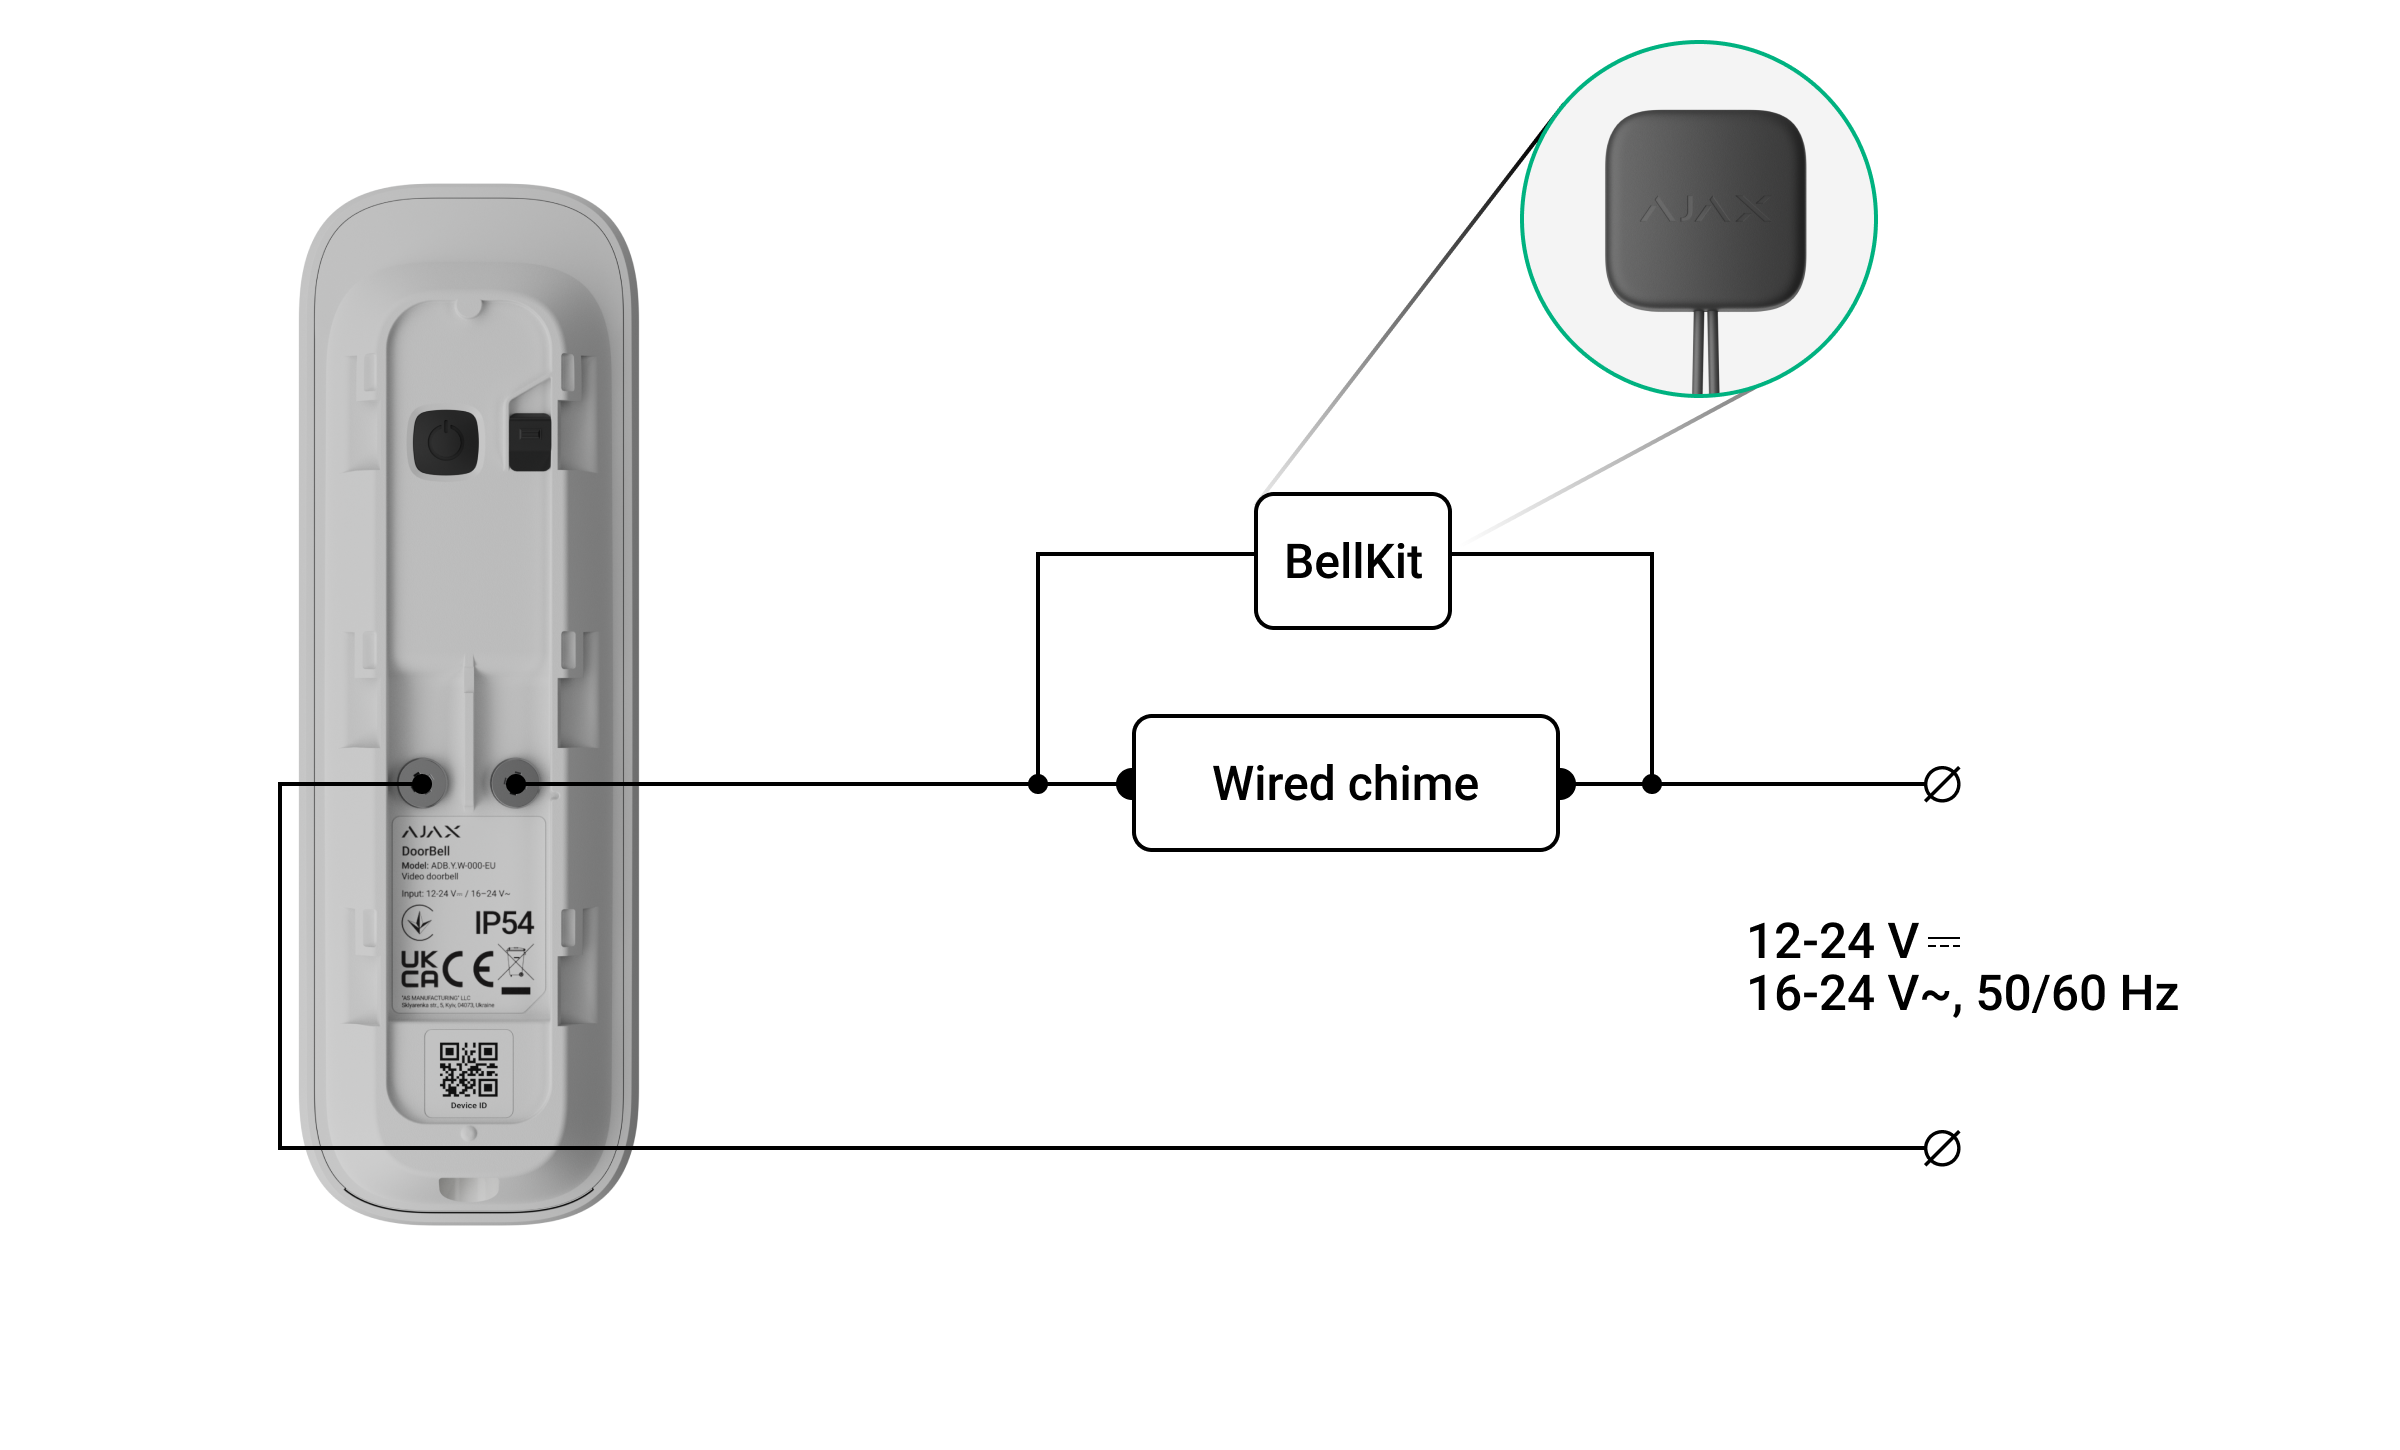
The package includes a BellKit, which allows the DoorBell to be connected to mechanical or digital doorbells in rooms.
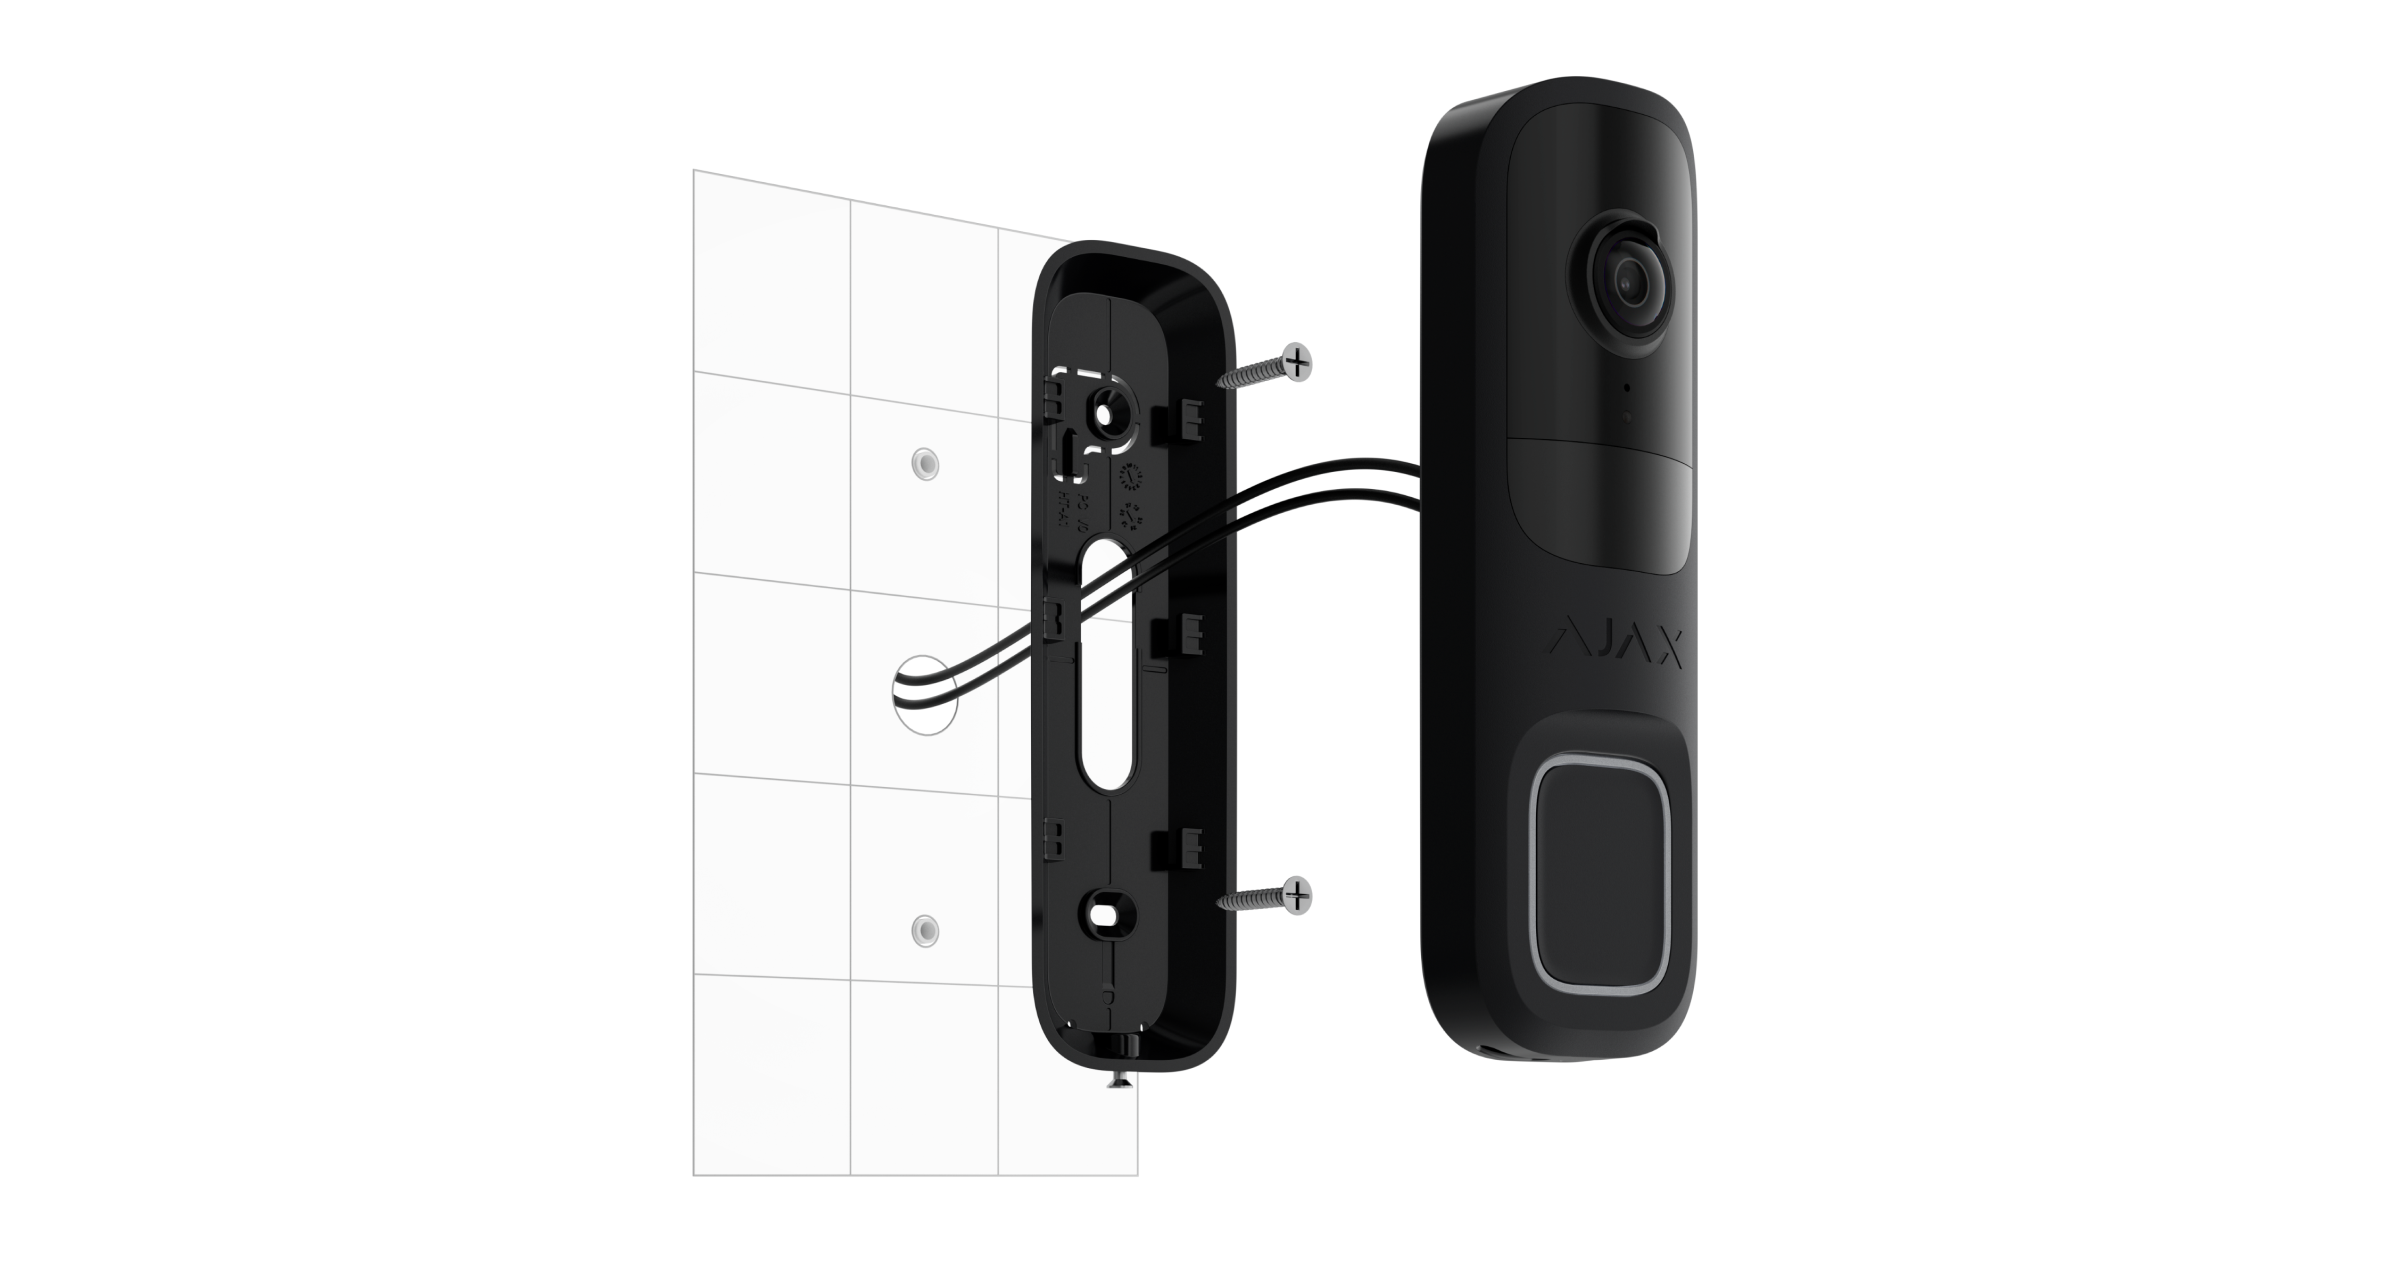
We recommend using the appropriate wedge-shaped bracket to adjust the camera's field of view. The set includes two brackets:
The first option lets you tilt the DoorBell 10° up or down,
second — 25° to the right or to the left.
Installation steps:
Unplug the external power supply cable from the power source.
Remove the SmartBracket mounting panel from the device: first, unscrew the retaining screw and slide the panel downward.
If necessary, attach the appropriate wedge-shaped bracket to the SmartBracket and secure it with the screws provided. Use all mounting points.
Route the power cable through the SmartBracket panel.
For temporary fastening, use double-sided tape or other temporary fasteners.
Important! The double-sided adhesive tape is intended only for temporary installation. The device may detach from the surface at any time. In this case, the tamper will not be triggered if the device is removed.
Connect the wires to the terminals and secure them firmly. For a reliable connection, use the wires with U-shaped terminals included in the kit.
Completion of Installation
Turn on the external power supply.
Add it to the DoorBell system.
Place the device on the SmartBracket mounting panel.
Check the device's operation and the camera's fields of view.
If the camera angle is correct and the device is working as intended, remove the device from the SmartBracket.
Secure the SmartBracket panel or wedge-shaped bracket to the surface using the screws included in the kit. Use all mounting points.
Important! If you use other fasteners, make sure they do not damage or deform the panel or the wedge-shaped bracket.
Place the device on the SmartBracket mounting panel.
Tighten the locking screw at the bottom of the device's housing. This ensures a more secure fit and prevents the device from being removed too easily.
Connecting via a corded phone
To connect the DoorBell to a wired doorbell, you must install the BellKit according to the wiring diagram shown below.
Connecting a Wired Ringer Using BellKit
When connecting the DoorBell to a wired doorbell using the BellKit, a more powerful power source is required to ensure stable operation of the device.
Recommended power supplies:
DC: 12–24 V, 3 A or more.
AC: 16–24 V, 10 VA or more.
Below are wiring diagrams for connecting the DoorBell to specific models or types of doorbells.
Wired connection in the Ajax app
Once the DoorBell and BellKit are connected to the wired doorbell, you need to configure the doorbell connection in the Ajax app.
Before configuring, make sure the DoorBell is connected to the system.
To configure:
Open the Devices tab.
Select "DoorBell " from the list. If it is connected to a network video recorder (NVR), open the " Cameras" section.
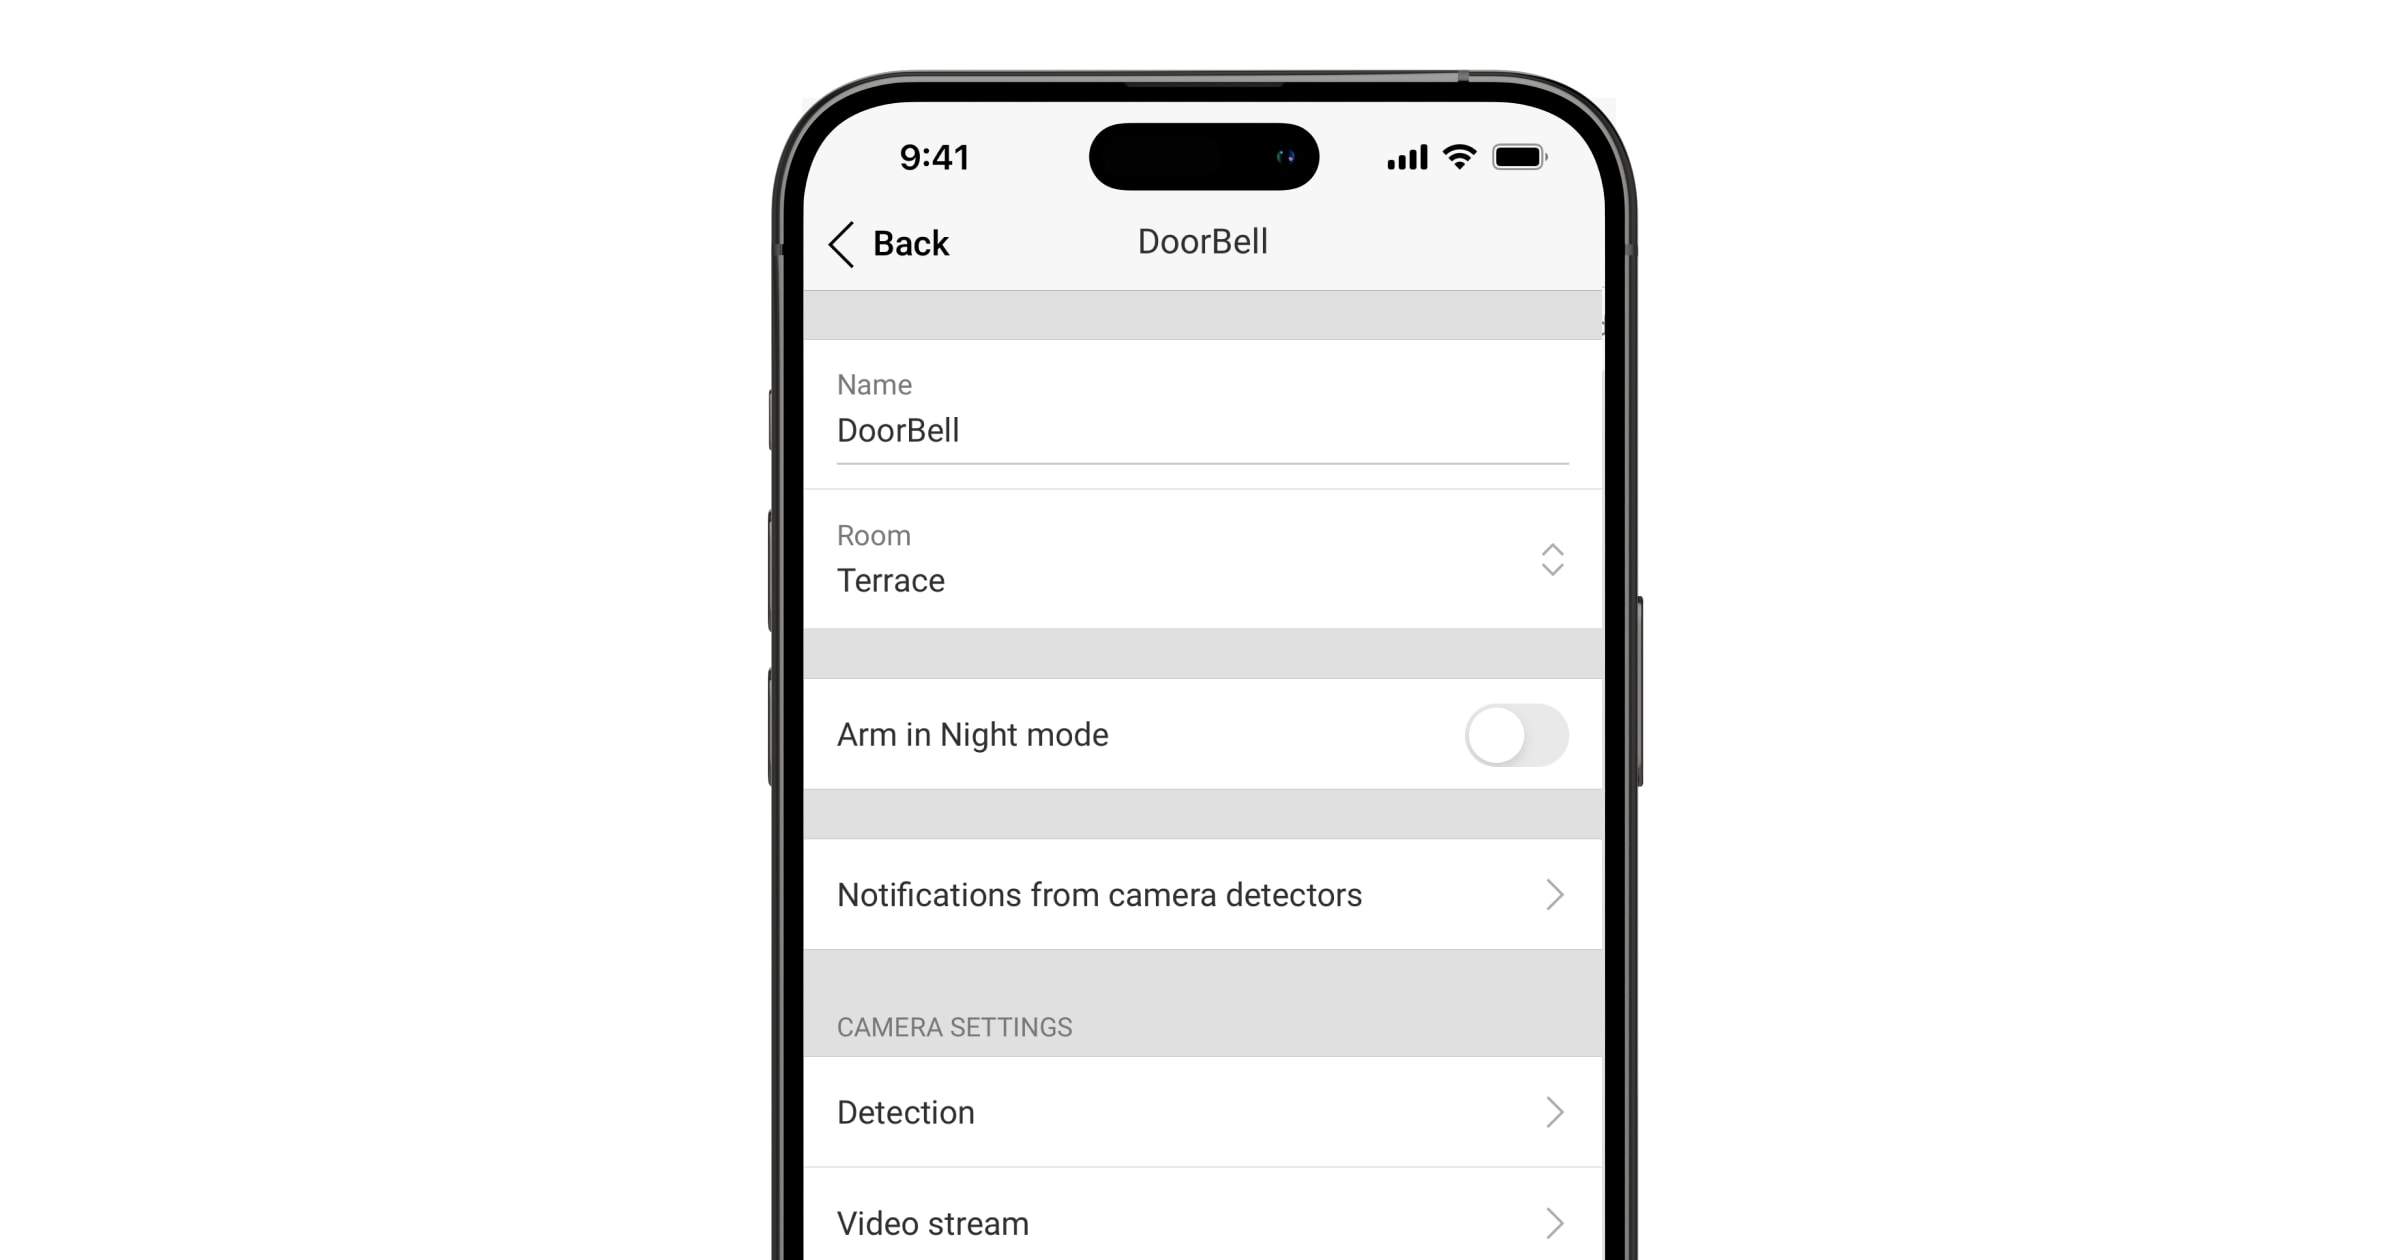
Double-tap the gear icon to open Settings.
Open the " Chime settings" section.
In the " Chime type " setting, select " Mechanical chime " or " Digital chime," depending on the type of bell you have connected.
If necessary, adjust the " Alert duration " setting.
Tap Save to apply the settings.
Adding to the System
Before adding:
Install the Ajax app.
Sign in to your account or create a new one.
Select aspace or create a new one.
Add at least one virtual room.
Make sure the system is disarmed.
Only a PRO or an administrator with configuration rights can add a device to a room.
Adding DoorBell to a room
Before connecting, make sure that:
The Wi-Fi signal covers the location where the DoorBell is installed.
An external power source is connected.
You are standing next to the DoorBell with your smartphone, which has the Ajax app installed.
You have the Wi-Fi network password.
DoorBell works only with 2.4 GHz Wi-Fi networks.
Steps for joining:
Open the Ajax app and select a room.
Go to the Devices tab and tap Add Device.
Scan the QR code or enter the device ID manually (located on the device's body and on the packaging).
Give the device a name.
Select a virtual space and a security group (if Group Mode is enabled). Tap Add Device.
Press the power button to turn on the DoorBell. When the indicator flashes blue, tap Next.
If the device has never been connected to Wi-Fi, it will enter Access Point (AP) mode, and your smartphone will prompt you to connect to the AP. Tap Connect.
If the device has previously been connected to Wi-Fi, it will automatically connect to the network, and you will see the live feed.
Select the Wi-Fi network you want and enter the password. Wait until DoorBell connects.
Tap " Finish" to add the device.
DoorBell will appear in the Ajax app's list of devices.
A device can be linked to only one room. To link it to a new room, you must first manually unlink it from the old one.
Connecting to Ajax NVR
If the DoorBell is already assigned to a room, it can be connected to the Ajax NVR.
Steps:
Open the Devices tab.
Select the NVR and tap Cameras.
Tap " Add Camera " and wait for the network to be scanned.
Select "DoorBell" from the list.
Enter a name, select a room, and choose a group.
Tap " Done," and after adding the item, tap " Close."
Connecting to the Ajax Hub
DoorBell can also be used as a backup communication channel with the hub, using the Jeweller and Wings protocols.
Steps:
Open the Devices tab.
Select DoorBell. If an NVR is connected, open the Cameras section.
Double-tap the gear icon to open Settings.
Open the " Connection" section.
Select " Reserve Radio Channel."
Tap " Set Up" and select the connected hub.
Tap Connect.
After connecting, it is recommended that you run theJeweller and Wings signal strength tests.
Icons in the Ajax app
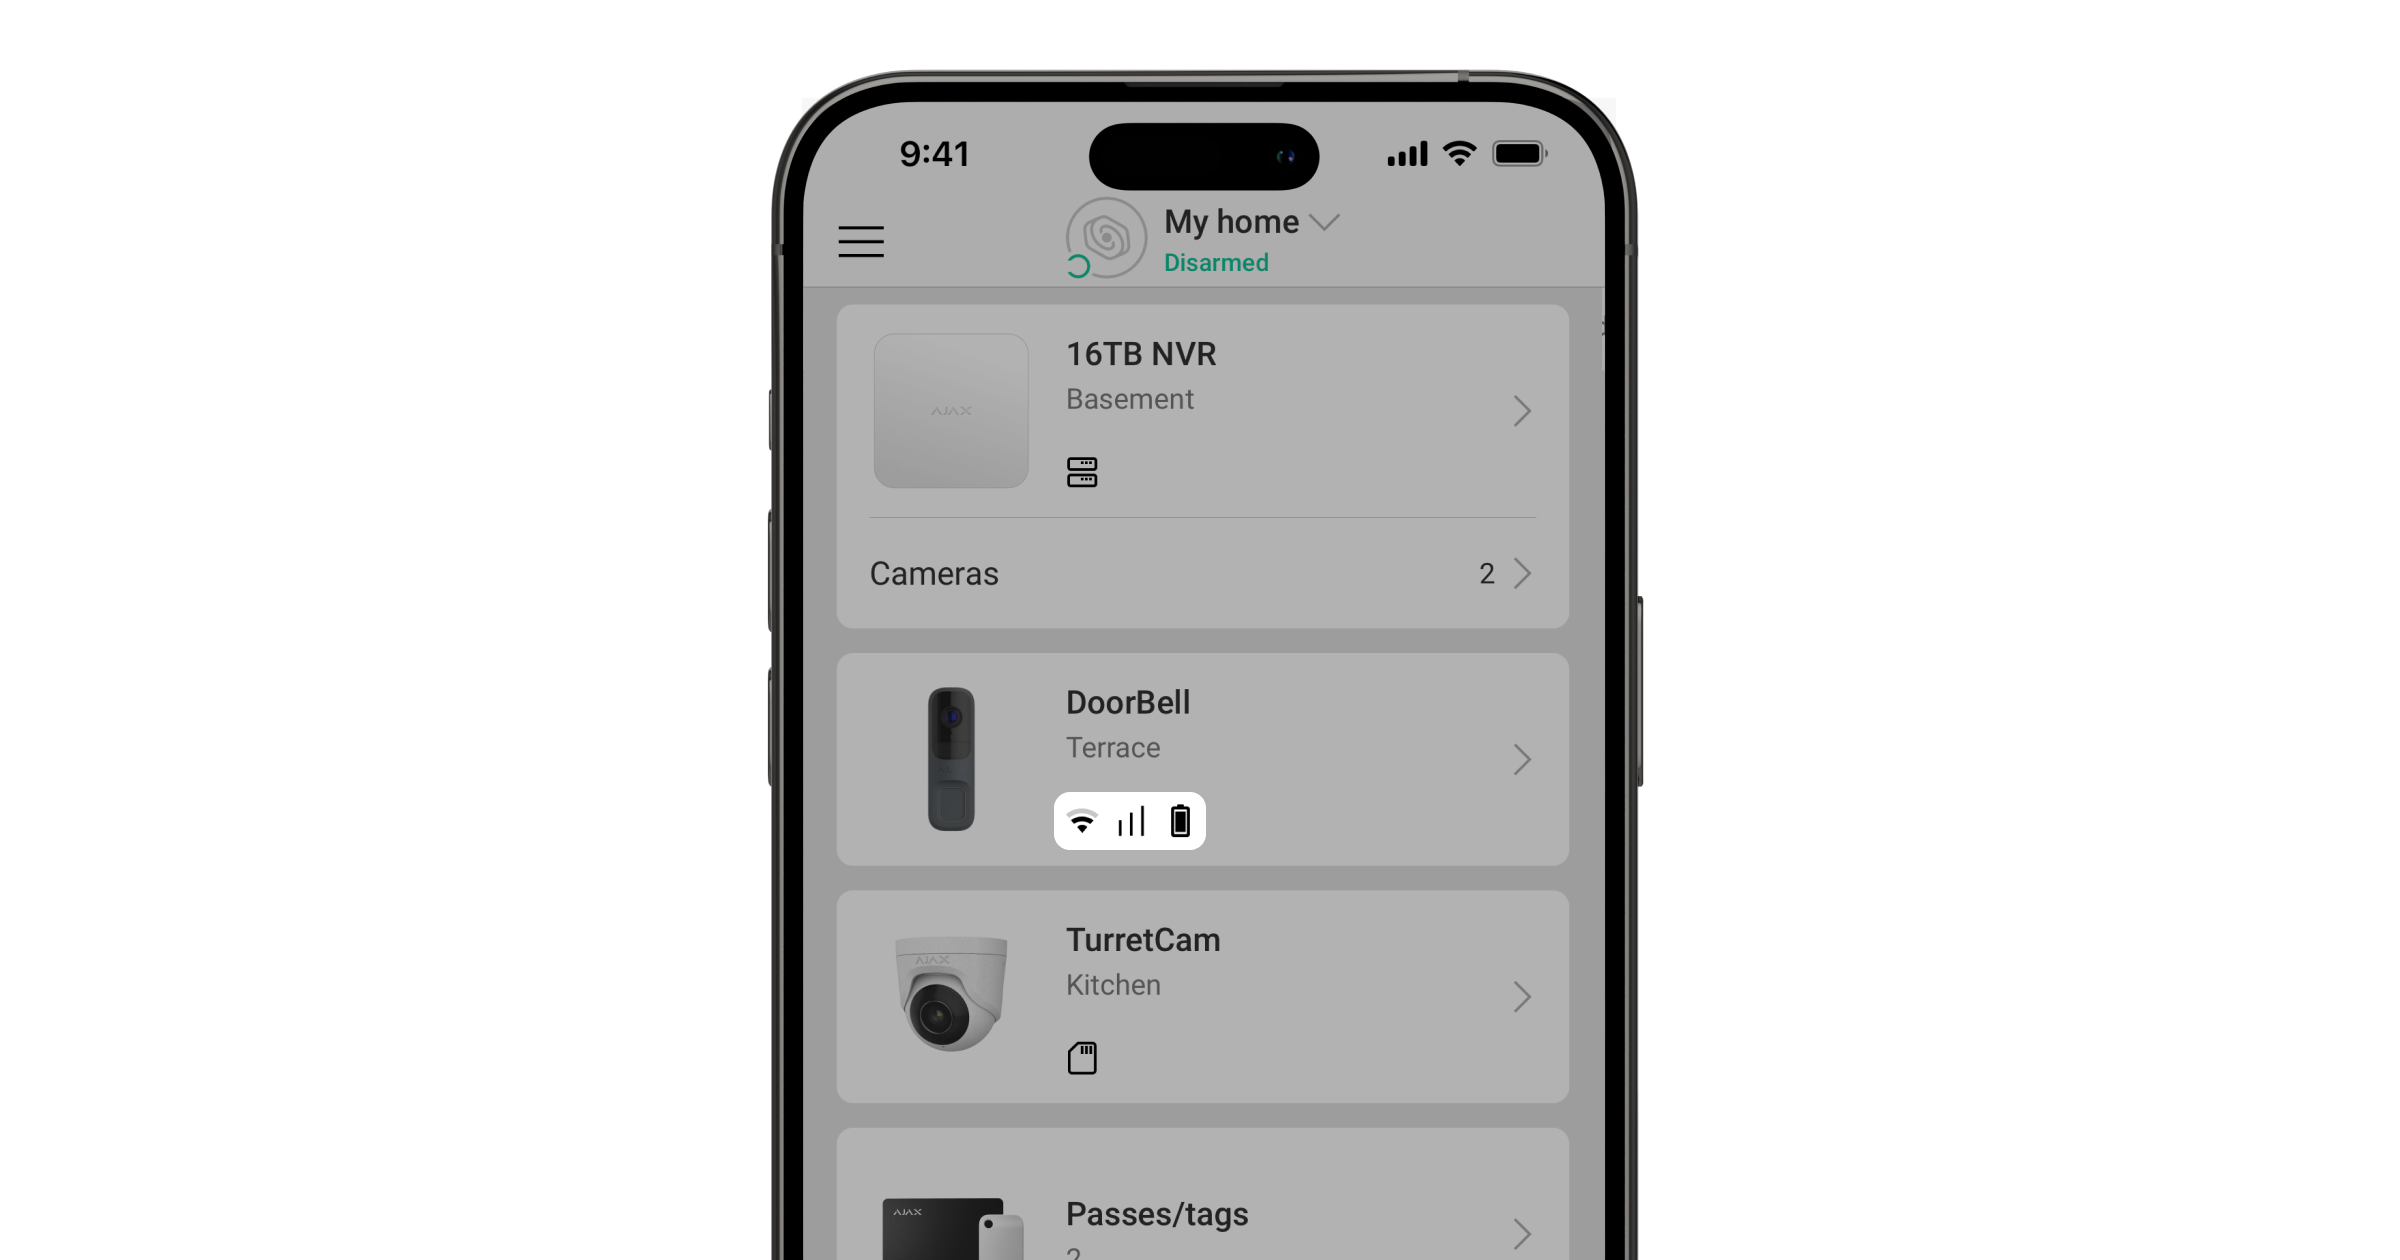
In the Ajax app, icons indicate the various operating statuses of DoorBell. You can view them on the Devices tab.
Additional services have been activated in accordance with your subscription.
Wi-Fi signal strength. Displays the signal strength via the Wi-Fi connection channel. Recommended value: 2–3 bars.
There is no Wi-Fi signal.
Signal strength on the backup channel. Shows the signal strength between the hub and the device. Recommended value: 2–3 bars.
The connection through Jeweller has been lost.
The device's battery charge level.
Low battery charge level.
Device battery error.
The device's battery temperature is outside the normal range.
Night mode.
There is no access to the device's video feed.
The device operates via a radio signal amplifier.
A firmware update is available. Open the device's status or settings to view the description and start the update.
The firmware installation failed.
The ONVIF connection is enabled.
DoorBell States
DoorBell statuses include information about the device and its operating parameters. You can view them in the Ajax app:
Open the Devices tab.
Select " DoorBell " from the list.
Parameter
Meaning
Additional Services
Available only in Ajax PRO apps. Displays the services activated in the subscription and the company's contact information.
Error
Opens a list of device errors (visible only if an error has been detected).
Firmware Update
New version available / Download / Install / Update failed.
Switching threshold: early morning/late evening, medium, late morning/early night
IR Lighting: Auto / Manual / Off
IR intensity: adjustable in manual mode
Service Settings
Setting
Meaning
Time zone
User-defined time zone.
LED indicator when in motion
The LED flashes when the PIR sensor detects movement.
Sound when the button is pressed
The device plays a sound when the button is pressed.
ONVIF connection
Configuration for integration with third-party VMS.
Server connection (delay)
A delay of 30–600 seconds to prevent false server shutdown events.
Cloud survey interval
30–300 s. A shorter interval results in faster detection of a lost connection.
Notify without a siren
A warning about a loss of server connection using a standard sound rather than a siren.
Indications
Event
Indications
Note
Turning on the device.
The LED turns green for approximately 2,5 seconds.
—
The device is starting up.
The LED lights up orange in arc mode.
The indicator remains on until the device is fully powered on.
The device operates in access point (AP) mode.
The LED lights up white in arc mode until AP is activated, after which it flashes blue continuously.
The indicator remains on until the device connects to Wi-Fi.
Connection to Ajax Cloud was successful.
The LED turns green for approximately 3,5 seconds.
—
The connection to Ajax Cloud failed.
The LED lights up red for about 1 second.
This indicator is only available during device installation.
Turning off the device.
The LED lights up red for about 3 seconds, then flashes red in a circular pattern until the device turns off, and then flashes red rapidly three times.
—
Pressing the doorbell button.
The LED lights up white in arc mode for 30 seconds or until the user responds in the app.
—
Two-way voice communication is taking place.
The LED glows white continuously at 50% brightness.
—
The PIR sensor detects motion.
The LED lights up white for about 2.5 seconds at 50% brightness.
—
Sabotage alarm/reset when the system is disarmed.
The LED turns green for approximately 1,5 seconds.
—
Sabotage alarm when the system is armed.
The LED is flashing red continuously.
The indicator remains on until the system is disarmed.
Download the device's new firmware.
The LED flashes green twice and turns off every 3 seconds.
—
The device's firmware is being updated.
The LED is lit green continuously.
The indicator remains on until the update is complete.
The device is being reset to its factory settings.
The LED flashes purple every 1.5 seconds.
—
Disorders
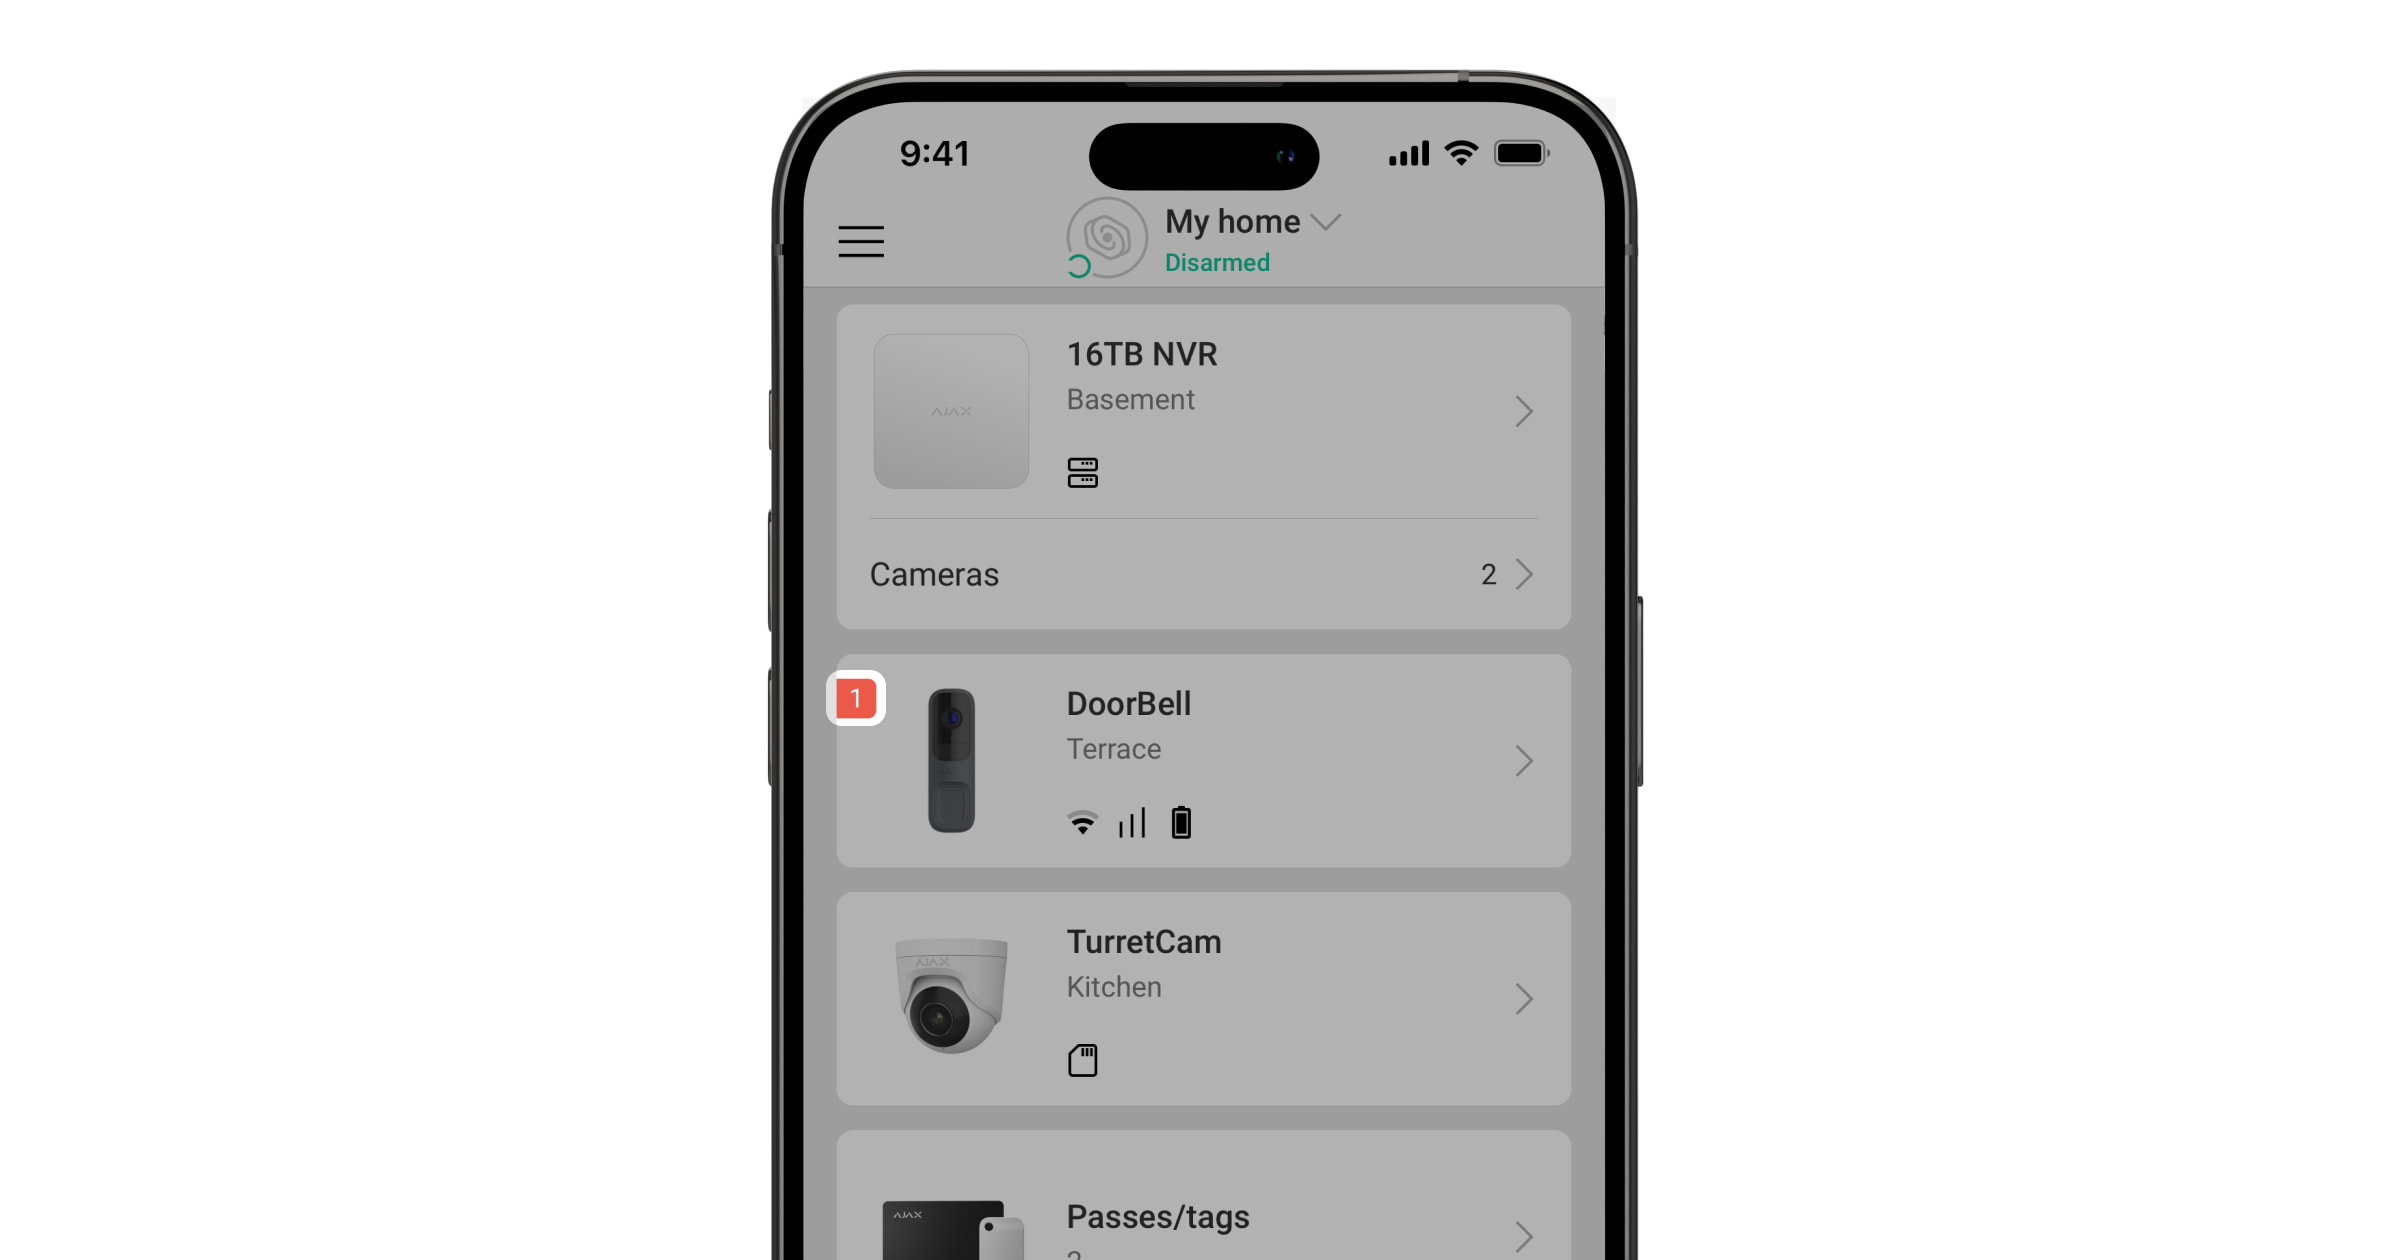
When a device detects a malfunction, a counter appears in the upper-left corner of the device's icon in the Ajax app.
You can view all issues in the "Device States" section.
Fields with detected errors are highlighted in red.
Disorders
Error messages are displayed if:
The device has lost its connection to the server.
The device's temperature is outside the acceptable range.
The device cover is open (the tamper is activated).
There is no connection to the control panel or the radio signal repeater via Jeweller (possible if the device is paired with the control panel).
There is no connection to the control panel or the radio signal repeater via Wings (possible if the device is paired with the control panel).
The device's battery is low.
Maintenance
Check the device's operation regularly.
If you notice a decline in image quality (blurring, darkening), check to see if the camera is dirty.
Wipe the housing clean of dust, cobwebs, and other dirt using a soft, dry cloth.
Do not use products containing alcohol, acetone, gasoline, or other active solvents.
Clean the lens with special care, as scratches can cause poor image quality and camera malfunction.
Warranty
Manufacturer: SIA “Ajax Systems Manufacturing”
Warranty period: 2 years from the date of purchase.
If the device is not working properly, you should first contact customer support —most technical issues can be resolved remotely.


 LED Lighting for Equipment
 Lighting
 LED Strips and Accessories
 Heating, Air Conditioning, and Water
 Solar Systems and Energy
 Garden Robots and Lawn Mowers
 Video Surveillance and Security
 For Drivers and Vehicles
 For the Garden and Yard
 For the garage, service shop, and tools
 For the Home, Interior, and Everyday Life
 Pet Supplies
 Electronics and Computer Supplies
 Cables, extension cords, charging
 Camping, Recreation, and Tents
 Sports, Hobbies, and Games
 Food and Beverage Equipment (HoReCa)
 Industrial Equipment and Livestock Farming