AJAX Wireless Touch Keypad with touch screen for Ajax system control, white
(0)
€263,73€336,36
-22%
Unit price
This product will be available for purchase in 2 weeks, but you can pre-order it now to receive a 10% discount!
KeyPad TouchScreen is a wireless keypad with a touchscreen designed for managing Ajax security systems. Users can authenticate using smartphones, Tag key fobs, Pass cards, and codes. The device is intended for indoor use only.
IPS capacitive touchscreen, diagonal: 5″, resolution: 480 × 854 pixels. Contactless access for 200 cards and key fobs; support for Bluetooth Low Energy (BLE); Power supply: 6 AA batteries; optional external power supply: 10.5–14 V, up to 0.5 A. Dimensions: 171.5 × 82.1 × 26 mm; Weight: 327 g;
KeyPad TouchScreen Communication
The KeyPad TouchScreen communicates with the hub using two secure radio protocols. The keypad uses the Jeweller protocol to transmit alarms and events, and the Wings protocol to update software, transmit group and room lists, and other additional information.
The communication range in an open area is up to 1,700 meters.
Functional Elements
Ambient light sensor — automatically adjusts screen brightness. 5-inchIPS touchscreen. Ajax logo with LED indicator. Card/keypad/Bluetooth reader. SmartBracket mounting panel. To remove the panel, slide it downward. Perforated section of the panel that triggers the tamper when an attempt is made to remove the keypad from the surface. Do not break off. Perforated section of the panel for routing cables through the wall. Built-in speaker (buzzer). Tamper button. QR code with the device ID for adding the keypad to the Ajax system. Power button. Terminals for connecting an external power supply (not included). The terminals can be removed from their holders if necessary. Cable channel for a third-party power supply cable. Perforated section of the panel for routing cables from the bottom. Hole for securing the SmartBracket mounting panel with a screw.
Compatible hubs and signal amplifiers
The keypad requires a compatible Ajax hub running OS Malevich version 2.16.1 or later.
[Check device compatibility]
Operating Principle
The KeyPad TouchScreen is equipped with a built-in buzzer, a touchscreen, and a reader for contactless authorization. The keypad is used to change security modes, control automation devices, and notify users of system alarms.
The keypad automatically adjusts the screen brightness and activates when the user approaches. Sensitivity can be adjusted in the app. The KeyPad TouchScreen interface is similar to the Ajax Security System app and offers both dark and light modes. The 5-inch touchscreen provides access to the security mode for the entire property or individual zones, and also allows you to control automation scenarios. The display also shows system errors if the system integrity check is enabled.
Depending on the settings, the KeyPad TouchScreen’s built-in buzzer alerts you to:
alarms;
changes in security mode;
entry/exit delays;
activation of the tamper detector.
The keypad operates on pre-installed batteries. It can also be connected to an external power source with a voltage range of 10.5–14 V⎓ and a minimum operating current of 0.5 A. When an external power supply is connected, the pre-installed batteries function as a backup power source.
Security Management
Security Management with KeyPad TouchScreen
The KeyPad TouchScreen allows you to arm and disarm the entire property or individual groups, as well as activate Night Mode. To change the security mode, use the Control tab.
Security can be managed using:
for smartphones – using the Ajax Security System app and Bluetooth Low Energy (BLE) technology. – a smartphone can be used in place of a Pass or Tag for user authentication. – Android and iOS phones with BLE 4.2 or later are supported.
cards or tags – DESFire® technology, based on the ISO 14443 international standard, is used for fast and secure user identification, providing 128-bit encryption and copy protection.
For codes – the keyboard supports the shared code, personal user codes, and codes for unregistered users.
Access Codes
Keyboard code – a global code that is set for the entire keyboard. Events are sent to Ajax applications on behalf of the keyboard.
User ID – a personal ID assigned to a user who has been added to the hub. Events are sent on behalf of the user.
Keypad access code – a code for a person who is not registered in the system. Events are sent with a name associated with this code.
RRU code – a code for Rapid Response Units. It is activated following an alert and remains active for a specified period of time. Events in the app are displayed using the name assigned to the code.
The number of personal, access, and RRU codes depends on the hub model.
Access rights and codes can be changed in Ajax apps. If a code is compromised, it can be changed remotely —there’s no need to call an on-site installer. If a user loses their Pass, Tag, or smartphone, an administrator or PRO with configuration rights can immediately block the device in the app. In the meantime, the user can use their personal code to control the system.
Group Security Management
Group Security Management
KeyPad TouchScreen allows you to control group security (if Group Mode is enabled). In the keypad settings, you can specify which groups will be available (keypad groups). By default, all groups are visible on the keypad display under the Control section.
If the "Followed group" feature is configured for groups, their security status can change automatically based on the settings and the status of the triggers.
Emergency Buttons
The KeyPad TouchScreen is equipped with on-screen emergency buttons that allow the user to quickly send an alarm signal:
Panic — sends an alarm signal to the security company's monitoring center and to all apps connected to the system.
Fire — triggers the fire alarm.
Medicine — sends a signal indicating the need for medical assistance.
The buttons also activate the sirens connected to the system at the same time (if this feature is enabled).
.
Emergency Buttons
ChatGPT says:
For Emergencies
KeyPad TouchScreen has a special " Panic " tab with three buttons:
Panic Button
Fire
Auxiliary signal
In the Ajax app, an administrator or PRO user with system configuration privileges can choose how many buttons will be displayed on the Panic tab. Two options are available in the KeyPad TouchScreen settings:
only the Panic Button (default mode),
all three buttons.
The text of notifications in the apps and the event codes that are sent to the Central Monitoring Station (CMS) depend on the type of button selected.
Protection against accidental presses is also available. In this case, the user must confirm the sending of the alarm by pressing the Send button on the on-screen keyboard. The confirmation screen appears after any panic button is pressed.
Pressing the emergency button can trigger alarm scenarios in the Ajax system.
Script Management
Automation control via a separate keyboard tab
In a separate keyboard tab, you can add up to six buttons that control a single automation device or a group of devices. Group scenarios provide more convenient control, allowing you to manage multiple switches, relays, or outlets simultaneously.
Automation scenarios are created in the keyboard settings, but they can be managed directly using the KeyPad TouchScreen.
Fault and Safety Mode Indication
KeyPad TouchScreen notifies users of system errors and security mode by:
display,
logo,
audible signals.
Depending on the settings, the logo lights up red continuously or only when the system or group is turned on. The display shows an indication only when it is active. The built-in speaker/alarm signals alarms, door openings, and entry/exit delay times.
Review of Recent Events
This feature is available on the KeyPad TouchScreen Jeweller with firmware version 11.60.20.8, 12.60.20.4, or later, when connected to a hub running OS Malevich version 2.33 or later.
The KeyPad TouchScreen Jeweller can display up to 100 of the most recent system events since the last check. Events are grouped and sorted by date.
Each event contains the following information:
device name;
activity;
room;
exact time (HH:MM).
How to enable viewing of recent events on the keyboard:
Open the Ajax app and select the room with the connected device.
Go to the Devices tab.
Select the KeyPad TouchScreen Jeweller and open its Settings (the gear icon).
Open the " Keyboard Notification Center" section.
Turn on the " Event Confirmation" toggle.
Tap Back to save your settings.
How to view recent events on the keyboard display:
Go to the " Management" tab.
Tap the icon 📜to open the list of events. If there are new events, the icon in the upper-right corner will have a red notification circle.
Click " Mark All as Read" to clear the list of events.
⚠️ Clearing events applies only to the keyboard on which the action was performed. Other keyboards connected to the same hub will still display the most recent events.
Silencing a Fire Alarm
Silencing a Fire Alarm with the KeyPad TouchScreen
If a fire alarm is triggered by the system, it can be silenced using the KeyPad TouchScreen.
Pressing the Fire emergency button on the Panic tab does not activate the Interconnected Fire Detectors Alarm feature (if enabled). When an emergency signal is sent from the keyboard, a corresponding notification is sent to the app and the CMS.
All KeyPad TouchScreen units with the "Mute Fire Alarm" feature enabled display a screen with information about the fire alarm and a button to mute it.
If the mute button has already been pressed on another keypad, a corresponding message is displayed on the other keypads.
Users can close the fire alarm mute screen and use other keypad functions. To reopen the mute screen, press the icon 🔥 on the KeyPad TouchScreen.
If the alarm was triggered by the ManualCallPoint Jeweller or if a critical CO or smoke level has been detected, the alarm cannot be silenced from the keypad.
These types of fire alarms are available on the KeyPad TouchScreen Jeweller with firmware version 11.60.10.19 or later.
Immediate Display of the Fire Alarm Mute Screen
To have the KeyPad TouchScreen immediately display the fire alarm silence screen, enable the " Always Active Display" toggle in the keypad settings. You will also need to connect an external power source.
Otherwise, the mute screen will only appear when the keyboard wakes up.
Duress Code
The KeyPad TouchScreen supports a duress code that allows you to simulate deactivation of the alarm system. In this case, the Ajax app and the installed sirens will not detect your actions, but the security company and other users of the security system will be immediately notified of the incident.
User Pre-Authorization
The pre-authorization feature prevents unauthorized access to the control panel and the system's current status. It can be enabled separately on the "Control " and "Scenarios " tabs in the keyboard settings.
The code entry screen is displayed only on those tabs where pre-authorization is enabled.
The user must first authenticate by entering a code or attaching a personal access device to the keyboard.
The exception is the "Alarm" tab, which allows you to send an emergency signal even without authorization.
Automatic Blocking of Unauthorized Access
If an incorrect code is entered 3 times in a row within 1 minute, or if an unverified access device is used:
The keyboard is locked for the duration specified in its settings.
During this period, the hub will ignore all codes and access devices.
All system users will be notified of any attempt to gain unauthorized access.
The keyboard turns off the reader and blocks access to all tabs. A corresponding message appears on the display.
A PRO user or administrator can unlock the keyboard in the app before the set lock time expires.
Two-stage activation
The KeyPad TouchScreen can be used to arm a two-stage alarm system, but it cannot be used as a second-stage device. The two-stage arming process using a Tag, Pass, or smartphone is identical to the procedure using a general or personal code on the keypad.
Jeweller and Wings Data Transmission Protocols
Jeweller — broadcasts alerts and events.
Wings — provides software updates, a list of groups and rooms, as well as other additional information.
Both are bidirectional wireless protocols that ensure fast and reliable communication between the hub and devices.
Forwarding Events to the Centralized Monitoring Station (CMS)
The Ajax system can forward alarms to PRO Desktop and CMS using the following protocols:
SurGard (Contact ID),
SIA (DC-09),
ADEMCO 685,
other protocols.
KeyPad TouchScreen transmits the following events:
entering the emergency code;
pressing the panic button (each button has its own event code);
keyboard lock due to an attempt at unauthorized access;
tamper alarm/reset;
loss/restoration of the connection to the hub (or signal amplifier);
turning the system on/off;
a failed attempt to start the system (if the system integrity check is enabled);
Complete or one-time deactivation/activation of the keyboard.
Adding to the System
The KeyPad TouchScreen is not compatible with:
Hub Jeweller,
Hub Plus Jeweller,
third-party alarm panels.
Requirements:
The keyboard must be located in the same location as the hub, within the wireless network's coverage area.
When using the ReX 2 signal amplifier, you must first connect the keyboard to the hub, and only then connect it to the ReX 2.
The hub and keyboard must operate within the same radio frequency band.
Before joining
Install the Ajax app.
Sign in to your account or create a new one.
Create or select Space.
Add at least one virtual room.
Connect a compatible hub and make sure it has Internet access.
Make sure the room is unarmed and that the hub is not undergoing an update.
Only a PRO or an administrator with configuration rights may perform this addition.
Damage
When a fault is detected on the KeyPad TouchScreen, a fault counter appears next to the device icon in the Ajax app. All faults are indicated in the keypad’s status. Fields with faults are highlighted in red.
An error is displayed if:
the keyboard housing is open (the tamper has been triggered);
There is no connection to the hub or radio signal booster via Jeweller;
There is no connection to a hub or wireless signal booster when using Wings;
The keyboard battery is low;
The keyboard temperature is outside the acceptable range.
Icons
Icons in the app
The icons in the app represent different keyboard states. To access the icons:
Log in to the Ajax app.
Select a hub.
Open the Devices tab.
Icon — Meaning
Icon
Meaning
Jeweller signal strength — displays the signal strength between the hub and the device. Recommended value: 2–3 bars.
The keypad battery level is OK — the keypad battery level is normal.
The keypad is malfunctioning. A list of errors is available in the keypad status section.
Displayed when the keypad's Bluetooth module is enabled — appears when the keypad's Bluetooth module is turned on.
Bluetooth setup is not complete — Bluetooth setup is not complete. A description is available in the keyboard status.
A firmware update is available. Go to the keyboard status or settings to view the description and start the update.
The icon is not available in the Ajax Security System app, version 3.0 and later, on iOS and Android devices.
To update the firmware, connect an external power source to the KeyPad TouchScreen.
RE — Appears when the keyboard is operating through a radio signal amplifier.
PT — Pass/Tag reading has been enabled in the KeyPad TouchScreen settings.
CH — The door-opening beep can be enabled in the KeyPad TouchScreen settings.
SAT — The device is in signal attenuation test mode.
PD — The device has been permanently deactivated.
TD — Tampere alarm notifications have been permanently disabled.
OD — The device is deactivated until the first system disarm.
TD — Tamper alarm notifications are disabled until the system is disarmed for the first time.
CL — The device has lost its connection to the hub, or the hub has lost its connection to the Ajax Cloud server.
NT — The device has not been moved to the new hub.
Icons on the display
Icons appear at the top of the display and provide information about specific system statuses or events.
Icon
Meaning
The system must be reset after an alarm. Depending on their account type, users can either submit a request or reset the system themselves. To do this, click the icon and select the appropriate button on the screen.
Silence the fire alarm. Appears after closing the screen that silences the fire alarm. Users can click the icon at any time to silence a fire alarm, including interconnected fire alarms.
If a fire alarm is triggered by a ManualCallPoint Jeweller, or if CO or smoke levels reach a critical threshold, the alarm cannot be silenced from the keypad.
These types of fire alarms are available on the KeyPad TouchScreen Jeweller with firmware version 11.60.10.19 or later.
CO-OFF — The door-opening sound alert is disabled. Click the icon to enable it.
Appears on the display once the necessary settings have been adjusted.
CO-ON — The door-opening sound alert is enabled. Click the icon to disable it.
Appears on the display once the necessary settings have been adjusted.
States
Conditions
Statuses provide information about the device and its operating parameters. You can view KeyPad TouchScreen statuses in the Ajax apps:
Go to the Devices tab. Select KeyPad TouchScreen from the list.
Parameter — Value
Data Import Displays an error when transferring data to the new hub:
Failed — The device was not transferred to the new hub.
Malfunction Clicking on the icon opens the KeyPad TouchScreen error list. This field is displayed only when an error is detected.
New firmware version available Clicking on the icon opens the instructions for updating the firmware. This field is displayed when new firmware is available. This status is not visible in the Ajax Security System app, version 3.0 and later (iOS and Android). To update the firmware, connect an external power source to the KeyPad TouchScreen.
Warning Clicking the icon opens a list of settings and permissions required for the keyboard to function properly.
Jeweller Signal Strength Signal strength between the hub or repeater and the device over the Jeweller channel. The recommended value is 2–3 bars. Jeweller is a protocol for transmitting KeyPad TouchScreen events and alarms.
Connection via Jeweller Connection status on the Jeweller channel between the device and the hub (or repeater):
Online — the device is connected to a hub or repeater.
Offline — The device is not connected to a hub or repeater. Check the keyboard connection.
Wings Signal Strength Signal strength between the hub or repeater and the device over the Wings channel. The recommended value is 2–3 bars. Wings is a protocol for firmware updates and for transmitting group, room, and other information.
Connection via Wings Connection status on the Wings channel between the hub or repeater and the device:
Online — the device is connected to a hub or repeater.
Offline — The device is not connected to a hub or repeater. Check the keyboard connection.
Transmitter power Displays the selected transmitter power. This parameter appears when the "Max " or " Attenuation " option is selected in the signal attenuation test.
Battery Charge Battery charge level:
OK
Battery low (Battery is low)
When the battery is low, the Ajax app and the security company receive the appropriate notifications. After a notification is sent, the keypad can continue to operate for up to 2 weeks.
Lid (Vāciņš) The status of the keyboard tamper, which reacts when the device's casing is removed or opened:
Open — The keyboard has been removed from the SmartBracket or its integrity has been compromised. Check the device.
Closed — The keyboard is mounted on the SmartBracket. The integrity of the housing and mounting hardware has not been compromised. Normal condition.
External Power Status of the external power source connection:
Connected — an external power source is connected.
Disconnected — the external power source has been disconnected. The device is running on batteries.
Always Active Display Appears when the Always Active Display option is enabled in Settings and an external power source is connected.
Alarm Sound Indication Displays the status of the setting : Enable the keypad beep when an alarm is detected in the system.
Alarm duration The duration of the audible alarm. Can be set in 3-second increments. Displayed when the "Enable keypad alarm when a system alarm is detected" option is enabled.
Pass/Tag Reading Indicates whether the card and tag reader is enabled.
Bluetooth Indicates whether the keyboard's Bluetooth module is enabled for system control via a smartphone.
Easy Armed Mode Change Displays the configuration of the Easy Armed Mode Change feature:
Off — Each mode change must be confirmed with a code or an access device.
Arm/disarm using an access device without confirming the action with buttons — allows you to change the mode using access devices without confirming with buttons. Available if Pass/Tag reading or Bluetooth is enabled and the keypad is assigned to only one group.
Disarm without disarming button — allows you to change the mode without confirmation via the keypad for the entire system or for groups. Available if " Codes length restrictions" is enabled in the hub settings.
Beeps Settings
Arming/Disarming — a short signal indicating arming or disarming.
Night Mode Activation/Deactivation — a short beep indicating that Night Mode has been activated or deactivated.
Entry Delays — signals indicating entry delays.
Exit Delays — signals indicating exit delays.
Entry Delays in Night Mode — signals indicating entry delays in Night Mode.
Exit Delays in Night Mode — alerts regarding exit delays in Night Mode.
Chime on opening (Door-opening sound signal) When enabled, the siren sounds to indicate that a door or detector has been opened while the system is in disarmed mode.
Beep Volume (Beep Volume) Appears when notifications for arming/disarming, entry/exit delays, or door opening are enabled. Displays the beep volume level.
Permanent Deactivation Displays the status of the keyboard's permanent deactivation:
From — the keyboard works normally.
Lid only — the hub administrator has disabled tamper notifications.
Entirely — the keyboard is completely disabled from system operation.
One-Time Deactivation Displays the status of the keyboard's one-time deactivation:
From — the keyboard works normally.
Lid only — tamper alerts are disabled until the first disarming.
Entirely — the keyboard is completely disabled from system operation until the first disarm.
Firmware ( ) Keyboard firmware version.
ID . Keyboard ID. Also available via the QR code on the device's casing and packaging.
Changing KeyPad TouchScreen Settings in the Ajax App
Go to the "Devices" tab.
Select " KeyPad TouchScreen " from the list.
Open Settings by clicking the icon.
Set the required parameters.
Press Back to save the new settings.
Settings
Name (Nosaukums) The keyboard's name. It appears in the list of hub devices, in SMS messages, and in the event stream. You can change the name by clicking in the text field. The name can contain up to 12 Cyrillic characters or up to 24 Latin characters.
Room Selection of a virtual room assigned a KeyPad TouchScreen. The room name is displayed in SMS and event feed notifications.
Access Settings Security Mode Control Method:
Keypad codes only (Keypad codes only)
User codes only (Only user codes)
Keypad and User Codes
To enable Keypad Access Codes for unauthorized users, select either the " Keypad codes only " or " Keypad and user codes" option.
Keypad Code Setting the general security management code. 4–6 digits.
Duress Code Setting the general silent alarm code. 4–6 digits.
Screen Detection Range : The distance at which the keyboard detects movement and turns on the display:
Minimum (Minimums)
Low
Normal (Default)
High
Max (Maximum)
Mute Fire Alarm (Silencing a Fire Alarm) If enabled, users can silence Ajax fire detector alarms (including interlinked ones). If the alarm is triggered by a ManualCallPoint in the Jeweller, or by a critical CO or smoke level, the alarm cannot be silenced. Available in Jeweller KeyPad TouchScreen firmware version 11.60.10.19.
Pass/Tag Reading Allows you to manage security mode using Pass and Tag access devices.
Bluetooth Allows you to control the security mode using your smartphone.
Bluetooth Sensitivity : Adjusting the Bluetooth module's sensitivity:Minimum, Low, Normal (default), High, Max.
Unauthorized Access Auto-Lock When enabled, the keypad locks for a specified period of time after 3 unsuccessful attempts (code or access device) within 1 minute.
Auto-lock Time, min (Lockout time, in minutes) Selecting the lockout duration following unauthorized access attempts: 3, 5, 10, 20, 30, 60, 90, or 180 minutes.
Chime Management via Keypad (Door Chime Control via Keypad) Allows the user to enable/disable notifications regarding the activation of the opening detector directly from the display. You must enable “Chime on opening” in the settings.
Firmware Update Puts the device into firmware update mode. An external power source is required for the update.
Jeweller Signal Strength Test Switches the device to Jeweller signal test mode.
Wings Signal Strength Test Sets the device to Wings signal test mode.
Signal Attenuation Test Sets the device to signal attenuation test mode.
Pass/Tag Reset Deletes all hubs associated with Pass or Tag.
User Guide Opens the KeyPad TouchScreen user guide in the app.
Permanent Deactivation Allows you to deactivate a device without disconnecting it from the system:
Off — Normal Mode
Entirely — the device is completely deactivated
Lid only — tamper notifications ignored
One-Time Deactivation Allows you to deactivate device events until the first disarm:
Off — Normal Mode
Lid only — tamper alerts are disabled during arming
Entirely — device deactivated during arming
Delete Device Disconnects the device from the hub and deletes its settings.
After an alarm is triggered
The keyboard can indicate when the armed system has been activated using an LED indicator.
Here's how the option works:
The system detects an alarm.
The keyboard plays an alarm tone (if enabled). The duration and volume of the tone depend on the device's settings.
The keyboard LEDs flash twice (once every 3 seconds) until the system is disarmed.
Thanks to this feature, system users and the security service can tell that an alarm has been triggered.
Important! The KeyPad TouchScreen does not display an alarm indication for detectors that are always active if the detector was triggered while the system was disarmed.
How to turn on the alarm indicator (in the Ajax PRO app):
Go to the hub settings: Hub → Settings → Service → LED Indication.
Specify which events the KeyPad TouchScreen will indicate with a double LED flash until the system is disarmed:
Confirmed intrusion/assault alarm.
Single intrusion/assault alarm.
Opening of the housing.
Select the desired KeyPad TouchScreen from the Devices menu.
Click " Back" to save the settings.
Click " Back" again. All settings will be applied.
Chime (opening signal)
If the " Chime on opening " option is enabled, the KeyPad TouchScreen emits a short beep to indicate that the opening detector has been triggered when the system is disarmed. This feature is useful, for example, in stores to alert employees when customers enter the premises.
Configuring notifications is a two-step process:
Keyboard Setup.
Setting Up the Opening Detectors.
How to configure keyboard response:
Open the Ajax app.
Go to the " Devices" tab.
Select KeyPad TouchScreen and go to Settings.
Open the Sound Indication → Beeps Settings menu.
Enable the " Chime on opening " toggle in the " Beep when disarmed" category.
Set the desired volume for notifications.
Click " Back" to save your settings.
If the settings are configured correctly, a bell icon will appear on the Control tab of the Ajax app. Click it to enable or disable the notification when the app opens.
How to set up signal control from the keyboard display:
Open the Ajax app.
Go to the " Devices" tab.
Select KeyPad TouchScreen and go to Settings.
Enable the " Chime management via keypad" toggle.
If the settings are correct, a bell icon will appear on the Control tab of the keyboard. Click it to enable or disable the startup sound.
Select the hub to which you want to add a Tag or Pass.
Go to the Devices tab.
Make sure that the Pass/Tag Reading feature is enabled in the settings of at least one keyboard.
Tap Add Device.
Select Add Pass/Tag.
Specify the type (Tag or Pass), color, device name, and user (if necessary).
Tap Next. The hub will then switch to device registration mode.
Go to any compatible keypad with Pass/Tag Reading enabled and activate it.
After activation, the KeyPad TouchScreen will display a screen to switch the keypad to access device registration mode. Press the Start button.
The screen updates automatically if an external power source is connected and the Always Active Display switch is turned on in the keypad settings.
Hold your Pass or Tag with the wide side facing the keypad’s reader (marked with wave icons on the casing) for a few seconds. If pairing is successful, a notification will appear in the Ajax app and on the keypad display.
If pairing fails, try again after 5 seconds. If the hub already has the maximum number of Tags or Passes connected, you’ll receive a corresponding notification in the app when you try to add a new device.
Both Tags and Passes can work with multiple hub devices simultaneously (up to 13). If you try to pair a Tag or Pass with a hub that has already reached its limit, you’ll receive a notification in the app. To pair this tag/card with a new hub, you’ll need to reset it.
If you need to add another Tag or Pass, tap “Add Another Pass/Tag” in the app and repeat steps 6 through 9.
How to delete a Tag or Pass from a hub
Resetting will delete all tag and card settings and pairings. A reset Tag or Pass is deleted only from the hub on which the reset was performed. On other hub devices, it will still be visible in the app, but it cannot be used for security mode management. Such devices must be deleted manually.
Open the Ajax app.
Select the hub.
Go to the Devices tab.
Select a compatible keypad from the list of devices.
Make sure the Pass/Tag Reading feature is enabled in the keypad’s settings.
Open the keyboard settings by tapping the icon button.
Tap the Pass/Tag Reset menu.
Tap Continue.
Go to any compatible keypad with Pass/Tag Reading enabled and activate it.
The KeyPad TouchScreen will display the screen in access device reset mode. Tap the Start button.
Hold your Pass or Tag with the wide side against the keypad reader for a few seconds. If the reset is successful, a notification will appear in the Ajax app and on the keypad display. If the formatting fails, try again.
If you need to reset another Pass or Tag, tap “Reset another Pass/Tag” in the app and repeat step 9.
Bluetooth Setup
KeyPad TouchScreen supports security mode management via a smartphone by holding it near the sensor. Management is performed via the Bluetooth connection. This method is convenient, secure, and fast, as there is no need to enter an access code, pair your phone with the keypad, or use a Tag/Pass that could be lost.
Bluetooth authentication is available only to Ajax Security System users.
Enabling Bluetooth Authentication in the App
Connect the KeyPad TouchScreen to the hub.
Enable the keypad’s Bluetooth sensor: Devices → KeyPad TouchScreen → Settings → toggle the Bluetooth switch on.
Tap Back to save the settings.
Setting up Bluetooth authentication
Open the Ajax Security System app and select the hub to which the KeyPad TouchScreen with Bluetooth enabled is connected.
By default, Bluetooth authentication is available to all users of this system.
To deny Bluetooth authentication to specific users:
Go to the Devices tab, select the hub, and open its settings.
Open the Users menu and select the desired user.
In the Permissions section, disable the Security management via Bluetooth toggle.
If the Ajax app was not previously allowed to use Bluetooth, a " KeyPad TouchScreen States" warning will appear. Tapping the icon will open a window explaining the actions. Enable the “Security management with a phone” toggle at the bottom.
Grant the app permission to discover and connect to nearby devices. The pop-up window may differ on Android and iOS smartphones.
You can also enable the “Security management with a phone” toggle in the app’s settings:
Tap the ☰ icon in the upper-left corner of the screen and select the App Settings menu. Open the System Settings menu and enable the “Security management with a phone” toggle.
We recommend configuring Geofence to ensure stable Bluetooth authentication.
A warning ⚠ appears in KeyPad TouchScreen States if Geofence is disabled and the app is not allowed to access the smartphone’s location. Tapping ⚠ icon opens a window with instructions on what to do next.
On the "Log In " tab. After logging in, the user will see the available groups that were hidden from the list of shared groups.
Ten seconds after the last action, the keypad screen switches to the home screen. To control the system using the KeyPad TouchScreen, re-enter the code or tap your personal access device.
Safety Management
Using codes, a Tag/Pass, or a smartphone, you can manage Night Mode and control the security mode for the entire property or specific groups. A user or PRO with the authority to configure the system can set access codes. This section provides information on adding a Tag or Pass to the hub. To control the system with a smartphone, you must adjust the appropriate Bluetooth settings in the keypad settings. Turn on Bluetooth and Location Services on your smartphone, and unlock the screen.
The KeyPad TouchScreen is locked for the duration specified in the settings if an incorrect code is entered three times in a row within 1 minute or if an unverified access device is used. Corresponding notifications are sent to users and to the security company’s Central Monitoring Station (CMS). A user or PRO with configuration rights can unlock the KeyPad TouchScreen in the Ajax app.
If Group Mode is disabled, the corresponding icon on the on-screen keyboard indicates the current security mode:
— Armed.
— Disarmed.
— Night Mode.
If Group Mode is enabled, users see the security status of each group separately. A group is armed if its button outline is white and marked with the icon. A group is disarmed if its button outline is gray and marked with the icon.
The group buttons located in Night Mode on the KeyPad TouchScreen display are framed by a white square.
If a personal or access code, Tag/Pass, or smartphone is used, the control panel’s event log and notification list display the username of the user who changed the security mode. If a general code is used, the name of the keypad from which the security mode was changed is displayed.
The steps for changing the security mode using the keypad depend on whether user pre-authorization is enabled in the KeyPad TouchScreen settings.
If pre-authorization is enabled
If pre-authorization is disabled
Example of Entering Codes
Code
Example
Note
Keypad code
Keypad duress code
1234 → OK
Numbers entered incorrectly can be cleared by clicking the button.
User code
User Emergency Code
2 → → 1234 → OK
First, enter theuser ID for the , press the button, and then enter a personal code.
Numbers entered incorrectly can be cleared by clicking the button.
Code of an unregistered user
Duress Code for Unregistered Users
1234 → OK
Numbers entered incorrectly can be cleared by clicking the button.
RRU Code
1234 → OK
Numbers entered incorrectly can be cleared by clicking the button.
Simplified Security Mode Change
The " Simplified Security Mode Switch " feature allows you to switch the security mode to the opposite one using a tag/passcode or a smartphone.
Simplified Security Mode Change … without confirmation using the Arm or Disarm button.
Buttons. Go to the keyboard settings to enable this feature.
To switch the security mode to the opposite setting:
Activate the keyboard by moving closer to it or holding your hand over the sensor. If necessary, log in first.
Connect your Tag/Pass or smartphone.
Two-stage activation
KeyPad TouchScreen Two-Step Power-On and Scenario Management
Two-stage activation
The KeyPad TouchScreen can be used in a two-stage activation process, but it cannot be used as the second-stage device.
The unlocking process using a tag, passcode, or smartphone is similar to using a personal or general code on the keypad.
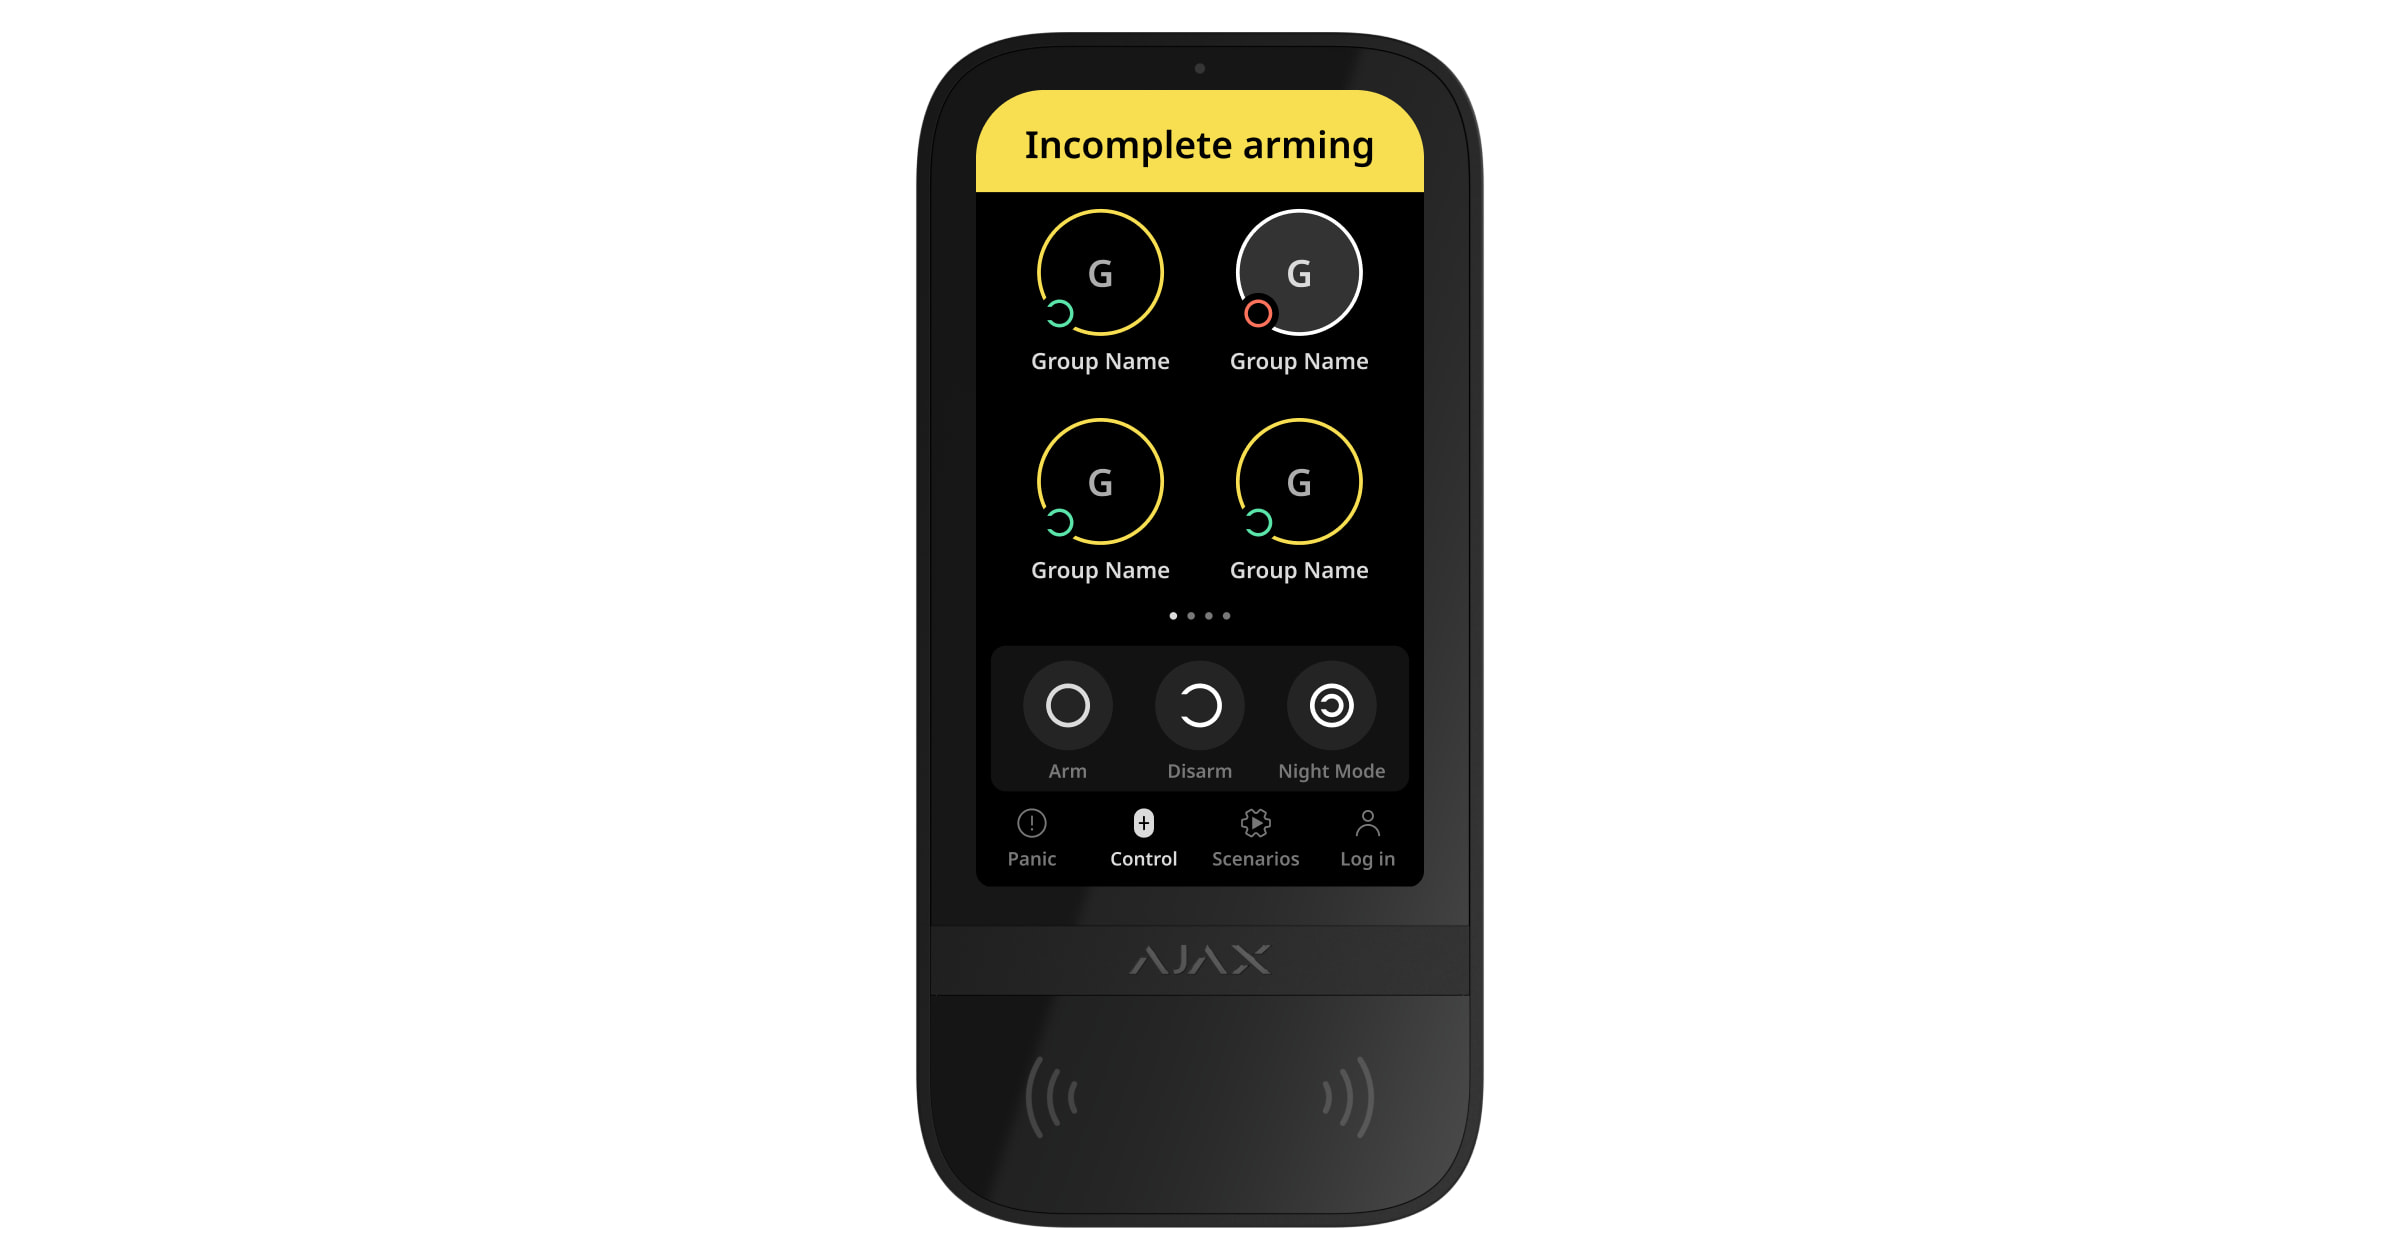
Users can see on the display whether the startup process has begun or is incomplete.
Group color indicators (when Group Mode is enabled):
Gray — disabled; activation has not begun.
Green — Power-on in progress.
Yellow — Power-on not complete.
White — armed.
Script Management Using the Keyboard
KeyPad TouchScreen allows you to create up to 6 scenarios from two types:
On preset action — controls one or more automation devices or the Ajax WaterStop Jeweller.
On switching the state — changes the state of a single automation device or the Ajax WaterStop Jeweller from the Scenarios tab on the keypad.
Creating a script:
Open the Ajax app and select a hub that has at least one automation device connected to it.
Go to the " Devices " tab and select " KeyPad TouchScreen."
Open Settings → Automation Scenarios and enable Scenarios Management.
Open Keypad Scenarios → Add Scenario.
Select the scenario type (On preset action or On switching the state).
A user with the Pre-authorization feature enabled must first authenticate using a code or an access device in order to manage scenarios.
Scripts are visible only if they have been enabled in the settings.
Place the keypad on the SmartBracket mounting panel. The device’s LED indicator will flash. This indicates that the keypad’s housing is closed.
If the LED indicator does not light up when you place the keyboard on the SmartBracket, check the tamper status in the Ajax app, the integrity of the mounting, and whether the keyboard is securely fastened to the panel.
Perform signal strength testsfor Jeweller and Wings. The recommended signal strength is two or three bars. If the signal is low (one bar), stable device operation cannot be guaranteed. Consider moving the keypad—even a 20 cm shift can significantly improve the signal. If the signal remains weak or unstable after repositioning, use a ReX 2 radio signal booster.
Perform the Signal Attenuation Test. During the test, the signal strength can be artificially reduced or increased to simulate various conditions at the installation site. If the location is chosen correctly, the keypad should display a stable signal with 2–3 bars.
If the tests are successful, remove the keypad from the SmartBracket.
Secure the SmartBracket panel to the surface using the screws included in the kit. Use all mounting points.
If you use other mounting hardware, make sure it does not damage or deform the panel.
Place the keyboard on the SmartBracket mounting panel.
Tighten the mounting screw located on the bottom of the case. This ensures a more secure attachment and protects the keyboard from being accidentally removed.
Connecting a Third-Party Power Supply
When using the KeyPad TouchScreen with a third-party power supply, follow the general electrical safety rules applicable to the use of electrical equipment, as well as the applicable electrical safety regulations.
Power supply connection specifications:
Voltage: 10.5–14 V⎓
Recommended specifications: 12 V⎓, current of at least 0.5 A
It is recommended to connect the power supply unit when:
ensure that the display remains on at all times (Always Active Display mode);
to prevent the battery from draining quickly, for example, in rooms with low temperatures;
Update the keyboard firmware.
When an external power source is connected, the pre-installed batteries function as a backup power source. Do not remove them when connecting the external power supply.
⚠️ Safety requirements:
Before installing the device, check the wires to make sure the insulation is not damaged.
Use only a grounded power source.
Do not disassemble the device while it is energized.
Do not use the device if the power cord is damaged.
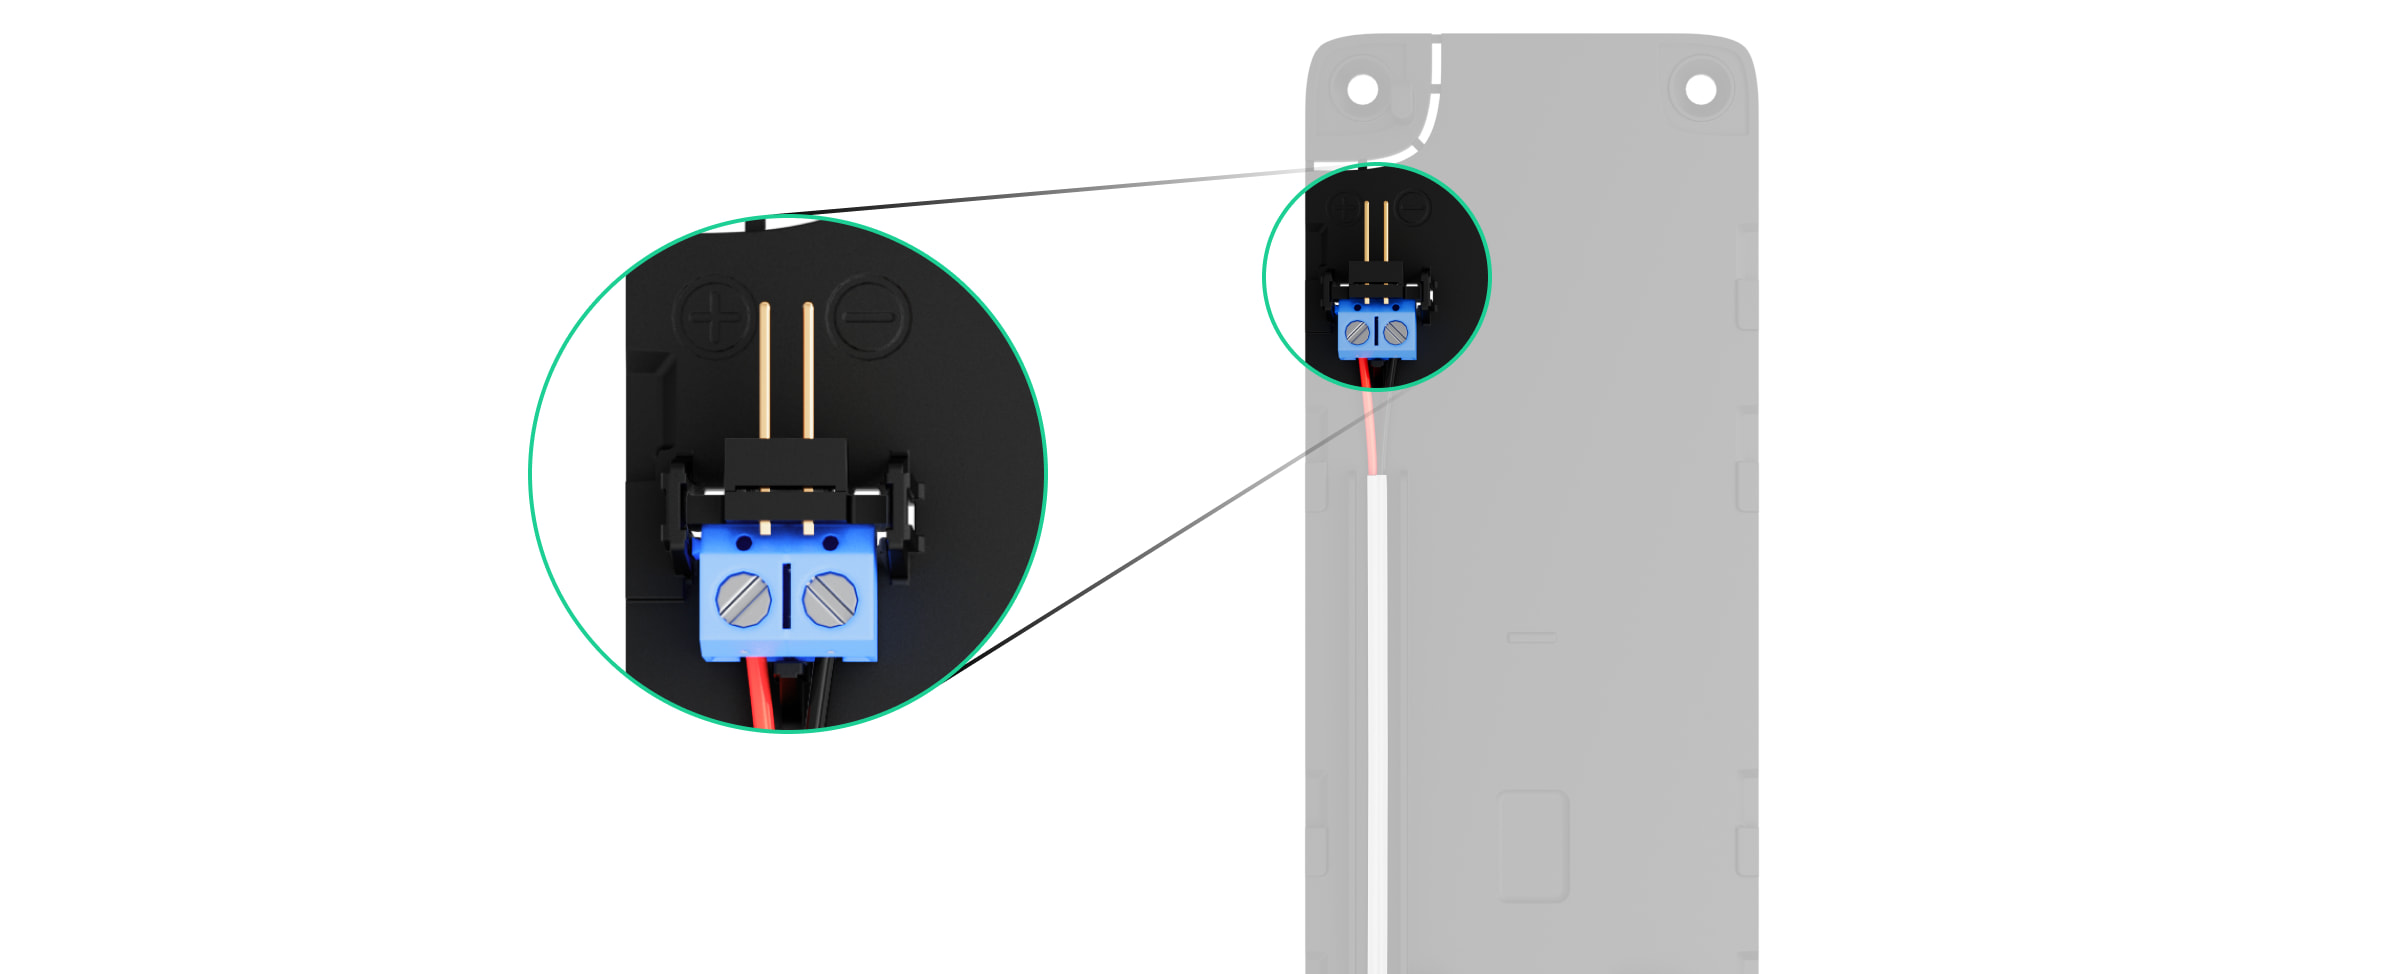
Steps for connecting the power supply:
Remove the SmartBracket mounting panel.
Carefully break out the perforated section of the housing to prepare the openings for the cable to pass through.
Connecting the External Power Supply (continued)
1 — Use the opening to route the cable through the wall. 2 — Use the opening to route the cable from the bottom. Simply snap off one of the perforated sections.
Connection procedure:
Disconnect the external power supply cable from the power source.
Connect the cable to the terminals, observing the polarity (+ / – are marked on the plastic).
Connecting the External Power Supply (continued)
Route the cable through the cable channel.
Example of how to route the cable from the bottom of the keyboard:
Connecting the External Power Supply (conclusion)
Turn on the keyboard and place it on the mounting panel. Check the battery and external power status in the Ajax app, as well as the overall operation of the device.
INCERT Compliance
Do not connect a third-party power supply to the KeyPad TouchScreen Jeweller in an INCERT-certified system.
Firmware Update
You can install a KeyPad TouchScreen firmware update when a new version is available. You can check for updates in the device list in the Ajax PRO: Tool for Engineers and PRO Desktop apps. If an update is available, an icon will appear next to the corresponding keypad. An administrator or PRO user with access to system settings can initiate the update in the KeyPad TouchScreen status or settings. The update takes up to 1–2 hours (if the keypad is operating via ReX 2).
To update the firmware, connect the KeyPad TouchScreen's external power supply. The update will not begin without an external power supply.
If the KeyPad TouchScreen is not connected to an external power source at the installation site, you can use a separate SmartBracket mounting panel. To do this, remove the keypad from the main mounting panel and install it on a spare panel connected to an external power supply with a voltage of 10.5–14 V⎓ and a current of 0.5 A or more.
The mounting panel can be purchased separately from authorized distributors.
Maintenance
Check the operation of the KeyPad TouchScreen regularly. The recommended frequency is once every three months. Clean the device’s casing of dust, cobwebs, and other dirt as they appear. Use soft, dry wipes designed for cleaning electronic devices.
Do not use cleaning products that contain alcohol, acetone, gasoline, or other active solvents. Wipe the screen gently.
The device operates for up to 1.5 years on the pre-installed batteries (estimate based on default settings and up to 4 daily interactions with the keyboard).
The system will send a timely alert when it is time to replace the batteries. When you change the security mode, the indicator will slowly light up and then go out.
Warranty
The product warranty for SIA “Ajax Systems Manufacturing” is valid for 2 years after purchase.
If the device is not working properly, contact Ajax technical support first. In most cases, technical issues can be resolved remotely.
*Offer valid only for purchases made in the online store
In-Store Pickup: Make your payment and, once confirmed, pick up your order at 15a Cesvaines Street, Riga
Delivery
We offer convenient delivery throughout Latvia to Omniva, DPD, or Latvijas Pasts pickup points for €2.99, or delivery by courier to your address for €7.99.
Free delivery to pickup points for orders of €100 or more; free courier delivery for orders of €300 or more.
Warranty
All products in our store come with an official warranty ranging from 2 to 6 years, depending on the manufacturer.
The warranty period is the same for both individuals and businesses!
Share:
AJAX Wireless Touch Keypad...
AJAX Wireless Touch Keypad with touch...
€263,73€336,36
Unit price
€263,73€336,36
Unit price
€263,73€336,36
Unit price
Free Shipping
To pickup points starting at €100; by courier starting at €300
30-Day Return Policy
All items must be free of signs of use
Product Description
KeyPad TouchScreen is a wireless keypad with a touchscreen designed for managing Ajax security systems. Users can authenticate using smartphones, Tag key fobs, Pass cards, and codes. The device is intended for indoor use only.
IPS capacitive touchscreen, diagonal: 5″, resolution: 480 × 854 pixels. Contactless access for 200 cards and key fobs; support for Bluetooth Low Energy (BLE); Power supply: 6 AA batteries; optional external power supply: 10.5–14 V, up to 0.5 A. Dimensions: 171.5 × 82.1 × 26 mm; Weight: 327 g;
KeyPad TouchScreen Communication
The KeyPad TouchScreen communicates with the hub using two secure radio protocols. The keypad uses the Jeweller protocol to transmit alarms and events, and the Wings protocol to update software, transmit group and room lists, and other additional information.
The communication range in an open area is up to 1,700 meters.
Functional Elements
Ambient light sensor — automatically adjusts screen brightness. 5-inchIPS touchscreen. Ajax logo with LED indicator. Card/keypad/Bluetooth reader. SmartBracket mounting panel. To remove the panel, slide it downward. Perforated section of the panel that triggers the tamper when an attempt is made to remove the keypad from the surface. Do not break off. Perforated section of the panel for routing cables through the wall. Built-in speaker (buzzer). Tamper button. QR code with the device ID for adding the keypad to the Ajax system. Power button. Terminals for connecting an external power supply (not included). The terminals can be removed from their holders if necessary. Cable channel for a third-party power supply cable. Perforated section of the panel for routing cables from the bottom. Hole for securing the SmartBracket mounting panel with a screw.
Compatible hubs and signal amplifiers
The keypad requires a compatible Ajax hub running OS Malevich version 2.16.1 or later.
[Check device compatibility]
Operating Principle
The KeyPad TouchScreen is equipped with a built-in buzzer, a touchscreen, and a reader for contactless authorization. The keypad is used to change security modes, control automation devices, and notify users of system alarms.
The keypad automatically adjusts the screen brightness and activates when the user approaches. Sensitivity can be adjusted in the app. The KeyPad TouchScreen interface is similar to the Ajax Security System app and offers both dark and light modes. The 5-inch touchscreen provides access to the security mode for the entire property or individual zones, and also allows you to control automation scenarios. The display also shows system errors if the system integrity check is enabled.
Depending on the settings, the KeyPad TouchScreen’s built-in buzzer alerts you to:
alarms;
changes in security mode;
entry/exit delays;
activation of the tamper detector.
The keypad operates on pre-installed batteries. It can also be connected to an external power source with a voltage range of 10.5–14 V⎓ and a minimum operating current of 0.5 A. When an external power supply is connected, the pre-installed batteries function as a backup power source.
Security Management
Security Management with KeyPad TouchScreen
The KeyPad TouchScreen allows you to arm and disarm the entire property or individual groups, as well as activate Night Mode. To change the security mode, use the Control tab.
Security can be managed using:
for smartphones – using the Ajax Security System app and Bluetooth Low Energy (BLE) technology. – a smartphone can be used in place of a Pass or Tag for user authentication. – Android and iOS phones with BLE 4.2 or later are supported.
cards or tags – DESFire® technology, based on the ISO 14443 international standard, is used for fast and secure user identification, providing 128-bit encryption and copy protection.
For codes – the keyboard supports the shared code, personal user codes, and codes for unregistered users.
Access Codes
Keyboard code – a global code that is set for the entire keyboard. Events are sent to Ajax applications on behalf of the keyboard.
User ID – a personal ID assigned to a user who has been added to the hub. Events are sent on behalf of the user.
Keypad access code – a code for a person who is not registered in the system. Events are sent with a name associated with this code.
RRU code – a code for Rapid Response Units. It is activated following an alert and remains active for a specified period of time. Events in the app are displayed using the name assigned to the code.
The number of personal, access, and RRU codes depends on the hub model.
Access rights and codes can be changed in Ajax apps. If a code is compromised, it can be changed remotely —there’s no need to call an on-site installer. If a user loses their Pass, Tag, or smartphone, an administrator or PRO with configuration rights can immediately block the device in the app. In the meantime, the user can use their personal code to control the system.
Group Security Management
Group Security Management
KeyPad TouchScreen allows you to control group security (if Group Mode is enabled). In the keypad settings, you can specify which groups will be available (keypad groups). By default, all groups are visible on the keypad display under the Control section.
If the "Followed group" feature is configured for groups, their security status can change automatically based on the settings and the status of the triggers.
Emergency Buttons
The KeyPad TouchScreen is equipped with on-screen emergency buttons that allow the user to quickly send an alarm signal:
Panic — sends an alarm signal to the security company's monitoring center and to all apps connected to the system.
Fire — triggers the fire alarm.
Medicine — sends a signal indicating the need for medical assistance.
The buttons also activate the sirens connected to the system at the same time (if this feature is enabled).
.
Emergency Buttons
ChatGPT says:
For Emergencies
KeyPad TouchScreen has a special " Panic " tab with three buttons:
Panic Button
Fire
Auxiliary signal
In the Ajax app, an administrator or PRO user with system configuration privileges can choose how many buttons will be displayed on the Panic tab. Two options are available in the KeyPad TouchScreen settings:
only the Panic Button (default mode),
all three buttons.
The text of notifications in the apps and the event codes that are sent to the Central Monitoring Station (CMS) depend on the type of button selected.
Protection against accidental presses is also available. In this case, the user must confirm the sending of the alarm by pressing the Send button on the on-screen keyboard. The confirmation screen appears after any panic button is pressed.
Pressing the emergency button can trigger alarm scenarios in the Ajax system.
Script Management
Automation control via a separate keyboard tab
In a separate keyboard tab, you can add up to six buttons that control a single automation device or a group of devices. Group scenarios provide more convenient control, allowing you to manage multiple switches, relays, or outlets simultaneously.
Automation scenarios are created in the keyboard settings, but they can be managed directly using the KeyPad TouchScreen.
Fault and Safety Mode Indication
KeyPad TouchScreen notifies users of system errors and security mode by:
display,
logo,
audible signals.
Depending on the settings, the logo lights up red continuously or only when the system or group is turned on. The display shows an indication only when it is active. The built-in speaker/alarm signals alarms, door openings, and entry/exit delay times.
Review of Recent Events
This feature is available on the KeyPad TouchScreen Jeweller with firmware version 11.60.20.8, 12.60.20.4, or later, when connected to a hub running OS Malevich version 2.33 or later.
The KeyPad TouchScreen Jeweller can display up to 100 of the most recent system events since the last check. Events are grouped and sorted by date.
Each event contains the following information:
device name;
activity;
room;
exact time (HH:MM).
How to enable viewing of recent events on the keyboard:
Open the Ajax app and select the room with the connected device.
Go to the Devices tab.
Select the KeyPad TouchScreen Jeweller and open its Settings (the gear icon).
Open the " Keyboard Notification Center" section.
Turn on the " Event Confirmation" toggle.
Tap Back to save your settings.
How to view recent events on the keyboard display:
Go to the " Management" tab.
Tap the icon 📜to open the list of events. If there are new events, the icon in the upper-right corner will have a red notification circle.
Click " Mark All as Read" to clear the list of events.
⚠️ Clearing events applies only to the keyboard on which the action was performed. Other keyboards connected to the same hub will still display the most recent events.
Silencing a Fire Alarm
Silencing a Fire Alarm with the KeyPad TouchScreen
If a fire alarm is triggered by the system, it can be silenced using the KeyPad TouchScreen.
Pressing the Fire emergency button on the Panic tab does not activate the Interconnected Fire Detectors Alarm feature (if enabled). When an emergency signal is sent from the keyboard, a corresponding notification is sent to the app and the CMS.
All KeyPad TouchScreen units with the "Mute Fire Alarm" feature enabled display a screen with information about the fire alarm and a button to mute it.
If the mute button has already been pressed on another keypad, a corresponding message is displayed on the other keypads.
Users can close the fire alarm mute screen and use other keypad functions. To reopen the mute screen, press the icon 🔥 on the KeyPad TouchScreen.
If the alarm was triggered by the ManualCallPoint Jeweller or if a critical CO or smoke level has been detected, the alarm cannot be silenced from the keypad.
These types of fire alarms are available on the KeyPad TouchScreen Jeweller with firmware version 11.60.10.19 or later.
Immediate Display of the Fire Alarm Mute Screen
To have the KeyPad TouchScreen immediately display the fire alarm silence screen, enable the " Always Active Display" toggle in the keypad settings. You will also need to connect an external power source.
Otherwise, the mute screen will only appear when the keyboard wakes up.
Duress Code
The KeyPad TouchScreen supports a duress code that allows you to simulate deactivation of the alarm system. In this case, the Ajax app and the installed sirens will not detect your actions, but the security company and other users of the security system will be immediately notified of the incident.
User Pre-Authorization
The pre-authorization feature prevents unauthorized access to the control panel and the system's current status. It can be enabled separately on the "Control " and "Scenarios " tabs in the keyboard settings.
The code entry screen is displayed only on those tabs where pre-authorization is enabled.
The user must first authenticate by entering a code or attaching a personal access device to the keyboard.
The exception is the "Alarm" tab, which allows you to send an emergency signal even without authorization.
Automatic Blocking of Unauthorized Access
If an incorrect code is entered 3 times in a row within 1 minute, or if an unverified access device is used:
The keyboard is locked for the duration specified in its settings.
During this period, the hub will ignore all codes and access devices.
All system users will be notified of any attempt to gain unauthorized access.
The keyboard turns off the reader and blocks access to all tabs. A corresponding message appears on the display.
A PRO user or administrator can unlock the keyboard in the app before the set lock time expires.
Two-stage activation
The KeyPad TouchScreen can be used to arm a two-stage alarm system, but it cannot be used as a second-stage device. The two-stage arming process using a Tag, Pass, or smartphone is identical to the procedure using a general or personal code on the keypad.
Jeweller and Wings Data Transmission Protocols
Jeweller — broadcasts alerts and events.
Wings — provides software updates, a list of groups and rooms, as well as other additional information.
Both are bidirectional wireless protocols that ensure fast and reliable communication between the hub and devices.
Forwarding Events to the Centralized Monitoring Station (CMS)
The Ajax system can forward alarms to PRO Desktop and CMS using the following protocols:
SurGard (Contact ID),
SIA (DC-09),
ADEMCO 685,
other protocols.
KeyPad TouchScreen transmits the following events:
entering the emergency code;
pressing the panic button (each button has its own event code);
keyboard lock due to an attempt at unauthorized access;
tamper alarm/reset;
loss/restoration of the connection to the hub (or signal amplifier);
turning the system on/off;
a failed attempt to start the system (if the system integrity check is enabled);
Complete or one-time deactivation/activation of the keyboard.
Adding to the System
The KeyPad TouchScreen is not compatible with:
Hub Jeweller,
Hub Plus Jeweller,
third-party alarm panels.
Requirements:
The keyboard must be located in the same location as the hub, within the wireless network's coverage area.
When using the ReX 2 signal amplifier, you must first connect the keyboard to the hub, and only then connect it to the ReX 2.
The hub and keyboard must operate within the same radio frequency band.
Before joining
Install the Ajax app.
Sign in to your account or create a new one.
Create or select Space.
Add at least one virtual room.
Connect a compatible hub and make sure it has Internet access.
Make sure the room is unarmed and that the hub is not undergoing an update.
Only a PRO or an administrator with configuration rights may perform this addition.
Damage
When a fault is detected on the KeyPad TouchScreen, a fault counter appears next to the device icon in the Ajax app. All faults are indicated in the keypad’s status. Fields with faults are highlighted in red.
An error is displayed if:
the keyboard housing is open (the tamper has been triggered);
There is no connection to the hub or radio signal booster via Jeweller;
There is no connection to a hub or wireless signal booster when using Wings;
The keyboard battery is low;
The keyboard temperature is outside the acceptable range.
Icons
Icons in the app
The icons in the app represent different keyboard states. To access the icons:
Log in to the Ajax app.
Select a hub.
Open the Devices tab.
Icon — Meaning
Icon
Meaning
Jeweller signal strength — displays the signal strength between the hub and the device. Recommended value: 2–3 bars.
The keypad battery level is OK — the keypad battery level is normal.
The keypad is malfunctioning. A list of errors is available in the keypad status section.
Displayed when the keypad's Bluetooth module is enabled — appears when the keypad's Bluetooth module is turned on.
Bluetooth setup is not complete — Bluetooth setup is not complete. A description is available in the keyboard status.
A firmware update is available. Go to the keyboard status or settings to view the description and start the update.
The icon is not available in the Ajax Security System app, version 3.0 and later, on iOS and Android devices.
To update the firmware, connect an external power source to the KeyPad TouchScreen.
RE — Appears when the keyboard is operating through a radio signal amplifier.
PT — Pass/Tag reading has been enabled in the KeyPad TouchScreen settings.
CH — The door-opening beep can be enabled in the KeyPad TouchScreen settings.
SAT — The device is in signal attenuation test mode.
PD — The device has been permanently deactivated.
TD — Tampere alarm notifications have been permanently disabled.
OD — The device is deactivated until the first system disarm.
TD — Tamper alarm notifications are disabled until the system is disarmed for the first time.
CL — The device has lost its connection to the hub, or the hub has lost its connection to the Ajax Cloud server.
NT — The device has not been moved to the new hub.
Icons on the display
Icons appear at the top of the display and provide information about specific system statuses or events.
Icon
Meaning
The system must be reset after an alarm. Depending on their account type, users can either submit a request or reset the system themselves. To do this, click the icon and select the appropriate button on the screen.
Silence the fire alarm. Appears after closing the screen that silences the fire alarm. Users can click the icon at any time to silence a fire alarm, including interconnected fire alarms.
If a fire alarm is triggered by a ManualCallPoint Jeweller, or if CO or smoke levels reach a critical threshold, the alarm cannot be silenced from the keypad.
These types of fire alarms are available on the KeyPad TouchScreen Jeweller with firmware version 11.60.10.19 or later.
CO-OFF — The door-opening sound alert is disabled. Click the icon to enable it.
Appears on the display once the necessary settings have been adjusted.
CO-ON — The door-opening sound alert is enabled. Click the icon to disable it.
Appears on the display once the necessary settings have been adjusted.
States
Conditions
Statuses provide information about the device and its operating parameters. You can view KeyPad TouchScreen statuses in the Ajax apps:
Go to the Devices tab. Select KeyPad TouchScreen from the list.
Parameter — Value
Data Import Displays an error when transferring data to the new hub:
Failed — The device was not transferred to the new hub.
Malfunction Clicking on the icon opens the KeyPad TouchScreen error list. This field is displayed only when an error is detected.
New firmware version available Clicking on the icon opens the instructions for updating the firmware. This field is displayed when new firmware is available. This status is not visible in the Ajax Security System app, version 3.0 and later (iOS and Android). To update the firmware, connect an external power source to the KeyPad TouchScreen.
Warning Clicking the icon opens a list of settings and permissions required for the keyboard to function properly.
Jeweller Signal Strength Signal strength between the hub or repeater and the device over the Jeweller channel. The recommended value is 2–3 bars. Jeweller is a protocol for transmitting KeyPad TouchScreen events and alarms.
Connection via Jeweller Connection status on the Jeweller channel between the device and the hub (or repeater):
Online — the device is connected to a hub or repeater.
Offline — The device is not connected to a hub or repeater. Check the keyboard connection.
Wings Signal Strength Signal strength between the hub or repeater and the device over the Wings channel. The recommended value is 2–3 bars. Wings is a protocol for firmware updates and for transmitting group, room, and other information.
Connection via Wings Connection status on the Wings channel between the hub or repeater and the device:
Online — the device is connected to a hub or repeater.
Offline — The device is not connected to a hub or repeater. Check the keyboard connection.
Transmitter power Displays the selected transmitter power. This parameter appears when the "Max " or " Attenuation " option is selected in the signal attenuation test.
Battery Charge Battery charge level:
OK
Battery low (Battery is low)
When the battery is low, the Ajax app and the security company receive the appropriate notifications. After a notification is sent, the keypad can continue to operate for up to 2 weeks.
Lid (Vāciņš) The status of the keyboard tamper, which reacts when the device's casing is removed or opened:
Open — The keyboard has been removed from the SmartBracket or its integrity has been compromised. Check the device.
Closed — The keyboard is mounted on the SmartBracket. The integrity of the housing and mounting hardware has not been compromised. Normal condition.
External Power Status of the external power source connection:
Connected — an external power source is connected.
Disconnected — the external power source has been disconnected. The device is running on batteries.
Always Active Display Appears when the Always Active Display option is enabled in Settings and an external power source is connected.
Alarm Sound Indication Displays the status of the setting : Enable the keypad beep when an alarm is detected in the system.
Alarm duration The duration of the audible alarm. Can be set in 3-second increments. Displayed when the "Enable keypad alarm when a system alarm is detected" option is enabled.
Pass/Tag Reading Indicates whether the card and tag reader is enabled.
Bluetooth Indicates whether the keyboard's Bluetooth module is enabled for system control via a smartphone.
Easy Armed Mode Change Displays the configuration of the Easy Armed Mode Change feature:
Off — Each mode change must be confirmed with a code or an access device.
Arm/disarm using an access device without confirming the action with buttons — allows you to change the mode using access devices without confirming with buttons. Available if Pass/Tag reading or Bluetooth is enabled and the keypad is assigned to only one group.
Disarm without disarming button — allows you to change the mode without confirmation via the keypad for the entire system or for groups. Available if " Codes length restrictions" is enabled in the hub settings.
Beeps Settings
Arming/Disarming — a short signal indicating arming or disarming.
Night Mode Activation/Deactivation — a short beep indicating that Night Mode has been activated or deactivated.
Entry Delays — signals indicating entry delays.
Exit Delays — signals indicating exit delays.
Entry Delays in Night Mode — signals indicating entry delays in Night Mode.
Exit Delays in Night Mode — alerts regarding exit delays in Night Mode.
Chime on opening (Door-opening sound signal) When enabled, the siren sounds to indicate that a door or detector has been opened while the system is in disarmed mode.
Beep Volume (Beep Volume) Appears when notifications for arming/disarming, entry/exit delays, or door opening are enabled. Displays the beep volume level.
Permanent Deactivation Displays the status of the keyboard's permanent deactivation:
From — the keyboard works normally.
Lid only — the hub administrator has disabled tamper notifications.
Entirely — the keyboard is completely disabled from system operation.
One-Time Deactivation Displays the status of the keyboard's one-time deactivation:
From — the keyboard works normally.
Lid only — tamper alerts are disabled until the first disarming.
Entirely — the keyboard is completely disabled from system operation until the first disarm.
Firmware ( ) Keyboard firmware version.
ID . Keyboard ID. Also available via the QR code on the device's casing and packaging.
Changing KeyPad TouchScreen Settings in the Ajax App
Go to the "Devices" tab.
Select " KeyPad TouchScreen " from the list.
Open Settings by clicking the icon.
Set the required parameters.
Press Back to save the new settings.
Settings
Name (Nosaukums) The keyboard's name. It appears in the list of hub devices, in SMS messages, and in the event stream. You can change the name by clicking in the text field. The name can contain up to 12 Cyrillic characters or up to 24 Latin characters.
Room Selection of a virtual room assigned a KeyPad TouchScreen. The room name is displayed in SMS and event feed notifications.
Access Settings Security Mode Control Method:
Keypad codes only (Keypad codes only)
User codes only (Only user codes)
Keypad and User Codes
To enable Keypad Access Codes for unauthorized users, select either the " Keypad codes only " or " Keypad and user codes" option.
Keypad Code Setting the general security management code. 4–6 digits.
Duress Code Setting the general silent alarm code. 4–6 digits.
Screen Detection Range : The distance at which the keyboard detects movement and turns on the display:
Minimum (Minimums)
Low
Normal (Default)
High
Max (Maximum)
Mute Fire Alarm (Silencing a Fire Alarm) If enabled, users can silence Ajax fire detector alarms (including interlinked ones). If the alarm is triggered by a ManualCallPoint in the Jeweller, or by a critical CO or smoke level, the alarm cannot be silenced. Available in Jeweller KeyPad TouchScreen firmware version 11.60.10.19.
Pass/Tag Reading Allows you to manage security mode using Pass and Tag access devices.
Bluetooth Allows you to control the security mode using your smartphone.
Bluetooth Sensitivity : Adjusting the Bluetooth module's sensitivity:Minimum, Low, Normal (default), High, Max.
Unauthorized Access Auto-Lock When enabled, the keypad locks for a specified period of time after 3 unsuccessful attempts (code or access device) within 1 minute.
Auto-lock Time, min (Lockout time, in minutes) Selecting the lockout duration following unauthorized access attempts: 3, 5, 10, 20, 30, 60, 90, or 180 minutes.
Chime Management via Keypad (Door Chime Control via Keypad) Allows the user to enable/disable notifications regarding the activation of the opening detector directly from the display. You must enable “Chime on opening” in the settings.
Firmware Update Puts the device into firmware update mode. An external power source is required for the update.
Jeweller Signal Strength Test Switches the device to Jeweller signal test mode.
Wings Signal Strength Test Sets the device to Wings signal test mode.
Signal Attenuation Test Sets the device to signal attenuation test mode.
Pass/Tag Reset Deletes all hubs associated with Pass or Tag.
User Guide Opens the KeyPad TouchScreen user guide in the app.
Permanent Deactivation Allows you to deactivate a device without disconnecting it from the system:
Off — Normal Mode
Entirely — the device is completely deactivated
Lid only — tamper notifications ignored
One-Time Deactivation Allows you to deactivate device events until the first disarm:
Off — Normal Mode
Lid only — tamper alerts are disabled during arming
Entirely — device deactivated during arming
Delete Device Disconnects the device from the hub and deletes its settings.
After an alarm is triggered
The keyboard can indicate when the armed system has been activated using an LED indicator.
Here's how the option works:
The system detects an alarm.
The keyboard plays an alarm tone (if enabled). The duration and volume of the tone depend on the device's settings.
The keyboard LEDs flash twice (once every 3 seconds) until the system is disarmed.
Thanks to this feature, system users and the security service can tell that an alarm has been triggered.
Important! The KeyPad TouchScreen does not display an alarm indication for detectors that are always active if the detector was triggered while the system was disarmed.
How to turn on the alarm indicator (in the Ajax PRO app):
Go to the hub settings: Hub → Settings → Service → LED Indication.
Specify which events the KeyPad TouchScreen will indicate with a double LED flash until the system is disarmed:
Confirmed intrusion/assault alarm.
Single intrusion/assault alarm.
Opening of the housing.
Select the desired KeyPad TouchScreen from the Devices menu.
Click " Back" to save the settings.
Click " Back" again. All settings will be applied.
Chime (opening signal)
If the " Chime on opening " option is enabled, the KeyPad TouchScreen emits a short beep to indicate that the opening detector has been triggered when the system is disarmed. This feature is useful, for example, in stores to alert employees when customers enter the premises.
Configuring notifications is a two-step process:
Keyboard Setup.
Setting Up the Opening Detectors.
How to configure keyboard response:
Open the Ajax app.
Go to the " Devices" tab.
Select KeyPad TouchScreen and go to Settings.
Open the Sound Indication → Beeps Settings menu.
Enable the " Chime on opening " toggle in the " Beep when disarmed" category.
Set the desired volume for notifications.
Click " Back" to save your settings.
If the settings are configured correctly, a bell icon will appear on the Control tab of the Ajax app. Click it to enable or disable the notification when the app opens.
How to set up signal control from the keyboard display:
Open the Ajax app.
Go to the " Devices" tab.
Select KeyPad TouchScreen and go to Settings.
Enable the " Chime management via keypad" toggle.
If the settings are correct, a bell icon will appear on the Control tab of the keyboard. Click it to enable or disable the startup sound.
Select the hub to which you want to add a Tag or Pass.
Go to the Devices tab.
Make sure that the Pass/Tag Reading feature is enabled in the settings of at least one keyboard.
Tap Add Device.
Select Add Pass/Tag.
Specify the type (Tag or Pass), color, device name, and user (if necessary).
Tap Next. The hub will then switch to device registration mode.
Go to any compatible keypad with Pass/Tag Reading enabled and activate it.
After activation, the KeyPad TouchScreen will display a screen to switch the keypad to access device registration mode. Press the Start button.
The screen updates automatically if an external power source is connected and the Always Active Display switch is turned on in the keypad settings.
Hold your Pass or Tag with the wide side facing the keypad’s reader (marked with wave icons on the casing) for a few seconds. If pairing is successful, a notification will appear in the Ajax app and on the keypad display.
If pairing fails, try again after 5 seconds. If the hub already has the maximum number of Tags or Passes connected, you’ll receive a corresponding notification in the app when you try to add a new device.
Both Tags and Passes can work with multiple hub devices simultaneously (up to 13). If you try to pair a Tag or Pass with a hub that has already reached its limit, you’ll receive a notification in the app. To pair this tag/card with a new hub, you’ll need to reset it.
If you need to add another Tag or Pass, tap “Add Another Pass/Tag” in the app and repeat steps 6 through 9.
How to delete a Tag or Pass from a hub
Resetting will delete all tag and card settings and pairings. A reset Tag or Pass is deleted only from the hub on which the reset was performed. On other hub devices, it will still be visible in the app, but it cannot be used for security mode management. Such devices must be deleted manually.
Open the Ajax app.
Select the hub.
Go to the Devices tab.
Select a compatible keypad from the list of devices.
Make sure the Pass/Tag Reading feature is enabled in the keypad’s settings.
Open the keyboard settings by tapping the icon button.
Tap the Pass/Tag Reset menu.
Tap Continue.
Go to any compatible keypad with Pass/Tag Reading enabled and activate it.
The KeyPad TouchScreen will display the screen in access device reset mode. Tap the Start button.
Hold your Pass or Tag with the wide side against the keypad reader for a few seconds. If the reset is successful, a notification will appear in the Ajax app and on the keypad display. If the formatting fails, try again.
If you need to reset another Pass or Tag, tap “Reset another Pass/Tag” in the app and repeat step 9.
Bluetooth Setup
KeyPad TouchScreen supports security mode management via a smartphone by holding it near the sensor. Management is performed via the Bluetooth connection. This method is convenient, secure, and fast, as there is no need to enter an access code, pair your phone with the keypad, or use a Tag/Pass that could be lost.
Bluetooth authentication is available only to Ajax Security System users.
Enabling Bluetooth Authentication in the App
Connect the KeyPad TouchScreen to the hub.
Enable the keypad’s Bluetooth sensor: Devices → KeyPad TouchScreen → Settings → toggle the Bluetooth switch on.
Tap Back to save the settings.
Setting up Bluetooth authentication
Open the Ajax Security System app and select the hub to which the KeyPad TouchScreen with Bluetooth enabled is connected.
By default, Bluetooth authentication is available to all users of this system.
To deny Bluetooth authentication to specific users:
Go to the Devices tab, select the hub, and open its settings.
Open the Users menu and select the desired user.
In the Permissions section, disable the Security management via Bluetooth toggle.
If the Ajax app was not previously allowed to use Bluetooth, a " KeyPad TouchScreen States" warning will appear. Tapping the icon will open a window explaining the actions. Enable the “Security management with a phone” toggle at the bottom.
Grant the app permission to discover and connect to nearby devices. The pop-up window may differ on Android and iOS smartphones.
You can also enable the “Security management with a phone” toggle in the app’s settings:
Tap the ☰ icon in the upper-left corner of the screen and select the App Settings menu. Open the System Settings menu and enable the “Security management with a phone” toggle.
We recommend configuring Geofence to ensure stable Bluetooth authentication.
A warning ⚠ appears in KeyPad TouchScreen States if Geofence is disabled and the app is not allowed to access the smartphone’s location. Tapping ⚠ icon opens a window with instructions on what to do next.
On the "Log In " tab. After logging in, the user will see the available groups that were hidden from the list of shared groups.
Ten seconds after the last action, the keypad screen switches to the home screen. To control the system using the KeyPad TouchScreen, re-enter the code or tap your personal access device.
Safety Management
Using codes, a Tag/Pass, or a smartphone, you can manage Night Mode and control the security mode for the entire property or specific groups. A user or PRO with the authority to configure the system can set access codes. This section provides information on adding a Tag or Pass to the hub. To control the system with a smartphone, you must adjust the appropriate Bluetooth settings in the keypad settings. Turn on Bluetooth and Location Services on your smartphone, and unlock the screen.
The KeyPad TouchScreen is locked for the duration specified in the settings if an incorrect code is entered three times in a row within 1 minute or if an unverified access device is used. Corresponding notifications are sent to users and to the security company’s Central Monitoring Station (CMS). A user or PRO with configuration rights can unlock the KeyPad TouchScreen in the Ajax app.
If Group Mode is disabled, the corresponding icon on the on-screen keyboard indicates the current security mode:
— Armed.
— Disarmed.
— Night Mode.
If Group Mode is enabled, users see the security status of each group separately. A group is armed if its button outline is white and marked with the icon. A group is disarmed if its button outline is gray and marked with the icon.
The group buttons located in Night Mode on the KeyPad TouchScreen display are framed by a white square.
If a personal or access code, Tag/Pass, or smartphone is used, the control panel’s event log and notification list display the username of the user who changed the security mode. If a general code is used, the name of the keypad from which the security mode was changed is displayed.
The steps for changing the security mode using the keypad depend on whether user pre-authorization is enabled in the KeyPad TouchScreen settings.
If pre-authorization is enabled
If pre-authorization is disabled
Example of Entering Codes
Code
Example
Note
Keypad code
Keypad duress code
1234 → OK
Numbers entered incorrectly can be cleared by clicking the button.
User code
User Emergency Code
2 → → 1234 → OK
First, enter theuser ID for the , press the button, and then enter a personal code.
Numbers entered incorrectly can be cleared by clicking the button.
Code of an unregistered user
Duress Code for Unregistered Users
1234 → OK
Numbers entered incorrectly can be cleared by clicking the button.
RRU Code
1234 → OK
Numbers entered incorrectly can be cleared by clicking the button.
Simplified Security Mode Change
The " Simplified Security Mode Switch " feature allows you to switch the security mode to the opposite one using a tag/passcode or a smartphone.
Simplified Security Mode Change … without confirmation using the Arm or Disarm button.
Buttons. Go to the keyboard settings to enable this feature.
To switch the security mode to the opposite setting:
Activate the keyboard by moving closer to it or holding your hand over the sensor. If necessary, log in first.
Connect your Tag/Pass or smartphone.
Two-stage activation
KeyPad TouchScreen Two-Step Power-On and Scenario Management
Two-stage activation
The KeyPad TouchScreen can be used in a two-stage activation process, but it cannot be used as the second-stage device.
The unlocking process using a tag, passcode, or smartphone is similar to using a personal or general code on the keypad.
Users can see on the display whether the startup process has begun or is incomplete.
Group color indicators (when Group Mode is enabled):
Gray — disabled; activation has not begun.
Green — Power-on in progress.
Yellow — Power-on not complete.
White — armed.
Script Management Using the Keyboard
KeyPad TouchScreen allows you to create up to 6 scenarios from two types:
On preset action — controls one or more automation devices or the Ajax WaterStop Jeweller.
On switching the state — changes the state of a single automation device or the Ajax WaterStop Jeweller from the Scenarios tab on the keypad.
Creating a script:
Open the Ajax app and select a hub that has at least one automation device connected to it.
Go to the " Devices " tab and select " KeyPad TouchScreen."
Open Settings → Automation Scenarios and enable Scenarios Management.
Open Keypad Scenarios → Add Scenario.
Select the scenario type (On preset action or On switching the state).
A user with the Pre-authorization feature enabled must first authenticate using a code or an access device in order to manage scenarios.
Scripts are visible only if they have been enabled in the settings.
Place the keypad on the SmartBracket mounting panel. The device’s LED indicator will flash. This indicates that the keypad’s housing is closed.
If the LED indicator does not light up when you place the keyboard on the SmartBracket, check the tamper status in the Ajax app, the integrity of the mounting, and whether the keyboard is securely fastened to the panel.
Perform signal strength testsfor Jeweller and Wings. The recommended signal strength is two or three bars. If the signal is low (one bar), stable device operation cannot be guaranteed. Consider moving the keypad—even a 20 cm shift can significantly improve the signal. If the signal remains weak or unstable after repositioning, use a ReX 2 radio signal booster.
Perform the Signal Attenuation Test. During the test, the signal strength can be artificially reduced or increased to simulate various conditions at the installation site. If the location is chosen correctly, the keypad should display a stable signal with 2–3 bars.
If the tests are successful, remove the keypad from the SmartBracket.
Secure the SmartBracket panel to the surface using the screws included in the kit. Use all mounting points.
If you use other mounting hardware, make sure it does not damage or deform the panel.
Place the keyboard on the SmartBracket mounting panel.
Tighten the mounting screw located on the bottom of the case. This ensures a more secure attachment and protects the keyboard from being accidentally removed.
Connecting a Third-Party Power Supply
When using the KeyPad TouchScreen with a third-party power supply, follow the general electrical safety rules applicable to the use of electrical equipment, as well as the applicable electrical safety regulations.
Power supply connection specifications:
Voltage: 10.5–14 V⎓
Recommended specifications: 12 V⎓, current of at least 0.5 A
It is recommended to connect the power supply unit when:
ensure that the display remains on at all times (Always Active Display mode);
to prevent the battery from draining quickly, for example, in rooms with low temperatures;
Update the keyboard firmware.
When an external power source is connected, the pre-installed batteries function as a backup power source. Do not remove them when connecting the external power supply.
⚠️ Safety requirements:
Before installing the device, check the wires to make sure the insulation is not damaged.
Use only a grounded power source.
Do not disassemble the device while it is energized.
Do not use the device if the power cord is damaged.
Steps for connecting the power supply:
Remove the SmartBracket mounting panel.
Carefully break out the perforated section of the housing to prepare the openings for the cable to pass through.
Connecting the External Power Supply (continued)
1 — Use the opening to route the cable through the wall. 2 — Use the opening to route the cable from the bottom. Simply snap off one of the perforated sections.
Connection procedure:
Disconnect the external power supply cable from the power source.
Connect the cable to the terminals, observing the polarity (+ / – are marked on the plastic).
Connecting the External Power Supply (continued)
Route the cable through the cable channel.
Example of how to route the cable from the bottom of the keyboard:
Connecting the External Power Supply (conclusion)
Turn on the keyboard and place it on the mounting panel. Check the battery and external power status in the Ajax app, as well as the overall operation of the device.
INCERT Compliance
Do not connect a third-party power supply to the KeyPad TouchScreen Jeweller in an INCERT-certified system.
Firmware Update
You can install a KeyPad TouchScreen firmware update when a new version is available. You can check for updates in the device list in the Ajax PRO: Tool for Engineers and PRO Desktop apps. If an update is available, an icon will appear next to the corresponding keypad. An administrator or PRO user with access to system settings can initiate the update in the KeyPad TouchScreen status or settings. The update takes up to 1–2 hours (if the keypad is operating via ReX 2).
To update the firmware, connect the KeyPad TouchScreen's external power supply. The update will not begin without an external power supply.
If the KeyPad TouchScreen is not connected to an external power source at the installation site, you can use a separate SmartBracket mounting panel. To do this, remove the keypad from the main mounting panel and install it on a spare panel connected to an external power supply with a voltage of 10.5–14 V⎓ and a current of 0.5 A or more.
The mounting panel can be purchased separately from authorized distributors.
Maintenance
Check the operation of the KeyPad TouchScreen regularly. The recommended frequency is once every three months. Clean the device’s casing of dust, cobwebs, and other dirt as they appear. Use soft, dry wipes designed for cleaning electronic devices.
Do not use cleaning products that contain alcohol, acetone, gasoline, or other active solvents. Wipe the screen gently.
The device operates for up to 1.5 years on the pre-installed batteries (estimate based on default settings and up to 4 daily interactions with the keyboard).
The system will send a timely alert when it is time to replace the batteries. When you change the security mode, the indicator will slowly light up and then go out.
Warranty
The product warranty for SIA “Ajax Systems Manufacturing” is valid for 2 years after purchase.
If the device is not working properly, contact Ajax technical support first. In most cases, technical issues can be resolved remotely.
We guarantee a safe shopping experience
Our store carries only products from official manufacturers and distributors that we trust.


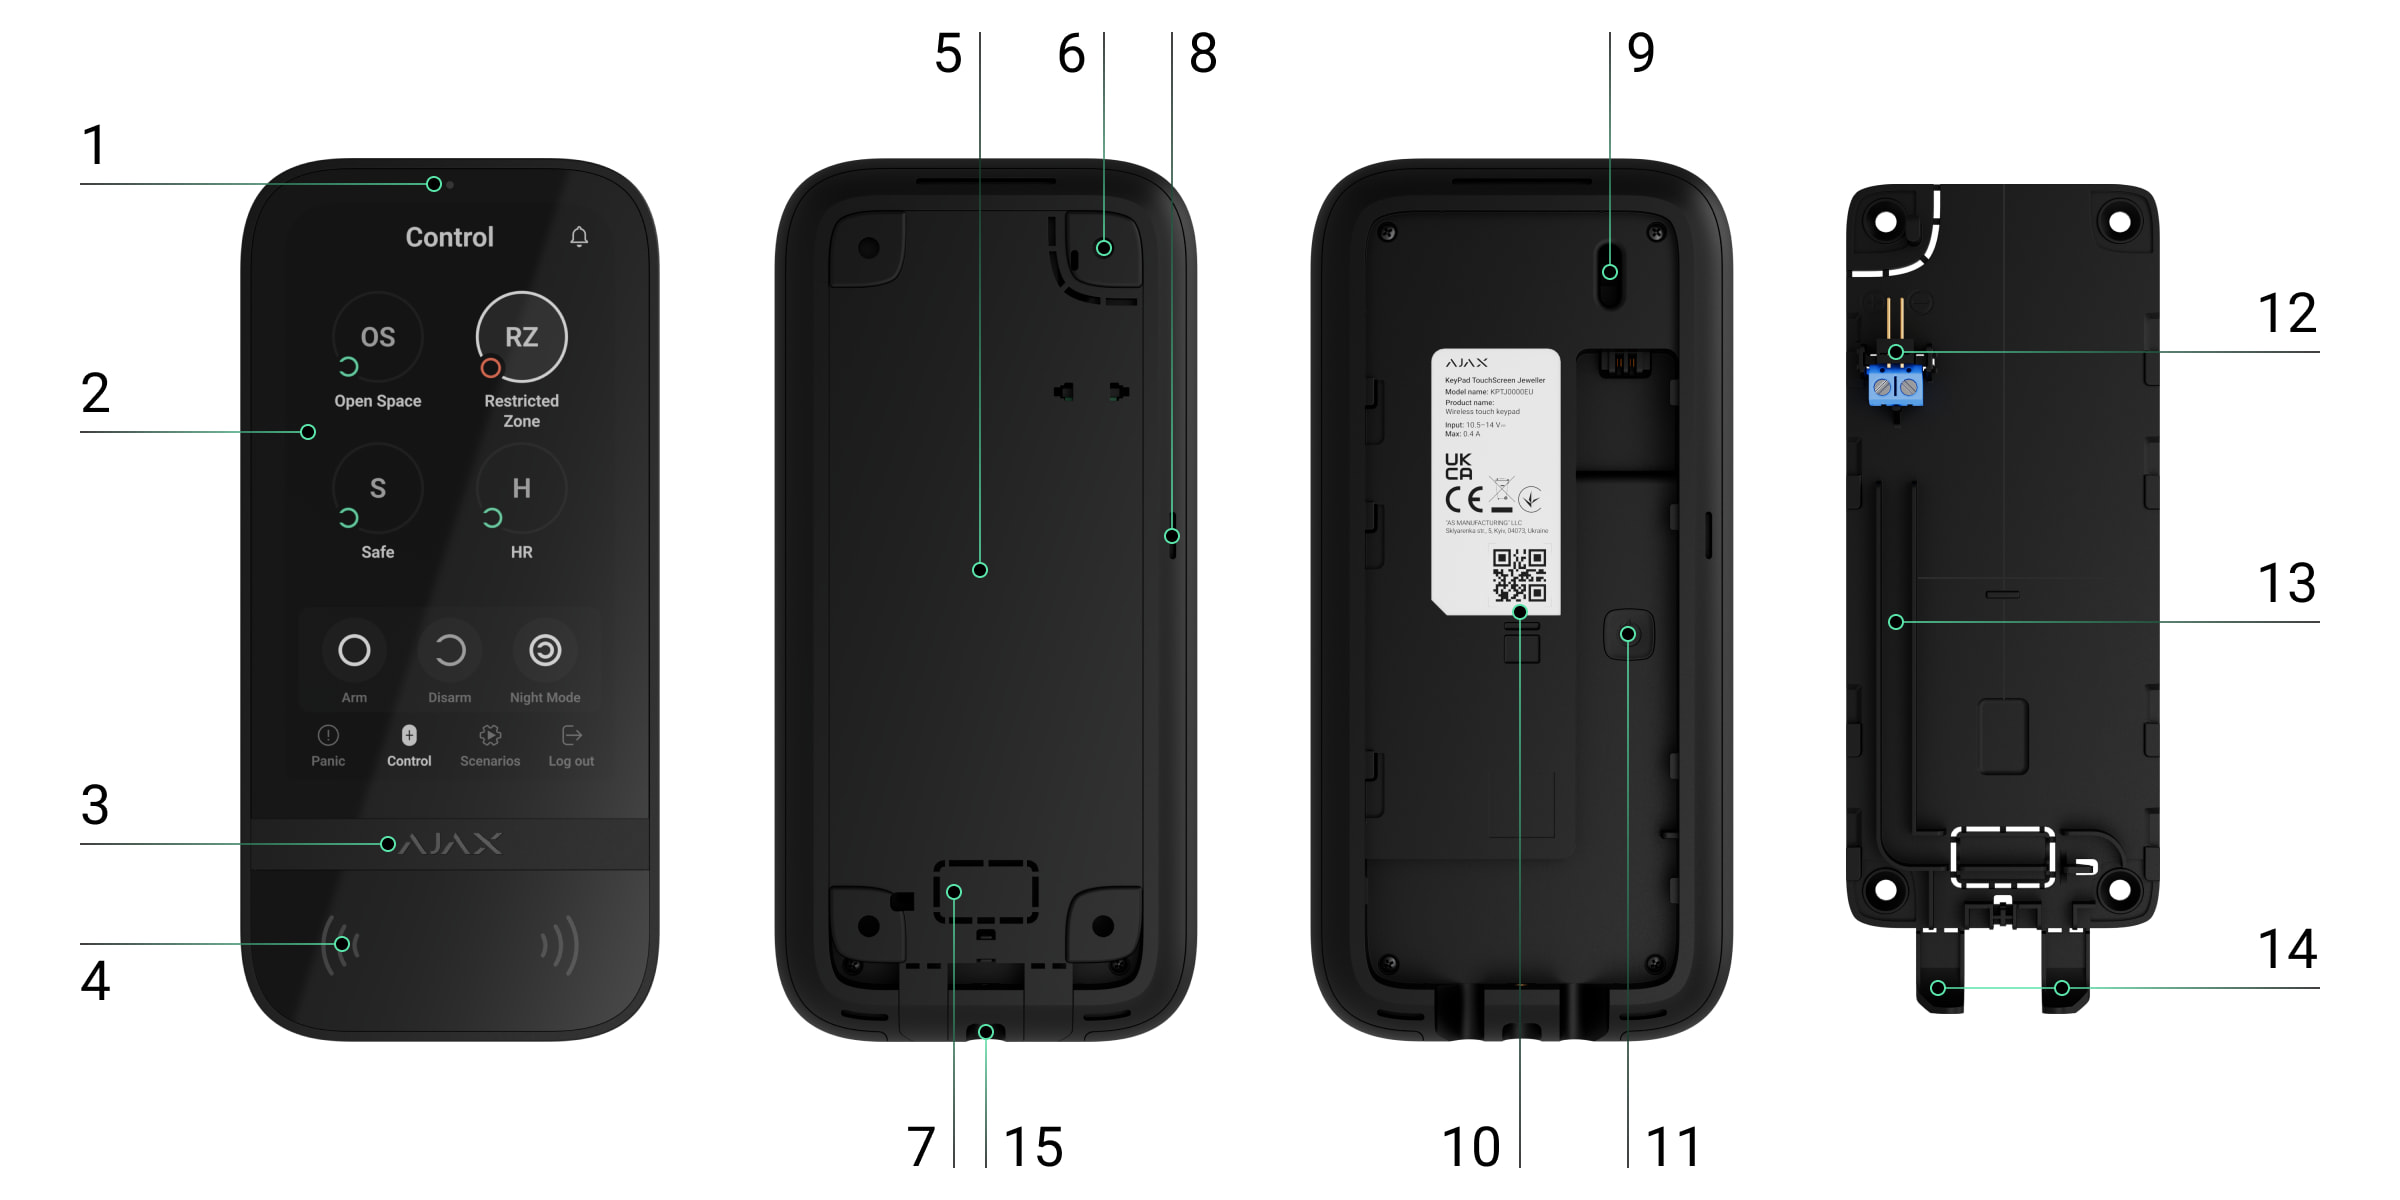
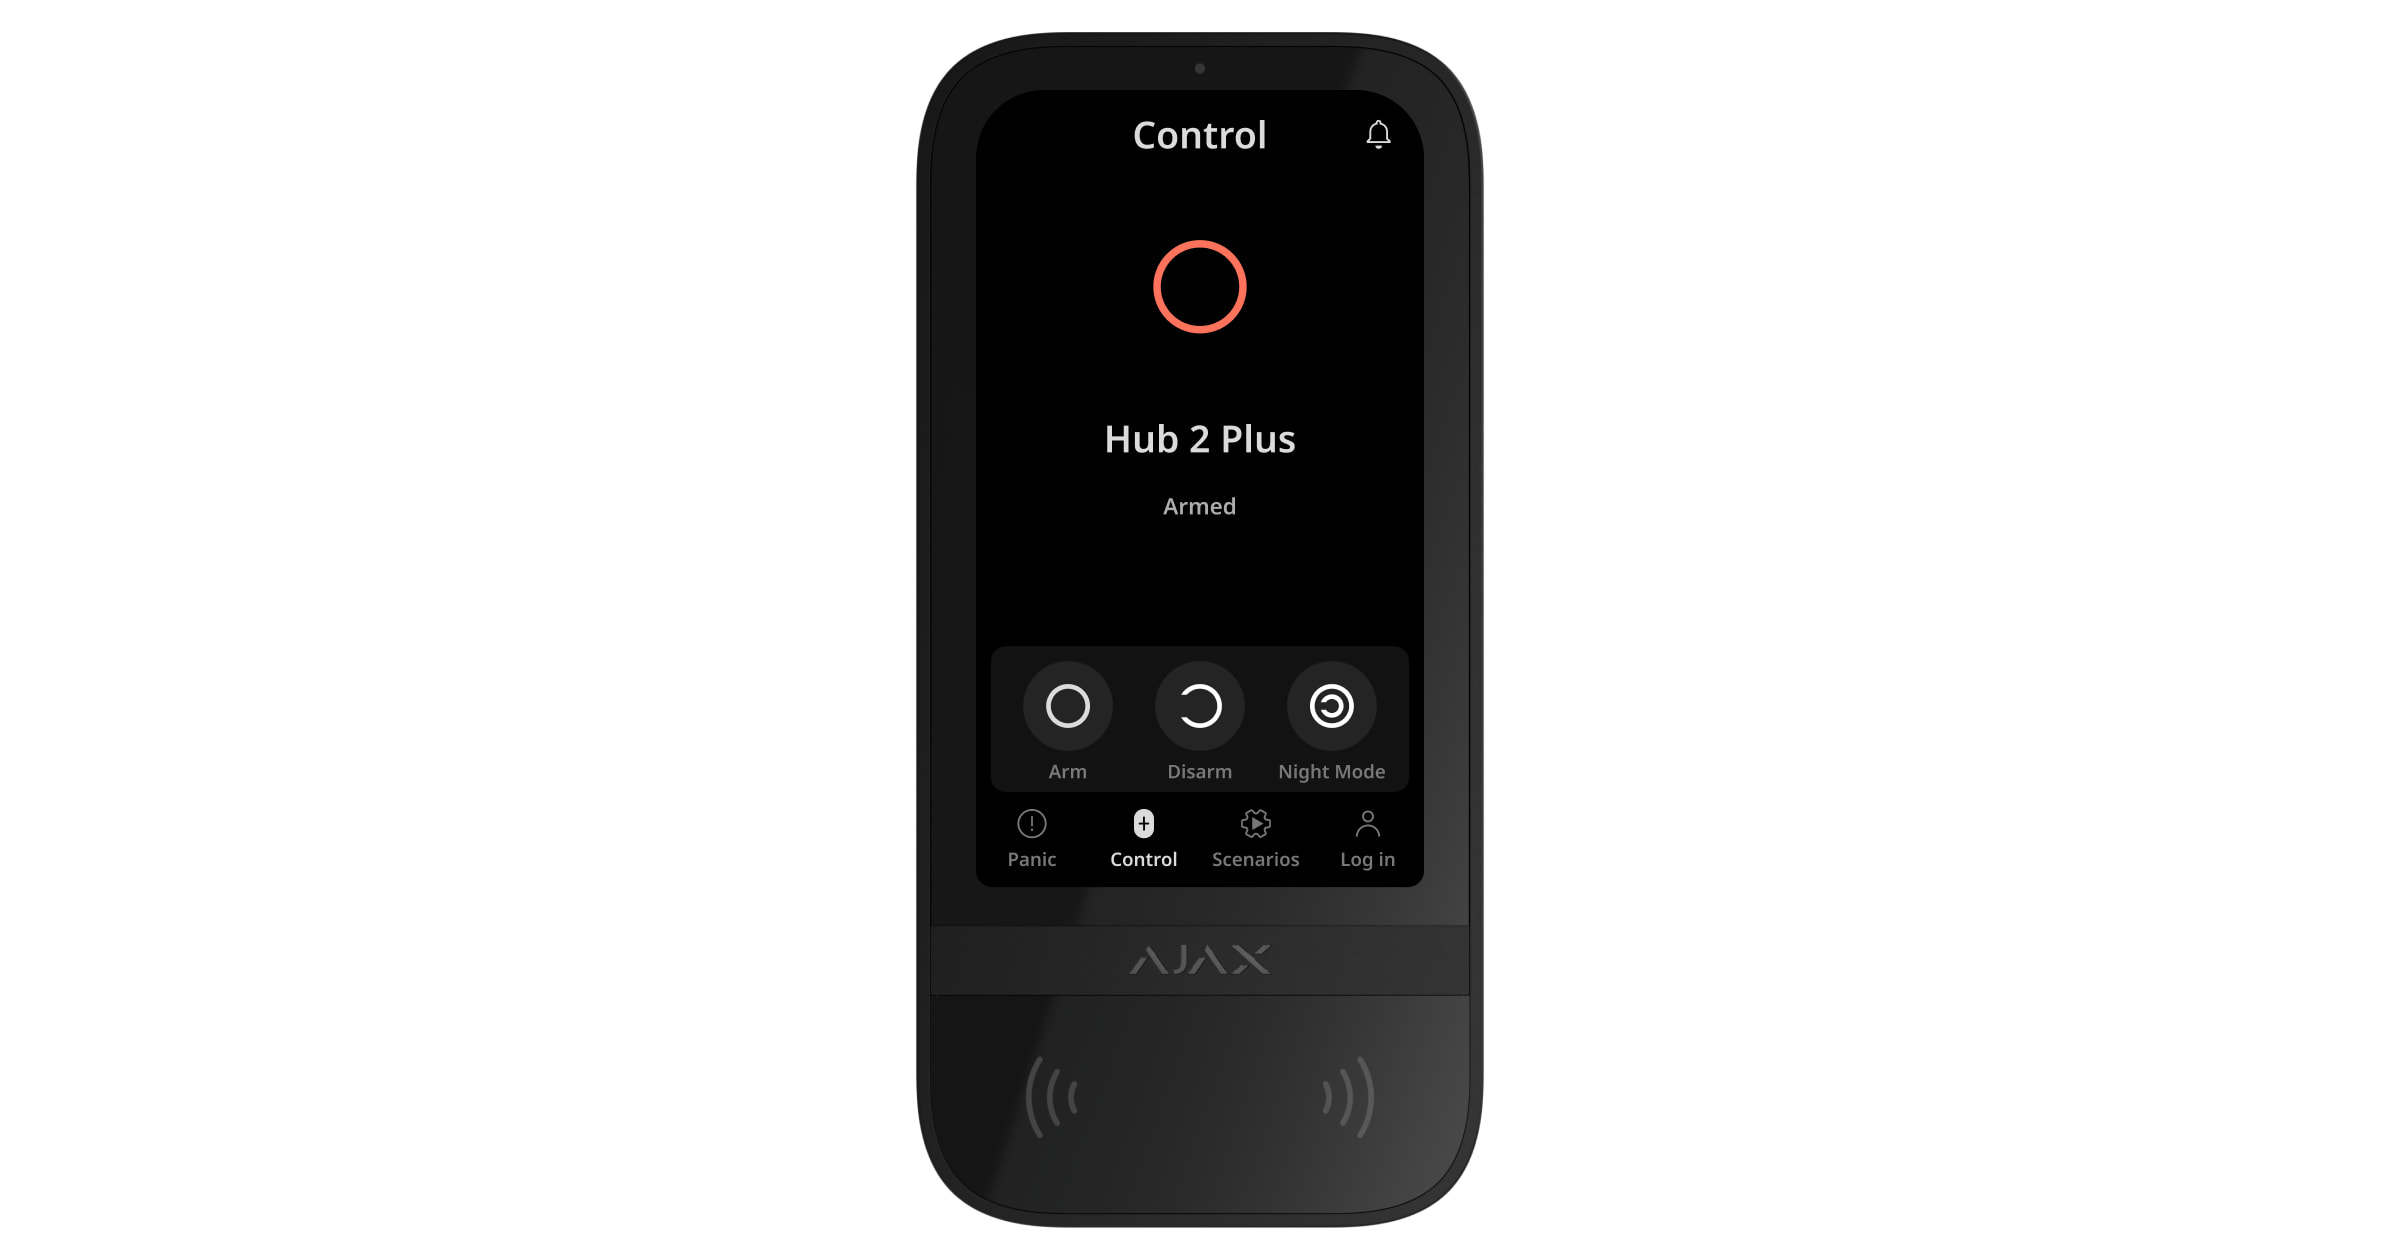
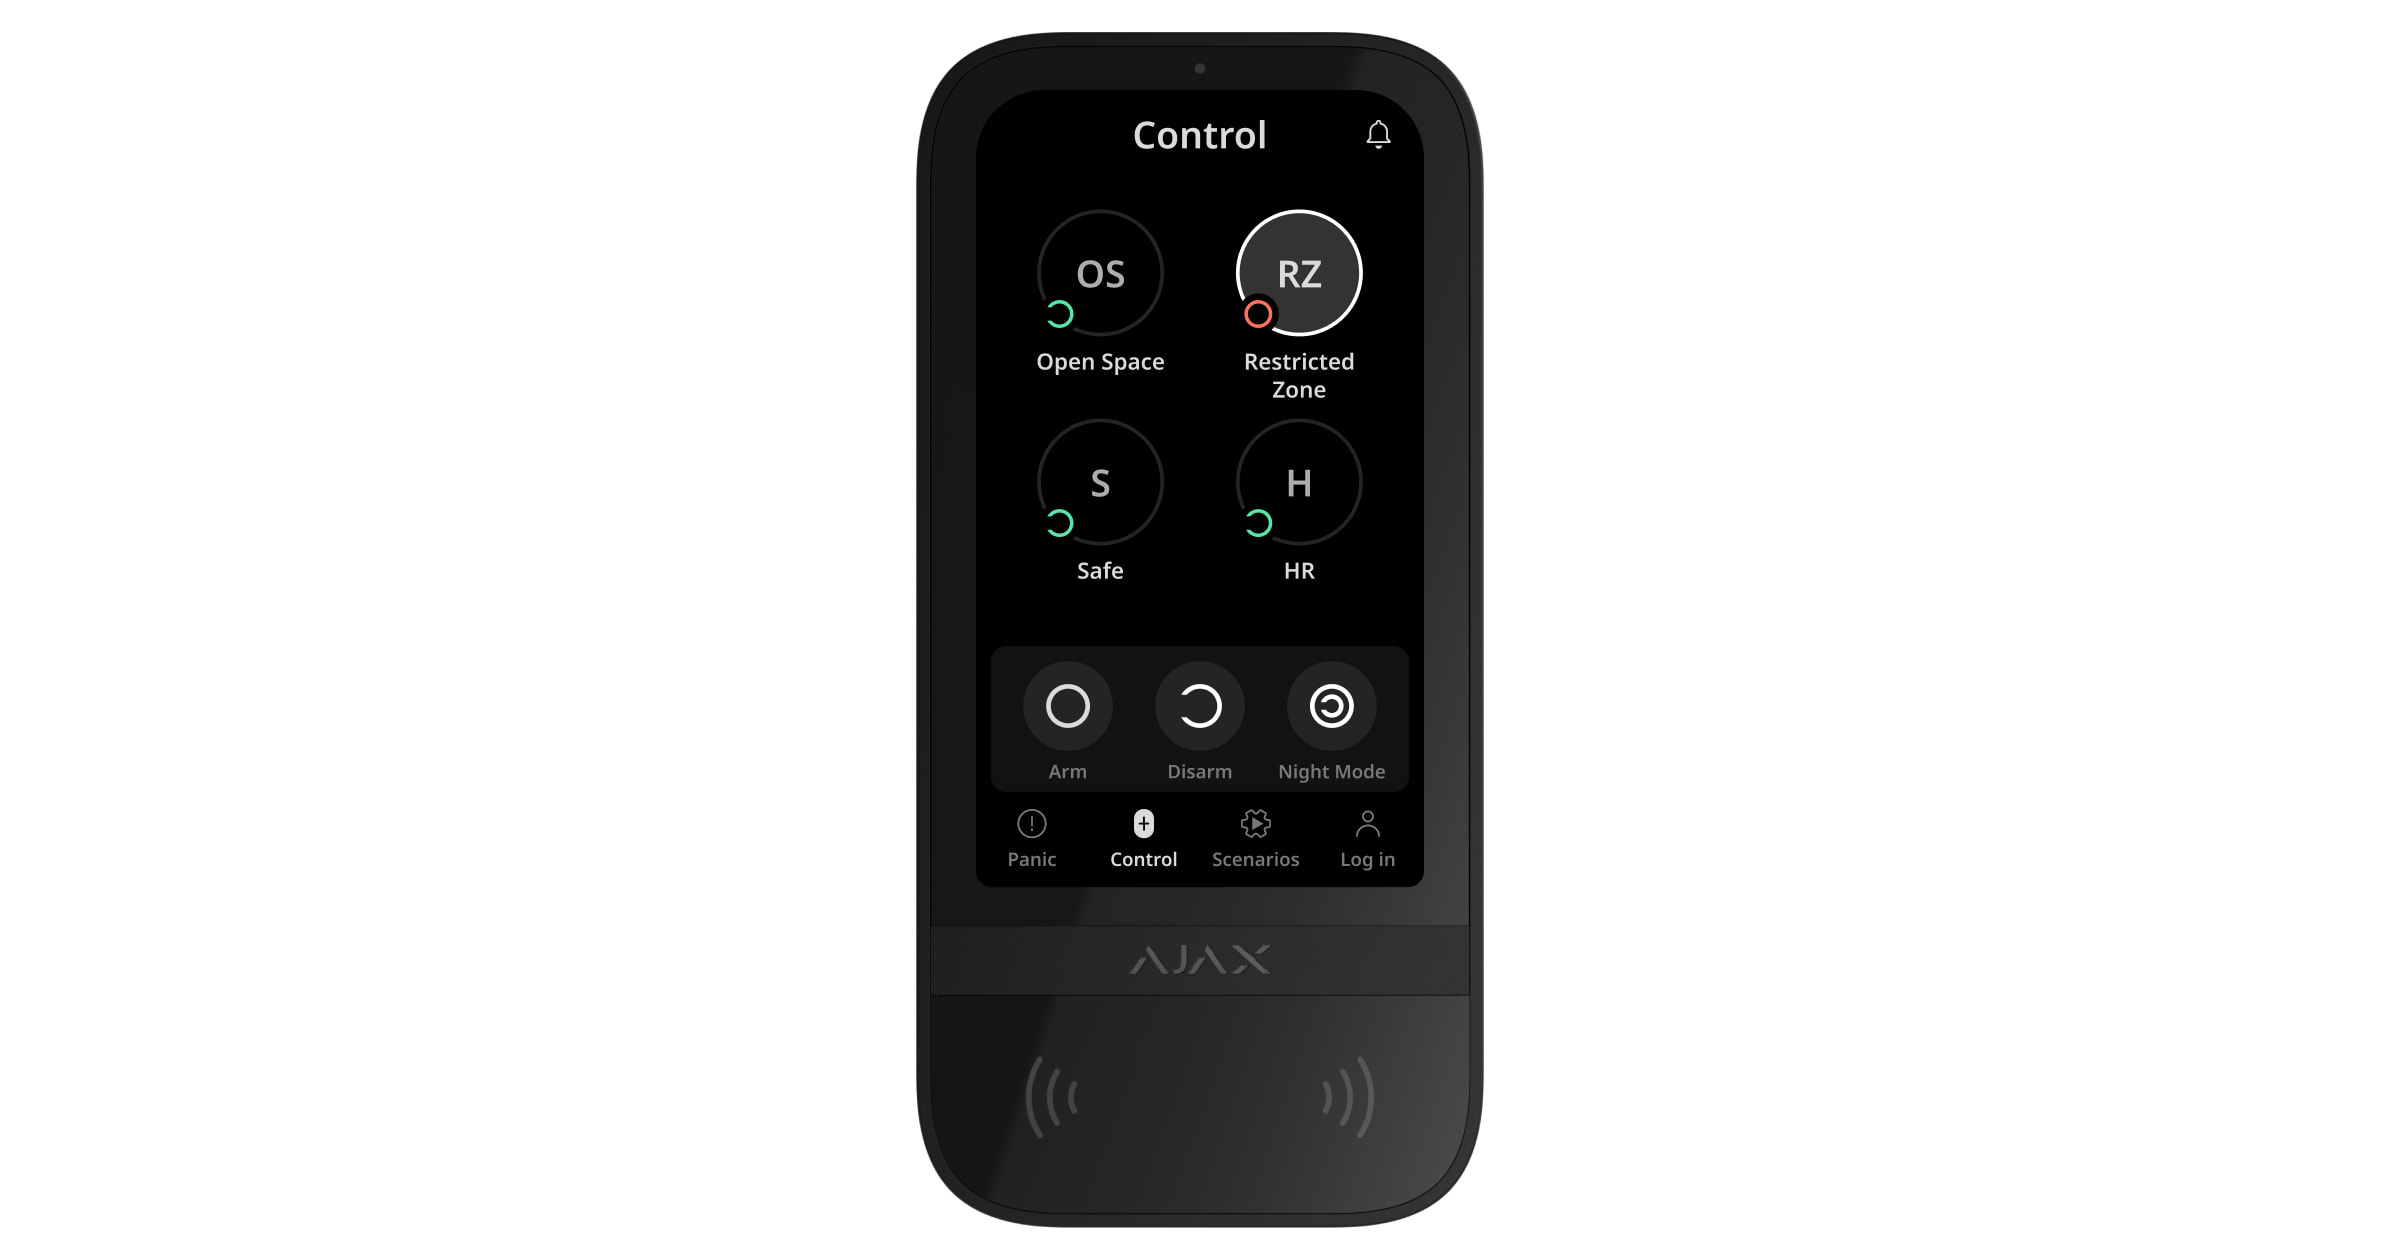
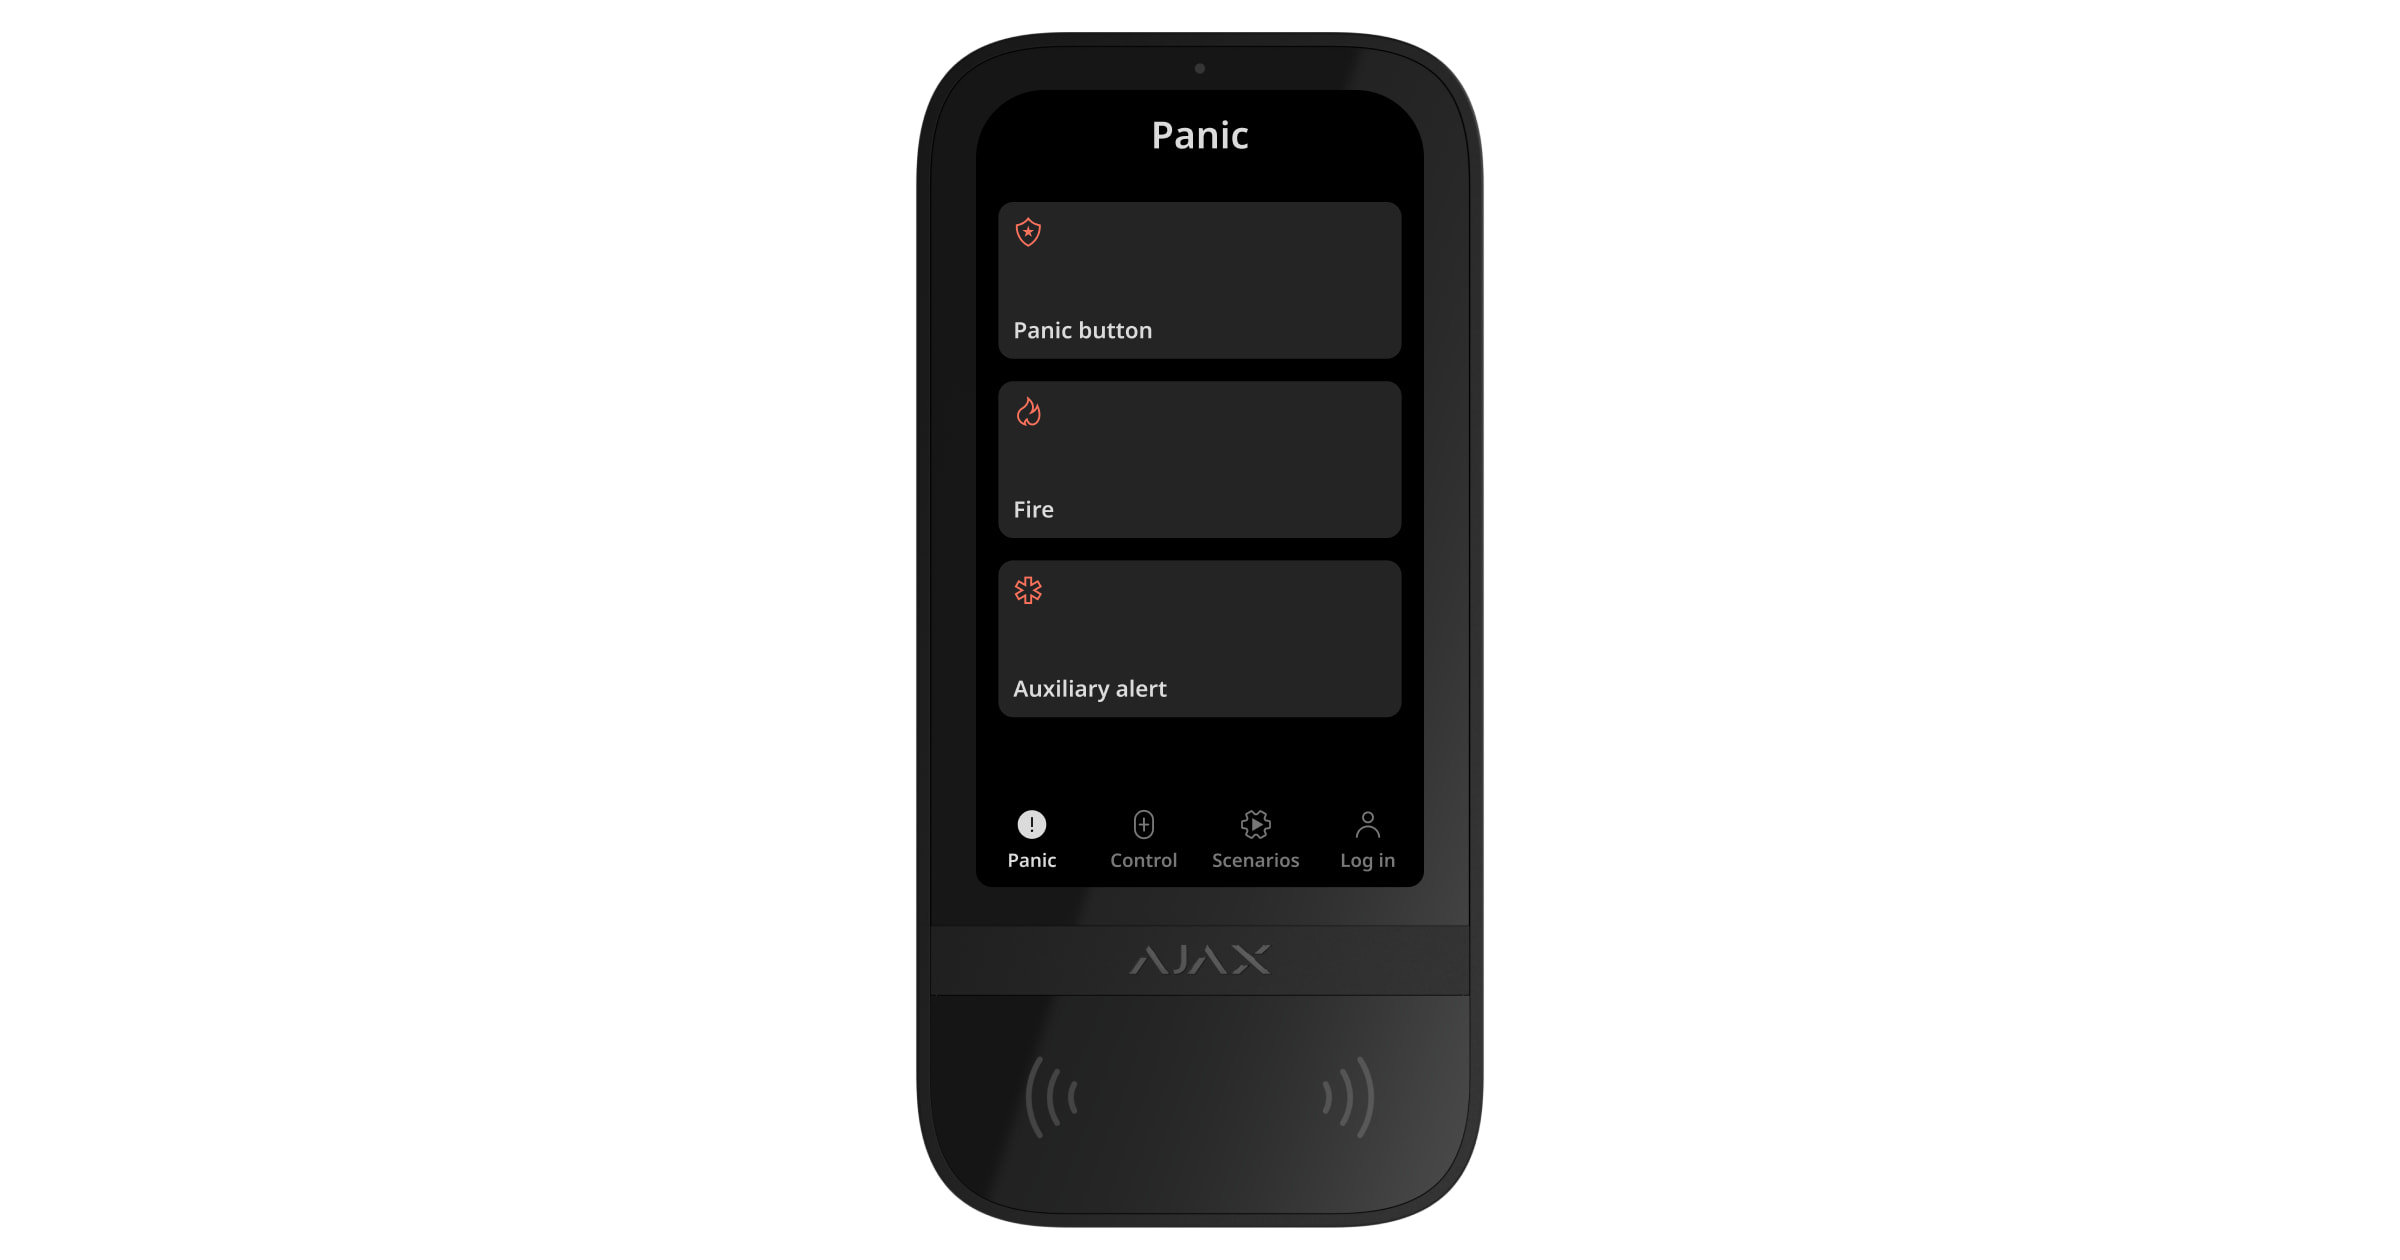
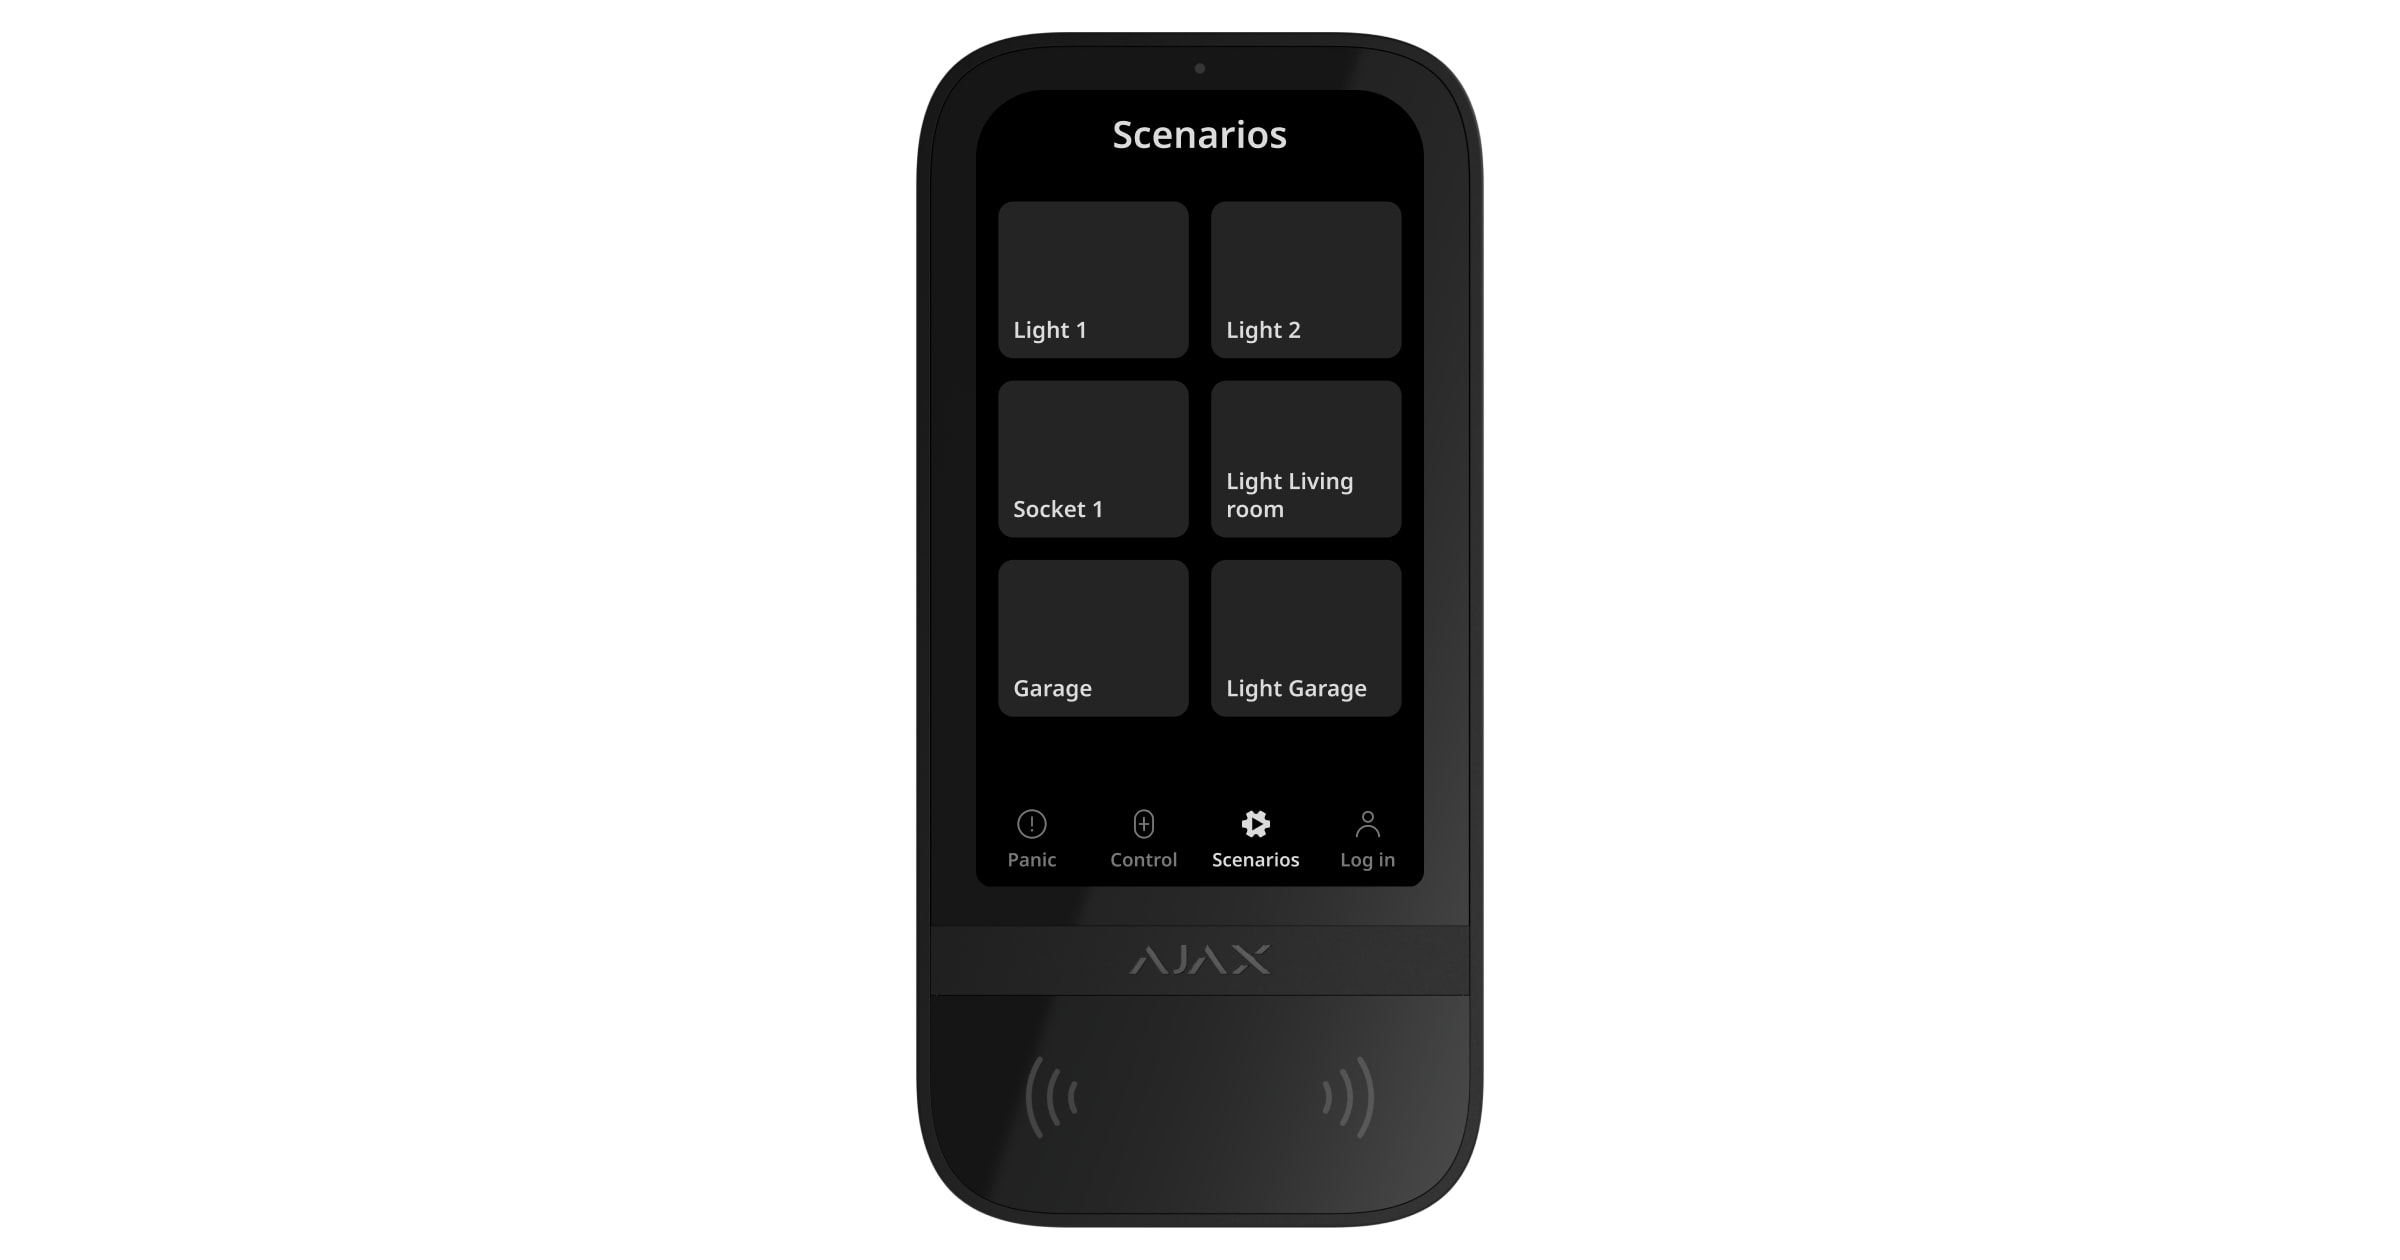
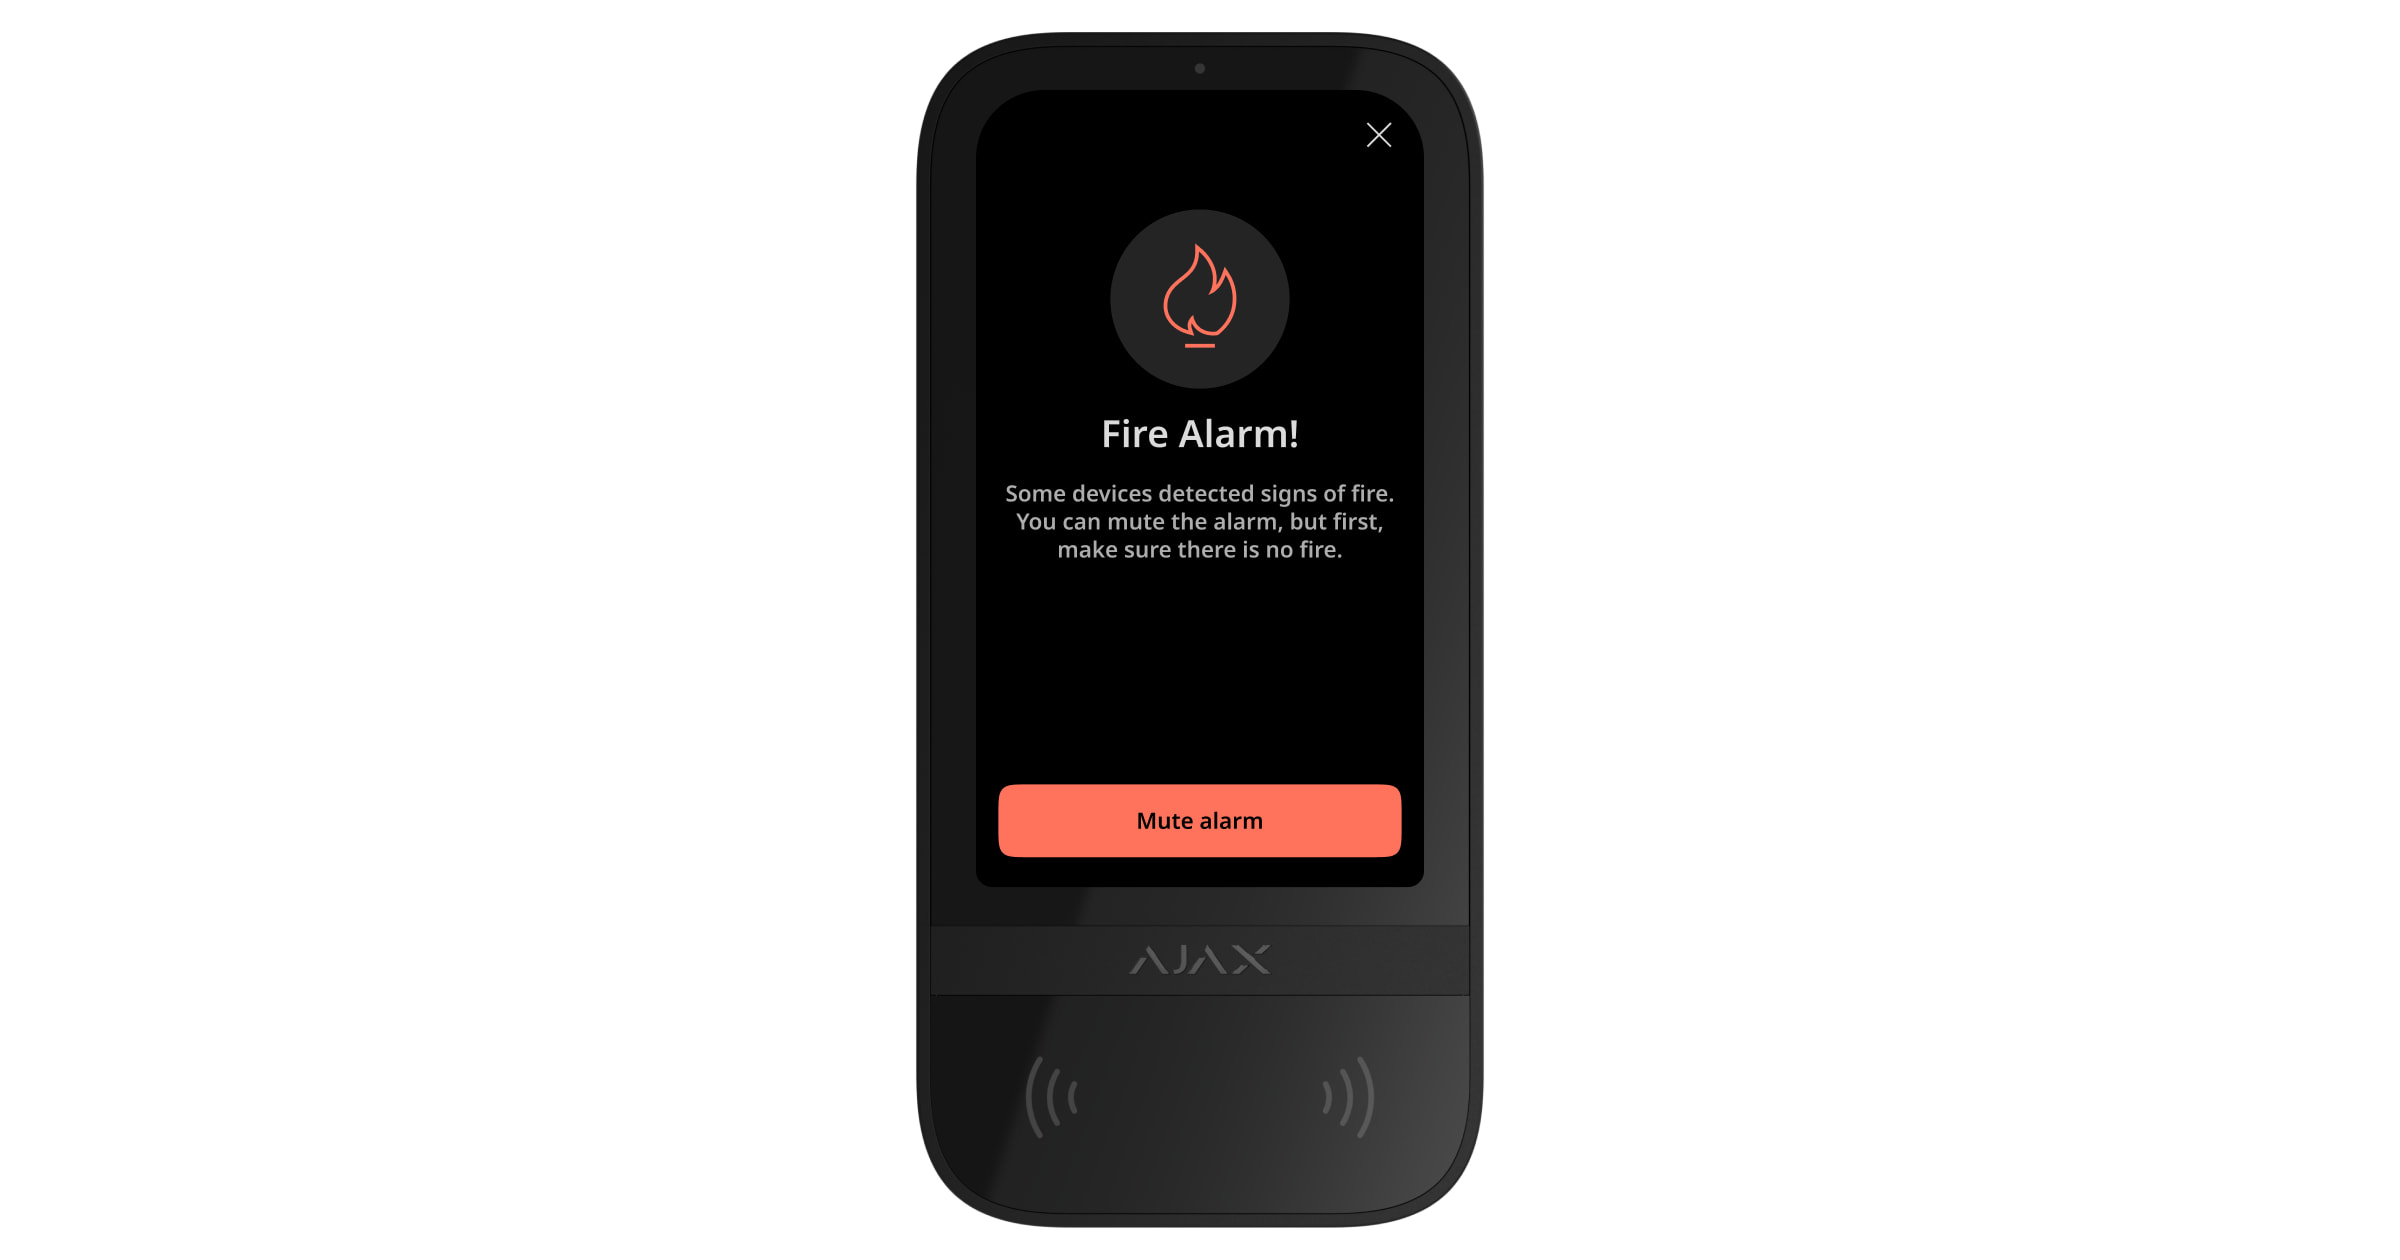
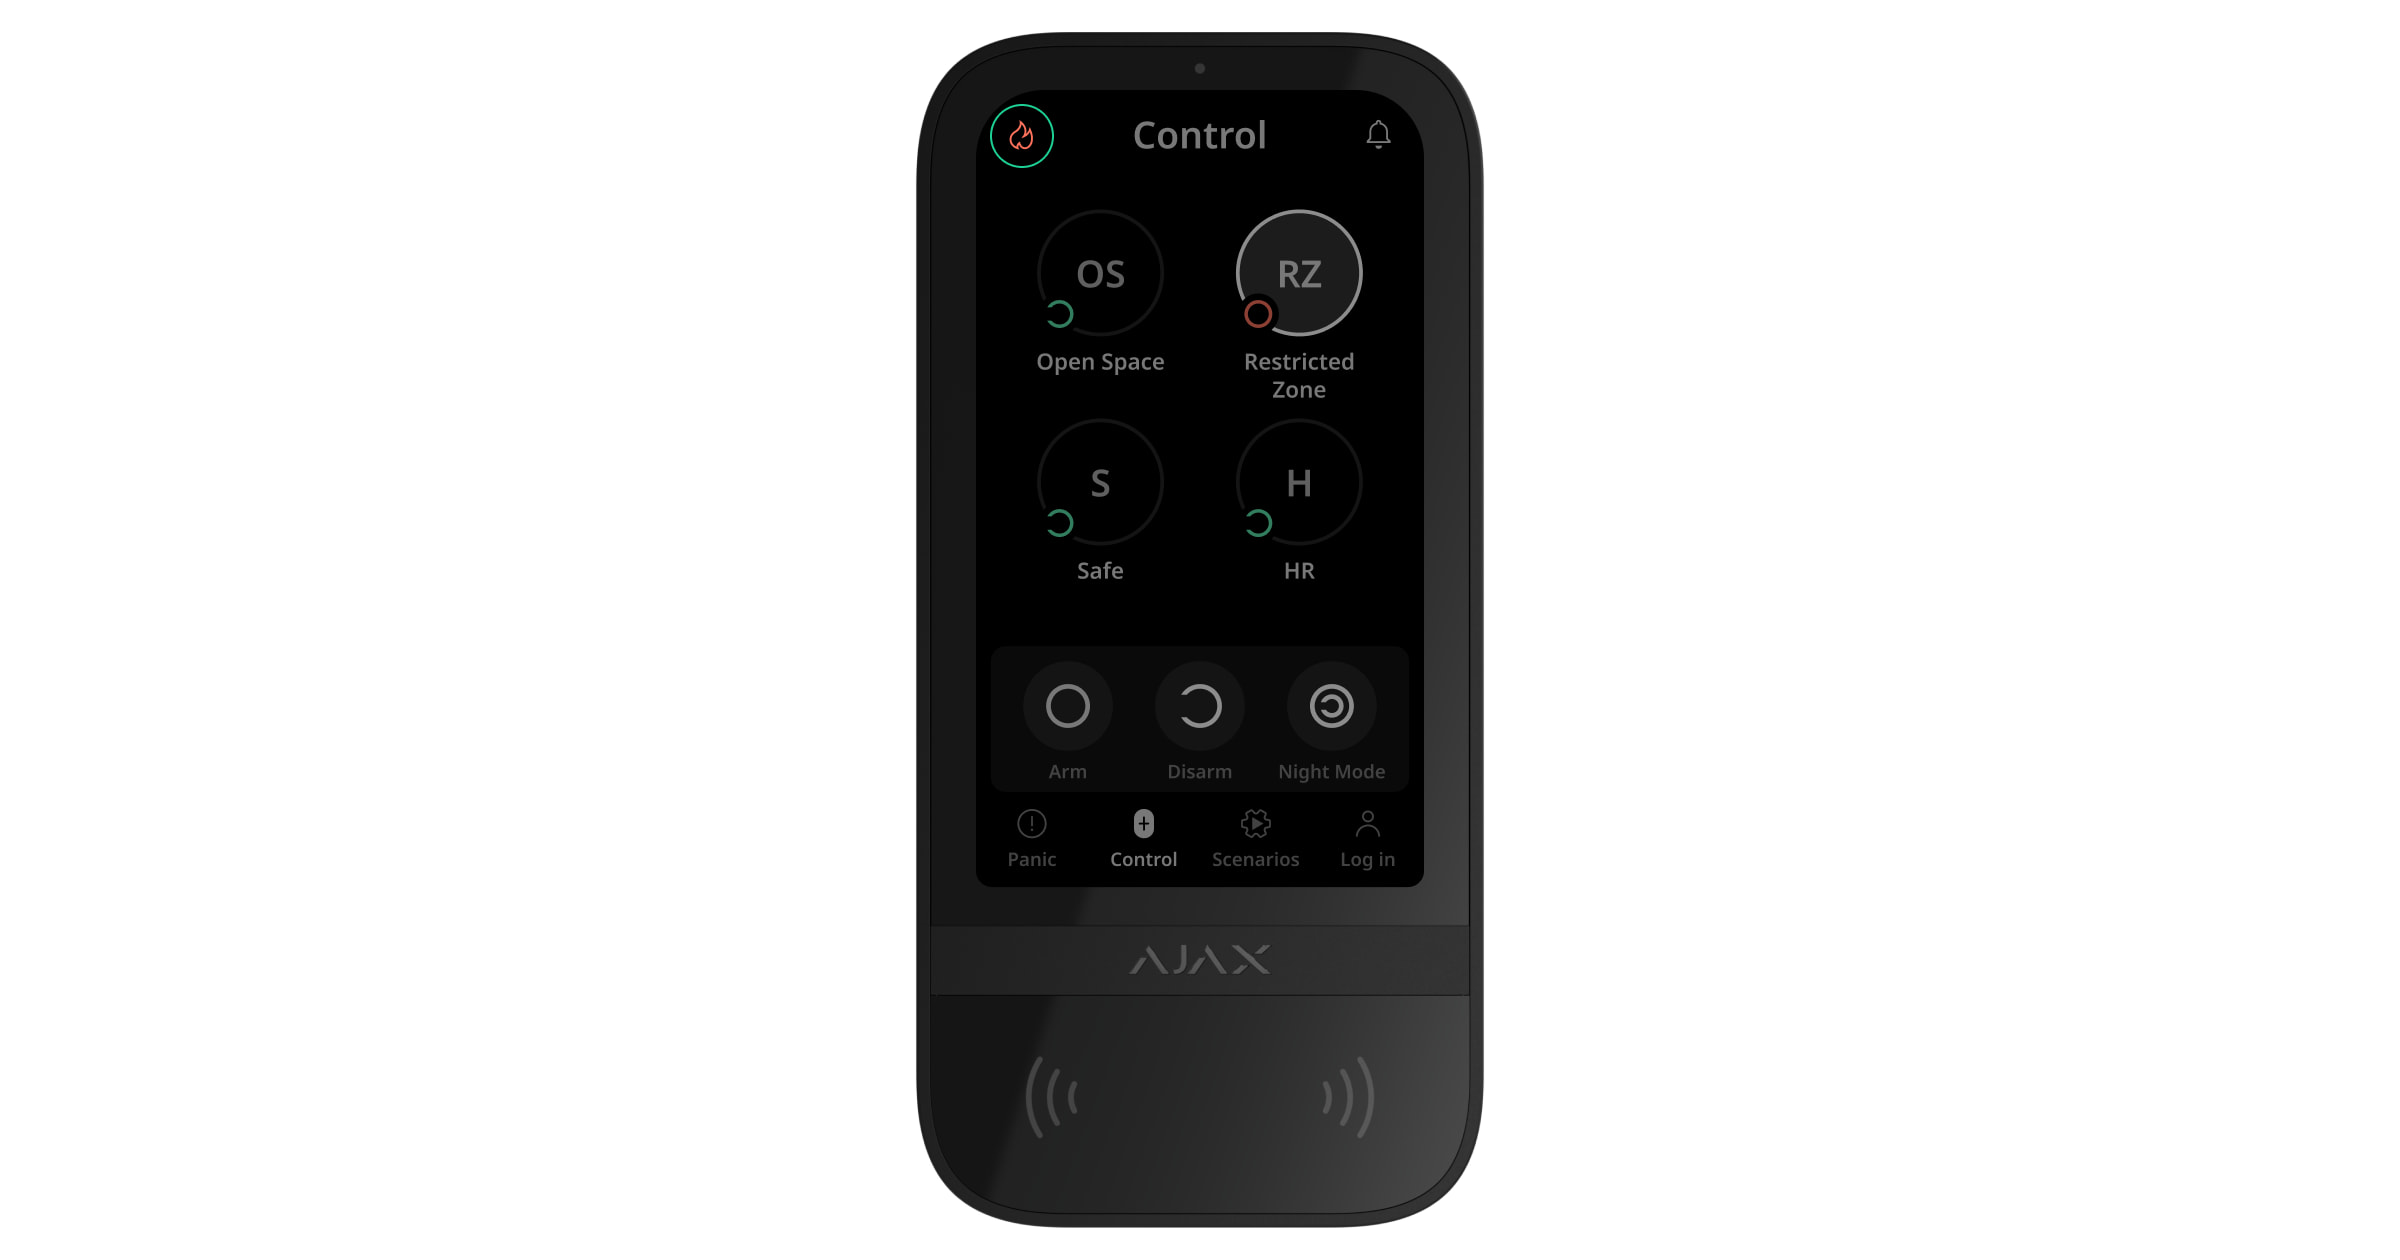

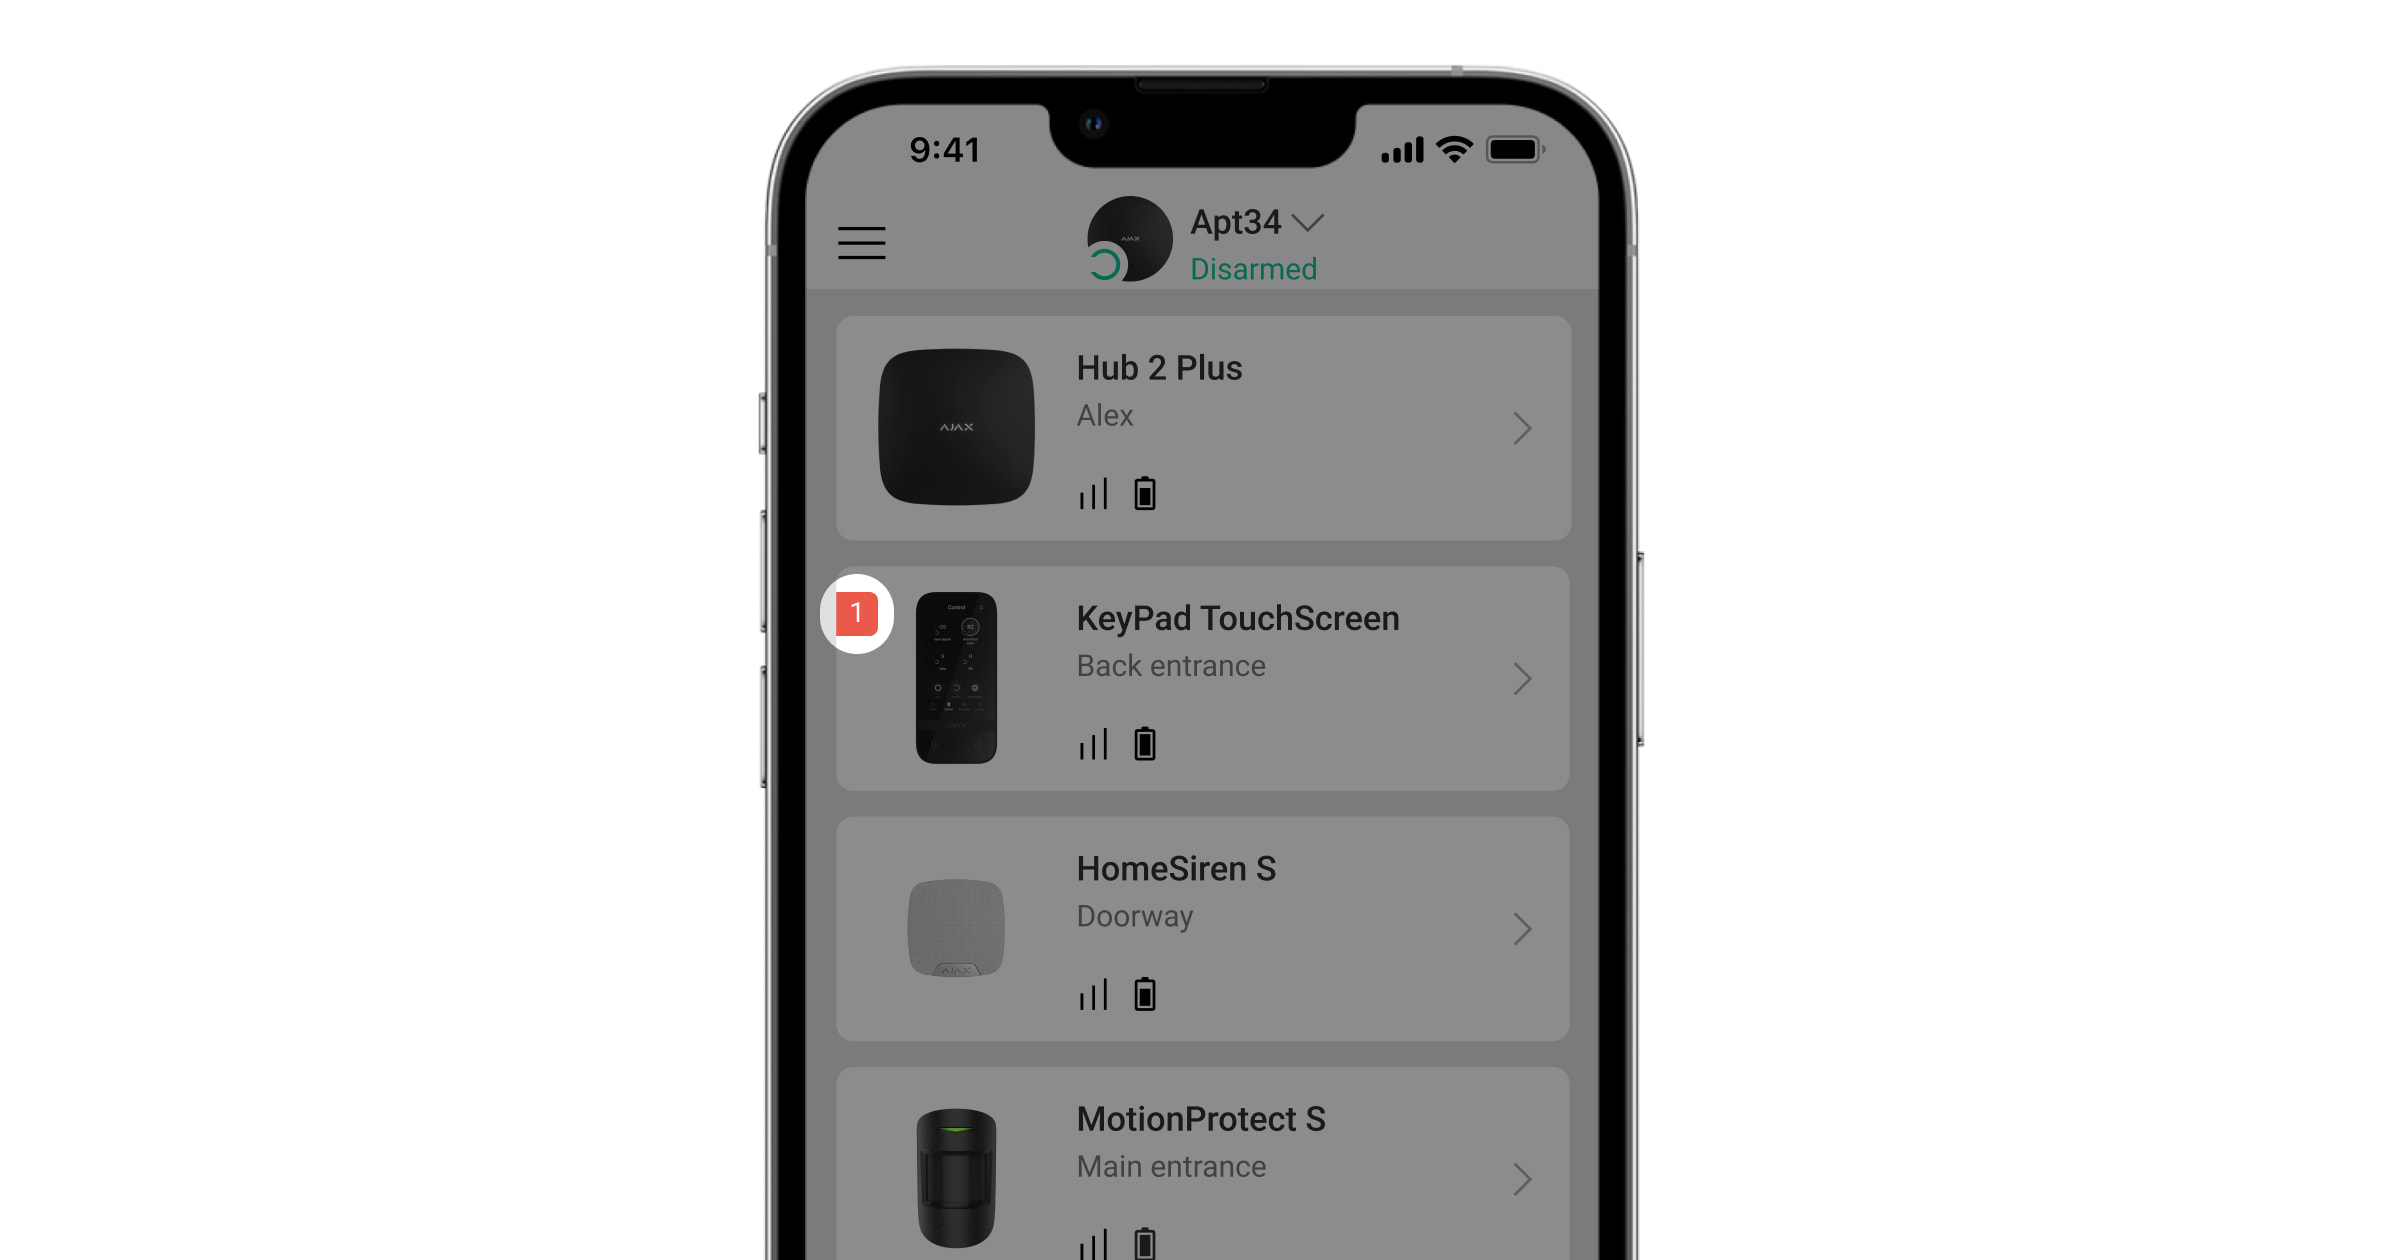
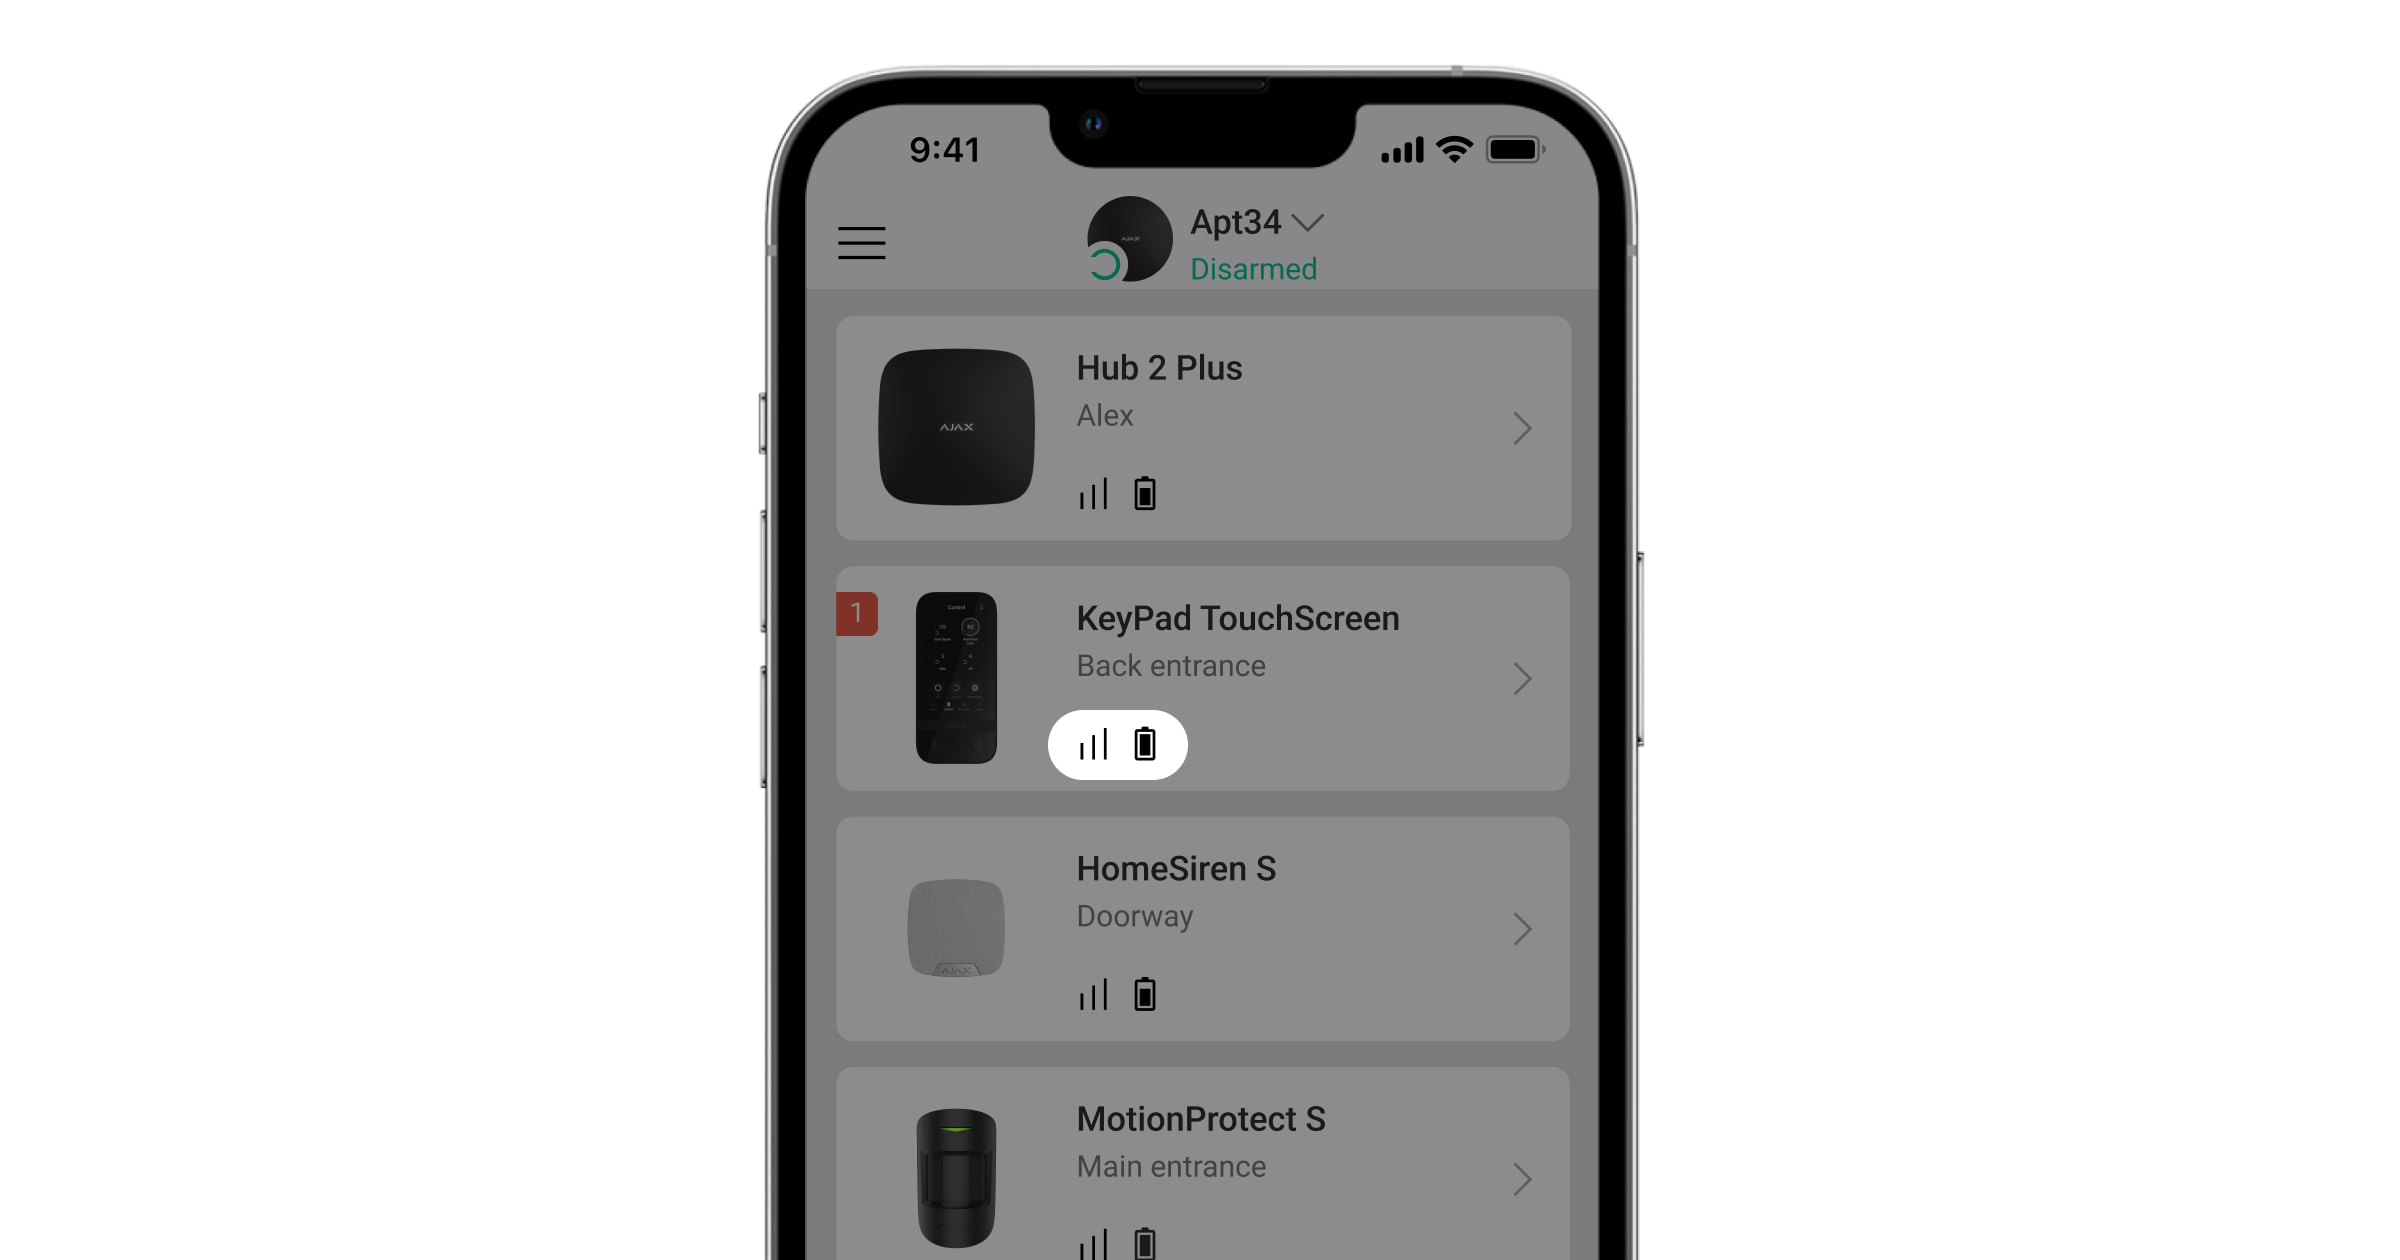





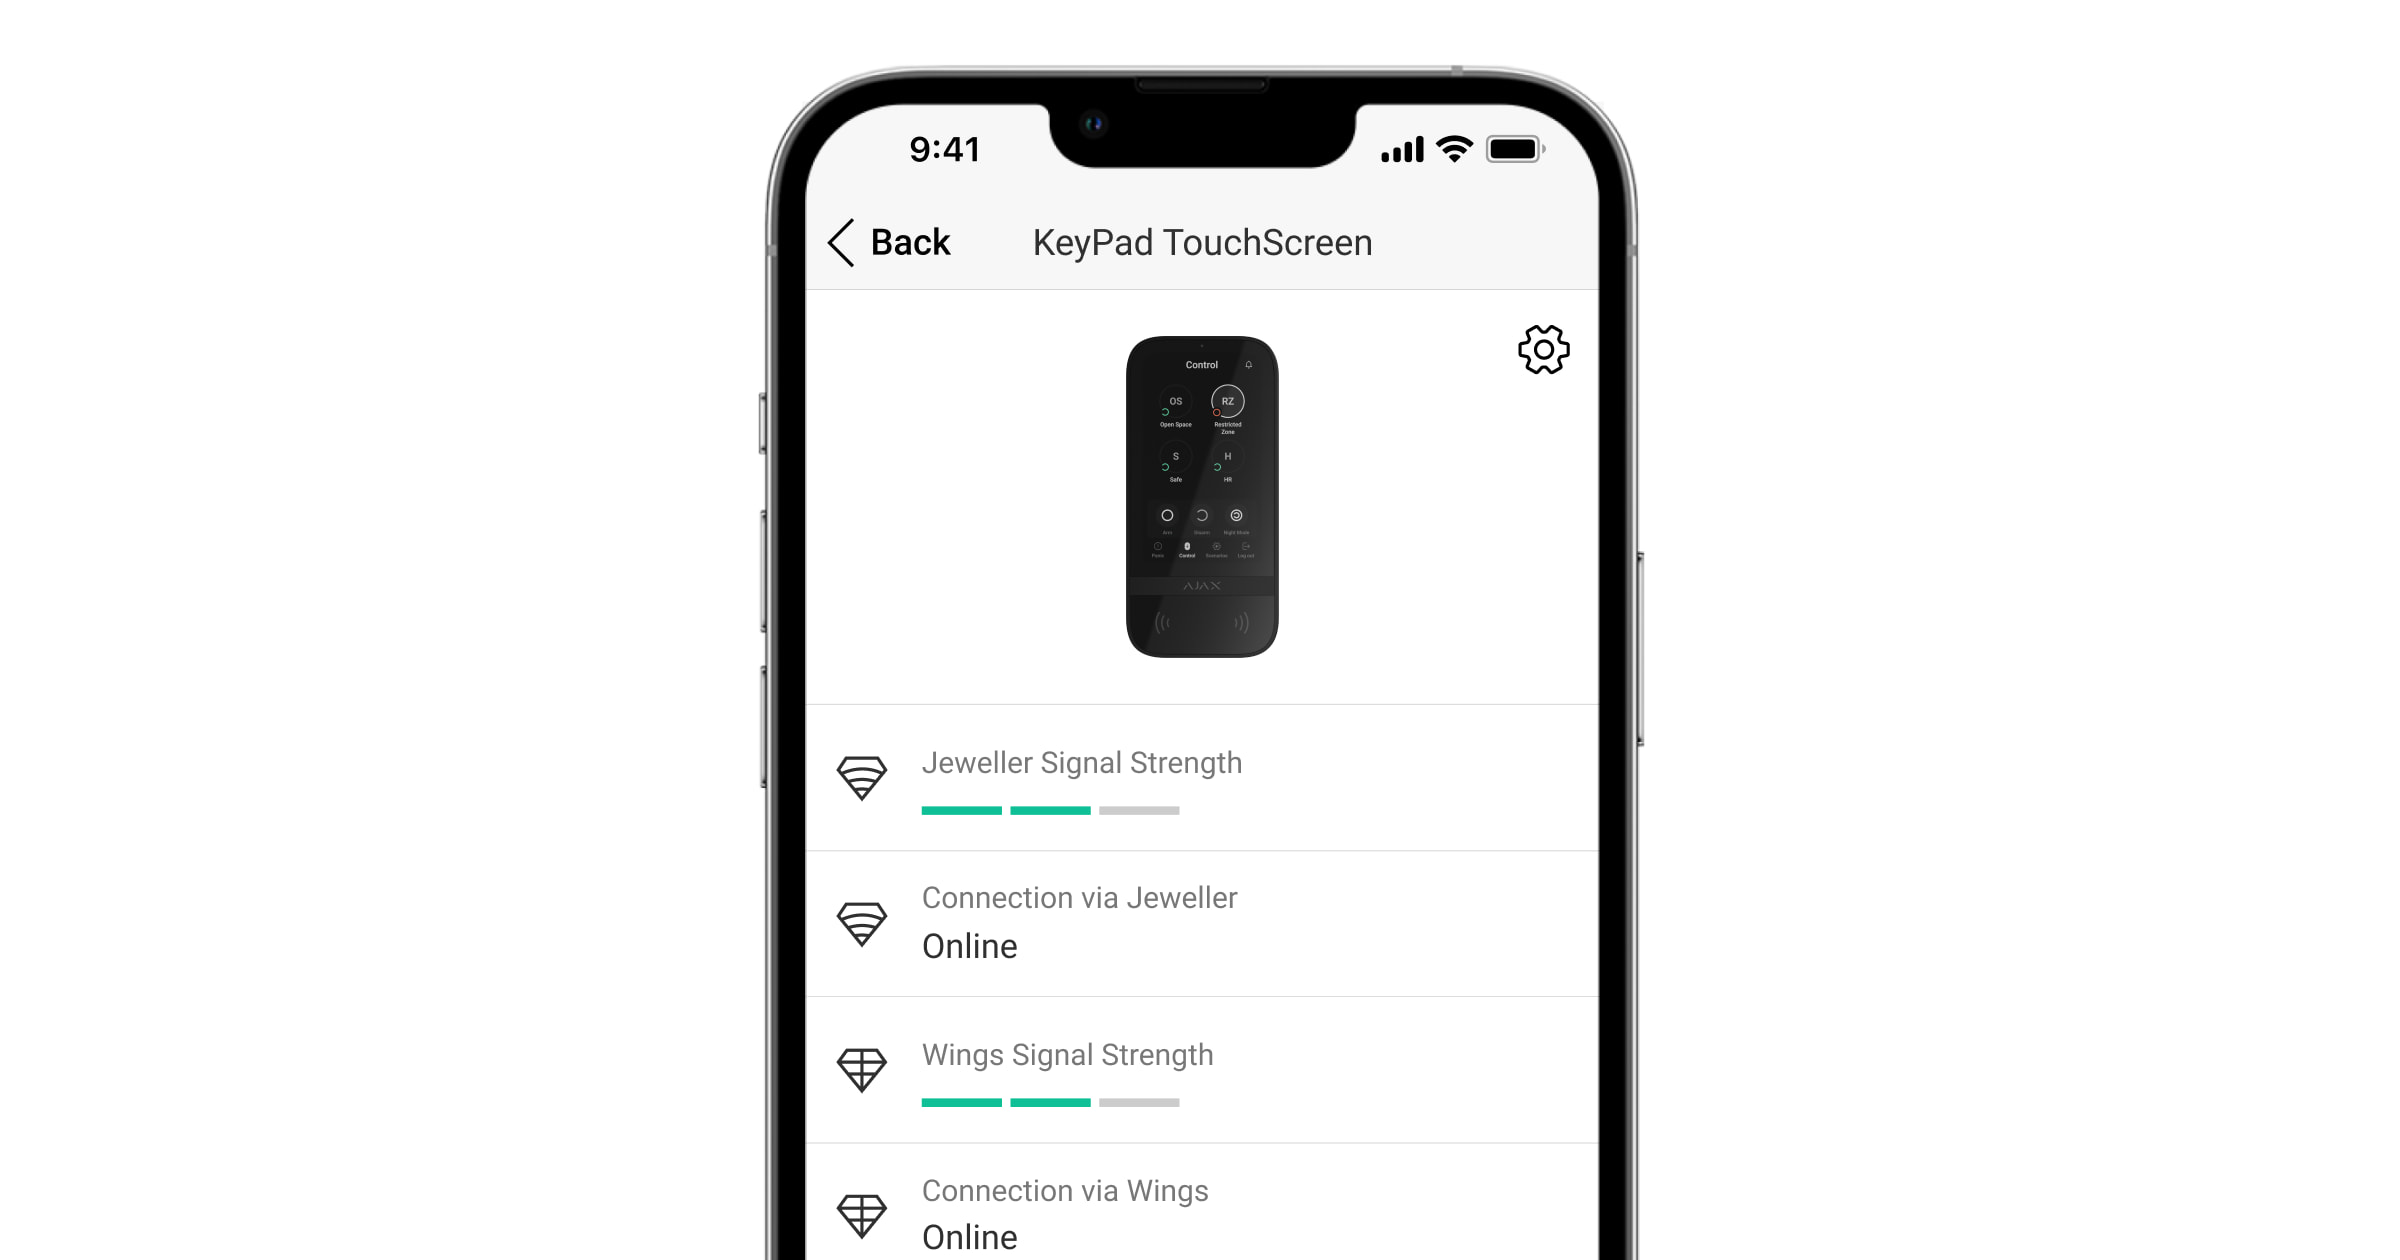
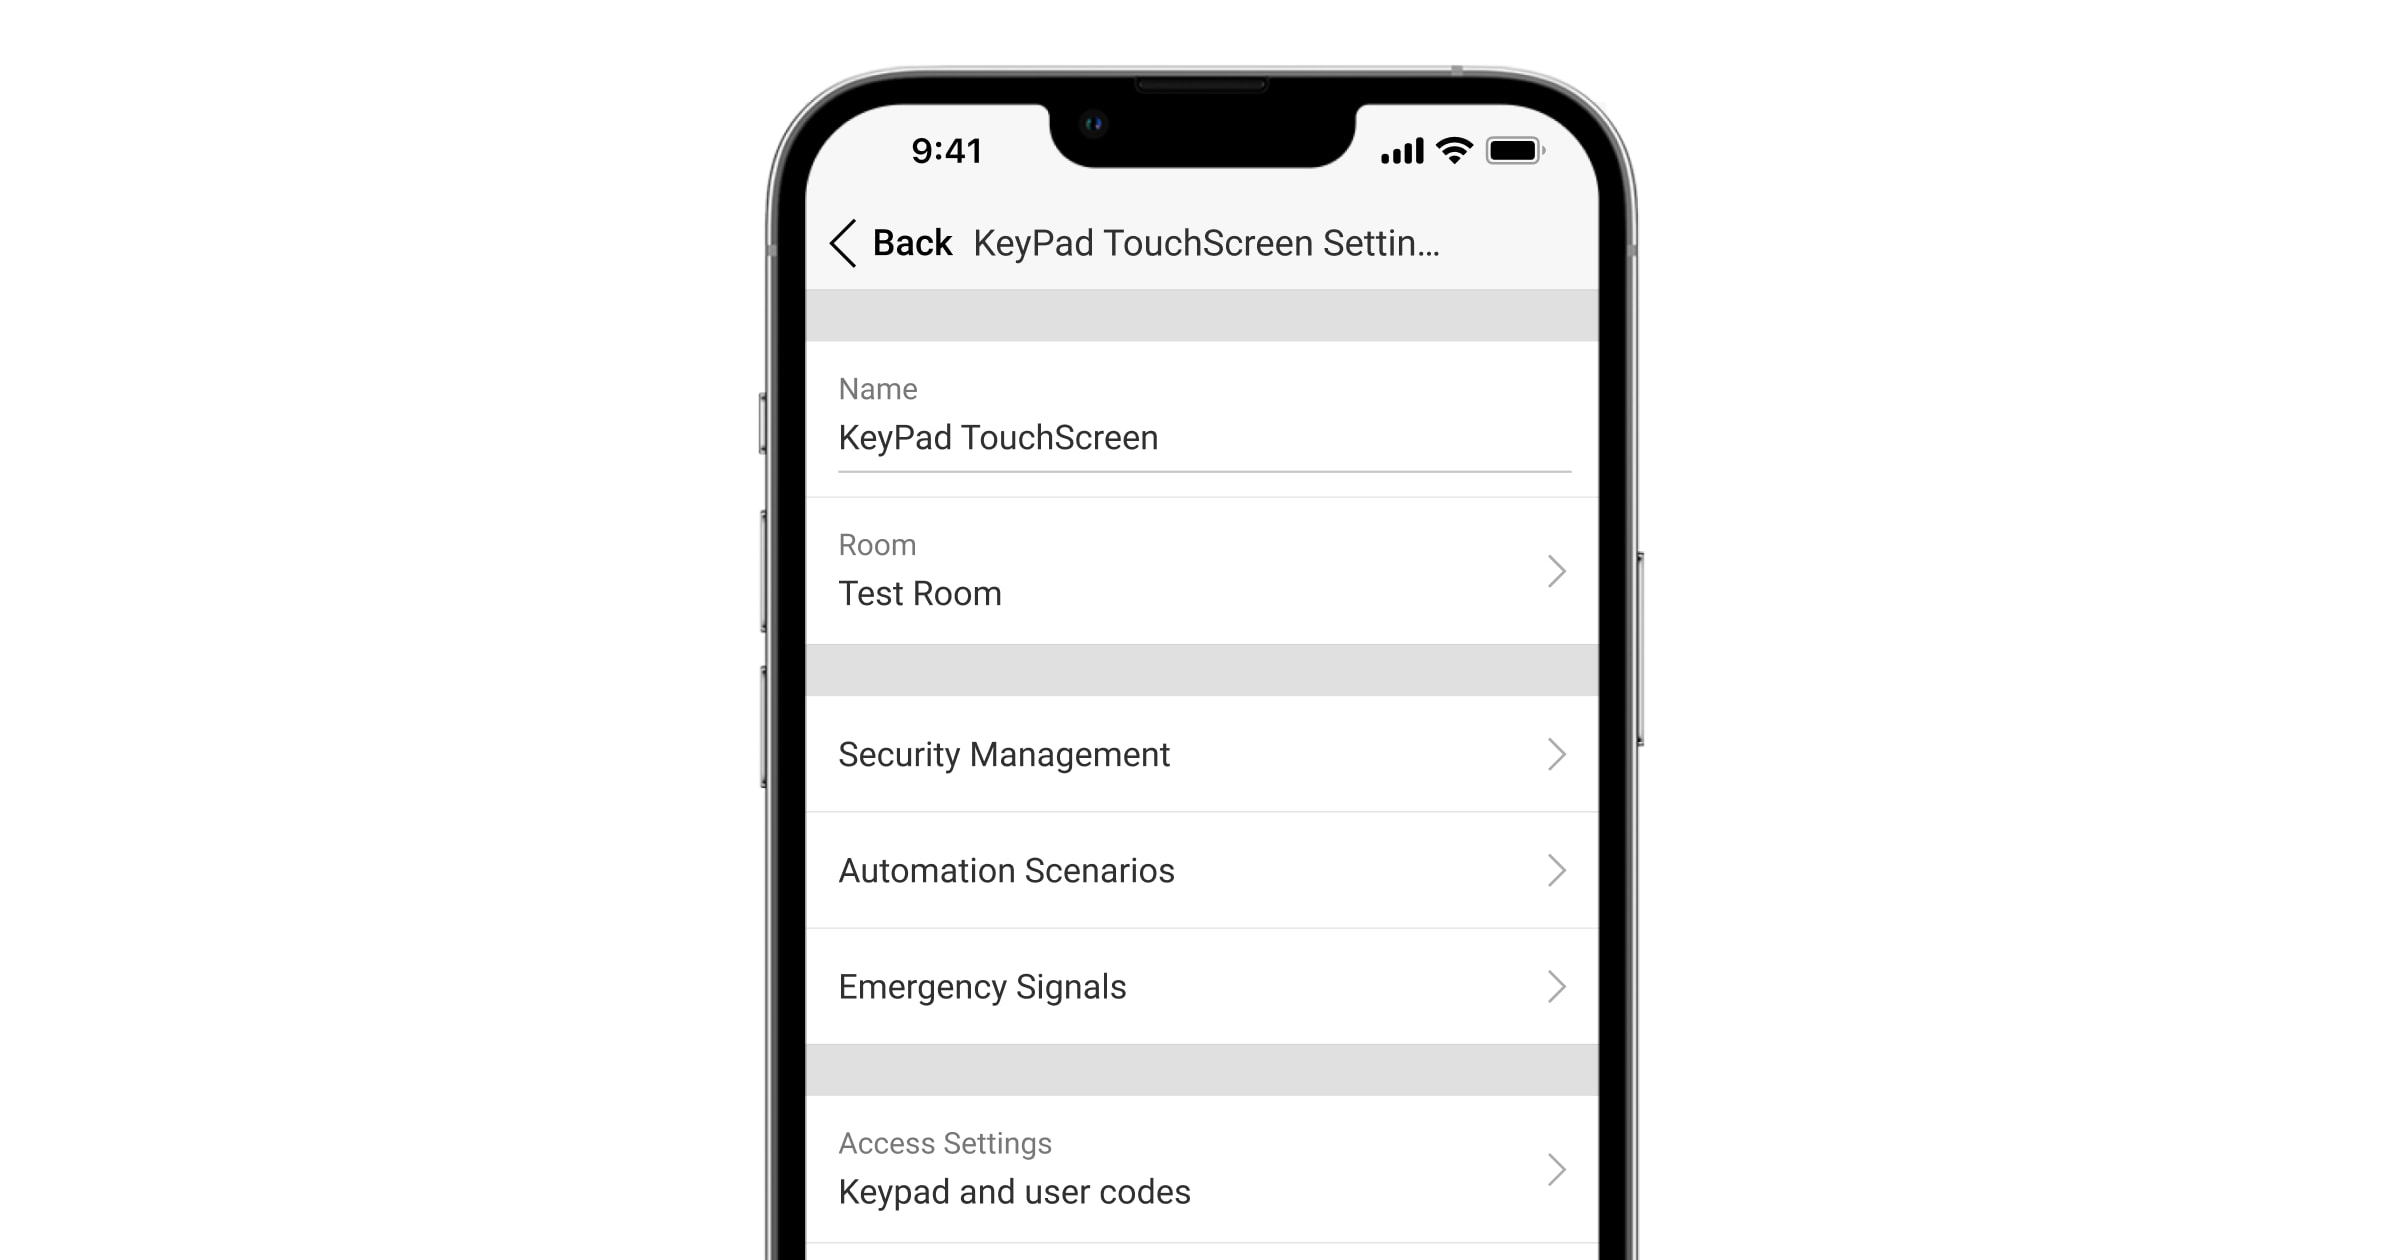

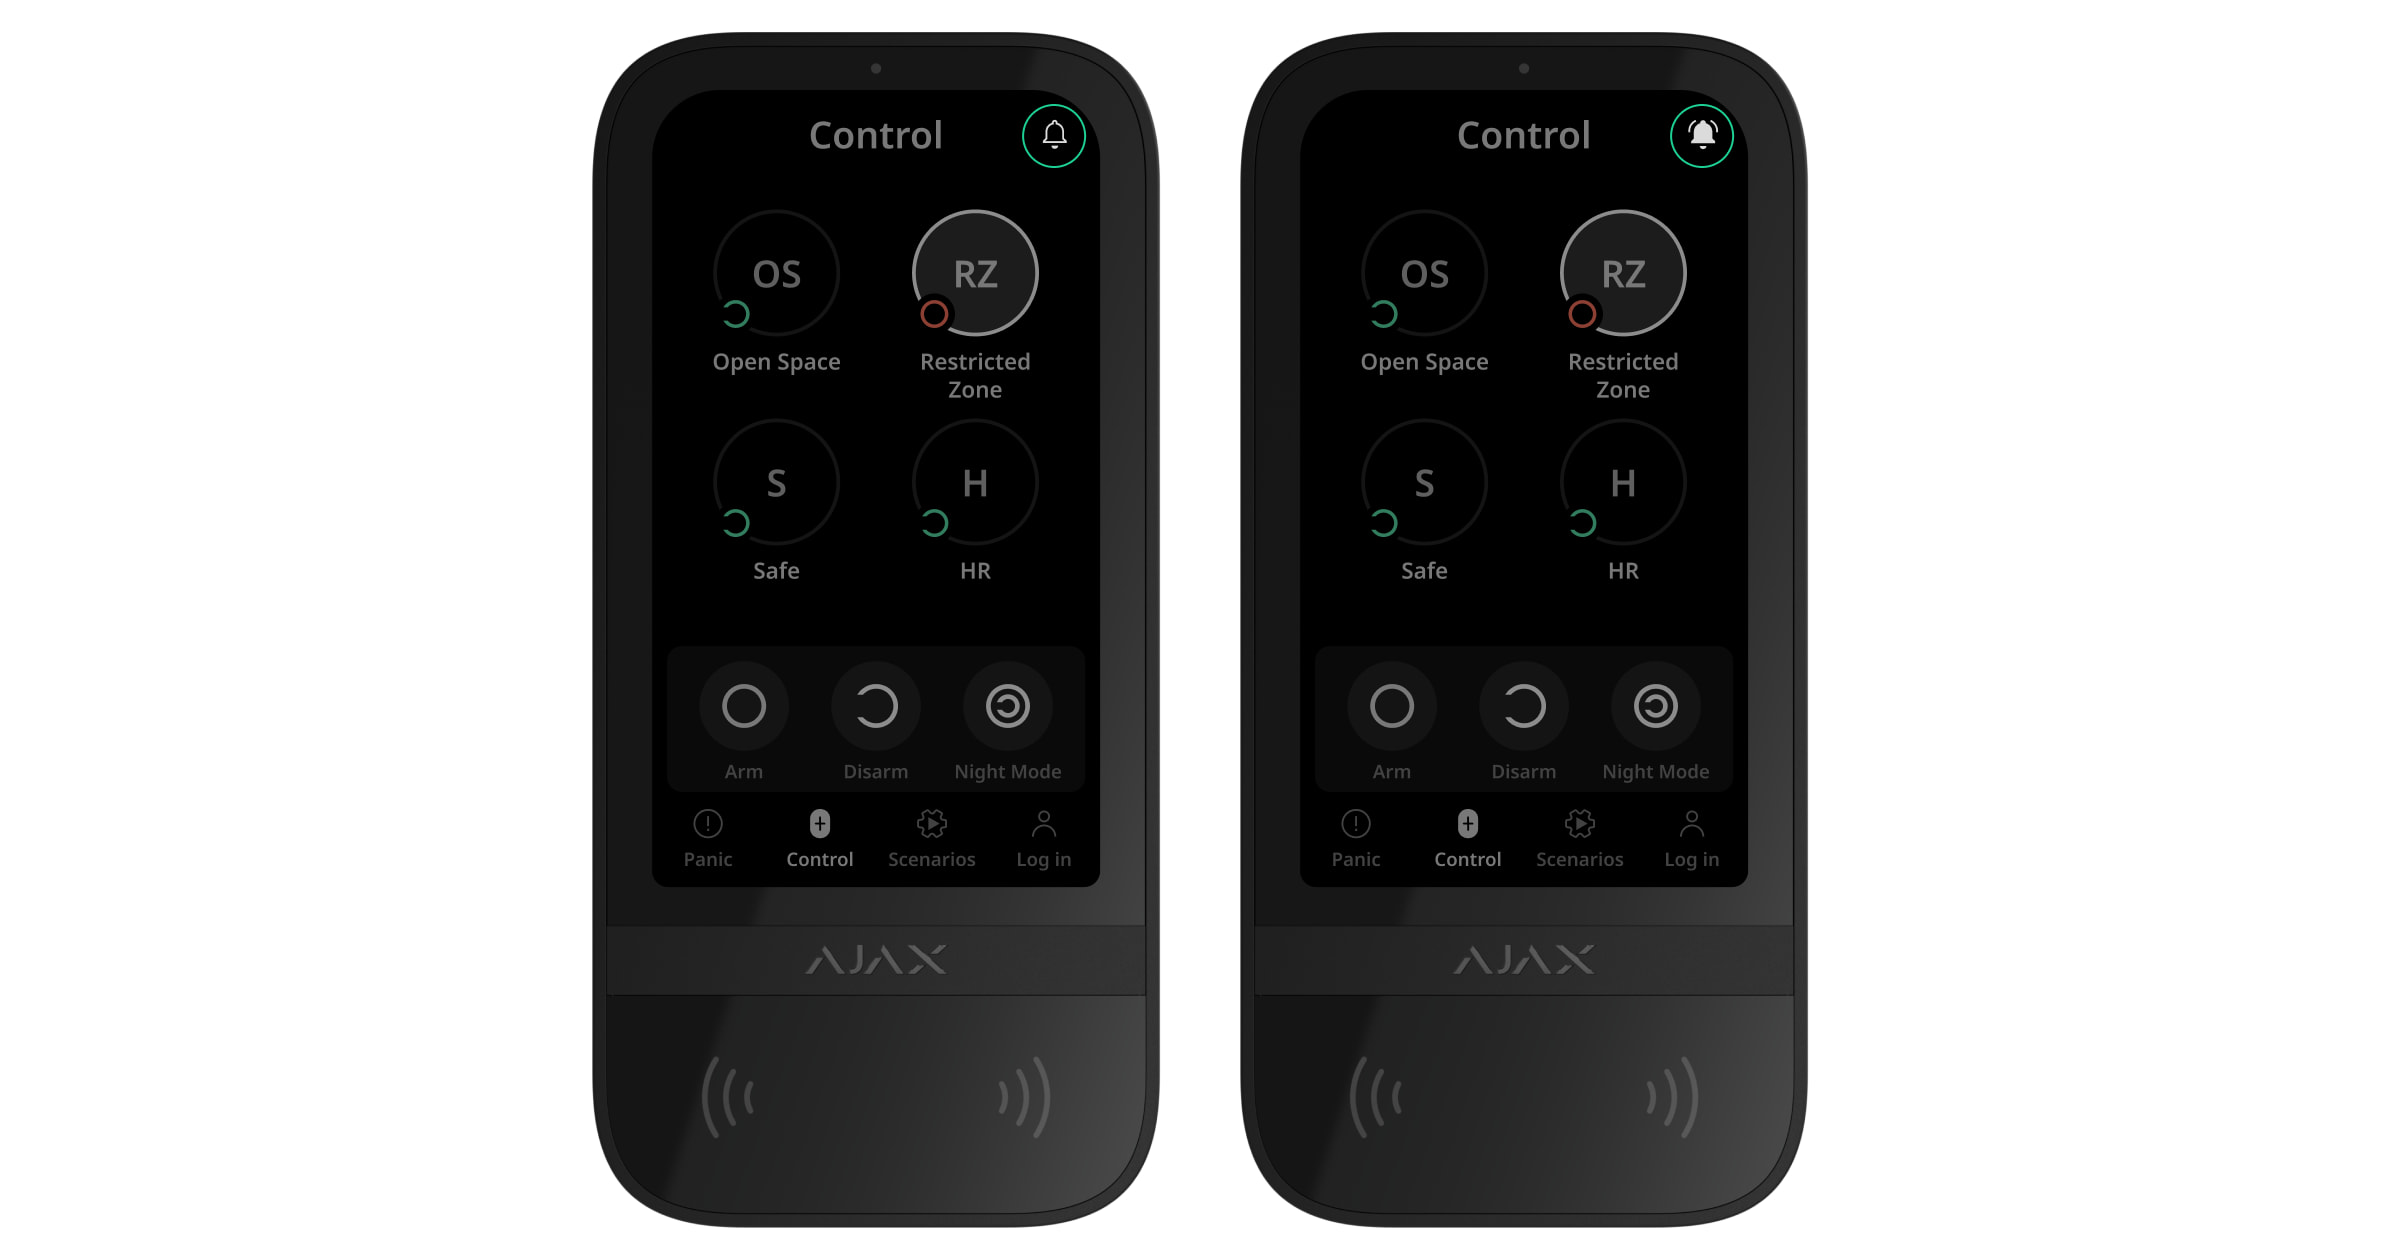
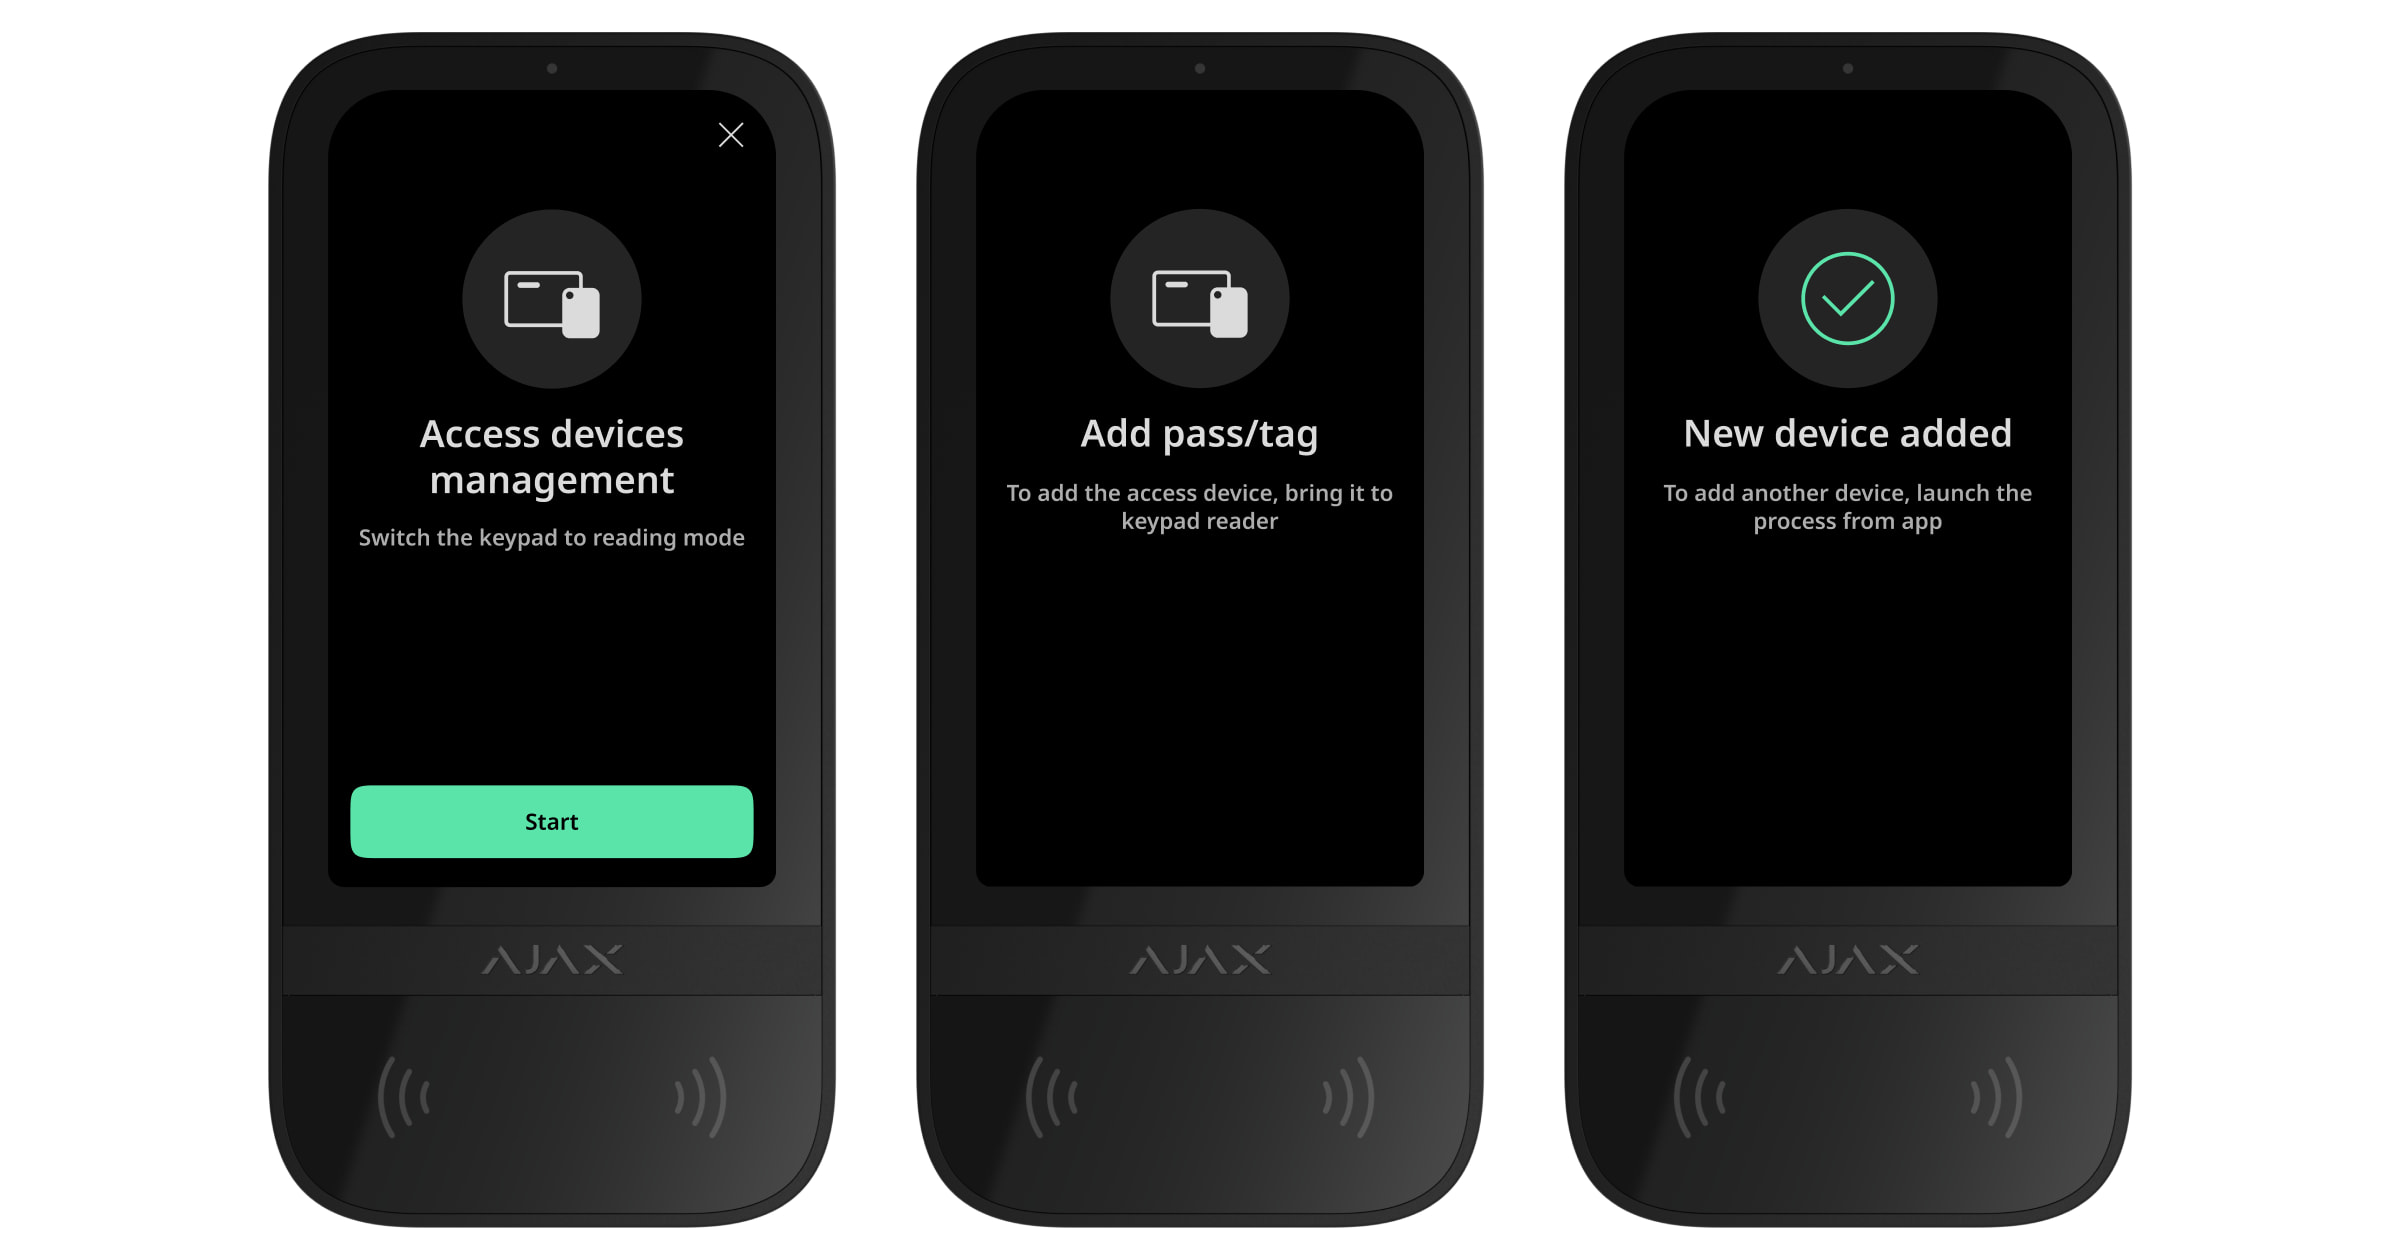
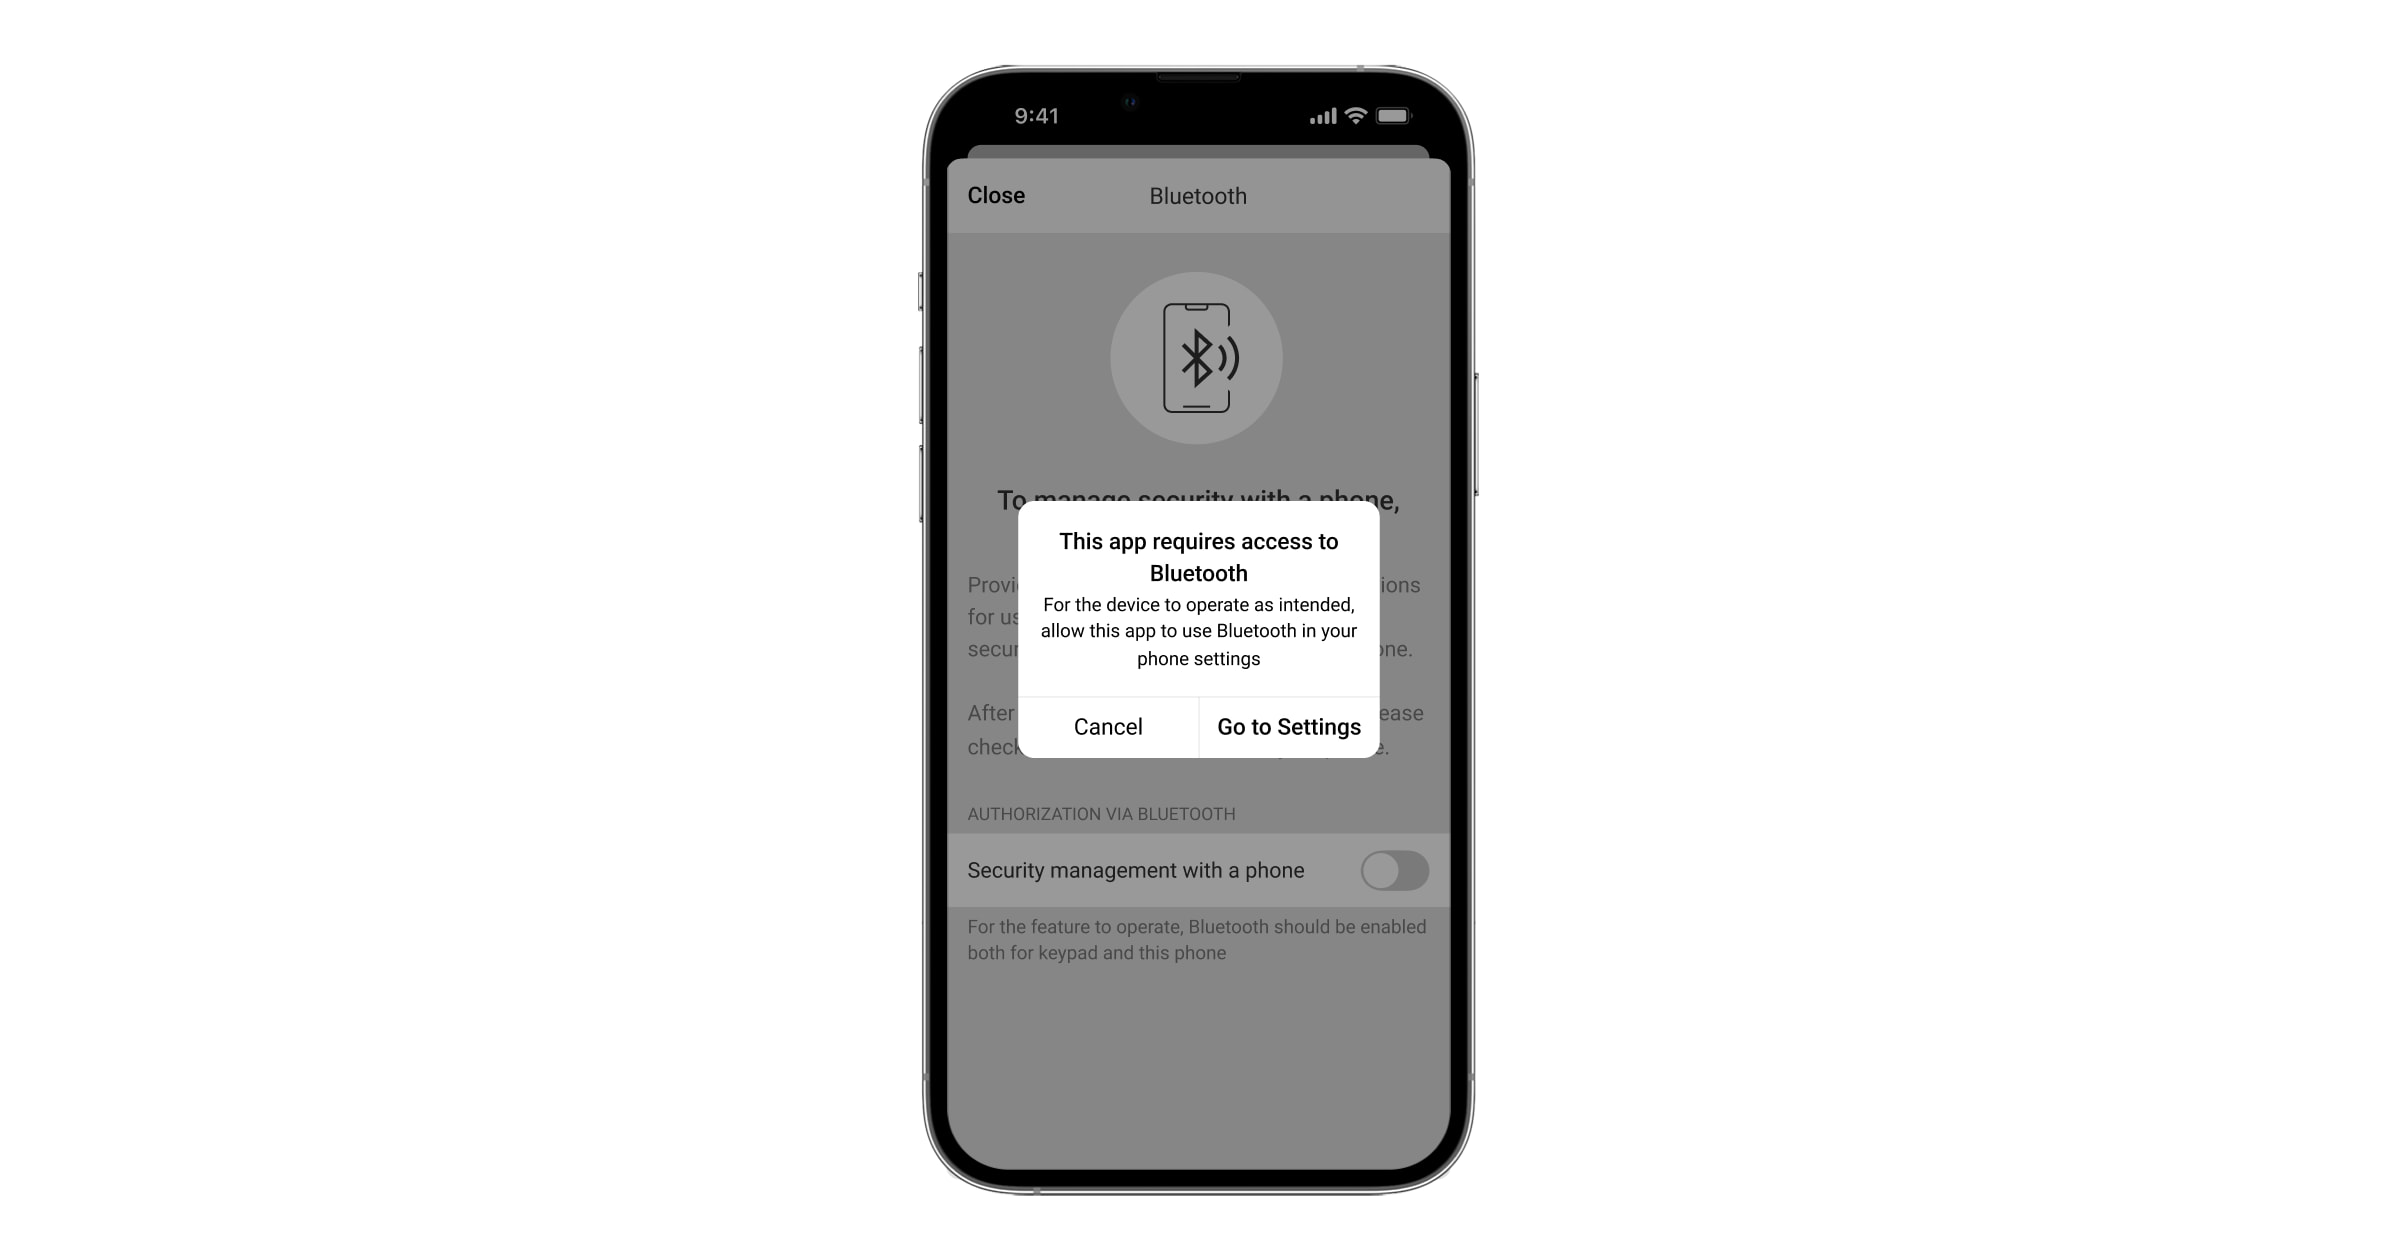
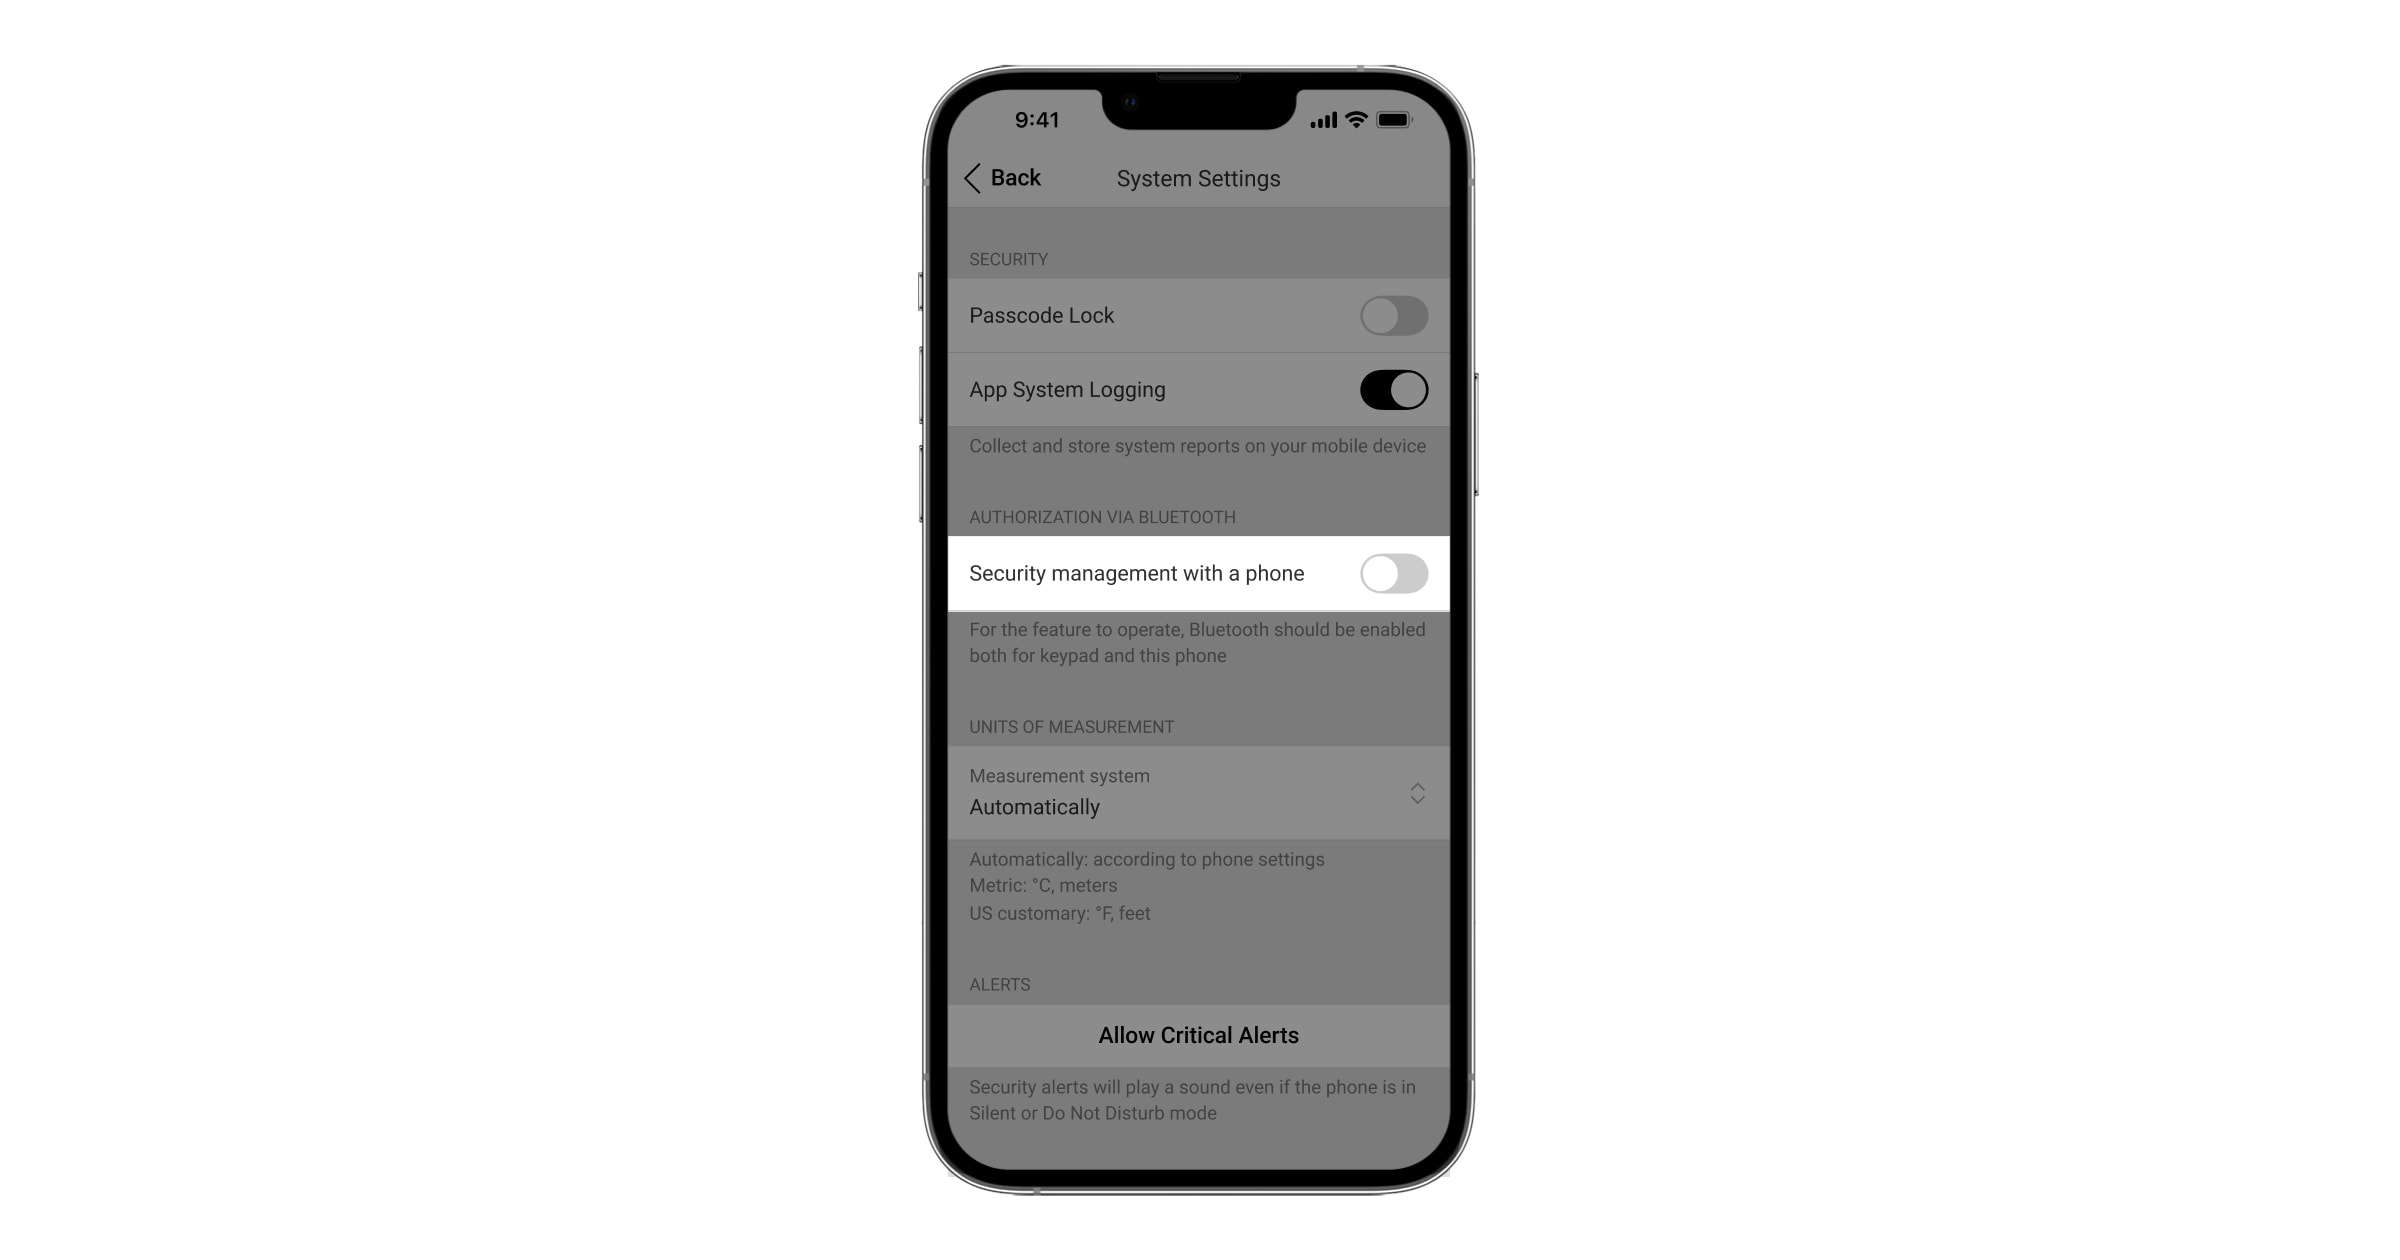
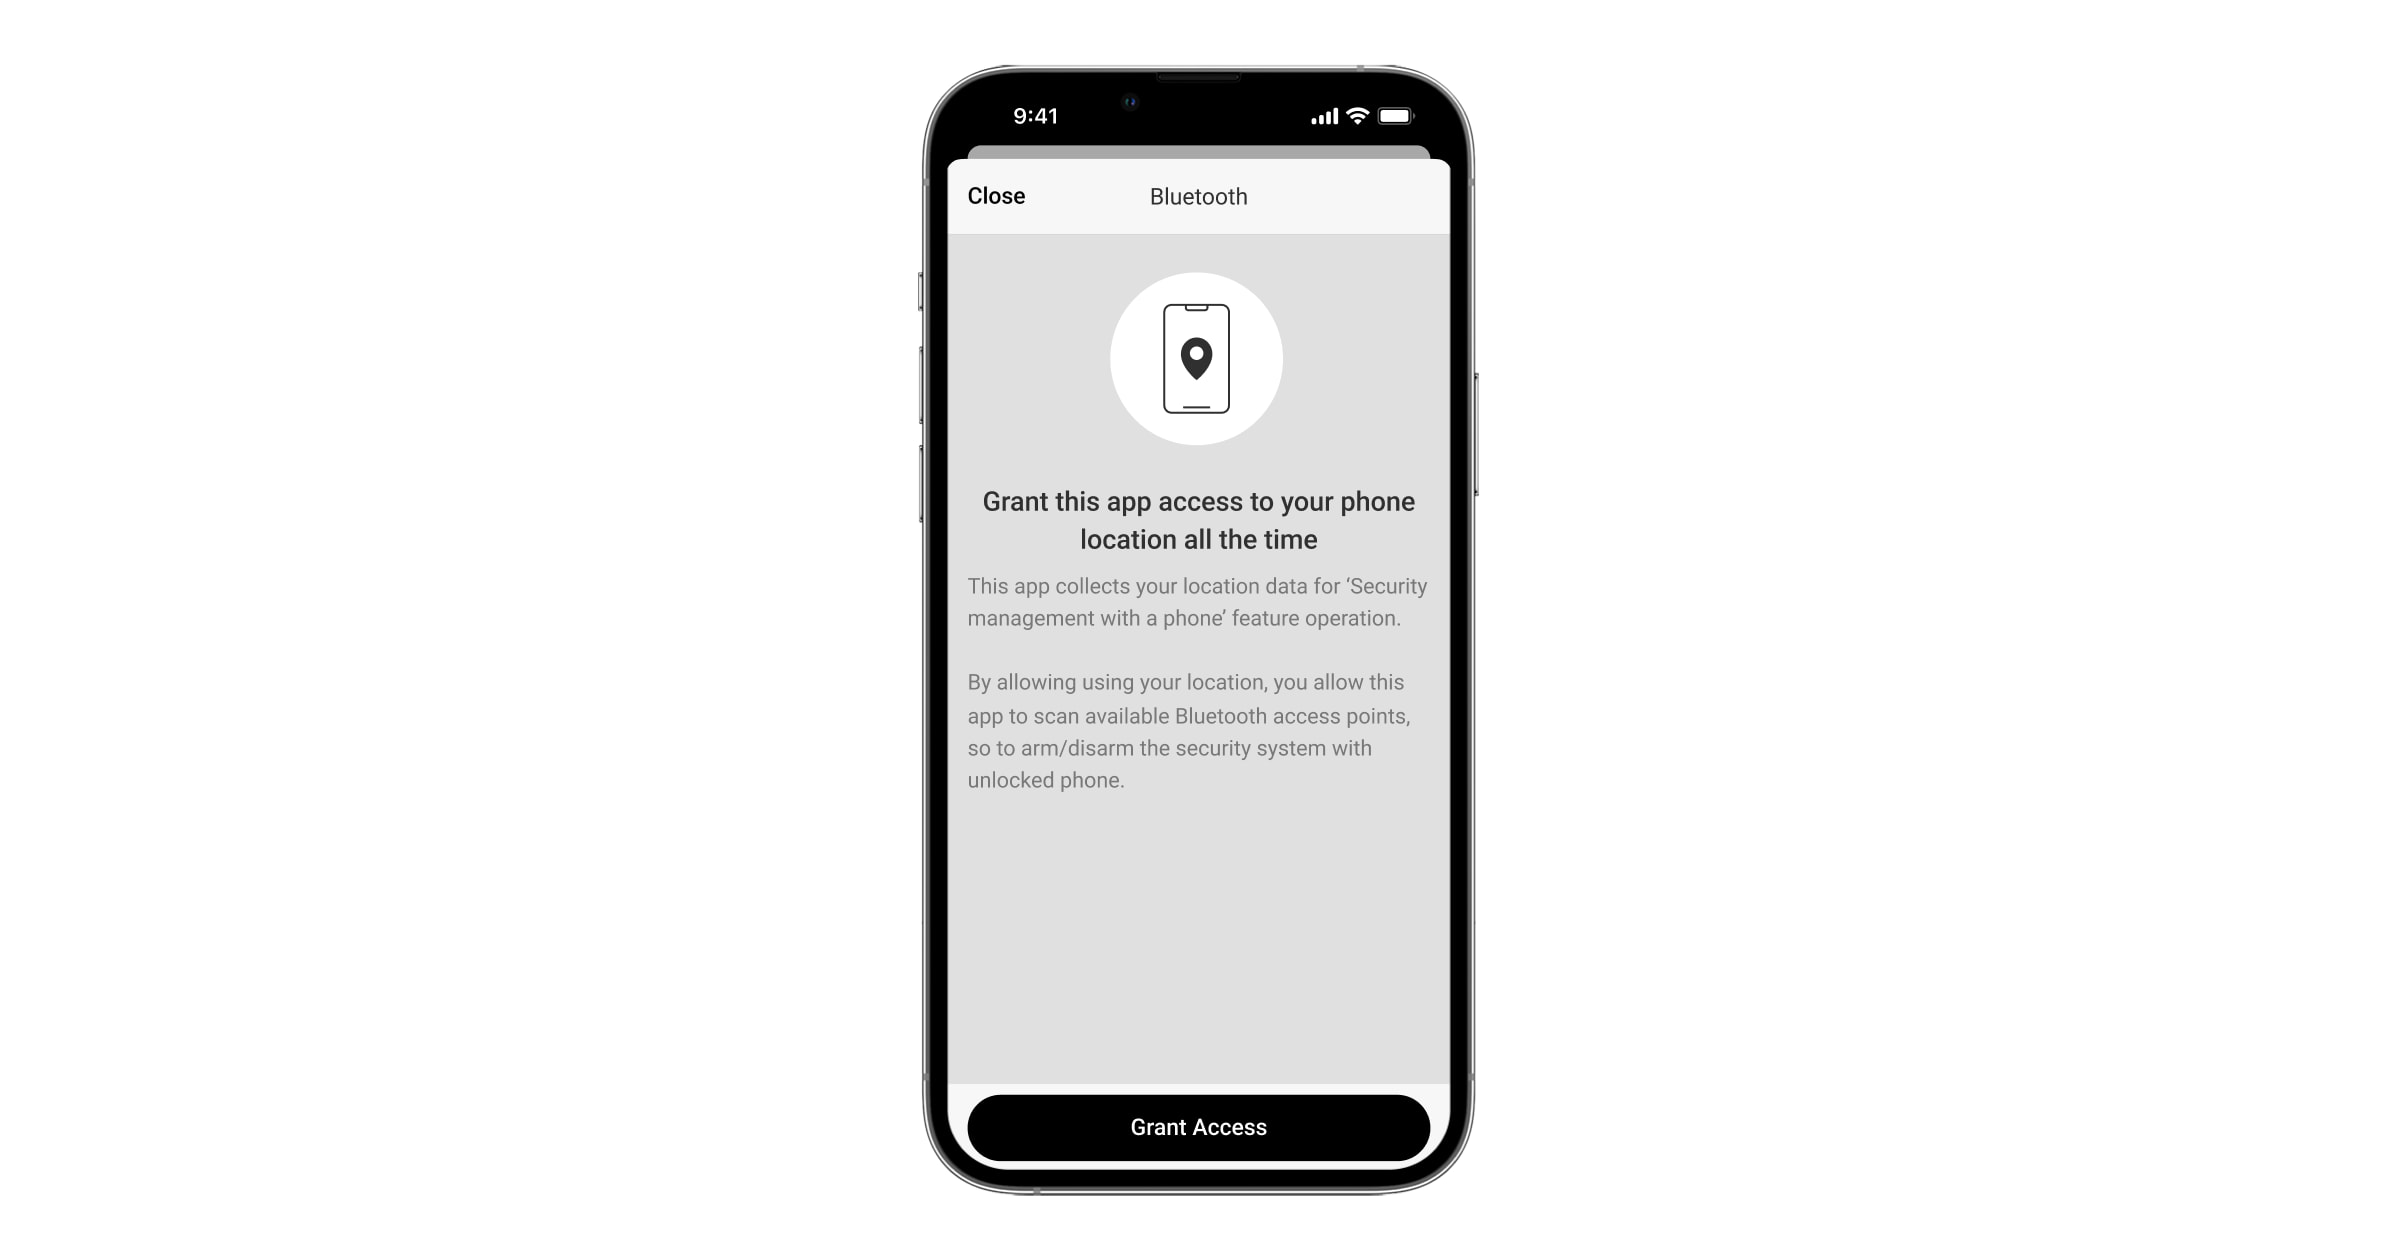
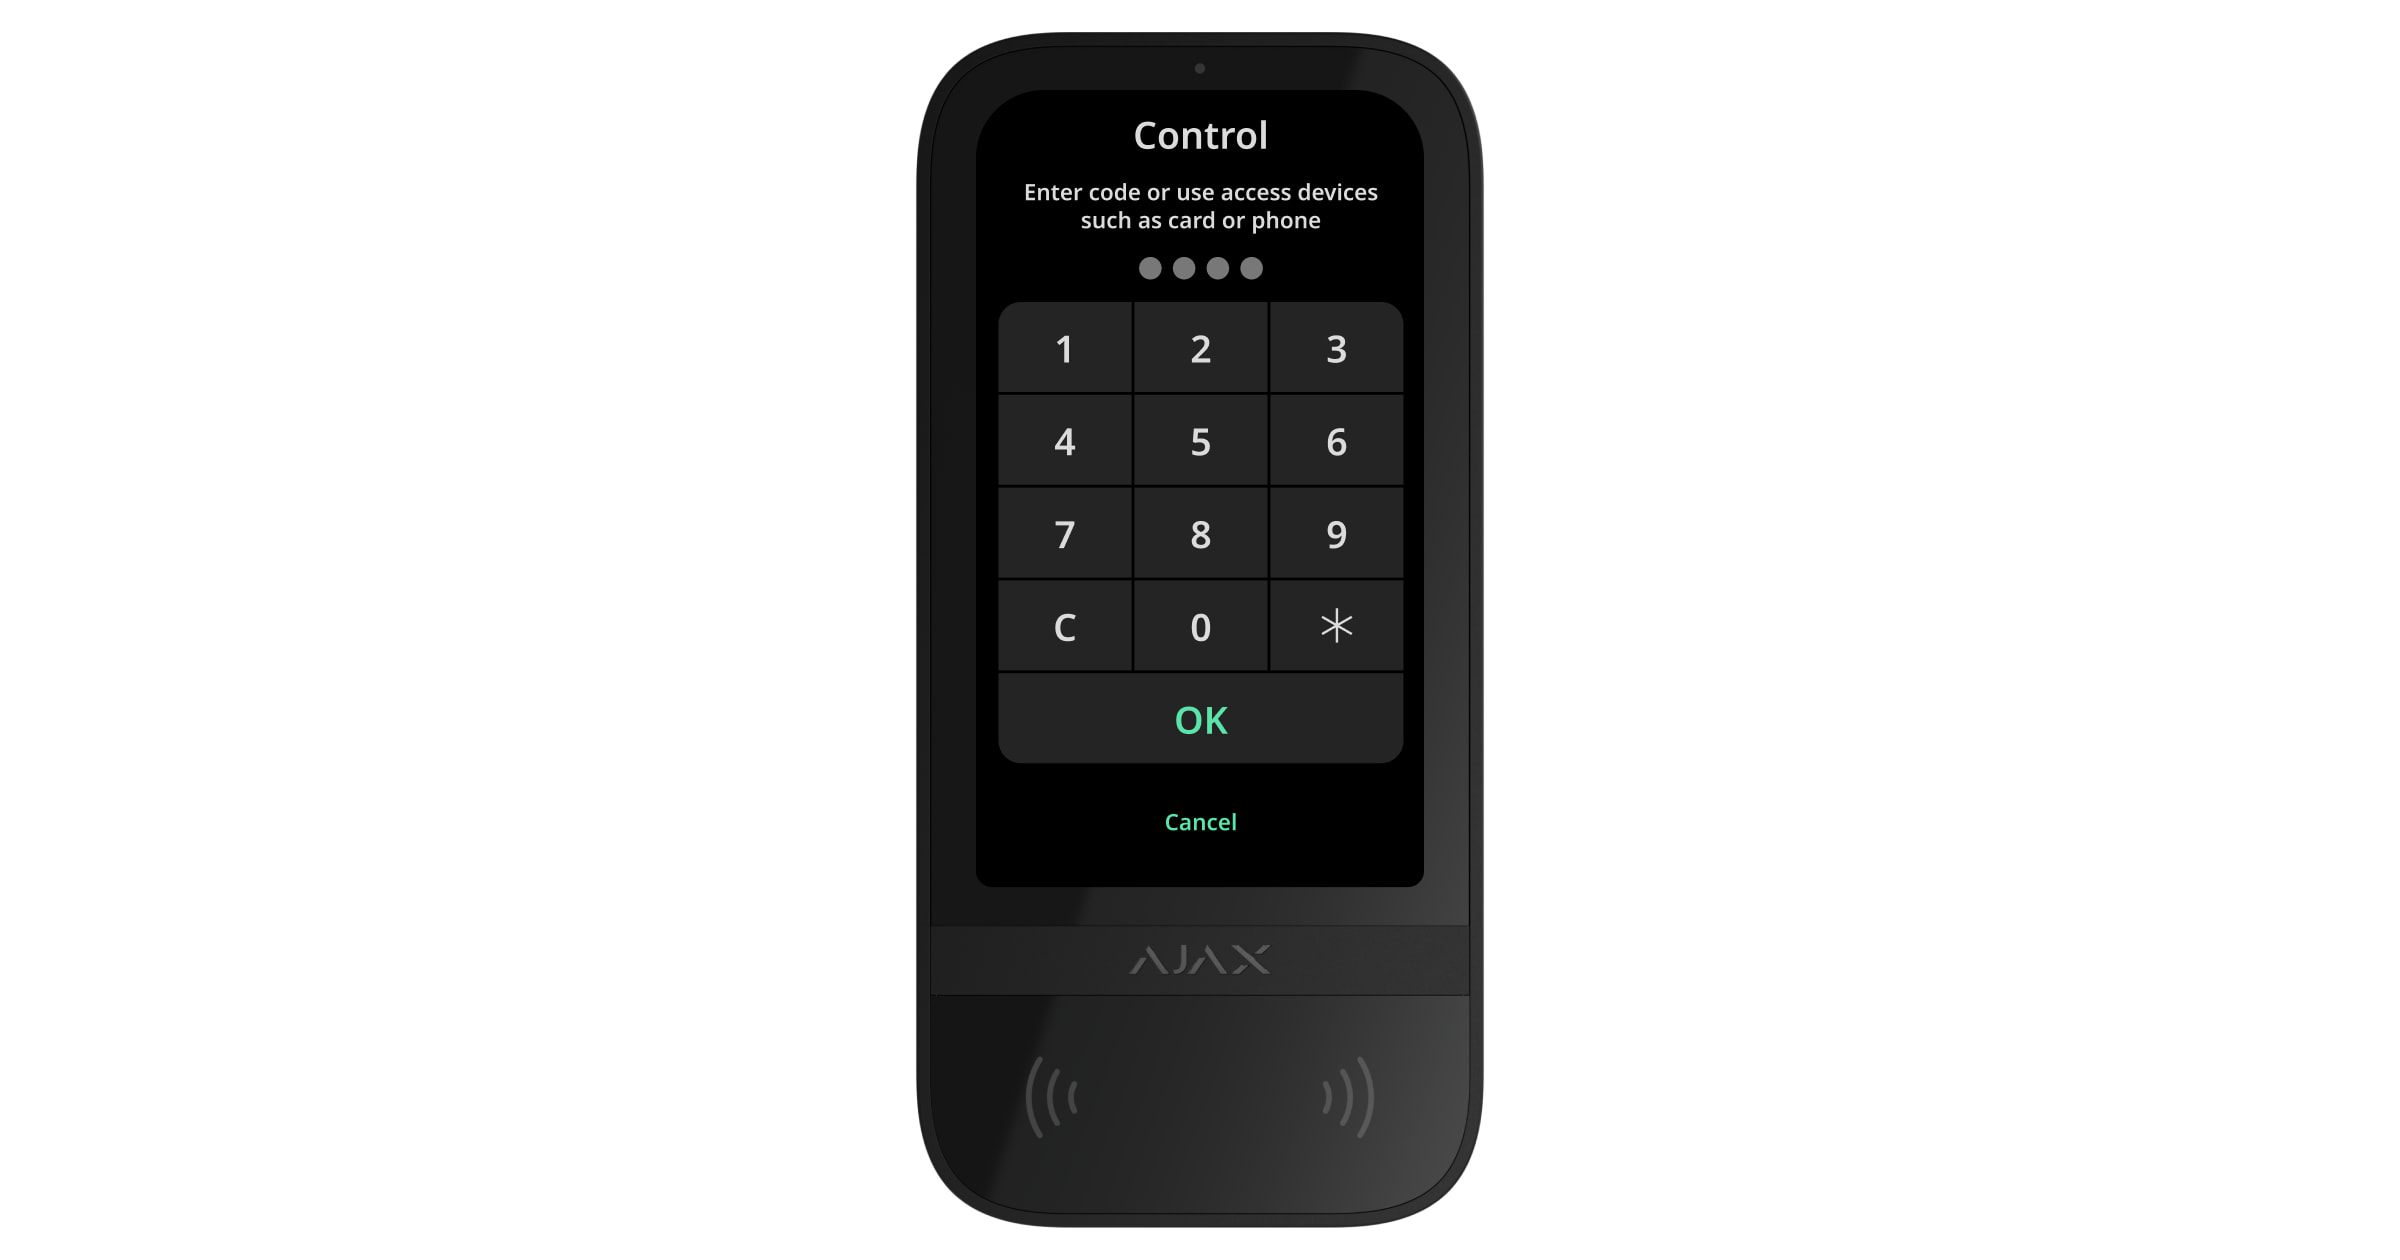
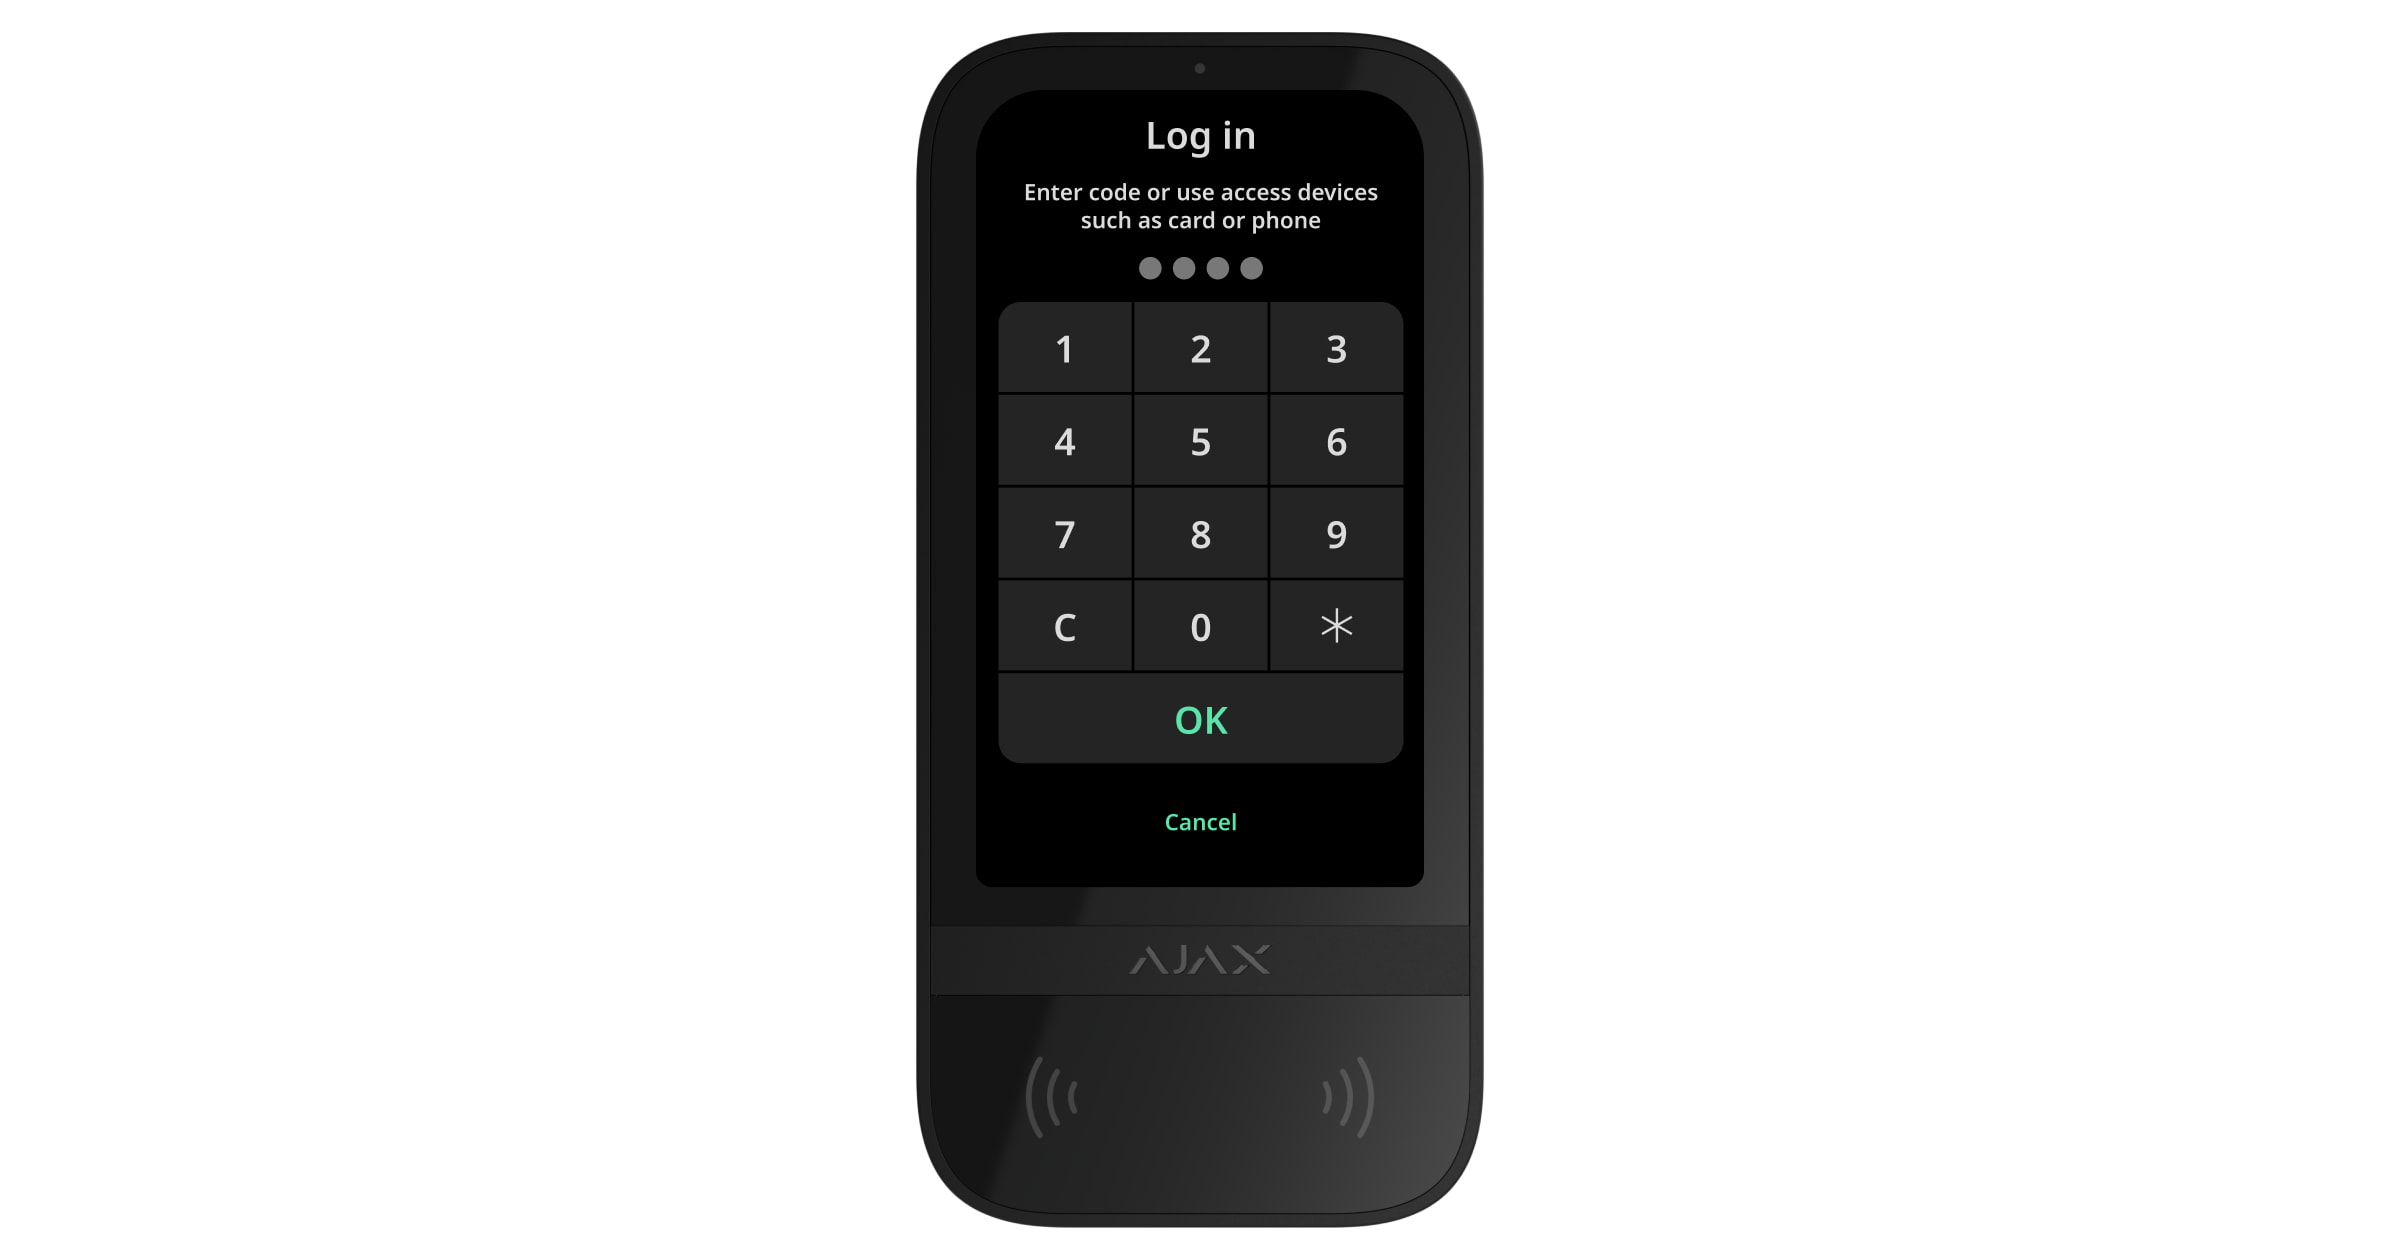
 — Armed.
 — Disarmed.
 — Night Mode.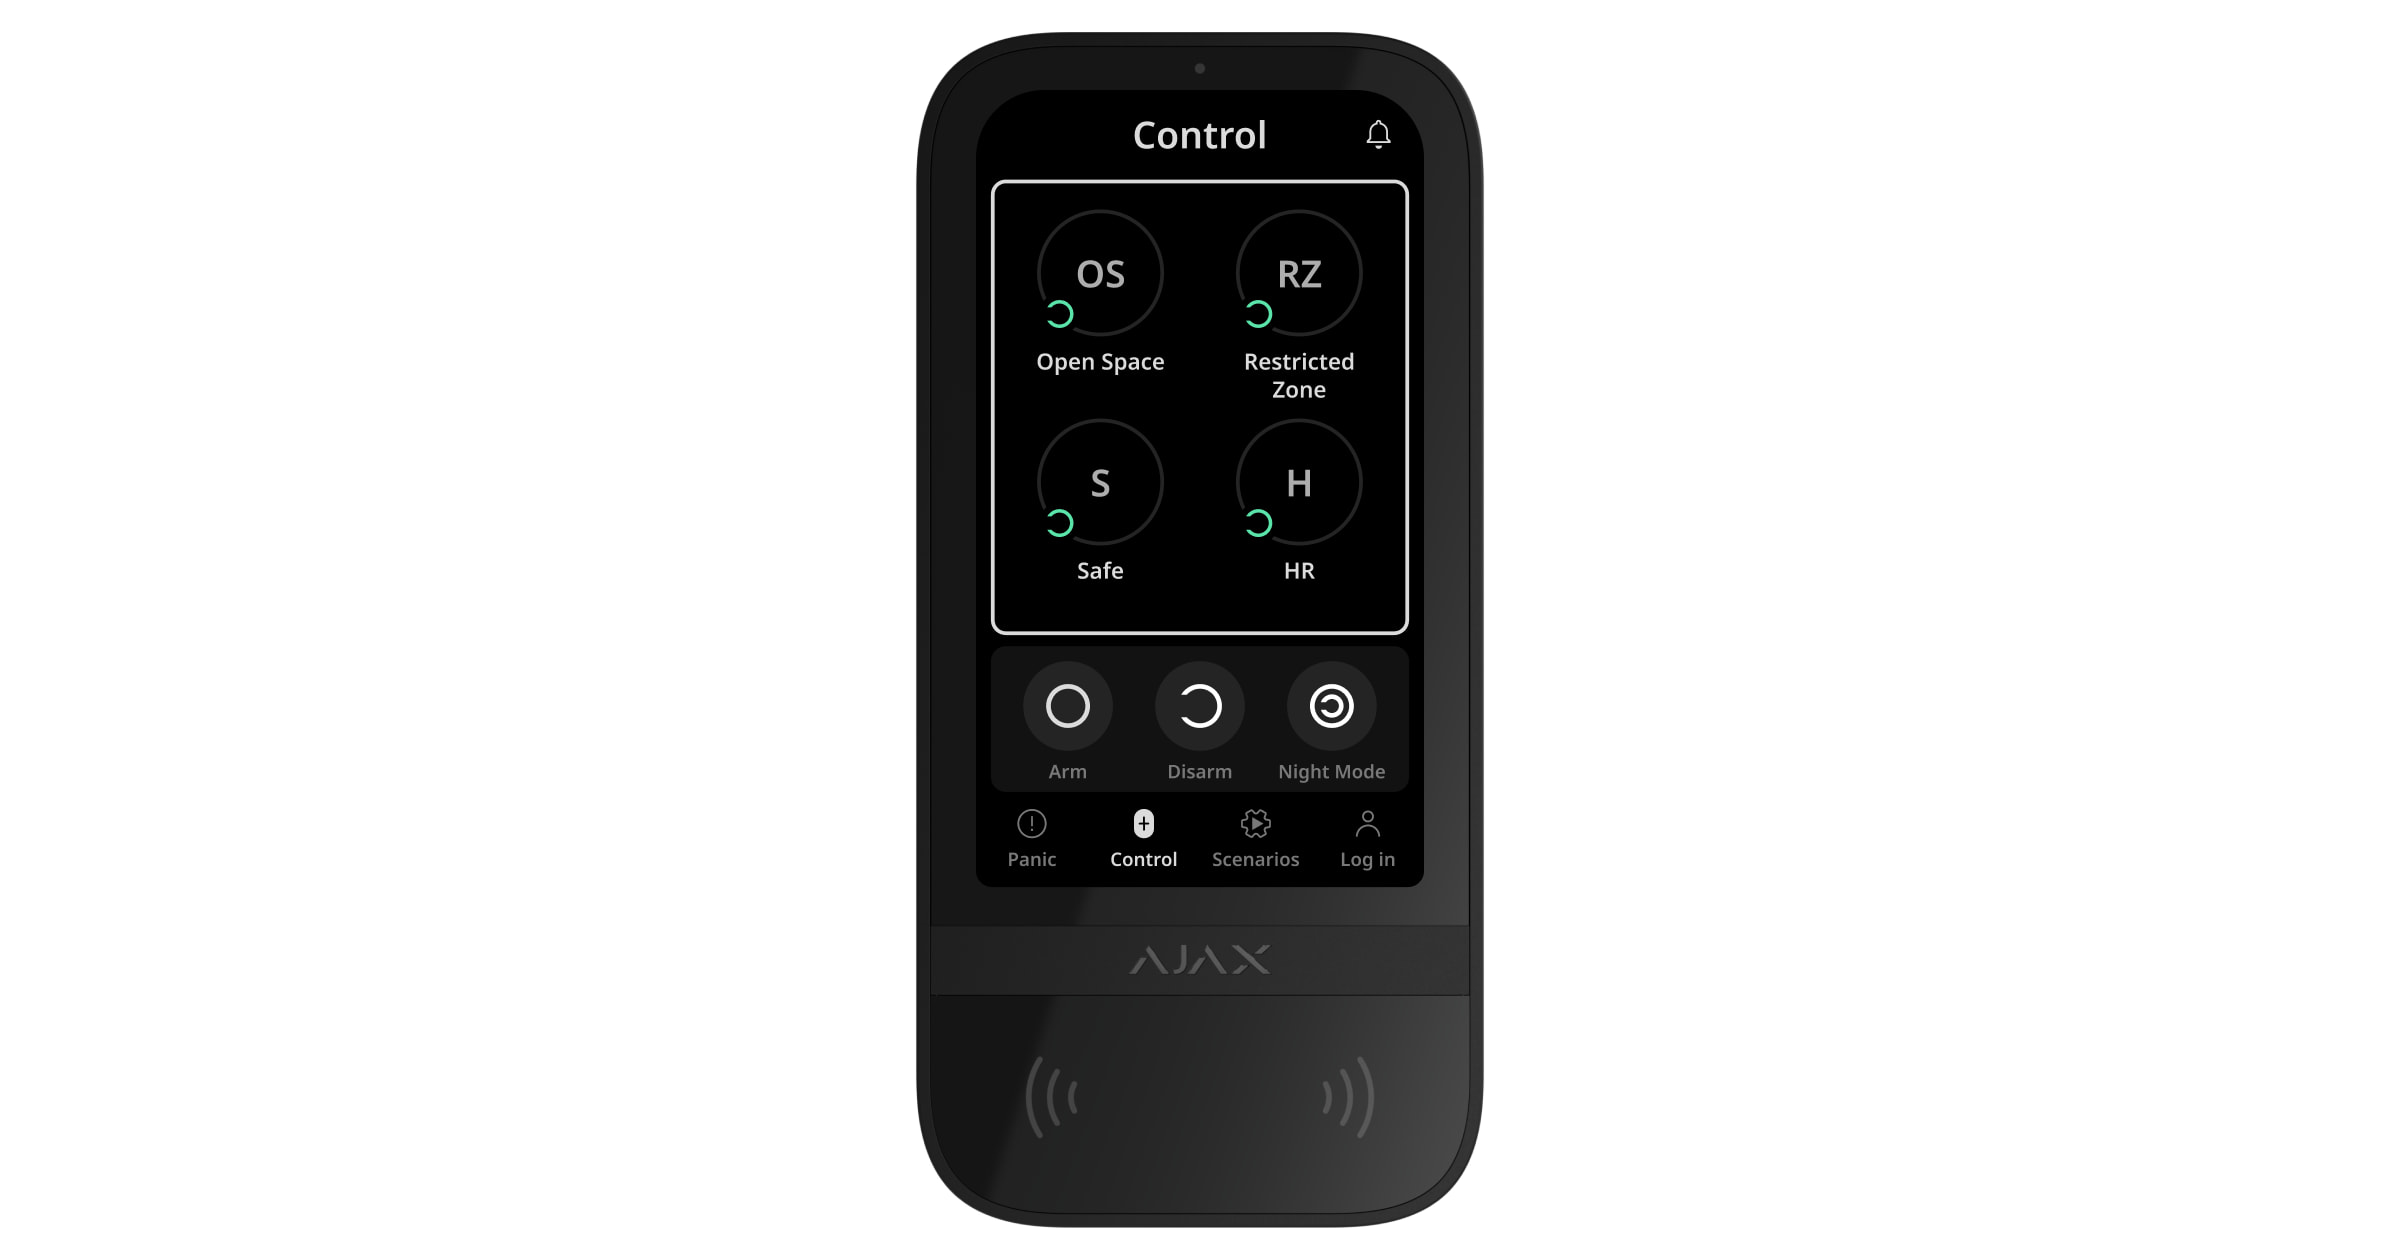
 button.
 → 1234 → OK