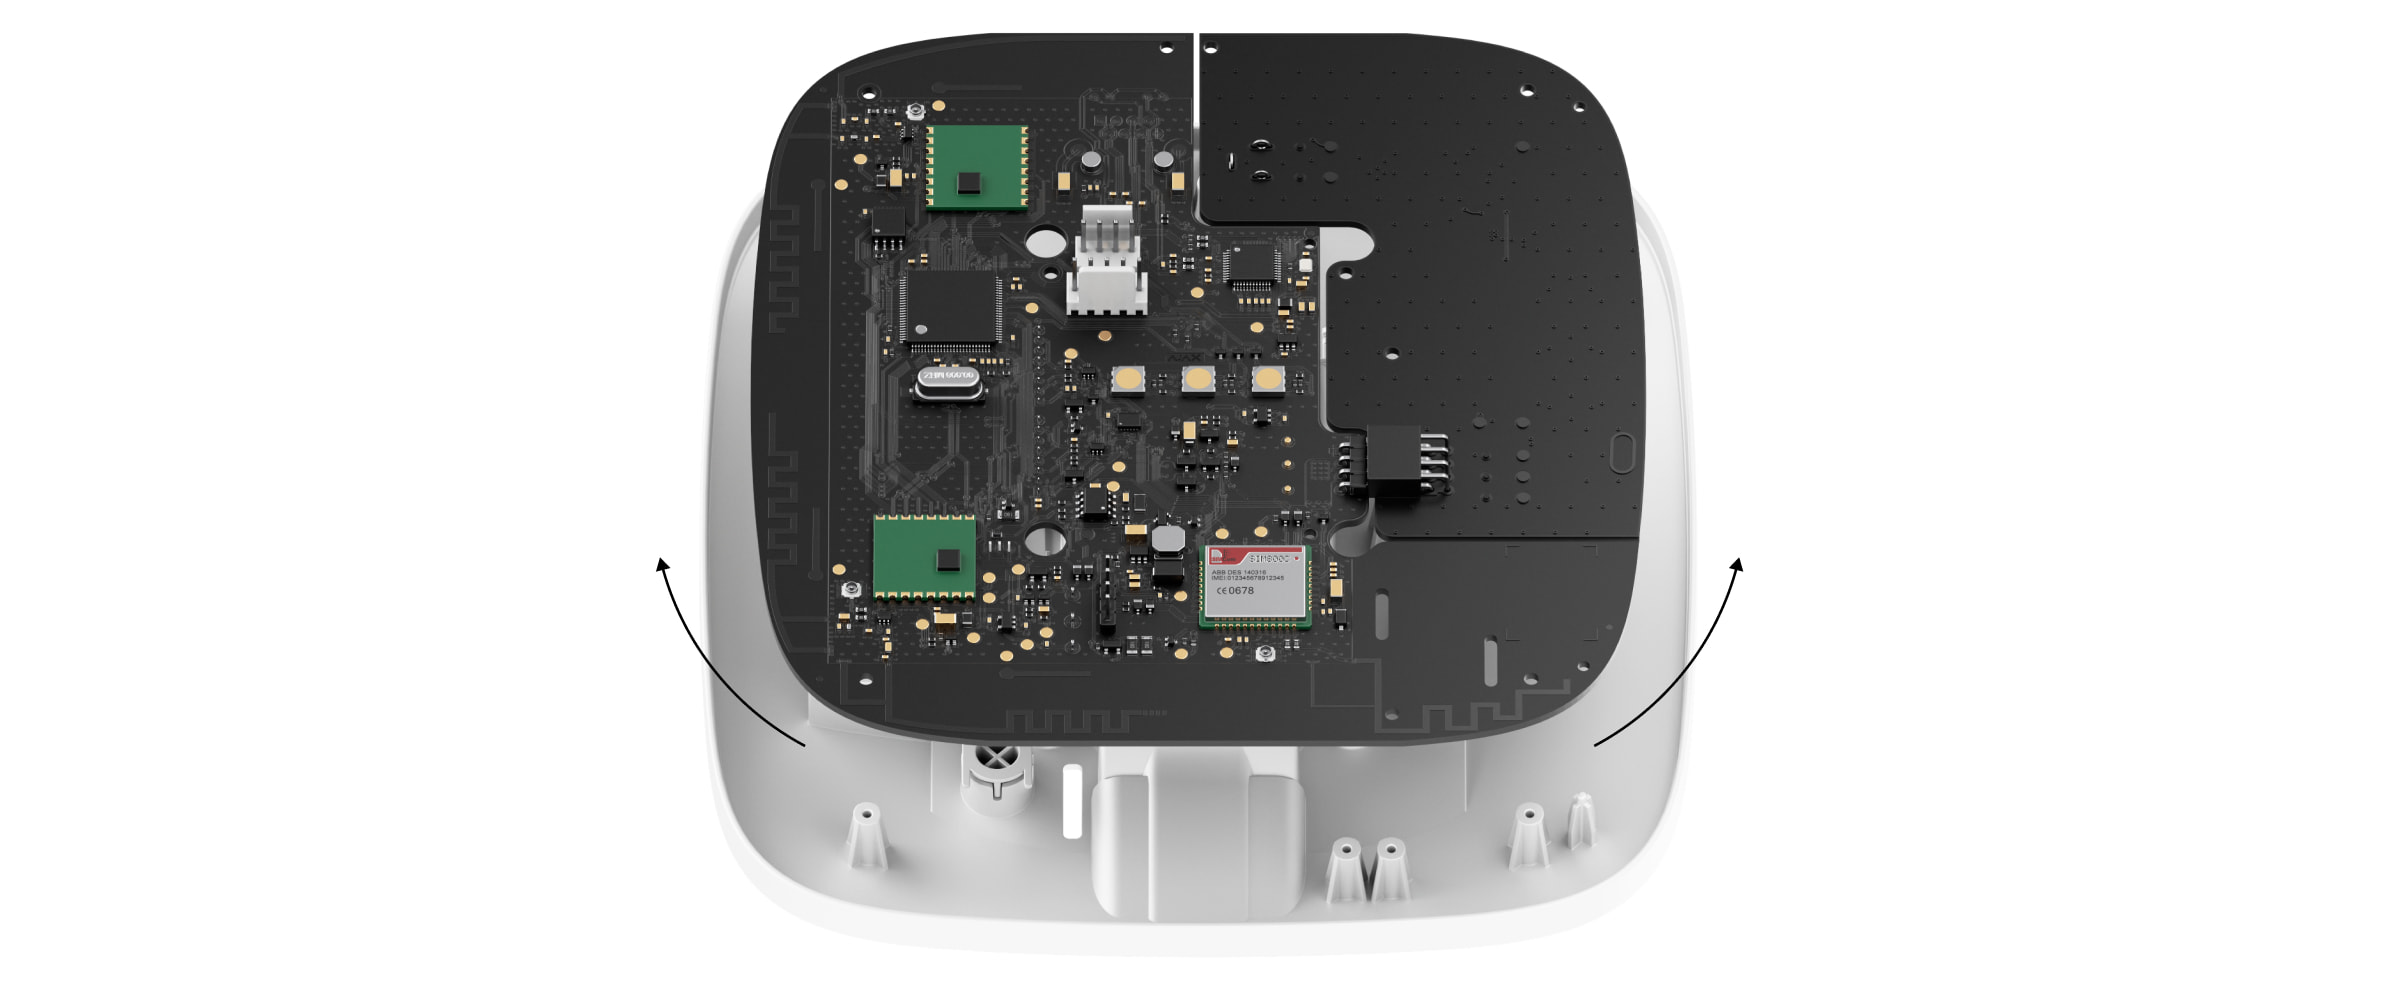
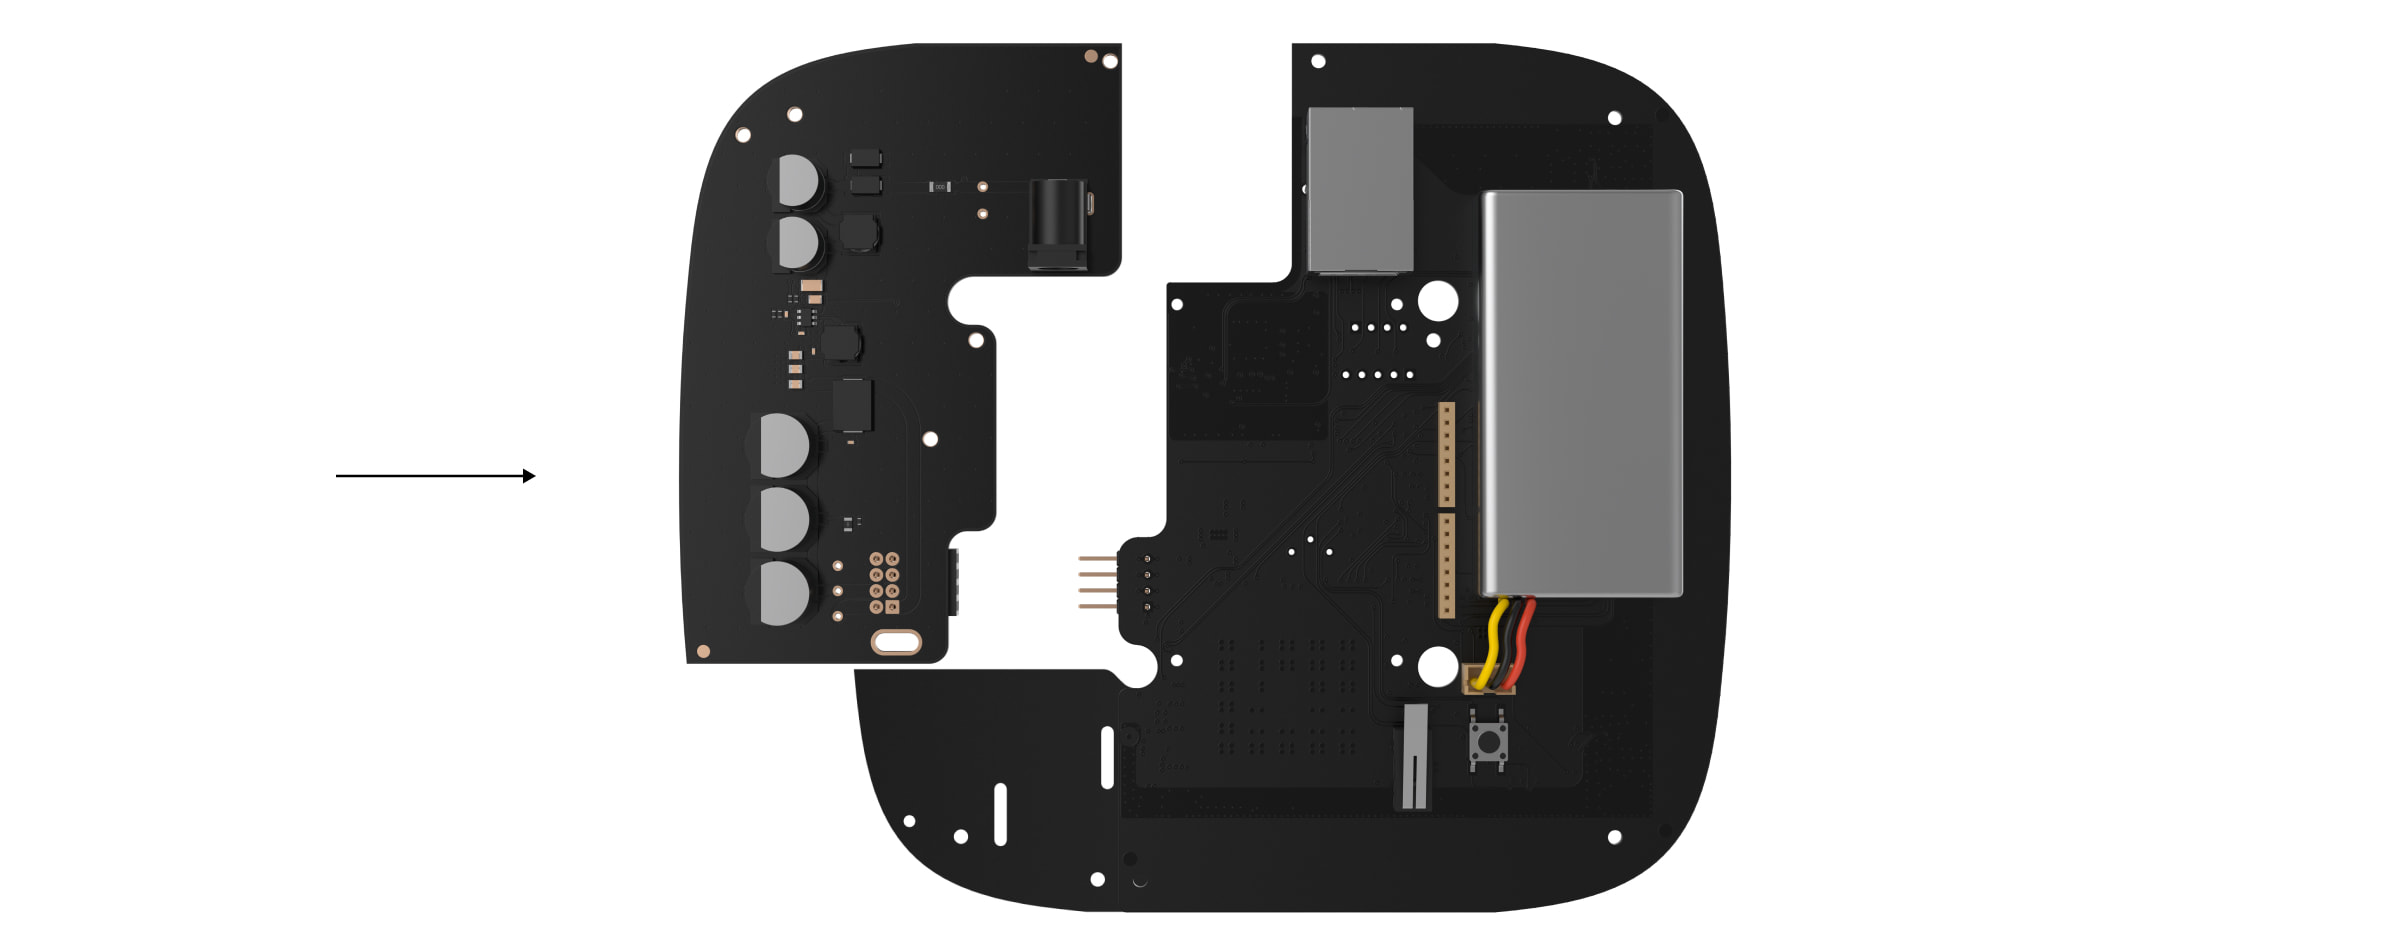
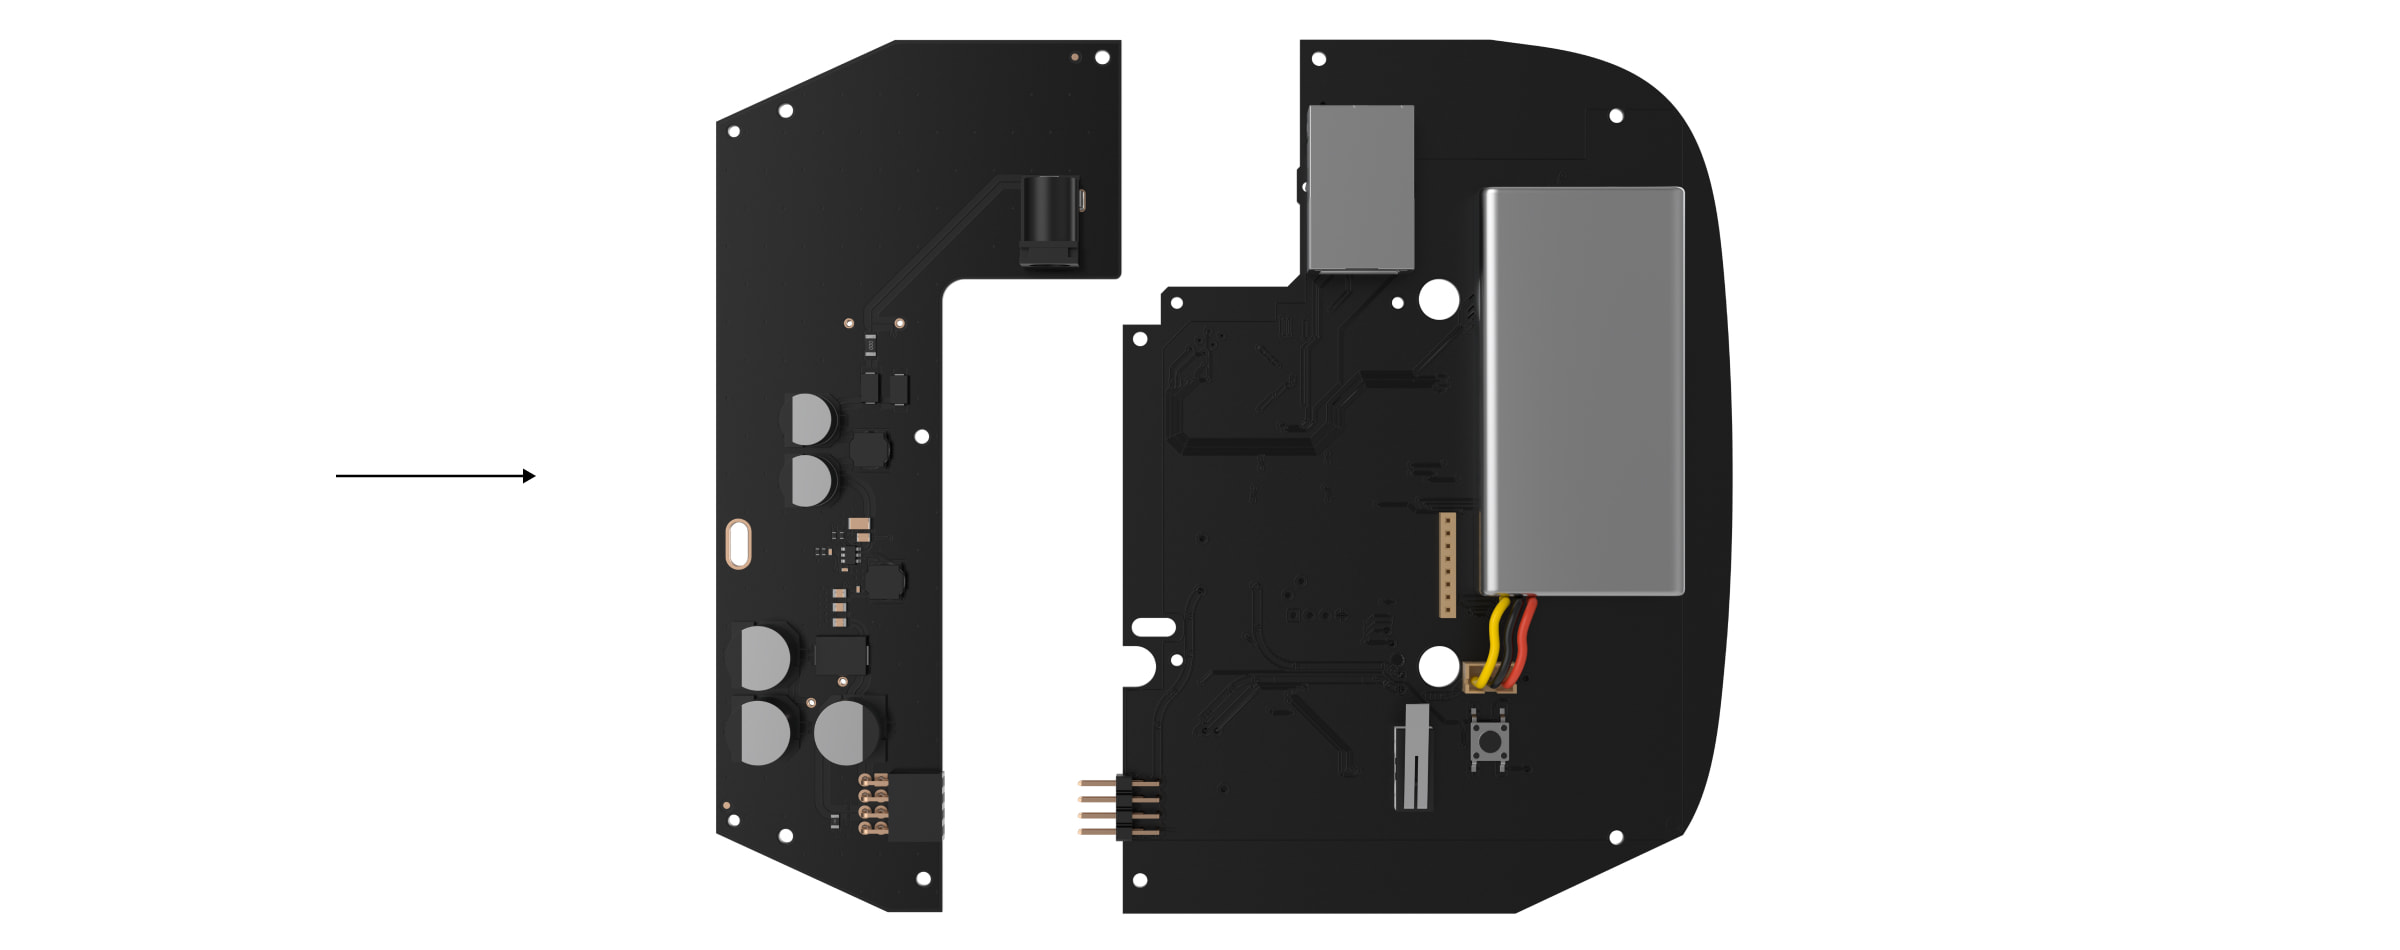
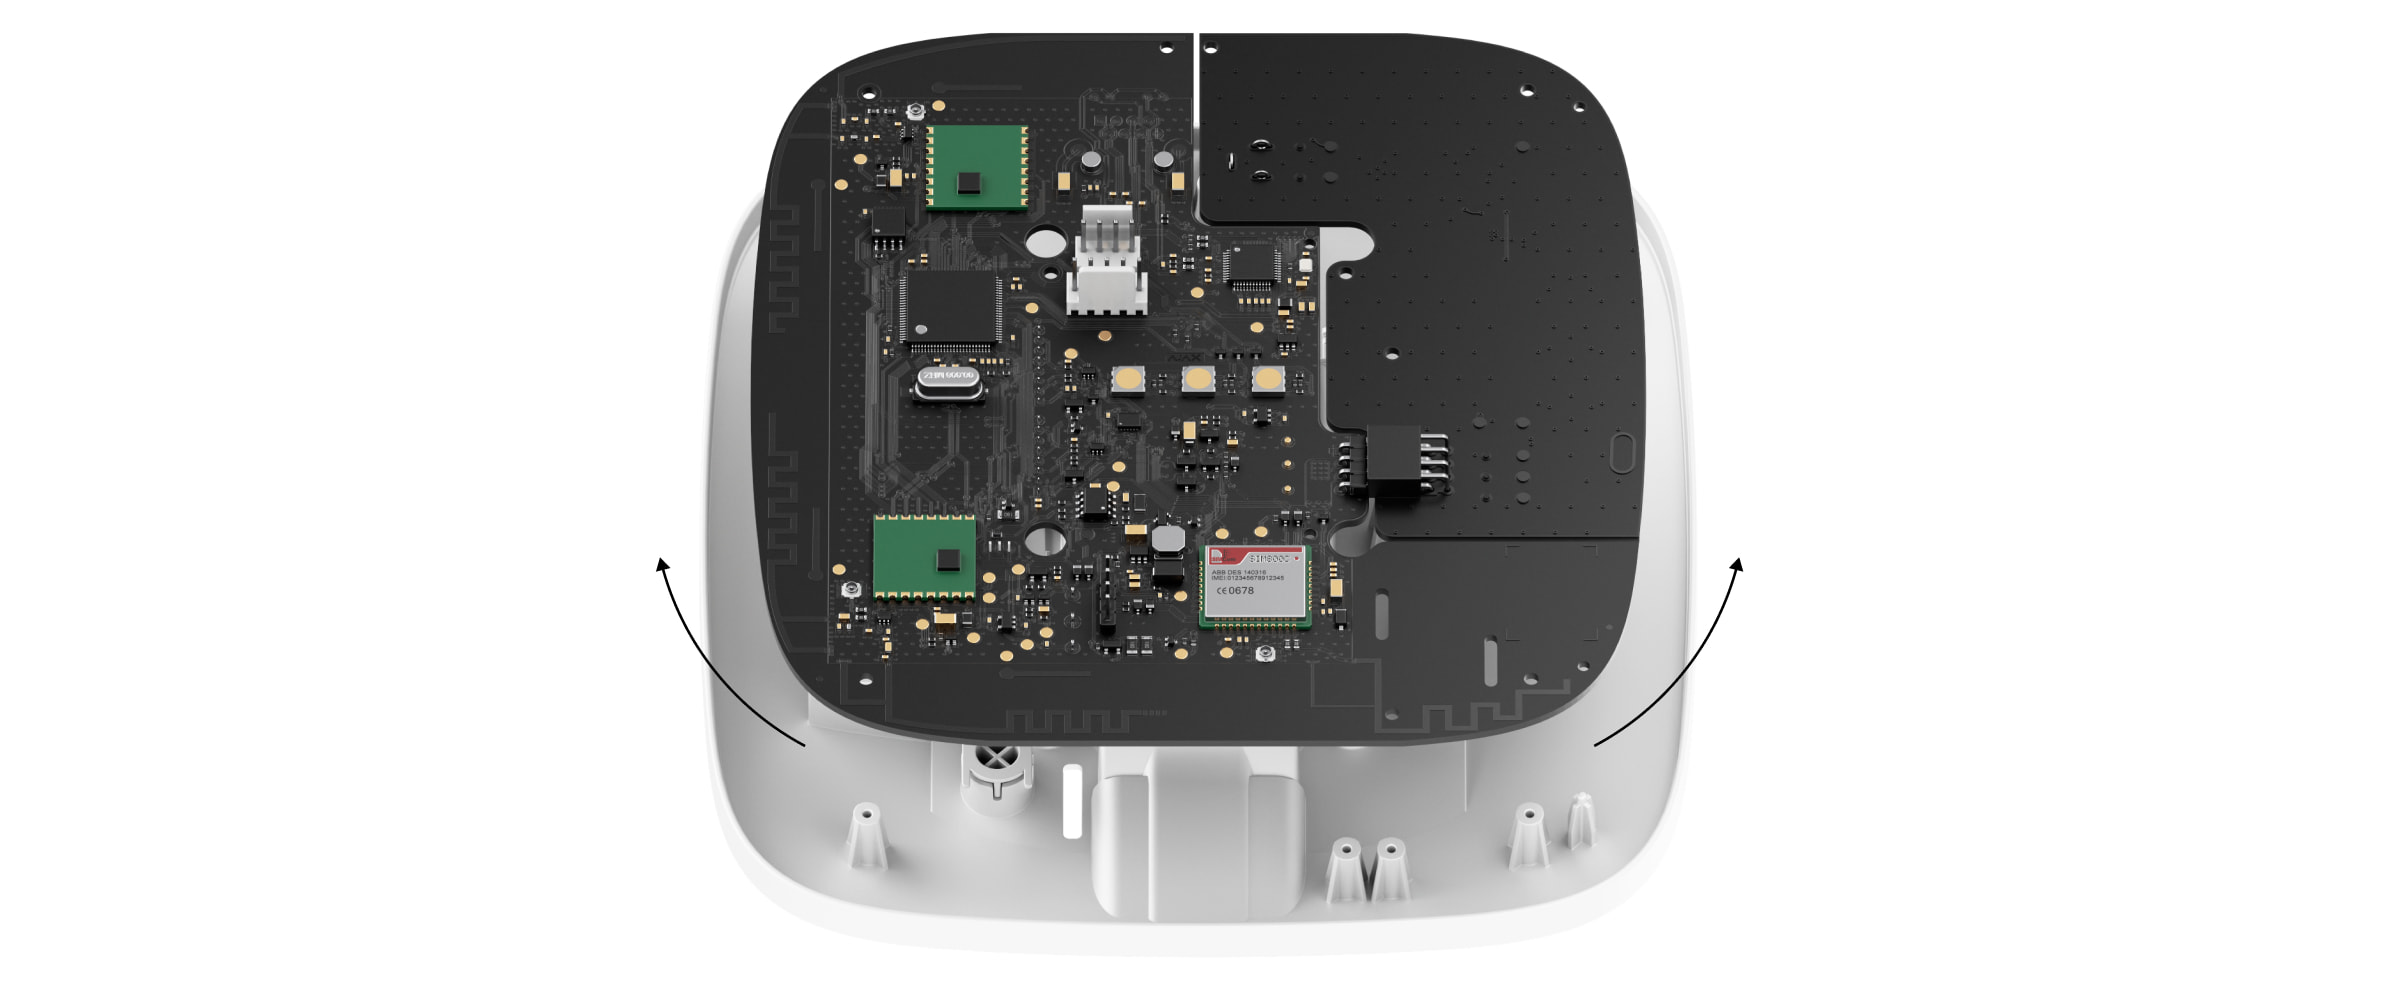
12V PSU for Hub 2/ReX 2is a power supply unit, connecting theHub 2control panels to 12 volt DC sources. This is an electronic board, replacing the standard 110/230 V power supply unit in the body of the device.
12V PSU for Hub 2/ReX 2 should be installed by a qualified electrician only.
Before installing the power supply, make sure that the device is disconnected from the mains.
When installing the 12V PSU for Hub 2/ReX 2, follow the general electrical safety rules, as well as the requirements of electrical safety regulatory acts. Never disassemble the device while it is under voltage!
Installation process:
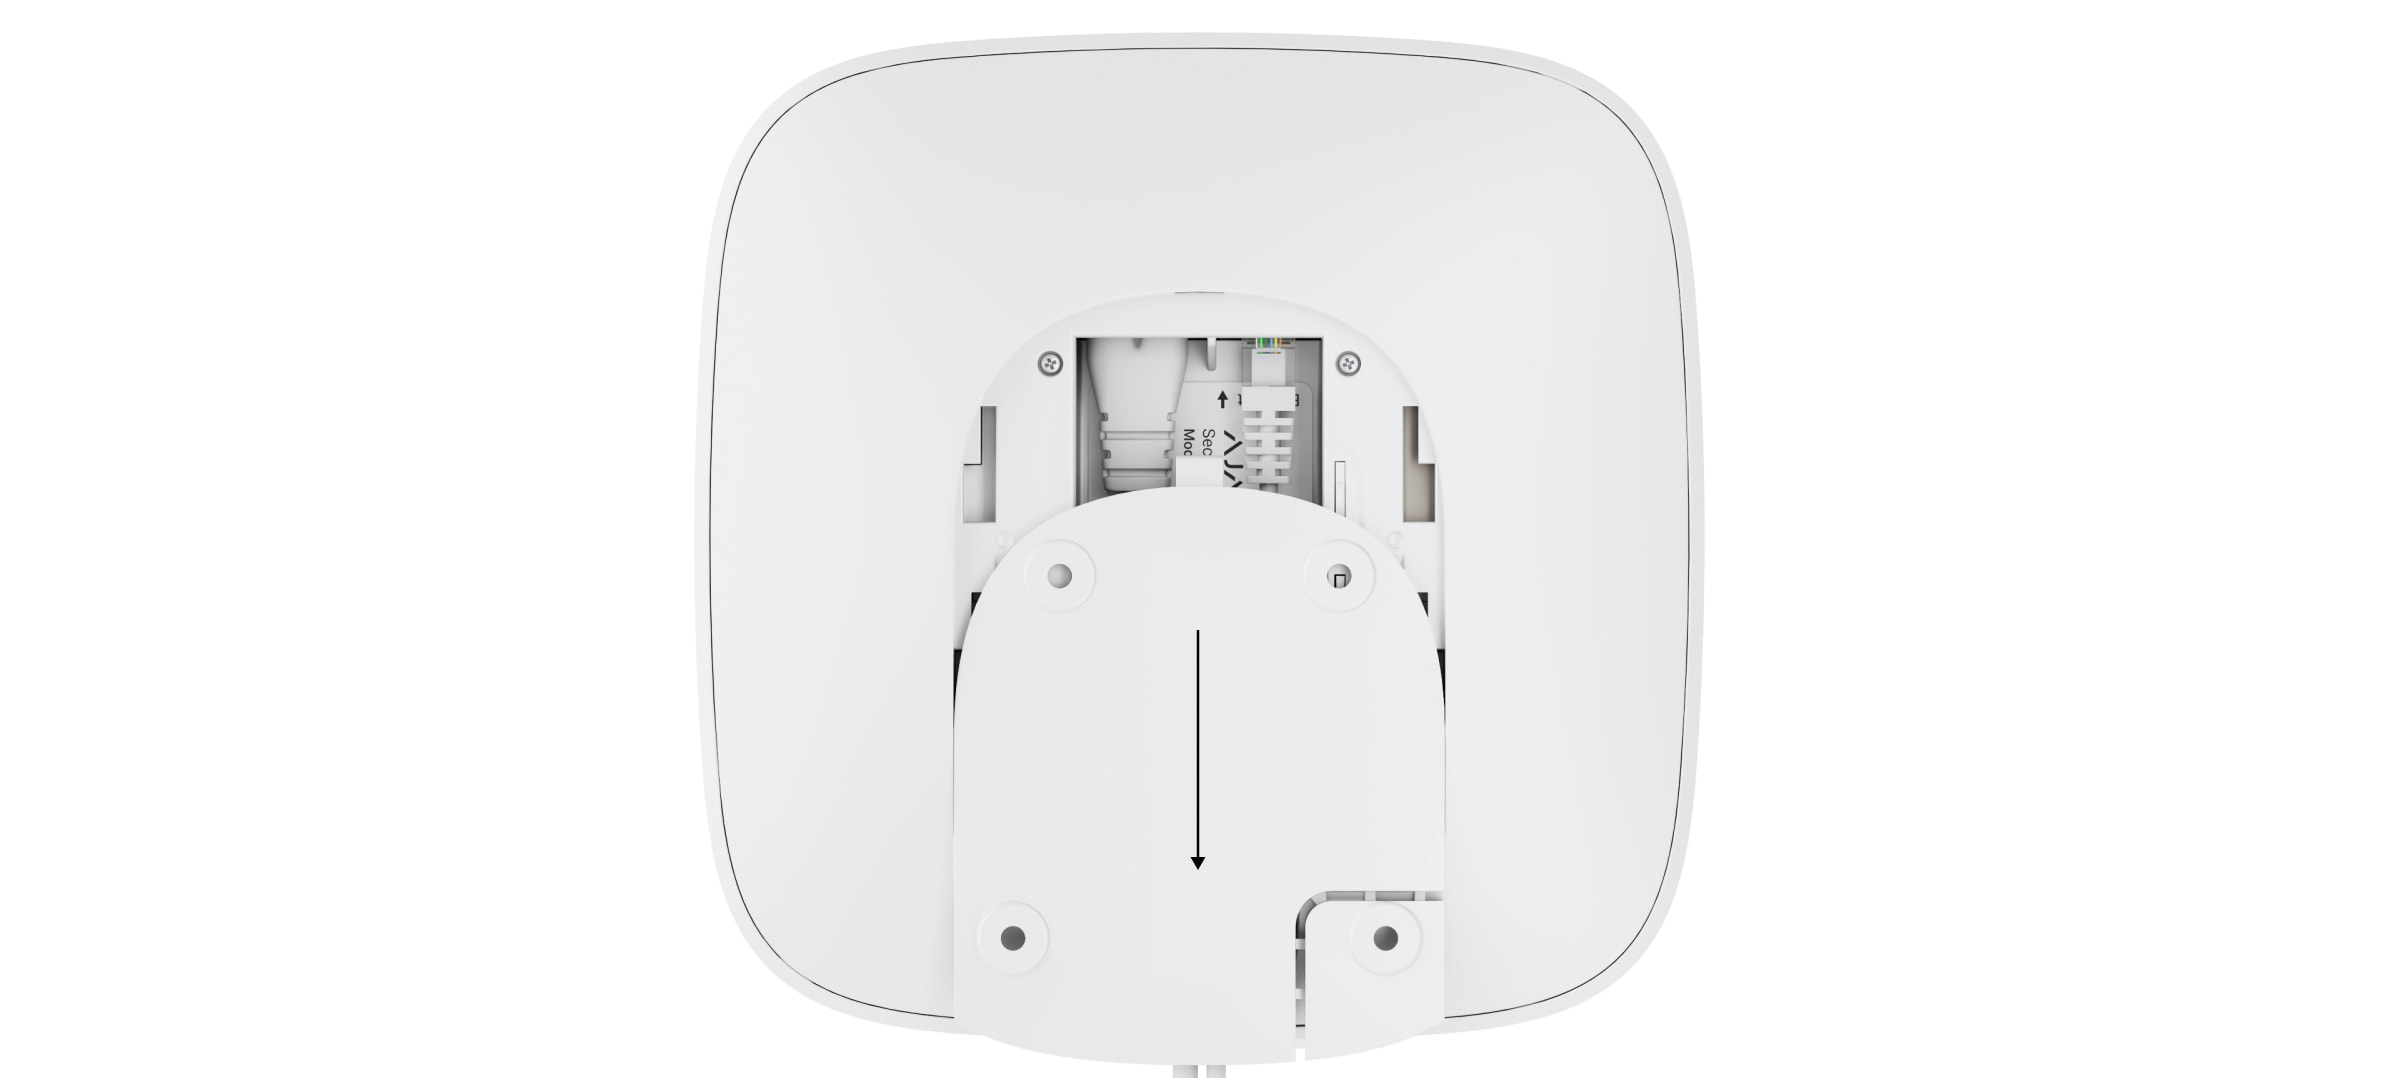
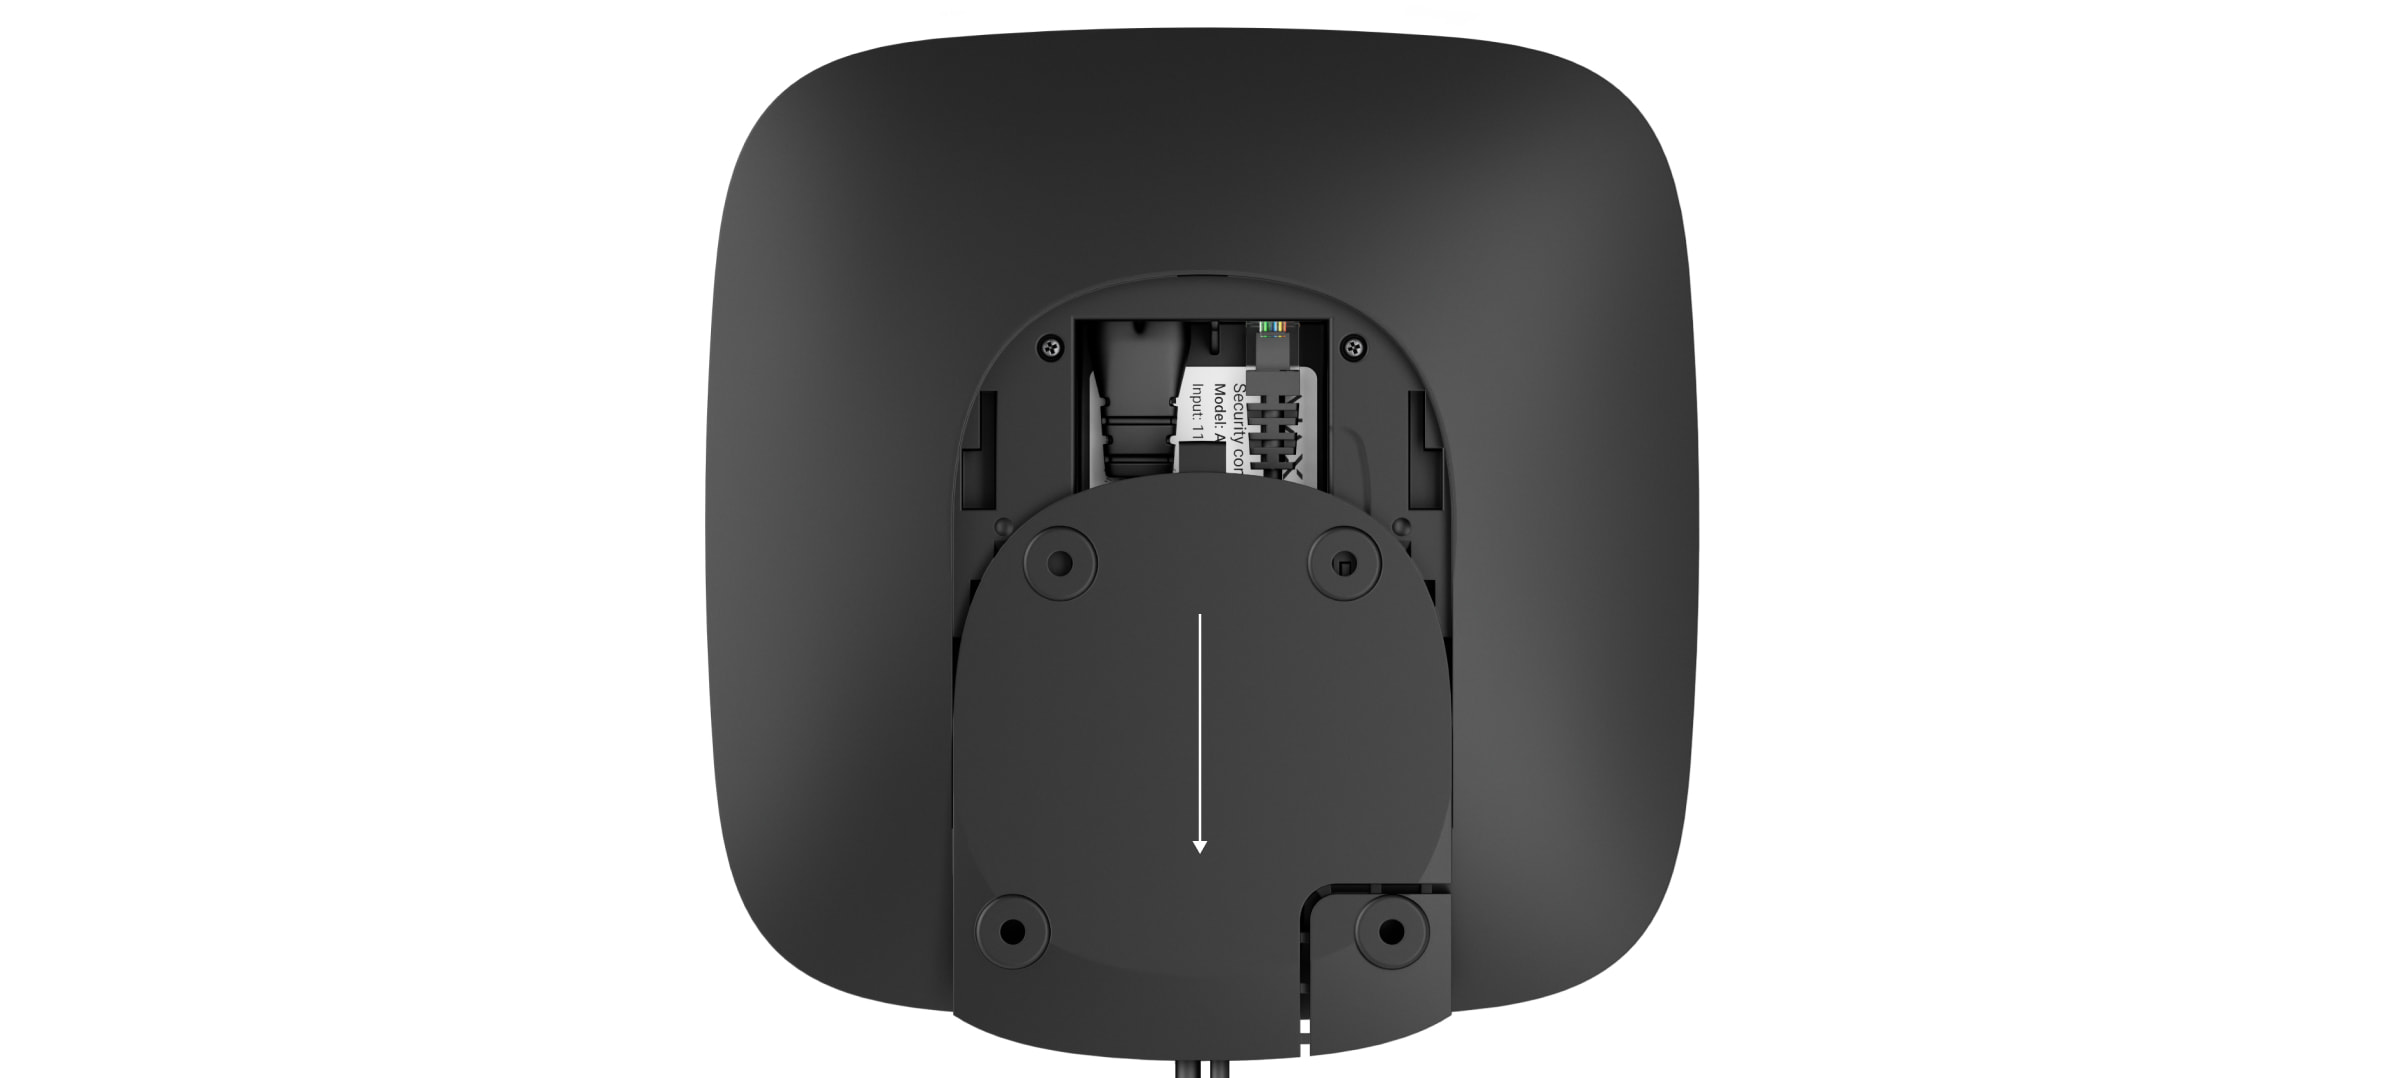
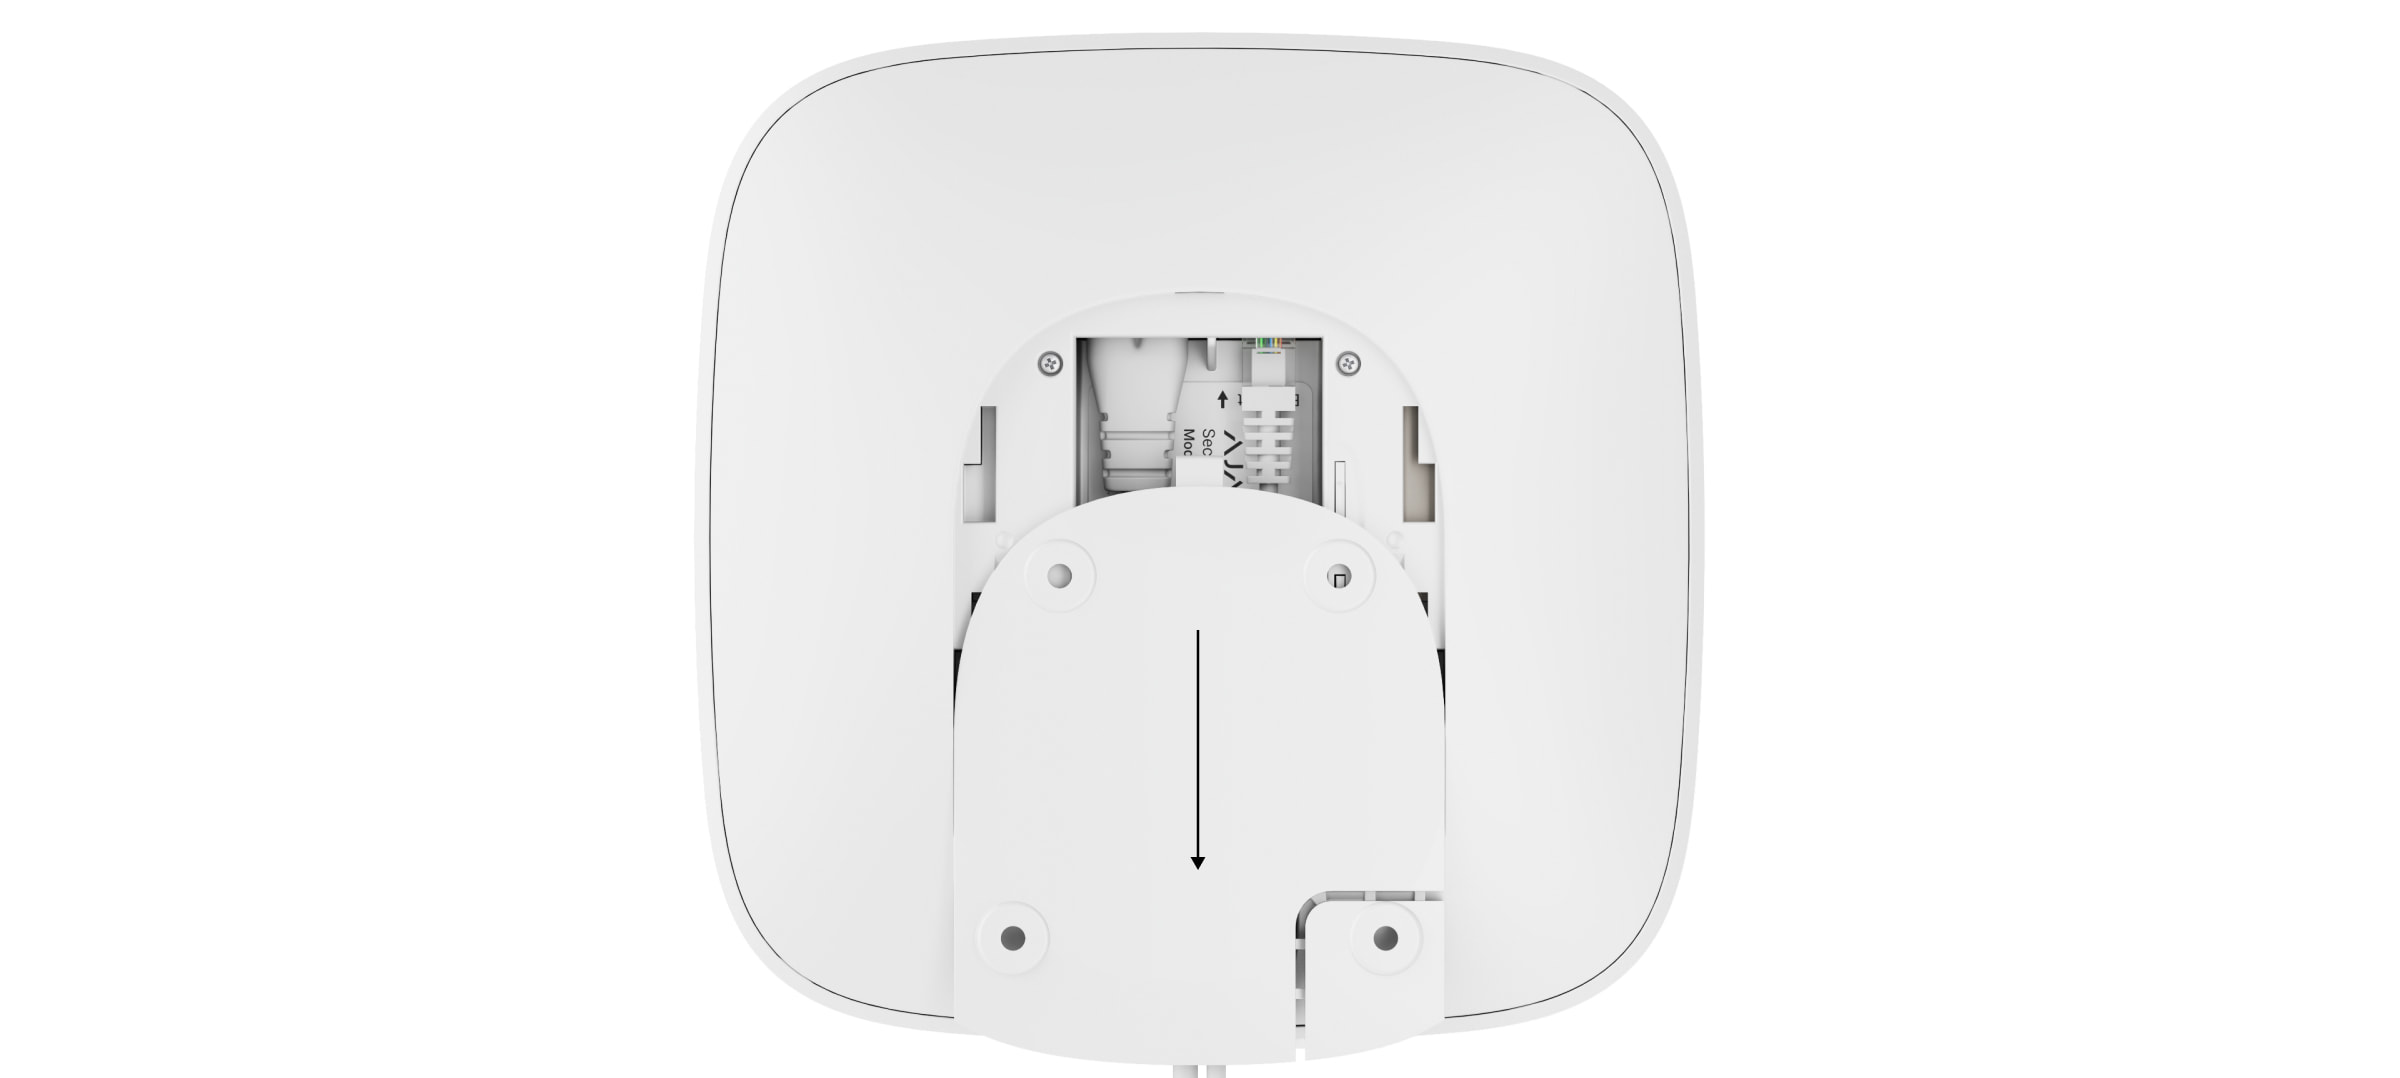
Remove the screws and take off the device from the SmartBracket mounting panel, shifting it down with force.
Switch off the device holding the power button for 2 seconds.
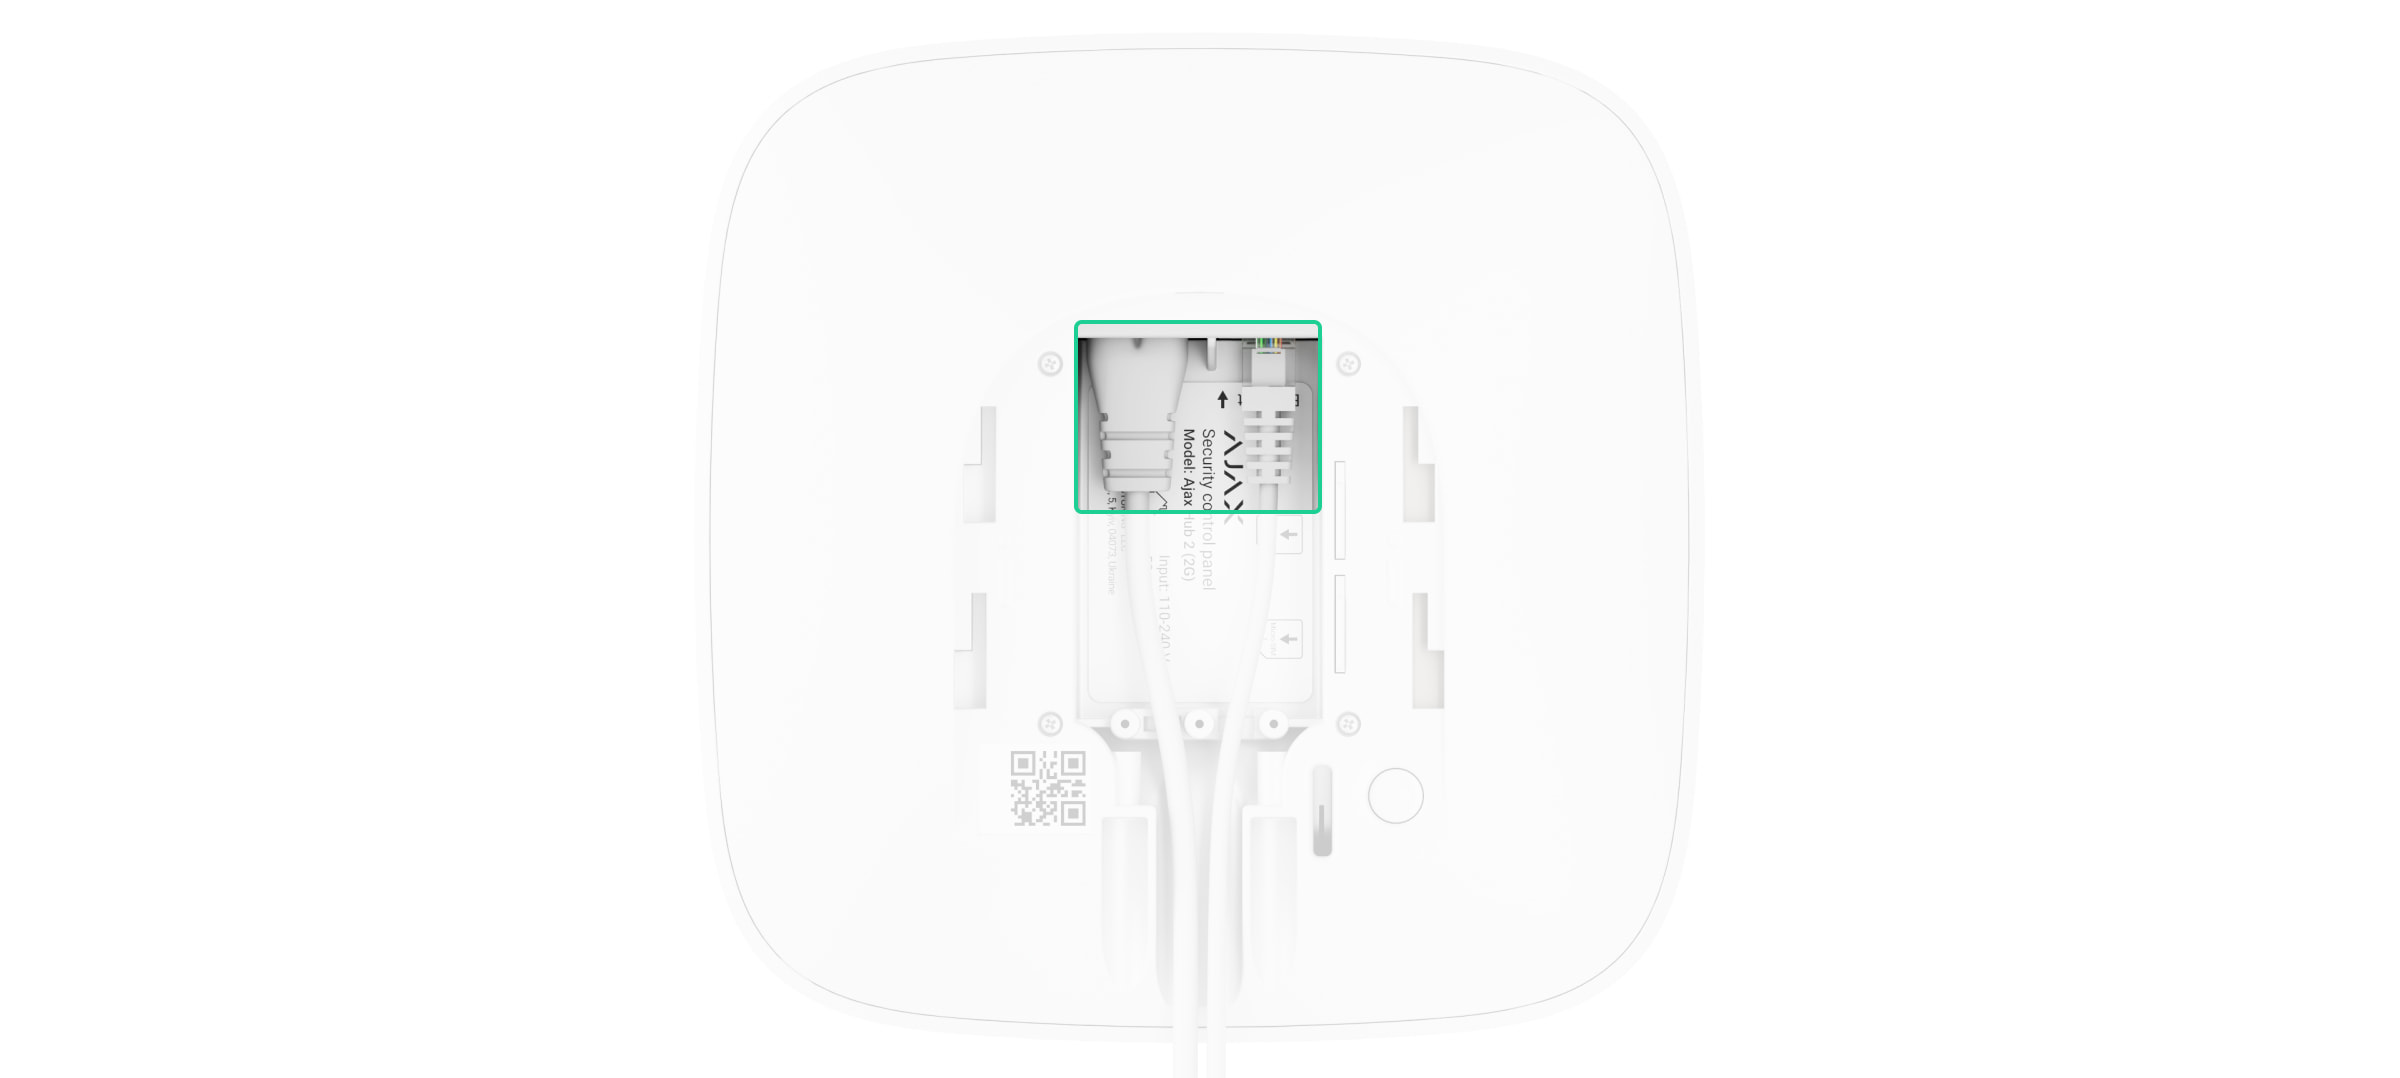
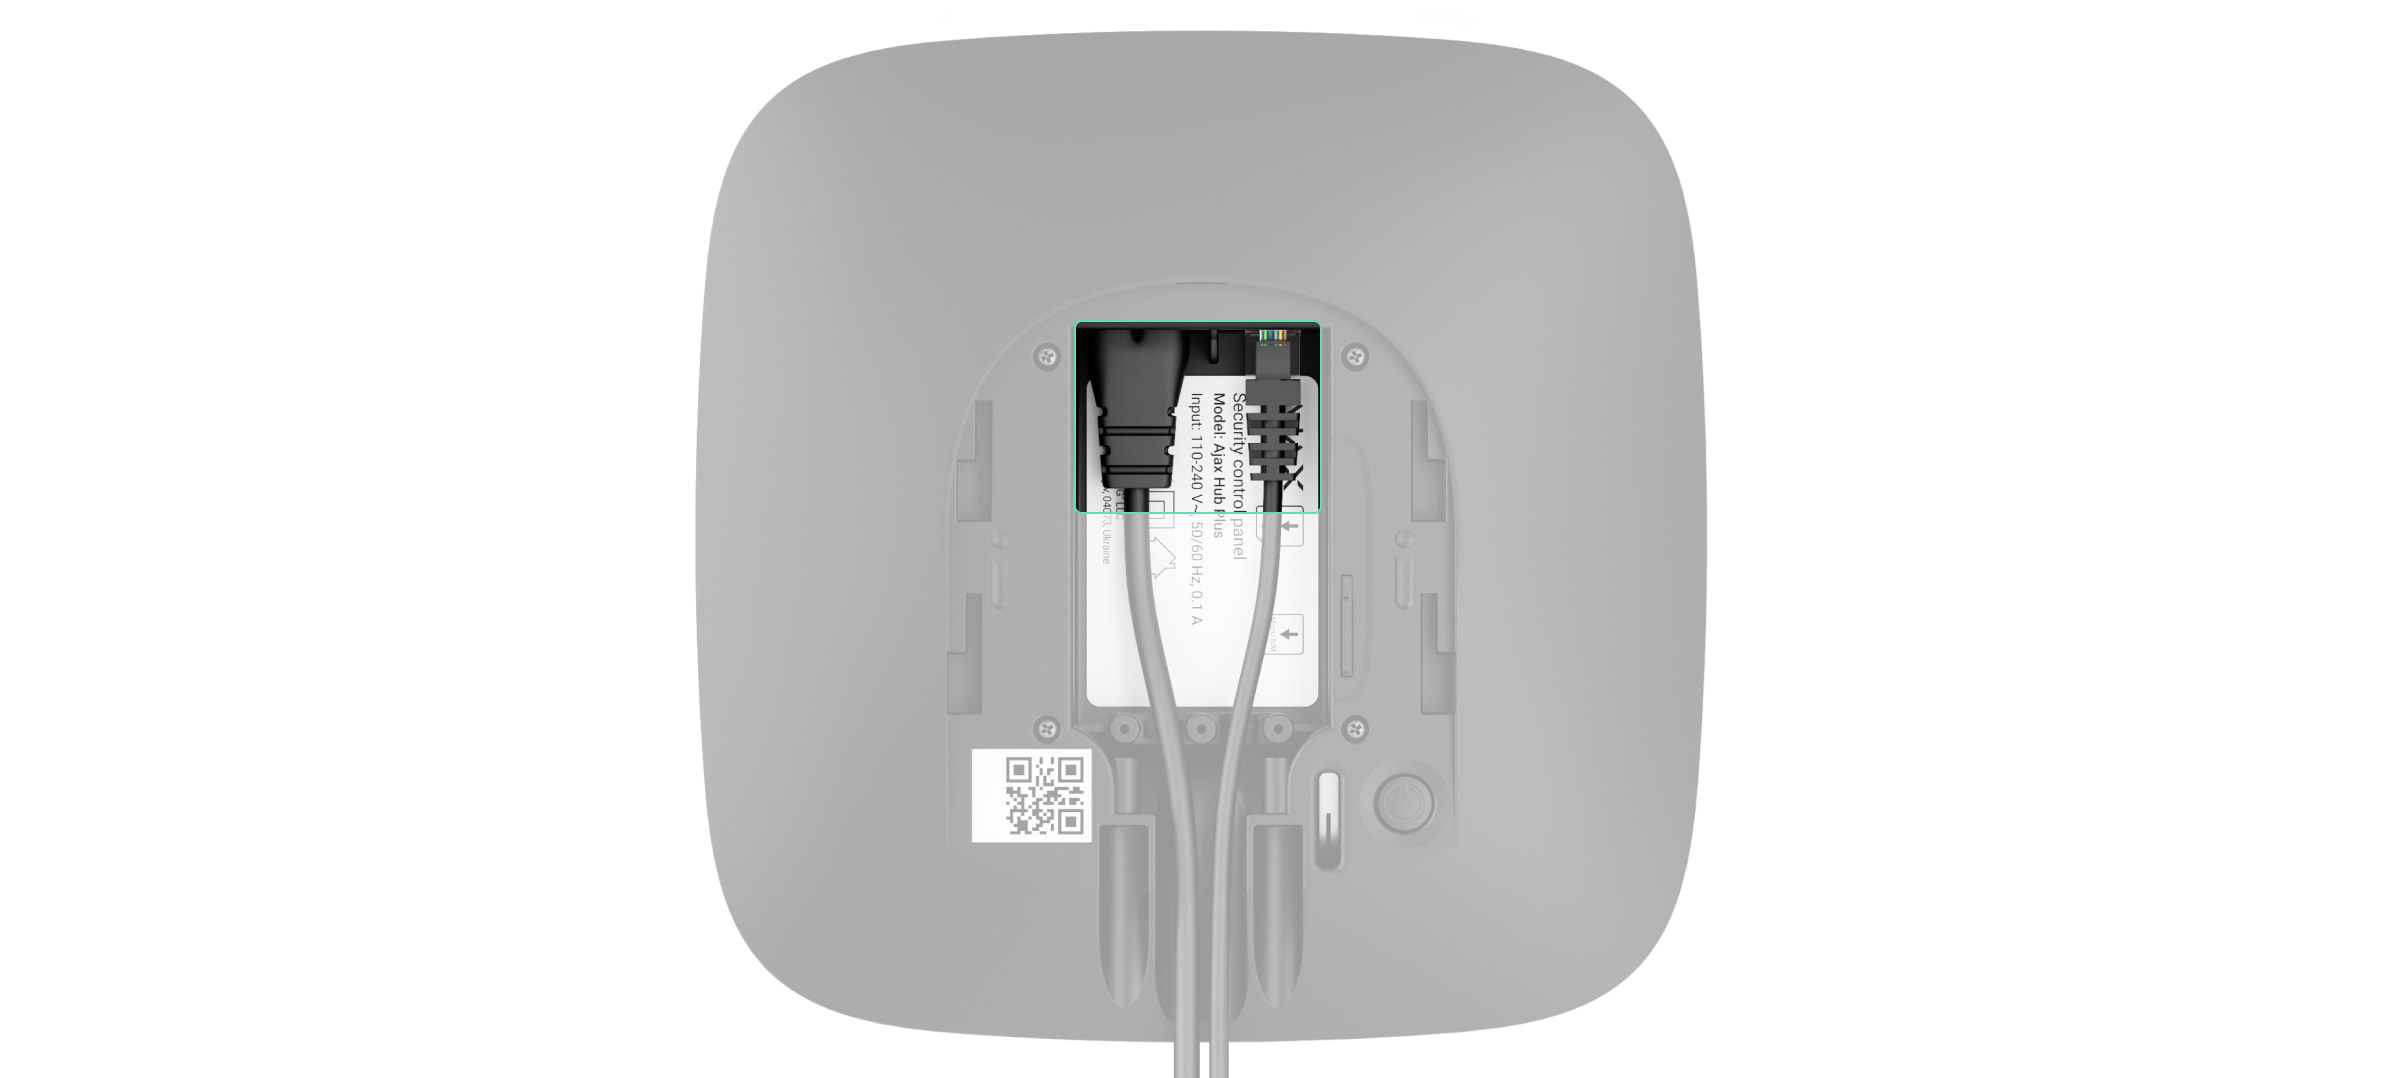
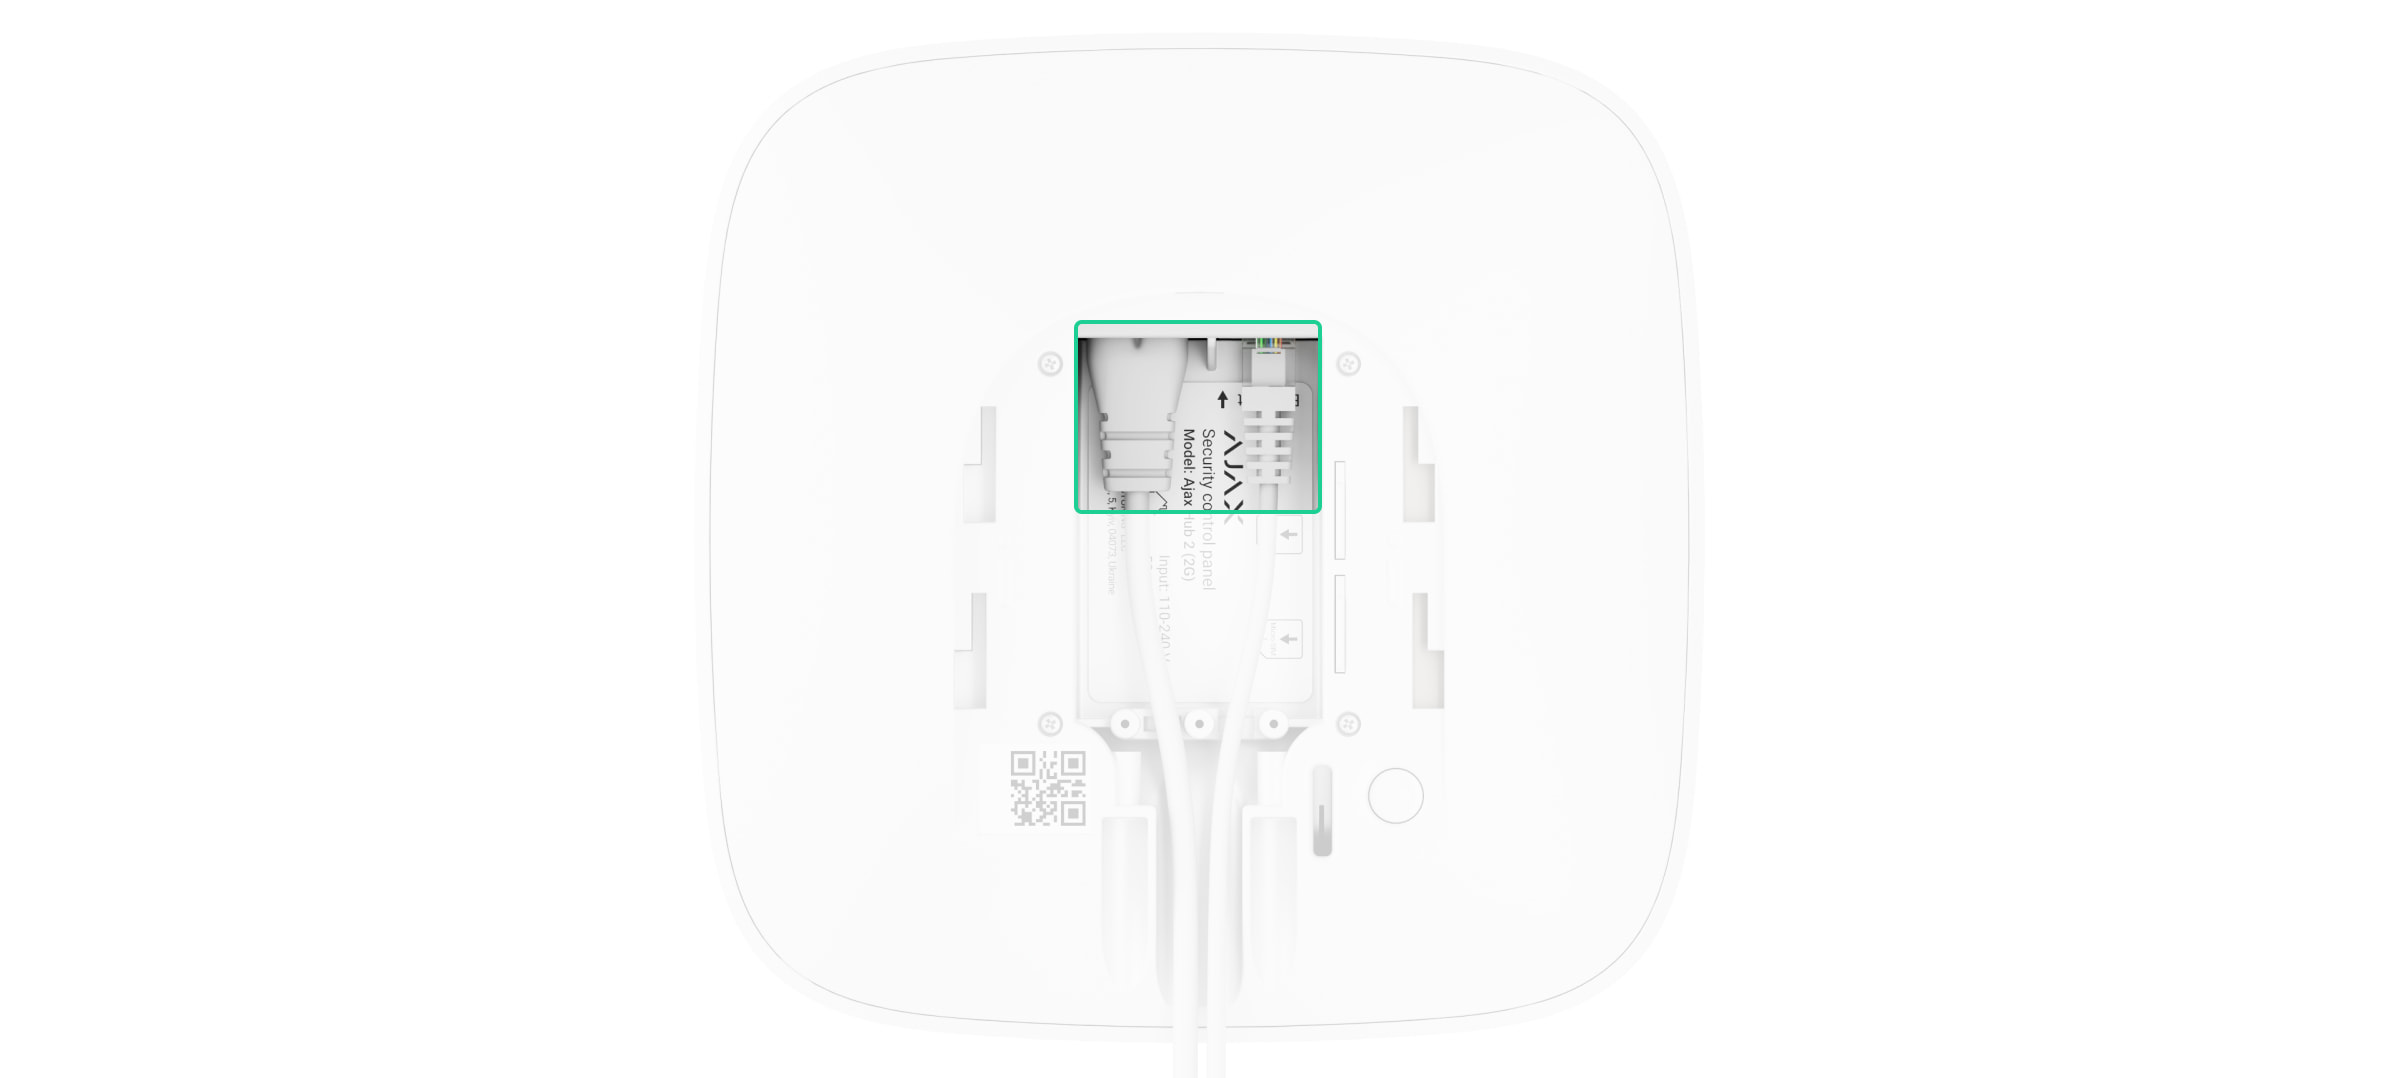
Disconnect power and Ethernet cables.
Wait 5 minutes for the capacitors to discharge.
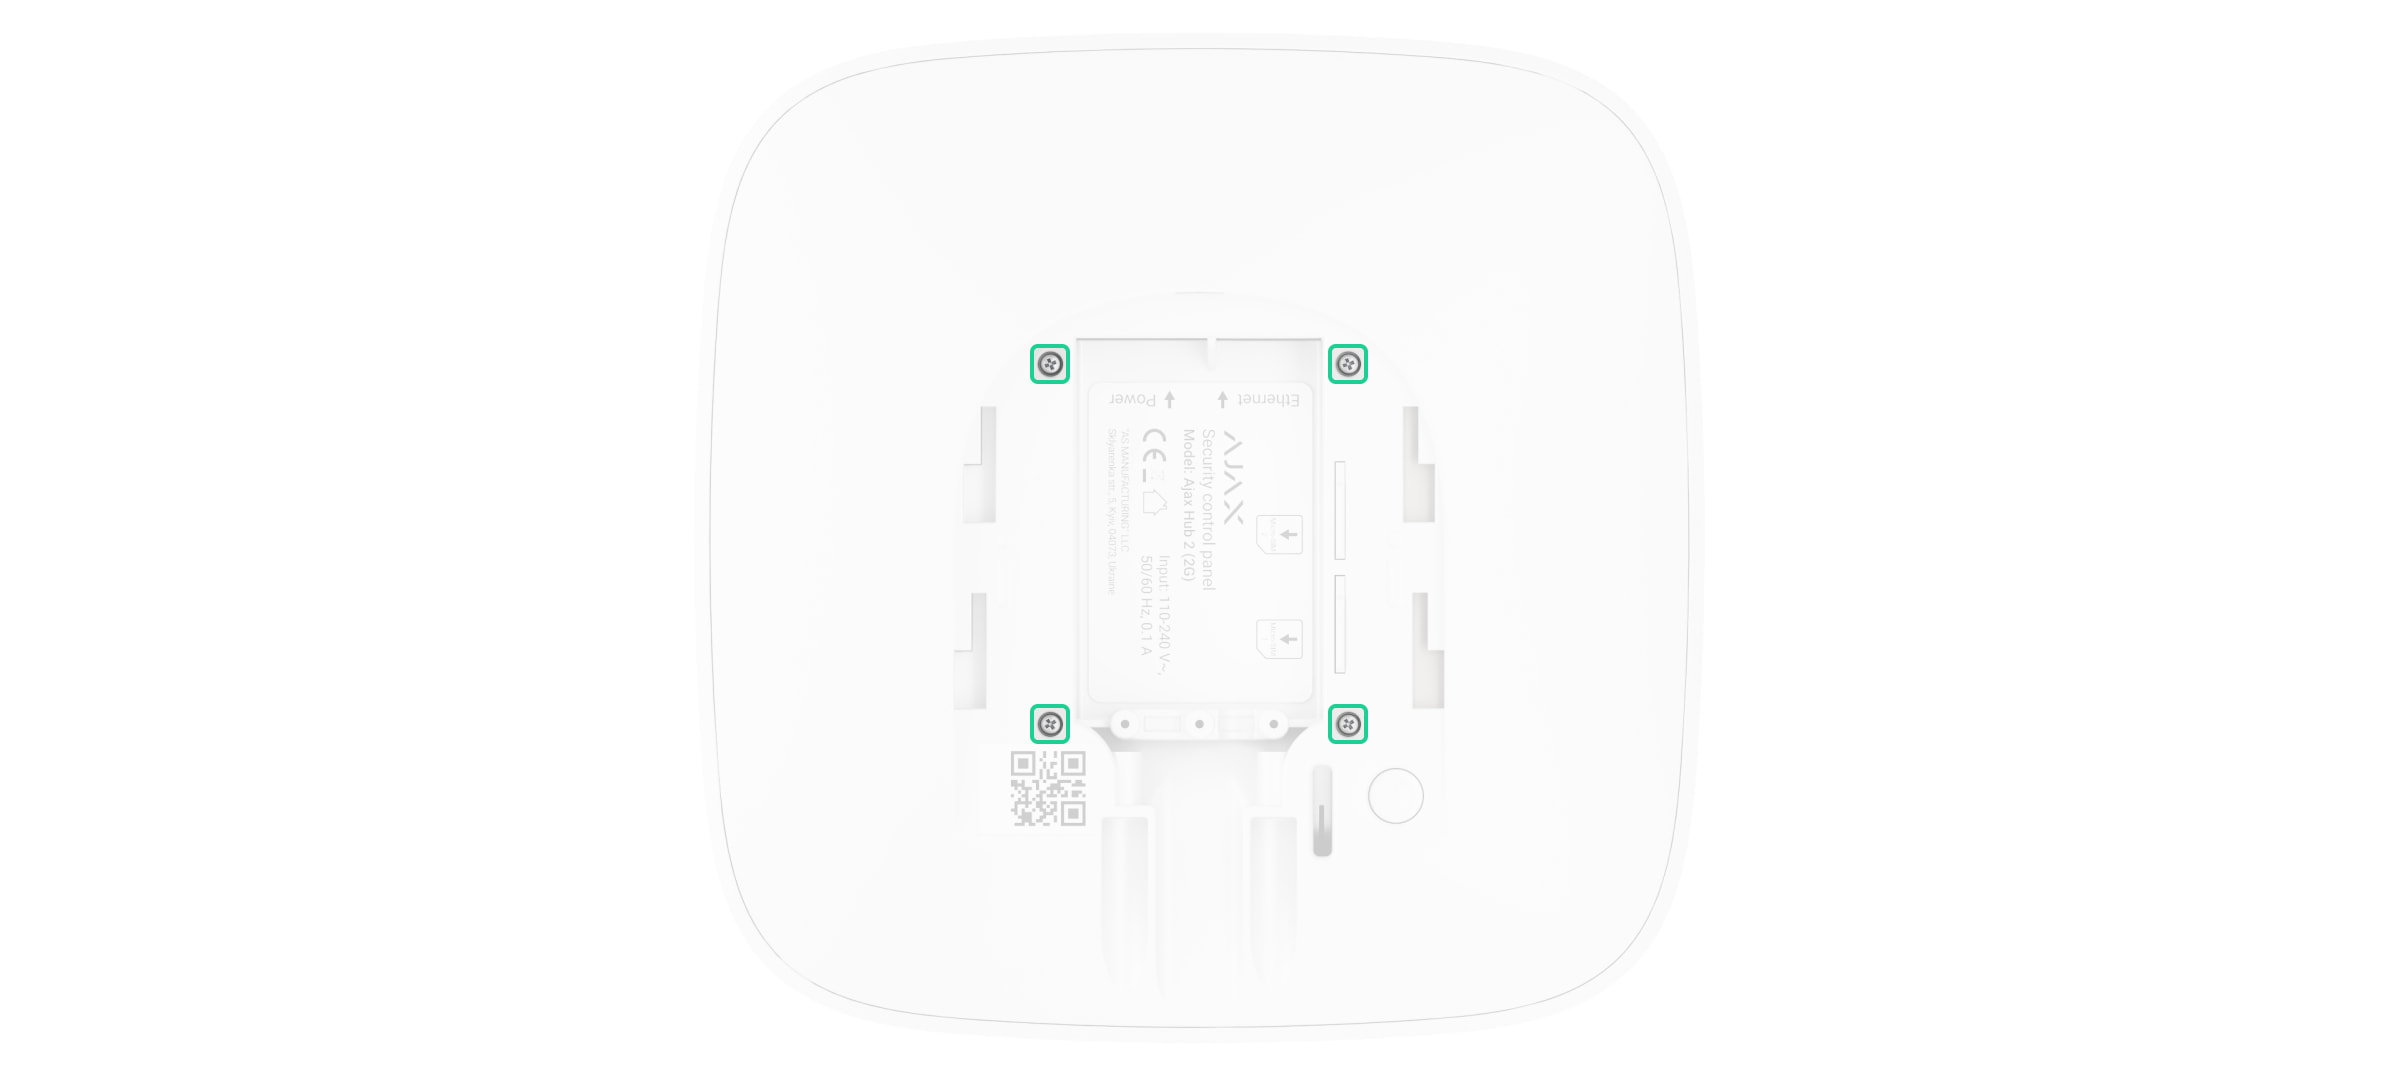
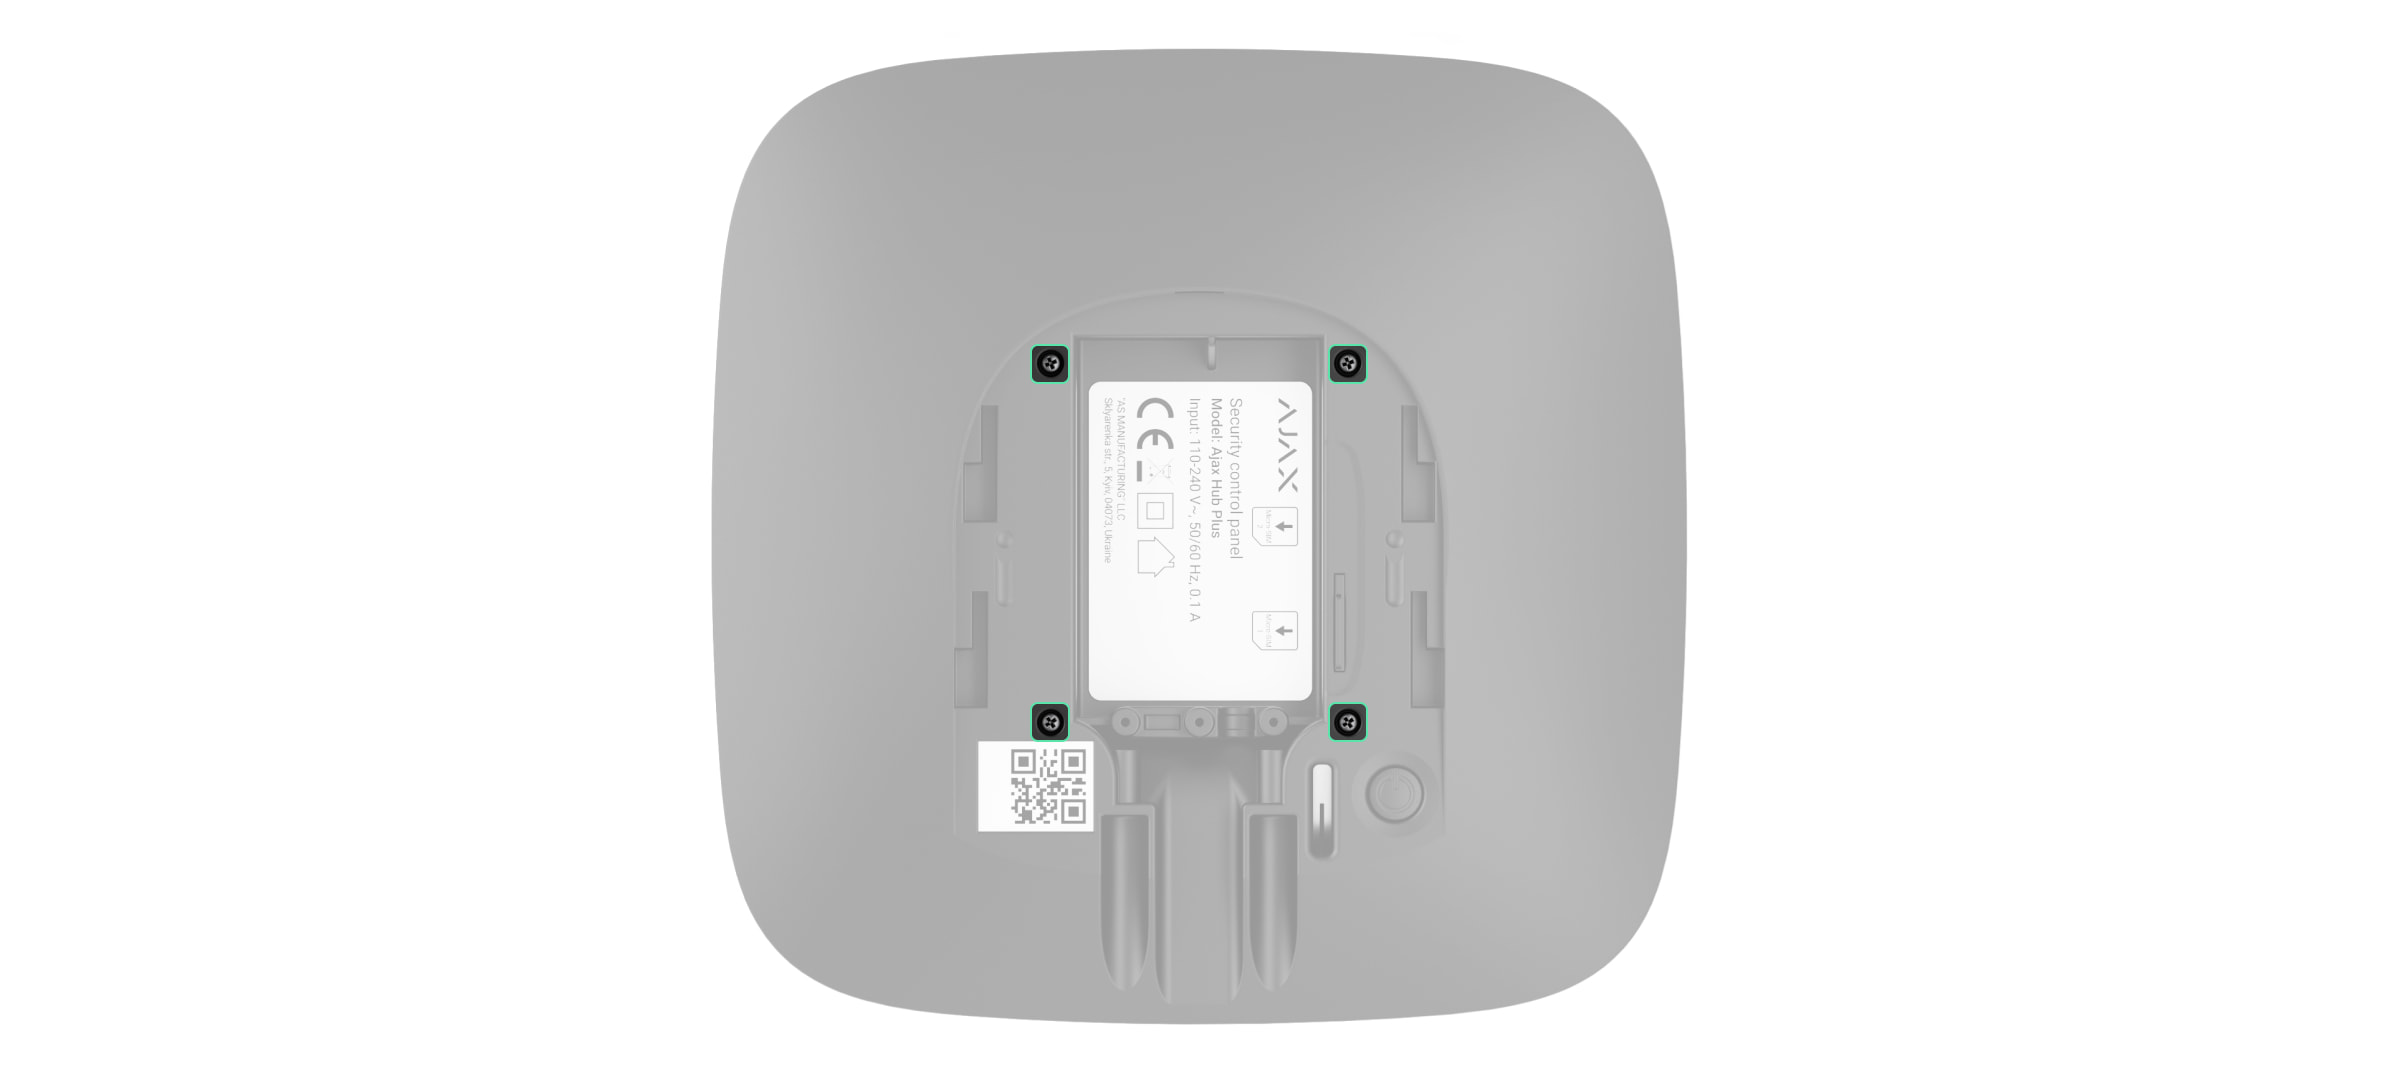
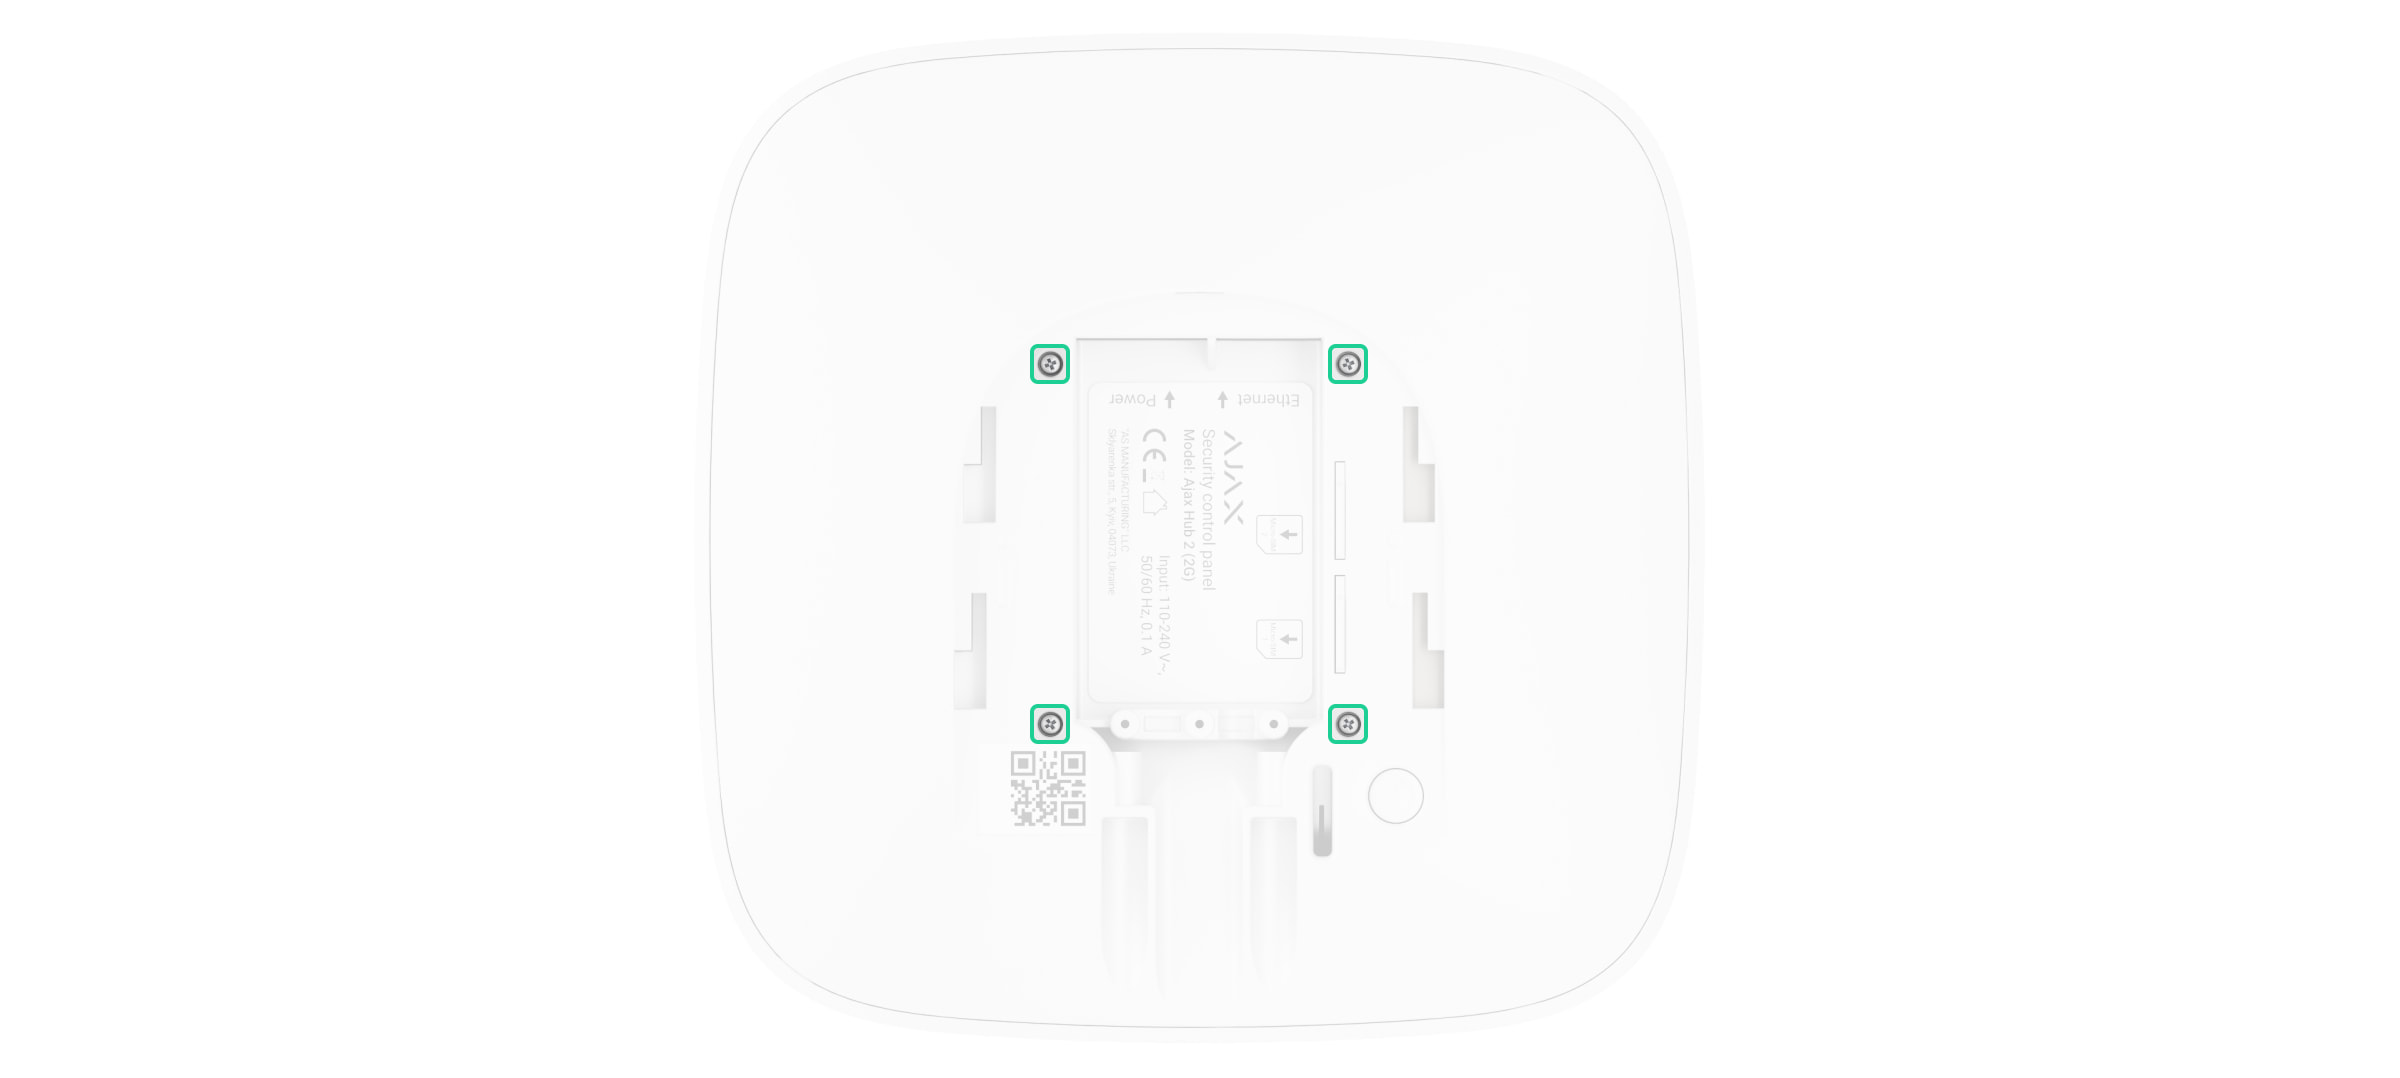
Remove four screws of the back lid and take it off.
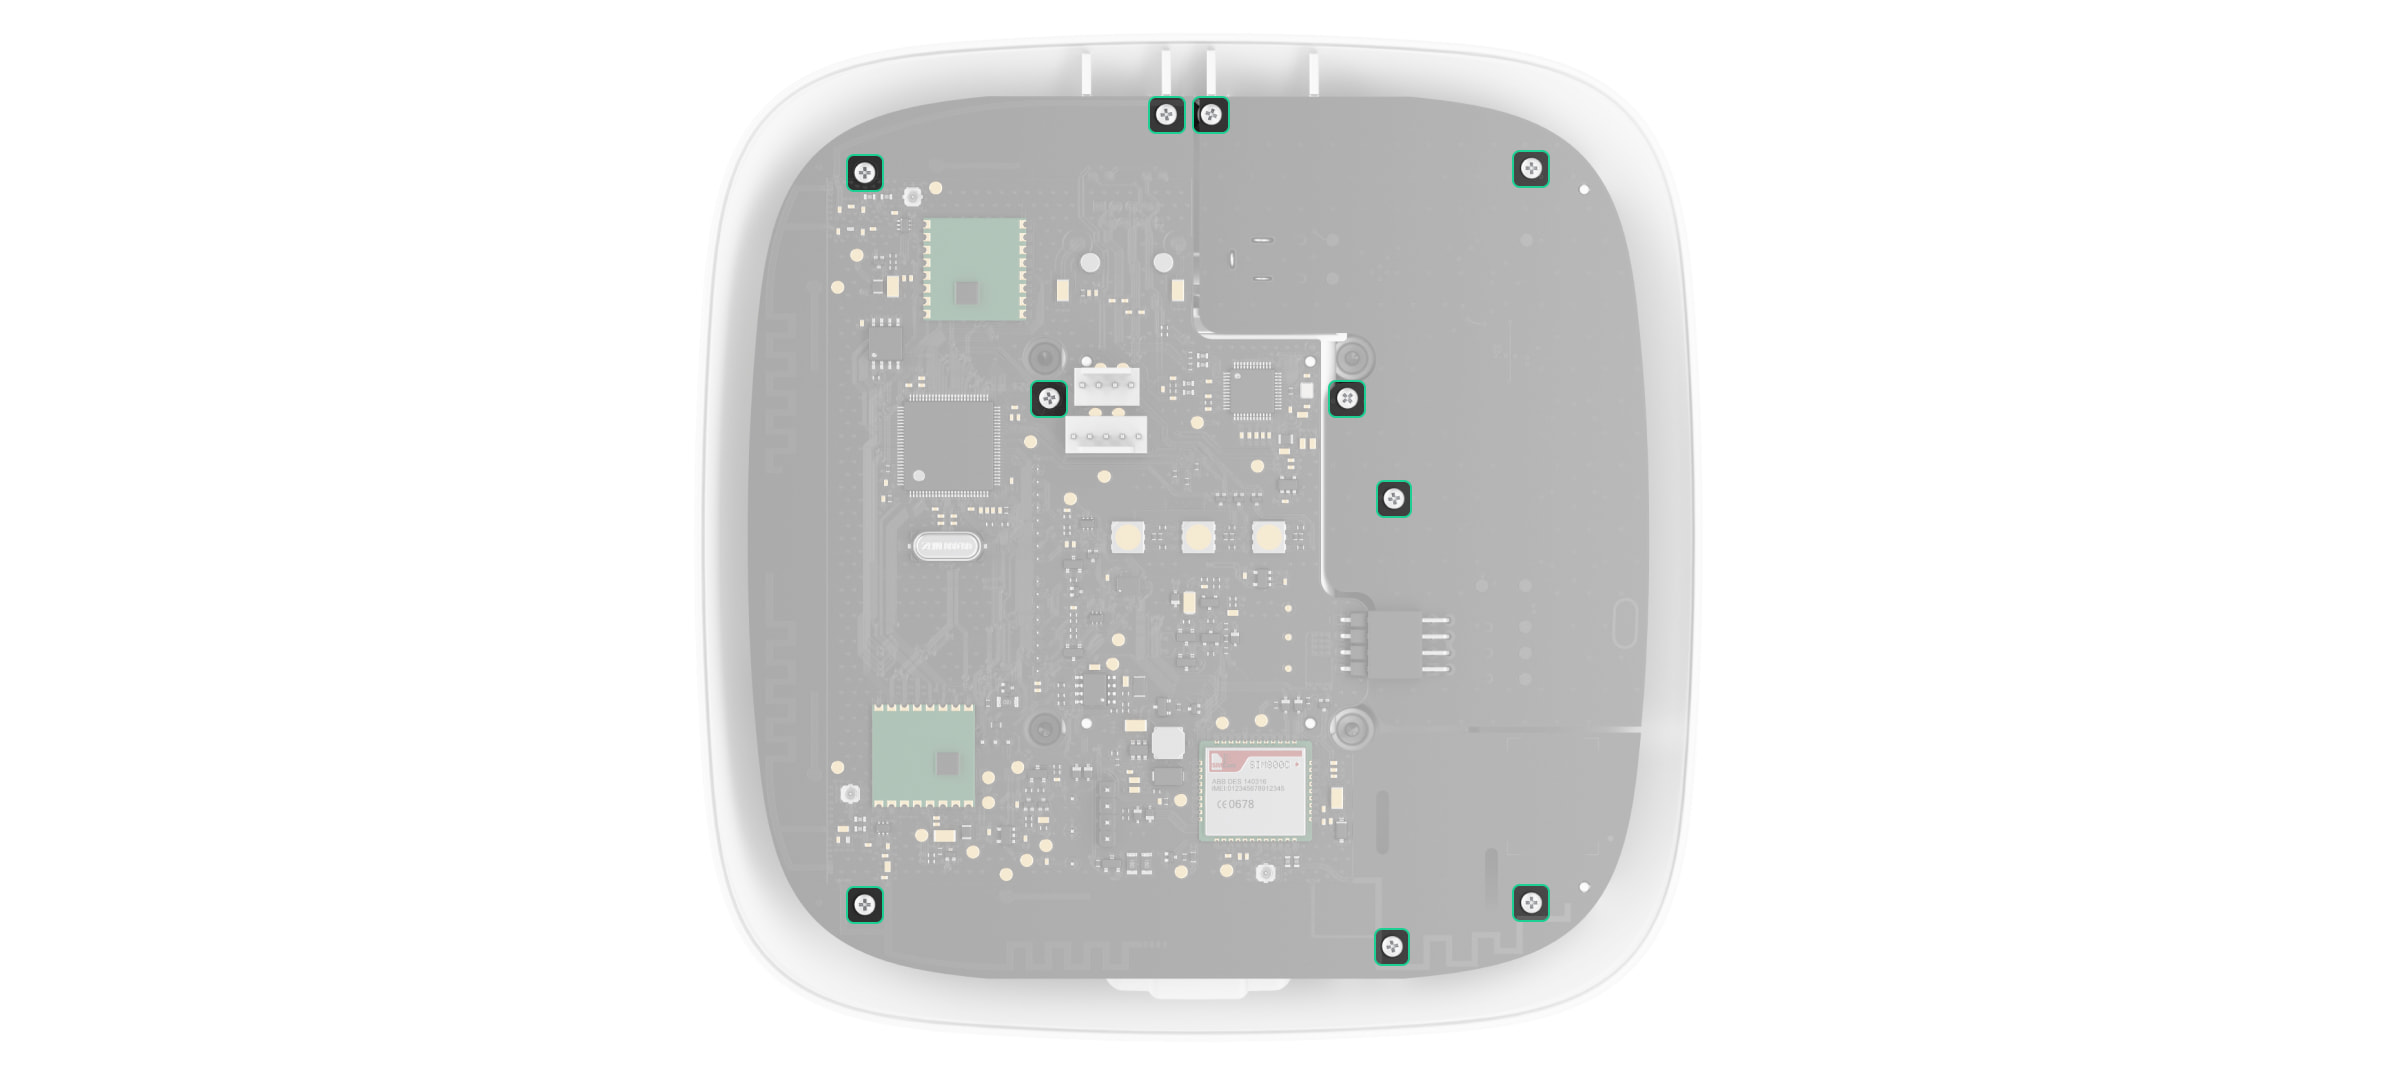
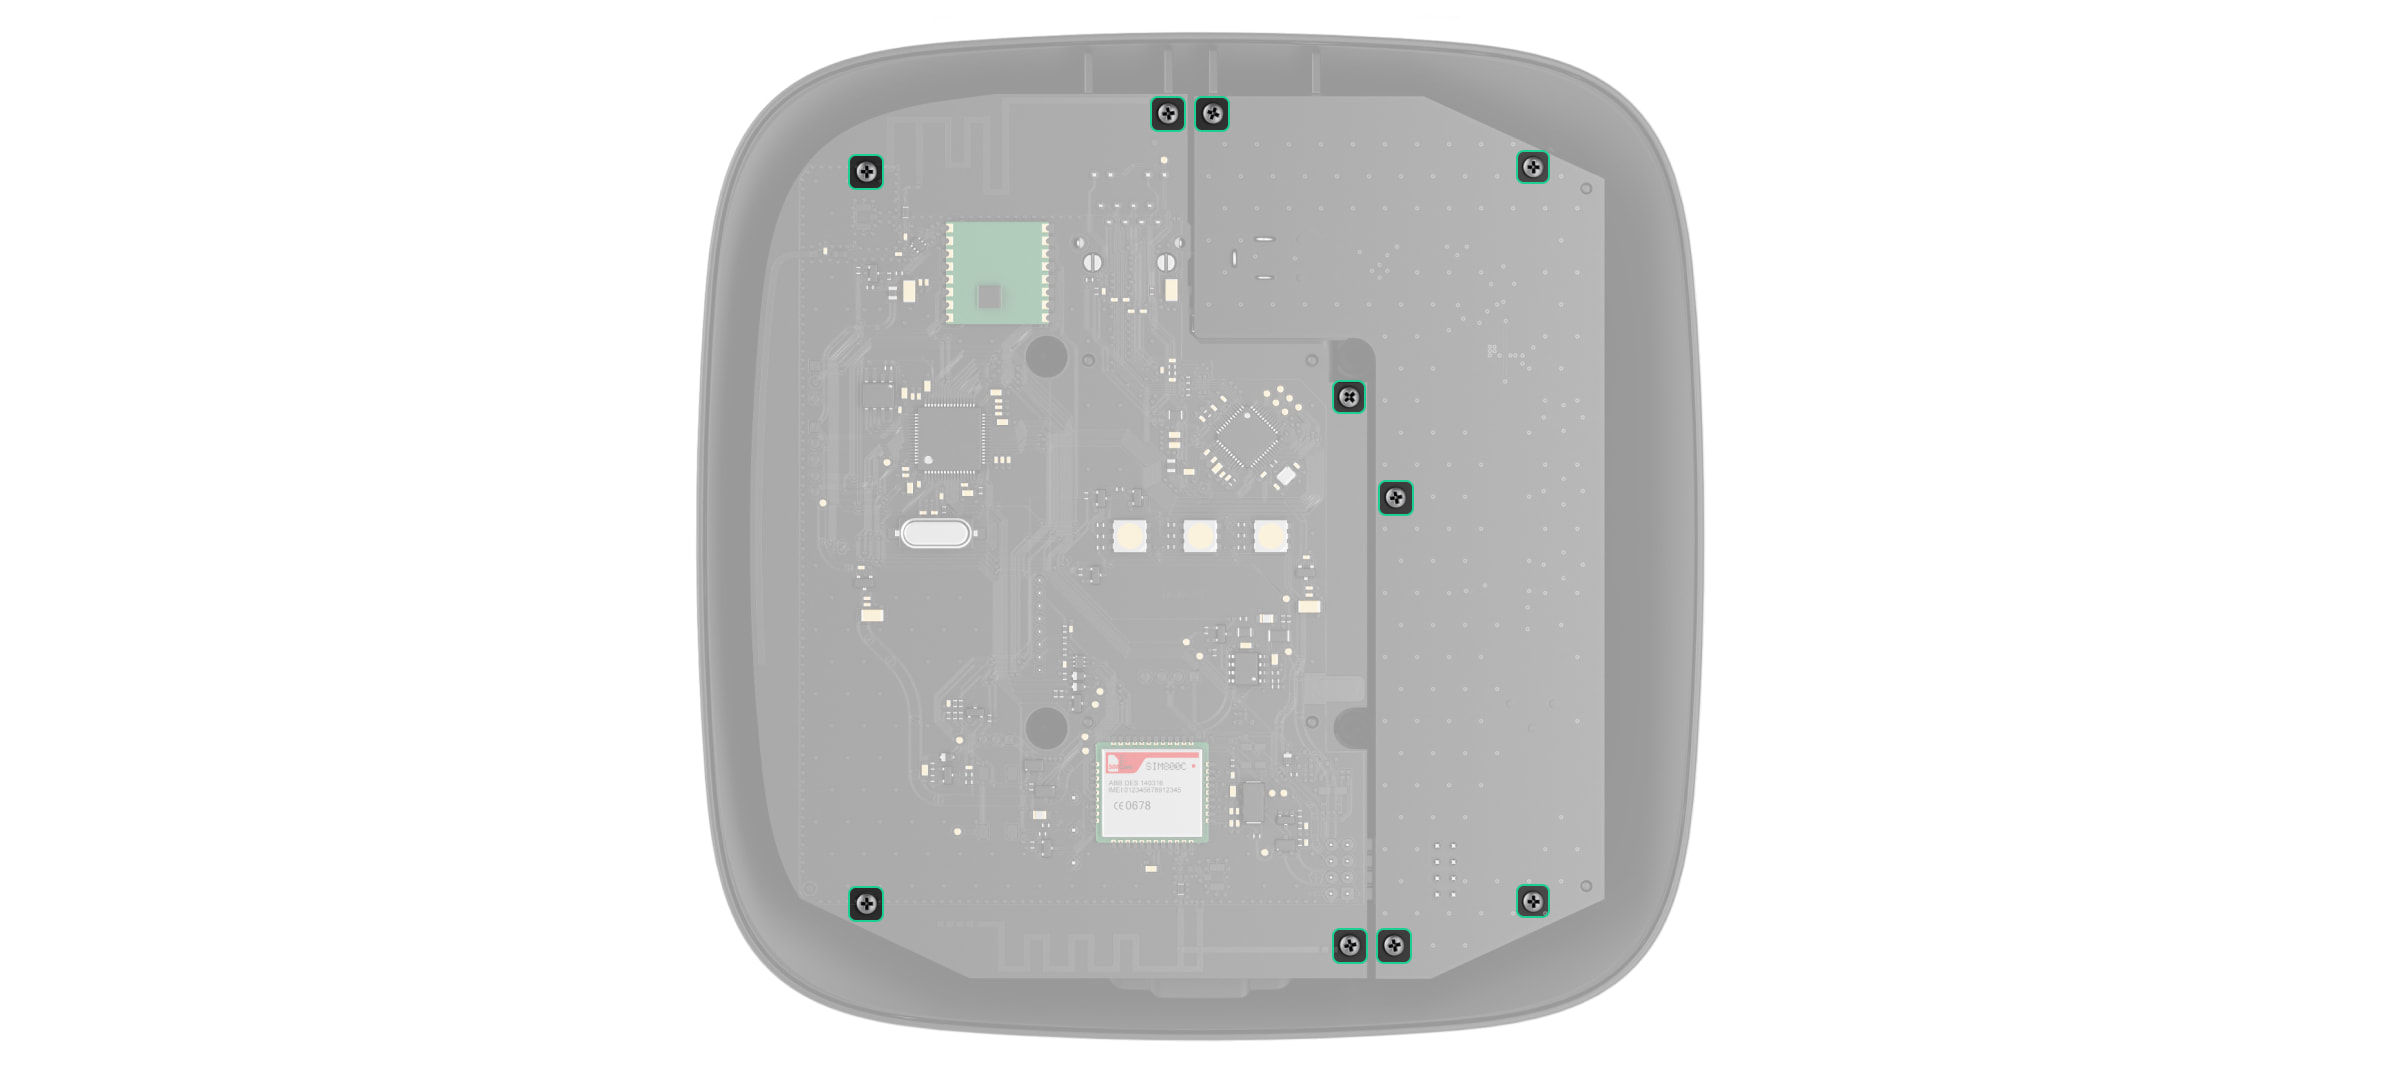
Remove the screws attaching the boards to the device body.
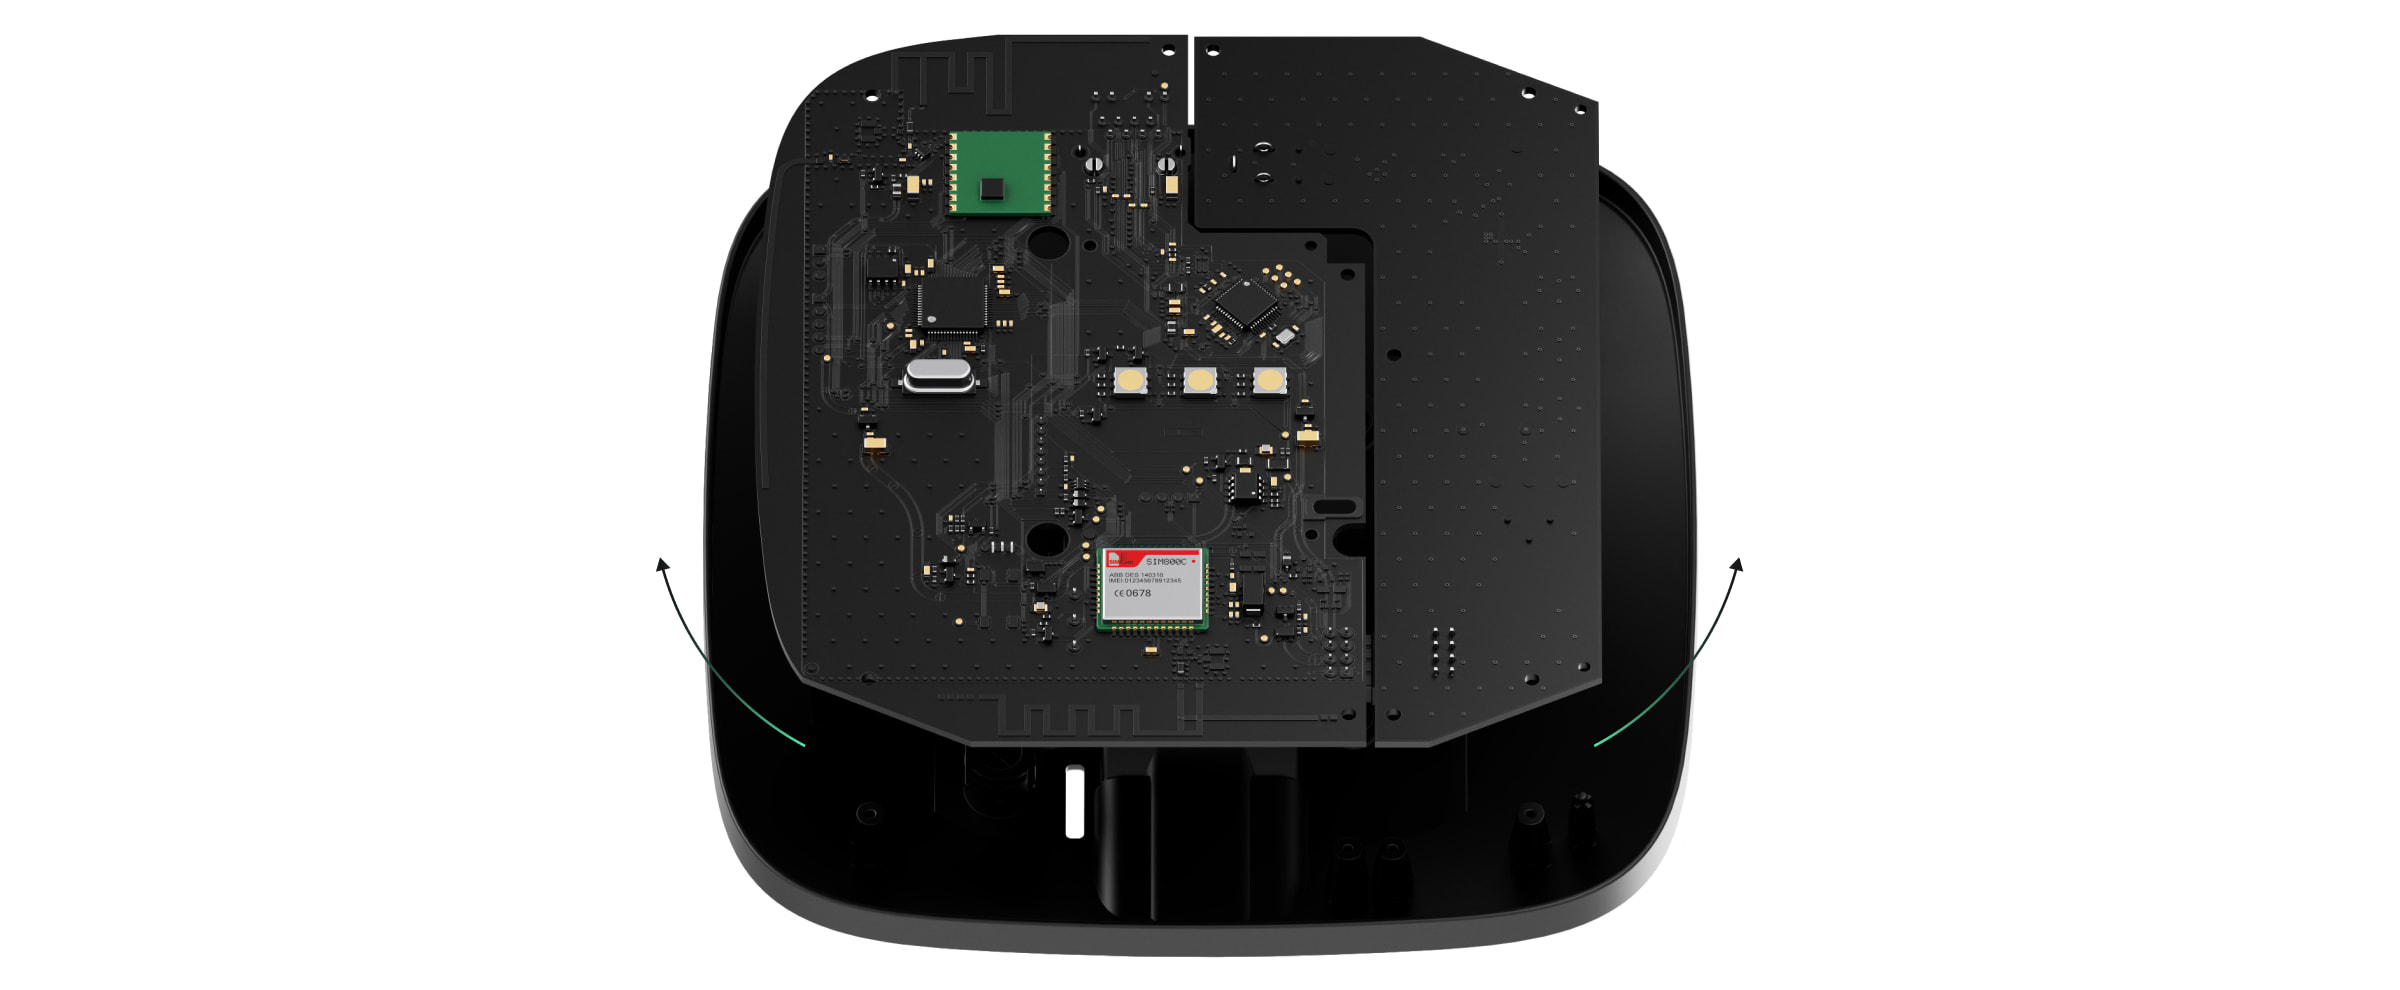
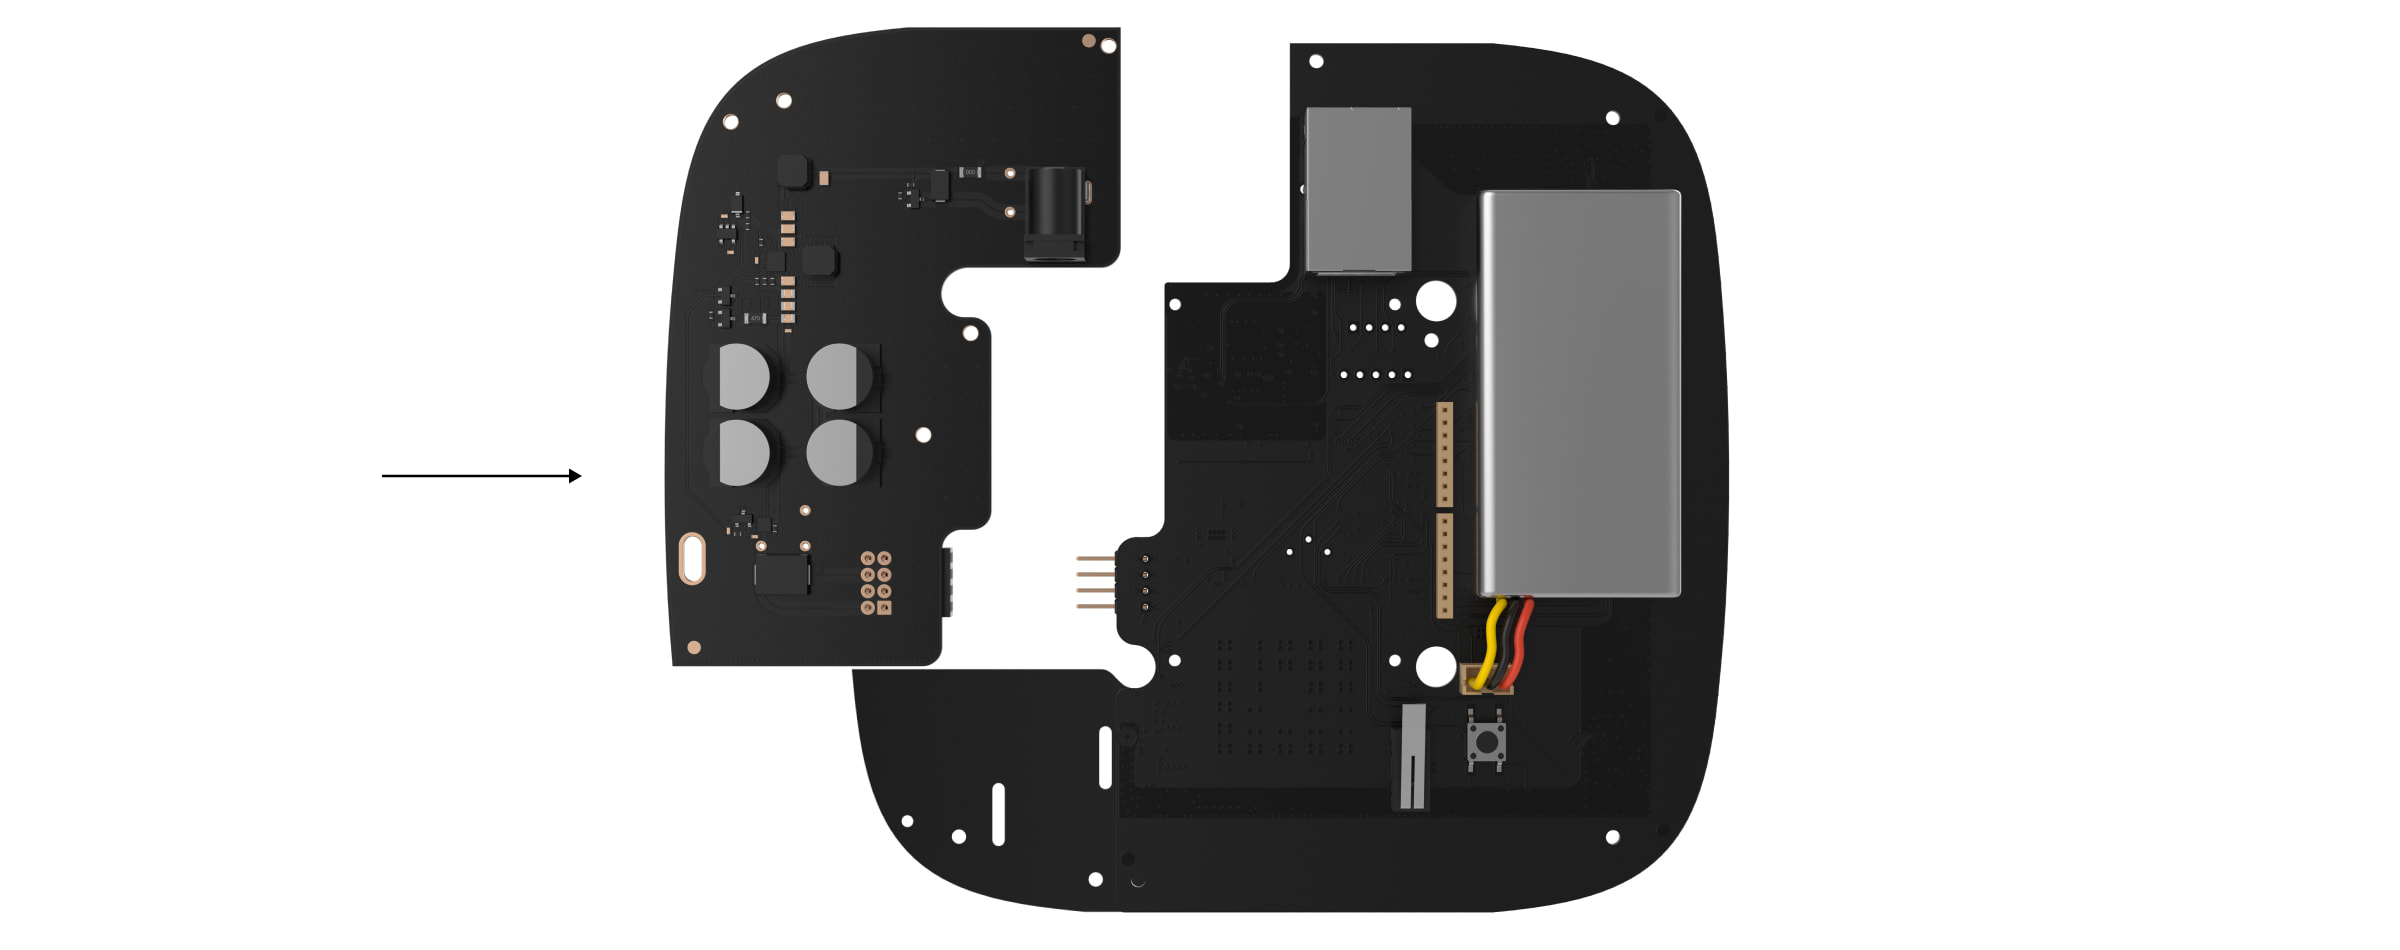
Carefully remove both boards, keeping them in the same plane and not disconnecting them. There is a connector between boards: do not break it.
Disconnect the power supply unit (smaller board) from the mainboard.
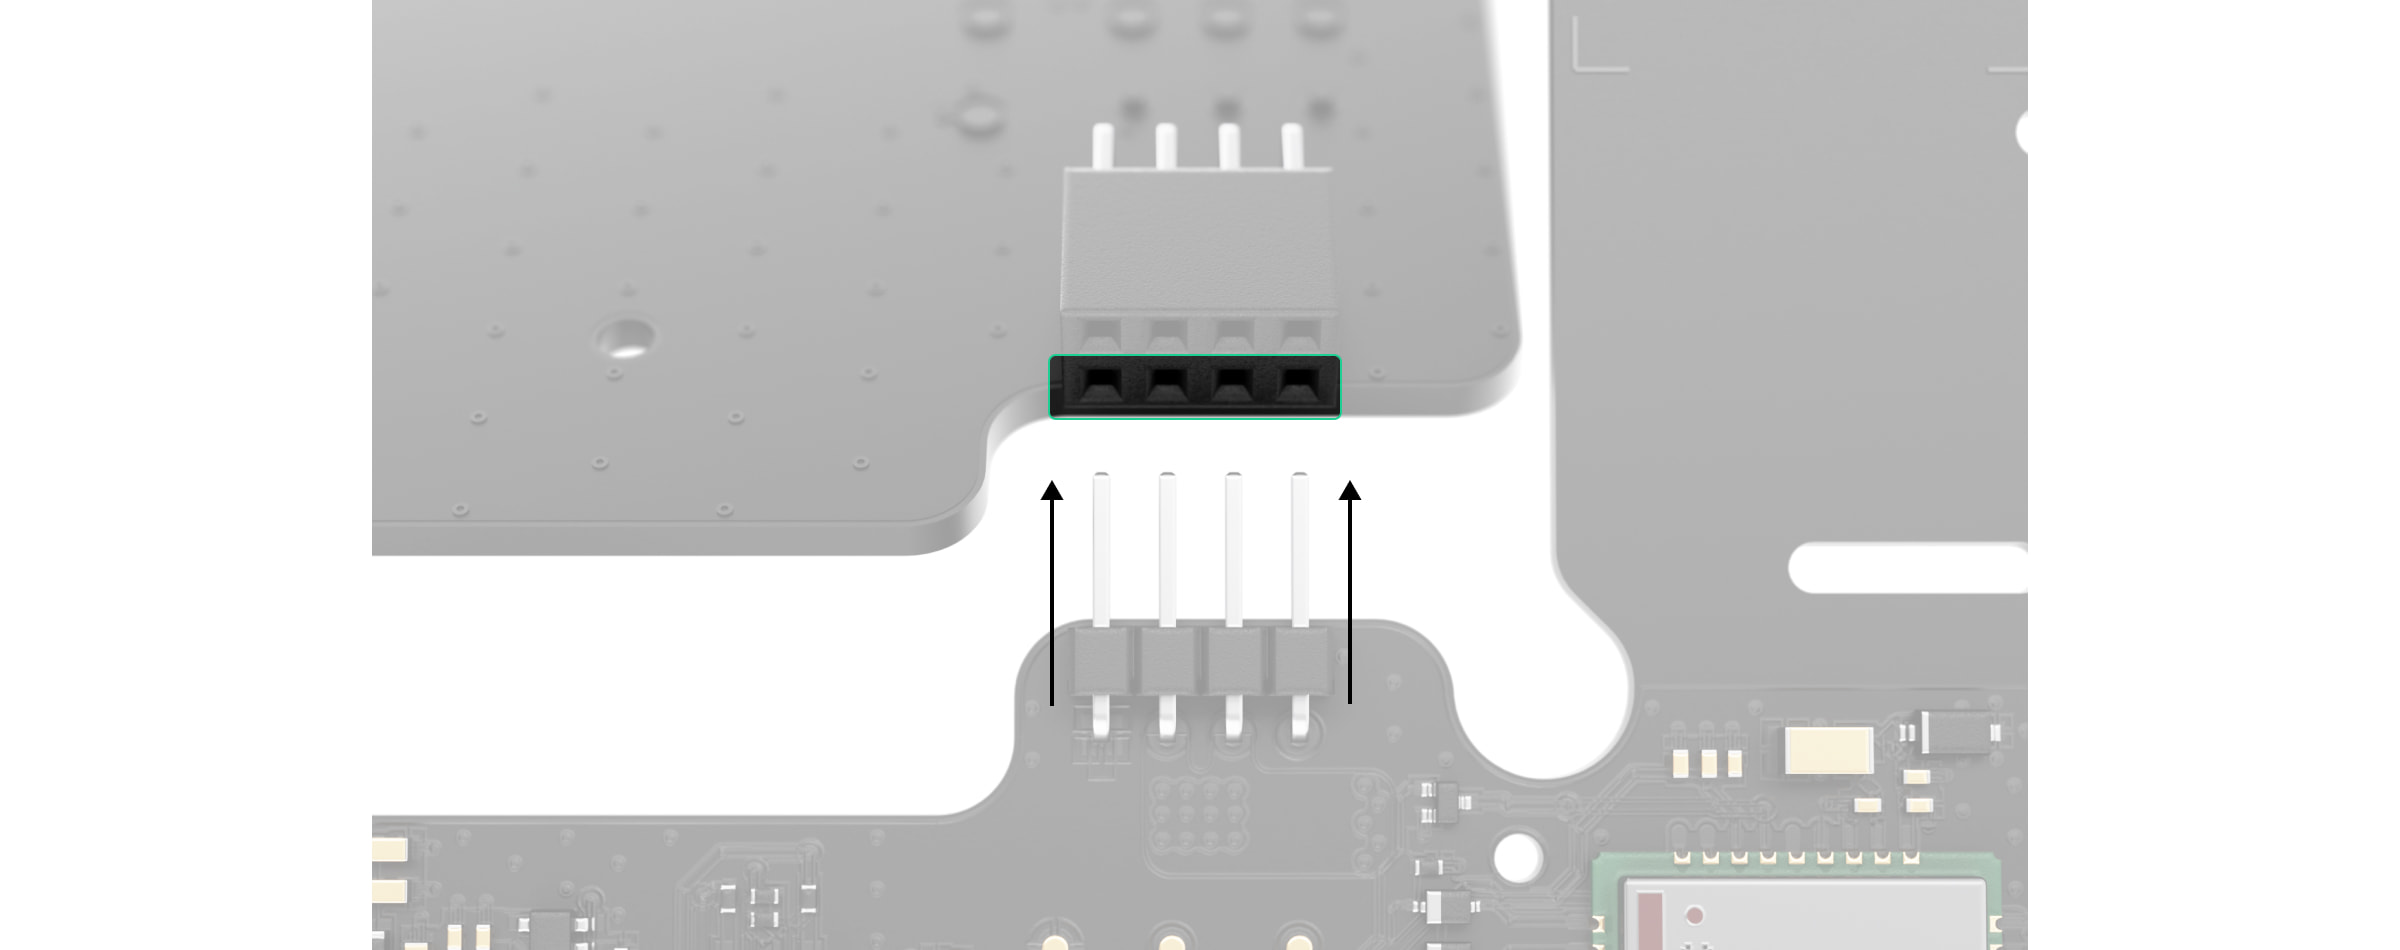
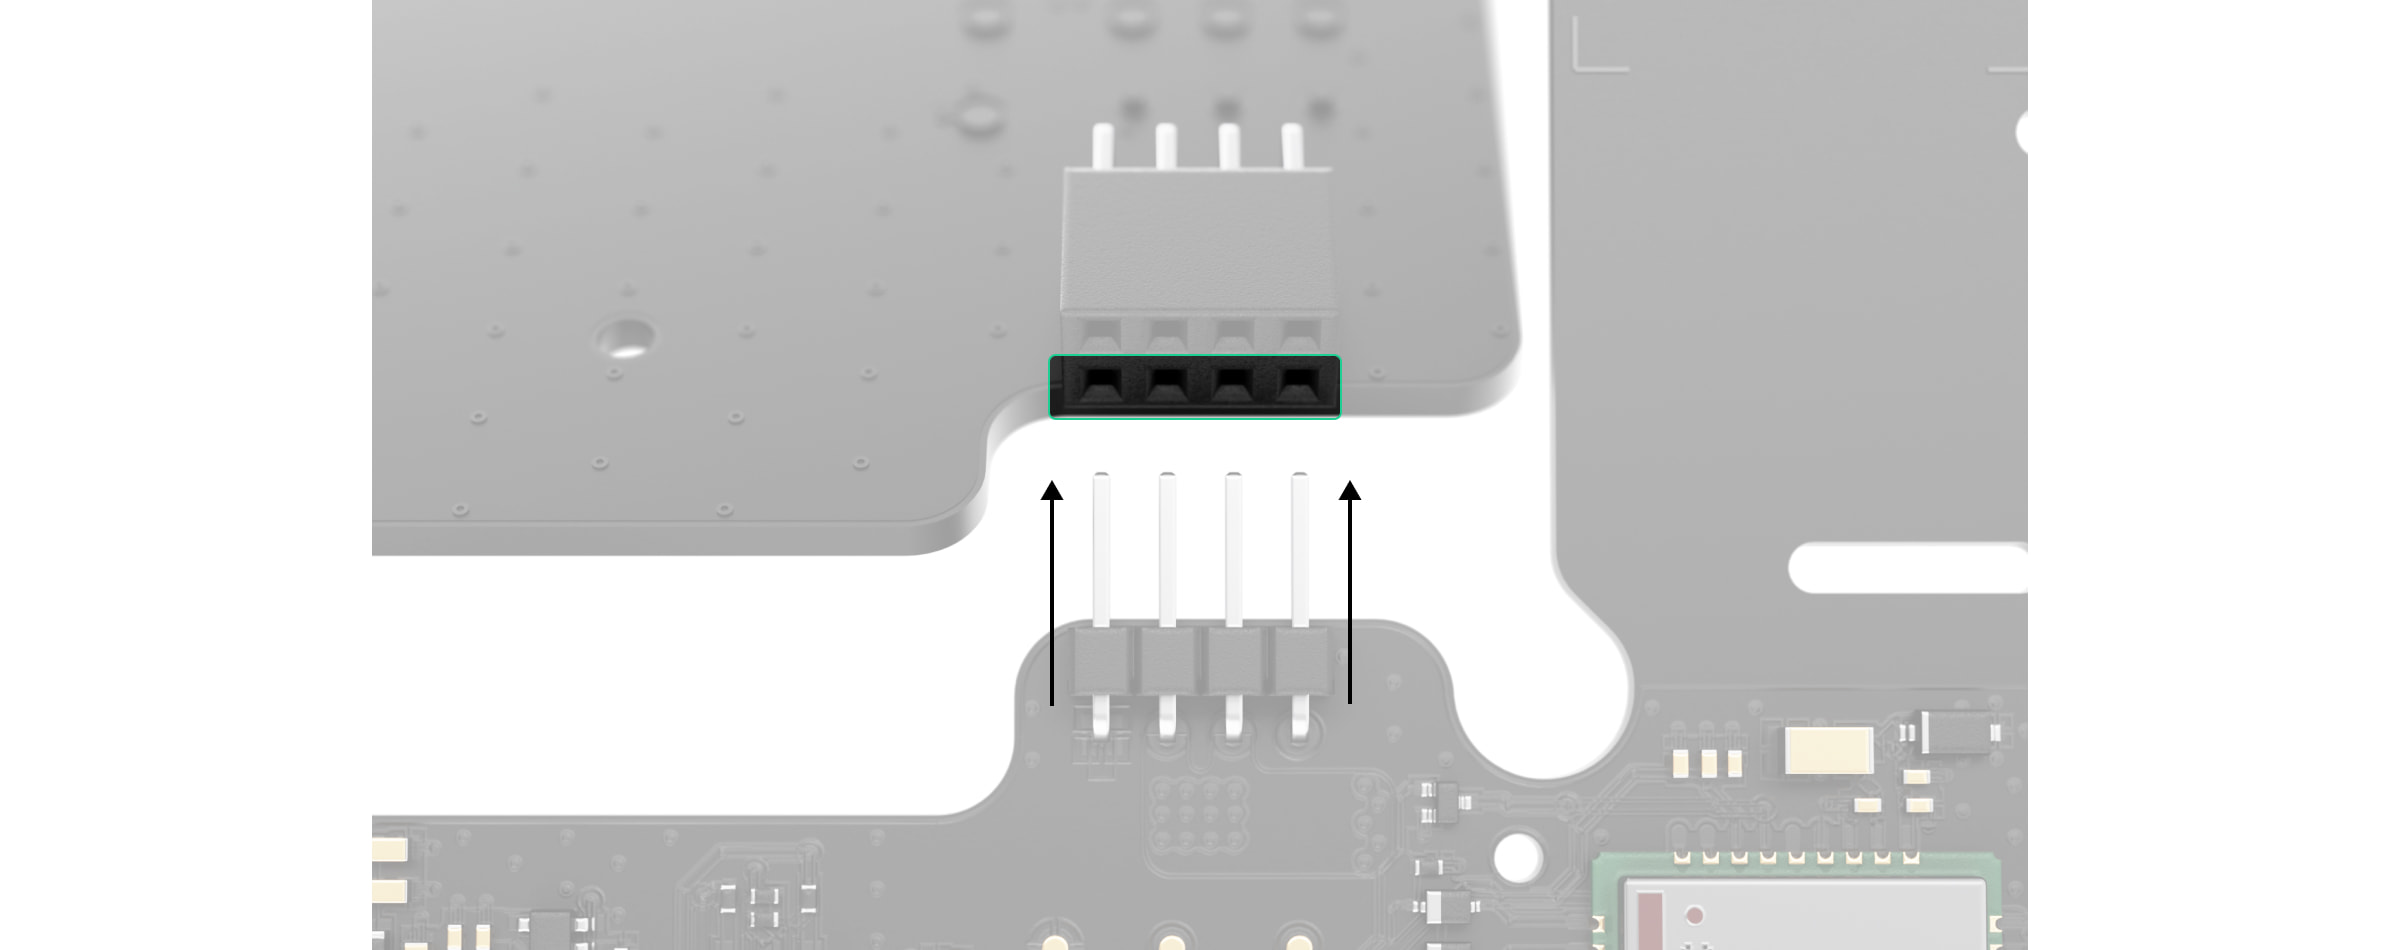
Connect 12V PSU for Hub 2/ReX 2 to the mainboard using the eight-pin connector between them. Do not warp or bend the antennas while replacing the board: this can cause the device to malfunction.
Please note: the board contacts should be plugged in the bottom row of the connector (closest to the board). When connected correctly, the boards are on the same level.
Reassemble the boards and the device body than tighten the screws.
Check that the battery and its cables are not clamped. When installed properly, the boards stand firmly on all guides and do not stagger. Holding the boards together with the back lid, turn the device over. The SIM card slot, power, and Ethernet sockets should match accurately and fit the corresponding sockets, and the power button should not be stuck. Change the information about input voltage on the device body to avoid incorrect power connections in the future. Use the special bundled sticker with the instruction.
Connect the power (and Ethernet cable) to the appropriate sockets.
Switch on the 12 V power source.
Do not connect the power cable with a voltage that exceeds the acceptable input voltage.
Switch on the device by holding the power button for 2 seconds.
Close and fix the SmartBracket mounting panel.
Switch on the device, wait until loading, and check the external power status in the Ajax app. If there is no power, and you are using a terminal adapter, check the polarity of the connected wires. If there is no power even after reconnecting, please contact the Support Service.
Maintenance
The device does not require technical maintenance.
{"id":55852831408463,"title":"Default Title","option1":"Default Title","option2":null,"option3":null,"sku":"367304807","requires_shipping":true,"taxable":true,"featured_image":null,"available":true,"name":"Ajax 12V Power Supply for Hub\/Hub Plus\/ReX","public_title":null,"options":["Default Title"],"price":2351,"weight":0,"compare_at_price":2997,"inventory_management":"shopify","barcode":"810031990498","requires_selling_plan":false,"selling_plan_allocations":[],"quantity_rule":{"min":1,"max":null,"increment":1}}
12V PSU for Hub/Hub Plus/ReXis a power supply unit, connecting the Hub/Hub Plus control panels as well as the ReX radio signal extender to 12 volt DC sources. This is an electronic board, replacing the standard 110/230 V power supply unit in the body of the device.
12V PSU for Hub/Hub Plus/ReX should be installed by a qualified electrician only.
Before installing the power supply, make sure that the device is disconnected from the mains.
When installing the 12V PSU for Hub/Hub Plus/ReX, follow the general electrical safety rules, as well as the requirements of electrical safety regulatory acts. Never disassemble the device while it is under voltage!
Installation process:
Remove the screws and take off the hub or range extender from the SmartBracket mounting panel, shifting the device up.
Switch off the hub or range extender holding the power button for 2 seconds.
Disconnect power and Ethernet cables.
Wait 5 minutes for the capacitors to discharge.
Remove four screws of the back lid and take it off.
Remove the screws attaching the boards to the device body.
Carefully remove both boards, keeping them in the same plane and not disconnecting them. There is a connector between boards: do not break it.
Disconnect the power supply unit (smaller board) from the mainboard.
Connect 12V PSU Hub/Hub Plus/ReX to the mainboard using the eight-pin connector between them. Do not warp or bend the antennas while replacing the board: this can cause the device to malfunction.
Reassemble the boards and the device body than tighten the screws.
Check that the battery and its cables are not clamped. When installed properly, the boards stand firmly on all guides and do not stagger. Holding the boards together with the back lid, turn the device over. The SIM card slot, power, and Ethernet sockets should match accurately and fit the corresponding sockets, and the power button should not be stuck.
Change the information about input voltage on the device body to avoid incorrect power connections in the future. Use the special bundled sticker with the instruction included in the set.
Connect the power (and Ethernet cable) to the appropriate sockets.
Switch on the power source to the hub or range extender.
Do not connect the power cable with a voltage that exceeds the acceptable input voltage 12V PSU for Hub/Hub Plus/ReX.
Switch on the device by holding the power button for 2 seconds.
Close and fix the SmartBracket mounting panel.
Switch on the device, wait until loading, and check the external power status in the Ajax app. If there is no power, and you are using a terminal adapter, check the polarity of the connected wires. If there is no power even after reconnecting, pleasecontact the Ajax Support Service.
Maintenance
The device does not require technical maintenance.
{"id":41592069456055,"title":"Default Title","option1":"Default Title","option2":null,"option3":null,"sku":"367304856","requires_shipping":true,"taxable":true,"featured_image":null,"available":true,"name":"AJAX 12V Power Supply Control Relay","public_title":null,"options":["Default Title"],"price":4113,"weight":0,"compare_at_price":5246,"inventory_management":"shopify","barcode":"856963007613","requires_selling_plan":false,"selling_plan_allocations":[],"quantity_rule":{"min":1,"max":null,"increment":1}}
AJAX RelayFor remote control of 12V equipment. Only works with one of the AJAX Hubs.
When installing and operating electrical devices, observe the general electrical safety rules, as well as the requirements of the electrical safety regulations.
Connecting the relay to the hub takes less than a minute - just scan a QR code with the Ajax app. The miniature device (39×33×18 mm) easily fits into a junction box, electrical panel or switch box housing with a DIN holder. And the flexible external antenna ensures a stable connection.
Versatility of settings and low power consumption make the relay a universal tool for equipment control. The dry contact is not galvanically connected to the device's power supply, so it can be used in both low-voltage and household networks. The relay can easily be connected to a power supply unit paired with a backup battery.
Modern electric gates and barriers are equipped with a remote control. It consists of a controller and control devices such as a remote control. The controller receives commands from the control devices and activates the gate or barrier opening/closing mechanism.
To integrate with Ajax, the controller must have a control input for connecting wired buttons and relays. The absence of such an input does not delay the connection, but it significantly complicates the process - the relay will have to be connected directly to the drive or controller board. Also, the controller may have a non-standard control input or special control and operation modes, which should also be taken into account during integration.
Sending information about the state of the gate/barrier ("closed" and "open") to the Ajax app is possible if the controller has a status output.
Device type: Wireless
Installation: In electrical distribution cabinet, distribution box
Works with all AJAX Hubs
Actuation element: Electromagnetic relay
Lifetime: 200,000 actuations
Voltage: Max — 36.5 V⎓, min — 6.5 V⎓
Maximum current: 5A at 24 V⎓, 13A at 230V~
Maximum working temperature: >65°C
Contacts: NO, NC
Adjustable pulse duration from 1 to 255 seconds
Operating temperature: From -20°С to +64°С
Protection class: IP20
Damping protection
Dimensions: 39x33x18mm
Weight: 25g
Available for pickup at
Out of stock at
Added to compare
Reached count_product-product limit
Added to compare
Reached count_product-product limit
{"id":55852902744399,"title":"Default Title","option1":"Default Title","option2":null,"option3":null,"sku":"367304808","requires_shipping":true,"taxable":true,"featured_image":null,"available":true,"name":"Ajax 6V Power Supply for Hub 2\/Hub 2 Plus\/ReX 2","public_title":null,"options":["Default Title"],"price":2351,"weight":0,"compare_at_price":2997,"inventory_management":"shopify","barcode":"810031991037","requires_selling_plan":false,"selling_plan_allocations":[],"quantity_rule":{"min":1,"max":null,"increment":1}}
6V PSU (type A)is an alternative power supply unit to connect an Ajax hub or range extender to 6 V⎓ sources. This is an electronic board, replacing the standard 110/230 V⎓ power supply unit in the body of the device.
6V PSU (type A) should be installed by a qualified electrician only.
Before installing the power supply, ensure the device is disconnected from the mains.
When installing the 6V PSU for Hub 2/Hub 2 Plus/ReX 2, follow the general electrical safety rules, as well as the requirements of electrical safety regulatory acts. Never disassemble the device while it is under voltage!
Installation process:
Remove the screws and take off the device from the SmartBracket mounting panel, shifting it down with force. If the hub or range extender is installed on a surface, move it upwards.
Switch off the device holding the power button for 2 seconds.
Disconnect power and Ethernet cables.
Wait 5 minutesafter switching off for the capacitors to discharge.
Remove four screws of the back lid and take it off.
Remove the screws attaching the boards to the device body.
Carefully remove both boards, keeping them in the same plane and not disconnecting them. There is a connector between boards: do not break it.
Disconnect the power supply unit (smaller board) from the mainboard.
Connect 6V PSU (type A) to the mainboard using the eight-pin connector between them. Do not warp or bend the antennas while replacing the board: this can cause the device to malfunction.
Please note: the board contacts should be plugged in the bottom row of the connector (closest to the board). When connected correctly, the boards are on the same level.
Reassemble the boards and the device body then tighten the screws.
Check that the battery and its cables are not clamped. When installed properly, the boards stand firmly on all guides and do not stagger. Holding the boards together with the back lid, turn the device over. The SIM card slots, power, and Ethernet sockets should match accurately and fit the corresponding sockets, and the power button should not be stuck.
Check the information about input voltage on the device body to avoid incorrect power connections in the future. Use the special bundled sticker with the instruction.
Connect the power (and Ethernet cable) to the appropriate sockets.
Switch on the 6 V⎓ power source.
Do not connect the power cable with a voltage that exceeds the acceptable input voltage.
Switch on the device by holding the power button for 2 seconds.
Install the hub or range extender onthe SmartBracket mounting panel.Fix the device.
Switch on the device, wait until loading, and check the external power status in the Ajax app. If there is no power, and you are using a terminal adapter, check the polarity of thepower cable. If there is no power even after reconnecting, pleasecontact the Support Service.
We recommend using zinc-air alkaline batteries for long-term autonomous operation. Before connecting such a battery, make sure that all the stickers have been removed, and valves capping the air access are open. If possible, leave the battery with access to air for up to 2 hours. This will start a chemical reaction inside and ensure proper functioning.
{"id":55844753211727,"title":"Default Title","option1":"Default Title","option2":null,"option3":null,"sku":"External Antenna black","requires_shipping":true,"taxable":true,"featured_image":null,"available":true,"name":"AJAX Antenna for LTE or radio communication, Standard SMA connector, Wired communication up to 3 m, Installation using double-sided tape","public_title":null,"options":["Default Title"],"price":2181,"weight":0,"compare_at_price":2781,"inventory_management":"shopify","barcode":null,"requires_selling_plan":false,"selling_plan_allocations":[],"quantity_rule":{"min":1,"max":null,"increment":1}}
A compatible Ajax hub is required for the antenna to work.
The device is compatible with:
Hub BP Jeweller
ExternalAntenna sold separately.
Operating principle
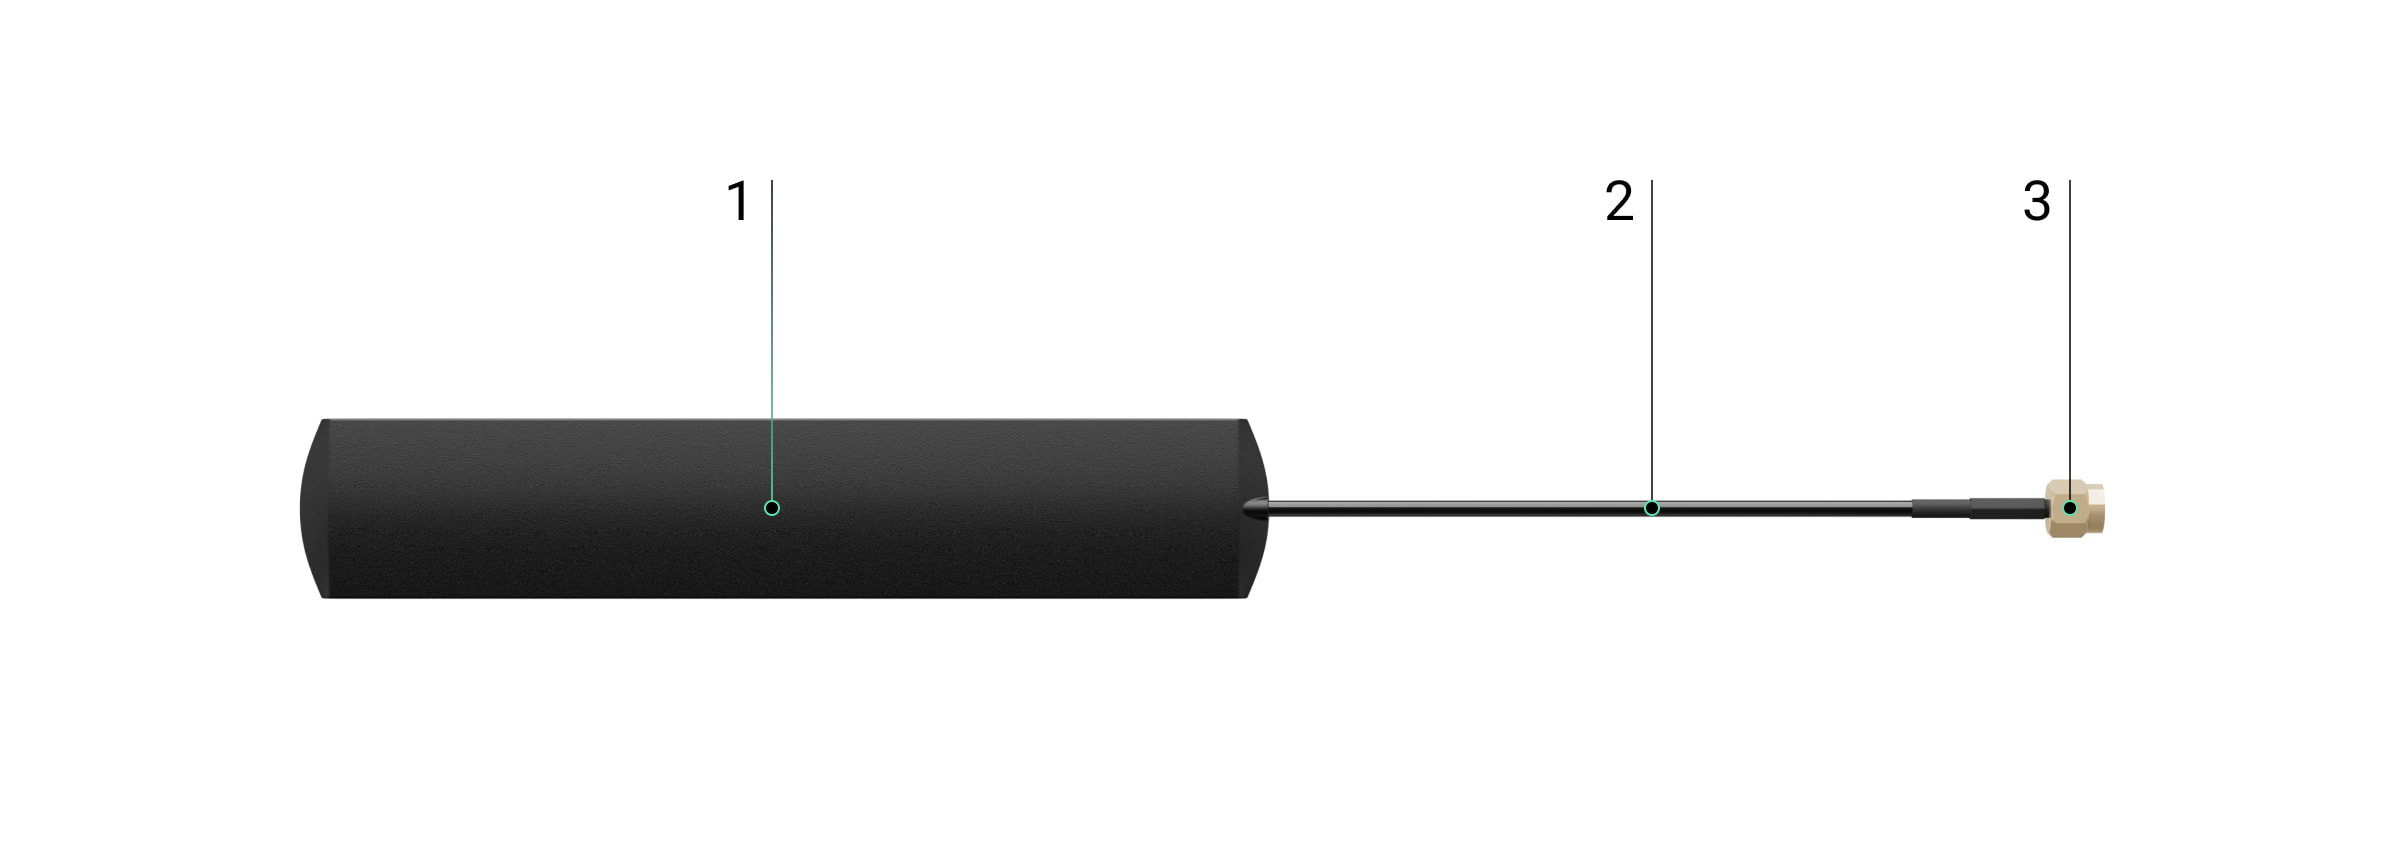
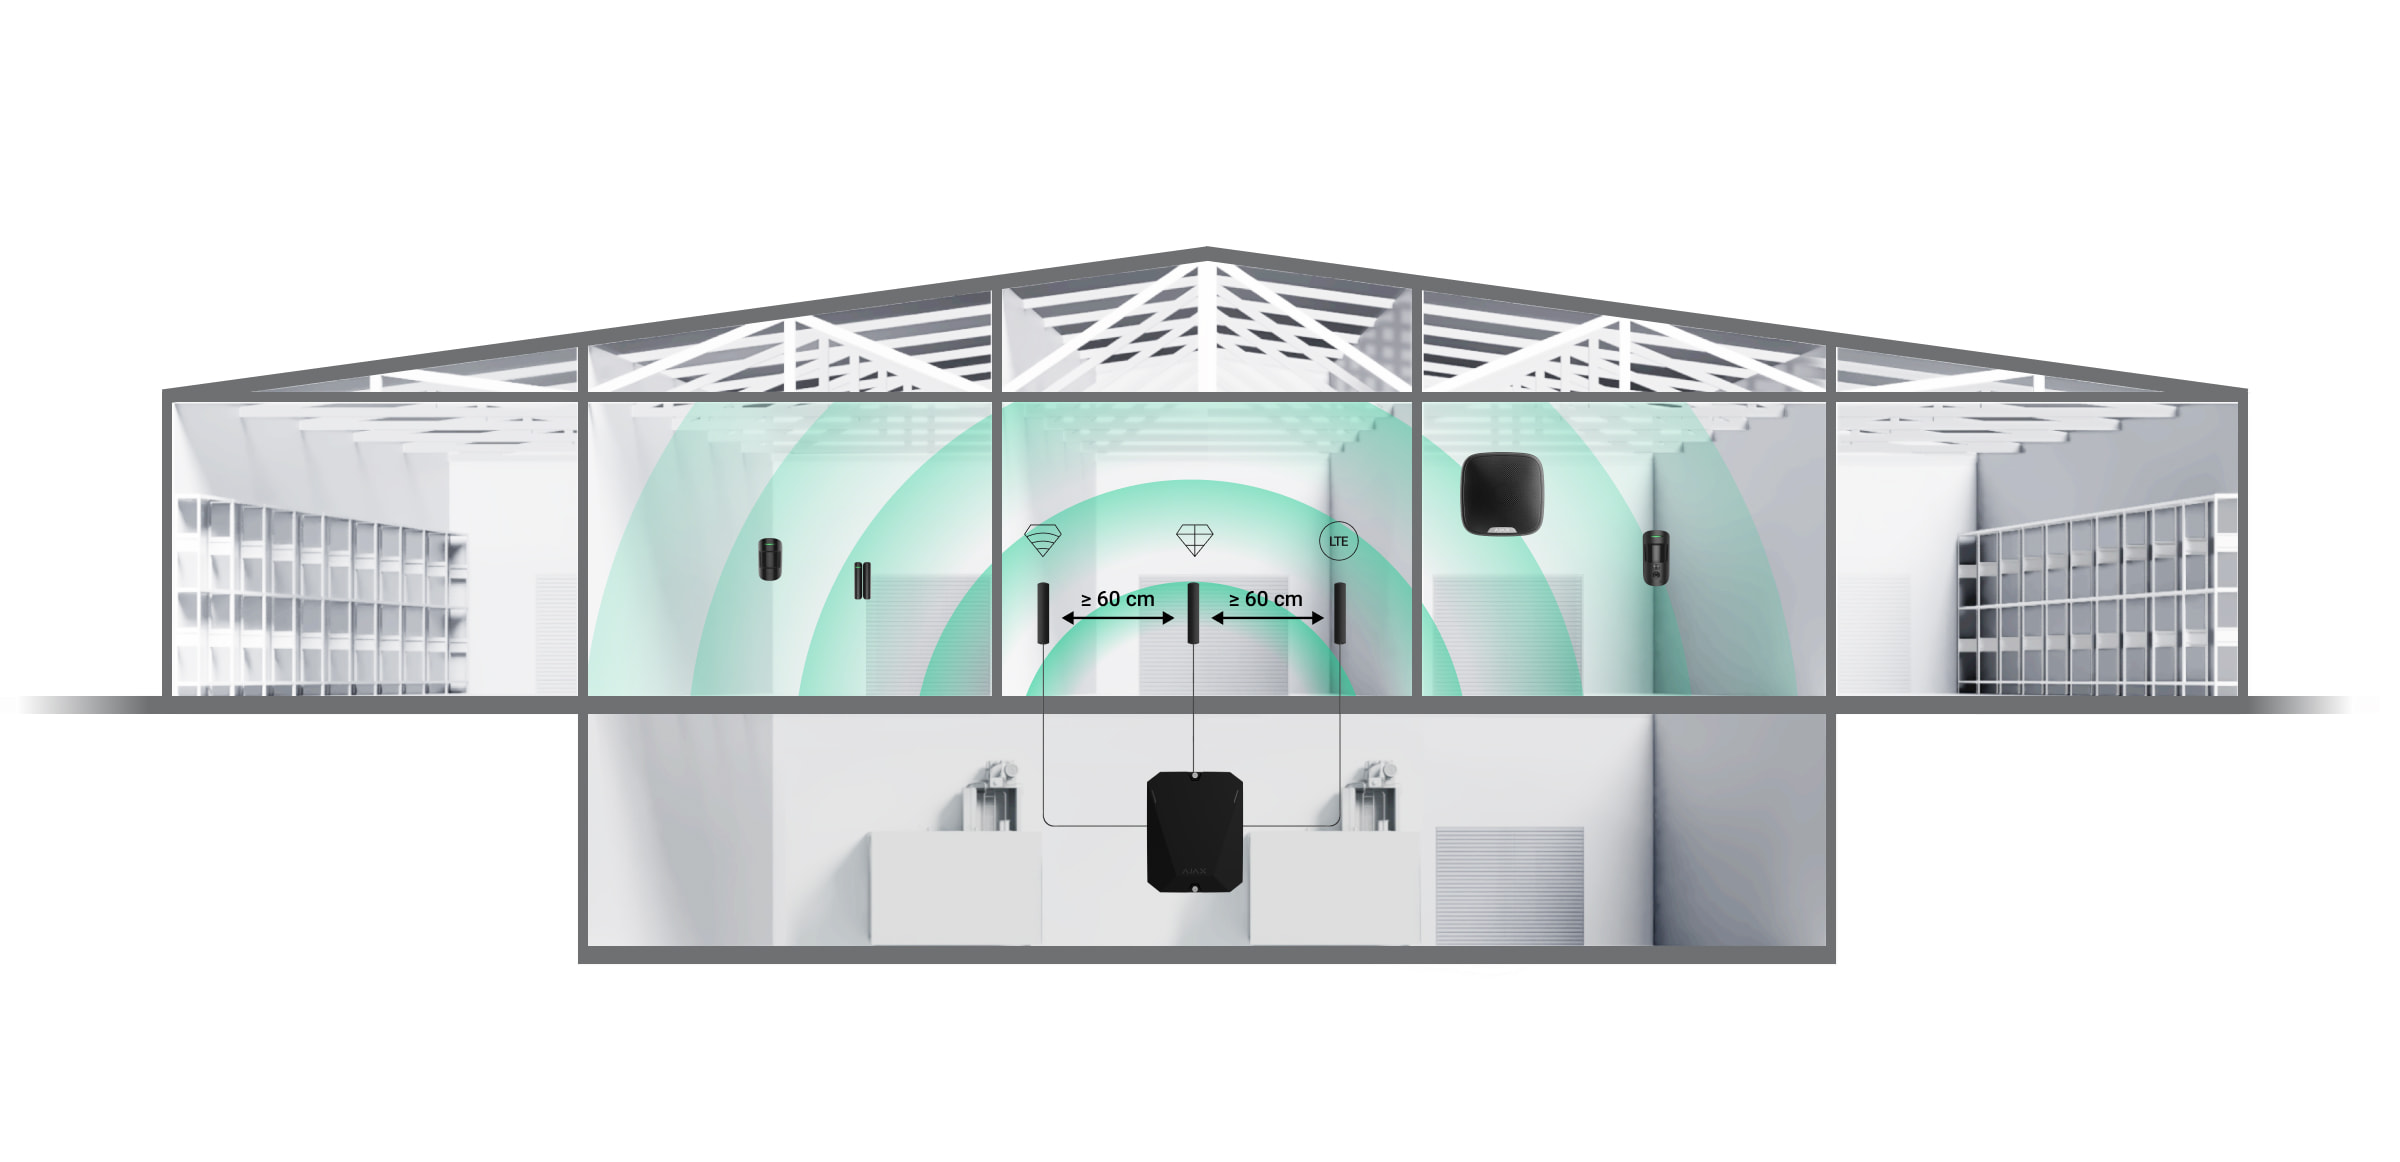
ExternalAntenna improves communication between the hub and connected devices or mobile network. It is useful when the Hub is installed in a safe, in a reinforced concrete room or in other places where the signal has to overcome obstacles. The antenna can be connected to the required Jeweller, Wings or Cellular connectors.
Choosing the installation location
When selecting the installation location for the antenna, factors affecting its performance must be taken into account:
Signal strength of the selected communication channel (Jeweller, Wings or Cellular).
Distance between the antenna and the hub. When using two or more antennas, the distance between them must be at least 60 cm.
Obstacles affecting the radio signal: walls, ceilings and large objects in the room.
Follow the installation recommendations when designing your Ajax system. The safety system must only be designed and installed by specialists. A list of recommended Ajax partners is available here.
Places where the antenna should not be installed
In rooms where the temperature and humidity exceed the permissible limits. This can damage the antenna.
In areas with low signal levels. This may cause loss of connection.
Close to metal objects and mirrors. Conductive objects may obscure the antenna.
Preparing for installation
Before installing the external antenna, make sure that:
The hub is compatible with the ExternalAntenna;
the hub has a stable 2-3 bar signal with the mobile network at the installation site;
all connected devices have a stable 2-3 bar signal at the installation site;
the cable length from the hub to the installation site is sufficient.
Cable layout
When preparing the cable routing, check the wiring and fire safety regulations for your region. Strictly comply with these standards and regulations. Practical advice on cable routing is available in this article.
Cable routing
Before installation, read carefully the section Selecting the installation site. Avoid deviations from the system design. Failure to follow the basic rules and recommendations in this manual may cause malfunctions. Learn more
Installation
Before installation, make sure that you have selected the optimum location for the device that meets the requirements of this manual.
Only a professional electrician should install the appliance.
How to install ExternalAntenna
Before installing the antenna, read the manual of the respective Hub.
Make sure that the hub is unplugged before installation.
Remove the front cover of the hub.
Identify the Jeweller, Wings or Cellular connectors on the circuit board.
Remove the isolation cap from the selected connector.
Connect the SMA (male) connector of the antenna to the SMA (female) connector of the board.
Switch on the hub. Close the housing of the hub. Remove the protective film from the pre-applied double-sided tape. Install the antenna at the selected location. Check the connection status in the app.
Status
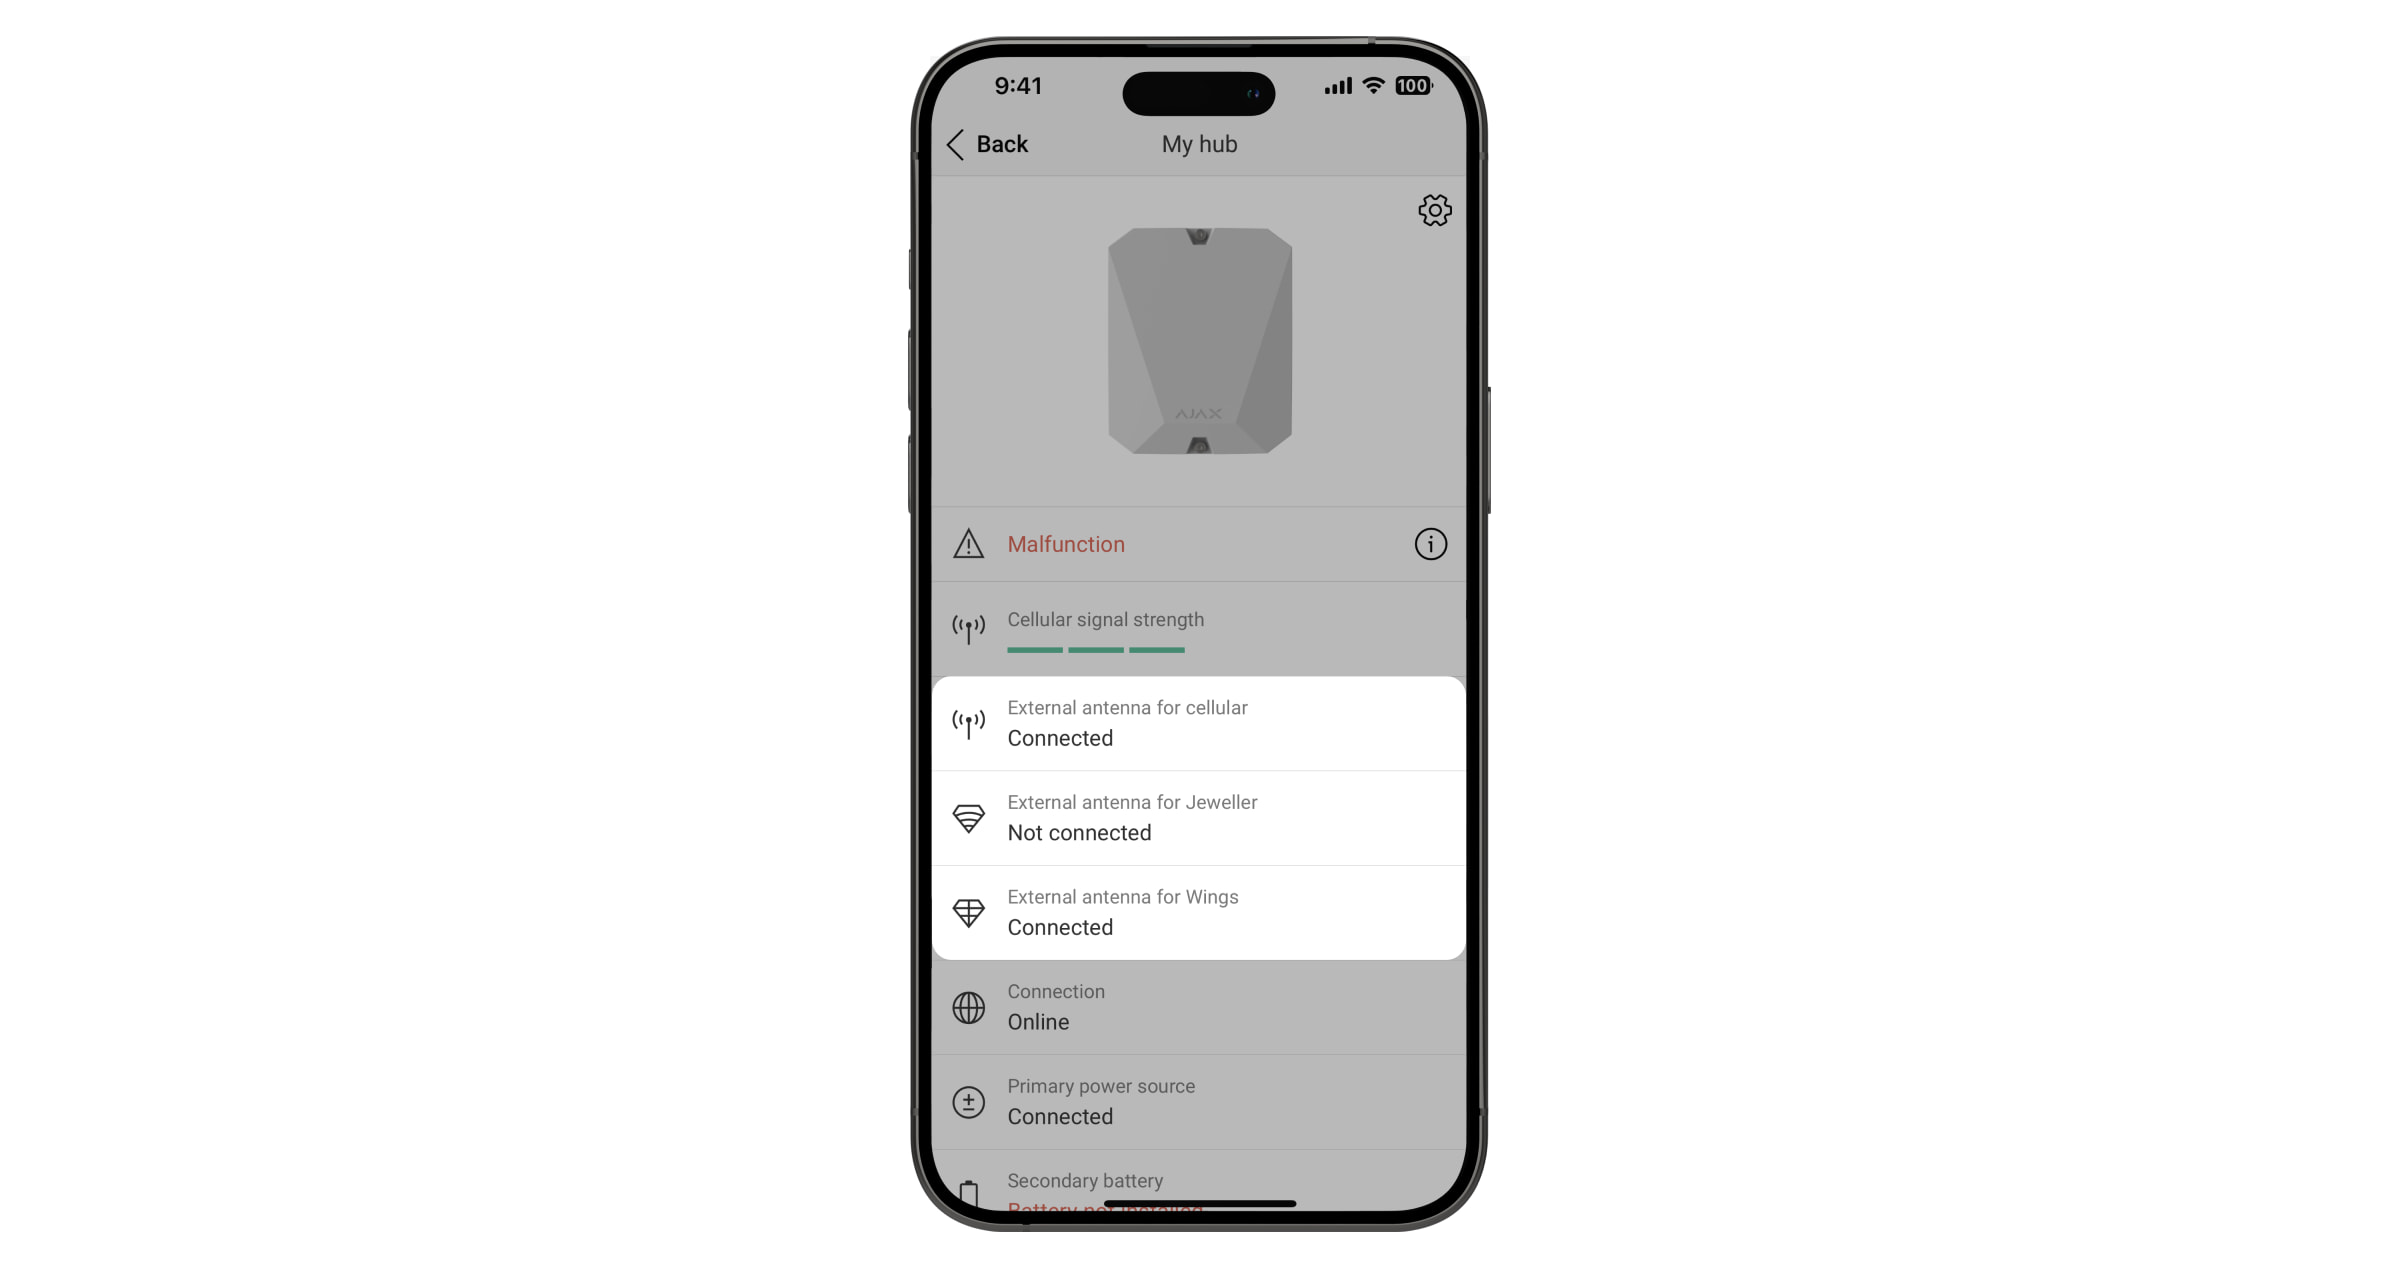
The Hub statuses contain information about the connection status of the antenna. These statuses are available in the Ajax app:
Open the Devices tab.
Select the hub from the list.
If the ExternalAntenna is damaged, the system will notify the user and the CMS.
Maintenance
ExternalAntenna does not require maintenance.
Technical specifications All technical specifications
Compliance with standards
Warranty
The Ajax Systems Manufacturing limited company product warranty is valid for 2 years after purchase.
If the device fails to function properly, please contact Ajax Technical Support first. In most cases, technical problems can be resolved remotely.
Available for pickup at
Out of stock at
Added to compare
Reached count_product-product limit
Added to compare
Reached count_product-product limit
{"id":41592061722807,"title":"Default Title","option1":"Default Title","option2":null,"option3":null,"sku":"367307588","requires_shipping":true,"taxable":true,"featured_image":null,"available":true,"name":"AJAX Wireless outdoor motion curtain type two-way detector DualCurtain Outdoor for installation on the facade of the house White color","public_title":null,"options":["Default Title"],"price":20999,"weight":0,"compare_at_price":26244,"inventory_management":"shopify","barcode":"4820246099233","requires_selling_plan":false,"selling_plan_allocations":[],"quantity_rule":{"min":1,"max":null,"increment":1}}
AJAX Wireless outdoor motion curtain type two-way detector DualCurtain Outdoor for installation on the facade of the house White color
SKU: 367307588
€209,99€262,44
Unit price
Ajax wireless two-way outdoor motion detector, suitable for installation on the front of the house. The detector protects the perimeter of your property. 15m detection on both sides, but can disable either zone in the Ajax app. Does not react to animals. Only works with one of the Ajax security control panels. The tamper will prevent the device from being removed unnoticed from the mount. And even if the detector is damaged, it will take less than a minute for the hub to detect the loss of communication and inform the central monitoring station and users of the problem.
The batteries last up to 4 years. Works only with Hub 2 and Hub 2 Plus.
AJAX Wireless outdoor motion detector MotionCam Outdoor with photo verification White
SKU: 367304847
€258,94€330,25
Unit price
Wireless motion detector with photo verification option MotionCam Outdoor .
Works only with AJAX CentralHub 2orHub 2 Plus .
Sends a verification image to the user in 9 seconds.
With MotionCam Outdoor, you will learn about the actual situation at home even before the thieves realize that they have been caught. An animated series of photos is sent immediately after motion is detected.
Easy to add by scanning the machine's QR code in the Ajax app.
Installation: Outdoors
Motion detection distance: Adjustable from 3 to 12m
Immunity to animals: up to 80 cm
Connectivity: Only with Hub 2, Hub 2 Plus
Detection range: Horizontal - 90°, Vertical - 80°
Alarm signal sending speed: 0.15 sec
Photo verification sending speed: 9 sec
Image resolution: 640 x 352 / 320 x 176
Number of images in series: From 1 to 5
Night vision: Infrared illumination
Installation height: From 0.8 to 1.3 m
Power supply: Batteries CR123A (×4), 3 V, working time up to 3 years
There is no warranty for the batteries.
Operating temperature: from -25°C to +60°C
Size:206 × 108 × 93mm
Weight: 470 g
The installation instructions are available in the Ajax app, which will open by scanning the QR code of the detector at the time of installation. Easy installation and connection to the Ajax central Hub.
Available for pickup at
Out of stock at
Added to compare
Reached count_product-product limit
Added to compare
Reached count_product-product limit
{"id":46866019025231,"title":"Default Title","option1":"Default Title","option2":null,"option3":null,"sku":"367308965","requires_shipping":true,"taxable":true,"featured_image":null,"available":true,"name":"AJAX Wireless outdoor motion detector MotionCam Outdoor PhOD (Image on request) with photo verification White","public_title":null,"options":["Default Title"],"price":28485,"weight":0,"compare_at_price":36330,"inventory_management":"shopify","barcode":"4823114014284","requires_selling_plan":false,"selling_plan_allocations":[],"quantity_rule":{"min":1,"max":null,"increment":1}}
PhOD (Photo on Demand) - Picture on demand - take a picture at any time and know what is happening on your property.
Works only with AJAX CentralHub 2orHub 2 Plus .
Sends a verification image to the user in 9 seconds.
With MotionCam Outdoor, you will learn about the actual situation at home even before the thieves realize that they have been caught. An animated series of photos is sent immediately after motion is detected.
Easy to add by scanning the machine's QR code in the Ajax app.
Installation: Outdoors
Motion detection distance: Adjustable from 3 to 12m
Immunity to animals: up to 80 cm
Connectivity: Only with Hub 2, Hub 2 Plus
Detection range: Horizontal - 90°, Vertical - 80°
Alarm signal sending speed: 0.15 sec
Photo verification sending speed: 9 sec
Image resolution: 640 x 352 / 320 x 176
Number of images in series: From 1 to 5
Night vision: Infrared illumination
Installation height: From 0.8 to 1.3 m
Power supply: Batteries CR123A (×4), 3 V, working time up to 3 years
There is no warranty for the batteries.
Operating temperature: from -25°C to +60°C
Size:206 × 108 × 93mm
Weight: 470 g
The installation instructions are available in the Ajax app, which will open by scanning the QR code of the detector at the time of installation. Easy installation and connection to the Ajax central Hub.
AJAX Wireless outdoor security siren StreetSiren in Black
SKU: 367307584
(1)
€117,60€149,97
Unit price
, an Ajax wireless outdoor siren that emits a loud alarm when a detector is triggered. It is designed for outdoor use to warn of danger or deter intruders. The siren works only in conjunction with one of the Ajax Control Panels.
Siren with an LED frame. IP54 protection,-25°C to +50°C. Operates for up to 5 years.
Volume: Adjustable, 85–113 dB at a distance of 1 m
Alarm duration: Adjustable, 3–180 s
Armed/Unarmed Indicator: Yes
Alarm signal transmission time: 0.15 s
Power supply: 4 CR123A batteries, 3 V
Battery life: 5 years
Batteries are not covered by the warranty
Communication range — 2,000 m in open terrain
Operating temperature: From -25°C to +50°C
Protection class: IP54
Dimensions: 200 × 200 × 51 mm
Weight: 528 g
Installation instructions are available in the Ajax app, which will open when you scan the detector's QR code during installation. Easy installation and connection to the Ajax Hub.
AJAX Wireless outdoor security siren StreetSiren, white Color
SKU: 367308694
€127,99€149,97
Unit price
Ajax Wireless outdoor sirenStreetSiren, which sounds an alarm when the detector is activated. It is suitable for outdoor areas to warn of danger or deter intruders. The siren only works in conjunction with one of the Ajax Control Panels.
Siren with LED frame. IP54 protection np -25°C to +50°C. Works up to 5 years.
Volume: Adjustable, 85-113 dB within 1m
Alarm length: Adjustable, 3-180 s
Indication of arming/disarming: Yes
Alarm transmission time: 0.15 s
Power supply: 4x CR123A batteries, 3 V
Battery life: 5 years
No warranty on batteries
Communication range: 2000 m in open environment
Operating temperature: -25°C to +50°C
Protection class: IP54
Size: 200 × 200 × 51 mm
Weight: 528g
Installation instructions are available in the Ajax app, which will open when the detector QR code is scanned during installation. Simple installation and connection to the Ajax Hub.
Available for pickup at
Out of stock at
Added to compare
Reached count_product-product limit
Added to compare
Reached count_product-product limit
{"id":41613546062007,"title":"Default Title","option1":"Default Title","option2":null,"option3":null,"sku":"367304816","requires_shipping":true,"taxable":true,"featured_image":null,"available":true,"name":"AJAX Wireless security door contact DoorProtect White","public_title":null,"options":["Default Title"],"price":3528,"weight":0,"compare_at_price":4499,"inventory_management":"shopify","barcode":null,"requires_selling_plan":false,"selling_plan_allocations":[],"quantity_rule":{"min":1,"max":null,"increment":1}}
AJAX Wireless security door contact DoorProtect White
SKU: 367304816
(2)
€35,28€44,99
Unit price
DoorProtect wireless door contact that connects to your AJAX security system.
An intrusion detector that notifies you when a door or window is open. Suitable for any type of door. Alarm notifications at unauthorised removal attempts.
Battery life 7 years.
Consists of 2 parts - opening detector and magnet.
Operating temperature: -10°C to +40°C
Dimensions: Diameter: 20 mm, Height: 90 mm
Weight: 29g
No warranty for batteries
Installation instructions are available in the Ajax app, which will open when the QR code of the detector is scanned during installation. Simple installation and connection to the Ajax Hub
Available for pickup at
Out of stock at
Added to compare
Reached count_product-product limit
Added to compare
Reached count_product-product limit
{"id":41613546029239,"title":"Default Title","option1":"Default Title","option2":null,"option3":null,"sku":"367304813","requires_shipping":true,"taxable":true,"featured_image":null,"available":true,"name":"AJAX Wireless security door contact DoorProtect Black","public_title":null,"options":["Default Title"],"price":3528,"weight":0,"compare_at_price":4499,"inventory_management":"shopify","barcode":"856963007040","requires_selling_plan":false,"selling_plan_allocations":[],"quantity_rule":{"min":1,"max":null,"increment":1}}
AJAX Wireless security door contact DoorProtect Black
SKU: 367304813
€35,28€44,99
Unit price
Wireless door contact DoorProtect , which can be connected to your AJAX security system.
An opening detector that notifies an intrusion through an open door or window. Suitable for any type of door. Alarm notifications on unauthorized removal attempt.
Battery life 7 years .
Consists of 2 parts - opening detector and magnet.
Operating temperature: from -10°С to +40°С
Dimensions: Diameter: 20 mm, Height: 90 mm
Weight: 29 years
There is no warranty for the batteries
The installation instructions are available in the Ajax app, which will open by scanning the QR code of the detector at the time of installation. Easy installation and connection to the Ajax central Hub
Available for pickup at
Out of stock at
Added to compare
Reached count_product-product limit
Added to compare
Reached count_product-product limit
{"id":41592070176951,"title":"Default Title","option1":"Default Title","option2":null,"option3":null,"sku":"367304815","requires_shipping":true,"taxable":true,"featured_image":null,"available":true,"name":"AJAX Wireless security door contact DoorProtect Plus with impact and location change sensor. White colour","public_title":null,"options":["Default Title"],"price":5293,"weight":0,"compare_at_price":6749,"inventory_management":"shopify","barcode":"856963007941","requires_selling_plan":false,"selling_plan_allocations":[],"quantity_rule":{"min":1,"max":null,"increment":1}}
AJAX Wireless security door contact DoorProtect Plus with impact and location change sensor. White colour
SKU: 367304815
€52,93€67,49
Unit price
DoorProtect Plus wireless door contact that connects to your AJAX security system.
An intrusion detector that notifies you when a door or window is open. Suitable for any type of door. Alarm notifications at unauthorised removal attempts. Also reacts to shock, vibration and change of location.
Battery life 7 years.
Consists of 2 parts - opening detector and magnet.
Operating temperature: -10°C to +40°C
Dimensions: Diameter: 20 mm, Height: 90 mm
Weight: 29g
No warranty for batteries
Installation instructions are available in the Ajax app, which will open when the QR code of the detector is scanned during installation. Simple installation and connection to the Ajax Hub
AJAX Wireless security indoor siren HomeSiren in White
SKU: 367304833
€74,96
Unit price
Ajax Wireless indoor sirenHomeSiren , which loudly announces the alarm when the detector is activated. It is suitable for indoor use to warn of danger or deter intruders. The siren only works together with one of the Ajax Centrals.
The installation instructions are available in the Ajax app, which will open by scanning the QR code of the detector at the time of installation. Easy installation and connection to the Ajax central Hub.
AJAX Wireless Security Indoor Siren HomeSiren Black
SKU: 367304832
€58,77€74,96
Unit price
Ajax Wireless indoor sirenHomeSiren , which loudly announces the alarm when the detector is activated. It is suitable for indoor use to warn of danger or deter intruders. The siren only works together with one of the Ajax Centrals.
The installation instructions are available in the Ajax app, which will open by scanning the QR code of the detector at the time of installation. Easy installation and connection to the Ajax central Hub.
AJAX Wireless security motion detector MotionProtect White
SKU: 367304853
€63,99€74,96
Unit price
Wireless motion detector MotionProtect , which can be connected to the Ajax security center. Notifies the user of an intrusion. The detector should be installed on the wall opposite the door or other place where it is possible to break into. Tamper alarm - you will receive a notification if someone tries to remove the detector. Battery life 5 years .
The detector does not react to animals up to 20 kg and 50 cm. Passive infrared detection algorithm that reduces the number of false alarms. The detector adjusts its sensitivity depending on the ambient temperature to work effectively in cold and warm weather.
Ready to work right out of the box - the battery is installed inside, it just needs to be installed on the bracket that comes with the detector.
Operating temperature: from -10°С to +40°С
Size: 110 × 65 × 50 mm
Weight: 96 years
There is no warranty for the batteries.
The installation instructions are available in the Ajax app, which will open by scanning the QR code of the detector at the time of installation. Easy installation and connection to the Ajax central Hub.
AJAX Wireless security motion detector MotionProtect Black
SKU: 367304849
€58,77€74,96
Unit price
Wireless motion detector MotionProtect , which can be connected to the Ajax security center. Notifies the user of an intrusion. The detector should be installed on the wall opposite the door or other place where it is possible to break into. Tamper alarm - you will receive a notification if someone tries to remove the detector. Battery life 5 years .
The detector does not react to animals up to 20 kg and 50 cm. Passive infrared detection algorithm that reduces the number of false alarms. The detector adjusts its sensitivity depending on the ambient temperature to work effectively in cold and warm weather.
Ready to work right out of the box - the battery is installed inside, it just needs to be installed on the bracket that comes with the detector.
Operating temperature: from -10°С to +40°С
Size: 110 × 65 × 50 mm
Weight: 96 years
There is no warranty for the batteries.
The installation instructions are available in the Ajax app, which will open by scanning the QR code of the detector at the time of installation. Easy installation and connection to the Ajax central Hub.
Available for pickup at
Out of stock at
Added to compare
Reached count_product-product limit
Added to compare
Reached count_product-product limit
{"id":41592061558967,"title":"Default Title","option1":"Default Title","option2":null,"option3":null,"sku":"367307579","requires_shipping":true,"taxable":true,"featured_image":null,"available":true,"name":"AJAX Wireless security motion detector MotionProtect Plus White with microwave sensor to help avoid false alarms","public_title":null,"options":["Default Title"],"price":8231,"weight":0,"compare_at_price":10498,"inventory_management":"shopify","barcode":"856963007019","requires_selling_plan":false,"selling_plan_allocations":[],"quantity_rule":{"min":1,"max":null,"increment":1}}
AJAX Wireless security motion detector MotionProtect Plus White with microwave sensor to help avoid false alarms
SKU: 367307579
(1)
€82,31€104,98
Unit price
Wireless motion detector MotionProtect Plus , which can be connected to the Ajax security center. Notifies the user of an intrusion. The detector should be installed on the wall opposite the door or other place where it is possible to break into. Tamper alarm - you will receive a notification if someone tries to remove the detector. Battery life 5 years . A microwave sensor that helps avoid false alarms caused by air conditioners, fireplaces, flickering lights, glare, curtains.
The detector does not react to animals up to 20 kg and 50 cm. Passive infrared detection algorithm that reduces the number of false alarms. The detector adjusts its sensitivity depending on the ambient temperature to work effectively in cold and warm weather.
Ready to work right out of the box - the battery is installed inside, it just needs to be installed on the bracket that comes with the detector.
Operating temperature: from -10°С to +40°С
Size: 110 × 65 × 50 mm
Weight: 96 years
There is no warranty for the batteries.
The installation instructions are available in the Ajax app, which will open by scanning the QR code of the detector at the time of installation. Easy installation and connection to the Ajax central Hub.
Available for pickup at
Out of stock at
Added to compare
Reached count_product-product limit
Added to compare
Reached count_product-product limit
{"id":41592061231287,"title":"Default Title","option1":"Default Title","option2":null,"option3":null,"sku":"367304852","requires_shipping":true,"taxable":true,"featured_image":null,"available":true,"name":"AJAX Wireless security motion detector MotionProtect Plus Black with microwave sensor to help avoid false alarms","public_title":null,"options":["Default Title"],"price":8231,"weight":0,"compare_at_price":10498,"inventory_management":"shopify","barcode":"856963007026","requires_selling_plan":false,"selling_plan_allocations":[],"quantity_rule":{"min":1,"max":null,"increment":1}}
AJAX Wireless security motion detector MotionProtect Plus Black with microwave sensor to help avoid false alarms
SKU: 367304852
€82,31€104,98
Unit price
Wireless motion detector MotionProtect Plus , which can be connected to the Ajax security center. Notifies the user of an intrusion. The detector should be installed on the wall opposite the door or other place where it is possible to break into. Tamper alarm - you will receive a notification if someone tries to remove the detector. Battery life 5 years . A microwave sensor that helps avoid false alarms caused by air conditioners, fireplaces, flickering lights, glare, curtains.
The detector does not react to animals up to 20 kg and 50 cm. Passive infrared detection algorithm that reduces the number of false alarms. The detector adjusts its sensitivity depending on the ambient temperature to work effectively in cold and warm weather.
Ready to work right out of the box - the battery is installed inside, it just needs to be installed on the bracket that comes with the detector.
Operating temperature: from -10°С to +40°С
Size: 110 × 65 × 50 mm
Weight: 96 years
There is no warranty for the batteries.
The installation instructions are available in the Ajax app, which will open by scanning the QR code of the detector at the time of installation. Easy installation and connection to the Ajax central Hub.
Available for pickup at
Out of stock at
Added to compare
Reached count_product-product limit
Added to compare
Reached count_product-product limit
{"id":46870133211471,"title":"Default Title","option1":"Default Title","option2":null,"option3":null,"sku":"367304862","requires_shipping":true,"taxable":true,"featured_image":null,"available":true,"name":"AJAX Wireless security system remote control SpaceControl in white","public_title":null,"options":["Default Title"],"price":2940,"weight":0,"compare_at_price":3749,"inventory_management":"shopify","barcode":null,"requires_selling_plan":false,"selling_plan_allocations":[],"quantity_rule":{"min":1,"max":null,"increment":1}}
AJAX Wireless security system remote control SpaceControl in white
SKU: 367304862
€29,40€37,49
Unit price
Wireless remote control SpaceControlwith an alarm button. WithSpaceControl help or turn on and off security, turn on night mode, send an alarm.
Control of the entire security system is available in the Ajax app on a smartphone, but if you have a discharged phone, you can use the SpaceControl console.
Ready to work immediately: the battery is inside the remote control. Simple addition of the device to your security system - by scanning the QR code in the Ajax app.
Battery life 5 years .
Operating temperature: from -25°С to +50°С
Size: 65 × 37 × 10 mm
Weight: 13 years
There is no warranty for the batteries.
The installation instructions are available in the Ajax app, which will open by scanning the QR code of the detector at the time of installation. Easy installation and connection to the Ajax central Hub.
Available for pickup at
Out of stock at
Added to compare
Reached count_product-product limit
Added to compare
Reached count_product-product limit
{"id":41592061165751,"title":"Default Title","option1":"Default Title","option2":null,"option3":null,"sku":"367304861","requires_shipping":true,"taxable":true,"featured_image":null,"available":true,"name":"AJAX Wireless security system remote control SpaceControl Black","public_title":null,"options":["Default Title"],"price":2940,"weight":0,"compare_at_price":3749,"inventory_management":"shopify","barcode":null,"requires_selling_plan":false,"selling_plan_allocations":[],"quantity_rule":{"min":1,"max":null,"increment":1}}
AJAX Wireless security system remote control SpaceControl Black
SKU: 367304861
(1)
€29,40€37,49
Unit price
Wireless remote control SpaceControlwith an alarm button. WithSpaceControl help or turn on and off security, turn on night mode, send an alarm.
Control of the entire security system is available in the Ajax app on a smartphone, but if you have a discharged phone, you can use the SpaceControl console.
Ready to work immediately: the battery is inside the remote control. Simple addition of the device to your security system - by scanning the QR code in the Ajax app.
Battery life 5 years .
Operating temperature: from -25°С to +50°С
Size: 65 × 37 × 10 mm
Weight: 13 years
There is no warranty for the batteries.
The installation instructions are available in the Ajax app, which will open by scanning the QR code of the detector at the time of installation. Easy installation and connection to the Ajax central Hub.
Available for pickup at
Out of stock at
Added to compare
Reached count_product-product limit
Added to compare
Reached count_product-product limit
{"id":41613546651831,"title":"Default Title","option1":"Default Title","option2":null,"option3":null,"sku":"367308948","requires_shipping":true,"taxable":true,"featured_image":null,"available":true,"name":"AJAX Wireless security keyboard Keypad Plus White","public_title":null,"options":["Default Title"],"price":11760,"weight":0,"compare_at_price":14997,"inventory_management":"shopify","barcode":"367304848","requires_selling_plan":false,"selling_plan_allocations":[],"quantity_rule":{"min":1,"max":null,"increment":1}}
AJAXKeypad Plus wirelesskeypad, connectable to the AJAX Hub 2 or Hub 2 Plus. Arm and disarm the system and activate night mode using the keypad.
The batteries last up to 3.5 years. Create a personal code for each user so you know who armed or disarmed the system and when. The user's name will be displayed in the event log.
After 3 unsuccessful attempts to enter the code, an alarm signal will be sent. You can create an alarm code that, when entered, simulates disarming the system if someone forces the user to disarm it; however, an alarm signal is immediately sent to the security company.
KeyPad Plus Jeweller User Manual
Updated
KeyPad Plus Jeweller is a wireless touch keypad for managing the Ajax system using encrypted contactless cards and key fobs. Designed for indoor installation. Supports a “silent alarm” when theduress code is enteredin.
The keypad manages security modes using passwords and cards or key fobs. It indicates the current security mode with an LED light.
The keypad operates as part of the Ajax system by connecting to the hub via the Jeweller secure radio communication protocol . The communication range without obstacles is up to 1,700 meters. The pre-installed battery has a life of up to 3.5 years.
SmartBracket mounting plate (to remove the plate, slide it down)
Do not tear off the perforated part of the mount. It is required to trigger the tamper in the event of any attempt to dismantle the keypad.
Power button
Tamper button
Keypad QR Code
Operating Principle
KeyPad Plus Jeweller arms and disarms the security system for the entire facility or for separate groups, and also allows you to activate the"" Night Mode. You can control the security modes with KeyPad Plus Jeweller using:
Codes. The keypad supports general and personal codes, as well as arming without entering a code.
Cards or key fobs. You can connect Tag key fobs and Pass cards to the system. To quickly and securely identify users, KeyPad Plus Jeweller uses DESFire® technology. DESFire® is based on the ISO 14443 international standard and combines 128-bit encryption with copy protection.
KeyPad Plus Jeweller supports the following code types:
Keypad code — a general code set up for the keypad. When used, all events are sent to Ajax apps on behalf of the keypad.
User code — a personal code set up for a user connected to the hub. When used, all events are delivered to Ajax apps on behalf of the user.
Keypad access code — set up for a person who is not registered in the system. When used, events are sent to Ajax apps with a name associated with this code.
The RRU code is an access code for the rapid response units (RRU) that is activated after an alarm is triggered and remains valid for a specified period. When the code is activated and used, events are sent to the Ajax apps with a title associated with this code.
The number of personal, access, and RRU codes depends on the hub model.
Access codes are not supported by the Hub (2G) Jeweller control panel.
Before entering a code or using Tag/Pass, you should activate (“wake up”) the KeyPad Plus Jeweller by sliding your hand over the touch panel from top to bottom. When it is activated, the button backlight turns on, and the keypad beeps.
The "Auto-wake on Delay when Entering function automatically activates the keypad when "Delay When Entering is configured. This function is supported by KeyPad Plus Jeweller with firmware version 6.60.0.6 or higher and hubs running OS Malevich 2.19 or higher.
The KeyPad Plus Jeweller is equipped with LED indicators that show the current security mode and any keypad malfunctions. The security status is displayed only when the keypad is active (the device backlight is on).
You can use the KeyPad Plus Jeweller without ambient lighting, as the keypad has a backlight. Pressing the buttons is accompanied by an audible signal. The backlight brightness and keypad volume can be adjusted in the settings. If you do not touch the keypad for 4 seconds, the KeyPad Plus Jeweller reduces the backlight brightness, and 8 seconds later, it enters power-saving mode and turns off the display.
If the batteries are discharged, the backlight turns on at the minimum brightness level regardless of the settings.
Function button
KeyPad Plus Jeweller features a"" function button that operates in 3 modes:
When the button is off, it is disabled and nothing happens when it is pressed.
Alarm — after the Function button is pressed, the system sends an alarm to the security company's monitoring station and all users.
Mute interconnected fire detector alarms — after the Function button is pressed, the system mutes the alarms of the Ajax fire detectors. Available only if an Interconnected Fire Detectors Alarm is enabled (Hub → Settings → Service → Fire detector settings)
KeyPad Plus Jeweller supports duress code. It allows you to simulate alarm deactivation. The Ajax app and sirens installed at the facility will not give you away in this case, but the security company and other users of the security system will be alerted to the incident.
The KeyPad Plus Jeweller can be used in a two-stage arming process, but cannot be used as a second-stage device. The two-stage arming process using a Tag or Pass is similar to arming using a personal or general code on the keypad.
The Ajax system can connect to the CMS and transmit events and alarms to the monitoring station of the security company inSurGard (Contact ID), ADEMCO 685, SIA (DC-09),and other proprietary protocol formats. A complete list of supported protocols isavailable here:. The device ID and the loop (zone) number can be found in its states.
Connection
KeyPad Plus Jeweller is incompatible with Hub (2G) Jeweller, third-party security control panels, and the ocBridge Plus and uartBridge integration modules.
Before establishing a connection
The hub and the device, which operate on different radio frequencies, are incompatible. The device's radio frequency range may vary by region. We recommend purchasing and using Ajax devices in the same region. You can check the range of operating radio frequencies by contacting thetechnical support service at.
Install the Ajax app and to create an account. Add a hub and create at least one room.
Make sure the hub is turned on and has Internet access (via Ethernet cable, Wi-Fi, and/or a mobile network). You can check this by opening the Ajax app or by looking at the hub logo on the faceplate—it will light up white or green if the hub is connected to the network.
Make sure the hub is not in armed mode and does not initiate updates by checking its status in the app.
Only a user or PRO with full admin rights can add a device to the hub.
To connect the KeyPad Plus Jeweller
Open the Ajax app. If your account has access to multiple hubs, select the one to which you want to connect the KeyPad Plus Jeweller.
Go to the" " menu under "Devices and click"" "Add Device."
Name the keypad, scan or enter the QR code (located on the package and under the SmartBracket mount), and select a room.
Click Add; the countdown will begin.
Turn on the keypad by holding down the power button for 3 seconds. Once connected, KeyPad Plus Jeweller will appear in the hub device list in the app. To connect, place the keypad in the same protected facility as the system (within the coverage area of the hub’s radio network). If the connection fails, try again in 10 seconds.
The keypad works with only one hub. When connected to a new hub, the device stops sending commands to the old hub. Once added to a new hub, the KeyPad Plus Jeweller is not removed from the old hub's device list. This must be done manually through the Ajax app.
The KeyPad Plus Jeweller turns off automatically 6 seconds after being turned on if the keypad fails to connect to the hub. Therefore, you do not need to turn off the device to retry the connection.
Updating the statuses of devices in the list depends on the Jeweller settings; the default value is 36 seconds.
Icons
The icons represent some of the KeyPad Plus Jeweller's states. You can view them in the"" tab under "Devices in the Ajax app.
Icon
Value
Jeweller signal strength — Displays the signal strength between the hub or radio signal range extender and the KeyPad Plus Jeweller
Displays the status of the ReX Jeweller range extender.
The field is not displayed if the keypad communicates directly with the hub.
Pass/Tag Reading
Displays whether the card and key fob reader is enabled.
Assigned Group: Easy Management
Indicates whether the security mode can be switched using a pass or tag without confirmation via the control buttons , , .
Easy Armed Mode Change
This setting replacesthe "" and "Assigned Group Easy Management" settings on the KeyPad Plus Jeweller with firmware version 5.60.6.3 or higher, when operating with hubs running the"" OS Malevich 2.19 or higher.
Displays the configuration for the"" and "Easy Armed Mode Change" features :
Off- —each attempt to arm or disarm the system must be confirmed by entering the passcode or presenting the access device.
Arm/disarm using an access device without confirming the action with buttons — allows users to switch the system's security modes using access devices without confirming the action by pressing keypad buttons.
Disarm without the disarm button — the system or its groups, whose security is managed using a passcode or access devices, will be disarmed without confirmation by pressing the keypad buttons.
A fixed passcode length should be set in the hub settings in the Ajax PRO app.
Permanent Deactivation
Displays the device's status:
From — the device operates normally and transmits all events.
Lid only — the hub administrator has disabled notifications about the body opening.
—the hub administrator has completely excluded the keypad from the system. The device does not execute system commands and does not report alarms or other events.
Shows the status of the keypad's one-time deactivation setting:
, the keypad operates in normal mode.
Lid-only —notifications regarding keypad tamper triggers are disabled until the first disarm.
—the keypad is completely excluded from the system's operation until the first disarm. The device does not execute system commands and does not report alarms or other events.
KeyPad Plus Jeweller is configured in the Ajax app:
Go to the" " tab under "Devices .
Select"" KeyPad Plus Jeweller from the list.
Go to Settings by clicking on the gear icon .
To apply the settings after making a change, click the" " buttonBack
Parameter
Value
Name
Device name. Displayed in the list of hub devices, SMS messages, and notifications in the event feed.
To change the device name, click the pencil icon .
The name can contain up to 12 Cyrillic characters or up to 24 Latin characters.
Room
Selecting the virtual room to which KeyPad Plus Jeweller is assigned.
The name of the room is displayed in the text of text messages and notifications in the event feed.
Group Management
Selecting the security group controlled by the device. You can select all groups or just one.
The field is displayed when " is enabled inGroup mode.
If the"" "Followed group feature is configured for groups, their security status can automatically change depending on their settings and the status of the initiators.
.
Access Settings
Selecting the method for arming or disarming:
Keypad codes only.
User codes only.
Keypad and user codes.
To activate the Keypad Access Codes set up for people who are not registered in the system, select the following options on the keypad: Keypad codes only or Keypad and user codes
.
Keypad Code
Selection of a general code for security control. Consists of 4 to 6 digits.
Duress Code
Selecting a general duress code for a silent alarm. Consists of 4 to 6 digits.
Selecting the function of the * button (Function button):
Off —the"" function button is disabled and does not execute any commands when pressed.
Panic — after the"" button is pressed, the system sends an alarm to the CMS and to all users.
Mute Interconnected Fire Detectors Alarm— when pressed, mutes the alarm of Ajax fire detectors. Available only if the"" Interconnected Fire Detectors Alarm is enabled.
When enabled, the"" function button must be pressed twice to send a panic alarm.
This setting is available if Function button is set to Panic.
Unauthorized Access Auto-Lock
If enabled, the keypad is locked for the preset duration if an incorrect code is entered or unverified passes/tags are used more than 3 times in a row within 1 minute.
It is not possible to disarm the system using the keypad during this time. You can unlock the keypad through the Ajax app.
Auto-Lock Time, min
Selecting the keypad lockout period after incorrect code attempts:
3 minutes.
5 minutes.
10 minutes.
20 minutes.
30 minutes.
60 minutes.
90 minutes.
180 minutes.
Brightness
Selecting the brightness of the keypad button backlight. The backlight is on only when the keypad is active.
This option does not affect the brightness level of the pass/tag reader and security mode indicators.
Buttons Volume
Selecting the volume level using the keypad buttons when they are pressed.
Pass/Tag Reading
When enabled, security mode can be controlled using Pass and Tag access devices.
Authorization Confirmation Using a Passcode
When enabled, system authorization using access devices requires confirmation of the action with a user or keypad code. This feature is available if the"" toggle under "Pass/Tag Reading is enabled.
This setting is supported when KeyPad Plus Jeweller is connected to hubs with firmware version OS Malevich 2.20 or higher.
Time for confirmation
Selects the maximum time allowed to confirm authorization with a password after the access devices have confirmed the request. Available if the"" toggle under "Authorization confirmation with a passcode is enabled.
This setting is supported when KeyPad Plus Jeweller is connected to hubs running firmware version OS Malevich 2.21 or higher.
Assigned Group: Easy Management
When enabled, changing the security mode using a tag and passcode does not require confirmation by pressing the“” arm button,the “” disarm button, orthe “” Night Mode button . The security mode switches automatically. This option is available if“” Pass/Tag Reading is enabled in the keypad settings.
If group mode is enabled, this option is available when the keypad is assigned to a specific group—the“”field in theGroup Managementsection of the keypad settings.
This setting replacesthe "" and "Assigned Group Easy Management" settings on the KeyPad Plus Jeweller with firmware version 5.60.6.3 or higher, when operating with hubs running the"" OS Malevich 2.19 or higher.
Allows users to arm or disarm the system without confirmation by pressing the buttons on the keypad.
There are three options available:
Off- —each attempt to arm or disarm the system must be confirmed by entering the passcode or presenting the access device.
Arm/disarm using an access device without confirming the action with buttons — allows users to switch the system's security modes using access devices without confirming the action with keypad buttons.
Disarm without the disarm button — the system or its groups, whose security is managed using a passcode or access devices, will be disarmed without confirmation by pressing the keypad buttons.
A fixed passcode length should be set in the hub settings in the Ajax PRO app.
Arming Without Code
This option allows you to arm the system without entering a code. To do so, simply click the"" "Arm or"" "Night Mode button.
Auto-Wake-Up Delay Upon Entry
This feature is available on the KeyPad Plus Jeweller with firmware version 6.60.0.6 or higher, when used with hubs runningthe OS Malevich 2.19 , or higher.
Activates the keypad afteraDelay When Entering is triggered by any security device .
The auto-wake feature may also reduce the keypad's battery life.
Sound an alarm with a siren if the panic button is pressed
The field is displayed if the"" option is selected under"Alarm" for the"" function ( ) button. When this option is enabled, the sirens connected to the security system sound an alert when the * button ( ) is pressed.
Jeweler Signal Strength Test
Switches the keypad to the Jeweller signal strength test mode.
Opens the KeyPad Plus Jeweller user manual in the Ajax app.
Permanent Deactivation
Allows the user to disable the device without removing it from the system.
There are three options available:
From — the device operates in normal mode and transmits all events.
—the device does not execute system commands and does not participate in automation scenarios, and the system ignores alarms and other device notifications.
The system only —the system ignores notifications triggered by device tampering.
Allows the user to disable the device's alarms until the first disarm.
There are three options available:
From — the device operates in normal mode.
Lid-only — notifications regarding device tampering are disabled while the armed mode is active.
—the device is completely excluded from the system's operation while armed mode is active. The device does not execute system commands and does not report alarms or other events.
The Ajax system allows you to set up a keypad code, as well as personal codes for users added to the hub.
With the OS Malevich 2.13.1 update, we have also added the ability to create access codes for people who are not added to the hub. This is convenient, for example, for granting a cleaning company access to security management.
With the“” OS Malevich 2.17 update, codes for rapid response units are available. The RRU codes are activated after the alarm and are valid for a specified period. See below for instructions on how to set up and use each type of code.
To set the keypad code
Go to keyboard settings.
Select " Keypad Code.
Set the keypad code you want.
To set the keypad duress code
Go to the keypad settings.
Select"" and "Duress Code."
Set the keypad duress code of your choice.
To set a personal code in the Ajax app
Go to the user profile settings (Hub → Settings → Users → Your profile settings).
Select"" > "Passcode Settings" > (Your User ID is also displayed in this menu).
Set User Code and Duress Code.
Each user sets their own personal code. The administrator cannot set a code for all users.
To set up an access code for a person who is not registered in the system
Go to the hub settings (Hub → Settings).
Select " Keypad Access Codes.
Set up Username and Access Code.
If you want to set up a duress code, change settings for group access, Night Mode, or the code ID, or temporarily disable or delete this code, select it from the list and make the changes.
PRO or a user with admin rights can set up an access code or change its settings. This feature is supported by hubs running OS Malevich 2.13.1 or later. Access codes are not supported by the Hub (2G) Jeweller control panel.
To set up the RRU code
Only a PRO user with the necessary permissions to configure the system can create and configure RRU codes in the Ajax PRO apps. For more information on configuring this feature, seethis article at .
The RRU codes are supported by hubs (except for the Hub (2G) Jeweller model) running OS Malevich 2.17 or later.
Adding passes and tags
KeyPad Plus Jeweller is compatible with Tag key fobs, Pass cards, and third-party cards and key fobs that use DESFire® technology.
Before adding third-party devices that support DESFire®, make sure they have enough free memory to handle the new keypad. Ideally, the third-party device should be pre-formatted.
The maximum number of connected passes/tags depends on the hub model. At the same time, the bound passes and tags do not affect the total limit on the number of devices connected to the hub.
Hub model
Number of Tag or Pass devices
Hub (4G) Jeweller
50
Hub Plus Jeweler
99
Hub 2 Jeweler
50
Hub 2 Plus Jeweler
200
Superior Hub Hybrid
50
The procedure for connecting Tag, Pass, and third-party devices is the same. See the connection instructions here.
Controlling security through codes
You can control Night Mode, security for the entire facility, or for separate groups using general, personal, RRU, and access codes (configured by PRO or a user with admin rights). The keypad allows you to use 4- to 6-digit codes. Incorrectly entered numbers can be cleared using the button.
If a personal code or access code is used, the name of the user who armed or disarmed the system is displayed in the hub's event feed and in the notifications list. If a general code is used, the name of the user who changed the security mode is not displayed.
Keypad access codes are supported by hubs (except for the Hub (2G) Jeweller model) running OS Malevich 2.13.1 or later.
, RRU codes are supported by hubs (except for the Hub (2G) Jeweller model) running OS Malevich 2.17 or later.
Arming with a personal code
The username is displayed in the notifications and events feed
Arming with a general code
The"" device name is displayed in the notifications and events feed
KeyPad Plus Jeweller is locked for the duration specified in the settings if an incorrect code is entered three times in a row within 1 minute. The corresponding notifications are sent to users and to the security company’s monitoring station. A user or PRO with administrator rights can unlock the keypad in the Ajax app.
Controlling security at the facility using a general code
Activate the keypad by swiping your hand over it. Hold the Tag or Pass up to the keypad's pass/tag reader if the Authorization confirmation with a passcode feature is enabled.
Enter thegeneral code for the "."
Press the to arm/disarm/Night Mode key.
For example: 1234 →
Group security management using a general code
Activate the keypad by swiping your hand over it. Hold the Tag or Pass up to the keypad's pass/tag reader if the Authorization confirmation with a passcode feature is enabled.
If a security group is assigned to KeyPad Plus Jeweller (in the"" field under"Group Management in the keypad settings), you do not need to enter the group ID. To manage the security mode for this group, simply enter a general or personal code.
If a group is assigned to KeyPad Plus Jeweller, you will not be able to manage Night Mode using a general code. In this case, Night Mode can only be managed using a personal code if the user has the appropriate permissions.
Security management of the facility using a personal code
Activate the keypad by swiping your hand over it. Hold the Tag or Pass up to the keypad's pass/tag reader if the Authorization confirmation with a passcode feature is enabled.
Activate the keypad by swiping your hand over it. Hold the Tag or Pass up to the keypad's pass/tag reader if the Authorization confirmation with a passcode feature is enabled.
Enter the User ID.
Press the * (Function ) button.
Enter your personal code.
Press the * (Function ) button.
Enter the " Group ID.
Press the to arm/disarm/Night Mode key.
For example: 2 → * → 1234 → * → 5 →
If a group is assigned to KeyPad Plus Jeweller (in the"" field under"Group Management in the keypad settings), you do not need to enter the group ID. To manage the security mode for this group, simply enter a personal code.
A duress code allows you to simulate alarm deactivation. In this case, the Ajax app and the sirens installed at the facility will not give the user away, but the security company and other users will be alerted to the incident. You can use either a personal or a general duress code. In the " and "Keypad Access Codes" sections, you can also set up a duress code for people who are not registered in the system.
Scenarios and sirens respond to disarming under duress in the same way as they do to normal disarming.
Activate the keypad by swiping your hand over it. Hold the Tag or Pass up to the keypad's pass/tag reader if the Authorization confirmation with a passcode feature is enabled.
Enter thegeneral duress code for the .
Press the disarming button .
For example: 4321→
To use a registered user's personal duress code
Activate the keypad by swiping your hand over it. Hold the Tag or Pass up to the keypad's pass/tag reader if the Authorization confirmation with a passcode feature is enabled.
Enter the User ID.
Press the * (Function ) button.
Enter thepersonal duress code for the .
Press the disarming button .
For example: 2→ * → 4422 →
To use the duress code of a person who is not registered in the system
Enter the"" duress code as set out in"" Keypad Access Codes and press the"" disarming key.
For example: 4567→
Using the RRU code
The RRU code is activated after the alarm is triggered, within the time period configured in the hub settings, and remains valid for a specified period. This ensures that the code is used only in the event of a security threat, unlike keypad or user codes.
Security control of the facility using the RRU code:
Enter RRU Code and press the arming/ disarming/ Night Mode activationbutton.
For example: 1234→
Security control of the group using the RRU code:
Enter RRU Code, press *, enter Group ID, and press the arming/ disarming/ Night Mode activationbutton.
For example: 1234 → * → 2→
Security Management Using Tags or Passes
Activate the keypad by swiping your hand over it. KeyPad Plus Jeweller will beep (if enabled in the settings) and turn on the backlight.
Note that the keypad can be activated automatically with the“” “Auto-wake on Delay when Entering” function if“” “Delay When Entering” is configured. This function is supported by KeyPad Plus Jeweller with firmware version 6.60.0.6 or higher and hubs with“” OS Malevich 2.19 or higher.
Hold your tag or pass up to the keypad's pass/tag reader. It is marked with wave icons.
Enter the required code if the" " feature is enabled and you are promptedto confirm authorization with a passcode .
Press the Arm, Disarm, or Night Mode button on the keypad.
Note that if Easy armed mode change is enabled in the KeyPad Plus Jeweller settings, you do not need to press the Arm, Disarm, or Night Mode button. The security mode will change to the opposite after tapping Tag or Pass.
Security control for a single group
Tag or Pass can control the security mode of a single group. This is possible if KeyPad Plus Jeweller is not assigned to any group and Tag or Pass has no group restrictions.
To change the security mode of a single group using a tag or password:
Activate the keypad by swiping your hand over it. Hold the Tag or Pass up to the keypad's pass/tag reader if the Authorization confirmation with a passcode feature is enabled.
Press the arming/ disarming/ Night Mode activationbutton.
For example: → 01→
If the security mode is successfully changed, a short beep will sound, the indicator will change, and a notification containing the username will appear in the event log.
Mute Interconnected Fire Detectors: Alarm Function
KeyPad Plus Jeweller can silence an interconnected fire alarm by pressing the Function button (if the required setting is enabled). The system's response to pressing a button depends on the settings and the system's status:
Interconnected fire detectors have already been installed — with the first press of the button, all fire detector sirens are silenced, except for those that triggered the alarm. Pressing the button again silences the remaining detectors.
The delay time for interconnected alarms lasts — by pressing the Function button, the siren of the triggered Ajax fire detectors is muted.
KeyPad Plus Jeweller can report the current security mode, keystrokes, malfunctions, and its status via LED indicators and audible alerts. The current security mode is displayed by the backlight after the keypad is activated. Information about the current security mode remains valid even if the arming mode is changed by another device—such as a key fob, another keypad, or an app.
The "Auto-wake on Delay when Entering function automatically activates the keypad when "Delay When Entering is configured. This function is supported by KeyPad Plus Jeweller with firmware version 6.60.0.6 or higher and hubs running OS Malevich 2.19 or higher.
You can activate the keypad by swiping your hand over the touch panel from top to bottom. When activated, the keypad's backlight will turn on and a beep will sound (if enabled).
Event
Indication
There is no connection to the hub or the wireless signal range extender
LEDXis blinking
The KeyPad Plus Jeweller housing is open (the SmartBracket mount has been removed)
LEDXflashesbriefly once
Touch button pressed
A short beep; the current system security status LED flashes once. The volume depends on the keypad settings
The system is armed
Short beep, Armed or Night Mode LED lights up
The system is disarmed
Two short beeps— . Disarmed , the LED lights up
An incorrect code was entered, or an attempt was made to change the security mode using an unconnected or deactivated pass/tag
A long beep; the LED backlight on the digital unit flashes 3 times
Security mode cannot be enabled (for example, a window is open and the System integrity check is enabled)
A long beep; the current security status LED flashes 3 times
The hub does not respond to the command—there is no connection
Long beep,X(Malfunction) , the LED lights up
The keypad is locked because an incorrect code was entered or an attempt was made to use an unauthorized pass or tag
A long beep, during which the security status LEDs and the keypad backlight flash three times
The batteries are low
After changing the security mode, theXLED lights up. The touch buttons are locked during this time.
When you try to turn on the keypad with dead batteries, it emits a long beep, theXLEDslowly lights up and then goes out, and the keypad turns off
The system requires you to confirm your authorization with a password after the access devices have been verified. Available if the"" feature is enabled and the "Authorization confirmation with a passcode" feature is activated at .
The current security status LED flashes for the set duration to confirm
Audible alerts for malfunctions
If any device is offline or the battery is low, KeyPad Plus Jeweller can alert system users with an audible alert. The keyboards’ХLEDswillflash. Malfunction notifications will be displayed in the events feed, via SMS, or as a push notification.
To enable audio notifications for malfunctions, usethe Ajax PRO and PRO Desktopapps:
Click Devices, select the hub, and open its settings : Click Service → Sounds and Alerts
Enable the following toggles: if any device's battery is low, , and if any device is offline.
Click Back to save your settings.
Settings for audible notifications of malfunctions are available for all hubs (except the Hub model) running firmware version OS Malevich 2.15 or higher.
The KeyPad Plus Jeweller with firmware version 5.57.5.0 or higher supports audible notifications of malfunctions.
Event
Indication
Note
If any device is offline.
Two short beeps— Malfunction : TheХindicatorflashestwice.
Beep once per minute until all devices in the system are online.
Users can delay the audible alert for 12 hours.
If KeyPad Plus is offline.
Two short beeps— Malfunction : TheХindicatorflashestwice.
Beep once per minute until the system's keyboard is online.
It is impossible to delay the audible signal.
If the battery of any device is low.
Three short beeps— Malfunction : TheХindicatorflashesthree times.
Beep once per minute until the battery is recharged or the device is removed.
Users can delay the audible alert for 4 hours.
Audible alerts for malfunctions sound once the keypad display has finished. If multiple malfunctions occur in the system, the keypad will first alert you to a loss of connection between the device and the hub.
Functionality Testing
The Ajax system offers several types of tests to help you ensure that device installation points are selected correctly.
KeyPad Plus Jeweller functionality tests do not start immediately, but after no more than one hub-detector ping period (36 seconds when using the standard hub settings). You can change the ping period for devices in the"" section of the "Jeweller menu in the hub settings.
Tests are available in the device settings menu (Ajax App → Devices → KeyPad Plus Jeweller → Settings )
The KeyPad Plus Jeweller is best placed indoors near the entrance. This allows you to disarm the system before the entry delays have expired, as well as to quickly arm the system when leaving the premises.
When holding the KeyPad Plus Jeweller in your hands or using it on a table, we cannot guarantee that the touch buttons will work properly.
It is recommended to install the keypad 1.3 to 1.5 meters above the floor for convenience. Install the keypad on a flat, vertical surface. This ensures that the KeyPad Plus Jeweller is securely attached to the surface and helps prevent false tamper alarms.
In addition, the placement of the keypad is determined by the distance from the hub or the radio signal range extender, and the presence of obstacles between them that block the radio signal: walls, floors, and other objects.
Be sure to check the Jeweller signal strength at the installation site. If the signal strength is low (one bar), we cannot guarantee that the security system will operate reliably. At the very least, move the device to a different location, as even a 20-cm shift can significantly improve signal reception.
In places where clothing (for example, next to a hanger), power cords, or Ethernet cables may obstruct the keypad. This can cause the keypad to trigger falsely.
Inside premises where the temperature and humidity exceed the permissible limits. This could damage the device.
In locations where the KeyPad Plus Jeweller has an unstable or weak signal with the hub or the radio signal range extender.
Within 1 meter of a hub or radio signal range extender.
Near electrical wiring. This may cause communication interference.
Outdoors. This could damage the device.
Installing the Keypad
Before installing KeyPad Plus Jeweller, be sure to select the best location in accordance with the requirements in this manual.
Attach the keypad to the surface with double-sided adhesive tape and performsignal strengthtests— , and attenuation. If the signal strength is unstable or if only one bar is displayed, move the keypad or use the radio signal range extender.
Double-sided adhesive tape may only be used for temporary attachment of the keypad. A device attached with adhesive tape can detach from the surface at any time and fall, which may cause it to malfunction.
Please note that if the device is attached with adhesive tape, the tamper will not trigger when you attempt to detach it.
Check how convenient it is to enter a code using a tag or pass to manage security modes. If it is inconvenient to manage security at the selected location, relocate the keypad.
Remove the keypad from the SmartBracket mounting plate.
Attach the SmartBracket mounting plate to the surface using the included screws. When attaching, use all mounting points. Be sure to secure the perforated corner of the SmartBracket plate so that the tamper sensor is triggered if anyone attempts to remove it.
Slide the KeyPad Plus Jeweller onto the mounting plate and tighten the mounting screw at the bottom of the unit. The screw ensures a more secure attachment and prevents the keypad from being easily removed.
As soon as the keypad is secured to the SmartBracket, LEDXwill flash once—this indicates that the tamper has been triggered. If the LED does not flash after installation on the SmartBracket, check the tamper status in the Ajax app, and then make sure the keypad is securely attached.
Maintenance
Check the operation of your keypad regularly. You can do this once or twice a week. Clean the unit of dust, cobwebs, and other contaminants as they appear. Use a soft, dry cloth that is suitable for cleaning equipment.
Do not use substances containing alcohol, acetone, gasoline, or other active solvents to clean the detector. Wipe the touch keypad gently: scratches can reduce the sensitivity of the keypad.
The batteries installed in the keypad provide up to 3.5 years of autonomous operation at default settings. If the battery is low, the system sends appropriate notifications, and theX(Malfunction) indicator gradually lights up and goes out after each successful code entry.
The KeyPad Plus Jeweller can continue to operate for up to 2 months after the low-battery warning is displayed. However, we recommend that you replace the batteries immediately upon receiving the notification. We recommend using lithium batteries, as they have a high capacity and are less affected by temperature fluctuations.
The warranty for products manufactured by the Limited Liability Company “Ajax Systems Manufacturing” is valid for 2 years after purchase and does not cover the included batteries.
If the device does not work properly, we recommend that you first contact customer support, as half of the technical issues can be resolved remotely.
AJAX Keypad Plus wireless keyboard, connects to AJAX Hub 2 or Hub 2 Plus. Turn on and off security, night mode with the keypad.
Battery life up to 3.5 years. Create a personal code for each user to know who turned the security on or off and when. The user's name will be reflected in the notification log.
An alarm will be sent after 3 unsuccessful attempts to enter the code. An alarm code can be created to simulate the removal of a security guard if someone forces the user to remove the security guard, but the alarm is sent immediately to the security company.
KeyPad Plus Jeweller user manual
Updated
KeyPad Plus Jewelleris a wireless touch keypad for managing the Ajax system with encrypted contactless cards and key fobs. Designed for indoor installation. Supports "silent alarm" when entering theduress code.
The keypad manages security modes using passwords andcardsorkey fobs. Indicates the current security mode with a LED light.
The keypad operates as part of the Ajax system by connecting via theJeweller secure radio communication protocolto the hub. The communication range without obstacles is up to 1700 meters. The pre-installed battery life is up to 3.5 years.
SmartBracket mounting plate (to remove the plate, slide it down)
Do not tear off the perforated part of the mount. It is required for actuating the tamper in case of any attempt to dismantle the keypad.
Power button
Tamper button
Keypad QR Code
Operating principle
KeyPad Plus Jeweller arms and disarms the security of the entire facility or separate groups as well as allows activating theNight Mode. You can control the security modes with KeyPad Plus Jeweller using:
Codes. The keypad supports general and personal codes, as well as as arming without entering a code.
Cards or key fobs. You can connectTag key fobsandPass cardsto the system. To quickly and securely identify users, KeyPad Plus Jeweller uses the DESFire® technology. DESFire® is based on the ISO 14443 international standard and combines 128-bit encryption and copy protection.
KeyPad Plus Jeweller supports code types as follows:
Keypad code- general code set up for the keypad. When used, all events are delivered to Ajax apps on behalf of the keypad.
User code- personal code set up for a user connected to the hub. When used, all events are delivered to Ajax apps on behalf of the user.
Keypad access code- set up for a person who is not registered in the system. When used, events are delivered to Ajax apps with a name associated with this code.
RRU codeis an access code for the rapid response units (RRU) activated after the alarm and valid for a specified period. When the code is activated and used, events are delivered to Ajax apps with a title associated with this code.
The number of personal, access, and RRU codes depends on the hub model.
Access codes are not supported by theHub (2G) Jewellercontrol panel.
Before entering a code or using Tag/Pass, you should activate ("wake up") the KeyPad Plus Jeweller by sliding your hand over the touch panel from top to bottom. When it is activated, the button backlight is enabled, and the keypad beeps.
Auto-wake on Delay when Enteringfunction allows automatically activating the keypad whenDelay When Enteringis set up. This function is supported by KeyPad Plus Jeweller with firmware version 6.60.0.6 or higher and hubs withOS Malevich 2.19or higher.
The KeyPad Plus Jeweller is equipped with LED indicators that show the current security mode and keypad malfunctions (if any). The security status is displayed only when the keypad is active (the device backlight is on).
You can use the KeyPad Plus Jeweller without ambient lighting as the keypad has a backlight. The pressing of the buttons is accompanied by a sound signal. The backlight brightness and keypad volume are adjustable in the settings. If you do not touch the keypad for 4 seconds, KeyPad Plus Jeweller reduces the backlight brightness, and 8 seconds later goes into power-saving mode and turns off the display.
If the batteries are discharged, the backlight turns on at the minimum level regardless of the settings.
Function button
KeyPad Plus Jeweller has aFunctionbutton that operates in 3 modes:
Off- the button is disabled and nothing happens after it is pressed.
Alarm- after theFunctionbutton is pressed, the system sends an alarm to the security company monitoring station and all users.
Mute interconnected fire detectors alarm- after theFunctionbutton is pressed, the system mutes the alarm of the Ajaxfire detectors. Available only if anInterconnected Fire Detectors Alarmis enabled (Hub → Settings → Service → Fire detectors settings)
KeyPad Plus Jeweller supportsduress code. It allows you to simulate alarm deactivation. The Ajaxappandsirensinstalled at the facility will not give you away in this case, but the security company and other users of the security system will be warned about the incident.
KeyPad Plus Jeweller can participate in two-stage arming, but cannot be used as a second-stage device. The two-stage arming process using Tag or Pass is similar to arming using a personal or general code on the keypad.
The Ajax system can connect to the CMS and transmit events and alarms to the monitoring station of the security company inSurGard (Contact ID), ADEMCO 685, SIA (DC-09), and other proprietary protocol formats. A complete list of supported protocols isavailable here. The device ID and the number of the loop (zone) can be found inits states.
Connection
KeyPad Plus Jeweller is incompatible with Hub (2G) Jeweller, third-party security central units, and ocBridge Plus and uartBridge integration modules.
Before starting connection
The hub and the device operating at different radio frequencies are incompatible. The radio-frequency range of the device may vary by region. We recommend purchasing and using Ajax devices in the same region. You can check the range of operating radio frequencies with thetechnical support service.
Install the Ajax app andcreate an account. Add a hub and create at least one room.
Ensure that the hub is on and has Internet access (via Ethernet cable, Wi-Fi, and/or mobile network). This can be done by opening the Ajax app or by looking at the hub logo on the faceplate - it lights white or green if the hub is connected to the network.
Make sure that the hub is not in armed mode and does not start updates by checking its status in the app.
Only a user or PRO with full admin rights can add a device to the hub.
To connect KeyPad Plus Jeweller
Open the Ajax app. If your account has access to multiple hubs, select the one to which you want to connect KeyPad Plus Jeweller.
Go to theDevices menu and clickAdd Device.
Name the keypad, scan or enter the QR code (located on the package and under the SmartBracket mount), and select a room.
ClickAdd; the countdown will begin.
Turn on the keypad by holding the power button for 3 seconds. Once connected, KeyPad Plus Jeweller will appear in the hub device list in the app. To connect, locate the keypad at the same protected facility as the system (within the coverage area of the hub radio network range). If the connection fails, try again in 10 seconds.
The keypad only works with one hub. When connected to a new hub, the device stops sending commands to the old hub. Once added to a new hub, KeyPad Plus Jeweller is not removed from the device list of the old hub. This must be done manually through the Ajax app.
KeyPad Plus Jeweller turns off automatically 6 seconds after being turned on if the keypad fails to connect to the hub. Therefore, you do not need to turn off the device to retry the connection.
Updating the statuses of devices in the list depends on the Jeweller settings; the default value is 36 seconds.
Icons
The icons represent some of KeyPad Plus Jeweller states. You can see them in theDevices tab in the Ajax app.
Icon
Value
Jeweller signal strength - Displays the signal strength between the hub or radio signal range extender and KeyPad Plus Jeweller
Displays the status of the ReX Jeweller range extender use.
The field is not displayed if the keypad works directly with the hub.
Pass/Tag Reading
Displays if card and keyfob reader is enabled.
Assigned Group Easy Management
Displays whether or not the security mode can be switched with Pass or Tag and without confirmation by the control buttons , , .
Easy Armed Mode Change
This setting replacesAssigned Group Easy Managementon KeyPad Plus Jeweller with firmware version 5.60.6.3 or higher, operating with hubs withOS Malevich 2.19or higher.
Shows the configuration for theEasy Armed Mode Changefeature:
Off- each arming or disarming attempt should be confirmed by entering the passcode or presenting the access device.
Arm/disarm using access device without confirming action by buttons- allows users to switch security modes of the system using access devices without confirmation by pressing keypad buttons.
Disarm without disarming button- the system or its groups, the security of which is managed with a passcode or access devices, will be disarmed without confirmation by pressing keypad buttons.
A fixed passcode length should be set in the hub settings in the Ajax PRO app.
Permanent Deactivation
Shows the status of the device:
No- the device operates normally and transmits all events.
Lid only- the hub admin has disabled notifications about the body opening.
Entirely- the hub admin has entirely excluded the keypad from the system. The device does not execute system commands and does not report alarms or other events.
Shows the status of the keypad one-time deactivation setting:
No- the keypad operates in normal mode.
Lid only- notifications on the keypad tamper triggering are disabled until the first disarm.
Entirely- the keypad is entirely excluded from the operation of the system until the first disarm. The device does not execute system commands and does not report alarms or other events.
KeyPad Plus Jeweller is configured in the Ajax app:
Go to theDevices tab.
SelectKeyPad Plus Jewellerfrom the list.
Go toSettingsby clicking on the gear icon .
To apply the settings after the change, click theBackbutton
Parameter
Value
Name
Device name. Displayed in the list of hub devices, SMS text, and notifications in the event feed.
To change the device name, click on the pencil icon .
The name can contain up to 12 Cyrillic characters or up to 24 Latin characters.
Room
Selecting the virtual room to which KeyPad Plus Jeweller is assigned.
The name of the room is displayed in the text of SMS and notifications in the event feed.
Group Management
Selecting the security group controlled by the device. You can select all groups or just one.
The field is displayed when theGroup modeis enabled.
If theFollowed groupfeature is configured for groups, their security state can automatically change depending on their settings and initiators' states.
.
Access Settings
Selecting the method of arming/disarming:
Keypad codes only.
User codes only.
Keypad and user codes.
To activate theKeypad Access Codesset up for people who are not registered in the system, select the options on the keypad:Keypad codes onlyorKeypad and user codes
.
Keypad Code
Selection of a general code for security control. Contains 4 to 6 digits.
Duress Code
Selecting a general duress code for silent alarm. Contains 4 to 6 digits.
Selecting the function of the * button(Functionbutton):
Off- theFunctionbutton is disabled and does not execute any commands when pressed.
Panic- after theFunctionbutton is pressed, the system sends an alarm to the CMS and to all users.
Mute Interconnected Fire Detectors Alarm - when pressed, mutes the alarm of Ajaxfire detectors. Available only if anInterconnected Fire Detectors Alarmis enabled.
When enabled, theFunctionbutton should be pressed twice to send a panic alarm.
This setting is available ifFunction buttonis set toPanic.
Unauthorized Access Auto-Lock
If active, the keypad is locked for the pre-set time if an incorrect code is entered or unverified passes/tags are used more than 3 times in a row within 1 minute.
It is not possible to disarm the system via keypad during this time. You can unlock the keypad through the Ajax app.
Auto-lock Time, min
Selecting the keypad lock period after wrong code attempts:
3 minutes.
5 minutes.
10 minutes.
20 minutes.
30 minutes.
60 minutes.
90 minutes.
180 minutes.
Brightness
Selecting brightness of the keypad buttons backlight. The backlight works only when the keypad is active.
This option does not affect the brightness level of pass/tag reader and security modes indicators.
Buttons Volume
Selecting the keypad buttons volume level when pressed.
Pass/Tag Reading
When enabled, the security mode can be controlled with Pass and Tag access devices.
Authorisation confirmation with a passcode
When enabled, system authorization using access devices requires confirmation of the action with the user or keypad code. Available if thePass/Tag Readingtoggle is enabled.
This setting is supported when KeyPad Plus Jeweller is connected to hubs with firmware versionOS Malevich 2.20or higher.
Time for confirmation
Selecting the maximum time to confirm authorization with a password after access devices' confirmation. Available if theAuthorization confirmation with a passcodetoggle is enabled.
This setting is supported when KeyPad Plus Jeweller is connected to hubs with firmware versionOS Malevich 2.21or higher.
Assigned Group Easy Management
When enabled, changing the security mode with Tag and Pass does not require confirmation by pressing thearm,disarm, orNight Modebutton. The security mode is switched automatically.The option is available ifPass/Tag Readingis enabled in the keypad settings.
If the group mode is activated, the option is available when the keypad is assigned to a particular group - theGroup Managementfield in the keypad settings.
This setting replacesAssigned Group Easy Managementon KeyPad Plus Jeweller with firmware version 5.60.6.3 or higher, operating with hubs withOS Malevich 2.19or higher.
Allows users to arm/disarm the system without confirmation by pressing keypad buttons.
Three options are available:
Off- each arming or disarming attempt should be confirmed by entering the passcode or presenting the access device.
Arm/disarm using access device without confirming action by buttons- allows users to switch security modes of the system using access devices without confirmation with keypad buttons.
Disarm without disarming button- the system or its groups, the security of which is managed with a passcode or access devices, will be disarmed without confirmation by pressing keypad buttons.
A fixed passcode length should be set in the hub settings in the Ajax PRO app.
Arming without Code
The option allows you to arm the system without entering a code. To do so, just click on theArmorNight Modebutton.
Auto-wake on Delay when Entering
The feature is available on KeyPad Plus Jeweller with firmware version 6.60.0.6 or higher, operating with hubs withOS Malevich 2.19or higher.
Activates the keypad afterDelay When Enteringis started by any security device.
The auto-wake feature may also reduce the keypad battery life.
Alert with a siren if the panic button is pressed
The field is displayed if theAlarmoption is selected for theFunctionbutton.When the option is enabled, the sirens connected to the security system give an alert when the * button(Functionbutton) is pressed.
Jeweller Signal Strength Test
Switches the keypad to the Jeweller signal strength test mode.
Opens KeyPad Plus Jeweller user manual in the Ajax app.
Permanent Deactivation
Allows the user to disable the device without removing it from the system.
Three options are available:
No- the device operates in normal mode and transmits all events.
Entirely- the device does not execute system commands and does not participate in automation scenarios, and the system ignores alarms and other device notifications.
Lid only- the system ignores the device tamper triggering notifications.
Allows the user to disable events of the device until the first disarm.
Three options are available:
No- the device operates in normal mode.
Lid only- notifications on the device tamper triggering are disabled while the armed mode is active.
Entirely- the device is completely excluded from the operation of the system while the armed mode is active. The device does not execute system commands and does not report alarms or other events.
The Ajax system allows you to set up a keypad code, as well as personal codes for users added to the hub.
With theOS Malevich 2.13.1update, we have also added the ability to create access codes for people who are not added to the hub. This is convenient, for example, to provide a cleaning company with access to security management.
With theOS Malevich 2.17update, codes for the rapid response units are available. The RRU codes are activated after the alarm and are valid for a specified period. See how to set up and use each type of code below.
To set keypad code
Go to keyboard settings.
SelectKeypad Code.
Set the keypad code you want.
To set the keypad duress code
Go to keypad settings.
SelectDuress Code.
Set the keypad duress code you want.
To set a personal code in the Ajax app
Go to the user profile settings(Hub→Settings →Users→Your profile settings).
SelectPasscode Settings(User ID is also visible in this menu).
SetUser CodeandDuress Code.
Each user sets a personal code individually. The admin cannot set a code for all users.
To set up an access code for a person who is not registered in the system
Go to the hub settings(Hub→Settings ).
SelectKeypad Access Codes.
Set upUsernameandAccess Code.
If you want to set up a duress code, change settings for access to groups, Night Mode, code ID, temporarily disable or delete this code, select it in the list and make changes.
PRO or a user with admin rights can set up an access code or change its settings. This function is supported by hubs with OS Malevich 2.13.1 and higher. Access codes are not supported by the Hub (2G) Jeweller control panel.
To set up the RRU code
Only a PRO with the rights to configure the system can create and configure the RRU codes in the AjaxPRO apps. More information about configuring this feature you can find inthis article.
The RRU codes are supported by hubs (except the Hub (2G) Jeweller model) with OS Malevich 2.17 and higher.
Adding passes and tags
KeyPad Plus Jeweller can work withTag key fobs,Pass cards, and third-party cards and key fobs that use DESFire® technology.
Before adding third-party devices that support DESFire®, make sure they have enough free memory to handle the new keypad. Preferably, the third-party device should be pre-formatted.
The maximum number of connected passes/tags depends on the hub model. At the same time, the bound passes and tags do not affect the total limit of devices on the hub.
Hub model
Number of Tag or Pass devices
Hub (4G) Jeweller
50
Hub Plus Jeweller
99
Hub 2 Jeweller
50
Hub 2 Plus Jeweller
200
Superior Hub Hybrid
50
The procedure for connecting Tag, Pass, and third-party devices is the same. See the connecting instructionshere.
Controlling security via codes
You can controlNight Mode, security of the entire facility or separate groups using general, personal, RRU, and access codes (configured by PRO or a user with admin rights). The keypad allows you to use 4 to 6 digit codes. Incorrectly entered numbers can be cleared with the button.
If a personal code or access code is used, the name of the user who armed or disarmed the system is displayed in the hub event feed and in the notifications list. If a general code is used, the name of the user who changed the security mode is not displayed.
Keypad access codesare supported by hubs (except theHub (2G) Jewellermodel) with OS Malevich 2.13.1 and higher.
The RRUcodesare supported by hubs (except theHub (2G) Jewellermodel) with OS Malevich 2.17 and higher.
Arming with a personal code
Theusernameis displayed in the notifications and events feed
Arming with a general code
Thedevice nameis displayed in the notifications and events feed
KeyPad Plus Jeweller is locked for the time specified in the settings if an incorrect code is entered three times in a row within 1 minute. The corresponding notifications are sent to users and to the monitoring station of the security company. A user or PRO with administrator rights can unlock the keypad in the Ajax app.
Controlling security at the object via general code
Activate the keypad by swiping your hand over it. Bring Tag or Pass to the keypad pass/tag reader if theAuthorization confirmation with a passcodefeature is activated.
Enter thegeneral code.
Press thearming/disarming /NightMode key.
For example: 1234 →
Group security management with a general code
Activate the keypad by swiping your hand over it. Bring Tag or Pass to the keypad pass/tag reader if theAuthorization confirmation with a passcodefeature is activated.
If a security group is assigned to KeyPad Plus Jeweller (in theGroup Managementfield in the keypad settings), you do not need to enter the group ID. To manage the security mode of this group, entering a general or personal code is sufficient.
If a group is assigned to KeyPad Plus Jeweller, you will not be able to manageNight Modeusing a general code. In this case,Night Modecan only be managed using a personal code if the user has the appropriate rights.
Security management of the facility using a personal code
Activate the keypad by swiping your hand over it. Bring Tag or Pass to the keypad pass/tag reader if theAuthorization confirmation with a passcodefeature is activated.
Activate the keypad by swiping your hand over it. Bring Tag or Pass to the keypad pass/tag reader if theAuthorization confirmation with a passcodefeature is activated.
Enter theUser ID.
Press the *(Functionbutton).
Enter yourpersonal code.
Press the *(Functionbutton).
Enter theGroup ID.
Press thearming/disarming /NightMode key.
For example: 2 → * → 1234 → * → 5 →
If a group is assigned to KeyPad Plus Jeweller (in theGroup Managementfield in the keypad settings), you do not need to enter the group ID. To manage the security mode of this group, entering a personal code is sufficient.
A duress code allows you to simulate alarm deactivation. The Ajax app and sirens installed at the facility will not give the user away in this case, but the security company and other users will be warned about the incident. You can use both a personal and a general duress code. InKeypad Access Codes, you can also set up a duress code for people not registered in the system.
Scenarios and sirens react to disarming under duress in the same way as to normal disarming.
Activate the keypad by swiping your hand over it. Bring Tag or Pass to the keypad pass/tag reader if theAuthorization confirmation with a passcodefeature is activated.
Enter thegeneral duress code.
Press the disarming button .
For example:4321 →
To use a personal duress code of registered user
Activate the keypad by swiping your hand over it. Bring Tag or Pass to the keypad pass/tag reader if theAuthorization confirmation with a passcodefeature is activated.
Enter theUser ID.
Press the *(Functionbutton).
Enter thepersonal duress code.
Press the disarming button .
For example:2 → * → 4422 →
To use a duress code of a person who is not registered in the system
Enter theduress codeset inKeypad Access Codesand press thedisarming key .
For example:4567 →
Using the RRU code
The RRU code is activated after triggering the alarm during the time configured in the hub settings, and it is valid for a specified period. This ensures that such code will only be used in case of risk, unlike keypad or user codes.
Security control of the object using the RRU code:
Enter RRUCodeand press thearming / disarming/ Night Mode activationbutton.
For example: 1234→
Security control of the group using the RRU code:
Enter RRUCode, press *, enterGroup ID, and press thearming / disarming/ Night Mode activationbutton.
For example: 1234 → *→ 2→
Security management using Tag or Pass
Activate the keypad by swiping your hand over it. KeyPad Plus Jeweller will beep (if enabled in the settings) and turn on the backlight.
Note that the keypad can be activated automatically with theAuto-wake on Delay when Enteringfunction ifDelay When Enteringis set up. This function is supported by KeyPad Plus Jeweller with firmware version 6.60.0.6 or higher and hubs withOS Malevich 2.19or higher.
Bring Tag or Pass to the keypad pass/tag reader. It is marked with wave icons.
Enter the required code if theAuthorization confirmation with a passcodefeature is activated.
Press theArm,Disarm, orNight Modebutton on the keypad.
Note that ifEasy armed mode changeis enabled in the KeyPad Plus Jeweller settings, you do not need to press theArm,Disarm, orNight Modebutton. The security mode will change to the opposite after tapping Tag or Pass.
Security control of a single group
Tag or Pass can control the security mode of a single group. This is possible if KeyPad Plus Jeweller is not assigned to any group and Tag or Pass has no group restrictions.
To change the security mode of a single group using Tag or Pass:
Activate the keypad by swiping your hand over it. Bring Tag or Pass to the keypad pass/tag reader if theAuthorization confirmation with a passcodefeature is activated.
Press thearming / disarming/ Night Mode activationbutton.
For example: → 01→
If the security mode is successfully changed, a short beep will sound, the indicator will change, and a notification with the username will appear in the event log.
Mute Interconnected Fire Detectors Alarms function
KeyPad Plus Jeweller can mute an interconnected fire alarm by pressing theFunctionbutton (if the required setting is enabled). The reaction of the system to pressing a button depends on the settings and the state of the system:
Interconnected Fire Detectors Alarms have already propagated- by the first press of the button, all sirens of the fire detectors are muted, except for those that registered the alarm. Pressing the button again mutes the remaining detectors.
Interconnected alarms delay time lasts- by pressing theFunctionbutton, the siren of the triggered Ajaxfire detectorsis muted.
KeyPad Plus Jeweller can report the current security mode, keystrokes, malfunctions, and its status by LED indication and sound. The current security mode is displayed by the backlight after the keypad is activated. The information about the current security mode is relevant even if the arming mode is changed by another device: a key fob, another keypad, or an app.
Auto-wake on Delay when Enteringfunction allows automatically activating the keypad whenDelay When Enteringis set up. This function is supported by KeyPad Plus Jeweller with firmware version 6.60.0.6 or higher and hubs withOS Malevich 2.19or higher.
You can activate the keypad by swiping your hand over the touch panel from top to bottom. When activated, the backlight on the keypad will turn on and a beep will sound (if enabled).
Event
Indication
There is no connection to the hub or radio signal range extender
LEDXblinks
KeyPad Plus Jeweller body is open (SmartBracket mount is removed)
LEDXblinks briefly once
Touch button pressed
Short beep, the current system security status LED blinks once. The volume depends on the keypad settings
The system is armed
Short beep,ArmedorNight ModeLED lights up
The system is disarmed
Two short beeps, theDisarmedLED lights up
An incorrect code was entered or there was an attempt to change security mode by an unconnected or deactivated pass/tag
Long beep, digital unit LED backlight blinks 3 times
The security mode cannot be activated (for example, a window is open and theSystem integrity checkis enabled)
Long beep, the current security status LED blinks 3 times
The hub does not respond to the command - there is no connection
Long beep,X(Malfunction)LED lights up
The keypad is locked due to a wrong code attempt or attempt to use an unauthorised pass/tag
Long beep, during which the security status LEDs and keypad backlight blink 3 times
The batteries are low
After changing the security mode, theX LED lights up. The touch buttons are locked for this time.
When you try to turn on the keypad with discharged batteries, it emits a long beep, theXLED smoothly lights up and goes off, then the keypad turns off
The system requires to confirm authorization with a password after access devices' confirmation. Available if theAuthorization confirmation with a passcodefeature is activated
The current security status LED blinks during the set time for confirmation
Sound notifications of malfunctions
If any device is offline or the battery is low, KeyPad Plus Jeweller can notify system users with an audible sound. The keyboards' LEDsХwill blink. Malfunction notifications will be displayed in the events feed, SMS text, or push notification.
To enable sound notifications of malfunctions, use Ajax PRO and PRO Desktopapps:
ClickDevices , choose hub and open its settings : ClickService→Sounds and Alerts
Enable toggles:If battery of any device is lowandIf any device is offline.
ClickBackto save settings.
Sound notifications of malfunctions settings are available for all hubs (except the Hub model) with firmware version OS Malevich 2.15 or higher.
Sound notifications of malfunctions are supported by KeyPad Plus Jeweller with firmware version 5.57.5.0 or higher.
Event
Indication
Note
If any device is offline.
Two short sound signals,MalfunctionindicatorХindicator blinks twice.
Beep once per minute until all devices in the system are online.
Users can delay sound indication for 12 hours.
If KeyPad Plus is offline.
Two short sound signals,MalfunctionindicatorХindicator blinks twice.
Beep once per minute until the keyboard in the system is online.
It's impossible to delay sound indication.
If battery of any device is low.
Three short sound signals,MalfunctionindicatorХblinks three times.
Beep once per minute until the battery is restored or the device is removed.
Users can delay sound indication for 4 hours.
Sound notifications of malfunctions appear when the keypad indication is finished. If several malfunctions occur in the system, the keypad will notify about the loss of connection between the device and the hub first.
Functionality testing
The Ajax system provides several types of tests that help you make sure that installation points of devices are selected correctly.
KeyPad Plus Jeweller functionality tests do not start straight away but after no more than one hub-detector ping period (36 seconds when using the standard hub settings). You can change the ping period of devices in theJewellermenu of the hub settings.
Tests are available in the device settings menu (Ajax App → Devices → KeyPad Plus Jeweller → Settings )
KeyPad Plus Jeweller is best placed indoors near the entrance. This allows disarming the system before the entry delays have expired, as well as quickly arming the system when leaving the premises.
When holding KeyPad Plus Jeweller in your hands or using it on a table, we cannot guarantee that the touch buttons will work properly.
It is a good practice to install the keypad 1.3 to 1.5 meters above the floor for convenience. Install the keypad on a flat, vertical surface. This allows KeyPad Plus Jeweller to be firmly attached to the surface and to avoid false tamper triggering.
Besides, the placement of the keypad is determined by the distance from the hub or the radio signal range extender, and the presence of obstacles between them that prevent the passage of the radio signal: walls, floors, and other objects.
Be sure to check the Jeweller signal strength at the installation site. If the signal strength is low (a single bar), we cannot guarantee a stable operation of the security system. At the very least, relocate the device as repositioning even by 20 cm can significantly improve the signal reception.
In places where parts of clothing (for example, next to the hanger), power cables, or Ethernet wire may obstruct the keypad. This can lead to false triggering of the keypad.
Inside premises with temperature and humidity outside the permissible limits. This could damage the device.
In places where KeyPad Plus Jeweller has an unstable or poor signal strength with the hub or radio signal range extender.
Within 1 meter of a hub or radio signal range extender.
Close to electrical wiring. This may cause communication interferences.
Outdoors. This could damage the device.
Installing the keypad
Prior to installing KeyPad Plus Jeweller, be sure to select the optimal location following the requirements of this manual.
Attach the keypad to the surface with double-sided adhesive tape and carry outsignal strengthandattenuation tests. If the signal strength is unstable or if one bar is displayed, move the keypad or use theradio signal range extender.
Double-sided adhesive tape may only be used for temporary attachment of the keypad. The device attached with adhesive tape can at any time be detached from the surface and fall, which may lead to failure.
Please note that if the device is attached with adhesive tape, the tamper will not trigger when trying to detach it.
Check the convenience for code entry using Tag or Pass to manage security modes. If it is inconvenient to manage the security at the selected location, relocate the keypad.
Remove the keypad from the SmartBracket mounting plate.
Attach the SmartBracket mounting plate to the surface using the bundled screws. When attaching, use all fixing points. Be sure to fix the perforated corner on the SmartBracket plate so that the tamper responds to a detachment attempt.
Slide KeyPad Plus Jeweller onto the mounting plate and tighten the mounting screw at the bottom of the body. The screw is needed for more reliable fastening and protection of the keypad from quick dismantling.
As soon as the keypad is fixed on the SmartBracket, it shall blink once with LEDX - this is a signal that the tamper has been triggered. If the LED does not blink after installation on SmartBracket, check the tamper status in the Ajax app, and then make sure the plate is firmly attached.
Maintenance
Check the functioning of your keypad on a regular basis. This can be done once or twice a week. Clean the body from dust, cobwebs, and other contaminants as they emerge. Use a soft dry cloth that is suitable for equipment care.
Do not use substances that contain alcohol, acetone, gasoline or other active solvents to clean the detector. Wipe the touch keypad gently: scratches can reduce the sensitivity of the keypad.
The batteries installed in the keypad provide up to 3.5 years of autonomous operation at default settings. If the battery is low, the system sends appropriate notifications, and theX(Malfunction) indicator smoothly lights up and goes out after each successful code entry.
KeyPad Plus Jeweller can work up to 2 months after the low battery signal. However, we recommend you replace the batteries immediately upon notification. It is advisable to use lithium batteries. They have a large capacity and are less affected by temperatures.
The warranty for the Limited Liability Company "Ajax Systems Manufacturing" products is valid for 2 years after purchase and does not extend to the bundled batteries.
If the device does not function properly, we recommend that you first contact the support service as half of the technical issues can be resolved remotely.
AJAX Wireless Smoke and Heat Detector FireProtect White
SKU: 367304827
€70,55€89,98
Unit price
Description
AJAX Wireless smoke detectorFireProtect with a temperature sensor that monitors safety in the room 24 hours a day and immediately reports smoke and rapid temperature jumps.
Can work separately as a smoke detector thanks to the built-in siren. Independently inspects the smoke chamber and immediately reports the need for dust removal.
The device detects smoke using a camera with a photoelectric sensor. But if the smoke is still not emitted, the detector registers the temperature increase in the room.
Ready to work right out of the box: the battery is already installed, so there is no need to disassemble the detector. It can be connected to the hub in a mobile app with one click. It can be installed on the SmartBracket in just a few minutes.
Detector type: Wireless
Installation: Indoors
Connectivity: With all Ajax Hubs, but can be used as a stand-alone device
Sensing element: Photoelectric and temperature sensor
Activation threshold: +59°С ±2°С
Notification types: Sound/light
Built-in siren volume: 85 dB
Alarm signal transmission speed: 0.15 s
False alarm filter: Yes
Power: Two CR2 batteries, 3V
Backup battery: CR2032
Battery life: 4 years
There is no warranty for the batteries
Operating temperature: From 0°С to +65°С
Humidity: Up to 80%
Remote testing and settings: Yes
Dimensions: 132 × 132 × 31 mm
Weight: 220 g
The installation instructions are available in the Ajax app, which will open by scanning the QR code of the detector at the time of installation. Easy installation and connection to the Ajax central Hub.
Available for pickup at
Out of stock at
Added to compare
Reached count_product-product limit
Added to compare
Reached count_product-product limit
{"id":41592065458359,"title":"Default Title","option1":"Default Title","option2":null,"option3":null,"sku":"367304851","requires_shipping":true,"taxable":true,"featured_image":null,"available":true,"name":"AJAX Wireless Indoor Curtain Type Motion Detector MotionProtect Curtain White color","public_title":null,"options":["Default Title"],"price":7055,"weight":0,"compare_at_price":8998,"inventory_management":"shopify","barcode":"856963007903","requires_selling_plan":false,"selling_plan_allocations":[],"quantity_rule":{"min":1,"max":null,"increment":1}}
AJAX Wireless Indoor Curtain Type Motion Detector MotionProtect Curtain White color
SKU: 367304851
€70,55€89,98
Unit price
Indoor curtain detectorMotionProtect Curtain is suitable for installation at doors, windows, gates. Detection range 15m.
Works only with one of the Ajax security control panels.
Reliable perimeter protection.
Garage protection.
Works even at -10°C.
With the right installation, can also be installed if you have pets.
Detector type.
Adjustable from 6 to 15 m
Installation: Indoor
Compatibility: With all Ajax control panels
Alarm transmission time: 0.15 seconds
Detection angle:
Horizontal - 6°
Vertical - 90°
Motion detection speed: 0.3 to 2 m/s
Recommended installation height: 2.4 m
Power supply: CR123A batteries, 3 V, up to 3 years
Communication range with other equipment: up to 1,700 m in open environments
Operating temperature: -10°C to +40°C
Size: 134 × 44 × 34 mm
Weight: 118 g
No warranty on batteries.
Installation instructions are available in the Ajax app, which will open when you scan the detector's QR code during installation. Simple installation and connection to the Ajax Hub.
Available for pickup at
Out of stock at
Added to compare
Reached count_product-product limit
Added to compare
Reached count_product-product limit
{"id":41613546913975,"title":"Default Title","option1":"Default Title","option2":null,"option3":null,"sku":"367304850","requires_shipping":true,"taxable":true,"featured_image":null,"available":true,"name":"AJAX Wireless Indoor Curtain Type Motion Detector MotionProtect Curtain in black","public_title":null,"options":["Default Title"],"price":7055,"weight":0,"compare_at_price":8998,"inventory_management":"shopify","barcode":null,"requires_selling_plan":false,"selling_plan_allocations":[],"quantity_rule":{"min":1,"max":null,"increment":1}}
AJAX Wireless Indoor Curtain Type Motion Detector MotionProtect Curtain in black
SKU: 367304850
€70,55€89,98
Unit price
Curtain type indoor detectorMotionProtect Curtain is suitable for installation at doors, windows, gates. Reception range at a distance of 15m.
Only works together with one of the Ajax security centers.
Reliable perimeter protection.
Protection in garages.
Works even at -10°C.
With the correct installation, you can also put it if you have pets.
Detector type: Wireless
Motion detection distance: Adjustable from 6 to 15 m
Installation: Indoors
Connectivity: With all Ajax centrals
Alarm sending time: 0.15 seconds
Detection angle:
Horizontal — 6°
Vertical — 90°
Motion detection speed: From 0.3 to 2 m/s
Recommended installation height: 2.4 m
Power source: Batteries CR123A, 3 V, up to 3 years
Communication range with other equipment: up to 1,700 m in an open environment
Operating temperature: From −10°С to +40°С
Size: 134 × 44 × 34 mm
Weight: 118 g
Batteries have no warranty.
The installation instructions are available in the Ajax app, which will open by scanning the QR code of the detector at the time of installation. Easy installation and connection to the Ajax central Hub.
AJAX Wireless indoor motion detector MotionCam with photo verification White
SKU: 367304848
€146,22€172,46
Unit price
Wireless motion detector with photo verification option MotionCam .
Works only with AJAX CentralHub 2orHub 2 Plus .
Sends a verification image to the user in 9 seconds.
With MotionCam, you will learn about the actual situation at home even before the thieves realize that they have been caught. An animated series of photos is sent immediately after motion is detected.
MotionCam is designed to monitor your safety, not your personal life. The motion detector cannot take pictures on demand. The camera only activates in response to a motion alarm. Data is encrypted throughout the transmission and storage process. You don't have to watch the video cameras all the time to know why the alarm went off.
The detector does not react to animals up to 20 kg and 50 cm. But if a particularly curious pet manages to set off the alarm (especially a cat), the photo report will confirm that the house is safe.
Easy to add by scanning the machine's QR code in the Ajax app.
Installation: Indoors
Motion detection distance: Up to 12m
Immunity against animals: Weight up to 20 kg, 50 cm
Power supply: Batteries CR123A (×2), 3 V, duration of work up to 4 years, or up to 2.5 years if the "Entry delay" function is turned on
There is no warranty for the batteries.
Operating temperature: from -10°C to +40°C
Size: 135 × 70 × 60 mm
Weight: 167 years
The installation instructions are available in the Ajax app, which will open by scanning the QR code of the detector at the time of installation. Easy installation and connection to the Ajax central Hub.
Available for pickup at
Out of stock at
Added to compare
Reached count_product-product limit
Added to compare
Reached count_product-product limit
{"id":46874647560527,"title":"Default Title","option1":"Default Title","option2":null,"option3":null,"sku":"367308964","requires_shipping":true,"taxable":true,"featured_image":null,"available":true,"name":"AJAX Wireless Indoor Motion Detector MotionCam PhOD (Image on Demand) with photo verification White","public_title":null,"options":["Default Title"],"price":14816,"weight":0,"compare_at_price":18896,"inventory_management":"shopify","barcode":"4823114014161","requires_selling_plan":false,"selling_plan_allocations":[],"quantity_rule":{"min":1,"max":null,"increment":1}}
AJAX Wireless Indoor Motion Detector MotionCam PhOD (Image on Demand) with photo verification White
SKU: 367308964
€148,16€188,96
Unit price
Wireless motion detector with photo verification option MotionCam PhOD . Photo on request.
Works only with AJAX CentralHub 2orHub 2 Plus .
Sends a verification image to the user in 9 seconds.
With MotionCam, you will learn about the actual situation at home even before the thieves realize that they have been caught. An animated series of photos is sent immediately after motion is detected.
MotionCam is designed to monitor your safety, not your personal life. The motion detector cannot take pictures on demand. The camera only activates in response to a motion alarm. Data is encrypted throughout the transmission and storage process. You don't have to watch the video cameras all the time to know why the alarm went off.
The detector does not react to animals up to 20 kg and 50 cm. But if a particularly curious pet manages to set off the alarm (especially a cat), the photo report will confirm that the house is safe.
Easy to add by scanning the machine's QR code in the Ajax app.
Installation: Indoors
Motion detection distance: Up to 12m
Immunity against animals: Weight up to 20 kg, 50 cm
Power supply: Batteries CR123A (×2), 3 V, duration of work up to 4 years, or up to 2.5 years if the "Entry delay" function is turned on
There is no warranty for the batteries.
Operating temperature: from -10°C to +40°C
Size: 135 × 70 × 60 mm
Weight: 167 years
The installation instructions are available in the Ajax app, which will open by scanning the QR code of the detector at the time of installation. Easy installation and connection to the Ajax central Hub.
AJAX Wireless indoor motion detector MotionCam PhOD with photo verification Black
SKU: 367308963
(1)
€188,96
Unit price
Wireless motion detector with photo verification option MotionCam PhOD (photo on demand). It is possible to send a request at any time to take a picture of what is happening on your property.
Works only with AJAX CentralHub 2orHub 2 Plus .
Sends a verification image to the user in 9 seconds.
With MotionCam, you will learn about the actual situation at home even before the thieves realize that they have been caught. An animated series of photos is sent immediately after motion is detected.
MotionCam is designed to monitor your safety, not your personal life. The motion detector cannot take pictures on demand. The camera only activates in response to a motion alarm. Data is encrypted throughout the transmission and storage process. You don't have to watch the video cameras all the time to know why the alarm went off.
The detector does not react to animals up to 20 kg and 50 cm. But if a particularly curious pet manages to set off the alarm (especially a cat), the photo report will confirm that the house is safe.
Easy to add by scanning the machine's QR code in the Ajax app.
Installation: Indoors
Motion detection distance: Up to 12m
Immunity against animals: Weight up to 20 kg, 50 cm
Power supply: Batteries CR123A (×2), 3 V, duration of work up to 4 years, or up to 2.5 years if the "Entry delay" function is turned on
There is no warranty for the batteries.
Operating temperature: from -10°C to +40°C
Size: 135 × 70 × 60 mm
Weight: 167 years
The installation instructions are available in the Ajax app, which will open by scanning the QR code of the detector at the time of installation. Easy installation and connection to the Ajax central Hub.