{"id":55850811523407,"title":"Default Title","option1":"Default Title","option2":null,"option3":null,"sku":"367309034","requires_shipping":true,"taxable":true,"featured_image":null,"available":true,"name":"Bezkontakta karte priekš KeyPad Plus (10gab) balta","public_title":null,"options":["Default Title"],"price":5227,"weight":0,"compare_at_price":6666,"inventory_management":"shopify","barcode":null,"requires_selling_plan":false,"selling_plan_allocations":[],"quantity_rule":{"min":1,"max":null,"increment":1}}
Bezkontakta karte priekš KeyPad Plus (10gab) balta
SKU: 367309034
€52,27€66,66
Vienības cena
Tag and Pass user manual
Updated
TagandPassare encrypted contactless access devices for managing the security modes of the Ajax system. They have the same functions and differ only in their body: Tag is a key fob, and Pass is a card.
Tag and Pass allow you to manage an object’s security without an account, access to the Ajax app, or knowing the password — all it takes is activating a compatible keypad and putting the key fob or card to it. The security system or a specific group will be armed or disarmed.
To quickly and securely identify users, KeyPad Plus uses the DESFire® technology. DESFire® is based on the ISO 14443 international standard and combines 128-bit encryption and copy protection.
Tag and Pass usage is recorded in the events feed. The system administrator can at any time revoke or restrict the access rights of the contactless identification device through the Ajax app.
Tag and Pass can work with or without user binding, which affects the notification texts in Ajax app and SMS.
With user binding
Theusernameis displayed in the notifications and events feed
Without user binding
Thedevice nameis displayed in the notifications and events feed
Tag and Pass can work with several hubs at the same time. The maximum number of hubs in the device memory is 13. Keep in mind that you need to bind a Tag or Pass to each of the hubs separately through the Ajax app.
The maximum number of Tag and Pass devices connected to a hub depends on the hub model. At the same time, the Tag or Pass does not affect the total limit of devices on the hub.
Hub model
Number of Tag and Pass devices
Hub Plus
99
Hub 2
50
Superior Hub Hybrid (2G)/(4G)
50
Hub 2 Plus
200
One user can bind any number of Tag and Pass devices within the limit of contactless identification devices on the hub. Keep in mind that devices remain connected to the hub even after all keypads have been removed.
Sending events to the monitoring station
The Ajax security system can connect to the monitoring station and transmit events to the CMS viaSurGard (Contact-ID),SIA (DC-09), ADEMCO 685, and other proprietary protocols. A complete list of supported protocols isavailable here.
When a Tag or Pass is bound to a user, arm and disarm events will be sent to the monitoring station with the user ID. If the device is not bound with the user, the hub will send the event with the device identifier. You can find the device ID in theStatusmenu.
Adding to the system
The devices are incompatible with the hub type ofHub, third-party security central panels, andocBridge PlusanduartBridgeintegration modules. Pass and Tag only work with KeyPad Plus keyboards.
Before adding a device
Install theAjax app. Create anaccount. Add a hub to the app and create at least one room.
Make sure that the hub is on and has access to the internet (via Ethernet cable, Wi-Fi, and/or mobile network). You can do this in the Ajax app or by looking at the hub logo on the front panel — the hub lights white or green when connected to the network.
Make sure the hub is not armed nor updates by looking at its status in the Ajax app.
Make sure a compatible keypad with DESFire® support is already connected to the hub.
If you want to bind a Tag or Pass to a user, make sure that the user’s account has already been added to the hub.
Only a user or PRO with administrator rights can connect a device to the hub.
How to add a Tag or Pass to the system
Open the Ajax app. If your account has access to multiple hubs, select the one to which you want to add a Tag or Pass.
Go to theDevicestab.
Make sure thePass/Tag Readingfeature is enabled in at least one keypad settings.
ClickAdd Device.
From the drop-down menu, selectAdd Pass/Tag.
Specify the type (Tag or Pass), colour, device name, and name (if necessary).
ClickNext. After that, the hub will switch to the device registration mode.
Go to any compatible keypad withPass/Tag Readingenabled, activate it — the device will beep (if enabled in the settings), and the backlight will light up. Then press thedisarming key. The keypad will switch to the access device logging mode.
Put Tag or Pass with the wide side to the keypad reader for a few seconds. It is marked with wave icons on the body. Upon successful addition, you will receive a notification in the Ajax app.
If the connection fails, try again in 5 seconds. Please note that if the maximum number of Tag or Pass devices has already been added to the hub, you will receive a corresponding notification in the Ajax app when adding a new device.
Tag and Pass can work with several hubs at the same time. The maximum number of hubs is 13. Keep in mind that you need to bind devices to each of the hubs separately through the Ajax app.
If you try to bind a Tag or Pass to a hub that has already reached the hub limit (13 hubs are bound to them), you will receive a corresponding notification. To bind such a Tag or Pass to a new hub, you will need to reset it (all data from tag/pass will be erased).
Selection of security modes and groups that can be managed by this Tag or Pass.
The field is displayed and active if Tag or Pass is not associated with the user
Active
Allows you to temporarily disable Tag or Pass without removing the device from the system
User Guide
Opens the Tag and Pass User Manual in the Ajax app
Unpair device
Removes Tag or Pass and its settings from the system.
There are two options for removing: when Tag or Pass is placed nearby, or access to it is absent.
If Tag or Pass is nearby:
Start the device removal process.
Go to any compatible keypad and activate it.
Press the disarming key. The keypad will change to access devices removal mode.
Bring the Tag or Pass to the keypad reader. It is marked with wave icons on the body. Upon successful removal, you will receive a notification in the Ajax app.
When you delete a Tag or Pass in this way, they disappear from the list of hub devices in the application.
If Tag or Pass is not available:
Start the device removal process.
Select theDelete without pass/tagoption and follow the app’s instructions.
In this case, the hub is not deleted from the Tag or Pass memory. To clear the device’s memory, you will need to reset it (all data will be deleted from the device).
Binding a Tag or Pass to a user
When a Tag or Pass is linked to a user, it fully inherits the rights to manage the user’s security modes. For example, if a user was able to manage only one group, then the bound Tag or Pass will have the right to manage only this group.
One user can bind any number of Tag or Pass devices within the limit of contactless identification devices connected to the hub.
User rights and permissions are stored in the hub. After being bound to a user, Tag and Pass represent the user in the system if devices are bound to the user. Therefore, when changing user rights, you do not need to make changes to the Tag or Pass settings — they are applied automatically.
To bind a Tag or Pass to a user, in the Ajax app:
Select the required hub if there are several hubs in your account.
Go to theDevicesmenu.
SelectPasses/Tags.
Select the required Tag or Pass.
Click on theto go to settings.
Select a user in the appropriate field.
ClickBackto save the settings.
When the user—to whom Tag or Pass is assigned—is deleted from the hub, the access device can not be used to manage security modes until not assigned to another user.
Temporarily deactivating a Tag or Pass
The Tag key fob or the Pass card can be temporarily disabled without removing them from the system. A deactivated card cannot be used to manage security modes.
If you try to change the security mode with a temporarily deactivated card or key fob more than 3 times, the keypad will be locked for the time set in the settings (if the setting is enabled), and corresponding notifications will be sent to the system users and to the security company monitoring station.
To temporarily deactivate a Tag or Pass, in the Ajax app:
Select the required hub if there are several hubs in your account.
Go to theDevicesmenu.
SelectPasses/Tags.
Select the required Tag or Pass.
Click on theto go to settings.
Disable theActiveoption.
ClickBackto save the settings.
To reactivate Tag or Pass, turn on theActiveoption.
Resetting a Tag or Pass
Up to 13 hubs can be bound to one Tag or Pass. As soon as this limit is reached, binding new hubs will only be possible after completely resetting Tag or Pass.
Note that resetting will delete all settings and bindings of key fobs and cards. In this case, the reset Tag and Pass are only removed from the hub from which the reset was made. On other hubs, Tag or Pass are still displayed in the app, but they cannot be used to manage the security modes. These devices should be removed manually.
When protection against unauthorized access is enabled, 3 attempts to change the security mode with a card or key fob that has been reset in a row block the keypad. Users and a security company are instantly notified. The time of blocking is set in the device settings.
To reset a Tag or Pass, in the Ajax app:
Select the required hub if there are several hubs in your account.
Go to theDevicesmenu.
Select a compatible keypad from the device list.
Click onto go to settings.
Select thePass/Tag Resetmenu.
Go to the keypad with pass/tag reading enabled and activate it. Then press thedisarming key. The keypad will change to the access device formatting mode.
Put the Tag or Pass to the keypad reader. It is marked with wave icons on the body. Upon successful formatting, you will receive a notification in the Ajax app.
Use
The devices do not require additional installation or fastening. The Tag key fob is easy to carry with you thanks to a special hole on the body. You can hang the device on your wrist or around your neck, or attach it to the key ring. The Pass card has no holes in the body, but you can store it in your wallet or phone case.
If you store a Tag or Pass in your wallet, do not place other cards next to it, such as credit or travel cards. This may interfere with the correct operation of the device when attempting to disarm or arm the system.
To change the security mode:
Activate KeyPad Plus by swiping over it with your hand. The keypad will beep (if enabled in the settings), and the backlight will light up.
Put the Tag or Pass to the keypad reader. It is marked with wave icons on the body.
Change the security mode of the object or zone. Note that if theEasy armed mode changeoption is enabled in the keypad settings, you do not need to press the security mode change button. The security mode will change to the opposite after holding or tapping Tag or Pass.
Tag and Pass can participate in two-stage arming, but cannot be used as second-stage devices. The two-stage arming process using Tag or Pass is similar to arming with a personal or general keypad password.
Tag un Pass ir šifrētas bezkontakta piekļuves ierīces Ajax sistēmas drošības režīmu pārvaldīšanai. Tām ir vienādas funkcijas, un tās atšķiras tikai ar korpusu: Tag ir atslēgu piekariņš, bet Pass ir karte.
Pass un Tag darbojas tikai ar KeyPad Plus un KeyPad TouchScreen.
Pirkt Tag Pirkt Pass
Izskats
Pass
Tag
Darbības princips
Tag un Pass ļauj pārvaldīt objekta drošību bez konta, piekļuves Ajax lietotnei vai paroles zināšanas — pietiek tikai aktivizēt saderīgu tastatūru un pie tās pietuvināt piekariņu vai karti. Drošības sistēma vai konkrēta grupa tiks ieslēgta vai izslēgta.
Lai ātri un droši identificētu lietotājus, KeyPad Plus izmanto DESFire® tehnoloģiju. Tā ir balstīta uz starptautisko standartu ISO 14443 un apvieno 128 bitu šifrēšanu un kopēšanas aizsardzību.
Tag un Pass lietošana tiek ierakstīta notikumu plūsmā. Sistēmas administrators jebkurā laikā var anulēt vai ierobežot ierīces piekļuves tiesības, izmantojot Ajax lietotni.
Kontu veidi un to tiesības
Ar lietotāja sasaisti — paziņojumos un notikumu plūsmā tiek parādīts lietotājvārds. Bez lietotāja sasaistes — tiek parādīts ierīces nosaukums.
Savietojamība ar hubiem
Maksimālais hubu skaits vienā ierīcē — 13. Katram hubam ierīce jāpievieno atsevišķi, izmantojot Ajax lietotni.
Hub modelis
Tag un Pass ierīču skaits
Hub Plus
99
Hub 2
50
Superior Hub Hybrid (2G/4G)
50
Hub 2 Plus
200
Notikumu sūtīšana uz apsardzes staciju
Ajax sistēma var nosūtīt notikumus uz CMS, izmantojot SurGard (Contact-ID), SIA (DC-09), ADEMCO 685 un citus protokolus.
Ja ierīce ir piesaistīta lietotājam — nosūtās ar lietotāja ID. Ja ierīce nav piesaistīta — nosūtās ar ierīces ID.
Pievienošana sistēmai
Ierīces nav savietojamas ar hubu Hub, trešo pušu centrālēm un moduļiem ocBridge Plus un uartBridge. Darbojas tikai ar KeyPad Plus tastatūrām.
Pirms pievienošanas:
Instalējiet Ajax lietotni un izveidojiet kontu.
Pievienojiet hubu un izveidojiet telpu.
Pārliecinieties, ka hubs ir tiešsaistē un nav apsardzes režīmā.
Hubam pievienojiet tastatūru ar DESFire® atbalstu.
Ierīces statusi
Parametrs
Vērtība
Lietotājs
Lietotājvārds, kuram piesaistīts Tag vai Pass. Ja nav piesaistes — Viesis
Aktīvs
Ierīces statuss: Jā / Nē
Identifikators
Ierīces ID, kas tiek nosūtīts CMS
Ierīces iestatīšana
Parametrs
Vērtība
Atlasīt ierīces tipu
Tag vai Pass
Krāsa
Melna vai balta
Ierīces nosaukums
Redzams sarakstā, SMS un paziņojumos (12 kirilicas vai 24 latīņu simboli)
Lietotājs
Atlasiet lietotāju, kuram piesaistīt ierīci
Drošības pārvaldība
Grupas un režīmi, kurus drīkst pārvaldīt ierīce
Aktīvs
Ļauj uz laiku deaktivizēt ierīci bez dzēšanas
Lietotāja rokasgrāmata
Atver rokasgrāmatu Ajax lietotnē
Atvienot ierīci
Noņem ierīci no sistēmas
Piesaistīšana lietotājam
Kad ierīce ir piesaistīta lietotājam, tā manto visas tā drošības pārvaldības tiesības.
Īslaicīga deaktivizēšana
Ierīci var uz laiku deaktivizēt, to nedzēšot no sistēmas. Deaktivizēta ierīce nevar mainīt drošības režīmus.
Atiestatīšana
Vienai ierīcei var piesaistīt līdz 13 hubiem. Sasniedzot limitu, nepieciešams atiestatījums — tas dzēš visus ierīces datus.
Lietošana
Tag ir ērti nēsāt pie atslēgām, uz rokas vai kaklā. Pass karti var ievietot makā vai vāciņā.
Drošības režīma maiņa
Aktivizējiet tastatūru ar roku, pietuviniet Tag vai Pass pie lasītāja un mainiet drošības režīmu.
Apkope
Tag un Pass neprasa baterijas un apkopi.
Komplekts
Tag vai Pass — 3/10/100 gab. (atkarībā no komplekta)
Ātrās palaišanas ceļvedis
Garantija
Garantija Ajax Systems Manufacturing produktiem — 2 gadi no iegādes datuma.
Ja ierīce nedarbojas pareizi, vispirms sazinieties ar tehnisko atbalstu.
Vai vēlaties, lai es arī tehniskās specifikācijas sadaļu (Tag un Pass atsevišķi) noformēju tabulās, kā internetveikalos parasti tiek rādīts produktu aprakstos?
Tu teici:
jā
ChatGPT saka:
Lieliski! Tad papildinām aprakstu ar tehniskajām specifikācijām tabulu formā, kā tas parasti ir internetveikalos.
Tehniskās specifikācijas
Tag
Parametrs
Vērtība
Ierīces tips
Bezkontakta atslēgu piekariņš
Materiāls
Plastmasa
Izmēri
37 × 25 × 6 mm
Svars
7 g
Darbības temperatūra
no –10 °C līdz +40 °C
Krāsa
Melna, balta
Savietojamība
Tikai ar KeyPad Plus, KeyPad TouchScreen
Maks. hubu skaits atmiņā
13
Drošība
DESFire® (ISO 14443, 128 bitu šifrēšana)
Barošanas avots
Nav nepieciešams (bez baterijas)
Pass
Parametrs
Vērtība
Ierīces tips
Bezkontakta karte
Materiāls
Plastmasa
Izmēri
86 × 54 × 1 mm
Svars
6 g
Darbības temperatūra
no –10 °C līdz +40 °C
Krāsa
Melna, balta
Savietojamība
Tikai ar KeyPad Plus, KeyPad TouchScreen
Maks. hubu skaits atmiņā
13
Drošība
DESFire® (ISO 14443, 128 bitu šifrēšana)
Barošanas avots
Nav nepieciešams (bez baterijas)
Komplekts
Tag vai Pass — 3/10/100 gab. (atkarībā no komplekta)
Ātrās palaišanas ceļvedis
Garantija
Garantija SIA “Ajax Systems Manufacturing” produktiem ir 2 gadi no iegādes datuma.
Ja ierīce nedarbojas pareizi, vispirms sazinieties ar tehnisko atbalstu — lielākā daļa problēmu tiek atrisinātas attālināti.
Pieejams saņemšanai veikalā
Izpārdots veikalā
Pievienots salīdzināšanai
Sasniegts count_product-produktu limits
Pievienots salīdzināšanai
Sasniegts count_product-produktu limits
{"id":41592067981495,"title":"Default Title","option1":"Default Title","option2":null,"option3":null,"sku":"367304849","requires_shipping":true,"taxable":true,"featured_image":null,"available":true,"name":"AJAX Bezvadu drošības kustības detektors MotionProtect Melnā krāsā","public_title":null,"options":["Default Title"],"price":5877,"weight":0,"compare_at_price":7496,"inventory_management":"shopify","barcode":"856963007217","requires_selling_plan":false,"selling_plan_allocations":[],"quantity_rule":{"min":1,"max":null,"increment":1}}
AJAX Bezvadu drošības kustības detektors MotionProtect Melnā krāsā
SKU: 367304849
€58,77€74,96
Vienības cena
Bezvadu kustības detektors MotionProtect, kurš pieslēdzams pie Ajax drošības centrāles. Paziņo lietotājam par ielaušanos īpašumā. Detektors jāuzstāda pie sienas pretī durvīm vai citai vietai, kur var ielauzties. Tampera trauksme - saņemsiet paziņojumu, ja kāds mēģinās noņemt detektoru. Baterijas darbības ilgums 5 gadi.
Detektors nereaģē uz dzīvniekiem līdz 20 kg un 50 cm. Pasīvas infrasarkanās detektēšanas algoritms, kas samazina viltus trauksmju skaitu. Detektors atkarībā no apkārtējas temperatūras regulē jutības pakāpi, lai efektīvi strādātu aukstajā un siltajā laikā.
Gatavs darbam uzreiz no kastes - baterija ir ielikta iekšā, tikai jāuzstāda uz kronšteina, kurš nāk komplektā ar detektoru.
Darba temperatūra: no -10°С līdz +40°С
Izmērs: 110 × 65 × 50 mm
Svars: 96 g
Baterijām garantijas nav.
Uzstādīšanas instrukcija pieejama Ajax lietotnē, kura atvērsies, noskenējot detektora QR kodu uzstādīšanas brīdī. Vienkārša uzstādīšana un pievienošana pie Ajax centrāles Hub.
Pieejams saņemšanai veikalā
Izpārdots veikalā
Pievienots salīdzināšanai
Sasniegts count_product-produktu limits
Pievienots salīdzināšanai
Sasniegts count_product-produktu limits
{"id":55850833543503,"title":"Default Title","option1":"Default Title","option2":null,"option3":null,"sku":"367308947","requires_shipping":true,"taxable":true,"featured_image":null,"available":true,"name":"Ajax Tag Bezkontakta breloks priekš KeyPad Plus (10pcs) melns","public_title":null,"options":["Default Title"],"price":5877,"weight":0,"compare_at_price":7496,"inventory_management":"shopify","barcode":null,"requires_selling_plan":false,"selling_plan_allocations":[],"quantity_rule":{"min":1,"max":null,"increment":1}}
Ajax Tag Bezkontakta breloks priekš KeyPad Plus (10pcs) melns
SKU: 367308947
€58,77€74,96
Vienības cena
Tag and Pass user manual
TagandPassare encrypted contactless access devices for managing the security modes of the Ajax system. They have the same functions and differ only in their body: Tag is a key fob, and Pass is a card.
Tag and Pass allow you to manage an object’s security without an account, access to the Ajax app, or knowing the password — all it takes is activating a compatible keypad and putting the key fob or card to it. The security system or a specific group will be armed or disarmed.
To quickly and securely identify users, KeyPad Plus uses the DESFire® technology. DESFire® is based on the ISO 14443 international standard and combines 128-bit encryption and copy protection.
Tag and Pass usage is recorded in the events feed. The system administrator can at any time revoke or restrict the access rights of the contactless identification device through the Ajax app.
Tag and Pass can work with or without user binding, which affects the notification texts in Ajax app and SMS.
With user binding
Theusernameis displayed in the notifications and events feed
Without user binding
Thedevice nameis displayed in the notifications and events feed
Tag and Pass can work with several hubs at the same time. The maximum number of hubs in the device memory is 13. Keep in mind that you need to bind a Tag or Pass to each of the hubs separately through the Ajax app.
The maximum number of Tag and Pass devices connected to a hub depends on the hub model. At the same time, the Tag or Pass does not affect the total limit of devices on the hub.
Hub model
Number of Tag and Pass devices
Hub Plus
99
Hub 2
50
Superior Hub Hybrid (2G)/(4G)
50
Hub 2 Plus
200
One user can bind any number of Tag and Pass devices within the limit of contactless identification devices on the hub. Keep in mind that devices remain connected to the hub even after all keypads have been removed.
Sending events to the monitoring station
The Ajax security system can connect to the monitoring station and transmit events to the CMS viaSurGard (Contact-ID),SIA (DC-09), ADEMCO 685, and other proprietary protocols. A complete list of supported protocols isavailable here.
When a Tag or Pass is bound to a user, arm and disarm events will be sent to the monitoring station with the user ID. If the device is not bound with the user, the hub will send the event with the device identifier. You can find the device ID in theStatusmenu.
Adding to the system
The devices are incompatible with the hub type ofHub, third-party security central panels, andocBridge PlusanduartBridgeintegration modules. Pass and Tag only work with KeyPad Plus keyboards.
Before adding a device
Install theAjax app. Create anaccount. Add a hub to the app and create at least one room.
Make sure that the hub is on and has access to the internet (via Ethernet cable, Wi-Fi, and/or mobile network). You can do this in the Ajax app or by looking at the hub logo on the front panel — the hub lights white or green when connected to the network.
Make sure the hub is not armed nor updates by looking at its status in the Ajax app.
Make sure a compatible keypad with DESFire® support is already connected to the hub.
If you want to bind a Tag or Pass to a user, make sure that the user’s account has already been added to the hub.
Only a user or PRO with administrator rights can connect a device to the hub.
How to add a Tag or Pass to the system
Open the Ajax app. If your account has access to multiple hubs, select the one to which you want to add a Tag or Pass.
Go to theDevicestab.
Make sure thePass/Tag Readingfeature is enabled in at least one keypad settings.
ClickAdd Device.
From the drop-down menu, selectAdd Pass/Tag.
Specify the type (Tag or Pass), colour, device name, and name (if necessary).
ClickNext. After that, the hub will switch to the device registration mode.
Go to any compatible keypad withPass/Tag Readingenabled, activate it — the device will beep (if enabled in the settings), and the backlight will light up. Then press thedisarming key. The keypad will switch to the access device logging mode.
Put Tag or Pass with the wide side to the keypad reader for a few seconds. It is marked with wave icons on the body. Upon successful addition, you will receive a notification in the Ajax app.
If the connection fails, try again in 5 seconds. Please note that if the maximum number of Tag or Pass devices has already been added to the hub, you will receive a corresponding notification in the Ajax app when adding a new device.
Tag and Pass can work with several hubs at the same time. The maximum number of hubs is 13. Keep in mind that you need to bind devices to each of the hubs separately through the Ajax app.
If you try to bind a Tag or Pass to a hub that has already reached the hub limit (13 hubs are bound to them), you will receive a corresponding notification. To bind such a Tag or Pass to a new hub, you will need to reset it (all data from tag/pass will be erased).
Selection of security modes and groups that can be managed by this Tag or Pass.
The field is displayed and active if Tag or Pass is not associated with the user
Active
Allows you to temporarily disable Tag or Pass without removing the device from the system
User Guide
Opens the Tag and Pass User Manual in the Ajax app
Unpair device
Removes Tag or Pass and its settings from the system.
There are two options for removing: when Tag or Pass is placed nearby, or access to it is absent.
If Tag or Pass is nearby:
Start the device removal process.
Go to any compatible keypad and activate it.
Press the disarming key. The keypad will change to access devices removal mode.
Bring the Tag or Pass to the keypad reader. It is marked with wave icons on the body. Upon successful removal, you will receive a notification in the Ajax app.
When you delete a Tag or Pass in this way, they disappear from the list of hub devices in the application.
If Tag or Pass is not available:
Start the device removal process.
Select theDelete without pass/tagoption and follow the app’s instructions.
In this case, the hub is not deleted from the Tag or Pass memory. To clear the device’s memory, you will need to reset it (all data will be deleted from the device).
Binding a Tag or Pass to a user
When a Tag or Pass is linked to a user, it fully inherits the rights to manage the user’s security modes. For example, if a user was able to manage only one group, then the bound Tag or Pass will have the right to manage only this group.
One user can bind any number of Tag or Pass devices within the limit of contactless identification devices connected to the hub.
User rights and permissions are stored in the hub. After being bound to a user, Tag and Pass represent the user in the system if devices are bound to the user. Therefore, when changing user rights, you do not need to make changes to the Tag or Pass settings — they are applied automatically.
To bind a Tag or Pass to a user, in the Ajax app:
Select the required hub if there are several hubs in your account.
Go to theDevicesmenu.
SelectPasses/Tags.
Select the required Tag or Pass.
Click on theto go to settings.
Select a user in the appropriate field.
ClickBackto save the settings.
When the user—to whom Tag or Pass is assigned—is deleted from the hub, the access device can not be used to manage security modes until not assigned to another user.
Temporarily deactivating a Tag or Pass
The Tag key fob or the Pass card can be temporarily disabled without removing them from the system. A deactivated card cannot be used to manage security modes.
If you try to change the security mode with a temporarily deactivated card or key fob more than 3 times, the keypad will be locked for the time set in the settings (if the setting is enabled), and corresponding notifications will be sent to the system users and to the security company monitoring station.
To temporarily deactivate a Tag or Pass, in the Ajax app:
Select the required hub if there are several hubs in your account.
Go to theDevicesmenu.
SelectPasses/Tags.
Select the required Tag or Pass.
Click on theto go to settings.
Disable theActiveoption.
ClickBackto save the settings.
To reactivate Tag or Pass, turn on theActiveoption.
Resetting a Tag or Pass
Up to 13 hubs can be bound to one Tag or Pass. As soon as this limit is reached, binding new hubs will only be possible after completely resetting Tag or Pass.
Note that resetting will delete all settings and bindings of key fobs and cards. In this case, the reset Tag and Pass are only removed from the hub from which the reset was made. On other hubs, Tag or Pass are still displayed in the app, but they cannot be used to manage the security modes. These devices should be removed manually.
When protection against unauthorized access is enabled, 3 attempts to change the security mode with a card or key fob that has been reset in a row block the keypad. Users and a security company are instantly notified. The time of blocking is set in the device settings.
To reset a Tag or Pass, in the Ajax app:
Select the required hub if there are several hubs in your account.
Go to theDevicesmenu.
Select a compatible keypad from the device list.
Click onto go to settings.
Select thePass/Tag Resetmenu.
Go to the keypad with pass/tag reading enabled and activate it. Then press thedisarming key. The keypad will change to the access device formatting mode.
Put the Tag or Pass to the keypad reader. It is marked with wave icons on the body. Upon successful formatting, you will receive a notification in the Ajax app.
Use
The devices do not require additional installation or fastening. The Tag key fob is easy to carry with you thanks to a special hole on the body. You can hang the device on your wrist or around your neck, or attach it to the key ring. The Pass card has no holes in the body, but you can store it in your wallet or phone case.
If you store a Tag or Pass in your wallet, do not place other cards next to it, such as credit or travel cards. This may interfere with the correct operation of the device when attempting to disarm or arm the system.
To change the security mode:
Activate KeyPad Plus by swiping over it with your hand. The keypad will beep (if enabled in the settings), and the backlight will light up.
Put the Tag or Pass to the keypad reader. It is marked with wave icons on the body.
Change the security mode of the object or zone. Note that if theEasy armed mode changeoption is enabled in the keypad settings, you do not need to press the security mode change button. The security mode will change to the opposite after holding or tapping Tag or Pass.
Tag and Pass can participate in two-stage arming, but cannot be used as second-stage devices. The two-stage arming process using Tag or Pass is similar to arming with a personal or general keypad password.
{"id":41613546913975,"title":"Default Title","option1":"Default Title","option2":null,"option3":null,"sku":"367304850","requires_shipping":true,"taxable":true,"featured_image":null,"available":true,"name":"AJAX Bezvadu Iekštelpu Aizkara Tipa Kustības Detektors MotionProtect Curtain melnā krāsā","public_title":null,"options":["Default Title"],"price":7055,"weight":0,"compare_at_price":8998,"inventory_management":"shopify","barcode":null,"requires_selling_plan":false,"selling_plan_allocations":[],"quantity_rule":{"min":1,"max":null,"increment":1}}
Barošanas avots: Baterijas CR123A, 3 V, līdz 3 gadiem
Komunikācijas diapazons ar citām iekārtām: līdz 1,700 m atklātā vidē
Darba temperatūra: No −10°С līdz +40°С
Izmērs: 134 × 44 × 34 mm
Svars: 118 g
Baterijām nav garantijas.
Uzstādīšanas instrukcija pieejama Ajax lietotnē, kura atvērsies, noskenējot detektora QR kodu uzstādīšanas brīdī. Vienkārša uzstādīšana un pievienošana pie Ajax centrāles Hub.
Ajax ManualCallPoint Red Jeweller ir bezvadu adresējama manuālās ugunsgrēka trauksmes aktivizēšanas poga, kas paredzēta ātrai un uzticamai ugunsgrēka trauksmes izsaukšanai dzīvojamās, komerciālās un sabiedriskās ēkās. Nospiežot pogu, tiek aktivizētas visu sistēmai pievienoto ugunsdrošības detektoru sirēnas, lietotāji saņem tūlītējus paziņojumus, bet apsardzes vai monitoringa centrs nekavējoties saņem trauksmes signālu.
Ierīce atbalsta automatizācijas scenārijus, piemēram, avārijas apgaismojuma ieslēgšanu, elektrisko slēdzeņu atbloķēšanu un objekta elektroapgādes atslēgšanu. Pateicoties Jeweller radiosakaru tehnoloģijai, tiek nodrošināta stabila un droša saziņa ar Ajax centrāli līdz pat 1700 m attālumā.
Ugunsgrēka trauksmes aktivizēšana Ar vienu pogas nospiešanu tiek aktivizēta visa ugunsdrošības sistēma un informētas atbildīgās personas.
Droša Jeweller radiosakaru tehnoloģija Šifrēta divvirzienu komunikācija ar Ajax centrāli nodrošina drošu datu pārraidi un aizsardzību pret viltošanu.
Plašs darbības rādiuss Sakaru attālums ar Ajax centrāli līdz 1700 m atklātā telpā.
Automatizācija ārkārtas situācijās Var automātiski ieslēgt avārijas apgaismojumu, atvērt evakuācijas izejas un atslēgt elektroapgādi.
Vienkārša uzstādīšana Savienošana ar sistēmu, izmantojot QR kodu, bez nepieciešamības izjaukt ierīci.
Specifikācija
Produkta tips: Manuālās ugunsgrēka trauksmes aktivizēšanas poga Sakaru tehnoloģija: Jeweller Darbības veids: Bezvadu Krāsa: Sarkana Standarts: EN 54-25 Sakaru attālums: Līdz 1700 m Baterijas darbības laiks: Līdz 7 gadiem Trauksmes atiestatīšana: Ar komplektā iekļauto atslēgu Aizsardzība pret nejaušu nospiešanu: Caurspīdīgs aizsargvāks Sabotāžas aizsardzība: Jā Automātiska pašdiagnostika: Jā Attālināta konfigurēšana: Jā Saderība: Ajax ugunsdrošības sistēmas un Ajax Hub centrāles Uzstādīšana: Pie sienas ar SmartBracket stiprinājumu Pielietojums: Dzīvojamās ēkas, biroji, veikali, noliktavas, izglītības iestādes, sabiedriskās ēkas un rūpniecības objekti.
Pieejams saņemšanai veikalā
Izpārdots veikalā
Pievienots salīdzināšanai
Sasniegts count_product-produktu limits
Pievienots salīdzināšanai
Sasniegts count_product-produktu limits
{"id":41592061558967,"title":"Default Title","option1":"Default Title","option2":null,"option3":null,"sku":"367307579","requires_shipping":true,"taxable":true,"featured_image":null,"available":true,"name":"Ajax MotionProtect Plus | kustības detektors ar mikroviļņu sensoru | balts","public_title":null,"options":["Default Title"],"price":8231,"weight":0,"compare_at_price":10498,"inventory_management":"shopify","barcode":"856963007019","requires_selling_plan":false,"selling_plan_allocations":[],"quantity_rule":{"min":1,"max":null,"increment":1}}
Ajax MotionProtect Plus | kustības detektors ar mikroviļņu sensoru | balts
SKU: 367307579
(1)
€82,31€104,98
Vienības cena
Bezvadu kustības detektors MotionProtect Plus, kurš pieslēdzams pie Ajax drošības centrāles. Paziņo lietotājam par ielaušanos īpašumā. Detektors jāuzstāda pie sienas pretī durvīm vai citai vietai, kur var ielauzties. Tampera trauksme - saņemsiet paziņojumu, ja kāds mēģinās noņemt detektoru. Baterijas darbības ilgums 5 gadi. Mikroviļņu sensors, kurš palīdz izvairīties no viltus trauksmēm, ko izsauc gaisa kondicionieti, kamīni, gaismas mirgošana, atspīdumi, aizkari.
Detektors nereaģē uz dzīvniekiem līdz 20 kg un 50 cm. Pasīvas infrasarkanās detektēšanas algoritms, kas samazina viltus trauksmju skaitu. Detektors atkarībā no apkārtējas temperatūras regulē jutības pakāpi, lai efektīvi strādātu aukstajā un siltajā laikā.
Gatavs darbam uzreiz no kastes - baterija ir ielikta iekšā, tikai jāuzstāda uz kronšteina, kurš nāk komplektā ar detektoru.
Darba temperatūra: no -10°С līdz +40°С
Izmērs: 110 × 65 × 50 mm
Svars: 96 g
Baterijām garantijas nav.
Uzstādīšanas instrukcija pieejama Ajax lietotnē, kura atvērsies, noskenējot detektora QR kodu uzstādīšanas brīdī. Vienkārša uzstādīšana un pievienošana pie Ajax centrāles Hub.
Pieejams saņemšanai veikalā
Izpārdots veikalā
Pievienots salīdzināšanai
Sasniegts count_product-produktu limits
Pievienots salīdzināšanai
Sasniegts count_product-produktu limits
{"id":48154698842447,"title":"Default Title","option1":"Default Title","option2":null,"option3":null,"sku":"367304811","requires_shipping":true,"taxable":true,"featured_image":null,"available":true,"name":"Ajax Combi Protect kustības detektors (Melns)","public_title":null,"options":["Default Title"],"price":8499,"weight":0,"compare_at_price":10498,"inventory_management":"shopify","barcode":"856963007149","requires_selling_plan":false,"selling_plan_allocations":[],"quantity_rule":{"min":1,"max":null,"increment":1}}
Ajax CombiProtect kustības un stikla izsitumu detektors acumirklī konstatē iebrucēju, taču nereaģē uz dzīvnieku, gaisa kondicionētāju radītām skaņām un kustībām. Dalieli attālumi nav šķērslis Stiklu bojājumu detektoru Ajax CombiProtect var uzstādīt līdz pat 1200 metru attālumā no Ajax Hub inteliģentā vadības paneļa - signāls to sasniegs bez pūlēm. Detektors konstatē stikla laušanas skaņu 9 metru attālumā un kustību līdz pat 12 metru attālumā. 100 psauga Ajax CombiProtect ir īpaša aizsardzība pret noziedznieku izmantotajām uzlaušanas metodēm - unikālā sistēma novērš sakaru signālu traucēšanu ar šifrētu signālu. Inteliģentais vadības panelis arī nepārtraukti pārbauda detektora darbību, periodiski nosūtot signālus ik pēc 12-300 sekundēm. Izgudrota lietošana Pieejami trīs jutības līmeņi. Izmanto īpašu SmartDetect algoritmu, lai novērstu dzīvnieku izraisītu viltus trauksmes signālu. Pateicoties unikālajam FresnelTech optiskajam komponentam, kas izgatavots no POLY IR4 materiāla, un Excelitas PIR sensoram, kas novērš viltus trauksmes signālus. Ierīce ir ļoti energoefektīva, un viena baterija darbojas līdz pat 5 gadiem. Izstādīšana un lietošana ir vienkārša Speciālie SmartBracket stiprinājumi ļauj detektoru ļoti viegli piestiprināt pie virsmām. Ajax SmartDetect kustības un stikla laušanas detektors ir savienots ar Ajax drošības sistēmu ar vienu pogas pieskārienu. Var izmantot ar uartBridge un ocBridgePlus moduļiem. Tehniskie dati Detektēšanas veids: bezvadu Pielietošanas vieta: iekštelpās Kustības noteikšanas attālums: līdz 12 m Autonomā noteikšanas diapazons: līdz 12 m Autonomā noteikšanas diapazons: 3 līmeņi (zems, vidējs, augsts) Atklāšanas leņķis: 88.5° horizontāli / 80° vertikāli Rekomendētais uzstādīšanas augstums: 2,4 m Indikācija dzīvniekiem: svars līdz 20 kg, augstums līdz 50 cm.6 MHz) Maksimālais attālums starp detektoru un vadības paneli: 1200 m (atklātā teritorijā) Baterijas tips: CR123A Baterijas barošanas spriegums: 3 V Baterijas darbības laiks: 5 m. Darbojas temperatūras diapazonā: no 0°C līdz 50°C Izturība pret mitrumu: līdz 90% Izmēri: 110x65x50 mm.
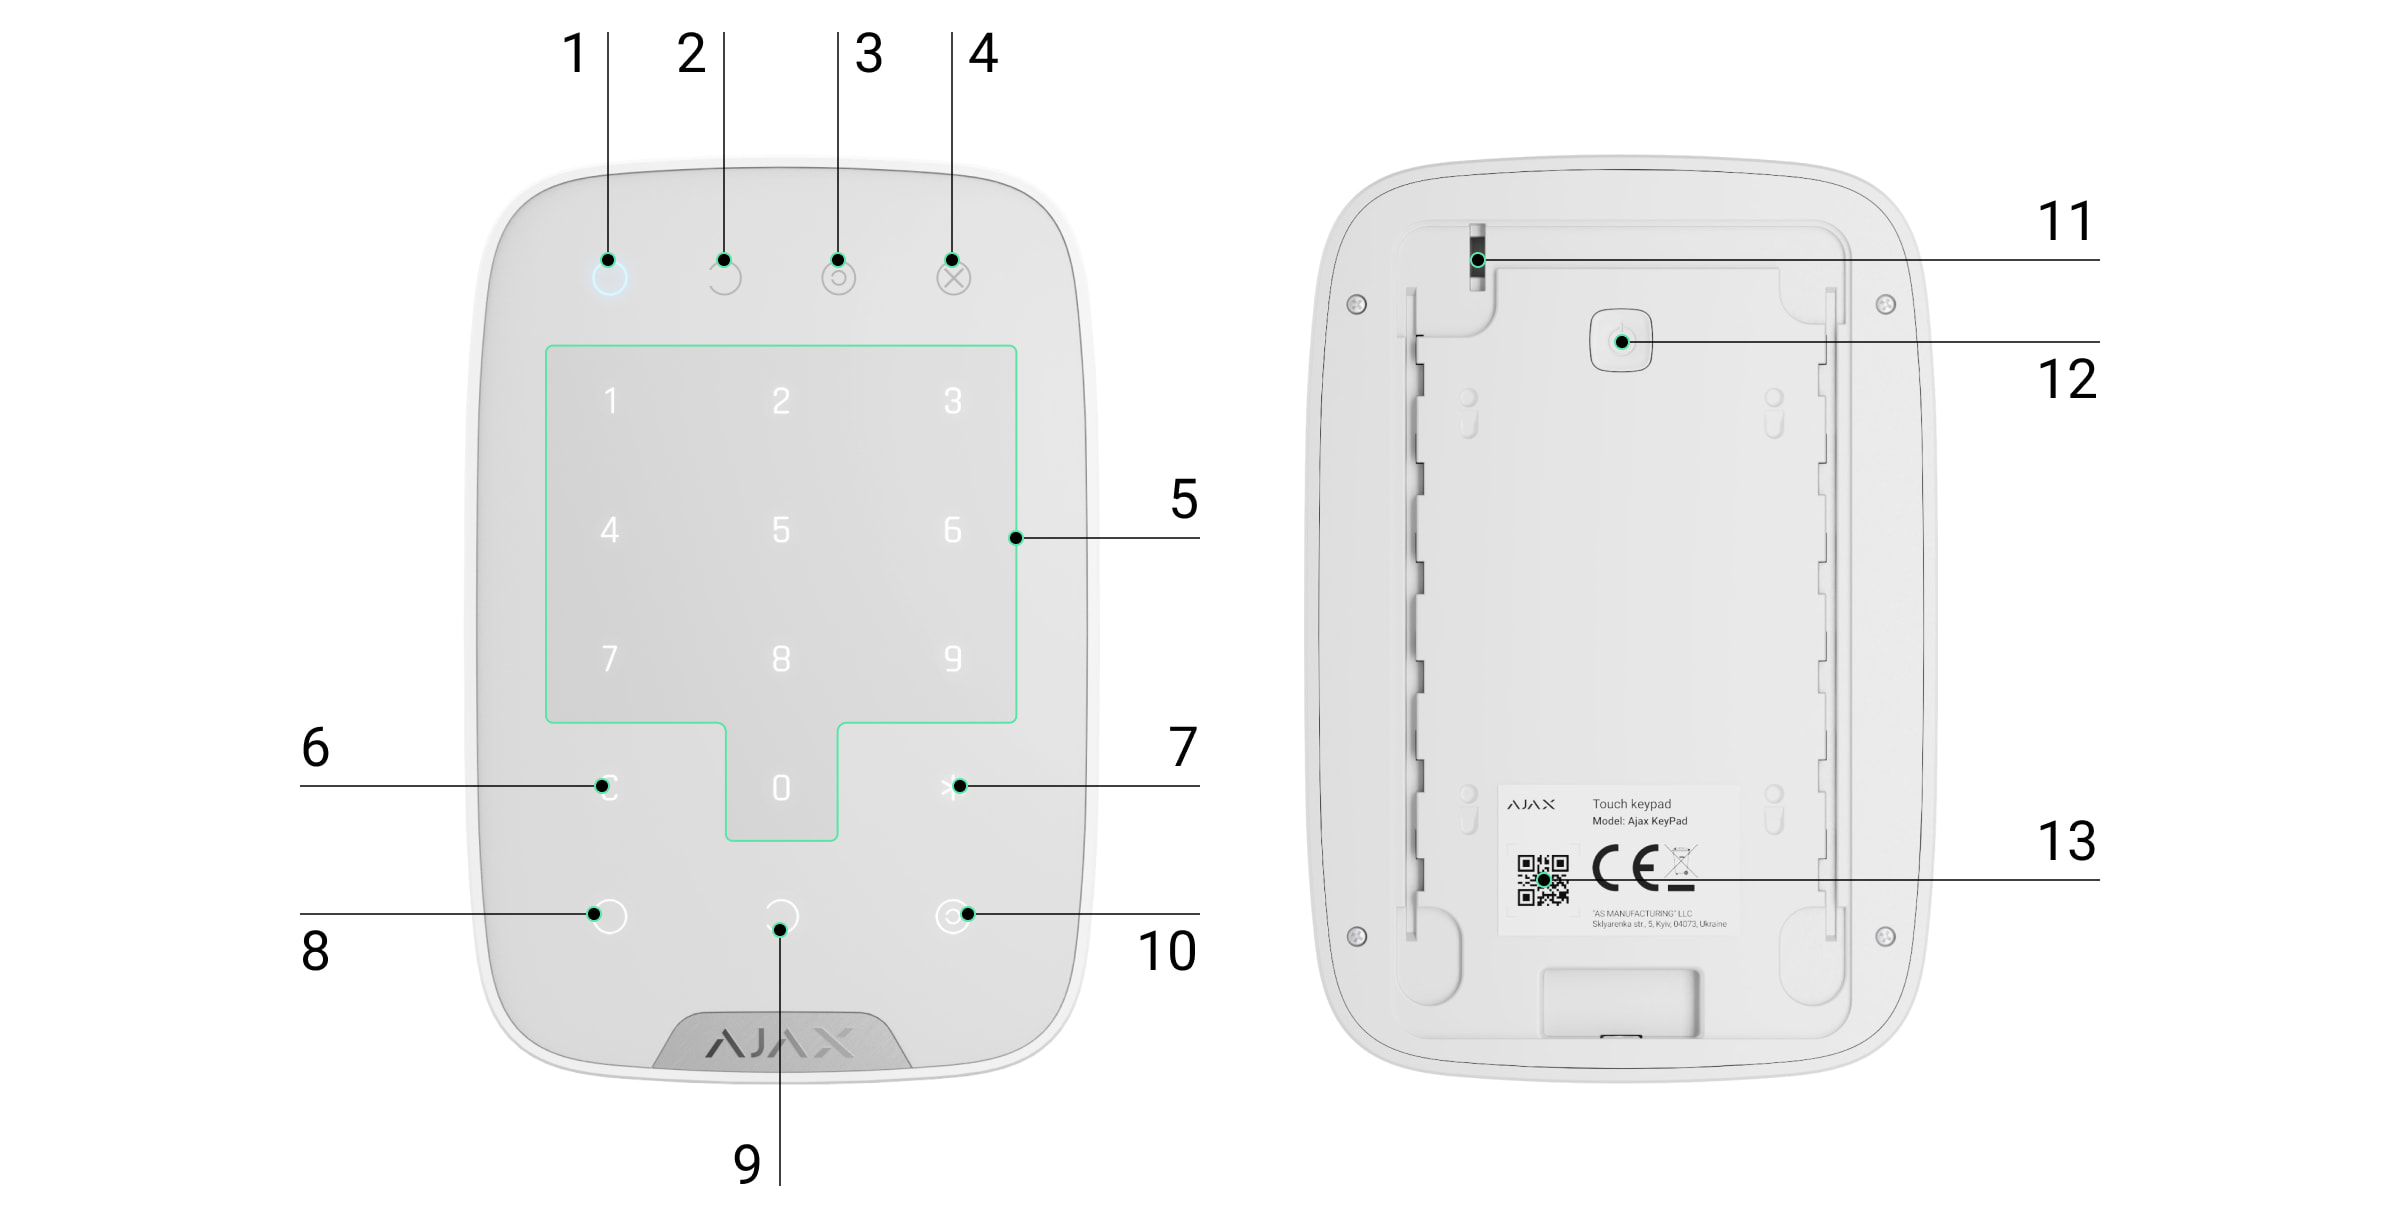
Bruņošanas režīma indikators Atbruņošanas režīma indikators Nakts režīma indikators Kļūmes indikators Ciparu pogu bloks Dzēšanas poga Funkcijas poga Bruņošanas poga Atbruņošanas poga Nakts režīma poga Tampera poga Ieslēgšanas/izslēgšanas poga QR kods
Lai noņemtu SmartBracket paneli, pabīdiet to uz leju (perforētā daļa nepieciešama tampera iedarbināšanai mēģinājuma laikā noraut ierīci no virsmas).
Darbības princips
KeyPad ir skārienjutīga tastatūra Ajax sistēmas vadībai. Tā kontrolē visa objekta vai atsevišķu grupu drošības režīmus un ļauj aktivizēt Nakts režīmu. Tastatūra atbalsta funkciju “klusais trauksmes signāls” — lietotājs var informēt apsardzes uzņēmumu par piespiedu atbruņošanu, neizraisot sirēnu skaņu vai Ajax lietotņu paziņojumus.
Drošības režīmu ar KeyPad var vadīt, izmantojot kodus. Pirms koda ievadīšanas tastatūra jāaktivizē, pieskaroties tai. Aktivizācijas laikā ieslēdzas taustiņu apgaismojums un tastatūra pīkst.
KeyPad atbalsta šādus kodu veidus:
KeyPad kods — vispārīgs kods, kas tiek iestatīts tastatūrai. Izmantojot to, visi notikumi tiek nosūtīti Ajax lietotnēm tastatūras vārdā. Lietotāja kods — personīgais kods, kas tiek iestatīts lietotājiem, kuri ir pievienoti hubam. Izmantojot to, notikumi tiek nosūtīti lietotnēm lietotāja vārdā. KeyPad piekļuves kods — tiek iestatīts personai, kura nav reģistrēta sistēmā. Izmantojot to, notikumi tiek nosūtīti lietotnēm ar šim kodam pievienoto nosaukumu. RRU kods — piekļuves kods ātrās reaģēšanas vienībām pēc trauksmes, derīgs noteiktu laika periodu.
Personīgo, piekļuves un RRU kodu skaits ir atkarīgs no huba modeļa.
Pieejas kodi netiek atbalstīti Hub (2G) Jeweller vadības panelī.
Tastatūras apgaismojuma spilgtums un skaļums tiek regulēts tās iestatījumos. Kad baterijas izlādējušās, apgaismojums tiek ieslēgts minimālā līmenī neatkarīgi no iestatījumiem.
Ja tastatūru neizmanto 4 sekundes, tā samazina apgaismojuma spilgtumu, un pēc 8 sekundēm pārslēdzas enerģijas taupīšanas režīmā, izslēdzot ekrānu. Pārslēdzoties šajā režīmā, ievadītās komandas tiek atiestatītas.
KeyPad atbalsta 4–6 ciparu kodus. Koda ievade jāapstiprina, nospiežot vienu no pogām: (bruņošana), (atbruņošana), (Nakts režīms). Kļūdaini ievadītos simbolus var dzēst ar pogu (Dzēšana).
KeyPad atbalsta arī režīmu vadību bez koda ievades, ja iestatījumos aktivizēta funkcija “Bruņošana bez koda”. Tā pēc noklusējuma ir izslēgta.
Funkcijas poga
KeyPad ir Funkcijas poga, kas darbojas 3 režīmos:
Izslēgta — poga nedarbojas. Trauksmes signāls — pēc nospiešanas sistēma nosūta trauksmi uz apsardzes uzņēmuma staciju, lietotājiem un aktivizē sistēmai pievienotās sirēnas. Kopīgo ugunsdetektoru trauksmju izslēgšana — pēc nospiešanas tiek atslēgtas Ajax ugunsdetektoru sirēnas (ja iespējota funkcija Interconnected FireProtect Alarms).
Piespiedu kods
Piespiedu kods ļauj simulēt atbruņošanu. Atšķirībā no panikas pogas, ievadot šo kodu, lietotājs netiek pakļauts riskam — sistēma norāda, ka tā ir atbruņota, bet apsardzes uzņēmums saņem trauksmi.
Pieejami šādi piespiedu kodi:
KeyPad kods — vispārīgs piespiedu kods. Lietotāja piespiedu kods — personīgais kods, ko iestata katrs lietotājs. KeyPad piekļuves kods — iestatīts personai, kura nav reģistrēta sistēmā.
Automātiska bloķēšana pie neatļautas piekļuves
Ja 1 minūtes laikā trīs reizes ievadīts kļūdains kods, tastatūra tiek bloķēta uz iestatījumos noteikto laiku. Šajā laikā hub ignorē visus kodus un informē lietotājus un CMS par mēģinājumu uzminēt kodu.
Tastatūra automātiski atbloķējas pēc noteiktā laika. Tomēr lietotājs vai PRO ar administratora tiesībām var atbloķēt tastatūru Ajax lietotnē.
Divpakāpju bruņošana
KeyPad piedalās bruņošanā divos posmos. Kad funkcija ir aktivizēta, sistēma tiks bruņota tikai pēc atkārtotas bruņošanas ar SpaceControl vai pēc otrā posma detektora atjaunošanās (piemēram, aizverot durvis ar DoorProtect).
Jeweller datu pārraides protokols
Tastatūra izmanto Jeweller radio protokolu notikumu un trauksmju pārraidei. Tas ir divvirzienu bezvadu datu pārraides protokols ar šifrēšanu, autentifikāciju un regulāru ierīču aptauju ik pēc 12 līdz 300 sekundēm.
Notikumu nosūtīšana uz apsardzes staciju
Ajax sistēma var nosūtīt trauksmes uz PRO Desktop un CMS, izmantojot SurGard (Contact ID), SIA (DC-09), ADEMCO 685 un citus protokolus.
KeyPad var nosūtīt šādus notikumus:
Ievadīts piespiedu kods. Nospiež panikas pogu (ja Funkcijas poga darbojas panikas režīmā). Tastatūra bloķēta kļūdainu mēģinājumu dēļ. Tampera trauksme/atjaunošana. Hub savienojuma zudums/atjaunošana. Tastatūras deaktivizācija/aktivizācija. Neveiksmīgs bruņošanas mēģinājums (ar aktivizētu integritātes pārbaudi).
Katra Ajax ierīce ir adresējama, tāpēc tiek nosūtīts arī ierīces tips, drošības grupa, piešķirtais nosaukums un telpa.
Indikācijas
Kad pieskaras KeyPad, tas ieslēdzas, izgaismojot tastatūru un norādot drošības režīmu: Bruņots, Atbruņots vai Nakts režīms. Drošības režīms vienmēr tiek attēlots aktuālais, neatkarīgi no tā, kura vadības ierīce (pults vai lietotne) tika izmantota režīma maiņai.
Notikums — Indikācija
Kļūmes indikators Х mirgo — norāda uz sakaru zudumu ar hub vai tastatūras vāciņa atvēršanu. Precīzu kļūmes iemeslu var pārbaudīt Ajax Security System lietotnē. KeyPad pogas nospiešana — īss pīkstiens, sistēmas pašreizējā bruņošanas stāvokļa LED mirgo vienu reizi. Sistēma ir bruņota — īss pīkstiens, iedegas Bruņots/Nakts režīma indikators. Sistēma ir atbruņota — divi īsi pīkstieni, iedegas Atbruņots režīma indikators. Nepareizs kods — garš skaņas signāls, tastatūras apgaismojums mirgo 3 reizes. Kļūme bruņošanas laikā (piemēram, detektors zudis) — garš pīkstiens, bruņošanas režīma indikators mirgo 3 reizes. Nav sakaru ar hub — garš pīkstiens, iedegas Kļūmes indikators. KeyPad bloķēts pēc 3 neveiksmīgiem mēģinājumiem ievadīt kodu — garš pīkstiens, drošības režīmu indikatori mirgo vienlaicīgi. Zems baterijas līmenis — pēc bruņošanas/atbruņošanas Kļūmes indikators vienmērīgi mirgo. Tastatūra ir bloķēta, kamēr indikators mirgo. Aktivizējot KeyPad ar zemām baterijām, tas izdod garu pīkstienu, Kļūmes indikators vienmērīgi iedegas un pēc tam nodziest.
Kļūmju skaņas paziņojumi
Ja kāda ierīce ir bezsaistē vai tai ir zems baterijas līmenis, KeyPad var paziņot lietotājiem ar skaņas signāliem. Tastatūras LED Х mirgos. Paziņojumi parādās notikumu lentē, SMS vai push paziņojumos.
Lai ieslēgtu skaņas paziņojumus par kļūmēm, izmantojiet Ajax PRO un PRO Desktop lietotnes:
Atveriet Devices, izvēlieties hub un atveriet tā iestatījumus.
Spiediet Service → Sounds and Alerts.
Aktivizējiet opcijas If battery of any device is low un If any device is offline.
Spiediet Back, lai saglabātu.
Pieejams visiem hub (izņemot Hub modeli) ar OS Malevich 2.15 vai jaunāku versiju. KeyPad atbalsta šo funkciju ar programmatūras versiju 5.57.1.1 vai jaunāku.
Notikums — Indikācija — Piezīme
Ja kāda ierīce ir bezsaistē — divi īsi pīkstieni, Kļūmes indikators mirgo 2 reizes. Signāls atkārtojas reizi minūtē, līdz visas ierīces ir tiešsaistē. Lietotāji var atlikt skaņas signālu uz 12 stundām. Ja KeyPad ir bezsaistē — divi īsi pīkstieni, Kļūmes indikators mirgo 2 reizes. Signāls atkārtojas reizi minūtē, līdz tastatūra ir tiešsaistē. Atlikt signālu nav iespējams. Ja kādai ierīcei ir zems baterijas līmenis — trīs īsi pīkstieni, Kļūmes indikators mirgo 3 reizes. Signāls atkārtojas reizi minūtē, līdz baterija tiek atjaunota vai ierīce noņemta. Lietotāji var atlikt signālu uz 4 stundām.
Skaņas paziņojumi par kļūmēm parādās pēc tastatūras indikācijas. Ja sistēmā rodas vairākas kļūmes, KeyPad vispirms informē par sakaru zudumu starp ierīci un hub.
Savienojums
Hub un ierīces ar atšķirīgām radiofrekvencēm nav savietojamas. Radiofrekvenču diapazons var atšķirties reģionāli. Ieteicams iegādāties un izmantot Ajax ierīces vienā reģionā.
Pirms savienošanas
Ieslēdziet hub un pārbaudiet interneta savienojumu (logo iedegas balts vai zaļš). Instalējiet Ajax lietotni, izveidojiet kontu, pievienojiet hub un vismaz vienu telpu. Pārliecinieties, ka hub nav bruņots un neveic atjaunināšanu (pārbaudiet lietotnē).
Tikai lietotāji ar administratora tiesībām var pievienot ierīci.
Kā savienot KeyPad ar hub
Atveriet Ajax lietotni, izvēlieties Add Device. Nosauciet ierīci, noskenējiet vai ievadiet manuāli QR kodu (atrodas uz korpusa un iepakojuma) un izvēlieties telpu. Spiediet Add — sāksies atskaites laiks. Ieslēdziet KeyPad, turot ieslēgšanas pogu 3 sekundes — tastatūras apgaismojums mirgos vienu reizi.
Savienošanai KeyPad jāatrodas hub bezvadu tīkla darbības zonā. Pieprasījums uz savienošanu tiek nosūtīts neilgi pēc ieslēgšanas.
Ja savienot neizdodas, izslēdziet KeyPad uz 5 sekundēm un mēģiniet vēlreiz.
Pievienotā ierīce parādīsies lietotnes sarakstā. Statusa atjaunināšanas biežums atkarīgs no huba iestatījumos noteiktā detektora ping intervāla (noklusējuma — 36 sekundes).
KeyPad nav iepriekš iestatītu kodu. Pirms lietošanas jāiestata visi nepieciešamie kodi: tastatūras kods (vispārējs), personīgie lietotāju kodi un piespiedu kodi (vispārējie un personīgie).
Atrašanās vietas izvēle
Ierīces atrašanās vieta ir atkarīga no attāluma līdz hub un šķēršļiem, kas kavē radio signāla pārraidi: sienas, grīdas, lieli priekšmeti telpā.
Ierīce paredzēta tikai lietošanai telpās.
Nelietot KeyPad šādās vietās:
Tuvu radio pārraides iekārtām, ieskaitot tām, kas darbojas 2G/3G/4G mobilajos tīklos, Wi-Fi maršrutētājiem, raidītājiem, radiostacijām, kā arī Ajax hub (izmanto GSM tīklu). Tuvu elektroinstalācijai. Tuvu metāla priekšmetiem un spoguļiem, kas var vājināt vai aizsegt radio signālu. Ārpus telpām. Telpās ar temperatūru un mitrumu ārpus pieļaujamā diapazona. Tuvāk par 1 m no hub.
Pārbaudiet Jeweller signāla stiprumu uzstādīšanas vietā
Testa laikā signāla līmenis tiek rādīts lietotnē un uz tastatūras ar drošības režīmu indikatoriem (Bruņots, Atbruņots, Nakts režīms) un kļūmes indikatoru X.
Ja signāls ir zems (viena svītra), stabila ierīces darbība nav garantēta. Lai uzlabotu signālu, pārvietojiet ierīci: pat 20 cm pārvietojums var ievērojami uzlabot signāla uztveršanu.
Ja pēc pārvietošanas signāls joprojām ir zems vai nestabils, izmantojiet radio signāla pastiprinātāju.
KeyPad paredzēts lietošanai, kad tas ir piestiprināts pie vertikālas virsmas. Lietojot to rokās, stabila sensora tastatūras darbība nav garantēta.
Stāvokļi Devices → KeyPad
Parametrs
Nozīme
Data import
Parāda kļūdu, pārsūtot datus uz jaunu hub: Failed — ierīce nav pārsūtīta uz jauno hub.
Temperatūra
Ierīces temperatūra. Mērīta procesorā un mainās pakāpeniski. Pieļaujamā kļūda starp lietotnē redzamo un telpas temperatūru — 2 °C. Vērtība tiek atjaunināta, ja temperatūra mainās vismaz par 2 °C. Var iestatīt scenāriju automatizācijas vadībai pēc temperatūras.
Jeweller signāla stiprums
Signāla stiprums starp hub un KeyPad.
Savienojums
Savienojuma statuss starp hub un KeyPad.
Raidītāja jauda
Rāda izvēlēto raidītāja jaudu. Parametrs parādās, kad Signal attenuation test izvēlēts Max vai Attenuation.
Baterijas uzlāde
Ierīces baterijas līmenis: OK vai Baterija izlādējusies.
Vāciņš
Tampera režīms, kas reaģē uz korpusa atvienošanu vai bojājumu.
ReX
Rāda radio signāla pastiprinātāja izmantošanas statusu.
Pastāvīga deaktivizācija
Rāda ierīces statusu: aktīva, pilnībā deaktivizēta vai deaktivizēti tikai tampera paziņojumi.
Vienreizēja deaktivizācija
Rāda ierīces deaktivizācijas statusu līdz pirmajai atbruņošanai: aktīva, pilnībā deaktivizēta vai deaktivizēti tikai tampera paziņojumi.
Programmatūra
KeyPad programmatūras versija.
Ierīces ID
Ierīces identifikators.
Iestatījumi Devices → KeyPad → Settings
Iestatījums
Nozīme
Name
Ierīces nosaukums, var rediģēt.
Room
Virtuālās telpas izvēle, kurai ierīce piesaistīta.
Group management
Drošības grupas izvēle, kuru ierīce kontrolē. Var izvēlēties visas vai tikai vienu. Pieejams, ja aktivizēts Group mode.
Access Settings
Verifikācijas metode bruņošanai/atbruņošanai: tikai tastatūras kodi; tikai lietotāju kodi; tastatūras un lietotāju kodi.
AJAX REX Jeweller Bezvadu repīteris - HUB - 1 gab, HUB 2 - 5 gab, HUB Plus - 5 gab, HUB 2 Plus - 5 gab, Balts
SKU: 367304858
€117,60€149,97
Vienības cena
ReX Jeweller
Apraksts ReX Jeweller ir sakaru signālu pastiprinātājs, kas palielina Ajax ierīču radio sakaru diapazonu ar hubu līdz 2 reizēm. Ierīce paredzēta tikai lietošanai telpās. Tā aprīkota ar iebūvētu aizsardzību pret sabotāžu un akumulatoru, kas nodrošina līdz 35 stundu darbību bez ārējās barošanas.
Saderība
Darbojas tikai ar Ajax hubiem.
Savienojums ar uartBridge un ocBridge Plus nav paredzēts.
Vadība un paziņojumi
Konfigurējams ar mobilo lietotni (iOS, Android).
Notifikācijas: push, SMS un zvani (ja aktivizēti).
Visi notikumi tiek reģistrēti un paziņoti lietotājam.
Uzraudzība
Ajax sistēmu var izmantot neatkarīgai objekta uzraudzībai.
Iespējams pieslēgums Apsardzes uzņēmuma centralizētajai pultij (CMS).
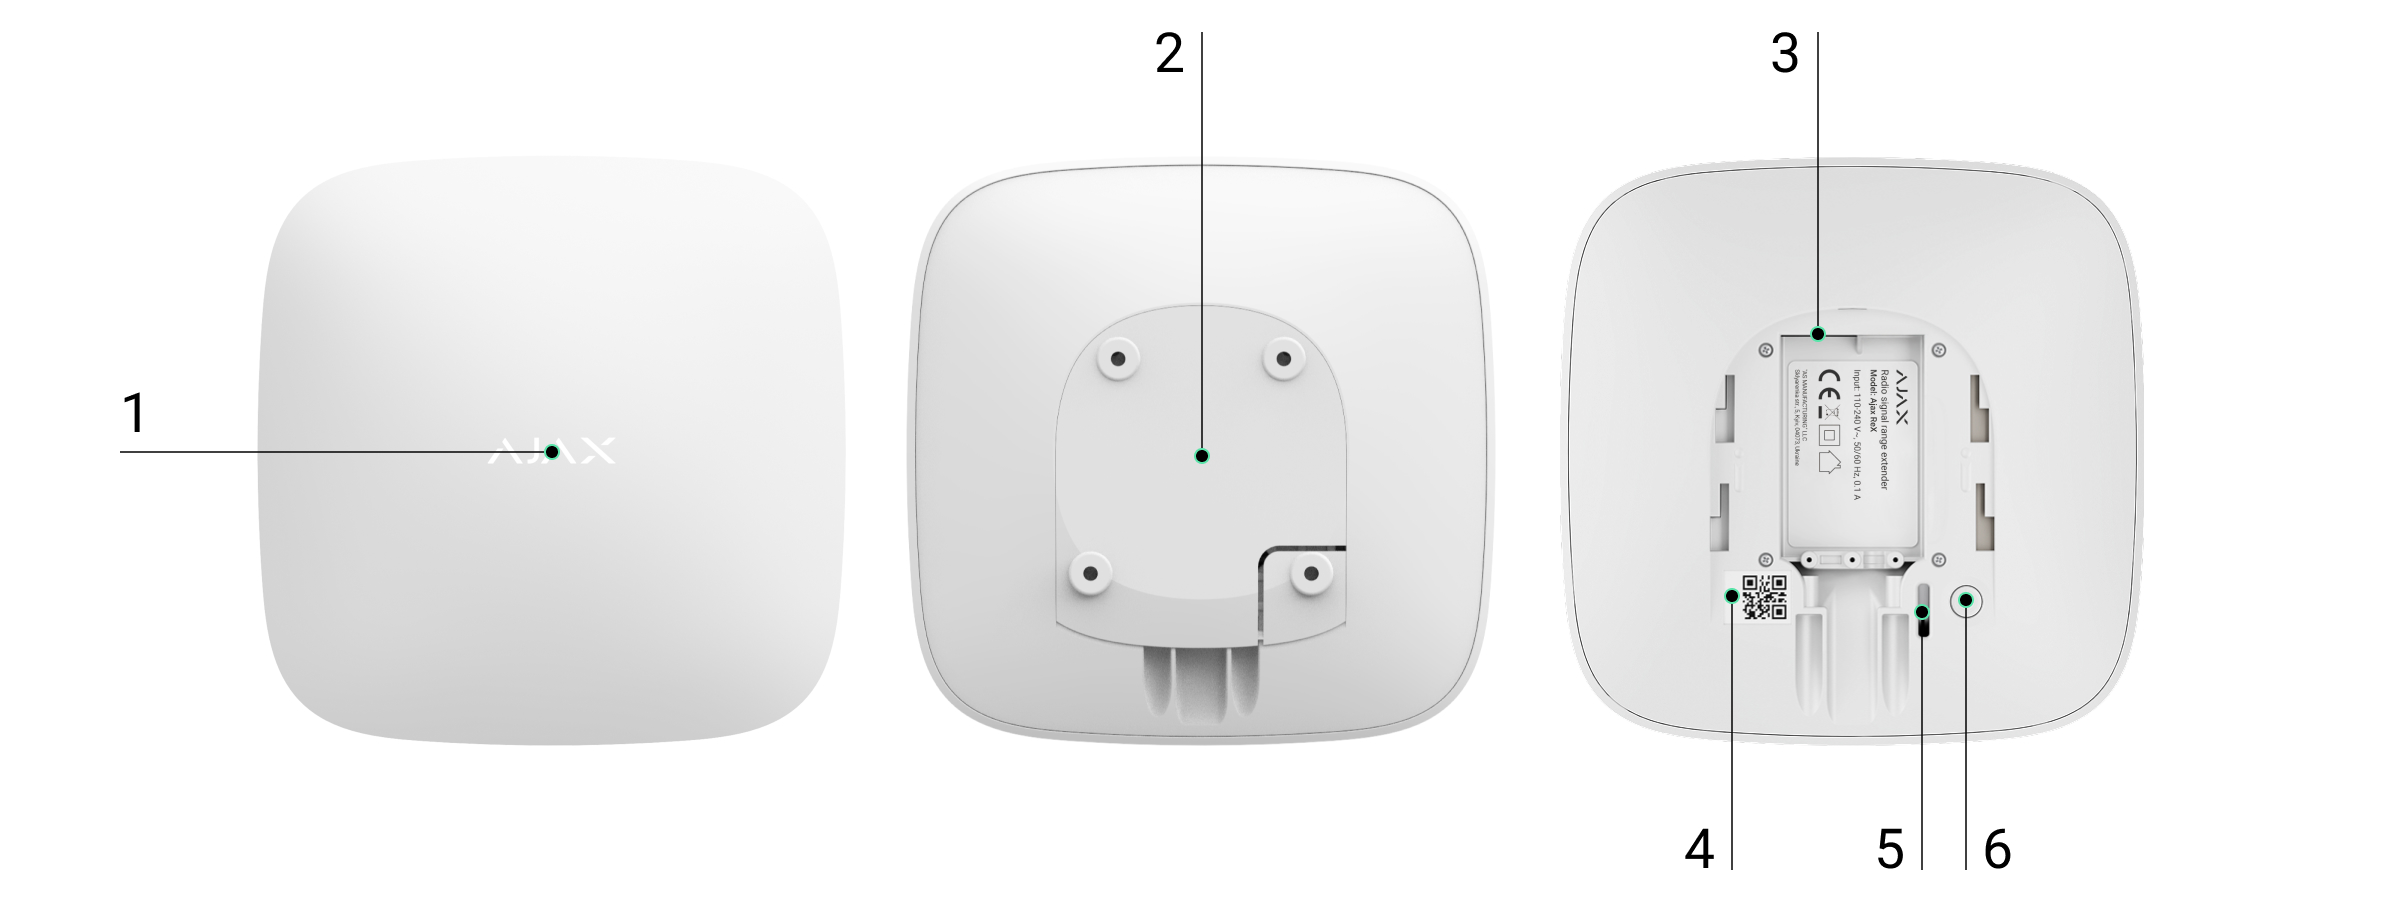
Functional elements
Funkcionālie elementi
Logo ar gaismas indikatoru
SmartBracket stiprinājuma panelis (perforētā daļa nepieciešama tampera aktivizēšanai, ja tiek mēģināts noņemt ReX Jeweller no virsmas)
Barošanas savienotājs
QR kods
Tampera poga
Ieslēgšanas poga
Darbības princips ReX Jeweller paplašina drošības sistēmas radio sakaru diapazonu, ļaujot Ajax ierīces uzstādīt lielākā attālumā no huba.
Sakaru diapazons Sakaru diapazonu starp ReX Jeweller un ierīci ierobežo pašas ierīces radio signāla darbības diapazons (norādīts ierīces specifikācijā tīmekļa vietnē un lietotāja rokasgrāmatā).
Darbība ReX saņem signālus no huba un pārsūta tos pievienotajām ierīcēm, kā arī nodod ierīču signālus atpakaļ hubam. Hub pārbauda pastiprinātāja darbību ik pēc 12–300 sekundēm (noklusējuma iestatījums – ik pēc 36 sekundēm), savukārt trauksmes tiek pārsūtītas 0,3 sekunžu laikā.
Pievienoto ReX Jeweller skaits
Atkarībā no huba modeļa, iespējams pievienot šādu skaitu signāla pastiprinātāju:
Hub – 1 ReX Jeweller
Hub Plus – līdz 5 ReX Jeweller
Hub 2 (2G) – līdz 5 ReX Jeweller
Hub 2 (4G) – līdz 5 ReX Jeweller
Hub 2 Plus – līdz 5 ReX Jeweller
Superior Hub Hybrid – līdz 5 ReX Jeweller
Vairāku ReX Jeweller pieslēgšana tiek atbalstīta ierīcēs ar OS Malevich 2.8 un jaunākām versijām. ReX Jeweller var pieslēgt tikai tieši hubam – savstarpēja pastiprinātāju savienošana nav atbalstīta. ⚠️ ReX Jeweller nepalielina hubam pievienojamo ierīču kopējo skaitu!
ReX Jeweller savienošana ar hubu
Hub un ierīces, kas darbojas dažādās radiofrekvencēs, nav savietojamas.
Radiofrekvenču diapazons var atšķirties atkarībā no reģiona. Rekomendēts iegādāties un izmantot Ajax ierīces vienā reģionā.
Darba radiofrekvences iespējams pārbaudīt pie tehniskā atbalsta dienesta.
Pirms ierīces pievienošanas
Instalējiet Ajax app vai Ajax PRO.
Pierakstieties esošā kontā vai izveidojiet jaunu.
Izvēlieties esošu Space vai izveidojiet jaunu.
Space funkcionalitāte pieejama no šādām versijām vai jaunākām:
Ajax Security System 3.0 iOS
Ajax Security System 3.0 Android
Ajax PRO: Tool for Engineers 2.0 iOS
Ajax PRO: Tool for Engineers 2.0 Android
Ajax PRO Desktop 4.0 macOS
Ajax PRO Desktop 4.0 Windows
Pievienojiet vismaz vienu virtuālu telpu (Room).
Pievienojiet saderīgu hubu šim Space. Pārliecinieties, ka hub ir ieslēgts un tam ir piekļuve internetam (Ethernet, Wi-Fi un/vai mobilais tīkls).
Pārliecinieties, ka sistēma ir atbruņota un hub neveic atjauninājumu (statusi redzami Ajax lietotnē).
⚠️ Ierīces pievienošanu hubam var veikt tikai lietotājs ar administratora tiesībām.
Savienošana
Atveriet Ajax lietotni un izvēlieties Add Device.
Nosauciet pastiprinātāju, noskenējiet vai manuāli ievadiet QR kodu (atrodas uz vāka un iepakojuma).
Ieslēdziet ReX Jeweller, turot ieslēgšanas pogu nospiestu 3 sekundes.
Pēc pieslēgšanās hubam ierīces logo mainīs krāsu no sarkanas uz baltu (30 sekunžu laikā pēc ieslēgšanas).
Detektēšana un savienojums Lai notiktu savienošana un atpazīšana, ReX Jeweller jāatrodas huba radio sakaru diapazonā (vienā un tajā pašā apsargājamajā objektā).
Savienojuma pieprasījums ar hubu tiek nosūtīts tikai tad, kad ierīce ir ieslēgta. Ja savienojums ar hubu neizdodas:
izslēdziet pastiprinātāju, nospiežot ieslēgšanas pogu uz 3 sekundēm,
atkārtojiet savienošanas procedūru pēc 5 sekundēm.
Pēc pievienošanas pie huba, pastiprinātājs parādīsies lietotnē ierīču sarakstā. Ierīču statusu atjaunošanās intervāls sarakstā atkarīgs no huba iestatījumos noteiktā aptaujas laika (noklusējuma vērtība — 36 sekundes).
Ierīču piešķiršana darbam caur ReX Jeweller Lai pievienotu ierīci pastiprinātājam:
Atveriet ReX Jeweller iestatījumus (Devices → ReX Jeweller → Settings).
Nospiediet Pair with device.
Izvēlieties ierīces, kas darbosies caur pastiprinātāju.
Atgriezieties ReX Jeweller iestatījumu izvēlnē.
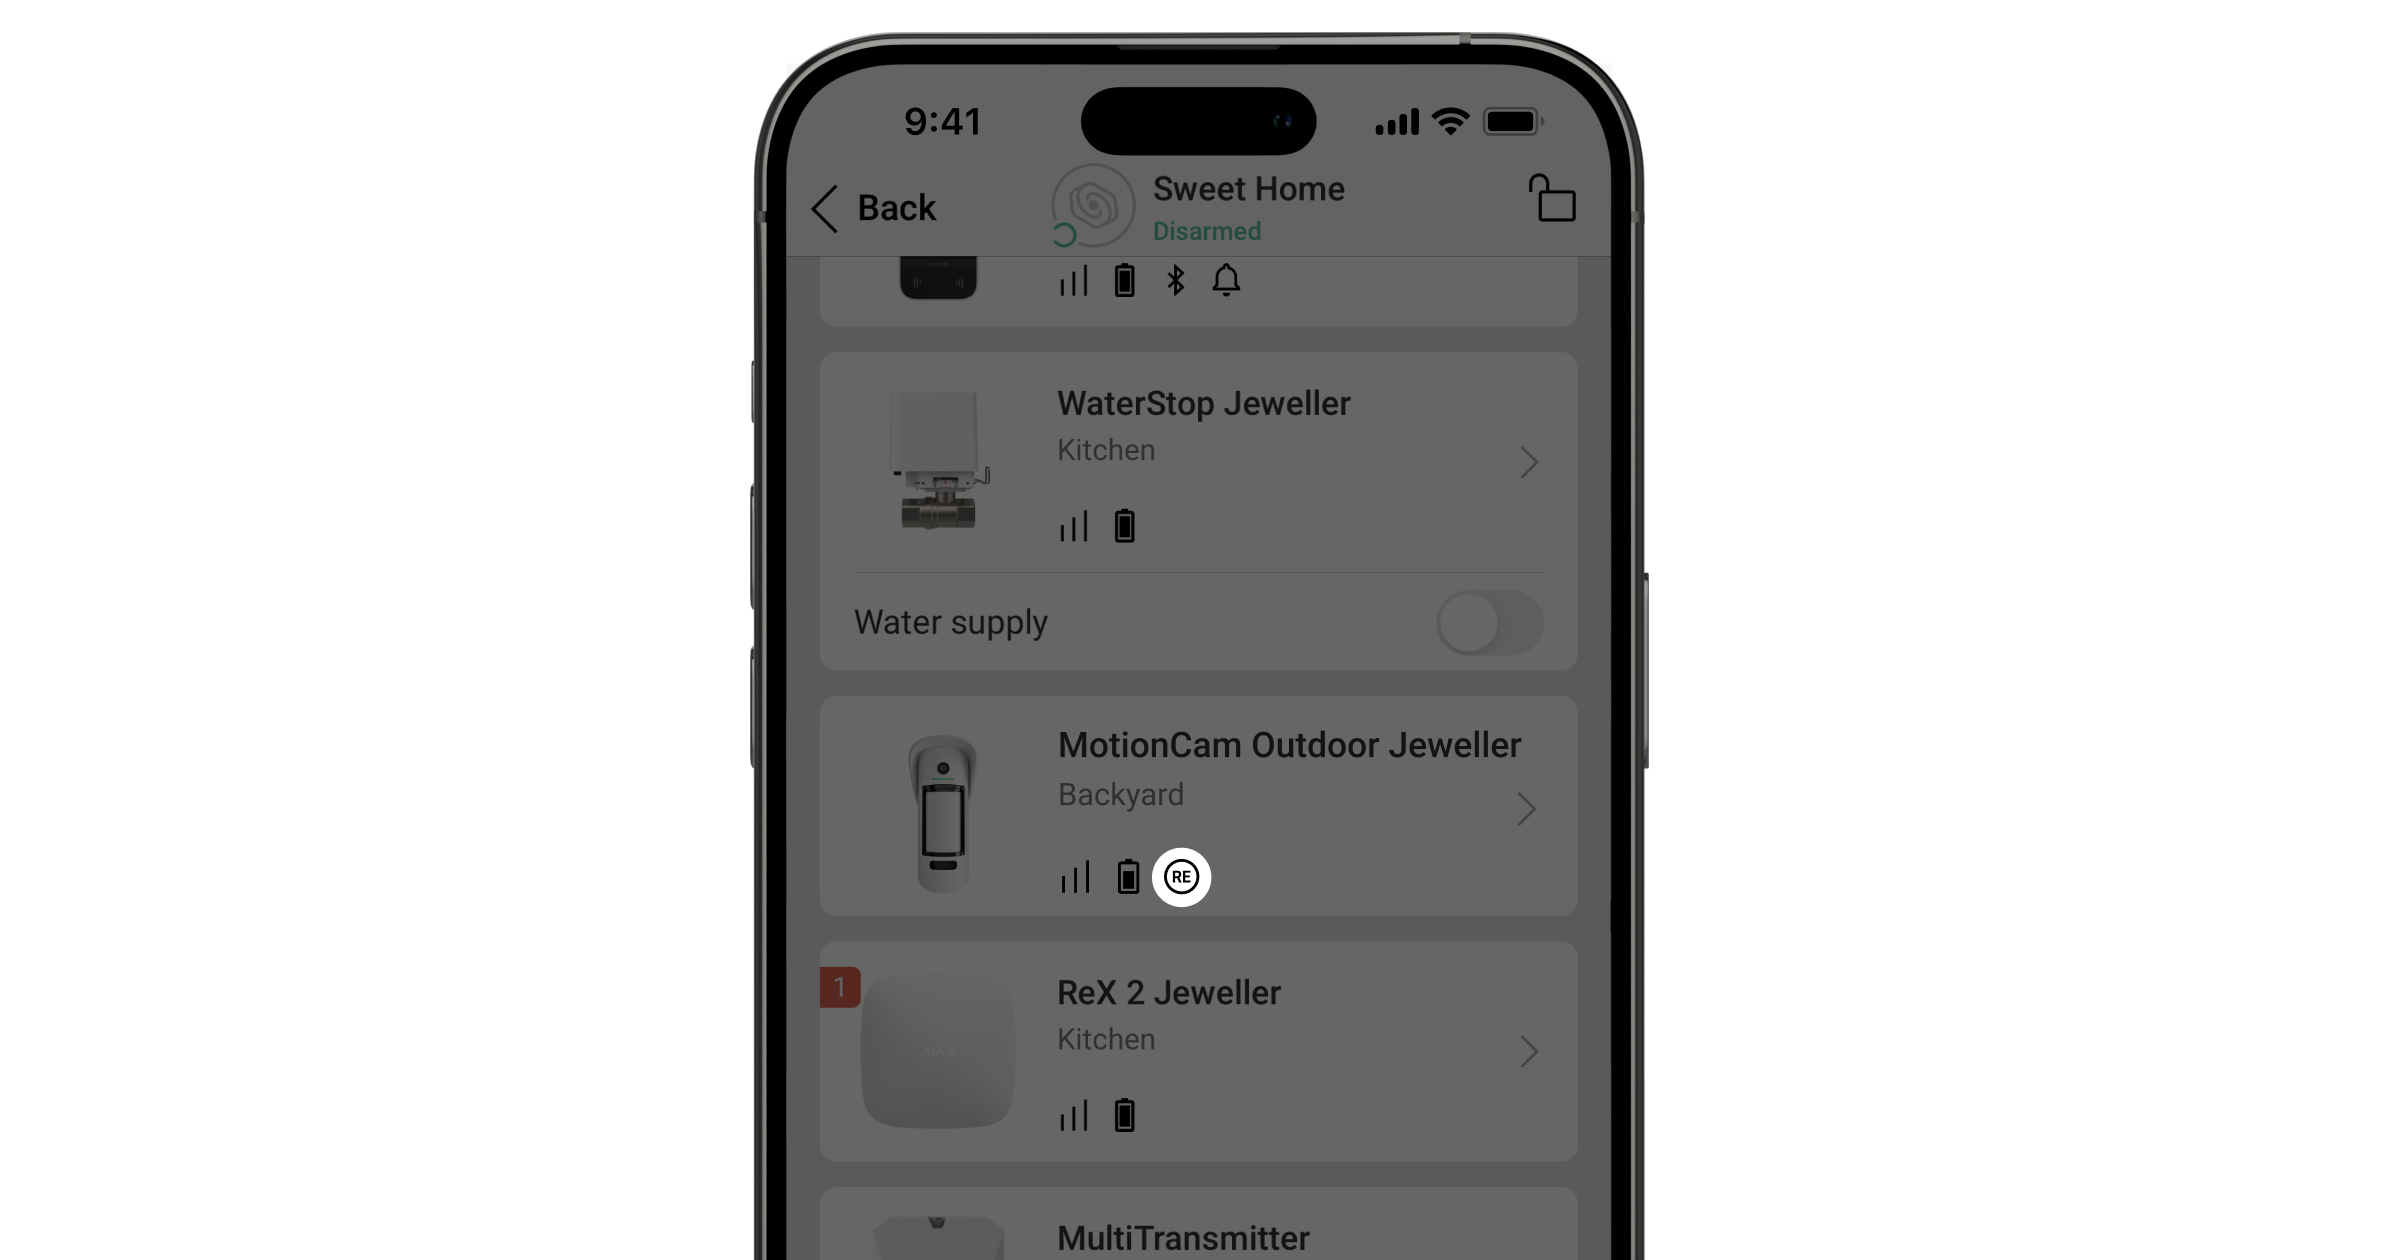
Kad savienojums būs izveidots, izvēlētās ierīces mobilajā lietotnē tiks atzīmētas ar 🔗 ikonu.
ReX Jeweller ierobežojumi un savienošana
ReX Jeweller neatbalsta savienošanu ar MotionCam kustības detektoru ar vizuālu alarmu verifikāciju, jo tas izmanto papildu Wings radio protokolu.
Ierīci var pievienot tikai vienam ReX Jeweller. Ja ierīce tiek piešķirta vienam pastiprinātājam, tā automātiski tiek atvienota no cita.
Ierīces piešķiršana tieši hubam
Dodieties uz ReX Jeweller iestatījumiem (Devices → ReX Jeweller → Settings).
Nospiediet Pair with device.
Noņemiet atzīmi no ierīcēm, kurām jāsavienojas tieši ar hubu.
Atgriezieties iestatījumu izvēlnē.
ReX Jeweller stāvokļi
Devices → ReX Jeweller → States
Data import – kļūdas paziņojums datu pārsūtīšanas laikā uz jaunu hubu.
Failed — ierīce nav pārsūtīta uz jauno hubu.
Some functions do not work – tiek rādīts, ja huba un ReX Jeweller programmaparatūras versijas neatbilst.
Atjauninājums notiek pusstundas laikā (ja sistēma ir atbruņota).
Nepieciešams:
stabils ārējais barošanas avots hubam un pastiprinātājam,
stabila huba–ReX Jeweller savienojuma kvalitāte,
huba pieslēgums internetam.
Jeweller Signal Strength – signāla stiprums starp hubu un ReX Jeweller.
Connection – savienojuma statuss starp hubu un pastiprinātāju.
Transmitter power – raidītāja jaudas statuss (redzams tikai signāla vājināšanas testā).
Battery Charge – akumulatora uzlādes līmenis procentos.
Lid – tampera stāvoklis, reaģē uz mēģinājumu noņemt vai bojāt korpusu.
External power – ārējā barošanas avota statuss.
Radio transmitter power – redzams signāla vājināšanas testā (Maximum / Minimum).
Permanent Deactivation – ierīces statuss:
Active — aktīvs;
Entirely — pilnībā atspējots;
Lid only — tiek ignorēti tikai tampera paziņojumi.
Firmware – ReX Jeweller programmaparatūras versija.
Device ID – ierīces identifikators.
ReX Jeweller iestatījumi
Devices → ReX Jeweller → Settings
Name – ierīces nosaukums (rediģējams).
Room – virtuālās telpas izvēle.
Charging mode(pieejams tikai Ajax PRO ar OS Malevich 2.24+) – akumulatora uzlādes režīms:
Continuous — nepārtraukta līdz pilnai uzlādei (piemērots lielākajai daļai barošanas avotu).
Interval — uzlāde ar pārtraukumiem (ieteicams cinka–gaisa barošanas avotiem).
LED Brightness – logo apgaismojuma spilgtuma regulēšana.
Pair with device – ierīču piešķiršana darbam caur ReX Jeweller.
Jeweller Signal Strength Test – signāla stipruma tests starp hubu un pastiprinātāju.
Signal Attenuation Test – raidītāja jaudas samazināšana/palielināšana, lai simulētu traucējumus un pārbaudītu savienojuma stabilitāti.
Permanent Deactivation – ierīces atspējošana, to neizdzēšot no sistēmas.
No — darbojas normāli.
Entirely — netiek izpildīti sistēmas komandas un ignorēti paziņojumi.
Lid only — tiek ignorēti tikai tampera paziņojumi.
User Guide – ReX Jeweller lietotāja rokasgrāmata.
Unpair device – atvienošana no huba un iestatījumu dzēšana.
Traucējumu paziņojumi
Ja rodas kļūmes, tās tiek rādītas laukā Malfunctions sadaļā Device States.
Some functions do not work – neatbilstoša huba un ReX Jeweller programmaparatūra.
Risinājums: pārliecinieties, ka huba automātiskie atjauninājumi ir ieslēgti.
LED indikācija
ReX Jeweller LED indikators atkarībā no ierīces stāvokļa var spīdēt sarkanā vai baltā krāsā.
Notikums
LED indikatora stāvoklis
Ierīce ir savienota ar hubu
Deg nepārtraukti baltā krāsā
Ierīce zaudēja savienojumu ar hubu
Deg nepārtraukti sarkanā krāsā
Nav ārējās barošanas
Mirgo ik pēc 10 sekundēm
Funkcionalitātes pārbaude
Pārbaude ReX Jeweller piesaistītajām ierīcēm tiks pievienota nākamajos OS Malevich atjauninājumos.
Ajax sistēma ļauj veikt testus, lai pārbaudītu pievienoto ierīču darbspēju. Testi netiek uzsākti nekavējoties, bet līdz 36 sekunžu laikā, ja tiek izmantoti standarta iestatījumi. Sākuma laiks ir atkarīgs no detektora aptaujas intervāla iestatījumiem (Jeweller sadaļā huba iestatījumos).
Var pārbaudīt:
Jeweller signāla stiprumu starp ReX Jeweller un hubu;
Jeweller signāla stiprumu starp ReX Jeweller un pievienoto ierīci.
Testa uzsākšana:
Lai pārbaudītu signāla stiprumu starp pastiprinātāju un hubu — atveriet ReX Jeweller iestatījumus un izvēlieties Jeweller Signal Strength Test.
Lai pārbaudītu signāla stiprumu starp pastiprinātāju un ierīci — atveriet pievienotās ierīces iestatījumus un izvēlieties Jeweller Signal Strength Test.
Ierīces uzstādīšana
Vietas izvēle
ReX Jeweller atrašanās vieta nosaka attālumu līdz hubam, pievienotajām ierīcēm un šķēršļu (sienu, pārsegumu, lielu objektu) ietekmi uz radiosignāla izplatību.
Ierīce paredzēta tikai lietošanai telpās.
Noteikti pārbaudiet signāla stiprumu izvēlētajā vietā!
Ja indikators rāda tikai vienu līmeni, stabila darbība nav garantēta. Lai uzlabotu signālu, pārvietojiet ReX Jeweller vai hubu — pat 20 cm pārvietojums var būtiski uzlabot uztveri.
Uzstādīšanas kārtība
Izvēlieties vietu, kas atbilst rokasgrāmatas prasībām, vēlams — paslēptu no tieša skata.
Montāžas laikā ievērojiet elektrodrošības noteikumus un normatīvus.
Piestipriniet SmartBracket montāžas paneli ar komplektā iekļautajām skrūvēm.
Ja izmantojat citus stiprinājumus, pārliecinieties, ka panelis netiek bojāts vai deformēts.
Nav ieteicams izmantot divpusējo līmlenti, jo tas var izraisīt ierīces nokrišanu un bojājumus.
Uzslidiniet ReX Jeweller uz montāžas paneļa.
Pēc uzstādīšanas pārbaudiet tampera statusu Ajax lietotnē un paneļa stingrību.
Papildu drošībai nostipriniet ReX Jeweller pie SmartBracket paneļa ar komplektā esošajām skrūvēm.
Uzstādīšanas drošība
Neuzstādiet pastiprinātāju apgrieztā veidā vertikālā montāžā (piemēram, uz sienas). Pareizi nostiprinātā stāvoklī Ajax logotips ir salasāms horizontāli.
Ja tiek mēģināts noņemt ierīci no virsmas vai atvienot no montāžas paneļa, lietotājs saņems paziņojumu.
Ierīci nedrīkst izjaukt, kamēr tā ir pieslēgta barošanai.
Aizliegts lietot ierīci ar bojātu strāvas kabeli.
Nedrīkst izjaukt vai modificēt ReX Jeweller vai tā sastāvdaļas — tas var radīt darbības traucējumus vai pilnīgu ierīces bojāeju.
Aizliegts uzstādīt ReX Jeweller
Ārpus telpām (ārā).
Tuvumā metāla priekšmetiem vai spoguļiem, kas slāpē vai bloķē radiosignālu.
Telpās ar mitruma vai temperatūras līmeni, kas pārsniedz atļautās robežas.
Tuvāk par 1 metru no maršrutētāja vai barošanas kabeļiem (radio traucējumu avoti).
Apkope
Regulāri pārbaudiet Ajax sistēmas darbspēju.
Notīriet korpusu no putekļiem, zirnekļu tīkliem un citiem netīrumiem, izmantojot mīkstu sausu drānu, kas paredzēta tehnikas kopšanai.
Nedrīkst izmantot vielas, kas satur spirtu, acetonu, benzīnu vai citus aktīvus šķīdinātājus.
Akumulatora nomaiņa: Norādījumi par ReX Jeweller radiosignāla pastiprinātāja akumulatora nomaiņu ir pieejami atsevišķi.
Tehniskie parametri
Visi tehniskie parametri pieejami ReX Jeweller specifikācijā.
Atbilstība standartiem
Ierīce atbilst noteiktajiem starptautiskajiem un reģionālajiem standartiem.
Garantija
Ražotāja SIA “Ajax Systems Manufacturing” garantija ir derīga 2 gadus no iegādes brīža.
Garantija neattiecas uz iepriekš uzstādīto akumulatoru.
Ja ierīce nedarbojas pareizi, vispirms sazinieties ar atbalsta dienestu — pusē gadījumu tehniskas problēmas tiek atrisinātas attālināti.
Tehniskā specifikācija – ReX Jeweller
Modelis: ReX Jeweller Mērķis: Radiosignāla pastiprinātājs Ajax ierīcēm (tikai iekštelpām)
Savienojumi un komunikācija
Savietojamība: tikai ar Ajax Hub sērijas centrālēm (nesavienojas ar uartBridge un ocBridge Plus)
Datu aizsardzība: divvirzienu sakari, blokšifrēšana ar mainīgu atslēgu, aizsardzība pret sabojāšanu
Radiosakaru diapazons: līdz 2000 m (tiešas redzamības apstākļos)
Pārlūkošanas intervāls: 12–300 s (noklusējuma 36 s)
Trauksmes paziņojums: līdz 0,3 s
Atbalstītie radiofrekvenču diapazoni (atkarībā no reģiona):
866,0–866,5 MHz
868,0–868,6 MHz
868,7–869,2 MHz
Maksimālā efektīvā izstarotā jauda (ERP): līdz 20 mW
Automātiska jaudas regulācija traucējumu un enerģijas patēriņa samazināšanai
Barošana un akumulators
Barošana: no ārējā avota (DC)
Iebūvēts akumulators: nodrošina līdz 35 h darbību bez ārējās barošanas
Aizsardzība pret sabojāšanu: tampera poga (reakcija uz noņemšanas mēģinājumiem)
Funkcijas un vadība
Iebūvēts LED indikators (statusa attēlošanai)
Vadība un konfigurācija: Ajax mobilās un datorprogrammas (iOS, Android, Windows, macOS)
Notifikācijas: push paziņojumi, SMS, zvani (ja aktivizēti)
Programmatūras atjaunināšana: automātiska caur OS Malevich
Izmēri un svars
Korpusa izmēri: 196 × 238 × 100 mm
Svars: 1010 g
Darba temperatūras diapazons: –10 °C līdz +40 °C
Relatīvais mitrums: līdz 75 %
Aizsardzības klase: IP40
Komplektācija
ReX Jeweller ierīce
SmartBracket montāžas panelis
Montāžas komplekts
Lietošanas instrukcija
Garantija
24 mēneši no iegādes brīža (neattiecas uz iepriekš uzstādīto akumulatoru).
Pieejams saņemšanai veikalā
Izpārdots veikalā
Pievienots salīdzināšanai
Sasniegts count_product-produktu limits
Pievienots salīdzināšanai
Sasniegts count_product-produktu limits
{"id":41613546651831,"title":"Default Title","option1":"Default Title","option2":null,"option3":null,"sku":"367308948","requires_shipping":true,"taxable":true,"featured_image":null,"available":true,"name":"AJAX Bezvadu drošības tastatūra Keypad Plus Baltā krāsā","public_title":null,"options":["Default Title"],"price":11760,"weight":0,"compare_at_price":14997,"inventory_management":"shopify","barcode":"367304848","requires_selling_plan":false,"selling_plan_allocations":[],"quantity_rule":{"min":1,"max":null,"increment":1}}
AJAX Bezvadu drošības tastatūra Keypad Plus Baltā krāsā
SKU: 367308948
(1)
€117,60€149,97
Vienības cena
AJAX Keypad Plus bezvadu tastatūra, pieslēdzama pie AJAX Hub 2 vai Hub 2 Plus. Ieslēdziet un izslēdziet apsardzi, nakts režīmu ar tastatūras palīdzību.
Baterijas strādā līdz 3.5 gadiem. Izveidojiet katram lietotājiem personīgu kodu, lai zinātu, kurš un kad ieslēdzis vai izlēdzis apsardzi. Lietotāja vārds tiks atspoguļots paziņojumu žurnālā.
Pēc 3 neveiksmīgiem koda ievadīšanas mēģinājumiem tiks nosūtīts trauksmes signāls. Var izveidot trauksmes kodu, ievadot kuru, tiek simulēta apsardzes noņēmšana, ja kāds piespiež lietotāju noņemt apsardzi, taču trauksmes signāls tiek nekavējoties sūtīts apsardzes kompānijai.
KeyPad Plus Jeweller user manual
Updated
KeyPad Plus Jewelleris a wireless touch keypad for managing the Ajax system with encrypted contactless cards and key fobs. Designed for indoor installation. Supports “silent alarm” when entering theduress code.
The keypad manages security modes using passwords andcardsorkey fobs. Indicates the current security mode with a LED light.
The keypad operates as part of the Ajax system by connecting via theJeweller secure radio communication protocolto the hub. The communication range without obstacles is up to 1700 meters. The pre-installed battery life is up to 3.5 years.
SmartBracket mounting plate (to remove the plate, slide it down)
Do not tear off the perforated part of the mount. It is required for actuating the tamper in case of any attempt to dismantle the keypad.
Power button
Tamper button
Keypad QR Code
Operating principle
KeyPad Plus Jeweller arms and disarms the security of the entire facility or separate groups as well as allows activating theNight Mode. You can control the security modes with KeyPad Plus Jeweller using:
Codes. The keypad supports general and personal codes, as well as arming without entering a code.
Cards or key fobs. You can connectTag key fobsandPass cardsto the system. To quickly and securely identify users, KeyPad Plus Jeweller uses the DESFire® technology. DESFire® is based on the ISO 14443 international standard and combines 128-bit encryption and copy protection.
KeyPad Plus Jeweller supports code types as follows:
Keypad code— general code set up for the keypad. When used, all events are delivered to Ajax apps on behalf of the keypad.
User code— personal code set up for a user connected to the hub. When used, all events are delivered to Ajax apps on behalf of the user.
Keypad access code— set up for a person who is not registered in the system. When used, events are delivered to Ajax apps with a name associated with this code.
RRU codeis an access code for the rapid response units (RRU) activated after the alarm and valid for a specified period. When the code is activated and used, events are delivered to Ajax apps with a title associated with this code.
The number of personal, access, and RRU codes depends on the hub model.
Access codes are not supported by theHub (2G) Jewellercontrol panel.
Before entering a code or using Tag/Pass, you should activate (“wake up”) the KeyPad Plus Jeweller by sliding your hand over the touch panel from top to bottom. When it is activated, the button backlight is enabled, and the keypad beeps.
Auto-wake on Delay when Enteringfunction allows automatically activating the keypad whenDelay When Enteringis set up. This function is supported by KeyPad Plus Jeweller with firmware version 6.60.0.6 or higher and hubs withOS Malevich 2.19or higher.
The KeyPad Plus Jeweller is equipped with LED indicators that show the current security mode and keypad malfunctions (if any). The security status is displayed only when the keypad is active (the device backlight is on).
You can use the KeyPad Plus Jeweller without ambient lighting as the keypad has a backlight. The pressing of the buttons is accompanied by a sound signal. The backlight brightness and keypad volume are adjustable in the settings. If you do not touch the keypad for 4 seconds, KeyPad Plus Jeweller reduces the backlight brightness, and 8 seconds later goes into power-saving mode and turns off the display.
If the batteries are discharged, the backlight turns on at the minimum level regardless of the settings.
Function button
KeyPad Plus Jeweller has aFunctionbutton that operates in 3 modes:
Off— the button is disabled and nothing happens after it is pressed.
Alarm— after theFunctionbutton is pressed, the system sends an alarm to the security company monitoring station and all users.
Mute interconnected fire detectors alarm— after theFunctionbutton is pressed, the system mutes the alarm of theAjax fire detectors. Available only if anInterconnected Fire Detectors Alarmis enabled (Hub → Settings→ Service → Fire detectors settings)
KeyPad Plus Jeweller supportsduress code. It allows you to simulate alarm deactivation. TheAjax appandsirensinstalled at the facility will not give you away in this case, but the security company and other users of the security system will be warned about the incident.
KeyPad Plus Jeweller can participate in two-stage arming, but cannot be used as a second-stage device. The two-stage arming process using Tag or Pass is similar to arming using a personal or general code on the keypad.
The Ajax system can connect to the CMS and transmit events and alarms to the monitoring station of the security company inSurGard (Contact ID), ADEMCO 685, SIA (DC-09), and other proprietary protocol formats. A complete list of supported protocols isavailable here. The device ID and the number of the loop (zone) can be found inits states.
Connection
KeyPad Plus Jeweller is incompatible with Hub (2G) Jeweller, third-party security central units, and ocBridge Plus and uartBridge integration modules.
Before starting connection
The hub and the device operating at different radio frequencies are incompatible. The radio-frequency range of the device may vary by region. We recommend purchasing and using Ajax devices in the same region. You can check the range of operating radio frequencies with thetechnical support service.
Install the Ajax app andcreate an account. Add a hub and create at least one room.
Ensure that the hub is on and has Internet access (via Ethernet cable, Wi-Fi, and/or mobile network). This can be done by opening the Ajax app or by looking at the hub logo on the faceplate — it lights white or green if the hub is connected to the network.
Make sure that the hub is not in armed mode and does not start updates by checking its status in the app.
Only a user or PRO with full admin rights can add a device to the hub.
To connect KeyPad Plus Jeweller
Open the Ajax app. If your account has access to multiple hubs, select the one to which you want to connect KeyPad Plus Jeweller.
Go to theDevicesmenu and clickAdd Device.
Name the keypad, scan or enter the QR code (located on the package and under the SmartBracket mount), and select a room.
ClickAdd; the countdown will begin.
Turn on the keypad by holding the power button for 3 seconds. Once connected, KeyPad Plus Jeweller will appear in the hub device list in the app. To connect, locate the keypad at the same protected facility as the system (within the coverage area of the hub radio network range). If the connection fails, try again in 10 seconds.
The keypad only works with one hub. When connected to a new hub, the device stops sending commands to the old hub. Once added to a new hub, KeyPad Plus Jeweller is not removed from the device list of the old hub. This must be done manually through the Ajax app.
KeyPad Plus Jeweller turns off automatically 6 seconds after being turned on if the keypad fails to connect to the hub. Therefore, you do not need to turn off the device to retry the connection.
Updating the statuses of devices in the list depends on the Jeweller settings; the default value is 36 seconds.
Icons
The icons represent some of KeyPad Plus Jeweller states. You can see them in theDevicestab in the Ajax app.
Icon
Value
Jeweller signal strength — Displays the signal strength between the hub or radio signal range extender and KeyPad Plus Jeweller
Displays the status of the ReX Jeweller range extender use.
The field is not displayed if the keypad works directly with the hub.
Pass/Tag Reading
Displays if card and keyfob reader is enabled.
Assigned Group Easy Management
Displays whether or not the security mode can be switched with Pass or Tag and without confirmation by the control buttons,,.
Easy Armed Mode Change
This setting replacesAssigned Group Easy Managementon KeyPad Plus Jeweller with firmware version 5.60.6.3 or higher, operating with hubs withOS Malevich 2.19or higher.
Shows the configuration for theEasy Armed Mode Changefeature:
Off— each arming or disarming attempt should be confirmed by entering the passcode or presenting the access device.
Arm/disarm using access device without confirming action by buttons— allows users to switch security modes of the system using access devices without confirmation by pressing keypad buttons.
Disarm without disarming button— the system or its groups, the security of which is managed with a passcode or access devices, will be disarmed without confirmation by pressing keypad buttons.
A fixed passcode length should be set in the hub settings in the Ajax PRO app.
Permanent Deactivation
Shows the status of the device:
No— the device operates normally and transmits all events.
Lid only— the hub admin has disabled notifications about the body opening.
Entirely— the hub admin has entirely excluded the keypad from the system. The device does not execute system commands and does not report alarms or other events.
Shows the status of the keypad one-time deactivation setting:
No— the keypad operates in normal mode.
Lid only— notifications on the keypad tamper triggering are disabled until the first disarm.
Entirely— the keypad is entirely excluded from the operation of the system until the first disarm. The device does not execute system commands and does not report alarms or other events.
KeyPad Plus Jeweller is configured in the Ajax app:
Go to theDevicestab.
SelectKeyPad Plus Jewellerfrom the list.
Go toSettingsby clicking on the gear icon.
To apply the settings after the change, click theBackbutton
Parameter
Value
Name
Device name. Displayed in the list of hub devices, SMS text, and notifications in the event feed.
To change the device name, click on the pencil icon.
The name can contain up to 12 Cyrillic characters or up to 24 Latin characters.
Room
Selecting the virtual room to which KeyPad Plus Jeweller is assigned.
The name of the room is displayed in the text of SMS and notifications in the event feed.
Group Management
Selecting the security group controlled by the device. You can select all groups or just one.
The field is displayed when theGroup modeis enabled.
If theFollowed groupfeature is configured for groups, their security state can automatically change depending on their settings and initiators’ states.
.
Access Settings
Selecting the method of arming/disarming:
Keypad codes only.
User codes only.
Keypad and user codes.
To activate theKeypad Access Codesset up for people who are not registered in the system, select the options on the keypad:Keypad codes onlyorKeypad and user codes
.
Keypad Code
Selection of a general code for security control. Contains 4 to 6 digits.
Duress Code
Selecting a general duress code for silent alarm. Contains 4 to 6 digits.
Selecting the function of the * button (Functionbutton):
Off— theFunctionbutton is disabled and does not execute any commands when pressed.
Panic— after theFunctionbutton is pressed, the system sends an alarm to the CMS and to all users.
Mute Interconnected Fire Detectors Alarm — when pressed, mutes the alarm ofAjax fire detectors. Available only if anInterconnected Fire Detectors Alarmis enabled.
When enabled, theFunctionbutton should be pressed twice to send a panic alarm.
This setting is available ifFunction buttonis set toPanic.
Unauthorized Access Auto-Lock
If active, the keypad is locked for the pre-set time if an incorrect code is entered or unverified passes/tags are used more than 3 times in a row within 1 minute.
It is not possible to disarm the system via keypad during this time. You can unlock the keypad through the Ajax app.
Auto-lock Time, min
Selecting the keypad lock period after wrong code attempts:
3 minutes.
5 minutes.
10 minutes.
20 minutes.
30 minutes.
60 minutes.
90 minutes.
180 minutes.
Brightness
Selecting brightness of the keypad buttons backlight. The backlight works only when the keypad is active.
This option does not affect the brightness level of pass/tag reader and security modes indicators.
Buttons Volume
Selecting the keypad buttons volume level when pressed.
Pass/Tag Reading
When enabled, the security mode can be controlled with Pass and Tag access devices.
Authorization confirmation with a passcode
When enabled, system authorization using access devices requires confirmation of the action with the user or keypad code. Available if thePass/Tag Readingtoggle is enabled.
This setting is supported when KeyPad Plus Jeweller is connected to hubs with firmware versionOS Malevich 2.20or higher.
Time for confirmation
Selecting the maximum time to confirm authorization with a password after access devices’ confirmation. Available if theAuthorization confirmation with a passcodetoggle is enabled.
This setting is supported when KeyPad Plus Jeweller is connected to hubs with firmware versionOS Malevich 2.21or higher.
Assigned Group Easy Management
When enabled, changing the security mode with Tag and Pass does not require confirmation by pressing thearm,disarm, orNight Modebutton. The security mode is switched automatically.The option is available ifPass/Tag Readingis enabled in the keypad settings.
If the group mode is activated, the option is available when the keypad is assigned to a particular group — theGroup Management field in the keypad settings.
This setting replacesAssigned Group Easy Managementon KeyPad Plus Jeweller with firmware version 5.60.6.3 or higher, operating with hubs withOS Malevich 2.19or higher.
Allows users to arm/disarm the system without confirmation by pressing keypad buttons.
Three options are available:
Off— each arming or disarming attempt should be confirmed by entering the passcode or presenting the access device.
Arm/disarm using access device without confirming action by buttons— allows users to switch security modes of the system using access devices without confirmation with keypad buttons.
Disarm without disarming button— the system or its groups, the security of which is managed with a passcode or access devices, will be disarmed without confirmation by pressing keypad buttons.
A fixed passcode length should be set in the hub settings in the Ajax PRO app.
Arming without Code
The option allows you to arm the system without entering a code. To do so, just click on theArmorNight Modebutton.
Auto-wake on Delay when Entering
The feature is available on KeyPad Plus Jeweller with firmware version 6.60.0.6 or higher, operating with hubs withOS Malevich 2.19or higher.
Activates the keypad afterDelay When Enteringis started by any security device.
The auto-wake feature may also reduce the keypad battery life.
Alert with a siren if the panic button is pressed
The field is displayed if theAlarmoption is selected for theFunctionbutton.When the option is enabled, the sirens connected to the security system give an alert when the * button (Functionbutton) is pressed.
Jeweller Signal Strength Test
Switches the keypad to the Jeweller signal strength test mode.
Opens KeyPad Plus Jeweller user manual in the Ajax app.
Permanent Deactivation
Allows the user to disable the device without removing it from the system.
Three options are available:
No— the device operates in normal mode and transmits all events.
Entirely— the device does not execute system commands and does not participate in automation scenarios, and the system ignores alarms and other device notifications.
Lid only— the system ignores the device tamper triggering notifications.
Allows the user to disable events of the device until the first disarm.
Three options are available:
No— the device operates in normal mode.
Lid only— notifications on the device tamper triggering are disabled while the armed mode is active.
Entirely— the device is completely excluded from the operation of the system while the armed mode is active. The device does not execute system commands and does not report alarms or other events.
Ajax system allows you to set up a keypad code, as well as personal codes for users added to the hub.
With theOS Malevich 2.13.1update, we have also added the ability to create access codes for people who are not added to the hub. This is convenient, for example, to provide a cleaning company with access to security management.
With theOS Malevich 2.17update, codes for the rapid response units are available. The RRU codes are activated after the alarm and are valid for a specified period. See how to set up and use each type of code below.
To set keypad code
Go to keyboard settings.
SelectKeypad Code.
Set the keypad code you want.
To set the keypad duress code
Go to keypad settings.
SelectDuress Code.
Set the keypad duress code you want.
To set a personal code in the Ajax app
Go to the user profile settings (Hub→Settings→Users→Your profile settings).
SelectPasscode Settings(User ID is also visible in this menu).
SetUser CodeandDuress Code.
Each user sets a personal code individually. The admin cannot set a code for all users.
To set up an access code for a person who is not registered in the system
Go to the hub settings (Hub→Settings).
SelectKeypad Access Codes.
Set upUsernameandAccess Code.
If you want to set up a duress code, change settings for access to groups, Night Mode, code ID, temporarily disable or delete this code, select it in the list and make changes.
PRO or a user with admin rights can set up an access code or change its settings. This function is supported by hubs with OS Malevich 2.13.1 and higher. Access codes are not supported by the Hub (2G) Jeweller control panel.
To set up the RRU code
Only a PRO with the rights to configure the system can create and configure the RRU codes in theAjax PRO apps. More information about configuring this feature you can find inthis article.
The RRU codes are supported by hubs (except the Hub (2G) Jeweller model) with OS Malevich 2.17 and higher.
Adding passes and tags
KeyPad Plus Jeweller can work withTag key fobs,Pass cards, and third-party cards and key fobs that use DESFire® technology.
Before adding third-party devices that support DESFire®, make sure they have enough free memory to handle the new keypad. Preferably, the third-party device should be pre-formatted.
The maximum number of connected passes/tags depends on the hub model. At the same time, the bound passes and tags do not affect the total limit of devices on the hub.
Hub model
Number of Tag or Pass devices
Hub (4G) Jeweller
50
Hub Plus Jeweller
99
Hub 2 Jeweller
50
Hub 2 Plus Jeweller
200
Superior Hub Hybrid
50
The procedure for connecting Tag, Pass, and third-party devices is the same. See the connecting instructionshere.
Controlling security via codes
You can controlNight Mode, security of the entire facility or separate groups using general, personal, RRU, and access codes (configured by PRO or a user with admin rights). The keypad allows you to use 4 to 6 digit codes. Incorrectly entered numbers can be cleared with thebutton.
If a personal code or access code is used, the name of the user who armed or disarmed the system is displayed in the hub event feed and in the notifications list. If a general code is used, the name of the user who changed the security mode is not displayed.
Keypad access codesare supported by hubs (except theHub (2G) Jewellermodel) with OS Malevich 2.13.1 and higher.
TheRRU codesare supported by hubs (except theHub (2G) Jewellermodel) with OS Malevich 2.17 and higher.
Arming with a personal code
Theusernameis displayed in the notifications and events feed
Arming with a general code
Thedevice nameis displayed in the notifications and events feed
KeyPad Plus Jeweller is locked for the time specified in the settings if an incorrect code is entered three times in a row within 1 minute. The corresponding notifications are sent to users and to the monitoring station of the security company. A user or PRO with administrator rights can unlock the keypad in the Ajax app.
Controlling security at the object via general code
Activate the keypad by swiping your hand over it. Bring Tag or Pass to the keypad pass/tag reader if theAuthorization confirmation with a passcodefeature is activated.
Enter thegeneral code.
Press thearming/disarming/Night Modekey.
For example: 1234 →
Group security management with a general code
Activate the keypad by swiping your hand over it. Bring Tag or Pass to the keypad pass/tag reader if theAuthorization confirmation with a passcodefeature is activated.
If a security group is assigned to KeyPad Plus Jeweller (in theGroup Managementfield in the keypad settings), you do not need to enter the group ID. To manage the security mode of this group, entering a general or personal code is sufficient.
If a group is assigned to KeyPad Plus Jeweller, you will not be able to manageNight Modeusing a general code. In this case,Night Modecan only be managed using a personal code if the user has the appropriate rights.
Security management of the facility using a personal code
Activate the keypad by swiping your hand over it. Bring Tag or Pass to the keypad pass/tag reader if theAuthorization confirmation with a passcodefeature is activated.
Activate the keypad by swiping your hand over it. Bring Tag or Pass to the keypad pass/tag reader if theAuthorization confirmation with a passcodefeature is activated.
Enter theUser ID.
Press the * (Functionbutton).
Enter yourpersonal code.
Press the * (Functionbutton).
Enter theGroup ID.
Press thearming/disarming/Night Modekey.
For example: 2 → * → 1234 → * → 5 →
If a group is assigned to KeyPad Plus Jeweller (in theGroup Managementfield in the keypad settings), you do not need to enter the group ID. To manage the security mode of this group, entering a personal code is sufficient.
A duress code allows you to simulate alarm deactivation. The Ajax app and sirens installed at the facility will not give the user away in this case, but the security company and other users will be warned about the incident. You can use both a personal and a general duress code. InKeypad Access Codes, you can also set up a duress code for people not registered in the system.
Scenarios and sirens react to disarming under duress in the same way as to normal disarming.
Activate the keypad by swiping your hand over it. Bring Tag or Pass to the keypad pass/tag reader if theAuthorization confirmation with a passcodefeature is activated.
Enter thegeneral duress code.
Press the disarming button.
For example:4321 →
To use a personal duress code of registered user
Activate the keypad by swiping your hand over it. Bring Tag or Pass to the keypad pass/tag reader if theAuthorization confirmation with a passcodefeature is activated.
Enter theUser ID.
Press the * (Functionbutton).
Enter thepersonal duress code.
Press the disarming button.
For example:2 → * → 4422 →
To use a duress code of a person who is not registered in the system
Enter theduress codeset inKeypad Access Codesand press thedisarming key.
For example:4567 →
Using the RRU code
The RRU code is activated after triggering the alarm during the time configured in the hub settings, and it is valid for a specified period. This ensures that such code will only be used in case of risk, unlike keypad or user codes.
Security control of the object using the RRU code:
EnterRRU Codeand press thearming / disarming/ Night Mode activationbutton.
For example: 1234→
Security control of the group using the RRU code:
EnterRRU Code, press*, enterGroup ID, and press thearming / disarming/ Night Mode activationbutton.
For example: 1234 →*→ 2→
Security management using Tag or Pass
Activate the keypad by swiping your hand over it. KeyPad Plus Jeweller will beep (if enabled in the settings) and turn on the backlight.
Note that the keypad can be activated automatically with theAuto-wake on Delay when Enteringfunction ifDelay When Enteringis set up. This function is supported by KeyPad Plus Jeweller with firmware version 6.60.0.6 or higher and hubs withOS Malevich 2.19or higher.
Bring Tag or Pass to the keypad pass/tag reader. It is marked with wave icons.
Enter the required code if theAuthorization confirmation with a passcodefeature is activated.
Press theArm,Disarm, orNight Modebutton on the keypad.
Note that ifEasy armed mode changeis enabled in the KeyPad Plus Jeweller settings, you do not need to press theArm,Disarm, orNight Modebutton. The security mode will change to the opposite after tapping Tag or Pass.
Security control of a single group
Tag or Pass can control the security mode of a single group. This is possible if KeyPad Plus Jeweller is not assigned to any group and Tag or Pass has no group restrictions.
To change the security mode of a single group using Tag or Pass:
Activate the keypad by swiping your hand over it. Bring Tag or Pass to the keypad pass/tag reader if theAuthorization confirmation with a passcodefeature is activated.
Press thearming / disarming/ Night Mode activationbutton.
For example:→ 01→
If the security mode is successfully changed, a short beep will sound, the indicator will change, and a notification with the username will appear in the event log.
Mute Interconnected Fire Detectors Alarms function
KeyPad Plus Jeweller can mute an interconnected fire alarm by pressing theFunctionbutton (if the required setting is enabled). The reaction of the system to pressing a button depends on the settings and the state of the system:
Interconnected Fire Detectors Alarms have already propagated— by the first press of the button, all sirens of the fire detectors are muted, except for those that registered the alarm. Pressing the button again mutes the remaining detectors.
Interconnected alarms delay time lasts— by pressing theFunctionbutton, the siren of the triggeredAjax fire detectorsis muted.
KeyPad Plus Jeweller can report the current security mode, keystrokes, malfunctions, and its status by LED indication and sound. The current security mode is displayed by the backlight after the keypad is activated. The information about the current security mode is relevant even if the arming mode is changed by another device: a key fob, another keypad, or an app.
Auto-wake on Delay when Enteringfunction allows automatically activating the keypad whenDelay When Enteringis set up. This function is supported by KeyPad Plus Jeweller with firmware version 6.60.0.6 or higher and hubs withOS Malevich 2.19or higher.
You can activate the keypad by swiping your hand over the touch panel from top to bottom. When activated, the backlight on the keypad will turn on and a beep will sound (if enabled).
Event
Indication
There is no connection to the hub or radio signal range extender
LEDXblinks
KeyPad Plus Jeweller body is open (SmartBracket mount is removed)
LEDXblinks briefly once
Touch button pressed
Short beep, the current system security status LED blinks once. The volume depends on the keypad settings
The system is armed
Short beep,ArmedorNight ModeLED lights up
The system is disarmed
Two short beeps, theDisarmedLED lights up
An incorrect code was entered or there was an attempt to change security mode by an unconnected or deactivated pass/tag
Long beep, digital unit LED backlight blinks 3 times
The security mode cannot be activated (for example, a window is open and theSystem integrity checkis enabled)
Long beep, the current security status LED blinks 3 times
The hub does not respond to the command — there is no connection
Long beep,X(Malfunction)LED lights up
The keypad is locked due to a wrong code attempt or attempt to use an unauthorised pass/tag
Long beep, during which the security status LEDs and keypad backlight blink 3 times
The batteries are low
After changing the security mode, theX LED lights up. The touch buttons are locked for this time.
When you try to turn on the keypad with discharged batteries, it emits a long beep, theXLED smoothly lights up and goes off, then the keypad turns off
The system requires to confirm authorization with a password after access devices’ confirmation. Available if theAuthorization confirmation with a passcodefeature is activated
The current security status LED blinks during the set time for confirmation
Sound notifications of malfunctions
If any device is offline or the battery is low, KeyPad Plus Jeweller can notify system users with an audible sound. The keyboards’ LEDsХwill blink. Malfunction notifications will be displayed in the events feed, SMS text, or push notification.
To enable sound notifications of malfunctions, use Ajax PRO and PRO Desktopapps:
ClickDevices, choose hub and open its settings: ClickService→Sounds and Alerts
Enable toggles:If battery of any device is lowandIf any device is offline.
ClickBackto save settings.
Sound notifications of malfunctions settings are available for all hubs (except the Hub model) with firmware version OS Malevich 2.15 or higher.
Sound notifications of malfunctions are supported by KeyPad Plus Jeweller with firmware version 5.57.5.0 or higher.
Event
Indication
Note
If any device is offline.
Two short sound signals,MalfunctionindicatorХblinks twice.
Beep once per minute until all devices in the system are online.
Users can delay sound indication for 12 hours.
If KeyPad Plus is offline.
Two short sound signals,MalfunctionindicatorХblinks twice.
Beep once per minute until the keyboard in the system is online.
It’s impossible to delay sound indication.
If battery of any device is low.
Three short sound signals,MalfunctionindicatorХblinks three times.
Beep once per minute until the battery is restored or the device is removed.
Users can delay sound indication for 4 hours.
Sound notifications of malfunctions appear when the keypad indication is finished. If several malfunctions occur in the system, the keypad will notify about the loss of connection between the device and the hub first.
Functionality testing
The Ajax system provides several types of tests that help you make sure that installation points of devices are selected correctly.
KeyPad Plus Jeweller functionality tests do not start straight away but after no more than one hub-detector ping period (36 seconds when using the standard hub settings). You can change the ping period of devices in theJewellermenu of the hub settings.
Tests are available in the device settings menu (Ajax App → Devices→ KeyPad Plus Jeweller → Settings)
KeyPad Plus Jeweller is best placed indoors near the entrance. This allows disarming the system before the entry delays have expired, as well as quickly arming the system when leaving the premises.
When holding KeyPad Plus Jeweller in your hands or using it on a table, we cannot guarantee that the touch buttons will work properly.
It is a good practice to install the keypad 1.3 to 1.5 meters above the floor for convenience. Install the keypad on a flat, vertical surface. This allows KeyPad Plus Jeweller to be firmly attached to the surface and to avoid false tamper triggering.
Besides, the placement of the keypad is determined by the distance from the hub or the radio signal range extender, and the presence of obstacles between them that prevent the passage of the radio signal: walls, floors, and other objects.
Be sure to check the Jeweller signal strength at the installation site. If the signal strength is low (a single bar), we cannot guarantee a stable operation of the security system. At the very least, relocate the device as repositioning even by 20 cm can significantly improve the signal reception.
In places where parts of clothing (for example, next to the hanger), power cables, or Ethernet wire may obstruct the keypad. This can lead to false triggering of the keypad.
Inside premises with temperature and humidity outside the permissible limits. This could damage the device.
In places where KeyPad Plus Jeweller has an unstable or poor signal strength with the hub or radio signal range extender.
Within 1 meter of a hub or radio signal range extender.
Close to electrical wiring. This may cause communication interferences.
Outdoors. This could damage the device.
Installing the keypad
Prior to installing KeyPad Plus Jeweller, be sure to select the optimal location following the requirements of this manual.
Attach the keypad to the surface with double-sided adhesive tape and carry outsignal strengthandattenuation tests. If the signal strength is unstable or if one bar is displayed, move the keypad or use theradio signal range extender.
Double-sided adhesive tape may only be used for temporary attachment of the keypad. The device attached with adhesive tape can at any time be detached from the surface and fall, which may lead to failure.
Please note that if the device is attached with adhesive tape, the tamper will not trigger when trying to detach it.
Check the convenience for code entry using Tag or Pass to manage security modes. If it is inconvenient to manage the security at the selected location, relocate the keypad.
Remove the keypad from the SmartBracket mounting plate.
Attach the SmartBracket mounting plate to the surface using the bundled screws. When attaching, use all fixing points. Be sure to fix the perforated corner on the SmartBracket plate so that the tamper responds to a detachment attempt.
Slide KeyPad Plus Jeweller onto the mounting plate and tighten the mounting screw at the bottom of the body. The screw is needed for more reliable fastening and protection of the keypad from quick dismantling.
As soon as the keypad is fixed on the SmartBracket, it shall blink once with LEDX — this is a signal that the tamper has been triggered. If the LED does not blink after installation on SmartBracket, check the tamper status in the Ajax app, and then make sure the plate is firmly attached.
Maintenance
Check the functioning of your keypad on a regular basis. This can be done once or twice a week. Clean the body from dust, cobwebs, and other contaminants as they emerge. Use a soft dry cloth that is suitable for equipment care.
Do not use substances that contain alcohol, acetone, gasoline or other active solvents to clean the detector. Wipe the touch keypad gently: scratches can reduce the sensitivity of the keypad.
The batteries installed in the keypad provide up to 3.5 years of autonomous operation at default settings. If the battery is low, the system sends appropriate notifications, and theX (Malfunction) indicator smoothly lights up and goes out after each successful code entry.
KeyPad Plus Jeweller can work up to 2 months after the low battery signal. However, we recommend you replace the batteries immediately upon notification. It is advisable to use lithium batteries. They have a large capacity and are less affected by temperatures.
The warranty for the Limited Liability Company “Ajax Systems Manufacturing” products is valid for 2 years after purchase and does not extend to the bundled batteries.
If the device does not function properly, we recommend that you first contact the support service as half of the technical issues can be resolved remotely.
Ajax vhfBridge | VHF radio komunikators, 8 izejas, savienojams ar Hub 2, Hub Plus, Hub 2 Plus | balts
SKU: 367308959
€124,24€158,46
Vienības cena
vhfBridge Jeweller User manual
vhfBridge Jeweller is a module for connecting Ajax security systems to third-party VHF transmitters. It provides 8 transistor outputs for connection to third-party VHF transmitters.
The device is powered from 100–240 V~ mains and can be operated from a 12 V⎓ backup battery.
vhfBridge Jeweller operates as part of the Ajax security system and connects to the hub via the Jeweller secure radio communication protocol. The hub communication range is up to 1,800 meters without obstacles. Supplied in two configurations: with a casing and without it.
Screws securing the casing lid. Unscrew with a bundled hexagon key (Ø 4 mm).
Space for a 12 V⎓ backup battery.
Battery not included with vhfBridge Jeweller set.
QR code with the device ID. It is used to pair the device with the Ajax security system.
Perforated part of the casing. Necessary for tamper triggering in case of any attempt to detach the device from the surface.
Perforated parts of the casing for cable output.
The presence of the casing depends on the vhfBridge Jeweller package. The device is supplied in two configurations: with a casing and without it.
vhfBridge Jeweller board elements
Terminals for connecting a 12 V⎓ backup battery.
100–240 V~ power supply input.
Tamper button. Signals if vhfBridge Jewellercasing lid is removed.
Power button.
LED indicator.
QR code with the device ID. It is used to pair the device with the Ajax security system.
Terminals for connecting a VHF transmitter.
vhfBridge Jeweller terminals
BATT — input for the 12 V⎓ backup power connection.
OUT — power output for the 12 V⎓ VHF transmitter (maximum output current is 2 A).
OUT 1…8 — vhfBridge Jeweller outputs for connecting a VHF transmitter.
LED indication
vhfBridge Jeweller LED indicator may light up white, red, or green, depending on the status of the device.
Please note that the LED indicator is not visible when the casing lid is closed. The LED indicator is used at the stage of vhfBridge Jeweller connecting and configuring. Later on, the state of the device can be monitored in the Ajax app.
LED indication
Event
Note
Lights up white.
Connection with the hub is established, external power supply is connected.
Lights up red.
There is no connection with the hub, external power supply is connected.
For example, the hub is turned off or vhfBridge Jeweller is outside the coverage area of the hub’s wireless network.
Goes out for 0.5 seconds, then lights up green and turns off.
Enabling vhfBridge Jeweller.
Goes out for 0.5 seconds, then lights up green and fades out over 3 seconds.
Disabling vhfBridge Jeweller.
Blinks red once per second.
vhfBridge Jeweller is not assigned to a hub.
Lights up for a second once every 10 seconds.
No external power supply is connected to vhfBridge Jeweller.
The colour of the indication depends on the status of connection with the hub:
lights up white if there is connection with the hub;
lights up red if there is no connection with the hub.
During an alarm, gradually lights up and goes out once every 10 seconds.
No external power supply and discharged external battery of vhfBridge Jeweller.
The colour of the indication depends on the status of connection with the hub:
lights up white if there is connection with the hub;
lights up red if there is no connection with the hub.
LED indication of output status
LED indication
Output status in case of alarm
High potential output (positive trip).
Lights up green.
Low potential output (negative trip).
Goes out.
Operating principle
vhfBridge Jeweller is designed to connect third-party VHF transmitters to create an additional channel for transmitting events to the CMS.
The communication channel with the CMS created using vhfBridge Jeweller can be used as the only or as a backup channel for communicating with the CMS (recommended more reliable option). This means that the hub can simultaneously transmit all events and alarms to the monitoring station of the security company not only through SIA (DC-09), ADEMCO 685, SurGard (Contact ID), and other proprietary protocols but also using vhfBridge Jeweller.
The transponder receives information about alarms and events from the hub via the Jeweller radio channel. Then, vhfBridge Jeweller transmits it to a third-party VHF transmitter via wires. The VHF transmitter, in turn, transmits all events and alarms to the CMS via a radio channel.
Events can be transmitted to the CMS via the Internet and vhfBridge Jeweller in parallel. Transmission via the Internet works as the main channel because of greater reliability and informativity. The transmitted events may contain the zone number of the triggered detector, group number, user number, and other data.
vhfBridge Jeweller works as a backup communication channel duplicating all events transmitted via the Internet. The delivery speed of events and alarms in both cases does not exceed 1 second.
An example of the algorithm of actions in case of an alarm from a MotionProtect motion detector:
MotionProtect has detected an alarm.
MotionProtect transmits the alarm to the hub via the Jeweller radio protocol.
The hub receives the MotionProtect alarm and transmits it to vhfBridge Jeweller via the Jeweller radio protocol.
vhfBridge Jeweller receives the alarm from the hub and transmits it to the VHF transmitter over a wired connection.
The VHF transmitter receives the alarm and transmits it to the radio receiver on the CMS side via the radio channel.
The radio receiver receives the alarm and transmits it to the CMS software.
The CMS receives and processes the alarm.
Output types
vhfBridge Jeweller has 8 potential outputs for connection to a VHF transmitter. There are two types of outputs:
High potential output (positive trip).
Low potential output (negative trip).
The high-potential output does not supply voltage in the normal state. As soon as an alarm or event occurs, the output supplies a voltage of 12–14 V⎓. The low-potential output works the other way around. In the normal state, the voltage is maintained at 12–14 V⎓, and when an alarm or event occurs, it drops to 0 V.
The vhfBridge Jeweller output type and alarm pulse duration are configurable in Ajax apps.
VHF transmitter power supply
vhfBridge Jeweller can supply a third-party VHF transmitter with 12 V⎓ power (maximum output current is 2 A).
If the VHF transmitter has a current consumption of more than 2 A, it can be powered by the vhfBridge Jeweller battery. In this case, disable battery charge tracking in the vhfBridge Jeweller settings so that the system users do not receive notifications about the vhfBridge Jeweller battery charging too long.
Sending events to the Central Monitoring Station (CMS)
The Ajax security system can transmit alarms to thePRO Desktopmonitoring app as well as the Central Monitoring Station (CMS) usingSurGard (Contact ID),SIA DC-09 (ADM-CID),ADEMCO 685, and other proprietary protocols. The list of supported protocols isavailable here.
When an alarm is received, the monitoring station operator of the security company knows what happened and where the rapid response unit has to be sent. All Ajax devices are addressable, so events, the device type, its assigned name and room can be transmitted to the PRO Desktop and the CMS. The list of transmitted parameters may differ depending on the type of the CMS and the selected communication protocol.
You can find vhfBridge Jeweller ID and zone number in the Statesin Ajax apps. The device number corresponds to the loop (zone) number.
Adding to the system
vhfBridge Jeweller doesn’t work with Hub, ocBridge Plus, uartBridge and third-party security central units.The device can only be added and configured through the Ajax PRO app by a user with administrator rights.
Open the Ajax app. If your account has access to multiple hubs, select the one to which you want to add vhfBridge Jeweller.
Go to the Devices menu and click Add Device.
Name the transponder, scan or enter the QR code manually (located on the device casing and packaging), and select a room and a group (if the group mode is activated).
Click Add— the countdown will begin.
Switch on vhfBridge Jeweller by holding the power button for 3 seconds. Keep in mind that the hub connection request is only sent when the integration module is turning on.
Please note that to find and pair the device, the transponder should be located within the hub’s radio communication range (on the same secured premises).
If the connection has failed, disconnect vhfBridge Jeweller for 5 seconds and try again. If the transponder has already been assigned to another hub, turn off vhfBridge Jeweller and then follow the standard addition procedure.
The connected transponder will appear in the list of hub devices in the app. Device status updates depend on Jeweller settings. The default status update period in the app is 36 seconds.
Malfunction counter
When a vhfBridge Jeweller malfunction is detected (e.g., no external power), the Ajax app will display a red icon with a number in the upper left corner of the device icon. This number indicates the number of malfunctions.
All malfunctions can be seen in the transponder states. Fields with malfunctions will be highlighted in red.
Icons
Icons display some of the vhfBridge Jeweller states. You can check them in the Ajax app in the Devices tab.
Icon
Meaning
Jeweller Signal Strength. Displays the signal strength between the hub and vhfBridge Jeweller.
Recommended value is 2–3 bars.
The charge level of the battery connected to vhfBridge Jeweller.
The presence of the 100–240 V~ external power supply:
Connected — the external power is connected.
Disconnected — the external power is disconnected.
Name of ReX range extender
Radio signal range extender connection status:
Online — the device is connected.
Offline — the device is not connected.
Please note that the field is displayed if vhfBridge Jeweller is operated via a radio signal range extender.
Permanent Deactivation
Shows the status of the device permanent deactivation function:
No — the device operates in normal mode and transmits all events.
Lid only — the hub admin disabled notifications about tamper alarms.
Entirely — the device is completely excluded from the system operation by the hub admin. The device does not follow system commands and does not report alarms or other events.
Firmware
vhfBridge Jeweller firmware version.
Device ID
vhfBridge Jeweller ID/serial number. Also located on the device box, its board, and the casing.
Device No.
Device loop (zone) number.
vhfBridge Jeweller settings
Settings can be changed in the Ajax app:
Go to the Devices tab.
Select vhfBridge Jeweller from the list.
Go to Settings by clicking the icon in the upper right corner.
Set the parameters.
ClickBackto save the new settings.
Please note that after editing the settings, you should click the Back button to save them.
Configuration
Meaning
Name
vhfBridge Jeweller name. Displayed in the text of SMS and notifications in the event feed.
To change the device name, click on the pencil icon.
The name can contain up to 12 Cyrillic characters or up to 24 Latin characters.
Room
Selecting the virtual room to which vhfBridge Jeweller is assigned.
The room name is displayed in the text of SMS and notifications in the event feed.
Track battery charge time
Set up the battery charge duration.
When this option is enabled, the system will send a malfunction notification if the battery connected to vhfBridge Jeweller has been charging more than 40 hours.
Disable tracking if the VHF transmitter is powered directly from the battery and not from the vhfBridge Jeweller power terminals.
Pulse Duration, sec
Pulse time on an event (from 1 to 255 seconds). Set in increment of 1 second.
The default value is 5 seconds.
Jeweller Signal Strength Test
Switches vhfBridge Jeweller to the Jeweller signal strength test mode.
The test allows you to check the signal strength between the hub and vhfBridge Jeweller and determine the optimal installation location.
Allows the user to disable the device without removing it from the system.
Three options are available:
No — the device operates in normal mode and transmits all events.
Entirely — the device will not execute system commands or participate in automation scenarios, and the system will ignore device alarms and other notifications.
Lid only — the system will ignore notifications about the triggering of the device tamper only.
Opens vhfBridge Jeweller User Guide in the Ajax app.
Unpair Device
Unpairs vhfBridge Jeweller, disconnects it from the hub, and deletes its settings.
vhfBridge Jeweller output configuration
By default, vhfBridge Jeweller outputs are configured as follows:
1st output — intrusion
2nd output — panic button
3rd output — malfunction
4th output — tamper
5th output — loss of vhfBridge Jeweller power supply
6th output — power loss of the hub
7th output — hub battery discharged
8th output — loss of communication between the hub and vhfBridge Jeweller
The settings of outputs can be changed in the Ajax app:
Go to the Devices tab.
Find vhfBridge Jeweller in the list of devices.
Go to the Outputs menu.
Find the output in the list and go to its Settings by clicking the gear icon .
Set the parameters.
Click Back to save the new settings.
Operating mode Selecting the output operating mode:
Pulse— vhfBridge Jeweller generates a pulse of a specified duration when activated.
Bistable— vhfBridge Jeweller changes the state of the contacts to the opposite (e.g., closed to open) when activated. In this mode, contacts will reset their state on disarming or system restore (ifRestoration after alarmis enabled for the same event type as the output).
This setting is available for users with administrator rights or in the PRO app. If the device is connected to hubs with firmware version OS Malevich 2.27 and later.
Configuration
Meaning
Type of Event
Selection of the event type to which vhfBridge Jeweller output reacts.
Check the complete list of event types and their icons below.
Connection type
Selection of the output type:
High potential output (positive trip).
Low potential output (negative trip).
Event types of vhfBridge Jeweller outputs
Icon
Type of event
Operating mode
Description
Not assigned
No
Output disabled.
Intrusion
Pulse
Alarm when motion, opening, and other detectors are triggered.
Fire
Pulse
Alarm when fire detectors are triggered.
Auxiliary alarm
Pulse
Alarm when pressing the auxiliary request alert button.
Confirmed hold-up device alarm according to PD 6662:2017.
Hub-transponder connection loss
Bistable
Loss of vhfBridge Jeweller connection with the hub / radio signal range extender via Jeweller channel.
The time before sending an event regarding the loss of communication between the hub and vhfBridge Jeweller to the CMS is calculated with the following formula:
With the minimum values of the “hub — detector” polling interval, an event regarding the loss of communication with the hub is sent to the CMS in 6 minutes.
Connecting VHF transmitter to vhfBridge Jeweller
List of recommended VHF transmitters
Hawk VHF Alarm Transmitter (FSK Electronics)
TX750C (RDC)
TR-41 (Puper)
vhfBridge Jeweller can be connected to any VHF transmitter with relay inputs. Connection via UART, RS-485, and other interfaces is not supported.
How to connect a VHF transmitter to vhfBridge Jeweller
When connecting the VHF transmitter, do not twist the wires together, but solder them. The ends of the VHF transmitter wires, which will be inserted into the vhfBridge Jeweller terminals should be tinned or crimped with a special sleeve.
Turn off the vhfBridge Jeweller power (if power was connected).
Turn off vhfBridge Jeweller.
Select vhfBridge Jeweller outputs to which you want to connect the VHF transmitter.
Pull the VHF transmitter wires into the vhfBridge Jewellercasingthrough the holes.
There are perforated sections on the casing that can be broken off so that the cable could be pulled through them.
Connect the VHF transmitter to the control outputs of vhfBridge Jeweller according to the wiring diagram in the User Guide supplied by the VHF transmitter manufacturer.
Fasten the cable securely to the vhfBridge Jeweller terminals using a straight screwdriver (slot PL 3.0).
Connect the power to the VHF transmitter.
If a VHF transmitter requires 12 V power to operate, it can be connected to the power terminals of the corresponding vhfBridge Jeweller zone. Do not connect the external power supply to the transmitter power terminals, as this may damage the device.
Connect power to vhfBridge Jeweller.
Turn on vhfBridge Jeweller.
vhfBridge Jeweller functionality testing
Integration module functionality tests do not start immediately but not later than over a single “hub — detector” polling interval (36 seconds with standard hub settings). You can change the polling period of devices in the Jeweller menu of the hub settings.
The placement of vhfBridge Jeweller determines its distance from the hub and the presence of obstacles between them that impede the passage of the radio signal: walls, inter-floor constructions, or large-sized objects located in the room.
Be sure to check the signal strength at the installation site. If the signal strength is low (a single bar), we cannot guarantee a stable operation of the security system. At the very least, relocate the device as repositioning even by 20 cm can significantly improve signal reception.
If poor or unstable signal strength is still reported after the relocation of the device, use the radio signal range extender.
When choosing the installation location, consider the distance between vhfBridge Jeweller and the VHF transmitter: the cable length should be sufficient for connection.
The minimum distance between vhfBridge Jeweller and the radio transmitter is 2 meters and the maximum distance is 7 meters. The minimum distance is required to avoid signal overlapping. The maximum distance allowed will help avoid signal attenuation in the cable.
Material and cross-section of the cable for connecting a VHF transmitter are determined by the manufacturer’s requirements and the maximum current. All requirements can be found in the manual or from the customer service of the VHF transmitter manufacturer.
vhfBridge Jeweller installation
Prior to mounting vhfBridge Jeweller, ensure that you have selected the optimal location corresponding to these instructions.
The transponder casing should be mounted on a vertical surface. If installed on a horizontal surface, thetamperwill not work when somebody attempts to dismantle the transponder.
To install vhfBridge Jeweller:
Remove the vhfBridge Jeweller casing lid by unscrewing the bottom and top screws with the bundled hex wrench.
Remove the vhfBridge Jeweller board from the holders by pulling them to the sides.
Prepare cable openings in advance by carefully breaking out the perforated parts of the casing.
Fasten the casing to a vertical surface at the chosen installation location using the bundled screws. When attaching, use all the fixation points on the casing. One of them, in the perforated part of the mount above the tamper, is needed to trigger the tamper on the back of the board in case of an attempt to tear the casing off the surface.
Run the cables into the transponder casing through the previously made holes.
Install the vhfBridge Jeweller board into the casing on the racks.
Secure the cable with cable ties using special mounts inside the casing.
Install a 12 V⎓ backup battery on the special holders in the casing. Please note that vhfBridge Jeweller cannot be connected to third-party power supply units.
We recommend using a 12 V⎓ battery of 4 or 7 Ah. For such batteries, special holders in the casing are designed. You can also use similar batteries of a different capacity, of the matching size, and with a charging time of no more than 30 hours. The maximum dimensions of the battery to be installed in the casing are 150 × 65 × 94 mm, and the weight is 5 kg.
Connect a backup battery to the board terminals according to the wiring diagram below (use the bundled cable). Follow the polarity and connection order of the wires. Securely fasten the conductors to the terminals.
Install the lid on the casing and fix it with the bundled screws.
Test vhfBridge Jeweller and connected VHF transmitter.
Do not install vhfBridge Jeweller
Outdoors. Doing so may cause the device to malfunction or not work properly.
Near metal objects or mirrors (for example, in a metal cabinet). They can shield and attenuate the radio signal.
Inside premises with temperature and humidity outside the permissible limits. Doing so may cause the device to malfunction or not work properly.
At a distance less than 1 meter from the hub or range extender. This could result in the loss of connection with the hub.
At a distance less than 2 meters from the VHF transmitter. The minimum distance is required to avoid signal overlapping
At a distance more than 7 meters from the VHF transmitter. The maximum distance allowed will help avoid signal attenuation in the cable.
Maintenance
Check the functionality of vhfBridge Jeweller regularly. The optimal frequency of checks is once every three months. Clean the casing from dust, cobwebs, and other contaminants as they emerge. Use a soft dry cloth suitable for equipment care. Do not use any substances containing alcohol, acetone, gasoline, and other active solvents to clean the device.
{"id":46874647560527,"title":"Default Title","option1":"Default Title","option2":null,"option3":null,"sku":"367308964","requires_shipping":true,"taxable":true,"featured_image":null,"available":true,"name":"AJAX Bezvadu Iekštelpu kustības detektors MotionCam PhOD (Attēls pēc pieprasījuma) ar fotoverifikāciju Baltā krāsā","public_title":null,"options":["Default Title"],"price":14816,"weight":0,"compare_at_price":18896,"inventory_management":"shopify","barcode":"4823114014161","requires_selling_plan":false,"selling_plan_allocations":[],"quantity_rule":{"min":1,"max":null,"increment":1}}
AJAX Bezvadu Iekštelpu kustības detektors MotionCam PhOD (Attēls pēc pieprasījuma) ar fotoverifikāciju Baltā krāsā
SKU: 367308964
€148,16€188,96
Vienības cena
Bezvadu kustības detektors ar fotoverifikācijas iespēju MotionCam PhOD. Foto pēc pieprasījuma.
Strādā tikai ar AJAX centrāliHub 2vaiHub 2 Plus.
Atsūta verifikācijas attēlu lietotājam 9 sekundēs.
Izmantojot MotionCam, Jūs uzzināsiet par faktisko situāciju mājās pat pirms zagļi sapratīs, ka viņi ir noķerti. Animēta fotoattēlu sērija tiek nosūtīta uzreiz pēc kustības uztveršanas.
MotionCam ir paredzēts, lai kontrolētu Jūsu drošību, nevis personīgo dzīvi. Kustības detektors nevar uzņemt attēlus pēc pieprasījuma. Kamera aktivizējas tikai, reaģējot uz kustības trauksmi. Dati tiek šifrēti visā pārraides un uzglabāšanas procesā. Jums nav visu laiku jāvēro videokameras, lai zinātu, kāpēc noskanēja signalizācija.
Detektors nereaģē uz dzīvniekiem līdz 20 kg un 50 cm. Bet, ja kādam īpaši zinātkāram mīlulim izdosies iedarbināt signalizāciju (īpaši kaķim), fotoreportāža apstiprinās, ka māja ir drošībā.
Vienkārša pievienošana, noskenējot iekārtas QR kodu Ajax lietotnē.
Uzstādīšana: Iekštelpās
Kustības uztveršanas attālums: Līdz 12m
Imunitāte pret dzīvniekiem: Svars līdz 20 kg, 50 cm
Barošana: Baterijas CR123A (×2), 3 V, darba ilgums līdz 4 gadiem, vai līdz 2.5 gadiem, ja ieslēgta funkcija “Ieejas aizkāve”
Baterijām garantijas nav.
Darba temperatūra: no -10°C līdz +40°C
Izmērs: 135 × 70 × 60 mm
Svars: 167 g
Uzstādīšanas instrukcija pieejama Ajax lietotnē, kura atvērsies, noskenējot detektora QR kodu uzstādīšanas brīdī. Vienkārša uzstādīšana un pievienošana pie Ajax centrāles Hub.
Pieejams saņemšanai veikalā
Izpārdots veikalā
Pievienots salīdzināšanai
Sasniegts count_product-produktu limits
Pievienots salīdzināšanai
Sasniegts count_product-produktu limits
{"id":41613546619063,"title":"Default Title","option1":"Default Title","option2":null,"option3":null,"sku":"367305098","requires_shipping":true,"taxable":true,"featured_image":null,"available":true,"name":"AJAX Bezvadu drošības tastatūra Keypad Plus Melnā krāsā","public_title":null,"options":["Default Title"],"price":14997,"weight":0,"compare_at_price":14997,"inventory_management":"shopify","barcode":null,"requires_selling_plan":false,"selling_plan_allocations":[],"quantity_rule":{"min":1,"max":null,"increment":1}}
AJAX Bezvadu drošības tastatūra Keypad Plus Melnā krāsā
SKU: 367305098
€149,97
Vienības cena
AJAX Keypad Plus bezvadu tastatūra, pieslēdzama pie AJAX Hub 2 vai Hub 2 Plus. Ieslēdziet un izslēdziet apsardzi, nakts režīmu ar tastatūras palīdzību.
Baterijas strādā līdz 3.5 gadiem. Izveidojiet katram lietotājiem personīgu kodu, lai zinātu, kurš un kad ieslēdzis vai izlēdzis apsardzi. Lietotāja vārds tiks atspoguļots paziņojumu žurnālā.
Pēc 3 neveiksmīgiem koda ievadīšanas mēģinājumiem tiks nosūtīts trauksmes signāls. Var izveidot trauksmes kodu, ievadot kuru, tiek simulēta apsardzes noņēmšana, ja kāds piespiež lietotāju noņemt apsardzi, taču trauksmes signāls tiek nekavējoties sūtīts apsardzes kompānijai.
KeyPad Plus Jeweller user manual
Updated
KeyPad Plus Jewelleris a wireless touch keypad for managing the Ajax system with encrypted contactless cards and key fobs. Designed for indoor installation. Supports “silent alarm” when entering theduress code.
The keypad manages security modes using passwords andcardsorkey fobs. Indicates the current security mode with a LED light.
The keypad operates as part of the Ajax system by connecting via theJeweller secure radio communication protocolto the hub. The communication range without obstacles is up to 1700 meters. The pre-installed battery life is up to 3.5 years.
SmartBracket mounting plate (to remove the plate, slide it down)
Do not tear off the perforated part of the mount. It is required for actuating the tamper in case of any attempt to dismantle the keypad.
Power button
Tamper button
Keypad QR Code
Operating principle
KeyPad Plus Jeweller arms and disarms the security of the entire facility or separate groups as well as allows activating theNight Mode. You can control the security modes with KeyPad Plus Jeweller using:
Codes. The keypad supports general and personal codes, as well as arming without entering a code.
Cards or key fobs. You can connectTag key fobsandPass cardsto the system. To quickly and securely identify users, KeyPad Plus Jeweller uses the DESFire® technology. DESFire® is based on the ISO 14443 international standard and combines 128-bit encryption and copy protection.
KeyPad Plus Jeweller supports code types as follows:
Keypad code— general code set up for the keypad. When used, all events are delivered to Ajax apps on behalf of the keypad.
User code— personal code set up for a user connected to the hub. When used, all events are delivered to Ajax apps on behalf of the user.
Keypad access code— set up for a person who is not registered in the system. When used, events are delivered to Ajax apps with a name associated with this code.
RRU codeis an access code for the rapid response units (RRU) activated after the alarm and valid for a specified period. When the code is activated and used, events are delivered to Ajax apps with a title associated with this code.
The number of personal, access, and RRU codes depends on the hub model.
Access codes are not supported by theHub (2G) Jewellercontrol panel.
Before entering a code or using Tag/Pass, you should activate (“wake up”) the KeyPad Plus Jeweller by sliding your hand over the touch panel from top to bottom. When it is activated, the button backlight is enabled, and the keypad beeps.
Auto-wake on Delay when Enteringfunction allows automatically activating the keypad whenDelay When Enteringis set up. This function is supported by KeyPad Plus Jeweller with firmware version 6.60.0.6 or higher and hubs withOS Malevich 2.19or higher.
The KeyPad Plus Jeweller is equipped with LED indicators that show the current security mode and keypad malfunctions (if any). The security status is displayed only when the keypad is active (the device backlight is on).
You can use the KeyPad Plus Jeweller without ambient lighting as the keypad has a backlight. The pressing of the buttons is accompanied by a sound signal. The backlight brightness and keypad volume are adjustable in the settings. If you do not touch the keypad for 4 seconds, KeyPad Plus Jeweller reduces the backlight brightness, and 8 seconds later goes into power-saving mode and turns off the display.
If the batteries are discharged, the backlight turns on at the minimum level regardless of the settings.
Function button
KeyPad Plus Jeweller has aFunctionbutton that operates in 3 modes:
Off— the button is disabled and nothing happens after it is pressed.
Alarm— after theFunctionbutton is pressed, the system sends an alarm to the security company monitoring station and all users.
Mute interconnected fire detectors alarm— after theFunctionbutton is pressed, the system mutes the alarm of theAjax fire detectors. Available only if anInterconnected Fire Detectors Alarmis enabled (Hub → Settings→ Service → Fire detectors settings)
KeyPad Plus Jeweller supportsduress code. It allows you to simulate alarm deactivation. TheAjax appandsirensinstalled at the facility will not give you away in this case, but the security company and other users of the security system will be warned about the incident.
KeyPad Plus Jeweller can participate in two-stage arming, but cannot be used as a second-stage device. The two-stage arming process using Tag or Pass is similar to arming using a personal or general code on the keypad.
The Ajax system can connect to the CMS and transmit events and alarms to the monitoring station of the security company inSurGard (Contact ID), ADEMCO 685, SIA (DC-09), and other proprietary protocol formats. A complete list of supported protocols isavailable here. The device ID and the number of the loop (zone) can be found inits states.
Connection
KeyPad Plus Jeweller is incompatible with Hub (2G) Jeweller, third-party security central units, and ocBridge Plus and uartBridge integration modules.
Before starting connection
The hub and the device operating at different radio frequencies are incompatible. The radio-frequency range of the device may vary by region. We recommend purchasing and using Ajax devices in the same region. You can check the range of operating radio frequencies with thetechnical support service.
Install the Ajax app andcreate an account. Add a hub and create at least one room.
Ensure that the hub is on and has Internet access (via Ethernet cable, Wi-Fi, and/or mobile network). This can be done by opening the Ajax app or by looking at the hub logo on the faceplate — it lights white or green if the hub is connected to the network.
Make sure that the hub is not in armed mode and does not start updates by checking its status in the app.
Only a user or PRO with full admin rights can add a device to the hub.
To connect KeyPad Plus Jeweller
Open the Ajax app. If your account has access to multiple hubs, select the one to which you want to connect KeyPad Plus Jeweller.
Go to theDevicesmenu and clickAdd Device.
Name the keypad, scan or enter the QR code (located on the package and under the SmartBracket mount), and select a room.
ClickAdd; the countdown will begin.
Turn on the keypad by holding the power button for 3 seconds. Once connected, KeyPad Plus Jeweller will appear in the hub device list in the app. To connect, locate the keypad at the same protected facility as the system (within the coverage area of the hub radio network range). If the connection fails, try again in 10 seconds.
The keypad only works with one hub. When connected to a new hub, the device stops sending commands to the old hub. Once added to a new hub, KeyPad Plus Jeweller is not removed from the device list of the old hub. This must be done manually through the Ajax app.
KeyPad Plus Jeweller turns off automatically 6 seconds after being turned on if the keypad fails to connect to the hub. Therefore, you do not need to turn off the device to retry the connection.
Updating the statuses of devices in the list depends on the Jeweller settings; the default value is 36 seconds.
Icons
The icons represent some of KeyPad Plus Jeweller states. You can see them in theDevicestab in the Ajax app.
Icon
Value
Jeweller signal strength — Displays the signal strength between the hub or radio signal range extender and KeyPad Plus Jeweller
Displays the status of the ReX Jeweller range extender use.
The field is not displayed if the keypad works directly with the hub.
Pass/Tag Reading
Displays if card and keyfob reader is enabled.
Assigned Group Easy Management
Displays whether or not the security mode can be switched with Pass or Tag and without confirmation by the control buttons,,.
Easy Armed Mode Change
This setting replacesAssigned Group Easy Managementon KeyPad Plus Jeweller with firmware version 5.60.6.3 or higher, operating with hubs withOS Malevich 2.19or higher.
Shows the configuration for theEasy Armed Mode Changefeature:
Off— each arming or disarming attempt should be confirmed by entering the passcode or presenting the access device.
Arm/disarm using access device without confirming action by buttons— allows users to switch security modes of the system using access devices without confirmation by pressing keypad buttons.
Disarm without disarming button— the system or its groups, the security of which is managed with a passcode or access devices, will be disarmed without confirmation by pressing keypad buttons.
A fixed passcode length should be set in the hub settings in the Ajax PRO app.
Permanent Deactivation
Shows the status of the device:
No— the device operates normally and transmits all events.
Lid only— the hub admin has disabled notifications about the body opening.
Entirely— the hub admin has entirely excluded the keypad from the system. The device does not execute system commands and does not report alarms or other events.
Shows the status of the keypad one-time deactivation setting:
No— the keypad operates in normal mode.
Lid only— notifications on the keypad tamper triggering are disabled until the first disarm.
Entirely— the keypad is entirely excluded from the operation of the system until the first disarm. The device does not execute system commands and does not report alarms or other events.
KeyPad Plus Jeweller is configured in the Ajax app:
Go to theDevicestab.
SelectKeyPad Plus Jewellerfrom the list.
Go toSettingsby clicking on the gear icon.
To apply the settings after the change, click theBackbutton
Parameter
Value
Name
Device name. Displayed in the list of hub devices, SMS text, and notifications in the event feed.
To change the device name, click on the pencil icon.
The name can contain up to 12 Cyrillic characters or up to 24 Latin characters.
Room
Selecting the virtual room to which KeyPad Plus Jeweller is assigned.
The name of the room is displayed in the text of SMS and notifications in the event feed.
Group Management
Selecting the security group controlled by the device. You can select all groups or just one.
The field is displayed when theGroup modeis enabled.
If theFollowed groupfeature is configured for groups, their security state can automatically change depending on their settings and initiators’ states.
.
Access Settings
Selecting the method of arming/disarming:
Keypad codes only.
User codes only.
Keypad and user codes.
To activate theKeypad Access Codesset up for people who are not registered in the system, select the options on the keypad:Keypad codes onlyorKeypad and user codes
.
Keypad Code
Selection of a general code for security control. Contains 4 to 6 digits.
Duress Code
Selecting a general duress code for silent alarm. Contains 4 to 6 digits.
Selecting the function of the * button (Functionbutton):
Off— theFunctionbutton is disabled and does not execute any commands when pressed.
Panic— after theFunctionbutton is pressed, the system sends an alarm to the CMS and to all users.
Mute Interconnected Fire Detectors Alarm — when pressed, mutes the alarm ofAjax fire detectors. Available only if anInterconnected Fire Detectors Alarmis enabled.
When enabled, theFunctionbutton should be pressed twice to send a panic alarm.
This setting is available ifFunction buttonis set toPanic.
Unauthorized Access Auto-Lock
If active, the keypad is locked for the pre-set time if an incorrect code is entered or unverified passes/tags are used more than 3 times in a row within 1 minute.
It is not possible to disarm the system via keypad during this time. You can unlock the keypad through the Ajax app.
Auto-lock Time, min
Selecting the keypad lock period after wrong code attempts:
3 minutes.
5 minutes.
10 minutes.
20 minutes.
30 minutes.
60 minutes.
90 minutes.
180 minutes.
Brightness
Selecting brightness of the keypad buttons backlight. The backlight works only when the keypad is active.
This option does not affect the brightness level of pass/tag reader and security modes indicators.
Buttons Volume
Selecting the keypad buttons volume level when pressed.
Pass/Tag Reading
When enabled, the security mode can be controlled with Pass and Tag access devices.
Authorization confirmation with a passcode
When enabled, system authorization using access devices requires confirmation of the action with the user or keypad code. Available if thePass/Tag Readingtoggle is enabled.
This setting is supported when KeyPad Plus Jeweller is connected to hubs with firmware versionOS Malevich 2.20or higher.
Time for confirmation
Selecting the maximum time to confirm authorization with a password after access devices’ confirmation. Available if theAuthorization confirmation with a passcodetoggle is enabled.
This setting is supported when KeyPad Plus Jeweller is connected to hubs with firmware versionOS Malevich 2.21or higher.
Assigned Group Easy Management
When enabled, changing the security mode with Tag and Pass does not require confirmation by pressing thearm,disarm, orNight Modebutton. The security mode is switched automatically.The option is available ifPass/Tag Readingis enabled in the keypad settings.
If the group mode is activated, the option is available when the keypad is assigned to a particular group — theGroup Management field in the keypad settings.
This setting replacesAssigned Group Easy Managementon KeyPad Plus Jeweller with firmware version 5.60.6.3 or higher, operating with hubs withOS Malevich 2.19or higher.
Allows users to arm/disarm the system without confirmation by pressing keypad buttons.
Three options are available:
Off— each arming or disarming attempt should be confirmed by entering the passcode or presenting the access device.
Arm/disarm using access device without confirming action by buttons— allows users to switch security modes of the system using access devices without confirmation with keypad buttons.
Disarm without disarming button— the system or its groups, the security of which is managed with a passcode or access devices, will be disarmed without confirmation by pressing keypad buttons.
A fixed passcode length should be set in the hub settings in the Ajax PRO app.
Arming without Code
The option allows you to arm the system without entering a code. To do so, just click on theArmorNight Modebutton.
Auto-wake on Delay when Entering
The feature is available on KeyPad Plus Jeweller with firmware version 6.60.0.6 or higher, operating with hubs withOS Malevich 2.19or higher.
Activates the keypad afterDelay When Enteringis started by any security device.
The auto-wake feature may also reduce the keypad battery life.
Alert with a siren if the panic button is pressed
The field is displayed if theAlarmoption is selected for theFunctionbutton.When the option is enabled, the sirens connected to the security system give an alert when the * button (Functionbutton) is pressed.
Jeweller Signal Strength Test
Switches the keypad to the Jeweller signal strength test mode.
Opens KeyPad Plus Jeweller user manual in the Ajax app.
Permanent Deactivation
Allows the user to disable the device without removing it from the system.
Three options are available:
No— the device operates in normal mode and transmits all events.
Entirely— the device does not execute system commands and does not participate in automation scenarios, and the system ignores alarms and other device notifications.
Lid only— the system ignores the device tamper triggering notifications.
Allows the user to disable events of the device until the first disarm.
Three options are available:
No— the device operates in normal mode.
Lid only— notifications on the device tamper triggering are disabled while the armed mode is active.
Entirely— the device is completely excluded from the operation of the system while the armed mode is active. The device does not execute system commands and does not report alarms or other events.
Ajax system allows you to set up a keypad code, as well as personal codes for users added to the hub.
With theOS Malevich 2.13.1update, we have also added the ability to create access codes for people who are not added to the hub. This is convenient, for example, to provide a cleaning company with access to security management.
With theOS Malevich 2.17update, codes for the rapid response units are available. The RRU codes are activated after the alarm and are valid for a specified period. See how to set up and use each type of code below.
To set keypad code
Go to keyboard settings.
SelectKeypad Code.
Set the keypad code you want.
To set the keypad duress code
Go to keypad settings.
SelectDuress Code.
Set the keypad duress code you want.
To set a personal code in the Ajax app
Go to the user profile settings (Hub→Settings→Users→Your profile settings).
SelectPasscode Settings(User ID is also visible in this menu).
SetUser CodeandDuress Code.
Each user sets a personal code individually. The admin cannot set a code for all users.
To set up an access code for a person who is not registered in the system
Go to the hub settings (Hub→Settings).
SelectKeypad Access Codes.
Set upUsernameandAccess Code.
If you want to set up a duress code, change settings for access to groups, Night Mode, code ID, temporarily disable or delete this code, select it in the list and make changes.
PRO or a user with admin rights can set up an access code or change its settings. This function is supported by hubs with OS Malevich 2.13.1 and higher. Access codes are not supported by the Hub (2G) Jeweller control panel.
To set up the RRU code
Only a PRO with the rights to configure the system can create and configure the RRU codes in theAjax PRO apps. More information about configuring this feature you can find inthis article.
The RRU codes are supported by hubs (except the Hub (2G) Jeweller model) with OS Malevich 2.17 and higher.
Adding passes and tags
KeyPad Plus Jeweller can work withTag key fobs,Pass cards, and third-party cards and key fobs that use DESFire® technology.
Before adding third-party devices that support DESFire®, make sure they have enough free memory to handle the new keypad. Preferably, the third-party device should be pre-formatted.
The maximum number of connected passes/tags depends on the hub model. At the same time, the bound passes and tags do not affect the total limit of devices on the hub.
Hub model
Number of Tag or Pass devices
Hub (4G) Jeweller
50
Hub Plus Jeweller
99
Hub 2 Jeweller
50
Hub 2 Plus Jeweller
200
Superior Hub Hybrid
50
The procedure for connecting Tag, Pass, and third-party devices is the same. See the connecting instructionshere.
Controlling security via codes
You can controlNight Mode, security of the entire facility or separate groups using general, personal, RRU, and access codes (configured by PRO or a user with admin rights). The keypad allows you to use 4 to 6 digit codes. Incorrectly entered numbers can be cleared with thebutton.
If a personal code or access code is used, the name of the user who armed or disarmed the system is displayed in the hub event feed and in the notifications list. If a general code is used, the name of the user who changed the security mode is not displayed.
Keypad access codesare supported by hubs (except theHub (2G) Jewellermodel) with OS Malevich 2.13.1 and higher.
TheRRU codesare supported by hubs (except theHub (2G) Jewellermodel) with OS Malevich 2.17 and higher.
Arming with a personal code
Theusernameis displayed in the notifications and events feed
Arming with a general code
Thedevice nameis displayed in the notifications and events feed
KeyPad Plus Jeweller is locked for the time specified in the settings if an incorrect code is entered three times in a row within 1 minute. The corresponding notifications are sent to users and to the monitoring station of the security company. A user or PRO with administrator rights can unlock the keypad in the Ajax app.
Controlling security at the object via general code
Activate the keypad by swiping your hand over it. Bring Tag or Pass to the keypad pass/tag reader if theAuthorization confirmation with a passcodefeature is activated.
Enter thegeneral code.
Press thearming/disarming/Night Modekey.
For example: 1234 →
Group security management with a general code
Activate the keypad by swiping your hand over it. Bring Tag or Pass to the keypad pass/tag reader if theAuthorization confirmation with a passcodefeature is activated.
If a security group is assigned to KeyPad Plus Jeweller (in theGroup Managementfield in the keypad settings), you do not need to enter the group ID. To manage the security mode of this group, entering a general or personal code is sufficient.
If a group is assigned to KeyPad Plus Jeweller, you will not be able to manageNight Modeusing a general code. In this case,Night Modecan only be managed using a personal code if the user has the appropriate rights.
Security management of the facility using a personal code
Activate the keypad by swiping your hand over it. Bring Tag or Pass to the keypad pass/tag reader if theAuthorization confirmation with a passcodefeature is activated.
Activate the keypad by swiping your hand over it. Bring Tag or Pass to the keypad pass/tag reader if theAuthorization confirmation with a passcodefeature is activated.
Enter theUser ID.
Press the * (Functionbutton).
Enter yourpersonal code.
Press the * (Functionbutton).
Enter theGroup ID.
Press thearming/disarming/Night Modekey.
For example: 2 → * → 1234 → * → 5 →
If a group is assigned to KeyPad Plus Jeweller (in theGroup Managementfield in the keypad settings), you do not need to enter the group ID. To manage the security mode of this group, entering a personal code is sufficient.
A duress code allows you to simulate alarm deactivation. The Ajax app and sirens installed at the facility will not give the user away in this case, but the security company and other users will be warned about the incident. You can use both a personal and a general duress code. InKeypad Access Codes, you can also set up a duress code for people not registered in the system.
Scenarios and sirens react to disarming under duress in the same way as to normal disarming.
Activate the keypad by swiping your hand over it. Bring Tag or Pass to the keypad pass/tag reader if theAuthorization confirmation with a passcodefeature is activated.
Enter thegeneral duress code.
Press the disarming button.
For example:4321 →
To use a personal duress code of registered user
Activate the keypad by swiping your hand over it. Bring Tag or Pass to the keypad pass/tag reader if theAuthorization confirmation with a passcodefeature is activated.
Enter theUser ID.
Press the * (Functionbutton).
Enter thepersonal duress code.
Press the disarming button.
For example:2 → * → 4422 →
To use a duress code of a person who is not registered in the system
Enter theduress codeset inKeypad Access Codesand press thedisarming key.
For example:4567 →
Using the RRU code
The RRU code is activated after triggering the alarm during the time configured in the hub settings, and it is valid for a specified period. This ensures that such code will only be used in case of risk, unlike keypad or user codes.
Security control of the object using the RRU code:
EnterRRU Codeand press thearming / disarming/ Night Mode activationbutton.
For example: 1234→
Security control of the group using the RRU code:
EnterRRU Code, press*, enterGroup ID, and press thearming / disarming/ Night Mode activationbutton.
For example: 1234 →*→ 2→
Security management using Tag or Pass
Activate the keypad by swiping your hand over it. KeyPad Plus Jeweller will beep (if enabled in the settings) and turn on the backlight.
Note that the keypad can be activated automatically with theAuto-wake on Delay when Enteringfunction ifDelay When Enteringis set up. This function is supported by KeyPad Plus Jeweller with firmware version 6.60.0.6 or higher and hubs withOS Malevich 2.19or higher.
Bring Tag or Pass to the keypad pass/tag reader. It is marked with wave icons.
Enter the required code if theAuthorization confirmation with a passcodefeature is activated.
Press theArm,Disarm, orNight Modebutton on the keypad.
Note that ifEasy armed mode changeis enabled in the KeyPad Plus Jeweller settings, you do not need to press theArm,Disarm, orNight Modebutton. The security mode will change to the opposite after tapping Tag or Pass.
Security control of a single group
Tag or Pass can control the security mode of a single group. This is possible if KeyPad Plus Jeweller is not assigned to any group and Tag or Pass has no group restrictions.
To change the security mode of a single group using Tag or Pass:
Activate the keypad by swiping your hand over it. Bring Tag or Pass to the keypad pass/tag reader if theAuthorization confirmation with a passcodefeature is activated.
Press thearming / disarming/ Night Mode activationbutton.
For example:→ 01→
If the security mode is successfully changed, a short beep will sound, the indicator will change, and a notification with the username will appear in the event log.
Mute Interconnected Fire Detectors Alarms function
KeyPad Plus Jeweller can mute an interconnected fire alarm by pressing theFunctionbutton (if the required setting is enabled). The reaction of the system to pressing a button depends on the settings and the state of the system:
Interconnected Fire Detectors Alarms have already propagated— by the first press of the button, all sirens of the fire detectors are muted, except for those that registered the alarm. Pressing the button again mutes the remaining detectors.
Interconnected alarms delay time lasts— by pressing theFunctionbutton, the siren of the triggeredAjax fire detectorsis muted.
KeyPad Plus Jeweller can report the current security mode, keystrokes, malfunctions, and its status by LED indication and sound. The current security mode is displayed by the backlight after the keypad is activated. The information about the current security mode is relevant even if the arming mode is changed by another device: a key fob, another keypad, or an app.
Auto-wake on Delay when Enteringfunction allows automatically activating the keypad whenDelay When Enteringis set up. This function is supported by KeyPad Plus Jeweller with firmware version 6.60.0.6 or higher and hubs withOS Malevich 2.19or higher.
You can activate the keypad by swiping your hand over the touch panel from top to bottom. When activated, the backlight on the keypad will turn on and a beep will sound (if enabled).
Event
Indication
There is no connection to the hub or radio signal range extender
LEDXblinks
KeyPad Plus Jeweller body is open (SmartBracket mount is removed)
LEDXblinks briefly once
Touch button pressed
Short beep, the current system security status LED blinks once. The volume depends on the keypad settings
The system is armed
Short beep,ArmedorNight ModeLED lights up
The system is disarmed
Two short beeps, theDisarmedLED lights up
An incorrect code was entered or there was an attempt to change security mode by an unconnected or deactivated pass/tag
Long beep, digital unit LED backlight blinks 3 times
The security mode cannot be activated (for example, a window is open and theSystem integrity checkis enabled)
Long beep, the current security status LED blinks 3 times
The hub does not respond to the command — there is no connection
Long beep,X(Malfunction)LED lights up
The keypad is locked due to a wrong code attempt or attempt to use an unauthorised pass/tag
Long beep, during which the security status LEDs and keypad backlight blink 3 times
The batteries are low
After changing the security mode, theX LED lights up. The touch buttons are locked for this time.
When you try to turn on the keypad with discharged batteries, it emits a long beep, theXLED smoothly lights up and goes off, then the keypad turns off
The system requires to confirm authorization with a password after access devices’ confirmation. Available if theAuthorization confirmation with a passcodefeature is activated
The current security status LED blinks during the set time for confirmation
Sound notifications of malfunctions
If any device is offline or the battery is low, KeyPad Plus Jeweller can notify system users with an audible sound. The keyboards’ LEDsХwill blink. Malfunction notifications will be displayed in the events feed, SMS text, or push notification.
To enable sound notifications of malfunctions, use Ajax PRO and PRO Desktopapps:
ClickDevices, choose hub and open its settings: ClickService→Sounds and Alerts
Enable toggles:If battery of any device is lowandIf any device is offline.
ClickBackto save settings.
Sound notifications of malfunctions settings are available for all hubs (except the Hub model) with firmware version OS Malevich 2.15 or higher.
Sound notifications of malfunctions are supported by KeyPad Plus Jeweller with firmware version 5.57.5.0 or higher.
Event
Indication
Note
If any device is offline.
Two short sound signals,MalfunctionindicatorХblinks twice.
Beep once per minute until all devices in the system are online.
Users can delay sound indication for 12 hours.
If KeyPad Plus is offline.
Two short sound signals,MalfunctionindicatorХblinks twice.
Beep once per minute until the keyboard in the system is online.
It’s impossible to delay sound indication.
If battery of any device is low.
Three short sound signals,MalfunctionindicatorХblinks three times.
Beep once per minute until the battery is restored or the device is removed.
Users can delay sound indication for 4 hours.
Sound notifications of malfunctions appear when the keypad indication is finished. If several malfunctions occur in the system, the keypad will notify about the loss of connection between the device and the hub first.
Functionality testing
The Ajax system provides several types of tests that help you make sure that installation points of devices are selected correctly.
KeyPad Plus Jeweller functionality tests do not start straight away but after no more than one hub-detector ping period (36 seconds when using the standard hub settings). You can change the ping period of devices in theJewellermenu of the hub settings.
Tests are available in the device settings menu (Ajax App → Devices→ KeyPad Plus Jeweller → Settings)
KeyPad Plus Jeweller is best placed indoors near the entrance. This allows disarming the system before the entry delays have expired, as well as quickly arming the system when leaving the premises.
When holding KeyPad Plus Jeweller in your hands or using it on a table, we cannot guarantee that the touch buttons will work properly.
It is a good practice to install the keypad 1.3 to 1.5 meters above the floor for convenience. Install the keypad on a flat, vertical surface. This allows KeyPad Plus Jeweller to be firmly attached to the surface and to avoid false tamper triggering.
Besides, the placement of the keypad is determined by the distance from the hub or the radio signal range extender, and the presence of obstacles between them that prevent the passage of the radio signal: walls, floors, and other objects.
Be sure to check the Jeweller signal strength at the installation site. If the signal strength is low (a single bar), we cannot guarantee a stable operation of the security system. At the very least, relocate the device as repositioning even by 20 cm can significantly improve the signal reception.
In places where parts of clothing (for example, next to the hanger), power cables, or Ethernet wire may obstruct the keypad. This can lead to false triggering of the keypad.
Inside premises with temperature and humidity outside the permissible limits. This could damage the device.
In places where KeyPad Plus Jeweller has an unstable or poor signal strength with the hub or radio signal range extender.
Within 1 meter of a hub or radio signal range extender.
Close to electrical wiring. This may cause communication interferences.
Outdoors. This could damage the device.
Installing the keypad
Prior to installing KeyPad Plus Jeweller, be sure to select the optimal location following the requirements of this manual.
Attach the keypad to the surface with double-sided adhesive tape and carry outsignal strengthandattenuation tests. If the signal strength is unstable or if one bar is displayed, move the keypad or use theradio signal range extender.
Double-sided adhesive tape may only be used for temporary attachment of the keypad. The device attached with adhesive tape can at any time be detached from the surface and fall, which may lead to failure.
Please note that if the device is attached with adhesive tape, the tamper will not trigger when trying to detach it.
Check the convenience for code entry using Tag or Pass to manage security modes. If it is inconvenient to manage the security at the selected location, relocate the keypad.
Remove the keypad from the SmartBracket mounting plate.
Attach the SmartBracket mounting plate to the surface using the bundled screws. When attaching, use all fixing points. Be sure to fix the perforated corner on the SmartBracket plate so that the tamper responds to a detachment attempt.
Slide KeyPad Plus Jeweller onto the mounting plate and tighten the mounting screw at the bottom of the body. The screw is needed for more reliable fastening and protection of the keypad from quick dismantling.
As soon as the keypad is fixed on the SmartBracket, it shall blink once with LEDX — this is a signal that the tamper has been triggered. If the LED does not blink after installation on SmartBracket, check the tamper status in the Ajax app, and then make sure the plate is firmly attached.
Maintenance
Check the functioning of your keypad on a regular basis. This can be done once or twice a week. Clean the body from dust, cobwebs, and other contaminants as they emerge. Use a soft dry cloth that is suitable for equipment care.
Do not use substances that contain alcohol, acetone, gasoline or other active solvents to clean the detector. Wipe the touch keypad gently: scratches can reduce the sensitivity of the keypad.
The batteries installed in the keypad provide up to 3.5 years of autonomous operation at default settings. If the battery is low, the system sends appropriate notifications, and theX (Malfunction) indicator smoothly lights up and goes out after each successful code entry.
KeyPad Plus Jeweller can work up to 2 months after the low battery signal. However, we recommend you replace the batteries immediately upon notification. It is advisable to use lithium batteries. They have a large capacity and are less affected by temperatures.
The warranty for the Limited Liability Company “Ajax Systems Manufacturing” products is valid for 2 years after purchase and does not extend to the bundled batteries.
If the device does not function properly, we recommend that you first contact the support service as half of the technical issues can be resolved remotely.
Vadu IP novērošanas kamera ar AI atbalstu, 110° skatleņķi, infrasarkano apgaismojumu (IR), True WDR, mikrofonu un PoE/12 V barošanu. Piemērota gan iekštelpām, gan āra uzstādīšanai.
Modeļi
5 Mp/2,8 mm
Izšķirtspēja līdz 2880 × 1620 px
Kadru ātrums līdz 25 FPS
Skatleņķis 100°–110°
Video straume
Video protokols: JetSparrow (Ajax Systems izstrādāts šifrēts P2P protokols)
Atmiņa:
NVR: HDD līdz 16 TB (SATA, 3,5”), nav iekļauts komplektā
microSD: līdz 256 GB, V30 vai ātrāka, nav iekļauta komplektā
Video kodeki: H.265, H.264
Dinamiskais diapazons: True WDR
Sakaru kanāls
Ethernet: līdz 100 Mbps
Galvenās funkcijas
Kustības noteikšana (programmatūras līmenī)
AI objektu noteikšana: cilvēki, dzīvnieki, transportlīdzekļi
Gudrais IR apgaismojums līdz 50 m, automātiska spilgtuma regulācija
Vadu IP novērošanas kamera ar AI atbalstu, 110° skatleņķi, infrasarkano apgaismojumu (IR), True WDR, mikrofonu un PoE/12 V barošanu. Piemērota gan iekštelpām, gan āra uzstādīšanai.
Modeļi
5 Mp/4 mm
Izšķirtspēja līdz 2880 × 1620 px
Kadru ātrums līdz 25 FPS
Skatleņķis 100°–110°
Video straume
Video protokols: JetSparrow (Ajax Systems izstrādāts šifrēts P2P protokols)
Atmiņa:
NVR: HDD līdz 16 TB (SATA, 3,5”), nav iekļauts komplektā
microSD: līdz 256 GB, V30 vai ātrāka, nav iekļauta komplektā
Video kodeki: H.265, H.264
Dinamiskais diapazons: True WDR
Sakaru kanāls
Ethernet: līdz 100 Mbps
Galvenās funkcijas
Kustības noteikšana (programmatūras līmenī)
AI objektu noteikšana: cilvēki, dzīvnieki, transportlīdzekļi
Gudrais IR apgaismojums līdz 15 m, automātiska spilgtuma regulācija
Vadu IP novērošanas kamera ar AI atbalstu, 110° skatleņķi, infrasarkano apgaismojumu (IR), True WDR, mikrofonu un PoE/12 V barošanu. Piemērota gan iekštelpām, gan āra uzstādīšanai.
Modeļi
5 Mp/2,8 mm
Izšķirtspēja līdz 2880 × 1620 px
Kadru ātrums līdz 25 FPS
Skatleņķis 100°–110°
Video straume
Video protokols: JetSparrow (Ajax Systems izstrādāts šifrēts P2P protokols)
Atmiņa:
NVR: HDD līdz 16 TB (SATA, 3,5”), nav iekļauts komplektā
microSD: līdz 256 GB, V30 vai ātrāka, nav iekļauta komplektā
Video kodeki: H.265, H.264
Dinamiskais diapazons: True WDR
Sakaru kanāls
Ethernet: līdz 100 Mbps
Galvenās funkcijas
Kustības noteikšana (programmatūras līmenī)
AI objektu noteikšana: cilvēki, dzīvnieki, transportlīdzekļi
Gudrais IR apgaismojums līdz 15 m, automātiska spilgtuma regulācija
Vadu IP novērošanas kamera ar AI atbalstu, 85° skatleņķi, infrasarkano apgaismojumu (IR), True WDR, mikrofonu un PoE/12 V barošanu. Piemērota gan iekštelpām, gan āra uzstādīšanai.
Modeļi
5 Mp/4 mm
Izšķirtspēja līdz 2880 × 1620 px
Kadru ātrums līdz 25 FPS
Skatleņķis 75°–85°
Video straume
Video protokols: JetSparrow (Ajax Systems izstrādāts šifrēts P2P protokols)
Atmiņa:
NVR: HDD līdz 16 TB (SATA, 3,5”), nav iekļauts komplektā
microSD: līdz 256 GB, V30 vai ātrāka, nav iekļauta komplektā
Video kodeki: H.265, H.264
Dinamiskais diapazons: True WDR
Sakaru kanāls
Ethernet: līdz 100 Mbps
Galvenās funkcijas
Kustības noteikšana (programmatūras līmenī)
AI objektu noteikšana: cilvēki, dzīvnieki, transportlīdzekļi
Gudrais IR apgaismojums līdz 50 m, automātiska spilgtuma regulācija
Curtain Outdoor Jewelleris a wireless curtain-type motion detector with dual motion detection technology for outdoor and indoor use. The detector has a horizontal detection angle of 8° and is designed for the perimeter control: windows, doorways, and other entrances or exits of the guarded facility. It detects motion at a distance of up to 12 m.
Curtain Outdoor Jeweller communicates with the hub using two secure protocols. The detector usesJewellerto transmit alarms and events andWingsto update the firmware. The communication range in an open space is up to 1,700 m. Pre-installed batteries ensure up to 3 years of autonomous operation.
Curtain Outdoor Jeweller is compatible withReX Jeweller. However, when connected to ReX Jeweller, firmware updates are unavailable because the detector uses theWingsprotocol.
You can manage the detector and its settings using iOS, Android, macOS, and Windowsapps. The system notifies users of any events via push notifications, SMS, or calls.
Functional elements
Detector
LED indicator.
Motion detector’s lens.
Masking sensor.
Power button.
Tamper button. It triggers in case of an attempt to detach the detector from the surface or remove it from the mounting panel.
QR code with the device ID. It is used to add the detector to the hub.
Slider for adjusting the motion detection distance.
SmartBracket mounting panel. To remove the panel, slide it down.
Perforated part of the mounting panel. Triggers a tamper in case of any attempt to detach the detector from the surface. Do not break it off.
Fixing points for attaching the SmartBracket mounting panel to the surface, angle or third-party mount.
Holding screw for securing the detector on SmartBracket.
The detector’s lens optical center mark for easy device installation.
Angle mount
Fixing points for attaching the angle mount to the surface.
Fixing points for attaching the SmartBracket mounting panel or hood to the angle mount.
Hood
The hood protects masking sensors from rain and snow. It is used when the detector cannot be installed under the cover.
Fixing points for attaching the hood to the surface and angle or third-party mount.
Perforated part of the hood. Triggers a tamper in case of any attempt to detach the detector from the surface. Do not break it off.
The detector’s lens optical center mark for easy device installation.
The hole for securing the detector on the hood with a holding screw.
Operating principle
Two parallel IR sensors of Curtain Outdoor Jeweller register intrusion upon detecting moving objects with a temperature different from the ambient.
When the device detects motion, it additionally performs a radio frequency (RF) scan with a built-in K-band microwave sensor. It helps to eliminate false alarms caused by thermal interference: air flows, fans, air conditioners, etc.
In case of an alarm, a detector instantly sends it to the hub. Therefore, the hub activates thesirensconnected to the system, runs thescenarios, and notifies users and the security company. All Curtain Outdoor Jeweller alarms and events are recorded in the events feed of Ajax apps.
Users and the monitoring company know exactly where motion is detected. The notifications contain the name of aspace(the name of a guarded facility), the device name, and the virtual room to which the detector is assigned.
The detector doesn’t switch to the armed mode instantly. The switching time depends on two factors: the exit delay (specified in the detector settings) and the hub–detector polling interval (JewellerorJeweller/Fibrasettings, the default value is 36 s). In the first case, the delay is set by an admin or a PRO-user with admin rights. In the second case, the delay occurs because it takes one polling interval for the hub to notify the detector about switching to the armed mode.
Curtain Outdoor Jeweller uses the SmartDetect algorithm to protect against false alarms. This algorithm allows the detector to analyze the thermal diagram read by the sensor: the intensity of infrared radiation, size of the heat spot, time spent in the detection area, and other parameters.
After this stage, an additional RF scan of the room is run using the built-in K-band microwave sensor. Depending on the result, the alarm is activated or not.
Curtain Outdoor Jeweller has theCorrelation signal processingfeature to prevent false alarms. It is enabled by default in the detector settings. When the feature is enabled, the detector activates the RF sensor only if both IR sensors register identical signals. If it is disabled, Curtain Outdoor Jeweller runs an RF scan when at least one of the two IR sensors detects thermal radiation.
When properly installed and configured, Curtain Outdoor Jeweller will not respond to pets up to 1 m (100 cm) in height. We recommend installing the detector at a height of 1 m, adjusting the slider on the detector enclosure to thePetposition, and setting up thePet immunedetection mode in the app.
Due to temperature compensation, the detector responds to movements, even if the indoor or outdoor temperature is close to the human body temperature. Read more about temperature compensation in thearticle.
Anti-masking system
Masking is an attempt to block the view of the detector. Curtain Outdoor Jeweller detects the following types of masking:
An obstacle in front of the detector’s lens at a distance of up to 5 cm. The maximum distance depends on the material.
Painting over the detector’s lens.
Taping the detector’s lens.
The system notifies users and the security company’s monitoring station about masking. The maximum masking detection time is 180 s (depending on the obstacle type and the distance to it).
If theAnti-maskingfeature is enabled, it is always active and works regardless of the security mode.
Jeweller and Wings are wireless data transfer protocols that provide fast and reliable two-way communication between the hub and devices. The detector usesJewellerto transmit alarms and events andWingsto update the firmware.
The Ajax system can transmit alarms to thePRO Desktopmonitoring app, as well as to the central monitoring station (CMS), in formats ofSurGard (Contact ID), SIA (DC-09), ADEMCO 685, andother protocols.
Curtain Outdoor Jeweller can transmit the following events:
Motion alarm.
Masking.
Alert if moved.
Tamper alarm/recovery.
Loss/restoration of connection with the hub.
Permanent deactivation/activation of the device.
One-time deactivation/activation of the device.
When an alarm is received, the operator at the security company’s monitoring station knows what happened and precisely where to dispatch a rapid response unit. The addressability of Ajax devices allows sending events to PRO Desktop or the CMS, including the device’s type and name, security group, and virtual room. Note that the list of transmitted parameters may vary depending on the CMS type and the selected communication protocol for the monitoring station.
Protection against faster battery discharging
TheNotify on risk of fast battery dischargefeature is available on devices operating with hubs withOS Malevich 2.27or later.
To prevent rapid battery discharge, Curtain Outdoor Jeweller has theNotify on risk of fast battery dischargesetting. Once the system detects that the device is installed incorrectly, system users will receive notifications in Ajax apps, and similar information will be displayed in the device states.
The device sensors can be triggered by different objects or obstacles, which the device filters out as unconfirmed alarms. Also, the device requires more power to process each triggering. As a result, when the number of such triggerings gets too high, the system will notify about increased power consumption and risk of fast battery discharge.
Enable theNotify on risk of fast battery dischargefeature in the device settings to save the battery charge.
Consider changing the device placement if you receive a notification about incorrect installation.
The hub and the device operating at different radio frequencies are incompatible. The radio-frequency range of the device may vary by region. We recommend purchasing and using Ajax devices in the same region. You can check the range of operating radio frequencies with thetechnical support service.
Open theAjax app. Select aspacewhere you want to add the detector.
Go to theDevicestab and clickAdd Device.
Name the device, scan, or type in the QR code (placed on the detector and the package box), and select a room and a group (ifGroup modeis enabled).
ClickAdd— the countdown will begin.
Switch on the device by holding the power button for 3 seconds.
Once added to the hub, the detector will appear in the list of hub devices in the Ajax app. The device status update frequency in the list depends on theJewellerorJeweller/Fibrasettings with the default value of 36 s.
If the connection fails, try again in 5 seconds. If the maximum number of devices is added to the hub, you will be notified when trying to add a new one.
Curtain Outdoor Jewellerworks with only one hub. Once the device is connected to a new hub, it stops sending events to the old one. Adding the detector to a new hub does not automatically remove it from the device list of the old hub. This must be done using the Ajax app.
Malfunctions
When the device detects a malfunction (for example, there is no connection via the Jeweller protocol), a malfunction counter is displayed in the Ajax app in the upper left corner of the device icon.
All malfunctions can be seen in the deviceStates. Fields with malfunctions will be highlighted in red.
Malfunction is displayed if:
The device temperature is outside acceptable limits.
The device lid is open (tamper is triggered).
No connection with the hub or radio signal range extender via Jeweller.
No connection with the hub or radio signal range extender via Wings.
The calibration of the masking sensor failed.
The accelerometer of the device is faulty.
The detector battery is low.
Icons
The icons in the app display some Curtain Outdoor Jeweller states. To access them:
Curtain Outdoor Jeweller is an outdoor detector, and its temperature is not considered when calculating the average temperature in the room to which the detector is assigned.
The status of the detector tamper that responds to detachment or opening of the device enclosure:
Open— the detector is removed from the SmartBracket mounting panel, or its integrity is compromised. Check the mounting of the detector.
Closed— the detector is installed on the SmartBracket mounting panel. The integrity of the device enclosure and the mounting panel is not compromised. Normal state.
Shows the status of the device’s permanent deactivation setting:
No— the device operates in normal mode and transmits all events.
Lid only— the hub administrator has disabled notifications about tamper triggering.
Entirely— the device is entirely excluded from the operation of the system. The device does not execute system commands and does not report alarms or other events.
By number of alarms— the device is automatically disabled when the number of alarms is exceeded (theDevices auto deactivationsetting). The feature is configured in Ajax PRO apps.
By timer— the device is automatically disabled by the system when the recovery timer expires (theDevices auto deactivationsetting). The feature is configured in Ajax PRO apps.
One-time deactivation
Shows the status of the device’s one-time deactivation setting:
No— the device operates in normal mode.
Entirely— the device is completely excluded from the operation of the system until the system is disarmed for the first time. The device does not execute system commands or report alarms and other events.
Lid only— notifications of the tamper triggering are disabled until the system is disarmed for the first time.
Instant alarm— the armed detector immediately reacts to a threat and raises the alarm.
Entry/Exit— when a delay is set, the armed device starts the countdown and doesn’t raise the alarm even if triggered until the countdown ends.
Follower— the detector inherits the delays fromEntry/Exitdetectors. However, when theFolloweris triggered individually, it immediately raises the alarm.
Delay when entering
Delay when entering (alarm activation delay) is the time the user has to disarm the security system after entering the premises.
Entry delay time inNight Mode. Delay when entering (alarm activation delay) is the time the user has to disarm the security system after entering the premises.
Detector name. Displayed in the list of hub devices, text of SMS and notifications in the events feed.
To change the detector name, click on the text field.
The name can contain up to 12 Cyrillic characters or up to 24 Latin characters.
Room
Selecting the virtual room to which Curtain Outdoor Jeweller is assigned.
The room name is displayed in the text of SMS and notifications in the events feed.
Sensitivity
Sensitivity level of the motion detector. The choice depends on the type of the object, the presence of probable sources of false alarms, and the specifics of the protected area:
Low— there are likely sources of false alarms in the protected area. For example, tall bushes.
Medium(by default) — recommended value, suitable for most objects. Do not change it if the detector works correctly.
High— there is no interference in the protected area; the maximum detection distance and the alarm detection speed are important. For example, if the detector is installed in a narrow passage.
Detection mode
Device reaction to motion, depending on object and device placement:
Pet immune— for premises with pets. The recommended device installation height is1 m. The slider on the enclosure has to be set to thePetposition.
Near— appropriate for short-range intrusion detection. The recommended device installation height is2.4 m. The slider on the enclosure has to be set to theNearposition.
Far(by default) — appropriate for long-range intrusion detection. The recommended device installation height is2.4 m. The slider on the enclosure has to be set to theFarposition.
Alarm LED indication
When disabled, the LED indicator doesn’t notify about alarms and tamper triggering.
Always active
When enabled, the detector is always in the armed mode and detects motion.
When enabled, the system raises the alarm if the device is moved or detached from the mounting panel.
Accelerometer sensitivity
The sensitivity level of the detector’s accelerometer. The selection depends on the type of the object, the presence of probable sources of false alarms, and the specifics of the protected area:
Low— there are likely sources of false alarms in the protected area. For example, vibration from passing trucks.
Medium(by default) — recommended value, suitable for most objects. Do not change it if the detector works correctly.
High— there is no interference in the protected area; the maximum detection distance and the alarm detection speed are important.
Notify on risk of fast battery discharge
Available on devices operating with hubs withOS Malevich 2.27or later.
When this option is enabled, the user is notified when incorrect installation affects the device’s battery life because the detector is often triggered without an actual intrusion.
Alert with a siren
If motion detected
When this option is enabled,sirensconnected to the systemare activated when motion is detected by Curtain Outdoor Jeweller.
If masking detected
When this option is enabled,sirensconnected to the systemare activated when Curtain Outdoor Jeweller detects masking
The field is displayed and active if theAnti-maskingoption is enabled.
If device was moved
When this option is enabled, the built-in accelerometer alerts about sabotage.Sirensadded to the systemare activated when Curtain Outdoor Jeweller is moved.
The field is displayed and active ifAlert if movedis enabled.
Alarm reaction
Operating mode
Specify how this device will react to alarms:
Instant alarm— the armed detector immediately reacts to a threat and raises the alarm.
Entry/Exit— when a delay is set, the armed device starts the countdown and doesn’t raise the alarm even if triggered until the countdown ends.
Follower— the detector inherits the delays fromEntry/Exitdetectors. However, when theFolloweris triggered individually, it immediately raises the alarm.
Delay when entering
Selecting delay time when entering: 5 to 120 s.
Delay when entering (alarm activation delay) is the time the user has to disarm the security system after entering the premises.
Opens the Curtain Outdoor Jeweller user manual in the Ajax app.
Permanent deactivation
Allows the user to deactivate the device without removing it from the system.
Three options are available:
No— the device operates in normal mode and transmits all events.
Entirely— the device does not execute system commands and does not participate in automation scenarios, and the system ignores alarms and other device notifications.
Lid only— the system ignores notifications about the device tamper triggering.
Allows the user to disable device events until the system is disarmed for the first time.
Three options are available:
No— the device operates in normal mode and transmits all events.
Entirely— the device is completely excluded from the operation of the system until the system is disarmed for the first time. The device does not follow system commands and does not report alarms or other events.
Lid only— notifications of the tamper triggering are disabled until the system is disarmed for the first time.
Downloading the updated firmware version of the detector.
Flashes green 2 times every second.
Updating the detector firmware. The indication lasts during the firmware update.
Functionality testing
The Ajax system offers several types of tests to help choose the correct installation place for the devices. Testing does not start immediately. However, the waiting time does not exceed the duration of one hub–device polling interval. The polling interval can be checked and configured in hub settings (Hub→Settings→JewellerorJeweller/Fibra).
Curtain Outdoor Jeweller is suitable for protecting the area around the guarded facility. It allows you to secure the perimeter, leaving space for free movement inside. The detector can be installed both outdoors and indoors.
Curtain Outdoor Jeweller can protect:
Front doors.
Windows.
Gates.
Fences.
Arches and other places where you need to protect the perimeter or passage.
The detector is located at a height of 2.4 mfrom the ground level. For thePet immunityfeature to be effective, the detector should be installed at a height of1 m from the ground level. The recommended height is specified relative to the optical center of the detector’s lens. It is marked by the intersection of two lines on the device’s mounting panel or hood.
If you install the detector at a height other than the recommended one, ensure there are no false alarms caused by pets, the device detects people’s motion, and the detection zone meets your needs.
If the surface is not flat, the installation height is calculated from the highest point of the area to be protected.
The detector should be installed on a flat, stable surface, for example, on the wall of a house or a solid fence. Installing the detector on a shaky (unstable) surface will result in false alarms. The detector enclosure must be placed perpendicular to the ground level, and the intended path of the intruder must be perpendicular to the axis of the detector’s lens.
When choosing where to place Curtain Outdoor Jeweller, consider the parameters that affect its operation:
Motion detection zone.
Jeweller and Wings signal strength.
Distance between the detector and the hub or range extender.
The presence of obstacles between devices that can affect the radio signal, such as walls, inter-floor ceilings, or large objects located in the premises.
The presence of bushes, trees, air conditioners, glass, and other constructions that can block the detector’s view.
The presence of water reservoirs or pools in the detection area. They can cause false alarms.
Consider the recommendations for detector placement when developing a security system project for the facility. The security system must be designed and installed by specialists. The list of recommended Ajax partners isavailable here.
Signal strength
The signal strength is determined by the number of undelivered or corrupted data packages over a certain period of time. The iconin theDevicestab in Ajax apps indicates the signal strength:
three bars— excellent signal strength;
two bars— good signal strength;
one bar— low signal strength, stable operation is not guaranteed;
crossed out icon— no signal.
Check the Jeweller and Wings signal strength before final installation. With a signal strength of one or zero bars, we do not guarantee the device will operate stable. Consider relocating the device, as adjusting its position even by 20 cm can significantly improve the signal strength. If the signal remains poor or unstable after relocation, consider using aradio signal range extender.
Detection zone
When choosing where to place the detector, perform thedetection zone testto accurately determine the sector in which the device detects motion.
The detection distance is adjusted using theDetection modeslider on the detector’s rear side.
Position of the Detection mode slider
Motion detection distance
Far
Up to 12 m
Near
Up to 8 m
Pet
Up to 12 m
When choosing the installation site, consider the detector’s horizontal viewing angle and the width of the detection zone. Incorrect placement of the detector may cause false alarms.
Motion detection distance
Detection zone width (beam)
Up to 12 m
1.68 m
Up to 8 m
1.12 m
Do not install the detector
Nearby any metal objects or mirrors that can cause signal attenuation and screening.
Opposite trees or bushes in the detection zone of both IR sensors of the detector.
In front of furniture, glass, or other constructions that may block the detector’s view.
In places where electrical panels, air conditioning units, downspout pipes, or other constructions are located in the device’s detection zone.
In front of water reservoirs or pools if they are located in the detection zone of the detector.
In places with low or unstable Jeweller and/or Wings signal strength.
Closer than 1 m to the hub or radio signal range extender.
Installation
Before installing Curtain Outdoor Jeweller, ensure that you have chosen the optimal location that complies with the requirements of this manual.
Use theInstallation templateto prepare holes for mounting the device’s SmartBracket or angle mount on the surface.
There are four options for installing Curtain Outdoor Jeweller:
To the SmartBracket mounting panel. SmartBracket allows you to install the detector on a vertical surface.
To the hood. The hood for Curtain Outdoor Jeweller protects masking sensors from rain and snow. It is used when the detector cannot be installed under the cover and allows you to install the detector on a vertical surface.
The hood replaces the detector’s SmartBracket mounting panel, so you need to remove it before installing the detector with the hood.
To the angle mount. It allows you to install the detector parallel to the guarded facility’s wall. The detector can be installed to the angle mount with the SmartBracket mounting panel or hood.
To a third-party mount. The detector can be installed to a third-party mount with the SmartBracket mounting panel or hood.
When using a third-party mount, ensure that Curtain Outdoor Jeweller is fixed vertically. Deviation from the vertical axis affects the detection area of the detector.
Before installation, set the required detection mode in the detectorsettingsand on its enclosure.
To install the detector:
Remove the SmartBracket mounting panel from the detector. Unscrew the holding screw first and slide the panel down.
Fix the SmartBracket panel or hood using double-sided adhesive tape or other temporary fasteners. The hood or mounting panel can be installed on a vertical surface or in a corner of the premises using the mount angle.
Therecommended installation height is 2.4 m or 1 m(to protect against false alarms caused by pets) relative to the optical center of the detector’s lens.
SmartBracket and the hood have markings on the inner side for easy installation. The intersection of two lines marks the optical center of the device’s lens (not the mounting panel or hood). Orient them when installing the detector.
Double-sided adhesive tape can only be used for temporary installation. The device attached by the tape may come unstuck from the surface at any time. As long as the device is taped, the tamper will not be triggered when the device is detached from the surface.
Set theDetection modeslider on the device enclosure to the required position. Then, theDetection modesettingin the Ajax app should be set to the value appropriate for the slider position.
Installation height
Slider position
Detection mode
2.4 m
Far
Far
2.4 m
Near
Near
1 m
Pet
Pet immune
Mismatching the slider position to theDetection modesetting and the installation height may result in the device’s incorrect operation.
Place the detector on the SmartBracket mounting panel or hood and run theJeweller signal strength testandWings signal strength test. The recommended signal strength is two or three bars. With a signal strength of one or zero bars, we do not guarantee the device will operate stable. Consider relocating the device, as repositioning even by 20 cm can significantly improve the signal strength. If the signal remains poor or unstable after relocation, consider using aradio signal range extender.
Perform thedetection zone test. To check the motion detector, walk around the premises while observing the LED indicator and determine the detection zone of the detector. The maximum range of motion detection is 12 m. If the detector does not respond to movement during the test in 5 cases out of 5, relocate the device.
Remove the detector from the SmartBracket mounting panel or hood.
Use bundled screws to attach SmartBracket / the hood / the angle or third-party mount to the surface.
Use theInstallation templateto prepare holes for mounting the device’s SmartBracket or angle mount on the surface.
If the detector is installed directly to the hood or mounting panel, attach the device to them. When installing the detector to the angle or third-party mount, first attach the SmartBracket mounting panel or hood to the mount using bundled screws. Then, install the detector on the mounting panel or hood.
Leave the device’s detection zone (horizontal angle is 8°) and ensure there is no movement within the detector’s zone of view. This is necessary for the correct calibration of masking sensors. During calibration, the detector’s LED indicator will flash green every 0.5 sec. Calibration takes up to 2 minutes.
Calibration starts automatically after installing the detector on the mounting panel or hood.
Tighten the holding screw on the bottom of the detector enclosure. The screw is needed for more reliable fastening and protection of the detector from quick dismantling.
If the LED indicator is not activated after installing the detector on SmartBracket, check the tamper status in the Ajax app, the integrity of the fastening, and the tightness of the detector fixation on the panel. You will receive a notification if the detector is detached from the surface or removed from the mounting panel.
Maintenance
Regularly check the functioning of the detector. The optimal frequency of checks is once every three months. Clean the detector enclosure from dust, cobwebs, and other contaminants as they emerge. Use soft, dry wipes suitable for equipment maintenance.
Do not use substances that contain alcohol, acetone, gasoline, and other active solvents to clean the device.
Pre-installed batteries provide up to 3 years of the detector’s autonomous operation. When the battery is low, the system will send a corresponding notification to Ajax apps. In case of an alarm, the LED indicator will smoothly light up and go out.
Warranty for the Limited Liability Company “Ajax Systems Manufacturing” products is valid for 2 years after the date of purchase.
If you encounter any issues with the device’s functionality, we recommend contacting Ajax Technical Support first. In most cases, technical issues can be resolved remotely.
NVR ir tīkla videoierakstītājs mājas un biroja videonovērošanai. Ierīcei var pieslēgt Ajax kameras un arī trešo pušu IP kameras.
Lietotājs var skatīt tiešraides un arhivētos video Ajax lietotnēs. Ierakstītājs saglabā saņemtos video datus uz cietā diska (nav iekļauts komplektā) ar atbilstošiem iestatījumiem. Ja cietais disks nav uzstādīts, NVR kalpo tikai trešo pušu IP kameru integrēšanai Ajax sistēmā.
⚡ Svarīgi: izmantojiet tikai HDD ar patēriņu līdz 7 W.
NVR prasa interneta pieslēgumu, lai savienotos ar Ajax Cloud. Tīklam ierīce pieslēdzas ar Ethernet kabeli.
Pieejamās versijas
NVR (8-ch)
NVR (16-ch)
NVR DC (8-ch)
NVR DC (16-ch)
Galvenās funkcijas
Saderīgs ar Ajax kamerām un trešo pušu IP kamerām.
Video signalizācijas apstiprināšana (alarm verification).
Arhīva video skatīšana un lejupielāde lietotnē.
Atbalsts HD diskiem līdz 16 TB (nav komplektā).
Drošs savienojums ar Ajax Cloud caur Ethernet.
Funkcionālie elementi
Logo ar LED indikatoru – parāda ierīces statusu.
Montāžas caurumi – paredzēti SmartBracket paneļa nostiprināšanai pie virsmas.
SmartBracket montāžas panelis – vienkāršai un drošai uzstādīšanai.
Perforētā daļa uz montāžas paneļa – nelauzt nost! Tā nodrošina tampera darbību, kas reaģē uz mēģinājumiem atvienot ierīci no virsmas.
Caurums HDD aizslēga skrūvei – drošai cietā diska fiksācijai.
Cietā diska aizslēgs.
Vieta cietā diska uzstādīšanai – atbalsta HDD līdz 16 TB.
QR kods ar ierīces ID – nepieciešams NVR pievienošanai Ajax sistēmai.
Barošanas savienotājs.
Cietā diska savienotājs.
Parametru atiestatīšanas poga.
Ethernet savienotājs – tīkla pieslēgumam.
Kabeļu fiksators – nodrošina drošu vadu nostiprināšanu.
Darbības princips
NVR ir videoierakstītājs, kas paredzēts trešo pušu IP kameru (ar ONVIF un RTSP protokoliem) un Ajax kameru pieslēgšanai.
Atbalsta cietā diska uzstādīšanu ar ietilpību līdz 16 TB (nav iekļauts komplektā).
Var darboties arī bez HDD, tikai integrācijai ar kamerām.
Lietotāji var izmantot video arhīva kalkulatoru, lai aprēķinātu nepieciešamo atmiņas ietilpību un ieraksta ilgumu.
NVR iespējas:
Pievienot un konfigurēt IP kameras (izšķirtspēju, spilgtumu, kontrastu u.c.).
Skatīt video reāllaikā ar iespēju pietuvināt attēlu.
Skatīt un eksportēt arhīva video pēc hronoloģijas vai kalendāra (ja pievienots HDD).
Izvēlēties kustības detekcijas veidu: kamerā vai pašā NVR.
Konfigurēt kustības detekciju NVR: zonas, jutīgums.
Izmantot Video sienu, kurā apvienoti visu pievienoto kameru attēli.
Veidot video scenārijus, kas nosūta īsu video Ajax lietotnē, ja tiek aktivizēts detektors.
⚡ No firmware 2.244 versijas visi no NVR lejupielādētie video ir ar Ajax digitālo parakstu, kas apliecina to autentiskumu. Pārbaudei izmantojiet Ajax Media Player programmu.
Integrācija ar VMS
NVR var savienot ar trešo pušu video pārvaldības sistēmām (Milestone, Genetec, Axxon, Digifort) caur ONVIF protokolu (no firmware 2.289 versijas).
Konfigurācija iespējama caur:
Ajax Security System (v3.25+),
Ajax PRO: Tool for Engineers (v2.25+),
Ajax PRO Desktop (v4.20+),
Ajax Desktop (v4.21+).
NVR uzstādīšanas vietas izvēle
Ieteicams izvēlēties uzstādīšanas vietu, kur NVR ir paslēpts no svešām acīm, piemēram, pieliekamajā. Tas palīdzēs samazināt sabotāžas iespējamību. Ņemiet vērā, ka ierīce paredzēta tikai uzstādīšanai telpās.
Ierīce ir izgatavota kompaktā korpusā ar pasīvo dzesēšanu. Ja NVR ir uzstādīts nepietiekami vēdināmās telpās, atmiņas diska darba temperatūra var pārsniegt pieļaujamās normas. Izvēlieties cietu, līdzenas horizontālas vai vertikālas virsmas uzstādīšanai un neapklājiet ierīci ar citiem priekšmetiem.
Ievērojiet novietošanas ieteikumus, izstrādājot Ajax sistēmu objektam. Drošības sistēma jāprojektē un jāuzstāda profesionāļiem. Saraksts ar autorizētajiem Ajax partneriem ir pieejams šeit.
Kur NVR nedrīkst uzstādīt
Ārpus telpām. Tas var izraisīt videoreģistratora bojājumus. Telpās ar temperatūras un mitruma rādītājiem, kas neatbilst darba parametriem.
Uzstādīšana
NVR uzstādīšana:
Noņemiet SmartBracket no videoreģistratora, pavelkot uz leju aizmugurējo paneli. Piestipriniet SmartBracket pie cietas, līdzenas virsmas ar komplektā iekļautajām skrūvēm. Izmantojiet vismaz divus stiprinājuma punktus. Lai tamperis reaģētu uz demontāžas mēģinājumiem, noteikti nostipriniet korpusu perforētajā vietā.
Paceliet cietā diska fiksatoru, nospiežot pogu.
Nomainot cieto disku, pagaidiet 10 sekundes pēc ierīces atvienošanas no strāvas avota. Cietajā diskā ir ātri rotējoši diski. Pēkšņas kustības vai triecieni var sabojāt mehānismu, izraisot fiziskus bojājumus un datu zudumu.
Nepārvietojiet un neapgrieziet NVR, kamēr cietais disks nav pārstājis griezties.
Uzstādiet cieto disku NVR korpusā tā, lai savienotāji sakristu.
Nolaidiet cietā diska fiksatoru.
Nostipriniet cieto disku NVR korpusā ar komplektā iekļauto skrūvi, izmantojot paredzēto fiksācijas vietu.
Pievienojiet ārējo barošanas avotu un Ethernet savienojumu. Pievienojiet ierīci sistēmai. Ievietojiet videoreģistratoru SmartBracket turētājā.
LED indikators iedegas dzeltenā krāsā un pēc savienojuma ar internetu kļūst zaļš. Ja savienojums ar Ajax Cloud serveri neizdodas, logo iedegas sarkans.
Pievienošana sistēmai
Pirms ierīces pievienošanas Instalējiet Ajax lietotni. Piesakieties savā kontā vai izveidojiet jaunu. Izvēlieties telpu vai izveidojiet jaunu. Pievienojiet vismaz vienu virtuālo istabu. Pārliecinieties, ka telpa ir atbruņota.
Tikai PRO vai telpas administrators ar sistēmas konfigurēšanas tiesībām var pievienot ierīci telpai.
Kontu veidi un to tiesības
Pievienošana telpai Atveriet Ajax lietotni. Izvēlieties telpu, kurai vēlaties pievienot NVR. Dodieties uz cilni Devices un pieskarieties Add device. Noskenējiet QR kodu vai ievadiet to manuāli. QR kods atrodas uz korpusa aizmugurējās daļas zem SmartBracket stiprinājuma paneļa un uz iepakojuma. Piešķiriet ierīcei nosaukumu. Izvēlieties virtuālo istabu. Pieskarieties Add. Pārliecinieties, ka videoreģistrators ir ieslēgts un tam ir piekļuve internetam. LED logo ir jādeg zaļā krāsā. Pieskarieties Add.
Pievienotā ierīce parādīsies Ajax lietotnes ierīču sarakstā.
NVR darbojas tikai ar vienu telpu. Lai savienotu videoreģistratoru ar jaunu telpu, tas manuāli jāizdzēš no iepriekšējās Ajax lietotnē.
IP kameras pievienošana NVR
Ar video ierīču kalkulatoru var aprēķināt, cik kameras un NVR var pievienot telpai.
IP kameras pievienošana automātiski: Trešās puses IP kameras pievienošana manuāli: Atveriet Ajax lietotni. Izvēlieties telpu, kurā ir pievienots NVR. Dodieties uz cilni Devices. Atrodiet sarakstā NVR un pieskarieties Cameras. Pieskarieties Add camera. Pagaidiet, līdz tīkls tiek noskenēts un parādās lokālajam tīklam pievienotās IP kameras. Izvēlieties kameru. Ievadiet lietotājvārdu un paroli (norādīti kameras dokumentācijā), ja kamera ir trešās puses, un pieskarieties Add. Ja dati ievadīti pareizi, parādīsies pievienotās kameras video priekšskatījums. Kļūdas gadījumā pārbaudiet ievadīto datu pareizību un mēģiniet vēlreiz. Pārliecinieties, ka video atbilst pievienotajai kamerai. Pieskarieties Next.
IP kamera, kas pievienota videoreģistratoram, parādīsies Ajax lietotnes NVR kameru sarakstā.
Atjaunošana uz rūpnīcas iestatījumiem
Lai atjaunotu NVR rūpnīcas iestatījumus:
Izslēdziet ierīci, atvienojot barošanas avotu. Nospiediet un turiet atiestatīšanas pogu. Ieslēdziet NVR, turpinot turēt atiestatīšanas pogu, un gaidiet, līdz LED indikators iedegsies violetā krāsā. Tas aizņem apmēram 50 s.
Pēc NVR ieslēgšanas ar nospiestu atiestatīšanas pogu LED indikators iedegas dzeltenā krāsā uz 20 s. Tad tas nodziest uz 30 s un iedegas violeti. Tas nozīmē, ka NVR ir atjaunots rūpnīcas iestatījumos.
Atlaidiet atiestatīšanas pogu.
Ikonas
Ikonas norāda dažus ierīces statusus. Tās var apskatīt Ajax lietotnē:
Izvēlieties telpu Ajax lietotnē. Dodieties uz cilni Devices. Atrodiet sarakstā NVR.
Stāvokļi
Stāvokļi parāda informāciju par ierīci un tās darbības parametriem. Tos var atrast Ajax lietotnē:
Izvēlieties telpu Ajax lietotnē. Dodieties uz cilni Devices. Izvēlieties sarakstā NVR.
Iestatījumi
Lai mainītu videoreģistratora iestatījumus Ajax lietotnē:
Dodieties uz cilni Devices. Izvēlieties sarakstā NVR. Dodieties uz Settings, pieskaroties zobrata ikonai. Iestatiet nepieciešamos parametrus. Pieskarieties Back, lai saglabātu iestatījumus.
Indikācija
Notikums – Indikācija – Piezīme
NVR startējas pēc pievienošanas pie strāvas. – Iedegas dzeltena. – Ja NVR ir pieslēgts Ajax Cloud, indikācija mainās uz zaļu. NVR ir ieslēgts un pieslēgts internetam. – Iedegas zaļa. NVR nav pieslēgts internetam vai nav savienojuma ar Ajax Cloud serveri. – Iedegas sarkana.
NVR nav uzstādīts cietais disks. Cietais disks ir uzstādīts, bet nedarbojas pareizi (piemēram, formatējot vai ar kļūdām, vai nepieciešama formatēšana). – Mirgo zaļi vai sarkani ik sekundi, atkarībā no savienojuma statusa ar Ajax Cloud serveri. Indikācija turpināsies līdz vienam no nosacījumiem: Cietais disks ir formatēts/uzstādīts. Visas NVR pievienotās kameras ir konfigurētas, lai neveiktu ierakstu uz NVR cieto disku.
Apkope
Ierīcei nav nepieciešama apkope.
Tehniskās specifikācijas
Tehniskās specifikācijas NVR (8-ch) Tehniskās specifikācijas NVR (16-ch) Tehniskās specifikācijas NVR DC (8-ch) Tehniskās specifikācijas NVR DC (16-ch)
Atbilstība standartiem
Garantija
Sabiedrības ar ierobežotu atbildību “Ajax Systems Manufacturing” produktu garantija ir spēkā 2 gadus pēc iegādes.
Ja ierīce nedarbojas pareizi, vispirms sazinieties ar Ajax tehnisko atbalstu. Vairumā gadījumu tehniskās problēmas var atrisināt attālināti.
Pieejams saņemšanai veikalā
Izpārdots veikalā
Pievienots salīdzināšanai
Sasniegts count_product-produktu limits
Pievienots salīdzināšanai
Sasniegts count_product-produktu limits
{"id":55923737690447,"title":"Default Title","option1":"Default Title","option2":null,"option3":null,"sku":"367313769","requires_shipping":true,"taxable":true,"featured_image":null,"available":true,"name":"Viedoieraksta iekārta NVR Ajax NVR DC 8-ch 1xHDD slots līdz 16TB H.265 4K Melna","public_title":null,"options":["Default Title"],"price":19089,"weight":0,"compare_at_price":24346,"inventory_management":"shopify","barcode":null,"requires_selling_plan":false,"selling_plan_allocations":[],"quantity_rule":{"min":1,"max":null,"increment":1}}
Viedoieraksta iekārta NVR Ajax NVR DC 8-ch 1xHDD slots līdz 16TB H.265 4K Melna
SKU: 367313769
€190,89€243,46
Vienības cena
Produkta specifikācija
Modeļa tips: NVR DC (8 kanāli) Video straume: līdz 4K (25/30 FPS) Atbalstītās kameras: ONVIF (Profile S/T), RTSP Uzglabāšana: cietais disks līdz 16 TB (SATA, 3,5”), HDD nav iekļauts, max patēriņš 7 W Dekodēšanas formāti: H.265, H.264 Datu caurlaidība: līdz 100 Mbit/s Darbības spriegums: 9–16 V⎓ (ar džemperi: 12,1–16 V⎓; bez džempera: 8–16 V⎓) Maks. strāva: līdz 4 A Strāvas patēriņš: līdz 24 W Baterija: CR2032, 3 V (sistēmas pulkstenim) Sakaru kanāli: Ethernet līdz 100 Mbit/s, Bluetooth BLE (2,400–2,4835 GHz) Radio signāla jauda: 2,5 mW (limits 100 mW) Sabotāžas aizsardzība: tamperis (noņemšanas/atdalīšanas noteikšana) Izmēri: 193 × 193 × 47 mm Svars: 583 g (bez HDD) Darbības temperatūra: 0 °C līdz +40 °C Mitrums: līdz 75 % Aizsardzības klase: IP20 Krāsa: Melna, Balta Komplektācija: NVR DC, SmartBracket stiprinājuma panelis, termināļa adapteris, Ethernet kabelis, uzstādīšanas komplekts, ātrās uzstādīšanas rokasgrāmata
Vadu IP novērošanas kamera ar AI atbalstu, 110° skatleņķi, infrasarkano apgaismojumu (IR), True WDR, mikrofonu un PoE/12 V barošanu. Piemērota gan iekštelpām, gan āra uzstādīšanai.
Modeļi
8 Mp/4 mm
Izšķirtspēja līdz 3840 × 2160 px
Kadru ātrums līdz 20 FPS
Skatleņķis 100°–110°
Video straume
Video protokols: JetSparrow (Ajax Systems izstrādāts šifrēts P2P protokols)
Atmiņa:
NVR: HDD līdz 16 TB (SATA, 3,5”), nav iekļauts komplektā
microSD: līdz 256 GB, V30 vai ātrāka, nav iekļauta komplektā
Video kodeki: H.265, H.264
Dinamiskais diapazons: True WDR
Sakaru kanāls
Ethernet: līdz 100 Mbps
Galvenās funkcijas
Kustības noteikšana (programmatūras līmenī)
AI objektu noteikšana: cilvēki, dzīvnieki, transportlīdzekļi
Gudrais IR apgaismojums līdz 50 m, automātiska spilgtuma regulācija
Vadu IP novērošanas kamera ar AI atbalstu, 110° skatleņķi, infrasarkano apgaismojumu (IR), True WDR, mikrofonu un PoE/12 V barošanu. Piemērota gan iekštelpām, gan āra uzstādīšanai.
Modeļi
8 Mp/2,8 mm
Izšķirtspēja līdz 3840 × 2160 px
Kadru ātrums līdz 20 FPS
Skatleņķis 100°–110°
Video straume
Video protokols: JetSparrow (Ajax Systems izstrādāts šifrēts P2P protokols)
Atmiņa:
NVR: HDD līdz 16 TB (SATA, 3,5”), nav iekļauts komplektā
microSD: līdz 256 GB, V30 vai ātrāka, nav iekļauta komplektā
Video kodeki: H.265, H.264
Dinamiskais diapazons: True WDR
Sakaru kanāls
Ethernet: līdz 100 Mbps
Galvenās funkcijas
Kustības noteikšana (programmatūras līmenī)
AI objektu noteikšana: cilvēki, dzīvnieki, transportlīdzekļi
Gudrais IR apgaismojums līdz 50 m, automātiska spilgtuma regulācija
Vadu IP novērošanas kamera ar AI atbalstu, 110° skatleņķi, infrasarkano apgaismojumu (IR), HDR/True WDR, mikrofonu un PoE/12 V barošanu. Piemērota gan iekštelpām, gan āra uzstādīšanai.
Modeļi
8 Mp/4 mm
Izšķirtspēja līdz 3840 × 2160 px
Kadru ātrums līdz 20 FPS
Skatleņķis 100°–110°
Video straume
Video protokols: JetSparrow (Ajax Systems izstrādāts šifrēts P2P protokols)
Atmiņa:
NVR: HDD līdz 16 TB (SATA, 3,5”), nav iekļauts komplektā
microSD: līdz 256 GB, V30 vai ātrāka, nav iekļauta komplektā
Video kodeki: H.265, H.264
Dinamiskais diapazons: HDR, WDR
Sakaru kanāls
Ethernet: līdz 100 Mbps
Galvenās funkcijas
Kustības noteikšana (programmatūras līmenī)
AI objektu noteikšana: cilvēki, dzīvnieki, transportlīdzekļi
Gudrais IR apgaismojums līdz 15 m, automātiska spilgtuma regulācija
Vadu IP novērošanas kamera ar AI atbalstu, 110° skatleņķi, infrasarkano apgaismojumu (IR), HDR/True WDR, mikrofonu un PoE/12 V barošanu. Piemērota gan iekštelpām, gan āra uzstādīšanai.
Modeļi
8 Mp/2,8 mm
Izšķirtspēja līdz 3840 × 2160 px
Kadru ātrums līdz 20 FPS
Skatleņķis 100°–110°
Video straume
Video protokols: JetSparrow (Ajax Systems izstrādāts šifrēts P2P protokols)
Atmiņa:
NVR: HDD līdz 16 TB (SATA, 3,5”), nav iekļauts komplektā
microSD: līdz 256 GB, V30 vai ātrāka, nav iekļauta komplektā
Video kodeki: H.265, H.264
Dinamiskais diapazons: HDR, WDR
Sakaru kanāls
Ethernet: līdz 100 Mbps
Galvenās funkcijas
Kustības noteikšana (programmatūras līmenī)
AI objektu noteikšana: cilvēki, dzīvnieki, transportlīdzekļi
Gudrais IR apgaismojums līdz 15 m, automātiska spilgtuma regulācija
Vadu IP novērošanas kamera ar AI atbalstu, 110° skatleņķi, infrasarkano apgaismojumu (IR), True WDR, mikrofonu un PoE/12 V barošanu. Piemērota gan iekštelpām, gan āra uzstādīšanai.
Modeļi
8 Mp/2,8 mm
Izšķirtspēja līdz 3840 × 2160 px
Kadru ātrums līdz 20 FPS
Skatleņķis 100°–110°
Video straume
Video protokols: JetSparrow (Ajax Systems izstrādāts šifrēts P2P protokols)
Atmiņa:
NVR: HDD līdz 16 TB (SATA, 3,5”), nav iekļauts komplektā
microSD: līdz 256 GB, V30 vai ātrāka, nav iekļauta komplektā
Video kodeki: H.265, H.264
Dinamiskais diapazons: True WDR
Sakaru kanāls
Ethernet: līdz 100 Mbps
Galvenās funkcijas
Kustības noteikšana (programmatūras līmenī)
AI objektu noteikšana: cilvēki, dzīvnieki, transportlīdzekļi
Gudrais IR apgaismojums līdz 50 m, automātiska spilgtuma regulācija
Secure Boot — aizsardzība pret programmaparatūras viltojumiem
OTA atjauninājumu digitālā paraksta pārbaude
Lietotāju un operatoru piekļuves tiesību sadale
Korpuss
Izmēri: 198 × 76 × 76 mm
Svars: 550 g
Darba temperatūra: −30 °C … +60 °C
Mitrums: līdz 90%
Aizsardzības klase: IP65
Krāsa: melna
Komplekts
BulletCam (8 Mp/2.8 mm)
Montāžas šablons
Montāžas piederumu komplekts
Ātrās uzstādīšanas ceļvedis
Pieejams saņemšanai veikalā
Izpārdots veikalā
Pievienots salīdzināšanai
Sasniegts count_product-produktu limits
Pievienots salīdzināšanai
Sasniegts count_product-produktu limits
{"id":55853481197903,"title":"Default Title","option1":"Default Title","option2":null,"option3":null,"sku":"367309044","requires_shipping":true,"taxable":true,"featured_image":null,"available":true,"name":"Ajax LifeQuality (8EU), Ajax LifeQuality - vieds iekštelpu gaisa sensors, kas mēra CO₂, temperatūru un mitrumu,Melns","public_title":null,"options":["Default Title"],"price":22660,"weight":0,"compare_at_price":28900,"inventory_management":"shopify","barcode":null,"requires_selling_plan":false,"selling_plan_allocations":[],"quantity_rule":{"min":1,"max":null,"increment":1}}
Ajax LifeQuality (8EU), Ajax LifeQuality - vieds iekštelpu gaisa sensors, kas mēra CO₂, temperatūru un mitrumu,Melns
SKU: 367309044
€226,60€289,00
Vienības cena
LifeQuality Jeweller User manual
LifeQuality Jewelleris a wireless air quality detector. Measures temperature, humidity, and CO2(carbon dioxide) concentration in the room. Reports air pollution using an LED indicator and notifications in Ajax apps, enables automation scenarios.
A hub is required for the detector to operate. The list of compatible hubs and range extenders isavailable here.
LifeQuality operates as part of the Ajax system, communicating with the hub over two secure radio protocols:JewellerandWings: the detector uses Jeweller to transmit measurements, while Wings transmits data backups. The hub communication range is up to 1,700 meters without obstacles.
LED indicator with a touch button. Reports the air quality and other detector events.
SmartBracket mounting panel. To remove the panel, turn it counterclockwise.
Power button.
Device QR code and ID (serial number). It is used to connect the device to Ajax system.
Operating principle
LifeQuality Jewelleris a wireless air quality detector. The detector monitors the temperature, humidity, and CO2(carbon dioxide) concentration, measuring them once a minute.
LifeQuality measurements are available in Ajax apps in theDevicestab. APRO or a user with system configuration rightscan set up comfort thresholds of temperature, humidity, and CO2(carbon dioxide) concentration. When values go beyond the specified limits, hub users receive notifications pointing out which indicator is outside the norm. This allows you to create an optimal microclimate in the room, reacting in time to the detector measurements.
Ajax automation devicesrespond to changes in LifeQuality indicators and perform user-defined actions usingautomation scenarios. For example,WallSwitchturns on the heating system when the specified minimum temperature is reached. Using LifeQuality with Ajax automation devices, supply systems, humidifiers, and air conditioning, it’s easy to maintain a comfortable microclimate inside.
Temperature and humidity sensor
Temperature and humidity are measured using a built-in combined SHT40 detector with digital sensors from the Swiss manufacturer Sensirion. The detector is installed in an isolated part of the main board. This excludes the influence of other board components and ensures measurement accuracy: the temperature measurement accuracy is ±0.2°C, and humidity is ±1.8%.
LifeQuality provides more accurate temperature measurements than other Ajax devices. Therefore, if the system includes LifeQuality, theRoomstab in Ajax apps displays only the temperature measured by LifeQuality. The temperature measurements of other devices are ignored. Microclimate measurements will only consider data from other LifeQuality devices added to the room.
CO2sensor
CO2concentration is measured using a built-in Sunrise non-dispersive infrared (NDIR) detector from the Swedish manufacturer Senseair. This detector type is protected from measurement errors that may occur due to aerosols, perfumes or vapour of other substances.
The operating principle of the detector is based on detecting changes in the intensity of infrared radiation. Air naturally enters the detector chamber, through which the infrared lamp transmits radiation. The chamber walls allow the infrared beam to reflect and migrate to the infrared sensor, which absorbs radiation. With a special coating technology inside the chamber, the measurement accuracy is ± (30 + 3%) ppm.
In the migration process through the chamber, the radiation intensity changes due to the absorption of radiation part by carbon dioxide molecules. When the radiation reaches the endpoint and is absorbed by the infrared sensor, the detector accurately detects CO2concentration in the air.
Data storage
The detector measures temperature, humidity level and CO2concentration once every minute. In Ajax apps, users can view current LifeQuality measurements and their history. The history of measurements is presented by charts. Charts show the trend of the selected air quality value over the last hour, day, week, month, or year. Ajax system stores this data on the Ajax Cloud server for up to 2 years.
LifeQuality also has built-in memory that allows the detector to store measurements for up to 72 hours if communication with the hub or radio signal range extender is lost. As soon as the connection is restored, all values are sent to Ajax apps and synchronized with the charts.
LifeQuality features automatic calibration of the CO2sensor. This feature allows the sensor continuously transmit the most accurate measurements of the carbon dioxide concentration in the room. At the same time, the temperature and humidity sensor is calibrated at the production stage and does not require additional calibration.
The built-in CO2sensor is calibrated at the production stage and automatically every 15 days without user or installer interaction. The automatic calibration mode is effective for ventilated rooms where CO2concentration is reduced to 400 ppm at least once every 15 days. If the detector is used in an unventilated space, we recommend calibrating it manually once a year. You can run the calibration manually in Ajax apps.
The CO2sensor calibration cannot be reset to the production or previous version. It takes effect as soon as the calibration process is completed. If it is interrupted, the device retains the result of the previous calibration.
Jeweller and Wings data transfer protocols
JewellerandWingsare two-way wireless protocols for fast and reliable two-sided connection between the hub and connected devices. Jeweller technology is used to transmit events and measured values. If connection is lost, Wings allows you to send data backups from the detector to the hub when connection is restored.
The protocols support floating key block encryption and device recognition on every session to prevent sabotage and spoofing.
To monitor connection with system devices and display their statuses Ajax apps have a system of hub–detector polls with a frequency of 12 to 300 seconds. The polling frequency is set by aPRO or a user with system setup rightsin the hub settings.
The Ajax system can transmit events and alarms to thePRO Desktopmonitoring app as well as the Central Monitoring Station (CMS) viaSurGard (Contact ID), SIA DC-09 (ADM-CID), ADEMCO 685, and other protocols. The list of supported protocols isavailable here.
Only communication loss events between LifeQuality and the hub (or the radio signal range extender) are transmitted to the CMS. Use PRO Desktop to receive all smart air quality detector events.
Addressability of Ajax devices allows you to send not only events but also the type of the device, the name, virtual room, and security group assigned to it to the PRO Desktop and to the CMS. The list of transmitted parameters may differ depending on the type of the CMS and the selected communication protocol.
The ID and detector loop (zone) number are available in the detectorStates.
LifeQuality should be within the coverage area of the hub radio network. To operate via aradio signal range extenderReX 2, connect LifeQuality to the hub first. Then connect the detector to the range extender in its settings.
Note that LifeQuality does not work with the ReX radio signal range extender.
If the maximum number of devices is added to the hub, you will be notified about exceeding the hub limit. The number of devices connected to the hub depends on thehub model.
Turn on LifeQuality by holding the power button for 3 seconds. The hub connection request is sent only if the detector is enabled. If the detector fails to connect to the hub, try again in 5 seconds.
The detector cannot connect to the hub if they operate on different radio frequencies. The radio frequency range of the device may vary by region. Please contacttechnical supportfor information on the operating frequency range of your devices.
Once connected, LifeQuality will appear in the device list in the Ajax app. Device status update depends on the polling interval set in theJewellerorJeweller/Fibrasettings. The default value is 36 seconds.
LifeQuality operates with one hub only. When connected to a new hub, the detector stops transmitting data to the old hub. Once added to a new hub, LifeQuality is not removed from the list of devices of the old hub. This must be done manually in Ajax apps.
Indication
LifeQuality LED indication can report detector’s status as well as air quality with a backlight.
LED indication
Event
Notes
Lights up slowly and goes out slowly after tapping on the device LED.
Level of the selected parameter display: temperature, humidity, the CO2level, worsening of any indicator.
The color of the device LED depends on the value of the selected parameter.
When temperature, humidity level, or worsening of any indicator is selected:
Green— the selected parameter is within acceptable values.
Yellow— the selected parameter goes beyond acceptable values.
When the CO2(carbon dioxide) concentration in the air is selected:
Red— 1400–1999 ppm (adverse health effects expected by prolonged exposure).
Purple— more than 2000 ppm (increased risks for health expected by prolonged exposure).
The sensor logo briefly lights up if theBlink on abnormal valuesoption is enabled in thesettings.
Lights up green for 1 second.
Turning the detector on.
Lights up red, then blinks three times.
Turning the detector off.
Lights up red.
Pressing the power button when the detector is on.
Appears only while the power button is pressed. If the button is pressed for more than 2 seconds, the detector briefly lights up three times and turns off.
Blinks red six times then blinks three more times but quicker.
The detector has been removed from the hub.
Lights up when the detector receives information that it has been removed from the hub.
Lights up green for 1 second. Blinks red six times then blinks three more times but quicker.
Turning on a detector not added to the hub.
Lights up red slowly three times.
Battery is low.
Lights up after tapping on the device LED.
Slowly lights up blue with an interval of 6 seconds.
Calibration of the CO2(carbon dioxide) sensor.
Calibration takes up to 20 minutes.
Lights up red for 1 second.
Accelerometer is triggered, the detector is displaced.
Functionality testing
The Ajax system provides several tests for choosing the installation place with a stable signal for the devices.JewellerandWings signal strength testsare available for LifeQuality. Tests determine the strength and stability of the signal at the intended location of the device.
To run a test in the Ajax app:
Select the hub if you have several of them or if you are using thePRO app.
Go to theDevicestab.
SelectLifeQuality.
Go to the settings by clicking on the gear icon.
Select the test.
Perform the test following the tips in the app.
Tests do not start immediately, but not later than over a single hub–device ping interval (36 seconds by default). You can change the device ping interval in theJeweller(orJeweller/Fibra) menu in the hub settings.
Icons
Icons show some of the LifeQuality states as well as measured air quality indicators. You can view them in Ajax apps in theDevices tab.
State icons
Icon
Value
Jeweller signal strength between LifeQuality and the hub (or range extender). The recommended value is two or three bars.
Air temperature in the room where LifeQuality is installed. Measured in Celsius or Fahrenheit depending on the app settings.
In the normal state, the text is colored black. The text changes color to yellow when the temperature is outside the comfort limits set in the settings.
Humidity level in the room where LifeQuality is installed. Measured in percentages.
In the normal state, the text is colored black. The text changes color to yellow when the humidity is outside the comfort limits set in the settings.
Level of CO2(carbon dioxide) concentration in the room where LifeQuality is installed. Measured in ppm (parts per million).
The color of the text depends on the concentration:
Up to 350 ppm — gray (the CO2sensor calibration is required).
1400–1999 ppm — red (adverse health effects expected by prolonged exposure).
More than 2000 ppm — purple (increased risks for health expected by prolonged exposure).
Jeweller Signal Strength
Signal strength between LifeQuality and the hub or radio signal range extender via Jeweller. The recommended value is two or three bars.
Jeweller is a protocol for transmitting LifeQuality events and alarms.
Connection via Jeweller
Connection status between LifeQuality and the hub or range extender via Jeweller:
Online— the detector is connected to the hub or range extender. Normal state.
Offline— no connection between the detector and hub (or range extender). Check the detector connection.
Wings Signal Strength
Signal strength between LifeQuality and the hub or the range extender via the Wings channel. The recommended value is two or three bars.
Wings is a protocol for transmitting LifeQuality backup data.
Connection via Wings
Connection status between LifeQuality and the hub or the range extender via Wings:
Online— the detector is connected to the hub or the range extender. Normal state.
Offline— no connection between the detector and the hub or the range extender. Check the detector connection.
Battery Сharge
The battery charge level of the device:
OK— batteries have sufficient charge. Normal state.
Battery low— batteries are discharged. We recommend replacing the batteries with new ones.
When the charge level is low, the Ajax apps and the security company receive a related notification.
After receiving the low battery notification, the detector can operate for several months more under normal conditions. However, we recommend replacing the batteries immediately upon notification.
LifeQuality ID (serial number). It is also located on the enclosure under the QR code and the device packaging.
Device No.
LifeQuality loop (zone) number. Events are sent to the monitoring station with this number.
Settings
To change LifeQuality settings in the Ajax app:
Open the Ajax app.
Select the hub if you have several of them or if you are using thePRO app.
Go to theDevicestab.
Select LifeQuality from the list.
Go toSettingsby clicking on the gear icon.
Set the required settings.
ClickBackto save the new settings.
Settings
Value
Name
Detector name. Displayed in the list of hub devices, SMS text, and notifications in the events feed.
To change the name, click on the text field. The name can contain up to 12 Cyrillic characters or up to 24 Latin characters.
Room
The virtual room to which LifeQuality is assigned.
To change the room, click on the field.
The room name is displayed in the text of SMS and notifications in the events feed.
Air monitor settings
Temperature
The settings of the lower and upper limits of a comfortable temperature. If the temperature goes beyond these limits, users will receive notifications.
The temperature can be set within the range between 0°C and +50°C.
Humidity
The settings of the lower and upper limits of a comfortable humidity level. If the humidity goes beyond these limits, users will receive notifications.
Humidity can be set within the range from 0% to 100%.
CO2level
The settings of the lower and upper limits of a comfortable carbon dioxide concentration in the air. If the concentration goes beyond these limits, users will receive notifications.
The concentration of CO2can be set within the range from 400 ppm to 2500 ppm.
Notifications
Notifications that users receive from LifeQuality:
When the device is moved— if enabled, users will receive a notification once the device is moved or detached from the mounting panel.
Temperature— if enabled, users will receive a notification once the temperature value goes beyond the specified limits.
Humidity— if enabled, users will receive notifications once the humidity value goes beyond the specified limits.
CO2level— if enabled, users will receive notifications once the carbon dioxide concentration goes beyond the specified limits.
Sensitivity
The settings of the threshold of sensitivity for device sensors and the period of time after which users will be notified about worsening of air quality:
Temperature— if enabled, users can set the acceptable fluctuation from 0.1°C to 10°C.
Humidity— if enabled, users can set the acceptable fluctuation from 0.1% to 10%.
CO2level— if enabled, users can set the acceptable fluctuation from 5 to 250 ppm.
LED Indication
The settings of the parameter which will be indicated after tapping on the device LED:
Temperature.
Humidity.
CO2level.
Worsening of any indicator.
If the toggleBlink on abnormal valuesis enabled, the device will flash with its LED once the selected parameter goes beyond acceptable values specified in device settings.
Enabling the option affects the battery life of the device.
Scenarios
The menu for setting up automation scenarios by temperature, humidity, and CO2level.
Switches the device to the Jeweller signal strength test mode.
The test helps to check the signal strength between the device and the hub or range extender to determine the optimal installation place for LifeQuality.
Switches the device to the Wings signal strength test mode.
The test helps to check the signal strength between the device and the hub or the range extender to determine the optimal installation place for LifeQuality.
Starts manual calibration of the carbon dioxide sensor. Calibration is required if the detector is installed in an unventilated area. In these conditions it should be manually calibrated once a year.
Unpairs LifeQuality from the hub and deletes its settings.
How to set up scenarios
Open the Ajax app.
Select the hub if you have several of them or if you are using thePRO app.
Go to theDevicestab.
Select LifeQuality from the list.
Go toSettingsby clicking on the gear icon.
Go to theScenariosmenu.
Choose one of the indicators:
Temperature
Humidity
CO2
Specify the value of the parameters:
Higher ThanorLower Thanto define the event that runs the scenario.
To create a scenario for both options, you should create two different scenarios, one forHigher Thanand another forLower Than.
The value upon which the scenario is triggered.
Values set as comfort limits in the LifeQuality settings are selected by default. You can change them for the scenario. It will not affect the notification settings upon exceeding the comfort limits.
ClickNext.
Select the necessary automation devices that should trigger when the measurements goes beyond the specified in the scenario limit.
Specify:
Name of the scenario
Action of the automation device
ClickSave.
If the device is offline, it will not execute the scenario as it misses the scenario trigger (e.g., during a power outage or when the connection between the hub and device is lost).
Use case: The automated action is scheduled for 10 a.m., so it must start at 10 a.m. The electrical power goes out at 9:55 a.m. and is restored ten minutes later. The automation scenario won’t start at 10 a.m. and will not start immediately after the power is back on. This scheduled action is missed.
Charts are available with firmware version from OS Malevich 2.15 and in apps of the following versions and higher:
Ajax Security System 2.23.1 for iOS
Ajax Security System 2.26.1 for Android
Ajax PRO: Tool for Engineers 1.17.1 for iOS
Ajax PRO: Tool for Engineers 1.17.1 for Android
Ajax PRO Desktop 3.6.1 for macOS
Ajax PRO Desktop 3.6.1 for Windows
Open the Ajax app.
Select the hub if you have several of them or if you are using thePRO app.
Go to theDevicestab.
SelectLifeQuality.
Select an indicator:
Temperature
Humidity
CO2
Select an interval:
Hour
Day
Week
Month
Year
You can also switch between detector measurements inside the screen. To do this, select the indicator in the menu above.
To view the values of measurements for the specified period, click on the corresponding column of the chart.
Charts may have gaps if at that time the connection between LifeQuality and the hub was lost for more than 72 hours or LifeQuality was disabled.
How to start CO2sensor calibration manually
Locate the detector outdoors and leave it for 10-15 minutes before starting the calibration. For example, take it outside or leave it by an open window. The CO2sensor is calibrated at the operating temperature of 0°C to +50°C.
To start calibration:
Open the Ajax app.
Select the hub if you have several of them or if you are using thePRO app.
Go to theDevicestab.
Select LifeQuality from the list.
Go toSettingsby clicking on the gear icon.
Go toСО2Sensor Calibrationmenu.
ClickStartand wait for the calibration to finish.
The CO2sensor is calibrated for up to 20 minutes. After clicking theStartbutton, the timer in the app will start the countdown. Calibration ends automatically after the countdown is completed — return LifeQuality to the selected installation place.
Selecting the installation place
The device is for indoor use only.
LifeQuality can be mounted on a vertical surface using an included installation kit. The device can also be placed on a horizontal surface without mounting. We recommend mounting the device on a vertical surface or on a ceiling. It will prevent the device from being displaced or accidentally dropped.
We recommend installing the detector at the height of a human airway. For example, locate it in the office at the sitting person’s head level or in the bedroom next to the bedhead. LifeQuality installs in every room in areas that are expected to be crowded. One detector operates effectively in one room, regardless of its size.
When choosing the location of the detector, consider the parameters that affect its operation:
Jeweller signal strength.
Wings signal strength.
Distance between the detector and the hub.
Presence of barriers for radio signal passage between devices: walls, interfloor ceilings, large objects located in the room.
Consider the placement recommendations when designing your Ajax system for the object. The security system must be designed and installed by specialists. The list of recommended Ajax partners isavailable here.
Signal strength
The Jeweller/Wings signal strength is determined by the ratio of the number of undelivered or corrupted data packets to expected ones that are exchanged between the hub and the detector within a certain period of time. Signal strength is indicated by the iconon theDevicestab:
Three bars— excellent signal strength.
Two bars— good signal strength.
One bar— low signal strength; stable operation is not guaranteed.
Crossed out icon— no signal; stable operation is not guaranteed.
Check the Jeweller and Wings signals strength at the installation place. We cannot guarantee stable operation if the signal strength is as low as one or zero bars. In this case, move the device. Repositioning even by 20 cm can significantly improve signal reception.
If the detector still has a low or unstable signal after it was moved, useReX 2.
LifeQuality is not compatible withReX. The list of compatible range extenders isavailable here.
Do not install the detector
Outdoors. This could damage the detector.
In places with fast air circulation. For example, near fans, open windows, or doors. This can lead to incorrect measurements.
Opposite any objects with rapidly changing temperature. For example, near electric and gas heaters. This can lead to incorrect temperature measurements.
In places where the detector has low or unstable signal strength. This can lead to a connection loss between the detector and the hub or radio signal range extender.
Inside premises with temperature and humidity outside the device’s operation limits. This could damage the detector.
In closed botanic gardens, greenhouses, and rooms with a large number of plants. The detector is not suitable for operation in such conditions.
Installation
Remove the SmartBracket mounting panel from the detector. To remove the panel, turn it counterclockwise.
Fix the SmartBracket panel to a vertical surface using double-sided adhesive tape or other temporary fastener. The mounting panel has an UP sign, which indicates the correct position of the panel.
Use double-sided adhesive tape for temporary fixation only. The device fixed permanently with adhesive tape can peel off the surface at any time, leading to damage if the device is dropped.
Run theJewellerandWingssignal strength tests. The recommended value is two or three bars.
If the signal strength is a single bar or lower, we cannot guarantee the stable operation of the system. Move the device as repositioning even by 20 cm can significantly improve the signal reception. If low or unstable signal strength is still reported after relocation, use theReX 2radio signal range extender.
Remove the detector from the mount.
Fasten the SmartBracket panel with bundled screws using all fixation points. If using other fasteners, ensure they do not damage or deform the mounting panel.
Place the detector on the SmartBracket mounting panel.
Malfunctions
If malfunction is detected (for example, there is no connection with the hub or range extender), the Ajax app displays a malfunction counter in the device field.
Malfunctions are displayed in the detectorStates. Fields with malfunctions are highlighted in red.
The device can report malfunctions to the monitoring station of the security company, as well as to users through push notifications and SMS.
LifeQuality malfunctions
CO2sensor calibration is required.
No connection to the hub or radio signal range extender.
The detector registered the fault of one or several built-in sensors.
The battery charge level is low.
Maintenance
Regularly check the functioning of the detector. The optimal frequency of check-ups is once every three months. Clean the enclosure from dust, cobwebs, and other contaminants as they emerge. Use a soft dry cloth suitable for equipment care. Do not use substances that contain alcohol, acetone, gasoline, and other active solvents to clean the device.