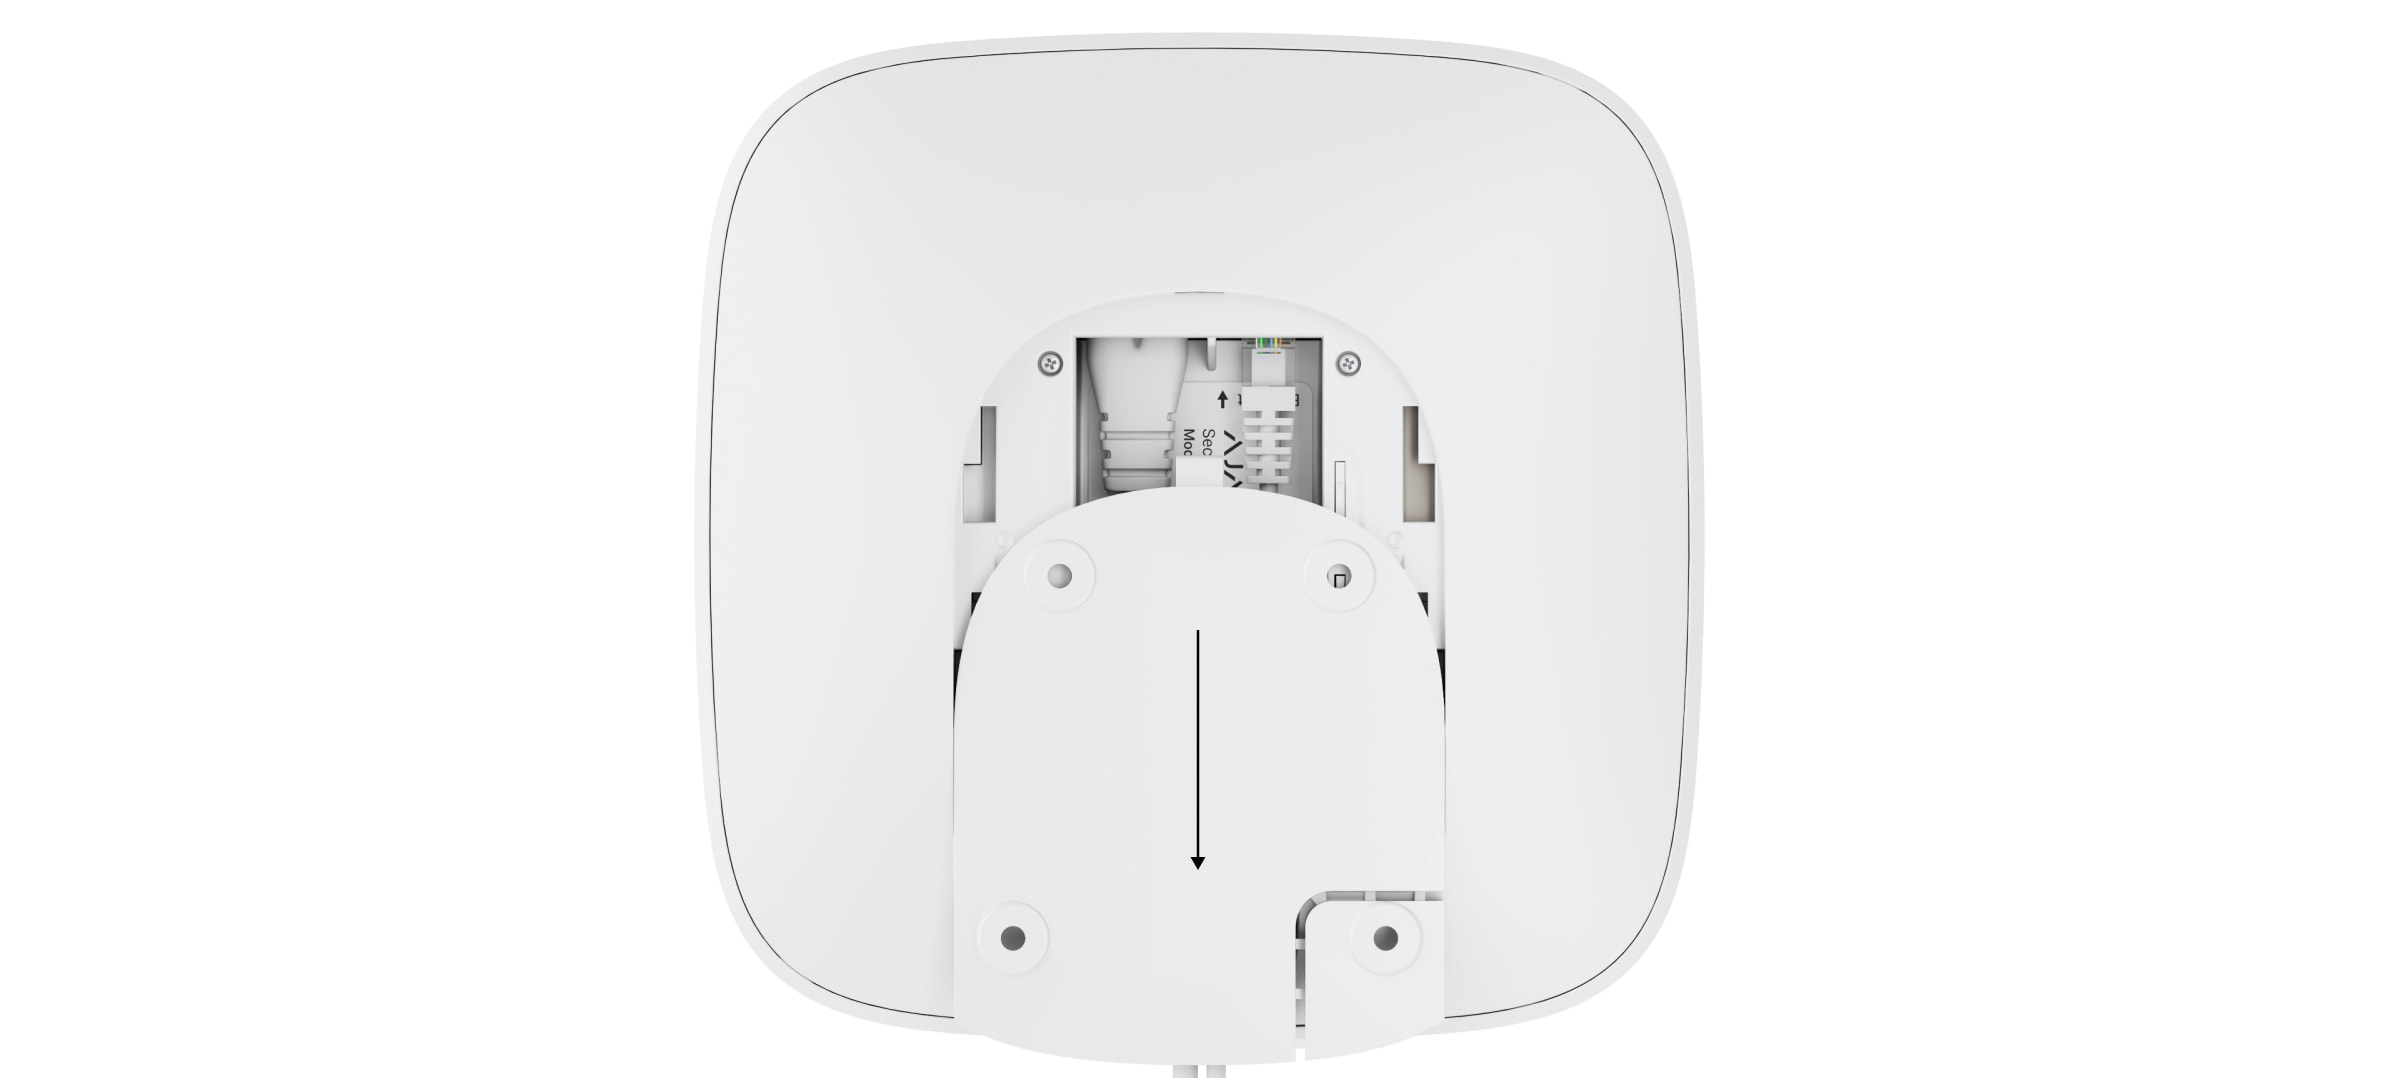
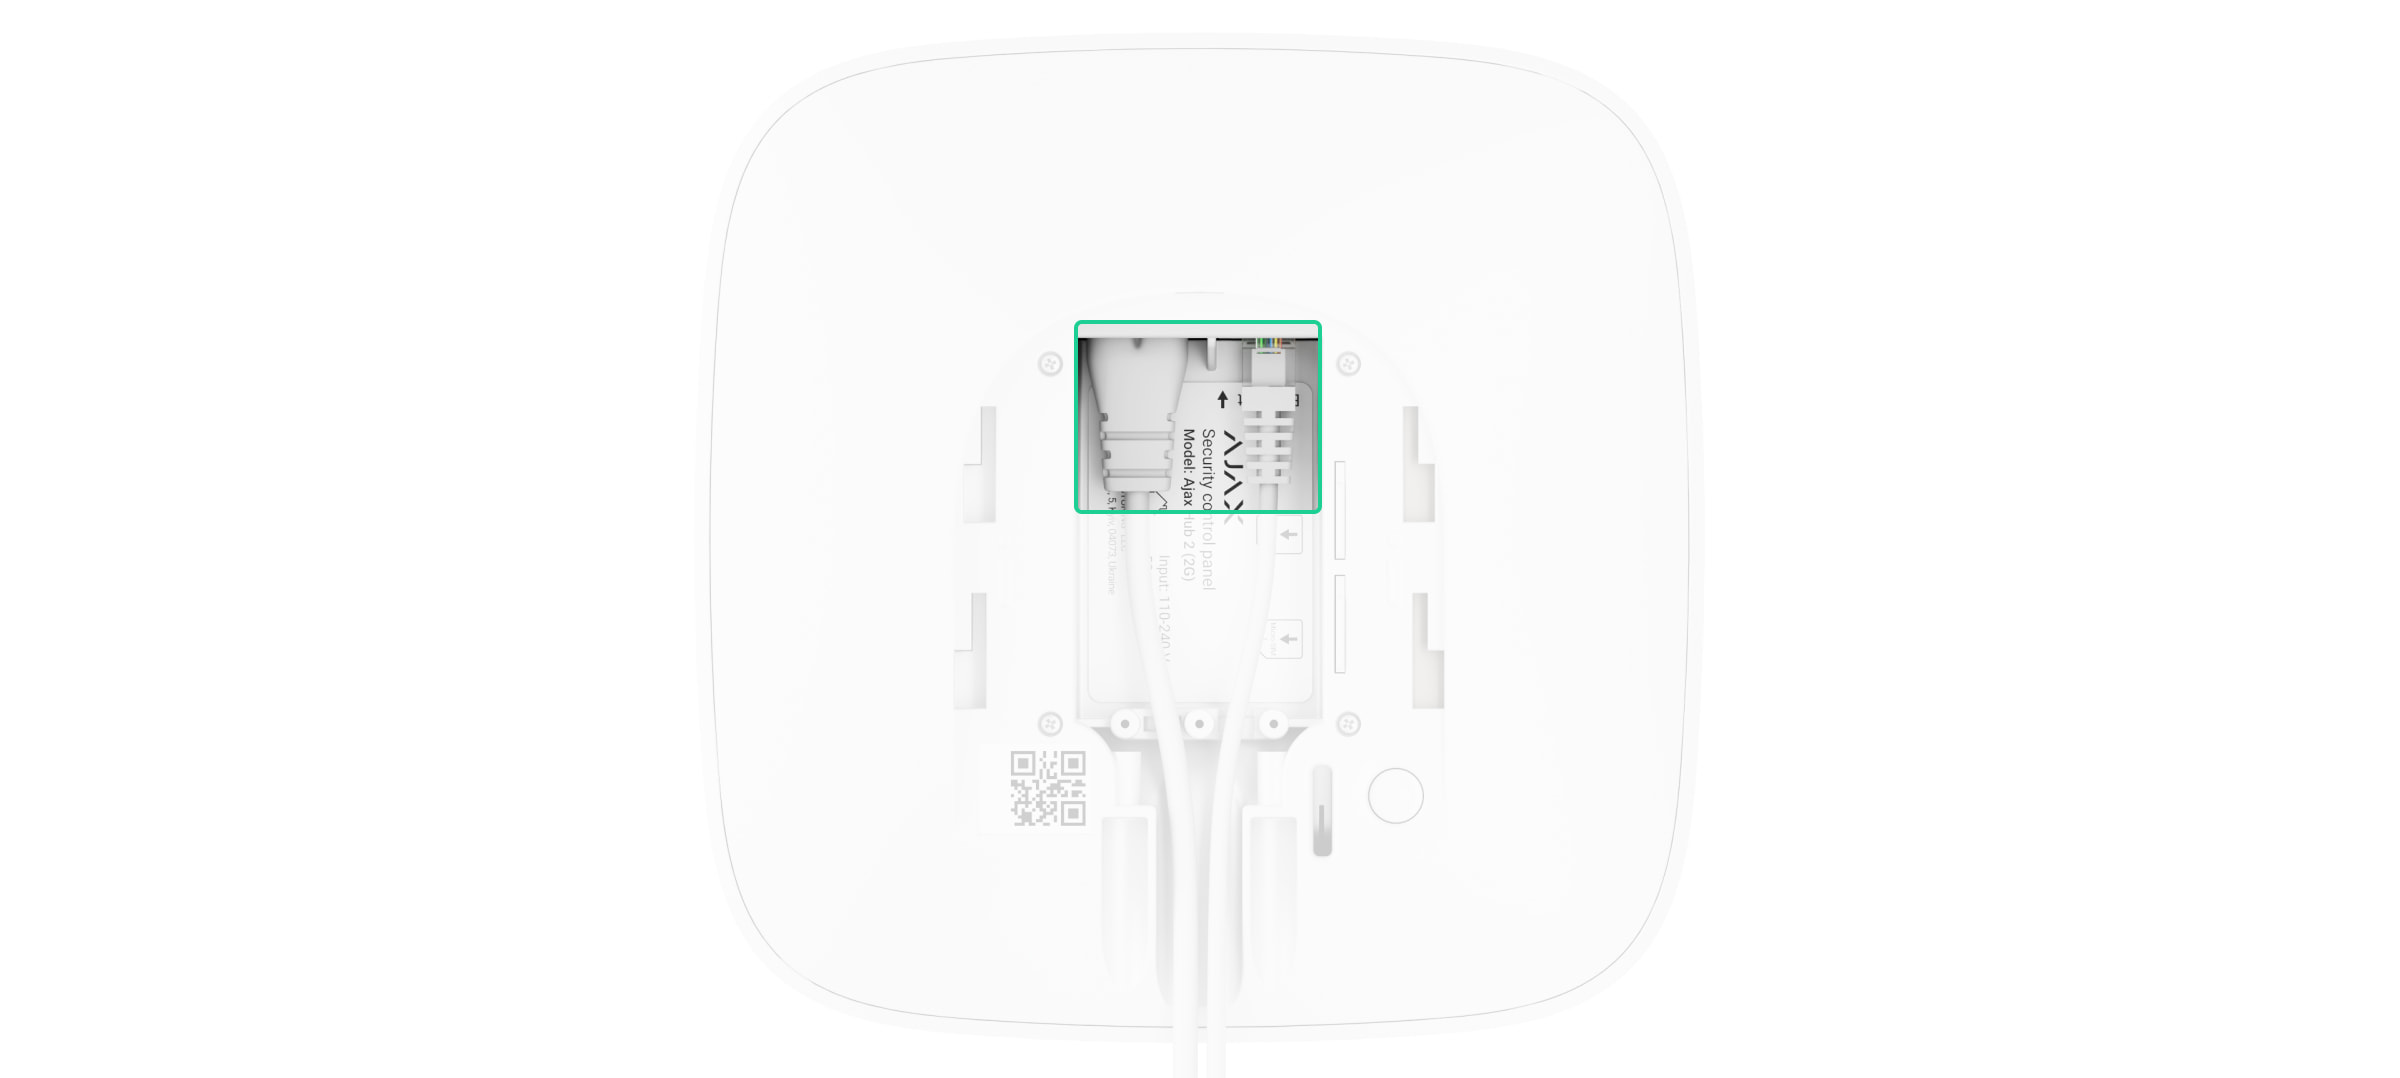
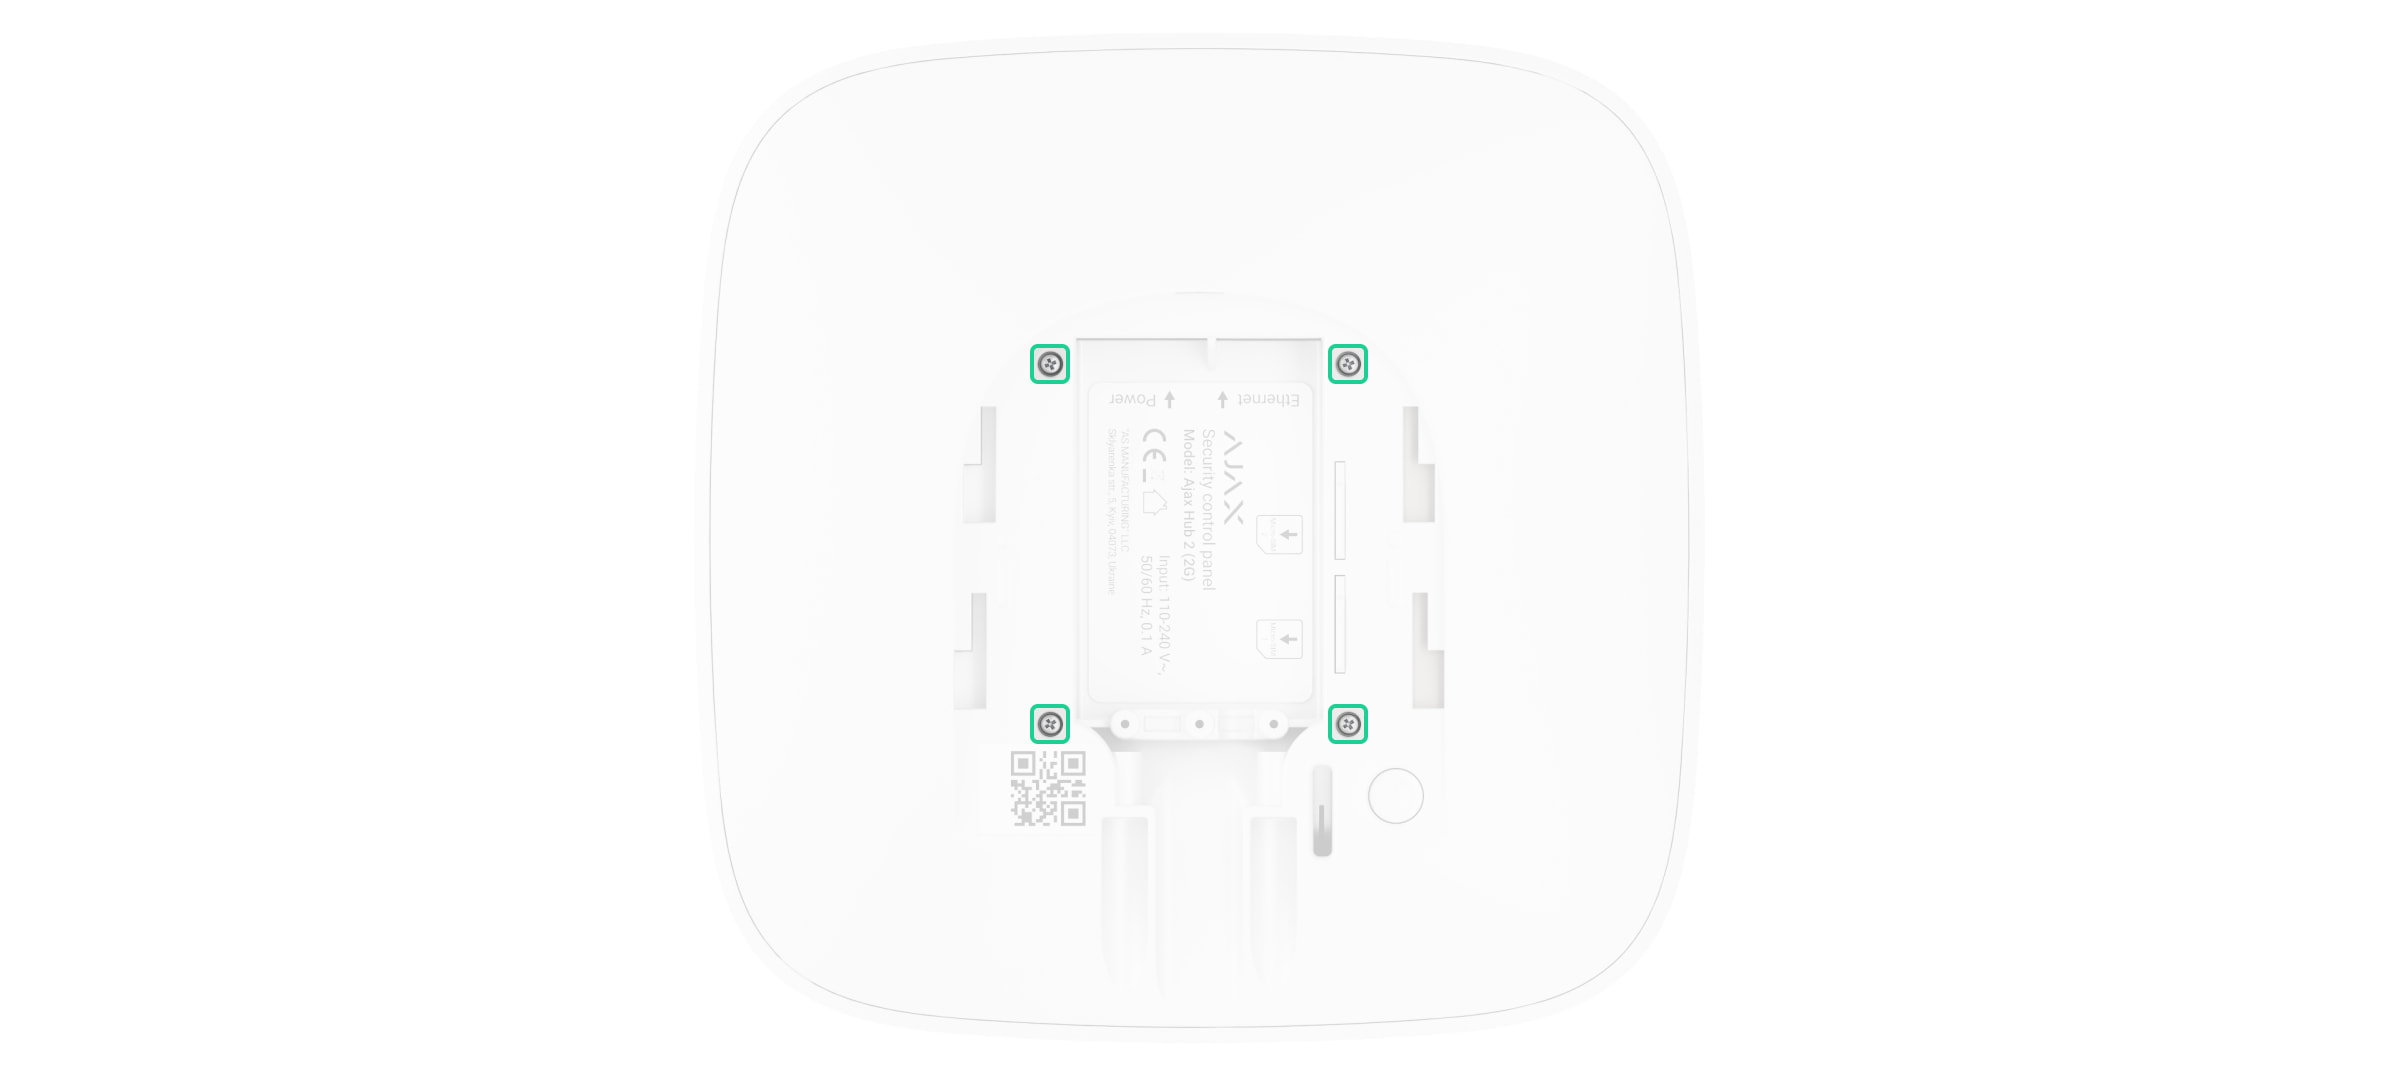
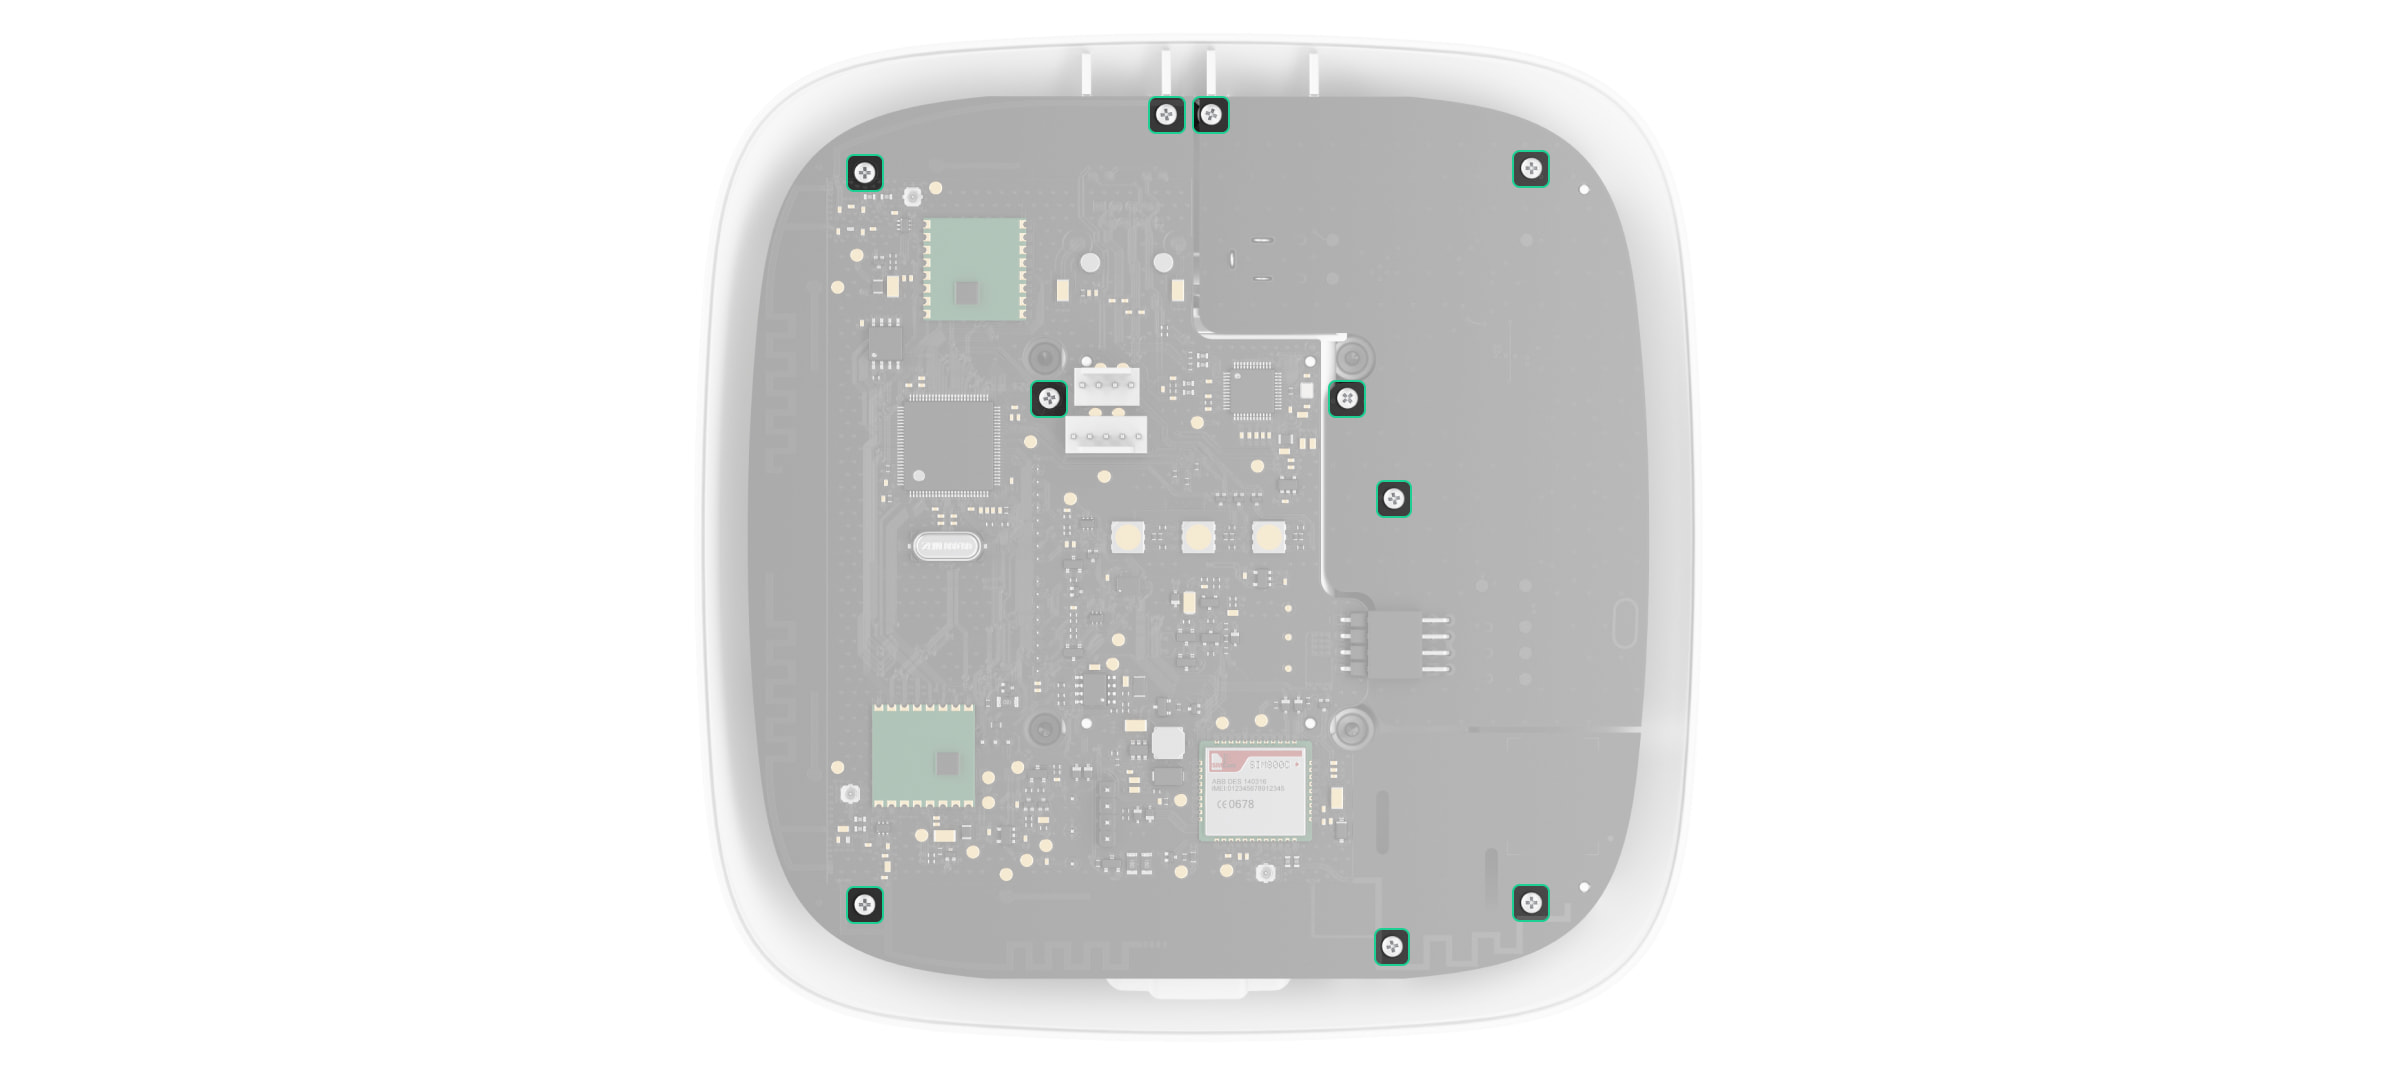
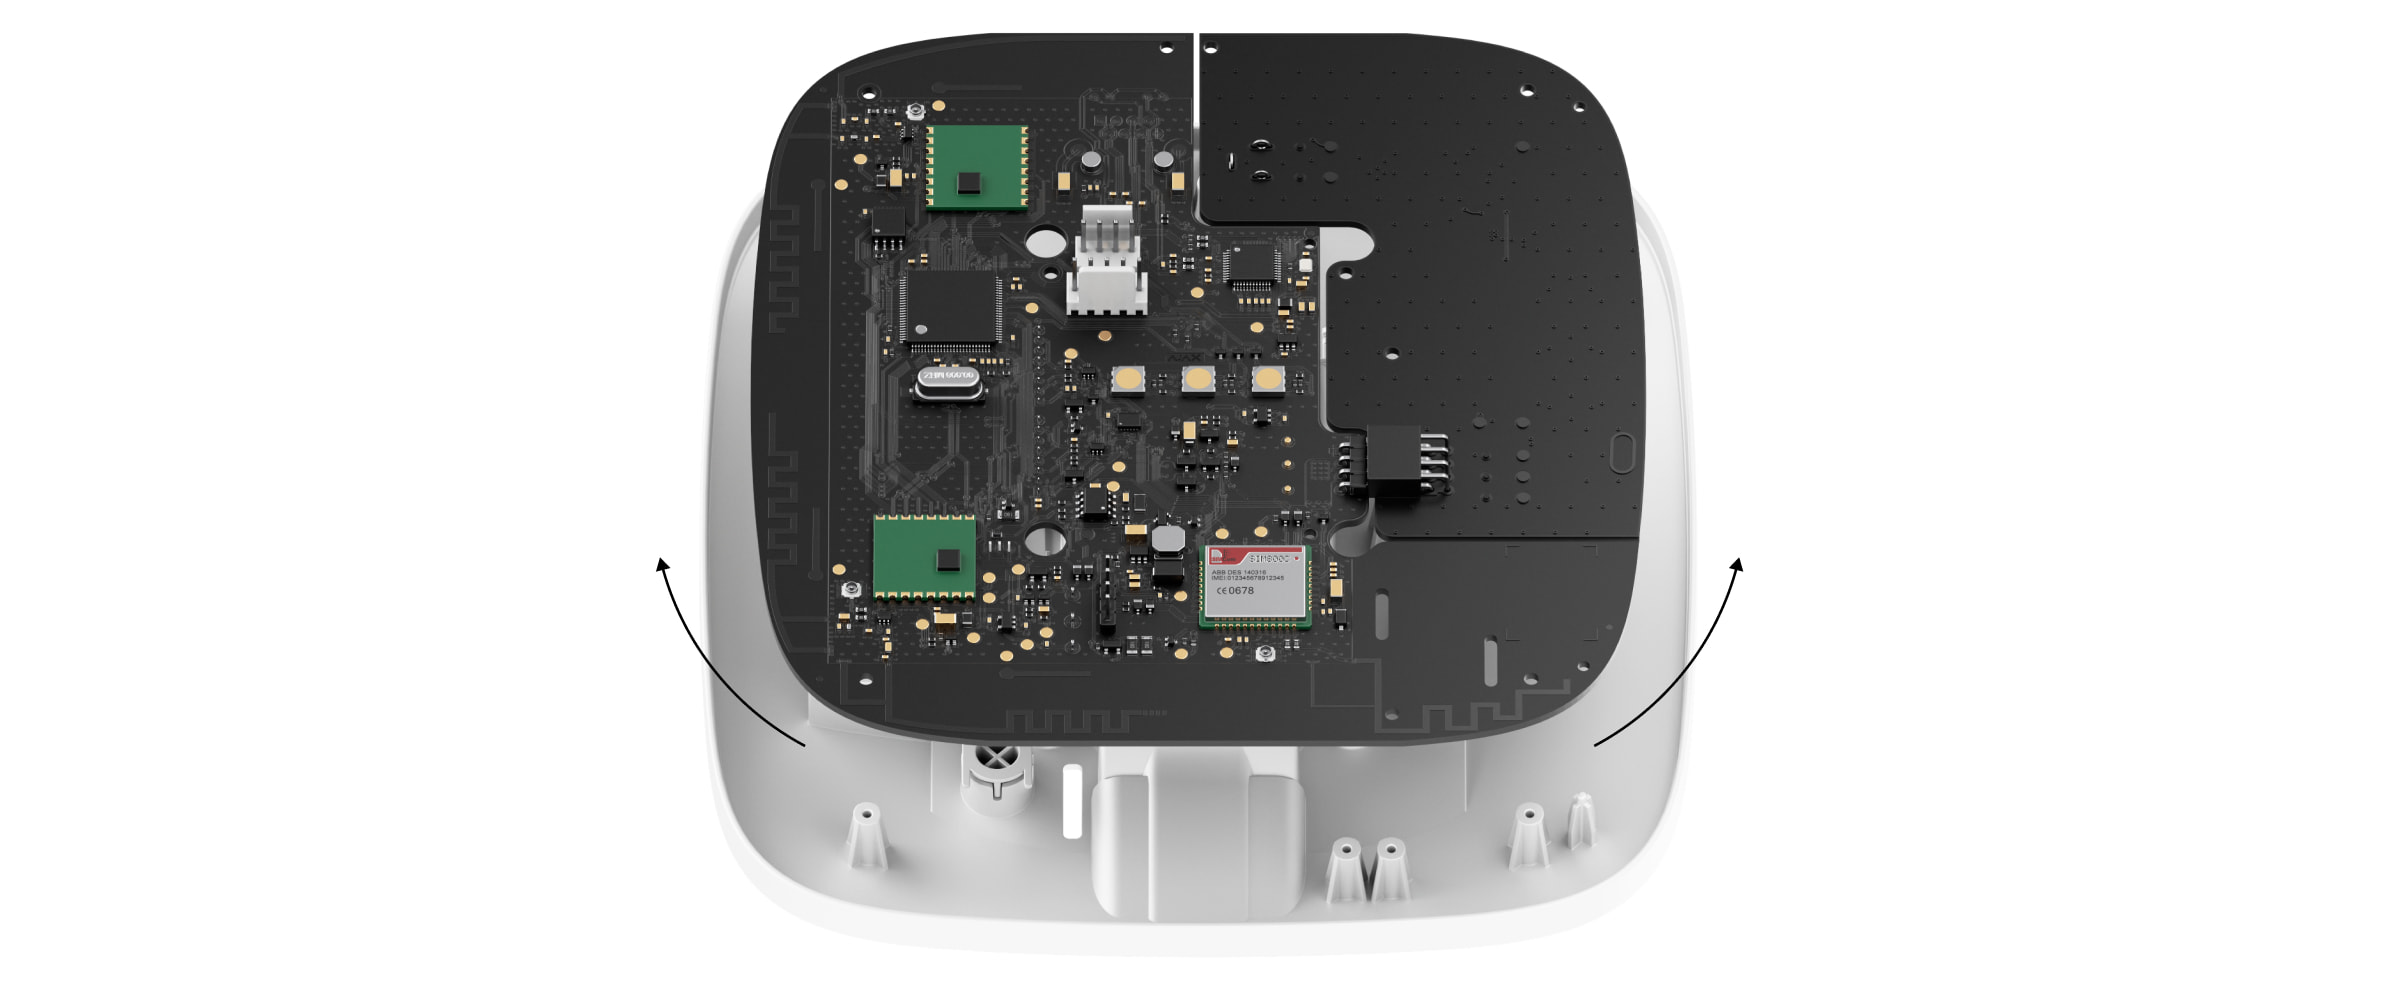
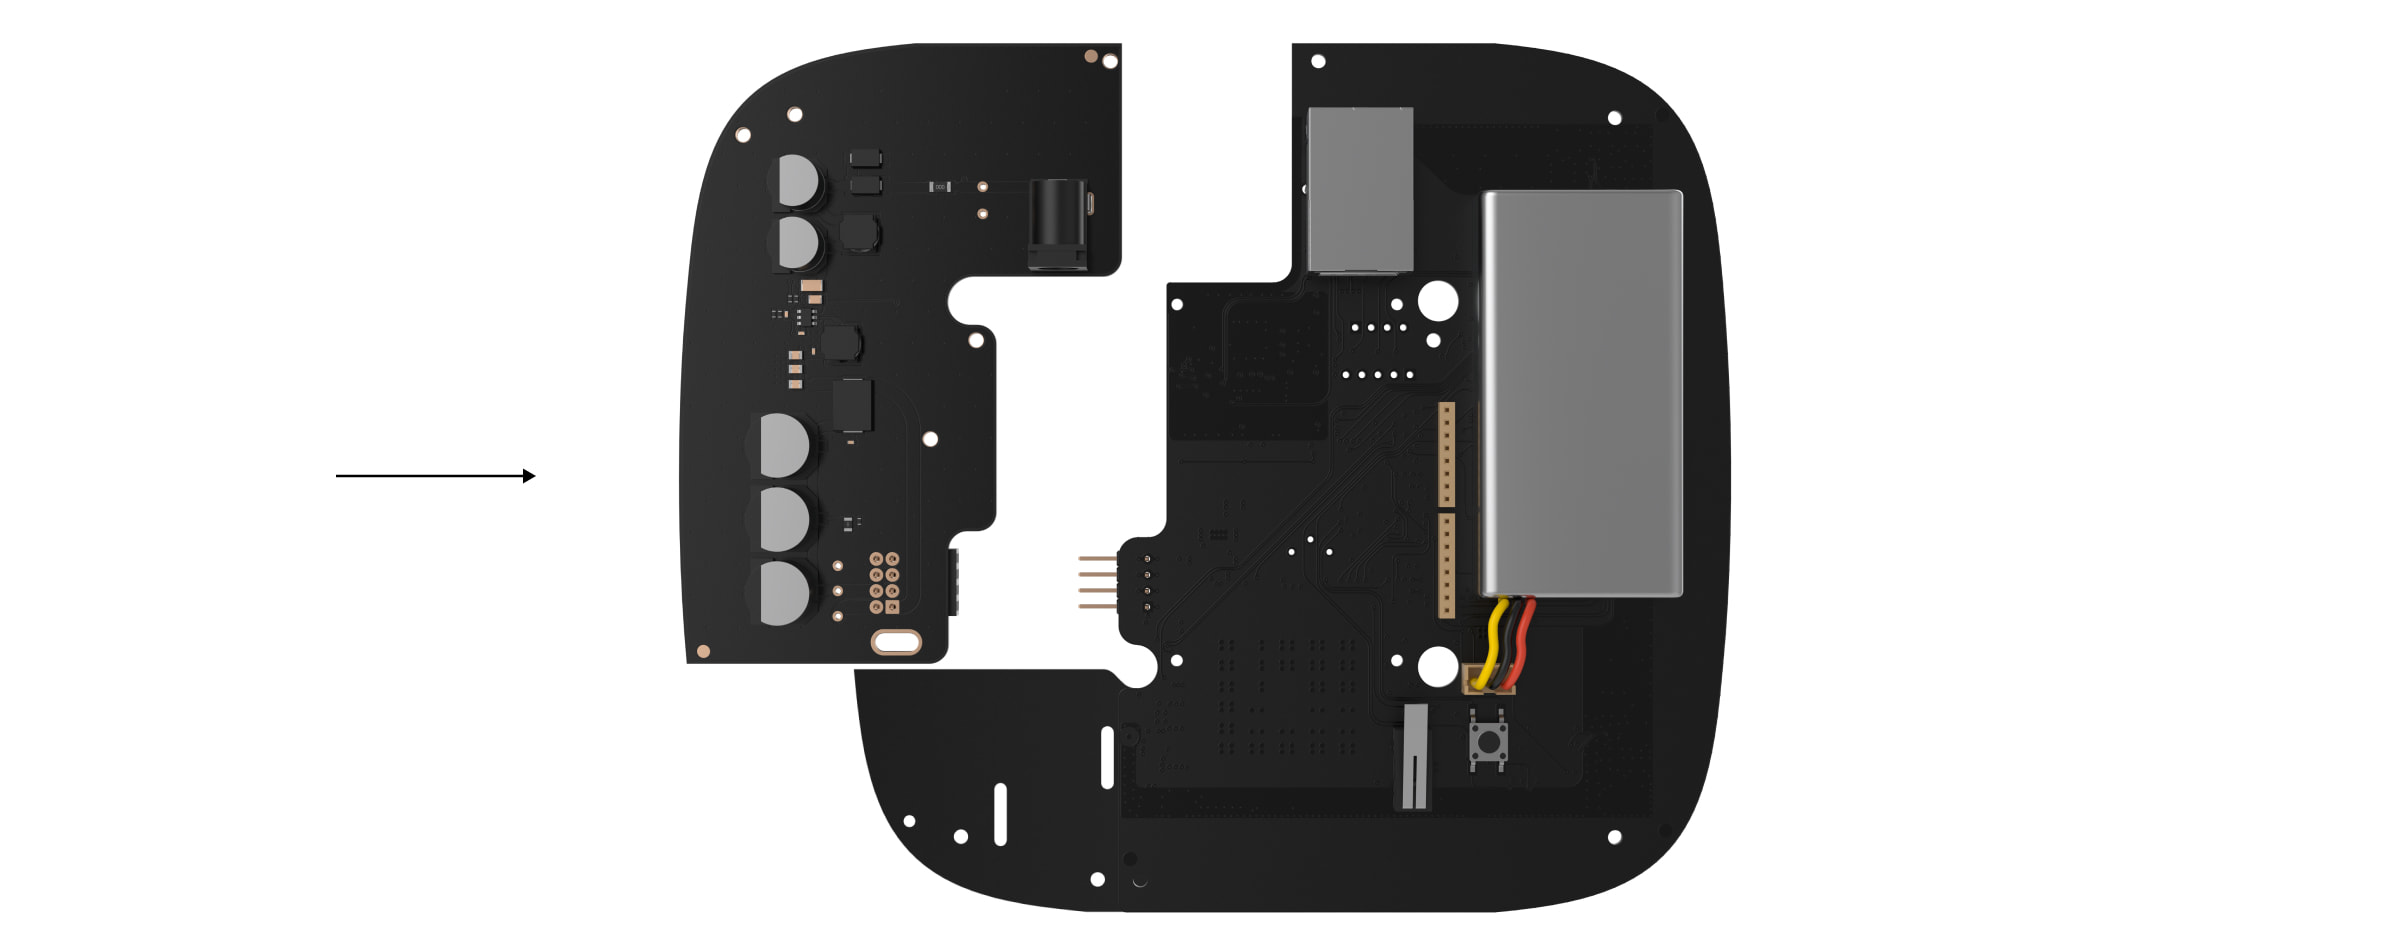
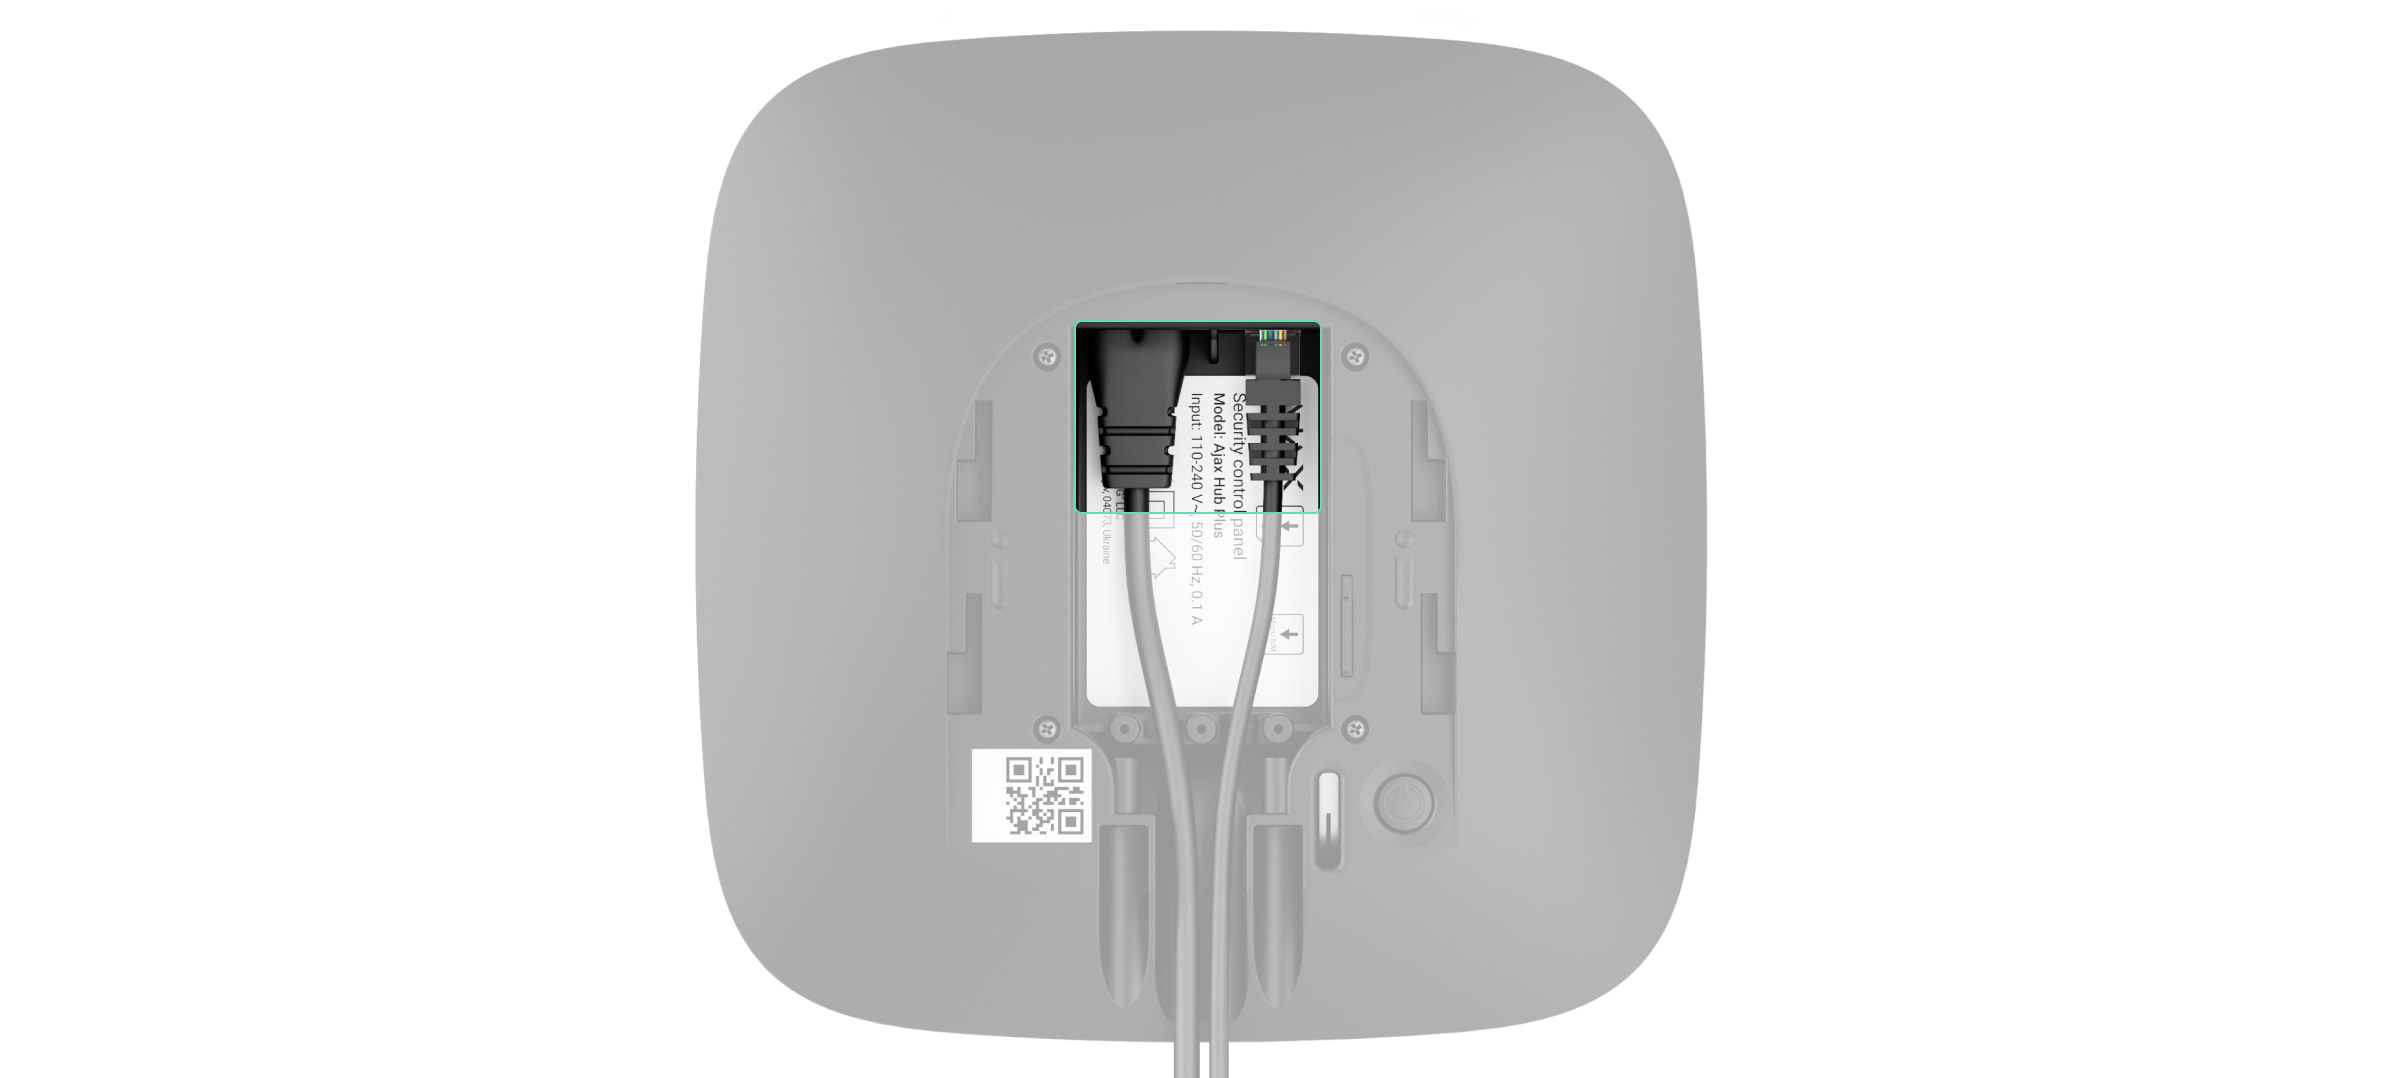
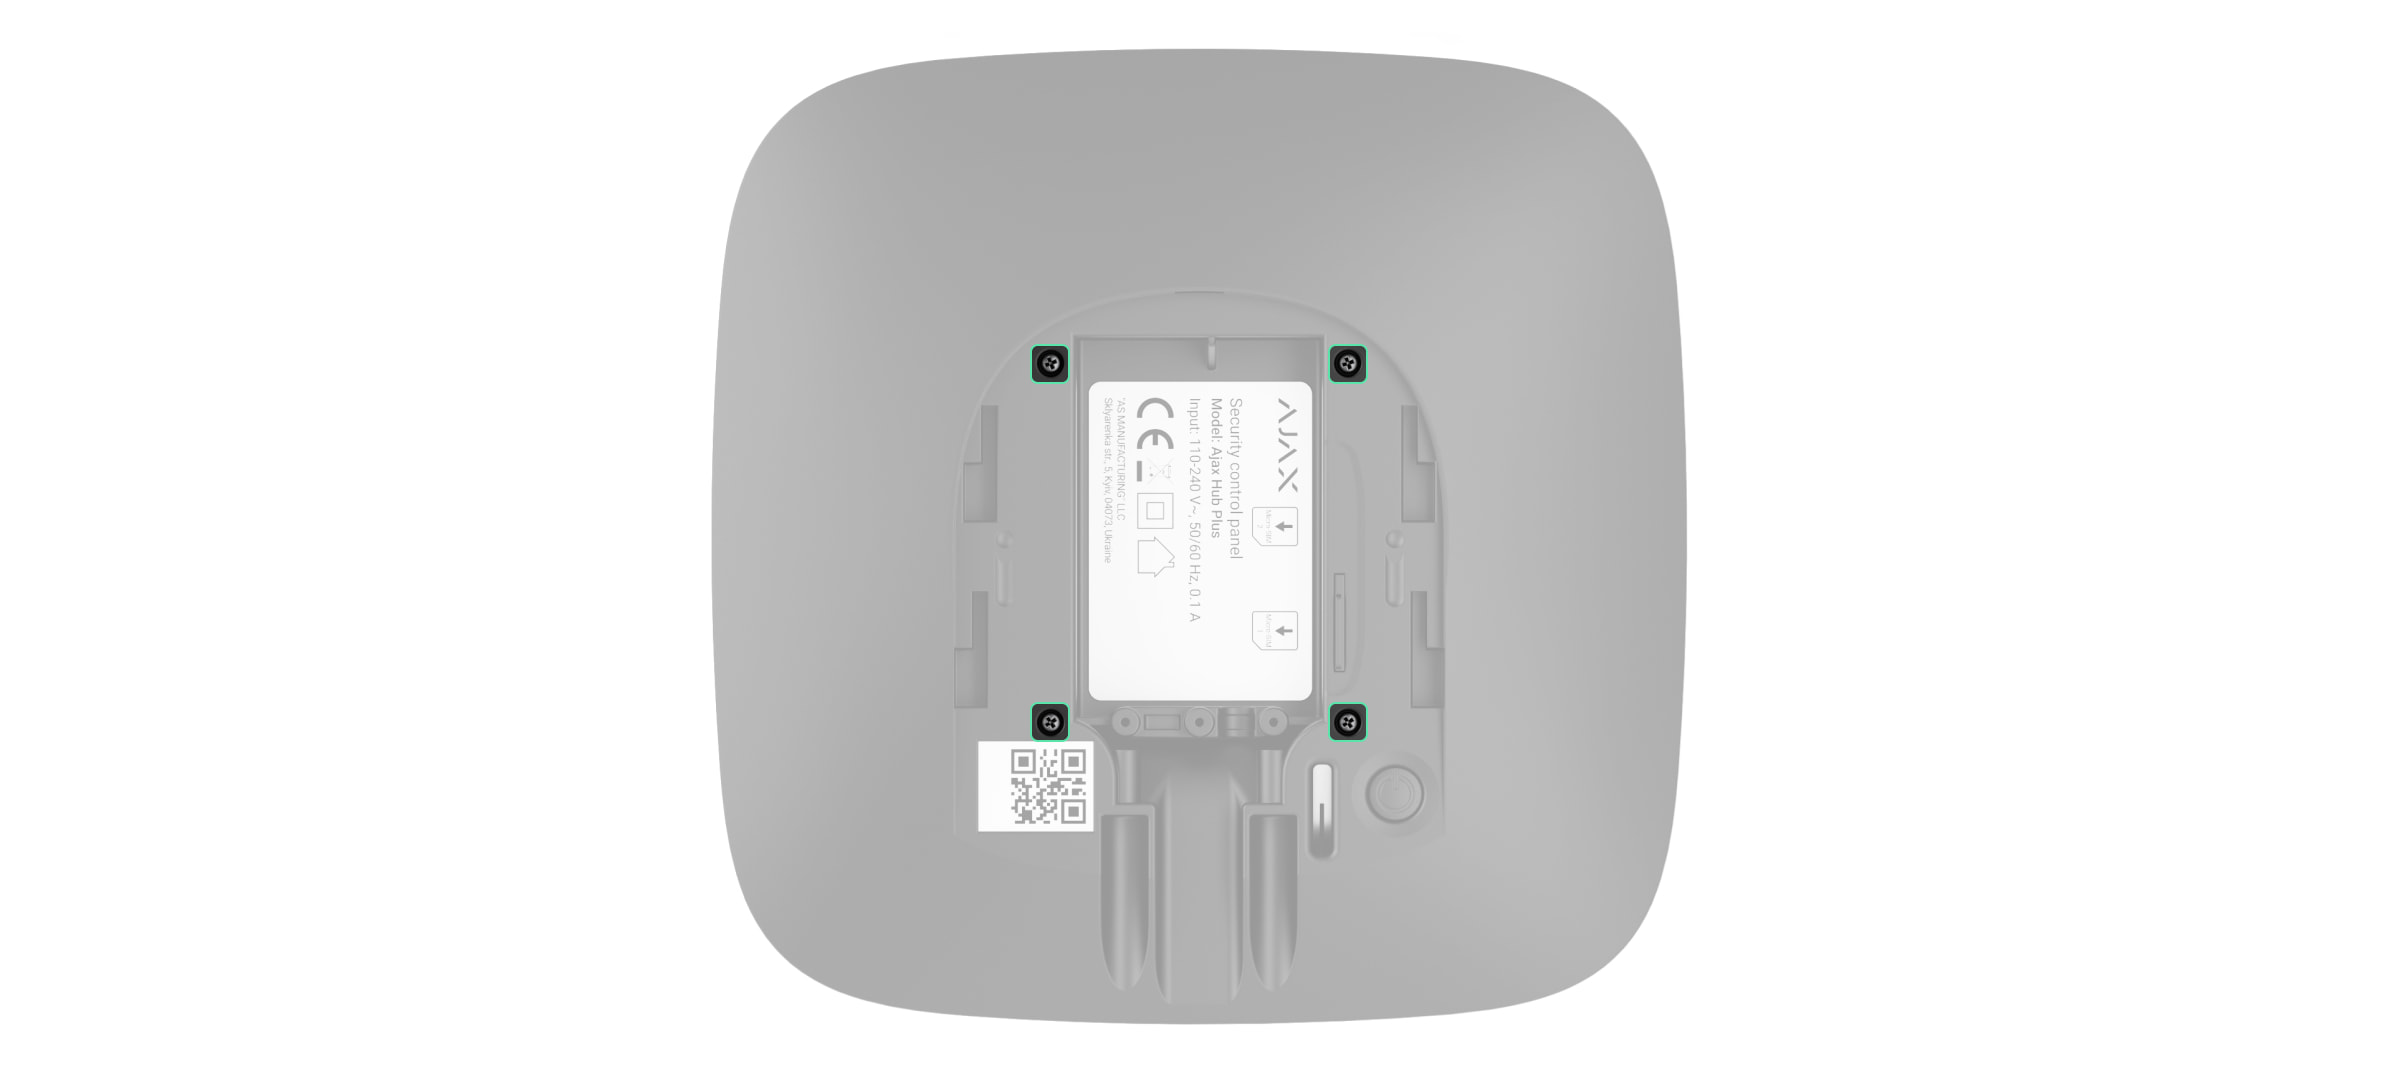
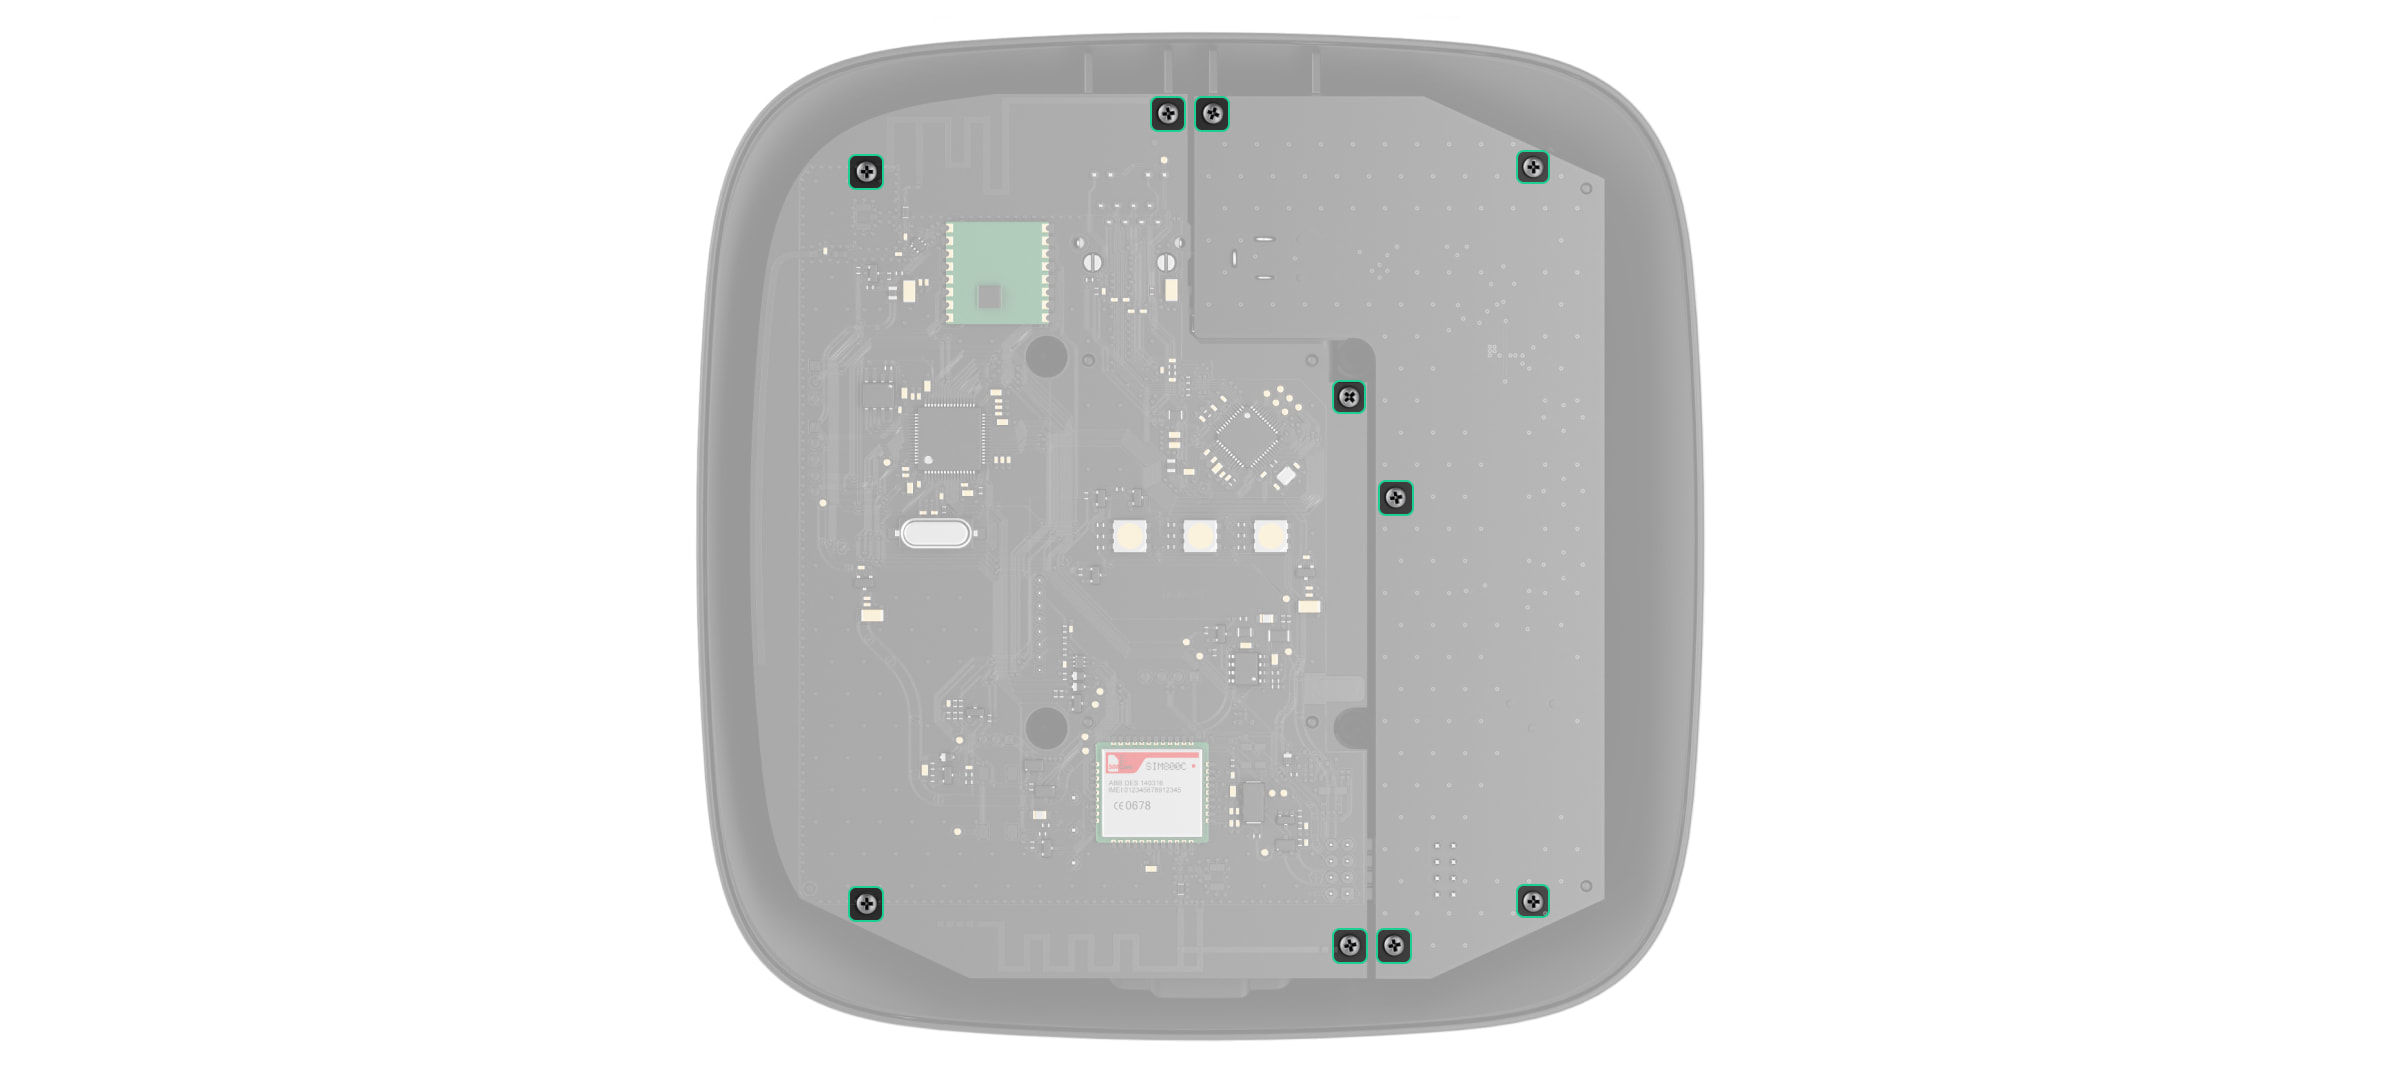
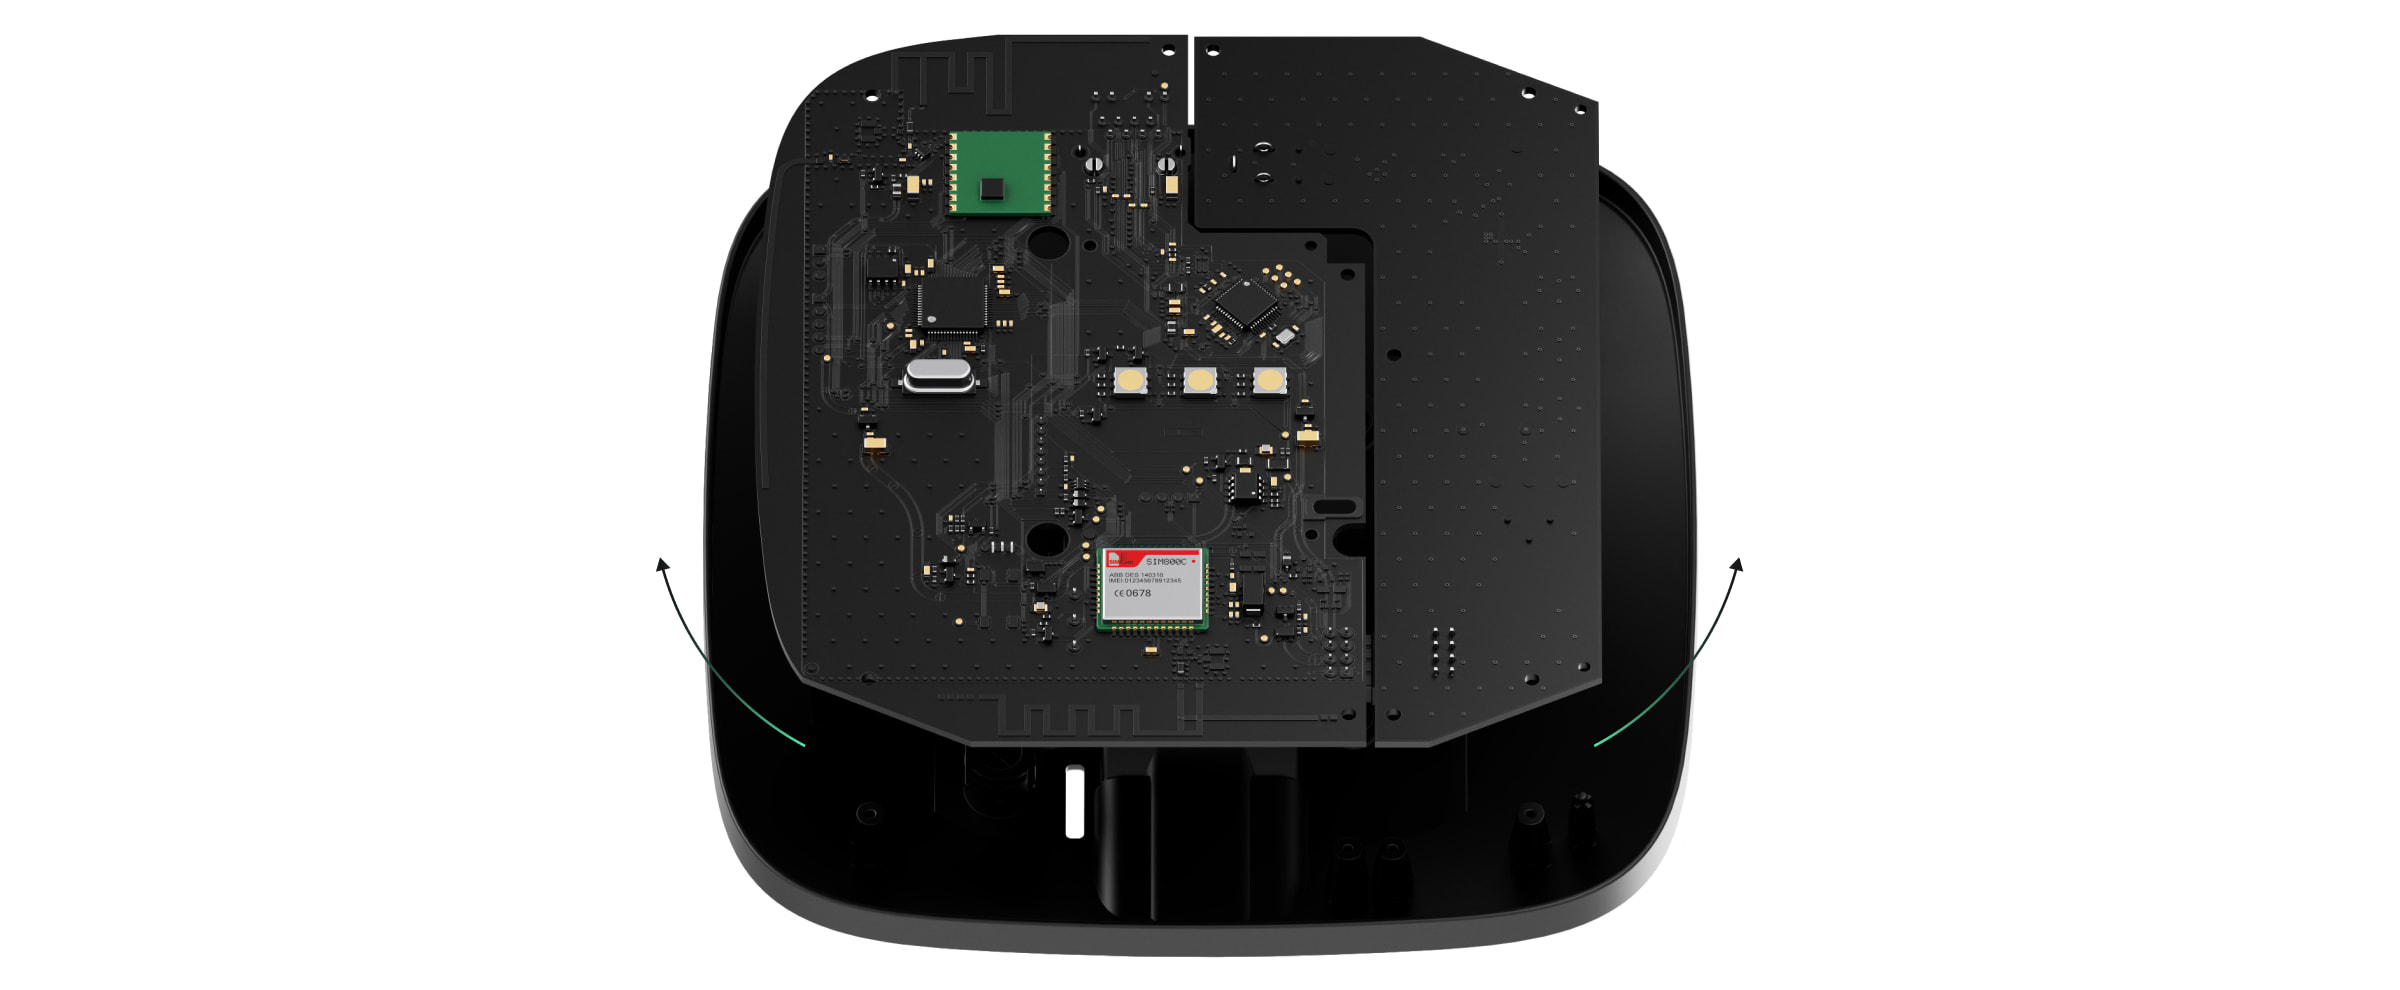
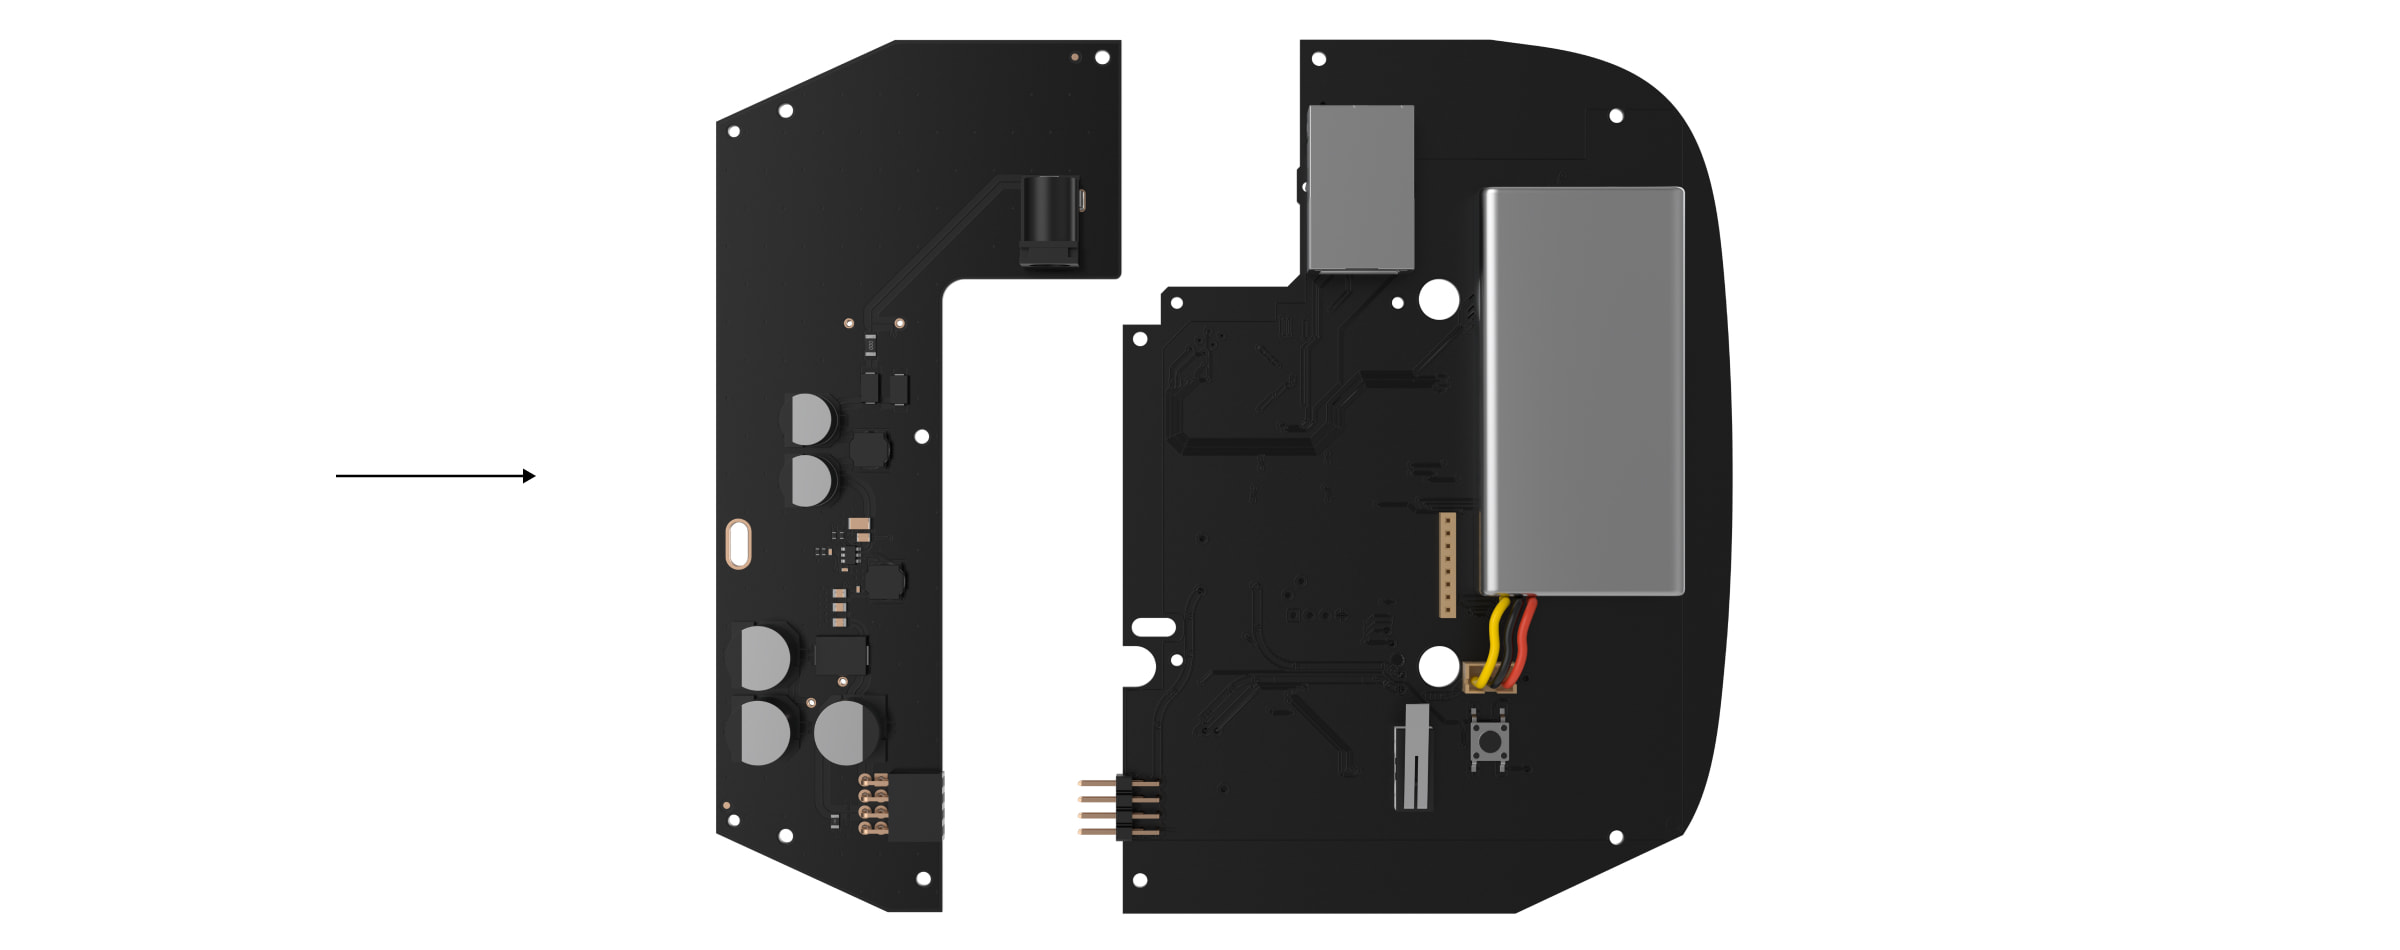
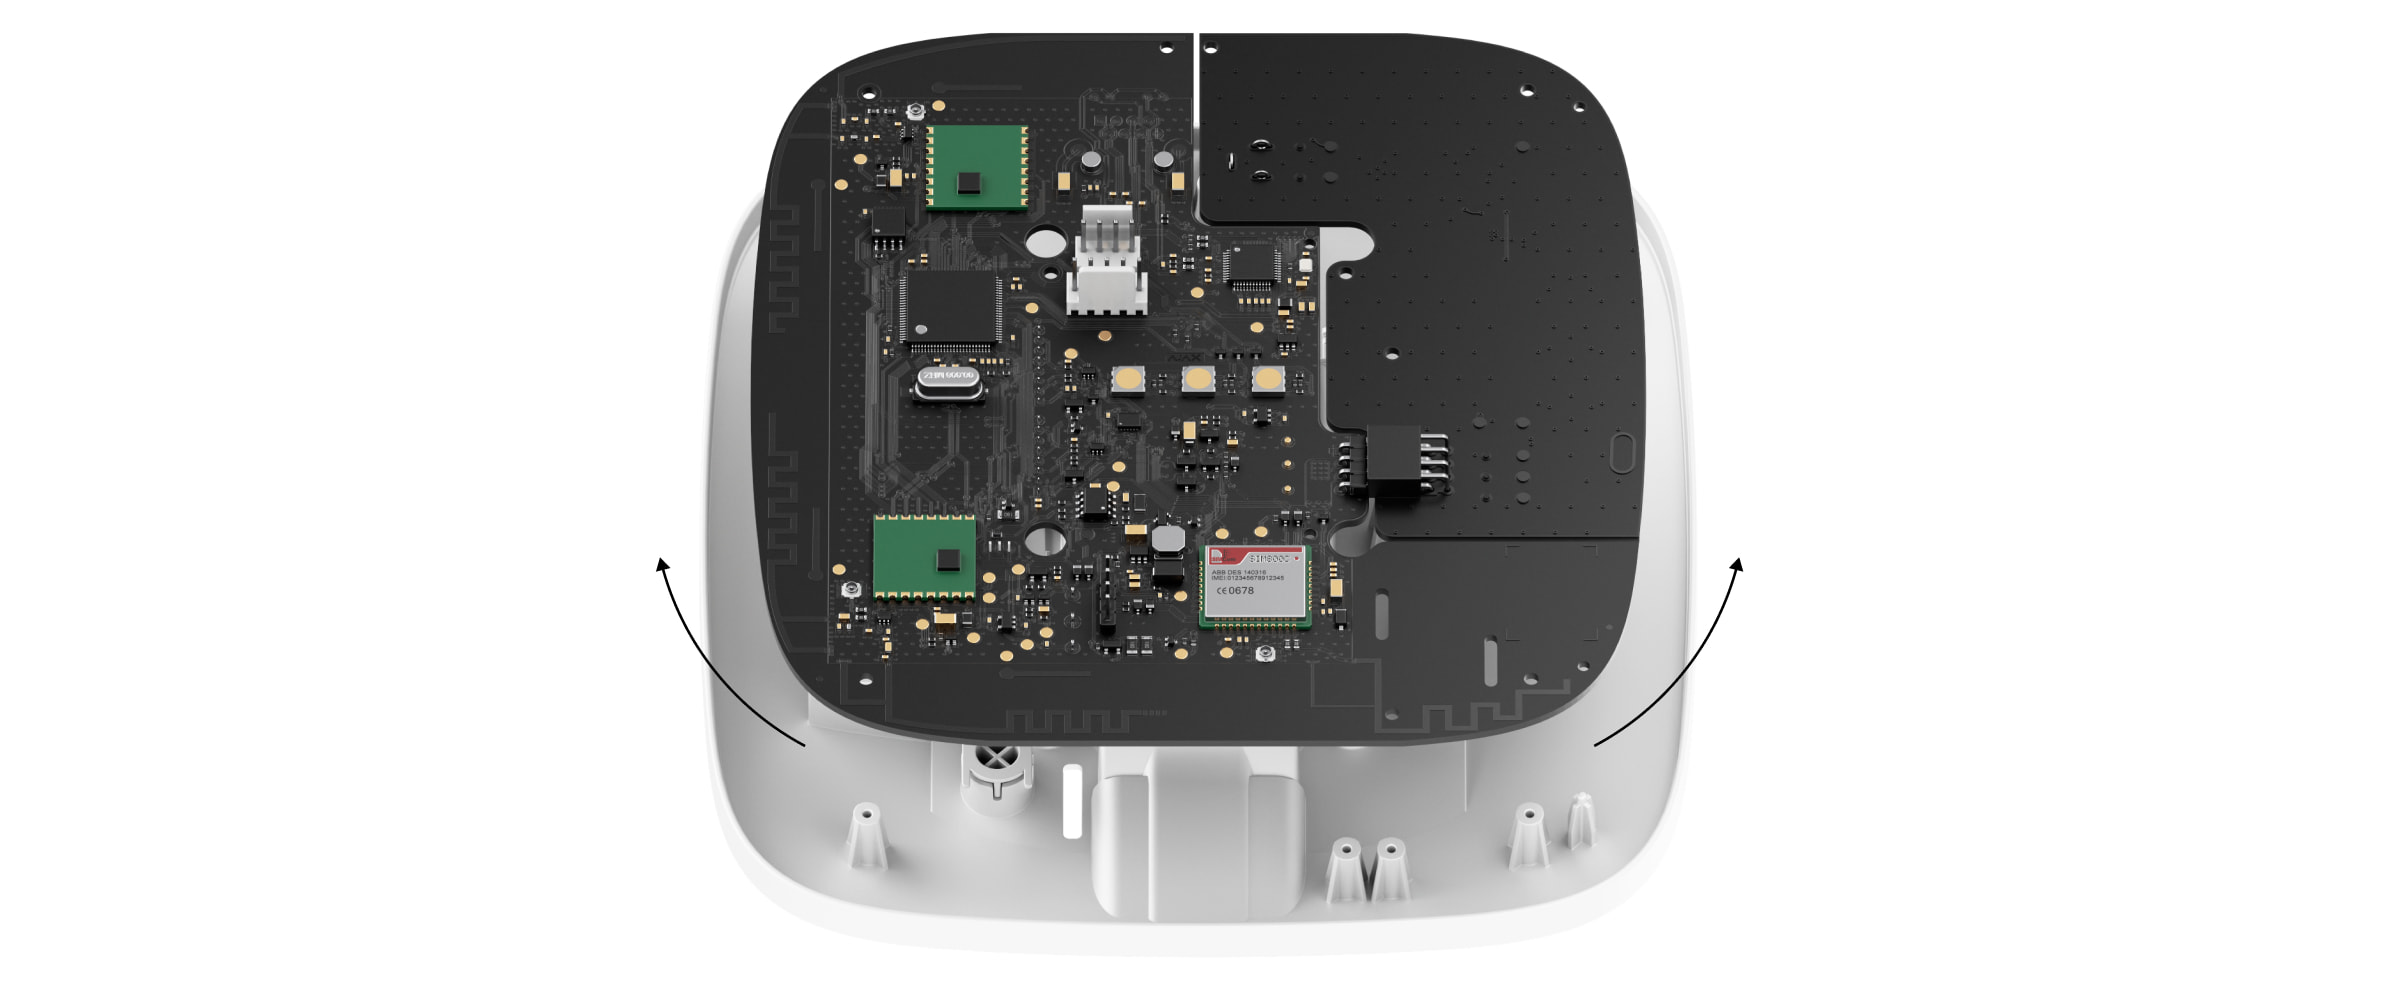
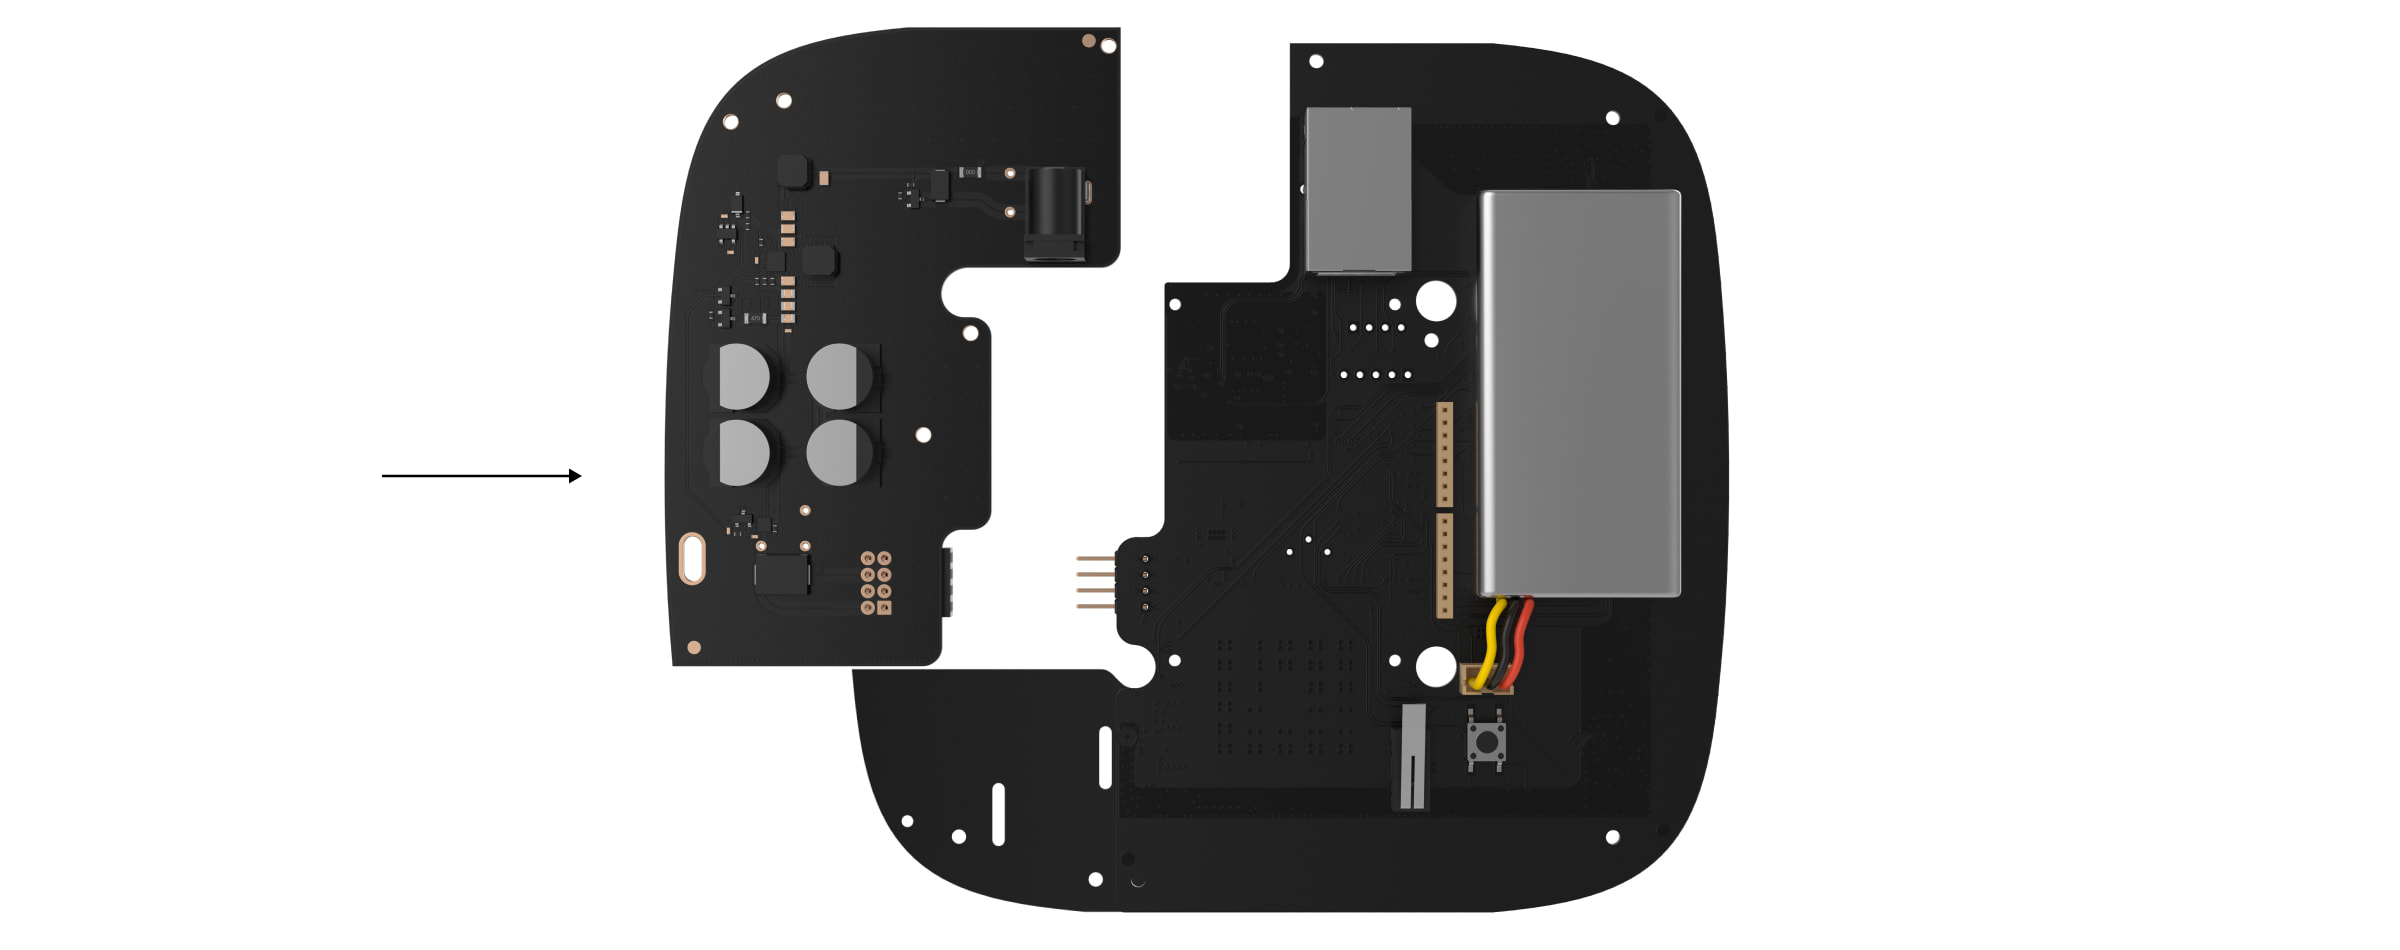
12V PSU for Hub 2/ReX 2is a power supply unit, connecting theHub 2control panels to 12 volt DC sources. This is an electronic board, replacing the standard 110/230 V power supply unit in the body of the device.
12V PSU for Hub 2/ReX 2 should be installed by a qualified electrician only.
Before installing the power supply, make sure that the device is disconnected from the mains.
When installing the 12V PSU for Hub 2/ReX 2, follow the general electrical safety rules, as well as the requirements of electrical safety regulatory acts. Never disassemble the device while it is under voltage!
Installation process:
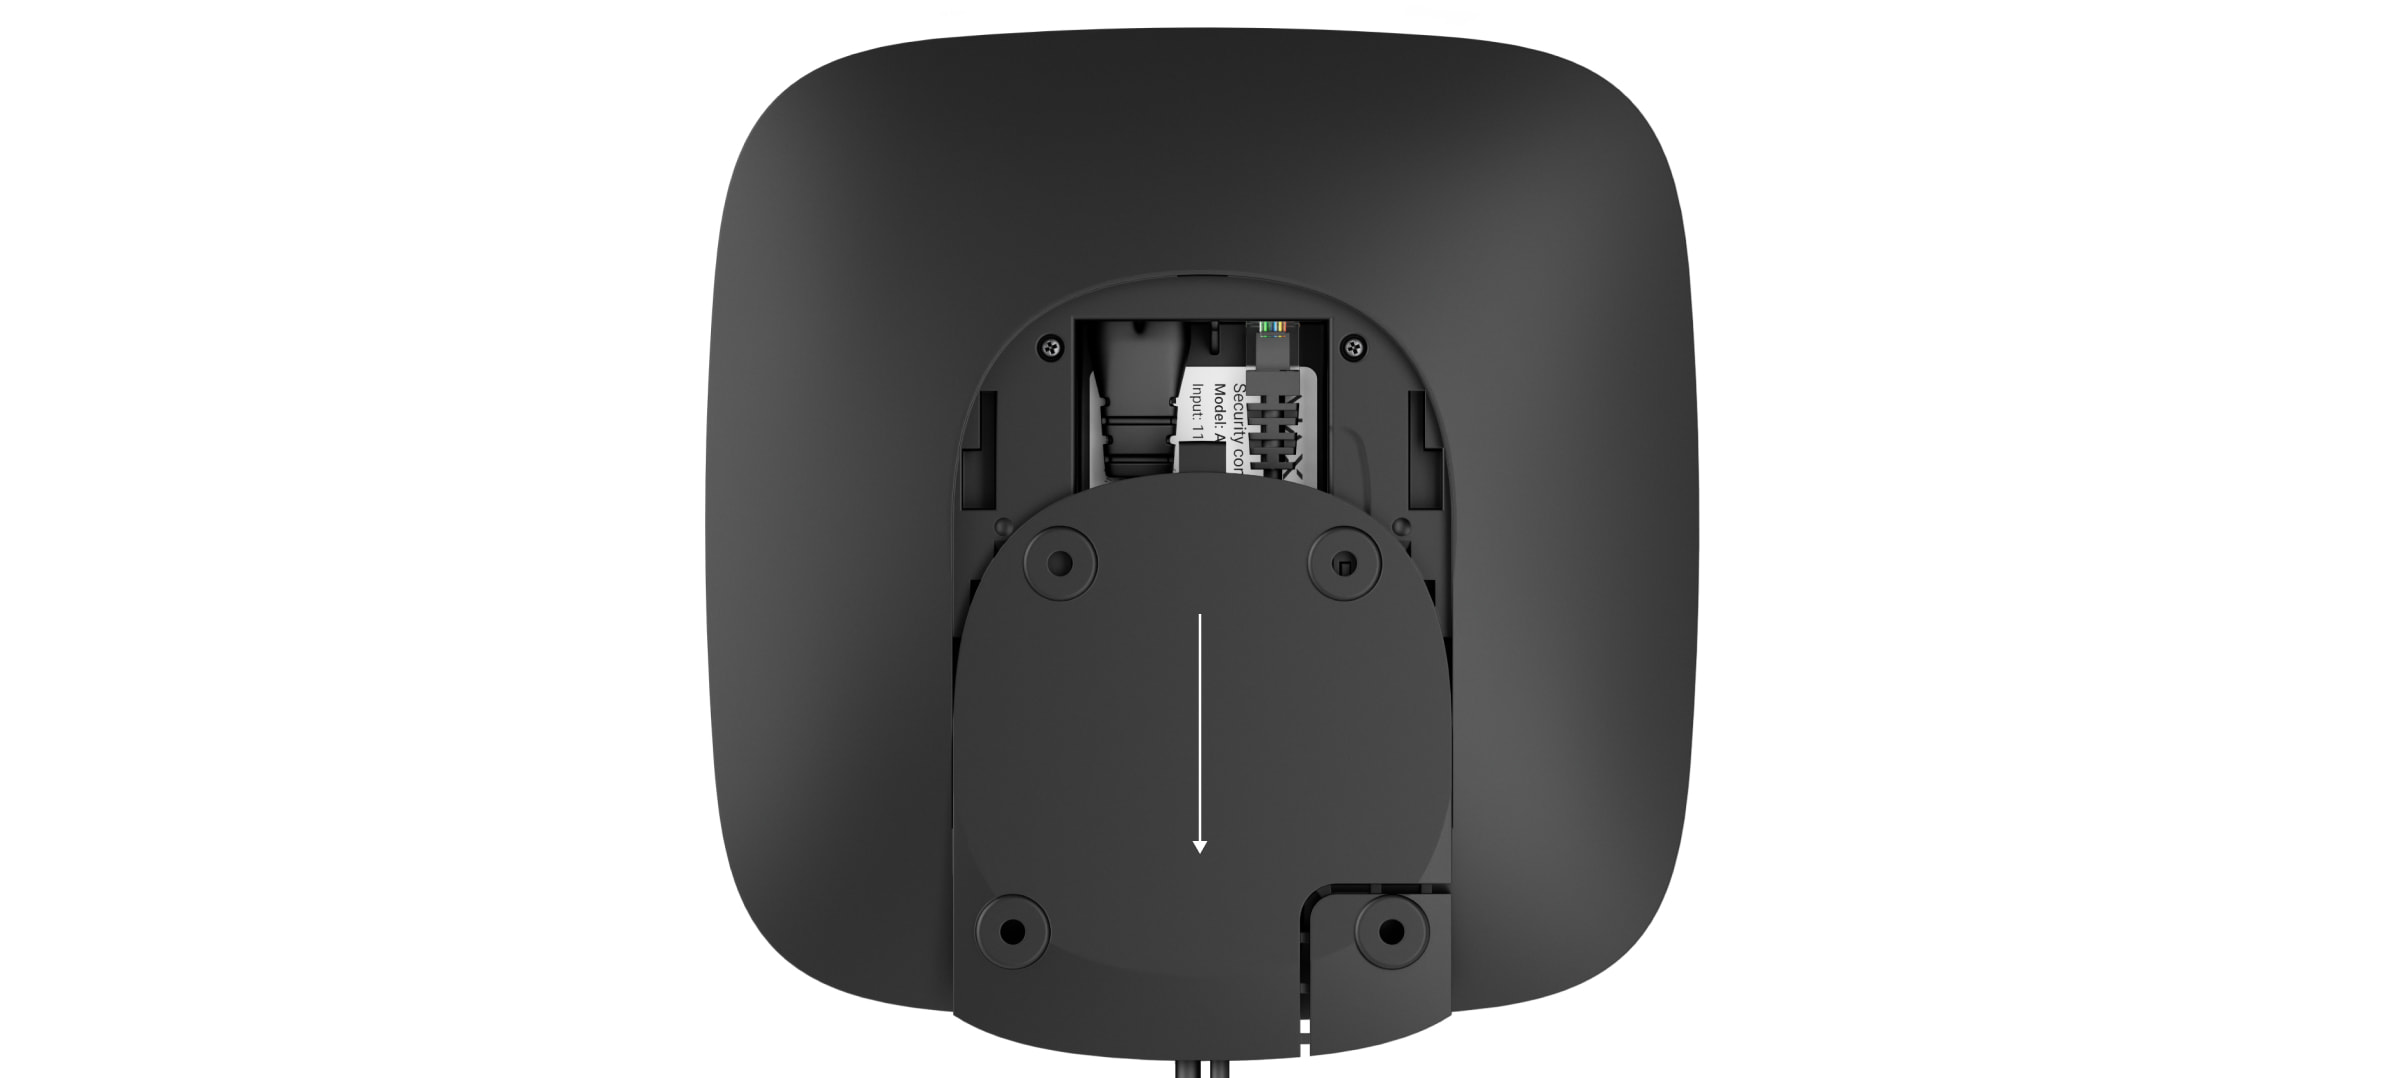
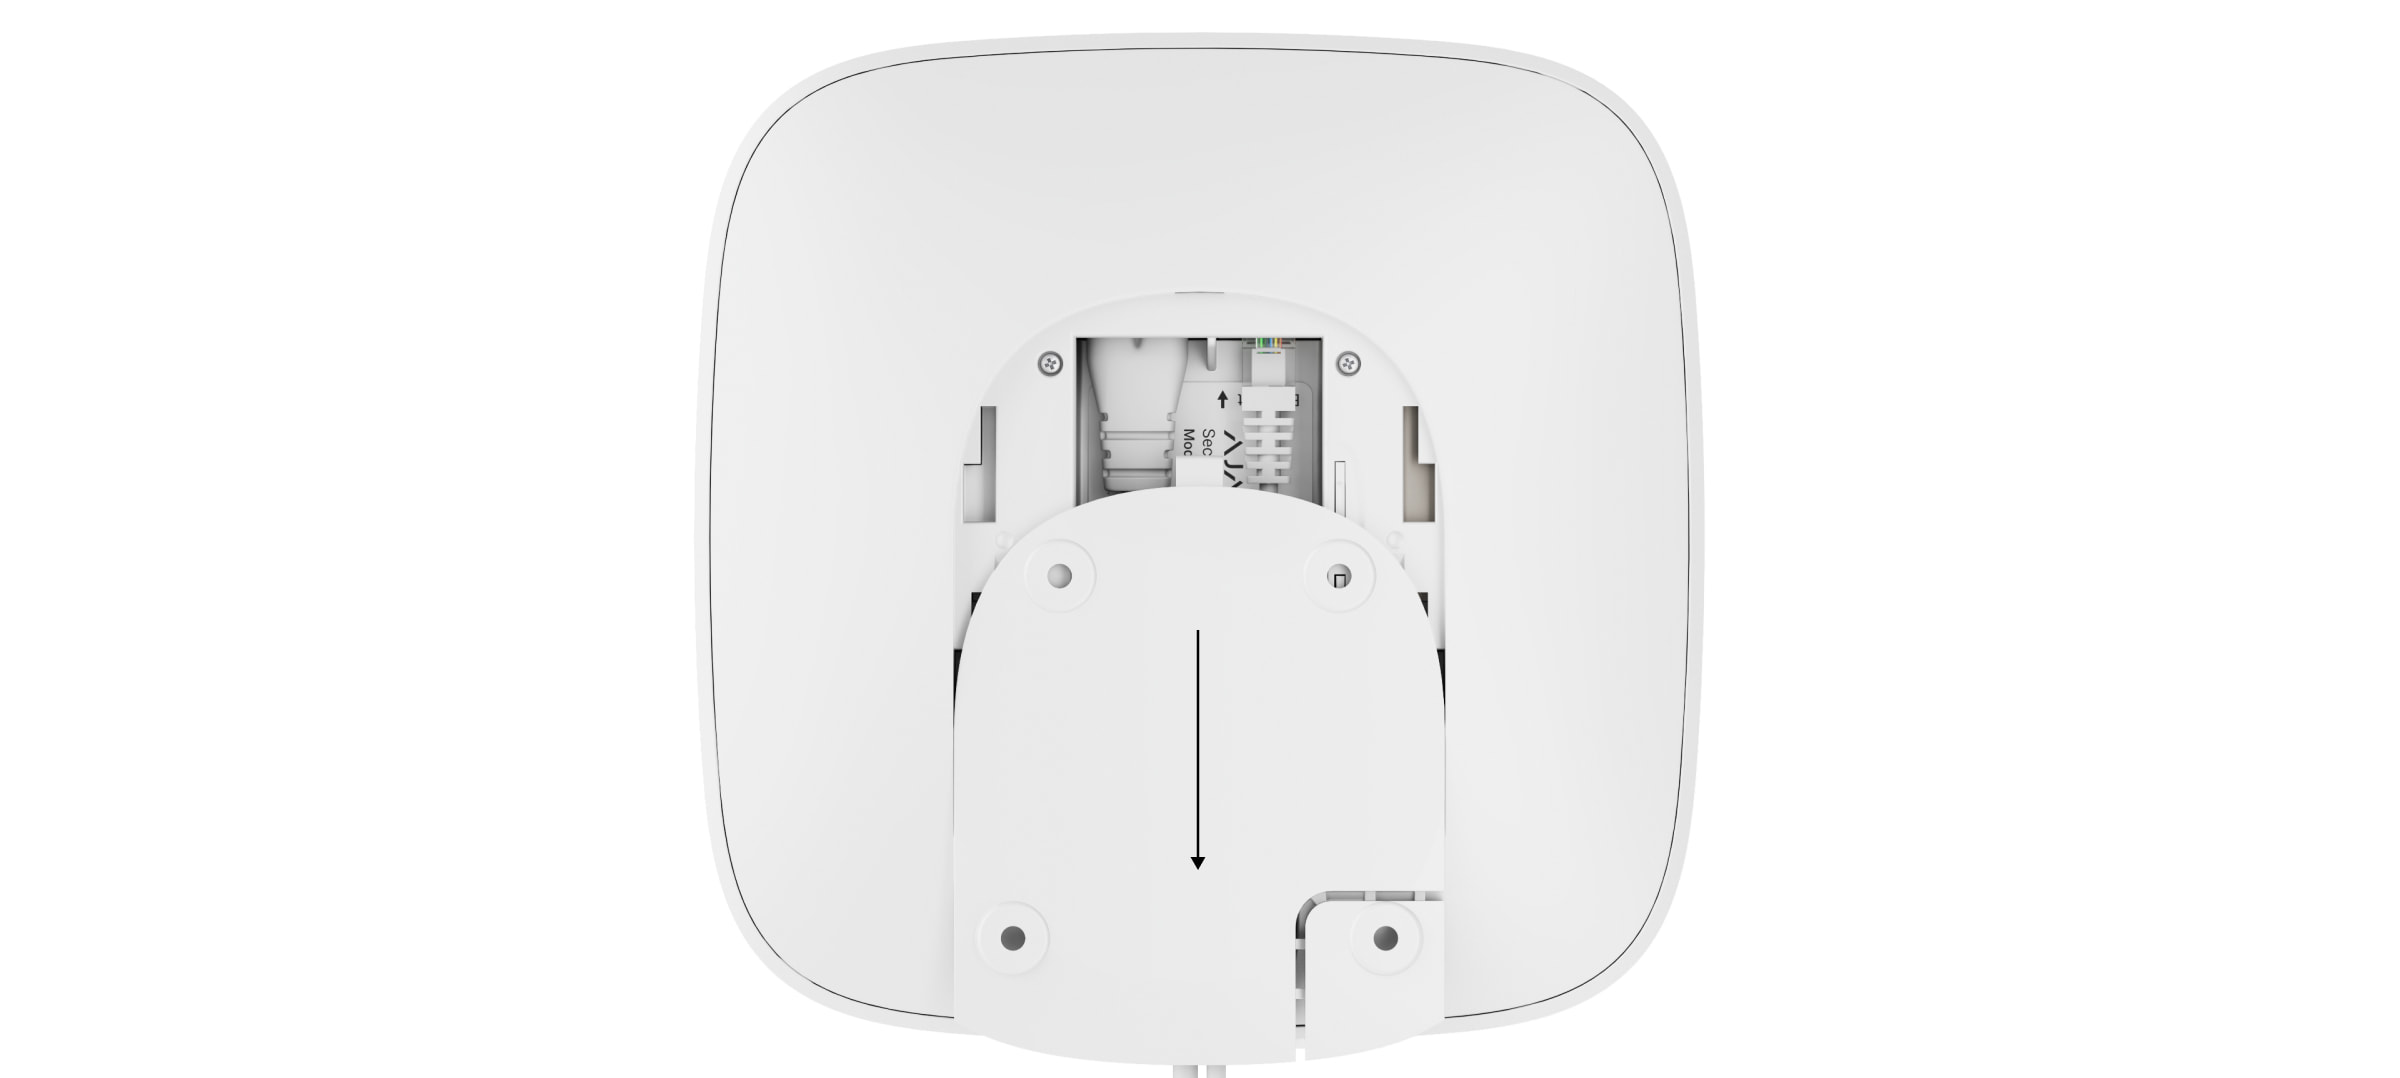
Remove the screws and take off the device from the SmartBracket mounting panel, shifting it down with force.
Switch off the device holding the power button for 2 seconds.
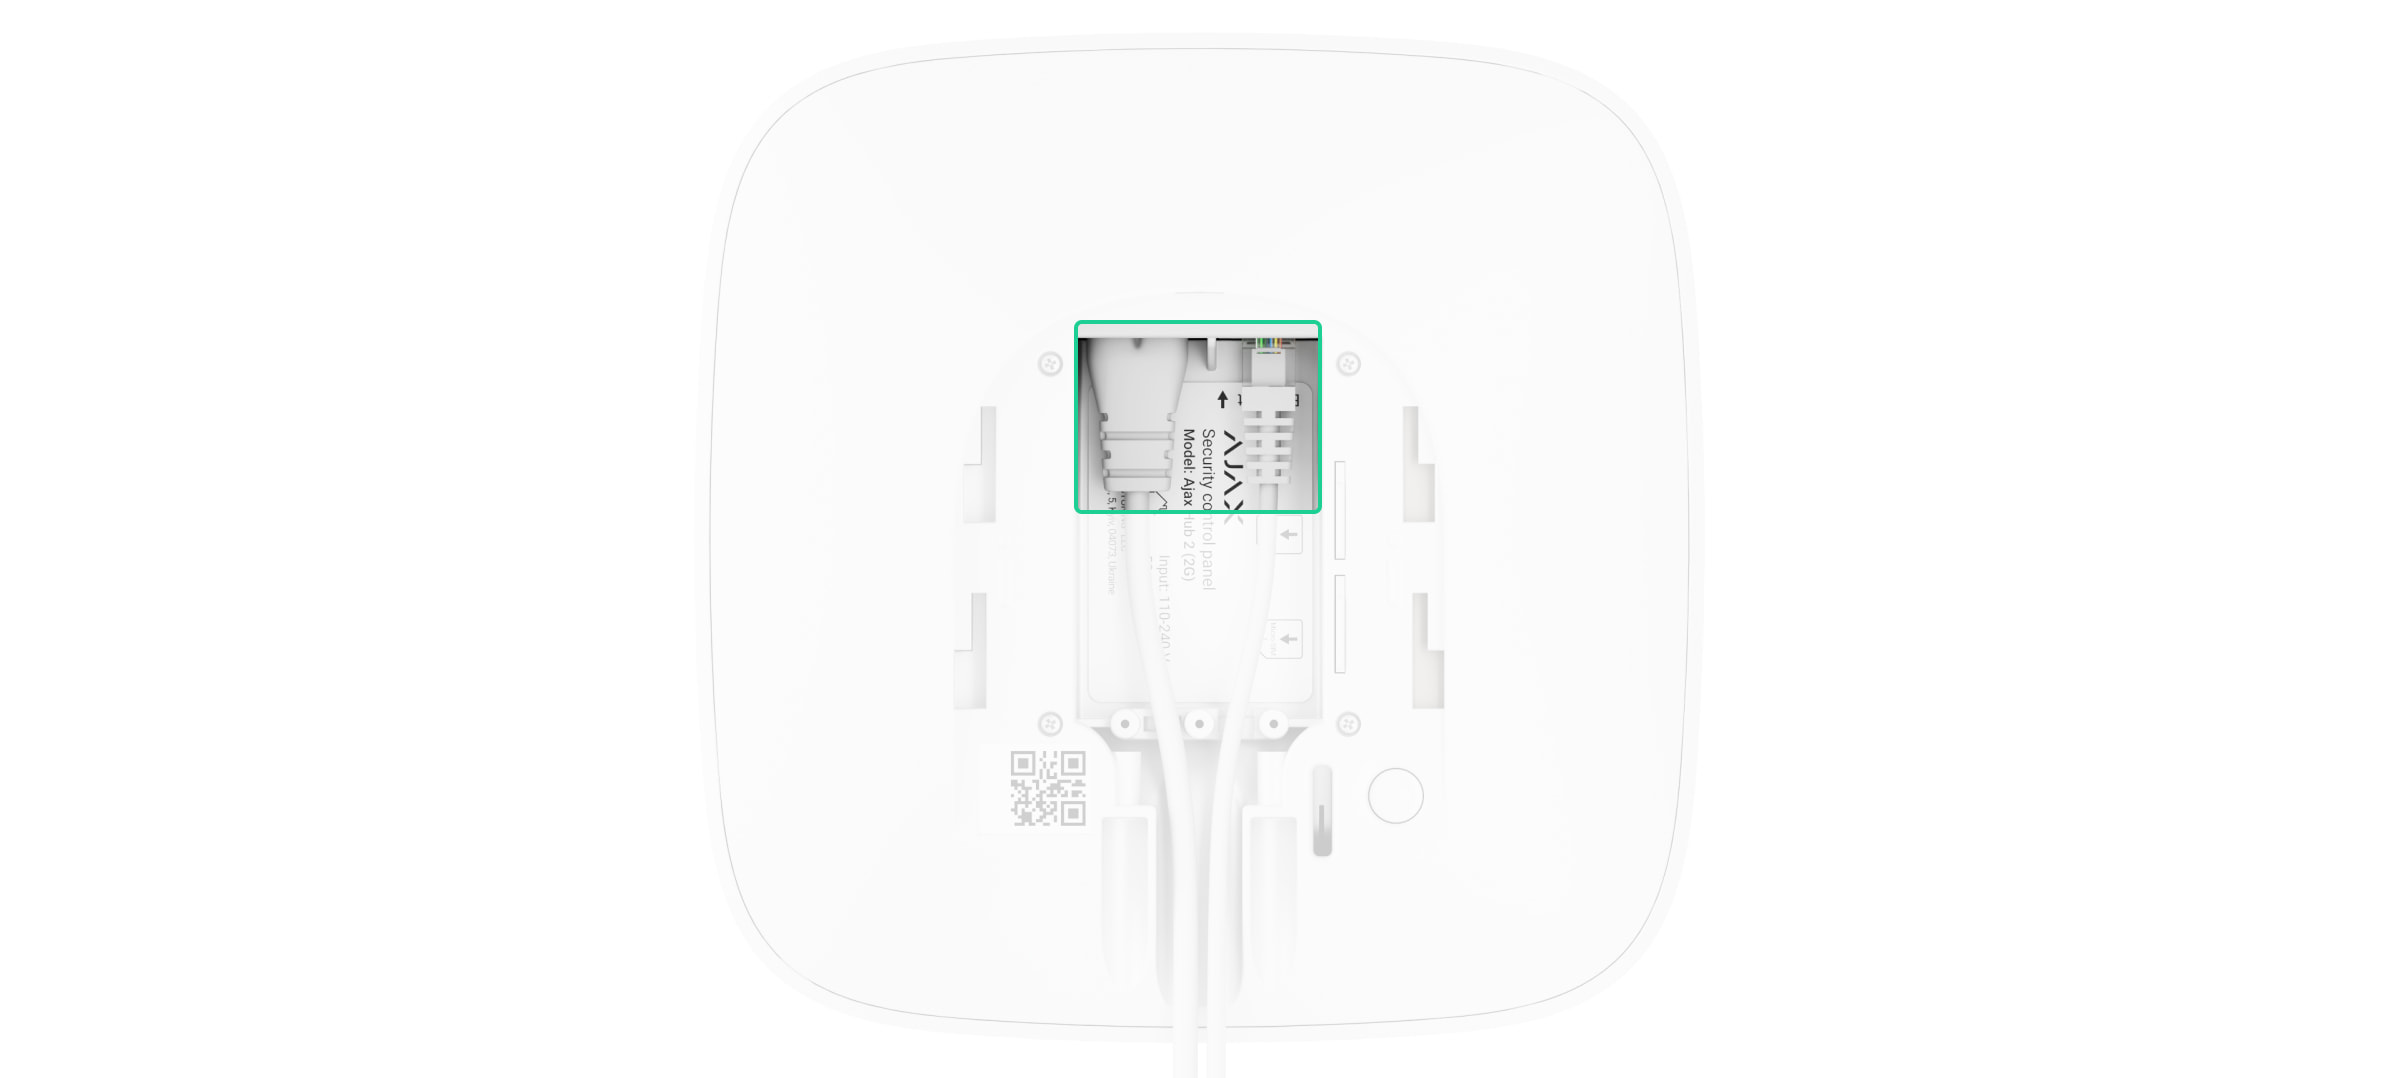
Disconnect power and Ethernet cables.
Wait 5 minutes for the capacitors to discharge.
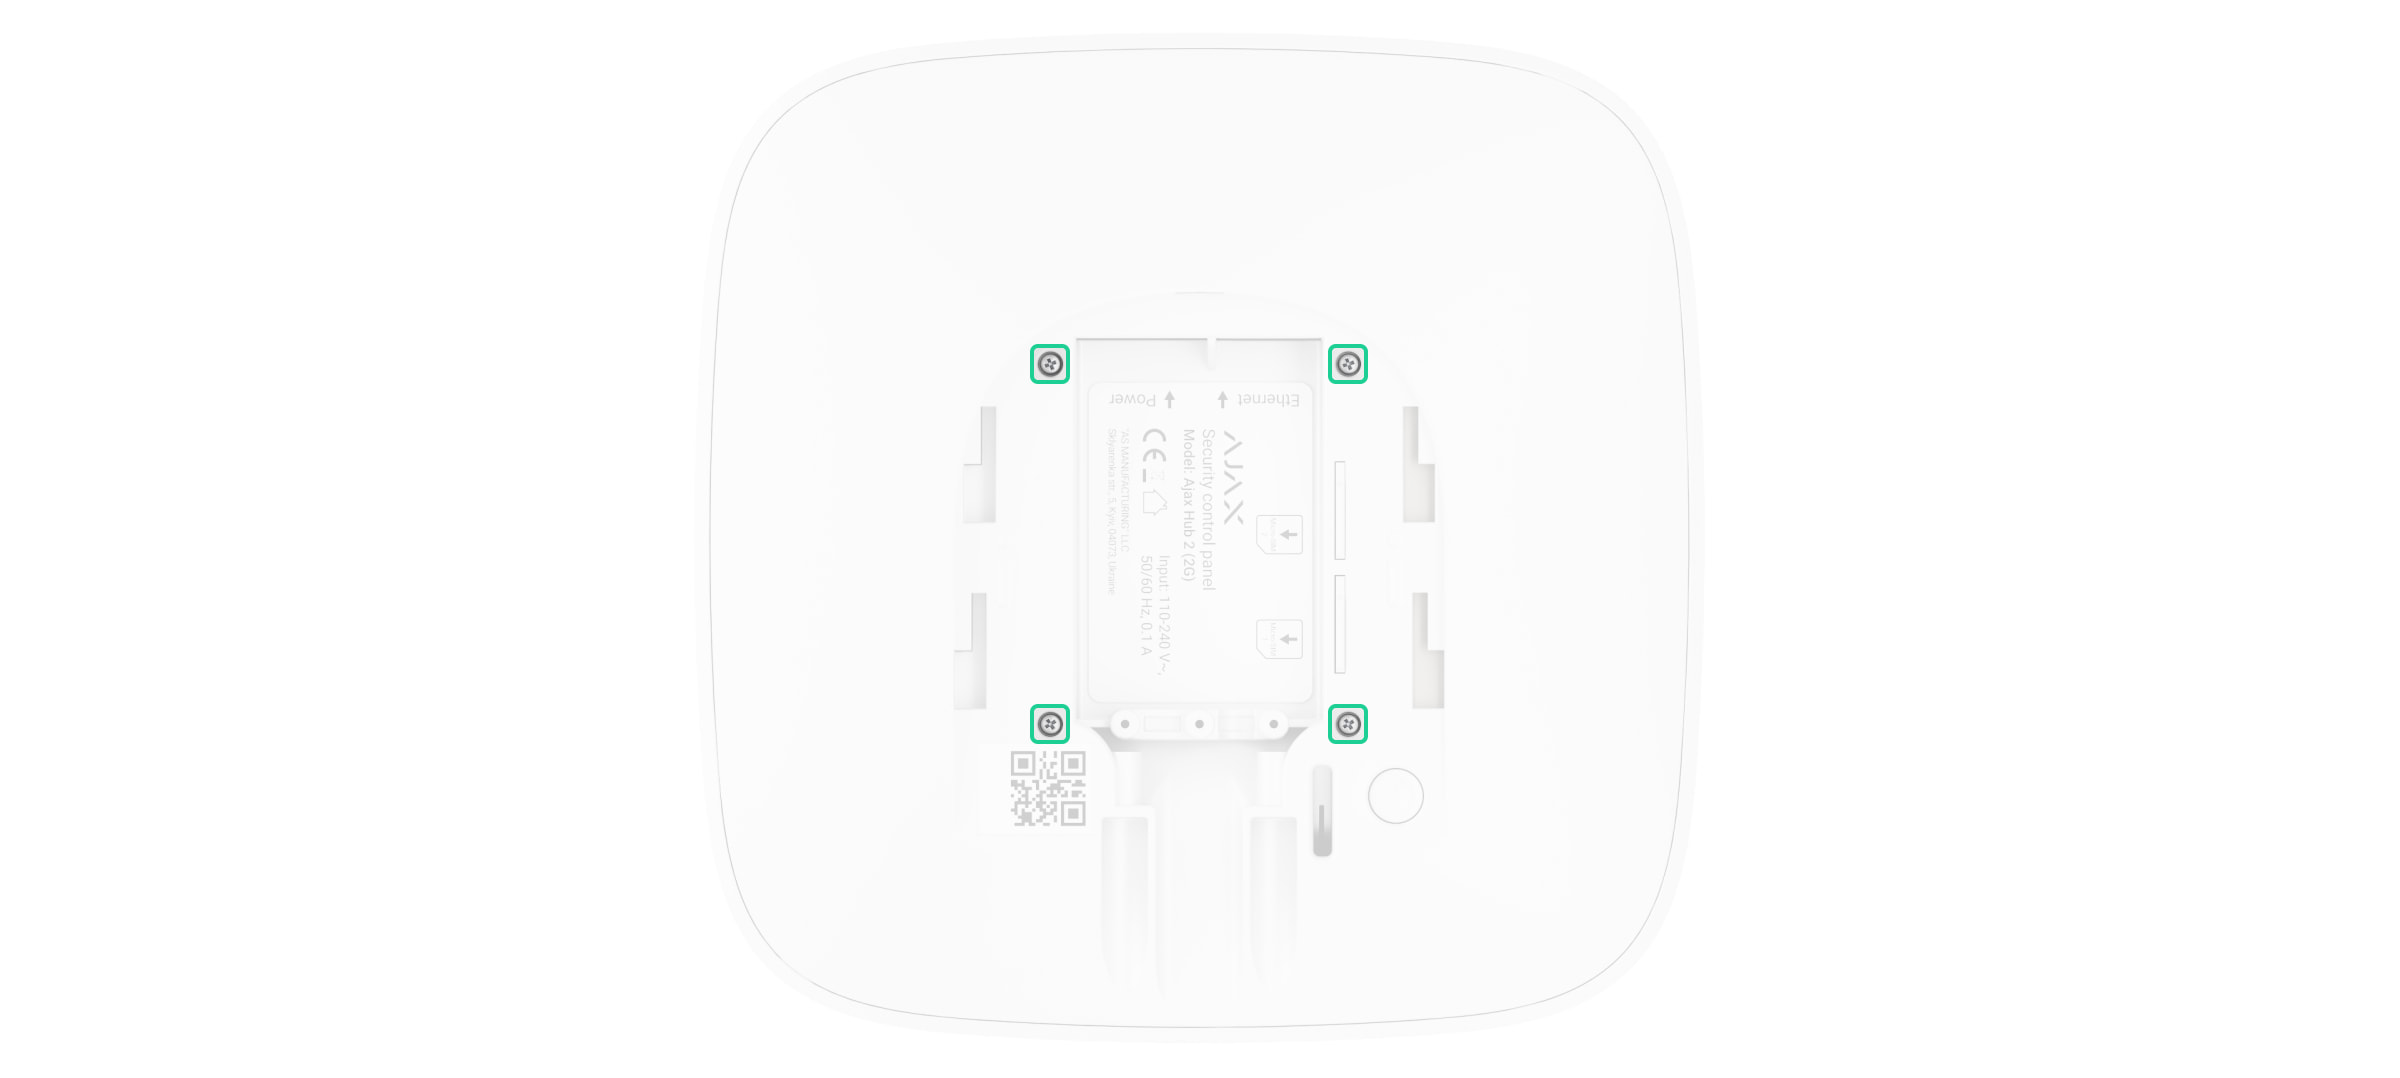
Remove four screws of the back lid and take it off.
Remove the screws attaching the boards to the device body.
Carefully remove both boards, keeping them in the same plane and not disconnecting them. There is a connector between boards: do not break it.
Disconnect the power supply unit (smaller board) from the mainboard.
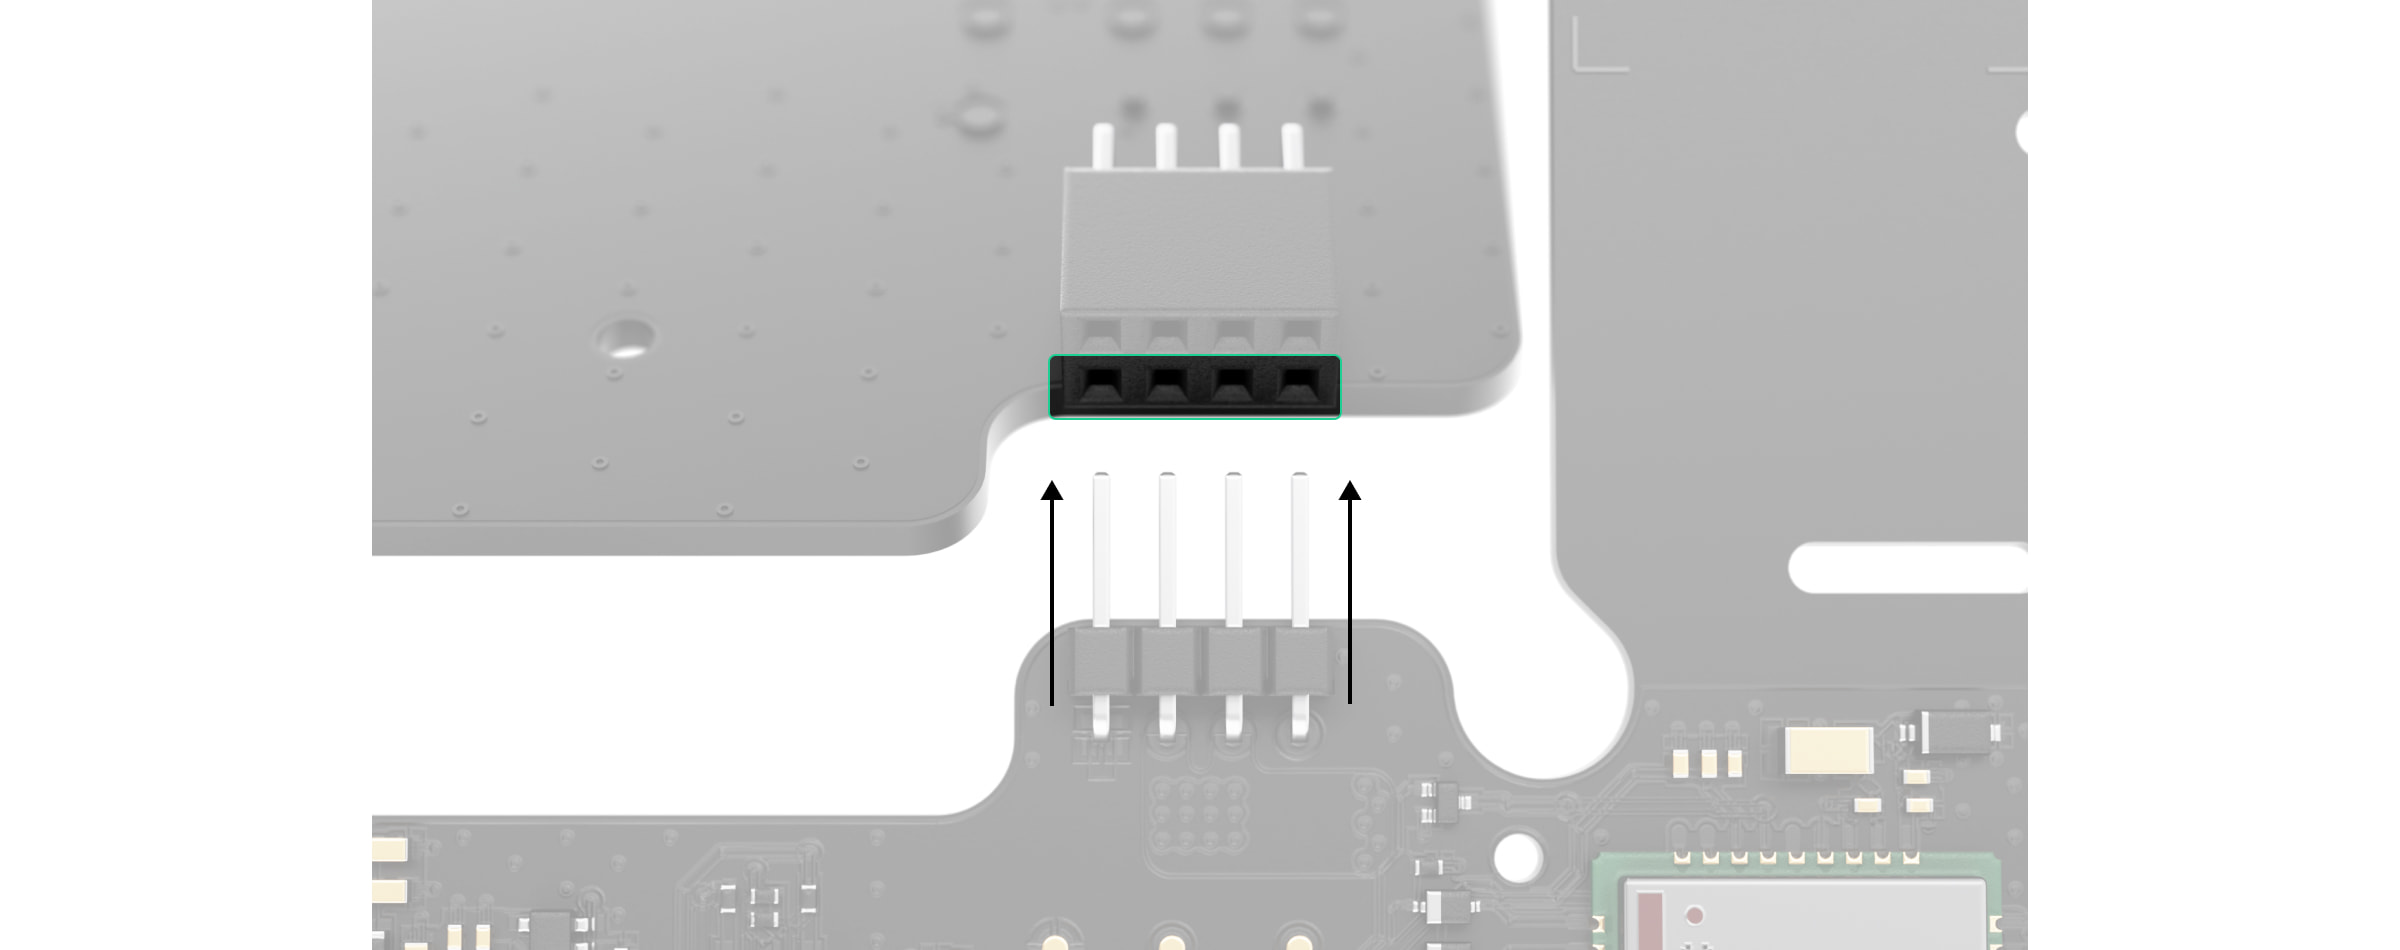
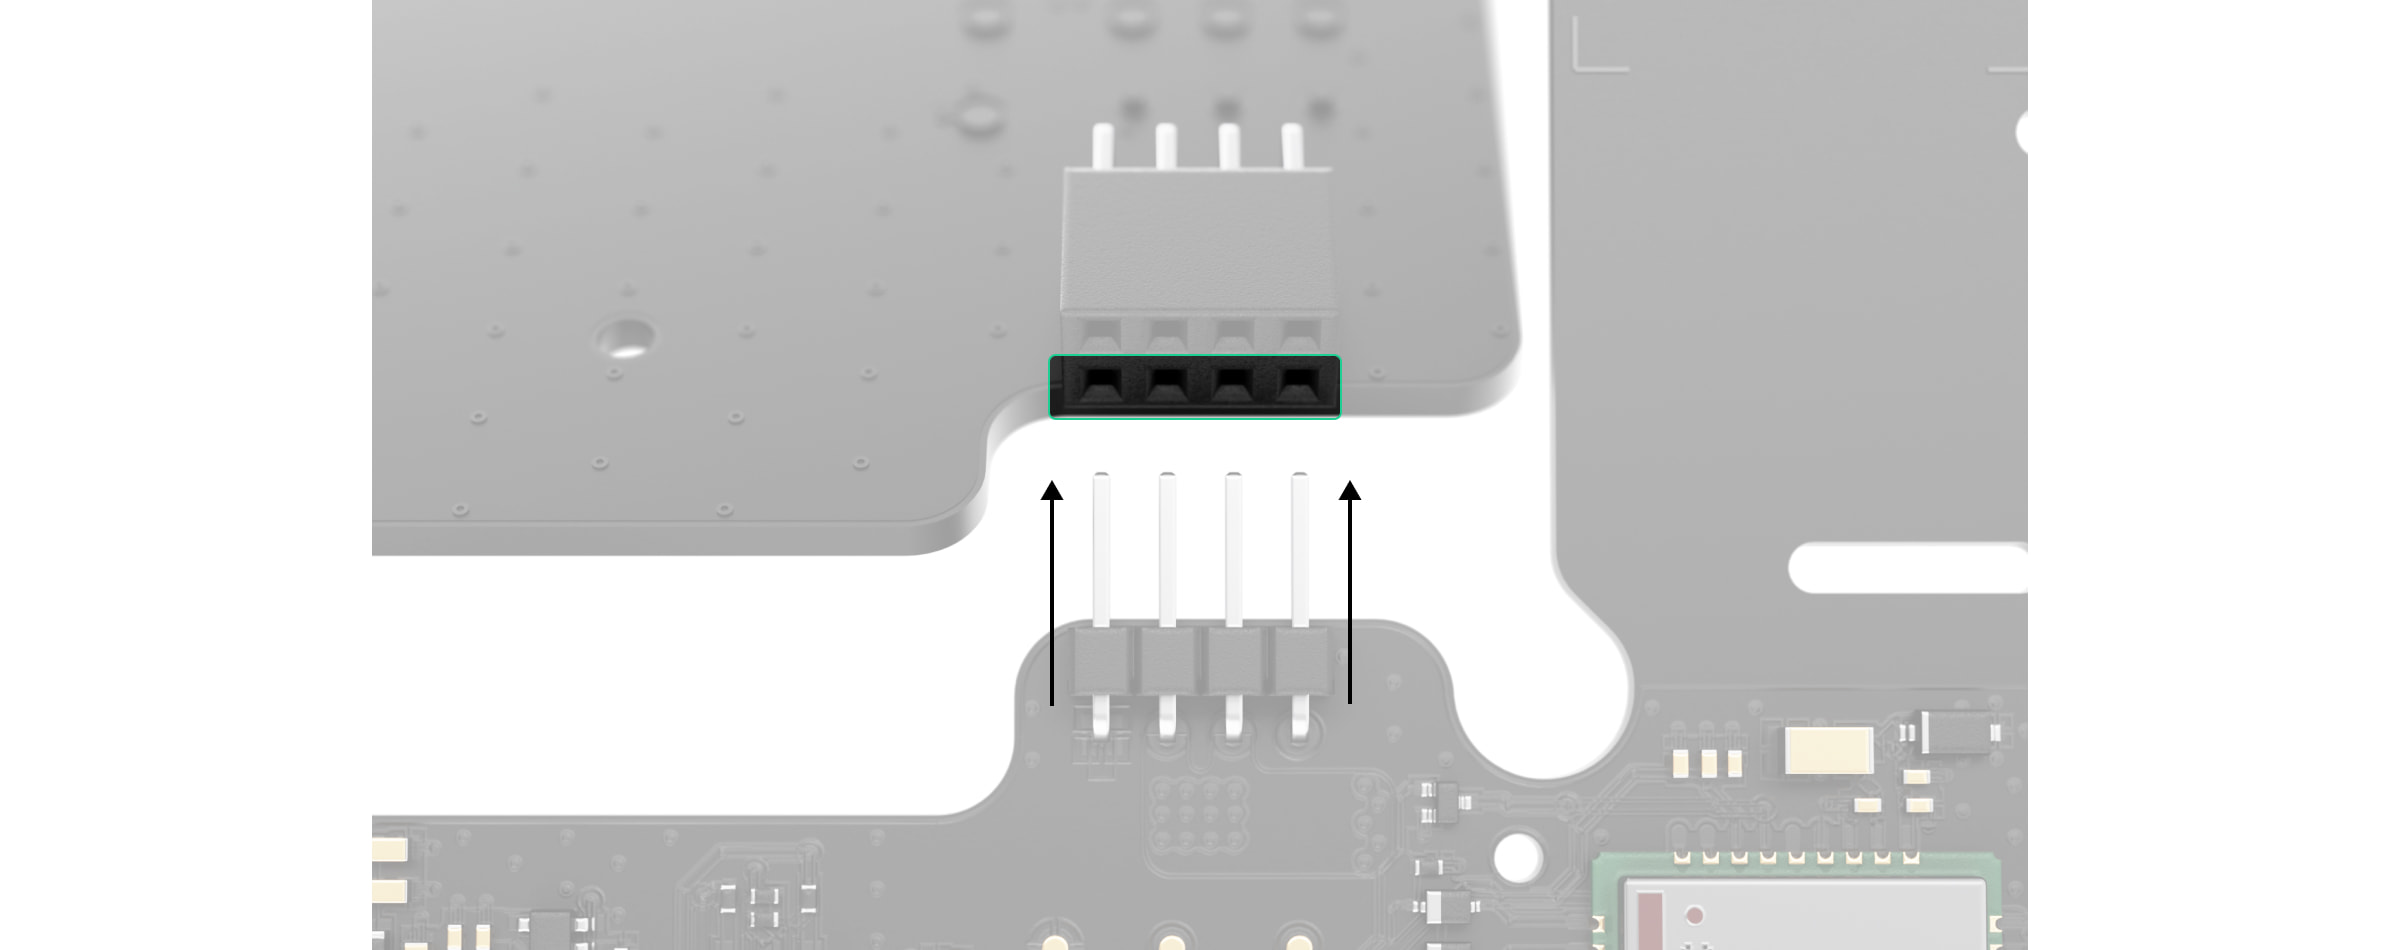
Connect 12V PSU for Hub 2/ReX 2 to the mainboard using the eight-pin connector between them. Do not warp or bend the antennas while replacing the board: this can cause the device to malfunction.
Please note: the board contacts should be plugged in the bottom row of the connector (closest to the board). When connected correctly, the boards are on the same level.
Reassemble the boards and the device body than tighten the screws.
Check that the battery and its cables are not clamped. When installed properly, the boards stand firmly on all guides and do not stagger. Holding the boards together with the back lid, turn the device over. The SIM card slot, power, and Ethernet sockets should match accurately and fit the corresponding sockets, and the power button should not be stuck. Change the information about input voltage on the device body to avoid incorrect power connections in the future. Use the special bundled sticker with the instruction.
Connect the power (and Ethernet cable) to the appropriate sockets.
Switch on the 12 V power source.
Do not connect the power cable with a voltage that exceeds the acceptable input voltage.
Switch on the device by holding the power button for 2 seconds.
Close and fix the SmartBracket mounting panel.
Switch on the device, wait until loading, and check the external power status in the Ajax app. If there is no power, and you are using a terminal adapter, check the polarity of the connected wires. If there is no power even after reconnecting, please contact the Support Service.
Maintenance
The device does not require technical maintenance.
12V PSU for Hub/Hub Plus/ReXis a power supply unit, connecting the Hub/Hub Plus control panels as well as the ReX radio signal extender to 12 volt DC sources. This is an electronic board, replacing the standard 110/230 V power supply unit in the body of the device.
12V PSU for Hub/Hub Plus/ReX should be installed by a qualified electrician only.
Before installing the power supply, make sure that the device is disconnected from the mains.
When installing the 12V PSU for Hub/Hub Plus/ReX, follow the general electrical safety rules, as well as the requirements of electrical safety regulatory acts. Never disassemble the device while it is under voltage!
Installation process:
Remove the screws and take off the hub or range extender from the SmartBracket mounting panel, shifting the device up.
Switch off the hub or range extender holding the power button for 2 seconds.
Disconnect power and Ethernet cables.
Wait 5 minutes for the capacitors to discharge.
Remove four screws of the back lid and take it off.
Remove the screws attaching the boards to the device body.
Carefully remove both boards, keeping them in the same plane and not disconnecting them. There is a connector between boards: do not break it.
Disconnect the power supply unit (smaller board) from the mainboard.
Connect 12V PSU Hub/Hub Plus/ReX to the mainboard using the eight-pin connector between them. Do not warp or bend the antennas while replacing the board: this can cause the device to malfunction.
Reassemble the boards and the device body than tighten the screws.
Check that the battery and its cables are not clamped. When installed properly, the boards stand firmly on all guides and do not stagger. Holding the boards together with the back lid, turn the device over. The SIM card slot, power, and Ethernet sockets should match accurately and fit the corresponding sockets, and the power button should not be stuck.
Change the information about input voltage on the device body to avoid incorrect power connections in the future. Use the special bundled sticker with the instruction included in the set.
Connect the power (and Ethernet cable) to the appropriate sockets.
Switch on the power source to the hub or range extender.
Do not connect the power cable with a voltage that exceeds the acceptable input voltage 12V PSU for Hub/Hub Plus/ReX.
Switch on the device by holding the power button for 2 seconds.
Close and fix the SmartBracket mounting panel.
Switch on the device, wait until loading, and check the external power status in the Ajax app. If there is no power, and you are using a terminal adapter, check the polarity of the connected wires. If there is no power even after reconnecting, pleasecontact the Ajax Support Service.
Maintenance
The device does not require technical maintenance.
AJAX Relejs12V iekārtu attālinātai vadībai. Darbojas tikai ar kādu no AJAX Hub.
Uzstādot un ekspluatējot elektroierīces, ievērojiet vispārīgos elektrodrošības noteikumus, kā arī elektrodrošības noteikumu prasības.
Releja pievienošana centrmezglam aizņem mazāk nekā minūti — pietiek, lai skenētu QR kodu ar Ajax lietotni. Miniatūra ierīce (39×33×18 mm) viegli iekļaujas sadales kārbā, elektriskajā panelī vai komutācijas bloka korpusā ar DIN turētāju. Un elastīgā ārējā antena nodrošina stabilu savienojumu.
Iestatījumu daudzpusība un zems enerģijas patēriņš padara releju par universālu rīku aprīkojuma vadībai. Sausais kontakts nav galvaniski pieslēgts ierīces barošanas avotam, lai to varētu izmantot gan zemsprieguma, gan sadzīves tīklos. Releju var viegli savienot ar barošanas bloku, kas savienots pārī ar rezerves akumulatoru.
Modernie elektriskie vārti un barjeras ir aprīkoti ar tālvadības pulti. Tas sastāv no kontroliera un vadības ierīcēm, piemēram, tālvadības pults. Kontrolieris saņem komandas no vadības ierīcēm un aktivizē vārtu vai barjeras atvēršanas/aizvēršanas mehānismu.
Lai integrētu ar Ajax, kontrollerim ir jābūt vadības ieejai vadu pogu un releju pievienošanai. Šādas ievades neesamība neaizkavē savienojumu, taču tas ievērojami sarežģī procesu – relejs būs jāpievieno tieši pie diska vai kontrollera plates. Tāpat kontrolierim var būt nestandarta vadības ieeja vai īpaši vadības un darbības režīmi, kas arī jāņem vērā integrējot.
Informācijas sūtīšana par vārtu/barjeras stāvokli (“aizvērts” un “atvērts”) uz Ajax lietotni ir iespējama, ja kontrollerim ir statusa izvade.
Ajax 6V Barošanas bloks priekš Hub 2/Hub 2 Plus/ReX 2
SKU: 367304808
€23,51€29,97
Vienības cena
6V PSU (type A) user manual
Updated
6V PSU (type A)is an alternative power supply unit to connect an Ajax hub or range extender to 6 V⎓ sources. This is an electronic board, replacing the standard 110/230 V⎓ power supply unit in the body of the device.
6V PSU (type A) should be installed by a qualified electrician only.
Before installing the power supply, ensure the device is disconnected from the mains.
When installing the 6V PSU for Hub 2/Hub 2 Plus/ReX 2, follow the general electrical safety rules, as well as the requirements of electrical safety regulatory acts. Never disassemble the device while it is under voltage!
Installation process:
Remove the screws and take off the device from the SmartBracket mounting panel, shifting it down with force. If the hub or range extender is installed on a surface, move it upwards.
Switch off the device holding the power button for 2 seconds.
Disconnect power and Ethernet cables.
Wait 5 minutesafter switching off for the capacitors to discharge.
Remove four screws of the back lid and take it off.
Remove the screws attaching the boards to the device body.
Carefully remove both boards, keeping them in the same plane and not disconnecting them. There is a connector between boards: do not break it.
Disconnect the power supply unit (smaller board) from the mainboard.
Connect 6V PSU (type A) to the mainboard using the eight-pin connector between them. Do not warp or bend the antennas while replacing the board: this can cause the device to malfunction.
Please note: the board contacts should be plugged in the bottom row of the connector (closest to the board). When connected correctly, the boards are on the same level.
Reassemble the boards and the device body then tighten the screws.
Check that the battery and its cables are not clamped. When installed properly, the boards stand firmly on all guides and do not stagger. Holding the boards together with the back lid, turn the device over. The SIM card slots, power, and Ethernet sockets should match accurately and fit the corresponding sockets, and the power button should not be stuck.
Check the information about input voltage on the device body to avoid incorrect power connections in the future. Use the special bundled sticker with the instruction.
Connect the power (and Ethernet cable) to the appropriate sockets.
Switch on the 6V⎓ power source.
Do not connect the power cable with a voltage that exceeds the acceptable input voltage.
Switch on the device by holding the power button for 2 seconds.
Install the hub or range extender onthe SmartBracket mounting panel.Fix the device.
Switch on the device, wait until loading, and check the external power status in the Ajax app. If there is no power, and you are using a terminal adapter, check the polarity of thepower cable. If there is no power even after reconnecting, pleasecontact the Support Service.
We recommend using zinc-air alkaline batteries for long-term autonomous operation. Before connecting such a battery, make sure that all the stickers have been removed, and valves capping the air access are open. If possible, leave the battery with access to air for up to 2 hours. This will start a chemical reaction inside and ensure proper functioning.
{"id":55844753211727,"title":"Default Title","option1":"Default Title","option2":null,"option3":null,"sku":"External Antenna black","requires_shipping":true,"taxable":true,"featured_image":null,"available":true,"name":"AJAX Antena LTE vai radio sakariem, Standarta SMA savienotājs, Vadu komunikācija līdz 3 m attālumā, Uzstādīšana, izmantojot abpusējo līmlenti","public_title":null,"options":["Default Title"],"price":2181,"weight":0,"compare_at_price":2781,"inventory_management":"shopify","barcode":null,"requires_selling_plan":false,"selling_plan_allocations":[],"quantity_rule":{"min":1,"max":null,"increment":1}}
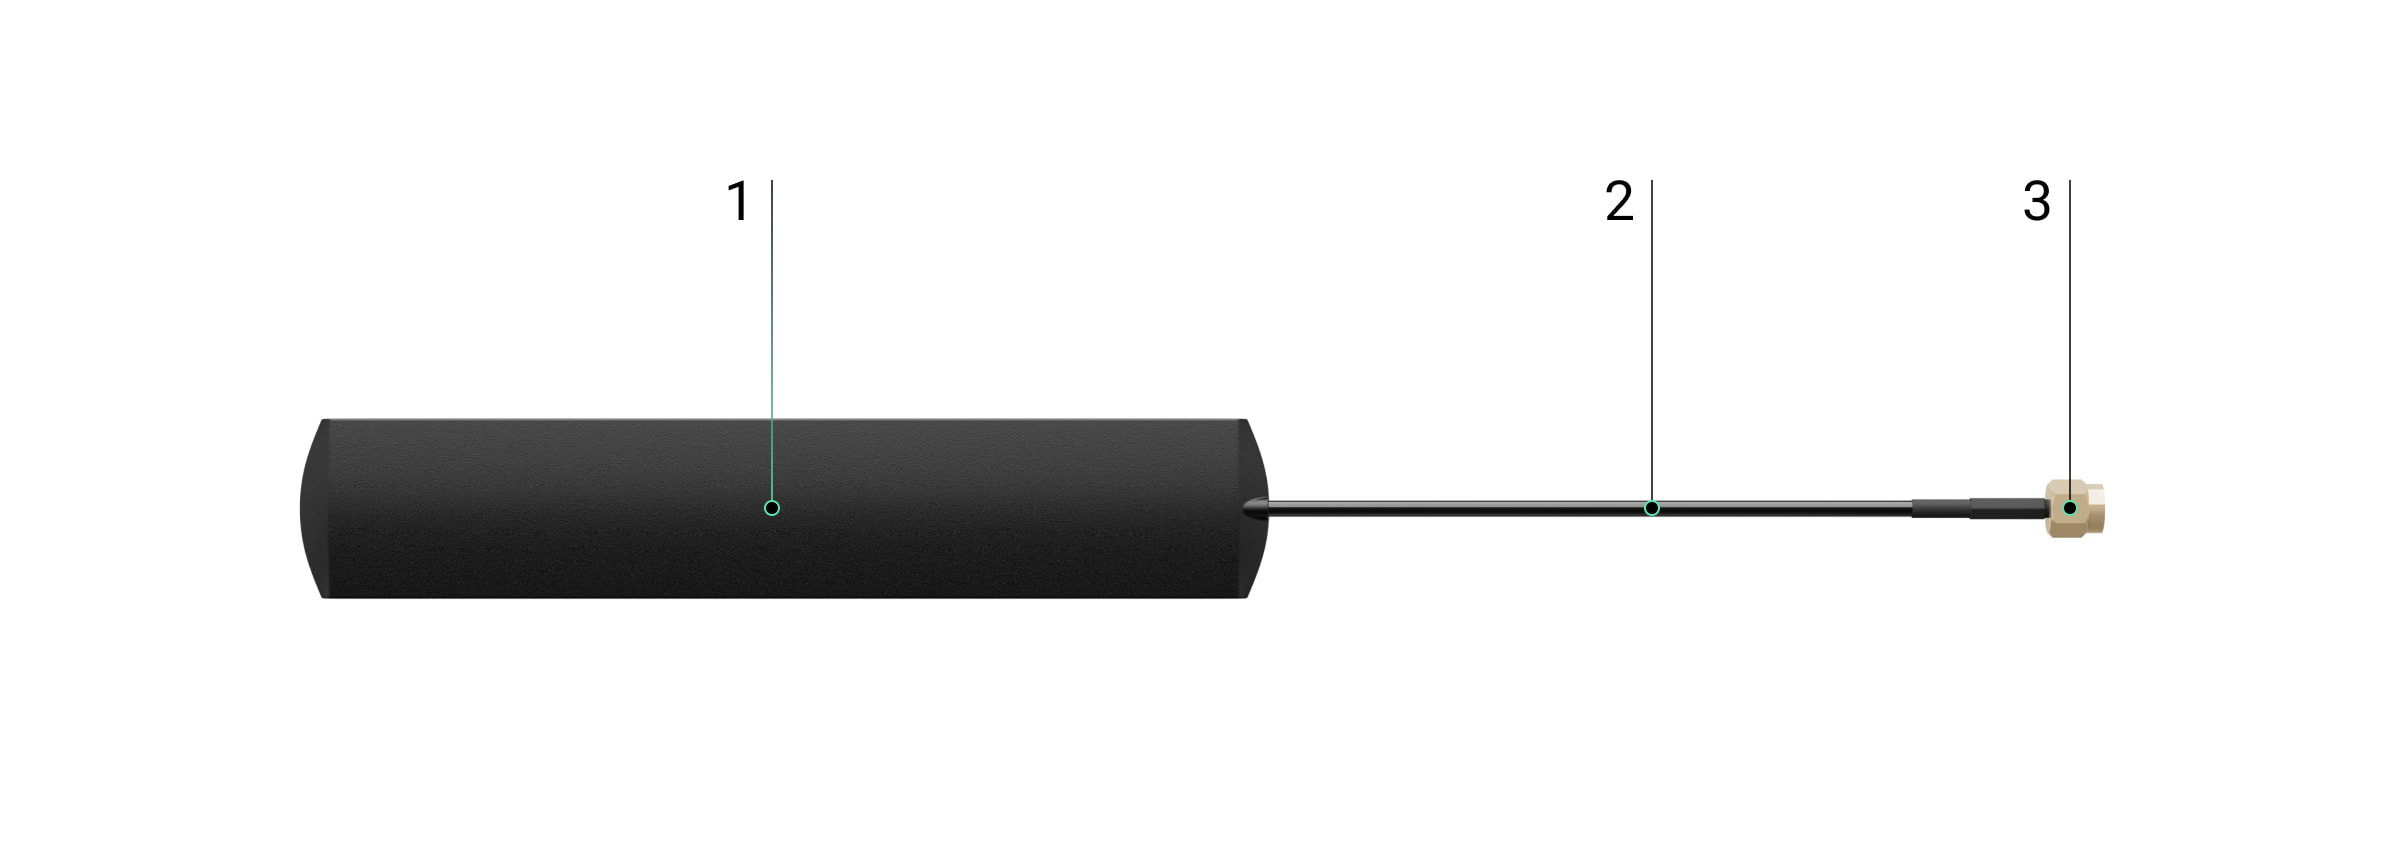
Antena. Koaksiālais kabelis. SMA savienotājs (vīriešu).
Saderīgie hubi
Lai antena darbotos, nepieciešams saderīgs Ajax hub.
Ierīce ir saderīga ar:
Hub BP Jeweller
ExternalAntenna tiek pārdota atsevišķi.
Darbības princips
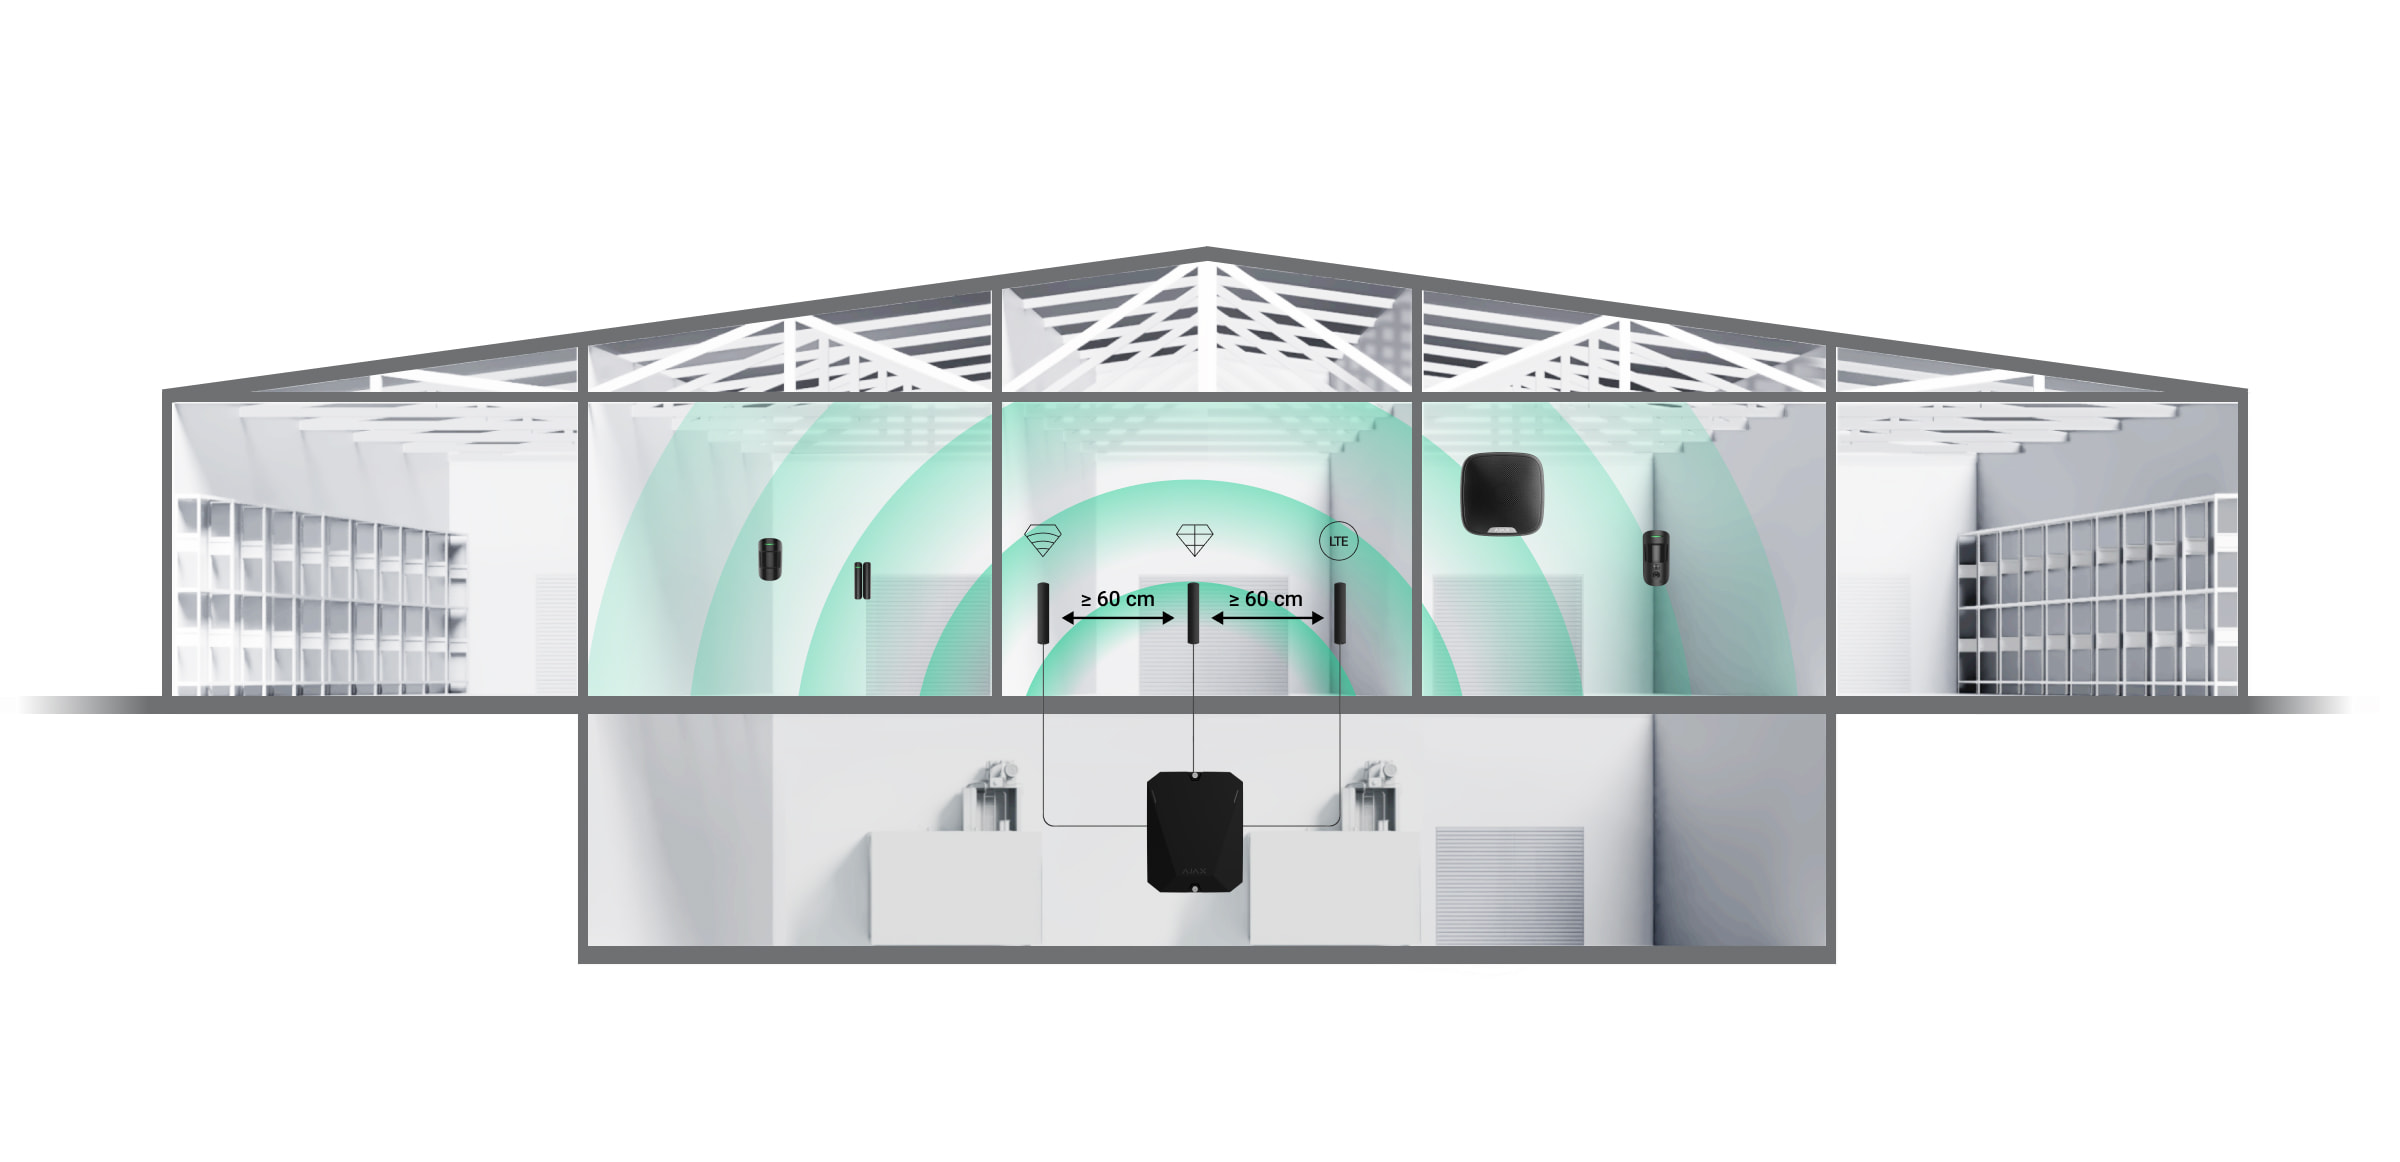
ExternalAntenna uzlabo sakarus starp hubu un pievienotajām ierīcēm vai mobilo tīklu. Tā ir noderīga, ja hubs tiek uzstādīts seifā, dzelzsbetona telpā vai citās vietās, kur signālam jāpārvar šķēršļi. Antenu var pievienot nepieciešamajiem Jeweller, Wings vai Cellular savienotājiem.
Uzstādīšanas vietas izvēle
Izvēloties antenas uzstādīšanas vietu, jāņem vērā faktori, kas ietekmē tās darbību:
Izvēlētā sakaru kanāla signāla stiprums (Jeweller, Wings vai Cellular).
Attālums starp antenu un hubu. Izmantojot divas vai vairākas antenas, attālumam starp tām jābūt vismaz 60 cm.
Šķēršļi, kas ietekmē radio signālu: sienas, starpstāvu pārsegumi un telpā esoši lieli priekšmeti.
Izstrādājot Ajax sistēmu, ievērojiet uzstādīšanas ieteikumus. Drošības sistēmu drīkst projektēt un uzstādīt tikai speciālisti. Ieteikto Ajax partneru saraksts pieejams šeit.
Vietas, kur antenu nedrīkst uzstādīt
Telpās, kur temperatūra un mitrums pārsniedz pieļaujamos limitus. Tas var sabojāt antenu.
Vietās ar zemu signāla līmeni. Tas var izraisīt savienojuma zudumu.
Tuvu metāla priekšmetiem un spoguļiem. Vadītspējīgi priekšmeti var aizsegt antenu.
Sagatavošanās uzstādīšanai
Pirms ārējās antenas uzstādīšanas pārliecinieties, ka:
hubs ir saderīgs ar ExternalAntenna;
hubam uzstādīšanas vietā ir stabils 2–3 stabiņu signāls ar mobilo tīklu;
uzstādīšanas vietā visām pievienotajām ierīcēm ir stabils 2–3 stabiņu signāls;
kabeļa garums no huba līdz uzstādīšanas vietai ir pietiekams.
Kabeļu izvietojums
Sagatavojot kabeļu maršrutēšanu, pārbaudiet sava reģiona elektroinstalācijas un ugunsdrošības noteikumus. Stingri ievērojiet šos standartus un noteikumus. Praktiski ieteikumi par kabeļu izvietojumu ir pieejami šajā rakstā.
Kabeļu maršrutēšana
Pirms uzstādīšanas rūpīgi izlasiet sadaļu Uzstādīšanas vietas izvēle. Izvairieties no novirzēm no sistēmas projekta. Pamatnoteikumu un šīs rokasgrāmatas ieteikumu neievērošana var radīt ierīces darbības traucējumus. Uzzināt vairāk
Uzstādīšana
Pirms uzstādīšanas pārliecinieties, ka esat izvēlējies optimālo ierīces vietu, kas atbilst šīs rokasgrāmatas prasībām.
Ierīci drīkst uzstādīt tikai profesionāls elektriķis.
Kā uzstādīt ExternalAntenna
Pirms antenas uzstādīšanas izlasiet attiecīgā huba rokasgrāmatu.
Pirms uzstādīšanas pārliecinieties, ka hubs ir atslēgts no strāvas.
Noņemiet huba priekšējo vāku.
Identificējiet Jeweller, Wings vai Cellular savienotājus uz plates.
Noņemiet izolācijas vāciņu no izvēlētā savienotāja.
Pievienojiet antenas SMA (vīriešu) savienotāju pie plates SMA (sieviešu) savienotāja.
Ieslēdziet hubu. Aizveriet huba korpusu. Noņemiet aizsargplēvi no iepriekš uzklātās divpusējās līmlentes. Uzstādiet antenu izvēlētajā vietā. Pārbaudiet savienojuma statusu lietotnē.
Statusi
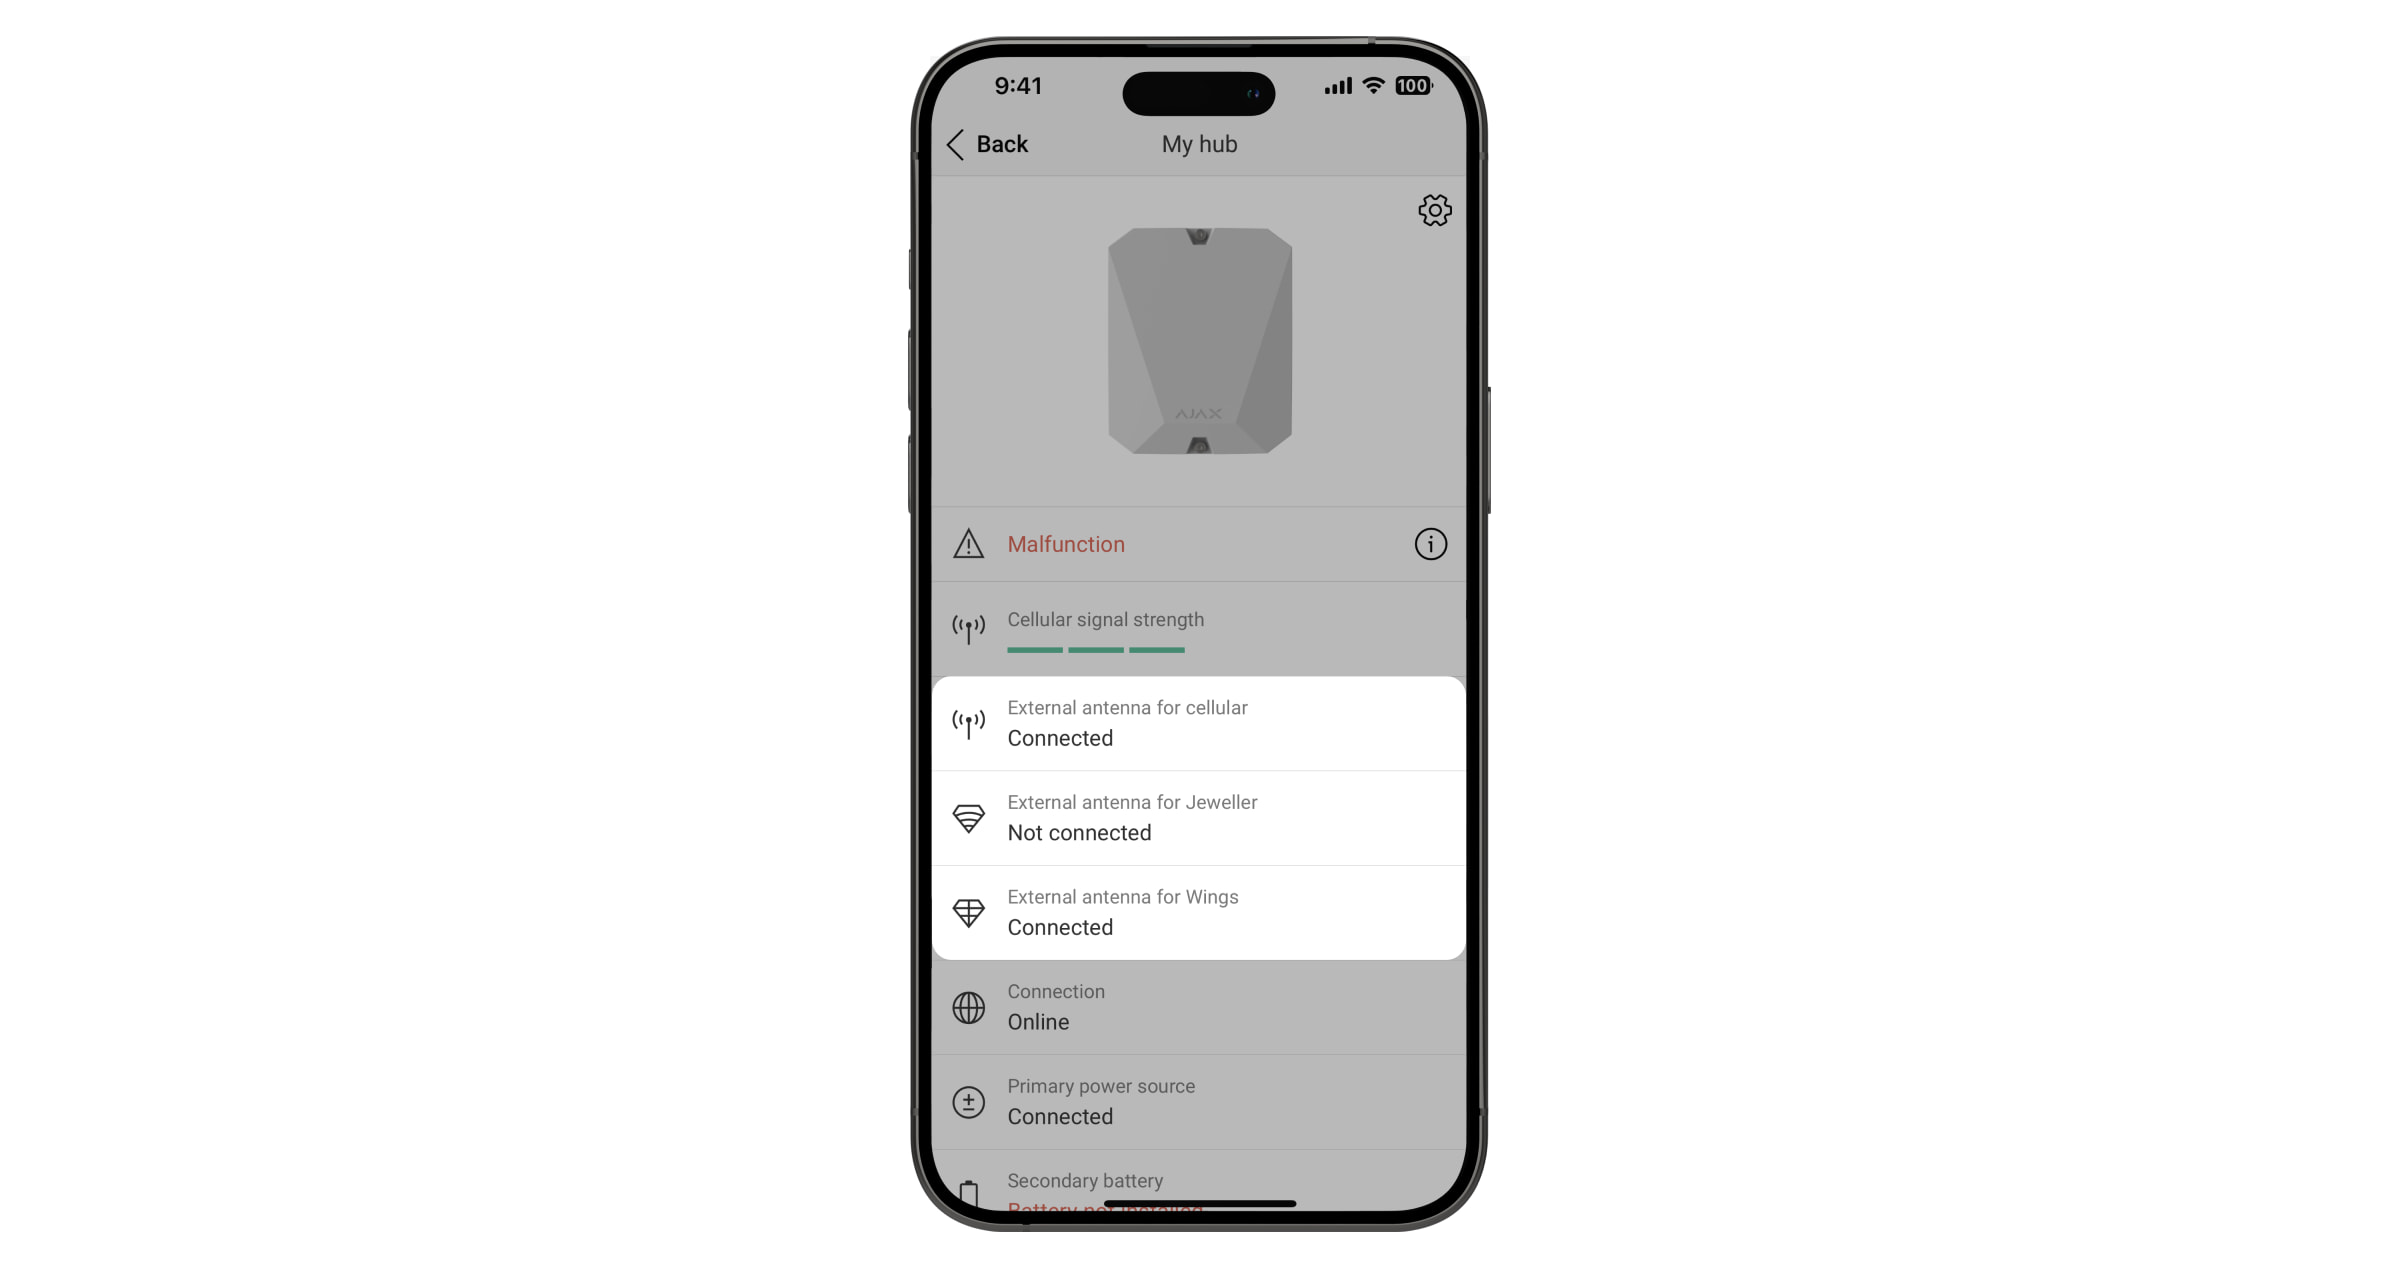
Huba statusos ir informācija par antenas savienojuma stāvokli. Šie statusi ir pieejami Ajax lietotnē:
Atveriet cilni Ierīces.
Sarakstā izvēlieties hubu.
Ja ExternalAntenna tiek bojāta, sistēma paziņos par to lietotājam un CMS.
Apkope
ExternalAntenna neprasa apkopi.
Tehniskās specifikācijas Visas tehniskās specifikācijas
Atbilstība standartiem
Garantija
Sabiedrības ar ierobežotu atbildību “Ajax Systems Manufacturing” produktu garantija ir derīga 2 gadus pēc iegādes.
Ja ierīce nedarbojas pareizi, vispirms sazinieties ar Ajax tehnisko atbalstu. Vairumā gadījumu tehniskas problēmas var atrisināt attālināti.
Pieejams saņemšanai veikalā
Izpārdots veikalā
Pievienots salīdzināšanai
Sasniegts count_product-produktu limits
Pievienots salīdzināšanai
Sasniegts count_product-produktu limits
{"id":41592061722807,"title":"Default Title","option1":"Default Title","option2":null,"option3":null,"sku":"367307588","requires_shipping":true,"taxable":true,"featured_image":null,"available":true,"name":"AJAX Bezvadu ārtelpu kustības aizkara tipa divvirzienu detektors DualCurtain Outdoor uzstādīšanai uz mājas fasādes Baltā krāsā","public_title":null,"options":["Default Title"],"price":20999,"weight":0,"compare_at_price":26244,"inventory_management":"shopify","barcode":"4820246099233","requires_selling_plan":false,"selling_plan_allocations":[],"quantity_rule":{"min":1,"max":null,"increment":1}}
AJAX Bezvadu ārtelpu kustības aizkara tipa divvirzienu detektors DualCurtain Outdoor uzstādīšanai uz mājas fasādes Baltā krāsā
SKU: 367307588
€209,99€262,44
Vienības cena
Ajax bezvadu divvirzienu ārtelpu kustības detektors, piemērots uzstādīšānas uz mājas fasādes. Detektors aizsargā Jūsu īpašuma perimetru. 15m uztvēršana abās pusēs, bet var atslēgt vienu vai otru zonu Ajax lietotnē. Nereaģē uz dzīvniekiem. Strādā tikai kopā ar kādu no Ajax drošības centrālēm. Tampers neļaus nemanāmi noņemt ierīci no stiprinājuma. Un pat tad, ja detektors tiek sabojāts, centrmezglam būs nepieciešama mazāk nekā minūte, lai uztvertu sakaru zudumu un informētu centrālo uzraudzības staciju un lietotājus par problēmu.
Baterijas strādā līdz 4 gadiem. Strādā tikai ar Hub 2 un Hub 2 Plus.
Trauksmes signāla nosūtīšanas ātrums: 0.15s
Darba temperatūra: No −25°С līdz +60°С
Aizsardzības klase: IP54
Izmērs: 174 × 123 × 88 mm
Svars: 615 g
Pieejams saņemšanai veikalā
Izpārdots veikalā
Pievienots salīdzināšanai
Sasniegts count_product-produktu limits
Pievienots salīdzināšanai
Sasniegts count_product-produktu limits
{"id":41592063033527,"title":"Default Title","option1":"Default Title","option2":null,"option3":null,"sku":"367304847","requires_shipping":true,"taxable":true,"featured_image":null,"available":true,"name":"AJAX Bezvadu ārtelpu kustības detektors MotionCam Outdoor ar fotoverifikāciju Baltā krāsā","public_title":null,"options":["Default Title"],"price":25894,"weight":0,"compare_at_price":33025,"inventory_management":"shopify","barcode":"4820246099196","requires_selling_plan":false,"selling_plan_allocations":[],"quantity_rule":{"min":1,"max":null,"increment":1}}
AJAX Bezvadu ārtelpu kustības detektors MotionCam Outdoor ar fotoverifikāciju Baltā krāsā
SKU: 367304847
€258,94€330,25
Vienības cena
Bezvadu kustības detektors ar fotoverifikācijas iespēju MotionCam Outdoor.
Strādā tikai ar AJAX centrāliHub 2vaiHub 2 Plus.
Atsūta verifikācijas attēlu lietotājam 9 sekundēs.
Izmantojot MotionCam Outdoor, Jūs uzzināsiet par faktisko situāciju mājās pat pirms zagļi sapratīs, ka viņi ir noķerti. Animēta fotoattēlu sērija tiek nosūtīta uzreiz pēc kustības uztveršanas.
Vienkārša pievienošana, noskenējot iekārtas QR kodu Ajax lietotnē.
Uzstādīšana: Ārtelpās
Kustības uztveršanas attālums: Regulējams no 3 līdz 12m
Barošana: Baterijas CR123A (×4), 3 V, darba ilgums līdz 3 gadiem
Baterijām garantijas nav.
Darba temperatūra: no -25°C līdz +60°C
Izmērs:206 × 108 × 93mm
Svars: 470 g
Uzstādīšanas instrukcija pieejama Ajax lietotnē, kura atvērsies, noskenējot detektora QR kodu uzstādīšanas brīdī. Vienkārša uzstādīšana un pievienošana pie Ajax centrāles Hub.
Pieejams saņemšanai veikalā
Izpārdots veikalā
Pievienots salīdzināšanai
Sasniegts count_product-produktu limits
Pievienots salīdzināšanai
Sasniegts count_product-produktu limits
{"id":46866019025231,"title":"Default Title","option1":"Default Title","option2":null,"option3":null,"sku":"367308965","requires_shipping":true,"taxable":true,"featured_image":null,"available":true,"name":"AJAX Bezvadu ārtelpu kustības detektors MotionCam Outdoor PhOD (Attēls pēc pieprasījuma) ar fotoverifikāciju Baltā krāsā","public_title":null,"options":["Default Title"],"price":28485,"weight":0,"compare_at_price":36330,"inventory_management":"shopify","barcode":"4823114014284","requires_selling_plan":false,"selling_plan_allocations":[],"quantity_rule":{"min":1,"max":null,"increment":1}}
AJAX Bezvadu ārtelpu kustības detektors MotionCam Outdoor PhOD (Attēls pēc pieprasījuma) ar fotoverifikāciju Baltā krāsā
SKU: 367308965
€284,85€363,30
Vienības cena
Bezvadu kustības detektors ar fotoverifikācijas iespēju MotionCam Outdoor PhOD.
PhOD (Photo on Demand) - Attēls pēc pieprasījuma - jebkurā brīdī uzņem attēlu un zini, kas notiek Tavā īpašumā.
Strādā tikai ar AJAX centrāliHub 2vaiHub 2 Plus.
Atsūta verifikācijas attēlu lietotājam 9 sekundēs.
Izmantojot MotionCam Outdoor, Jūs uzzināsiet par faktisko situāciju mājās pat pirms zagļi sapratīs, ka viņi ir noķerti. Animēta fotoattēlu sērija tiek nosūtīta uzreiz pēc kustības uztveršanas.
Vienkārša pievienošana, noskenējot iekārtas QR kodu Ajax lietotnē.
Uzstādīšana: Ārtelpās
Kustības uztveršanas attālums: Regulējams no 3 līdz 12m
Barošana: Baterijas CR123A (×4), 3 V, darba ilgums līdz 3 gadiem
Baterijām garantijas nav.
Darba temperatūra: no -25°C līdz +60°C
Izmērs:206 × 108 × 93mm
Svars: 470 g
Uzstādīšanas instrukcija pieejama Ajax lietotnē, kura atvērsies, noskenējot detektora QR kodu uzstādīšanas brīdī. Vienkārša uzstādīšana un pievienošana pie Ajax centrāles Hub.
Pieejams saņemšanai veikalā
Izpārdots veikalā
Pievienots salīdzināšanai
Sasniegts count_product-produktu limits
Pievienots salīdzināšanai
Sasniegts count_product-produktu limits
{"id":41592063819959,"title":"Default Title","option1":"Default Title","option2":null,"option3":null,"sku":"367307584","requires_shipping":true,"taxable":true,"featured_image":null,"available":true,"name":"AJAX Bezvadu drošības ārtelpu sirēna StreetSiren Melnā Krāsā","public_title":null,"options":["Default Title"],"price":11760,"weight":0,"compare_at_price":14997,"inventory_management":"shopify","barcode":null,"requires_selling_plan":false,"selling_plan_allocations":[],"quantity_rule":{"min":1,"max":null,"increment":1}}
AJAX Bezvadu drošības ārtelpu sirēna StreetSiren Melnā Krāsā
SKU: 367307584
(1)
€117,60€149,97
Vienības cena
Ajax Bezvadu ārtelpu sirēnaStreetSiren, kas skaļi paziņo par trauksmi detektora aktivizācijas laikā. Tas ir piemērots ārtelpām, lai brīdinātu par briesmām vai atturētu iebrucējus. Sirēna strādā tikai kopā ar kādu no Ajax Centrālēm.
Sirēna ar LED rāmīti. IP54 aizsardzība np -25°С līdz +50°С. Strādā līdz 5 gadiem.
Skaļums: Regulējams, 85−113 dB 1m diapazonā
Trauksmes garums: Regulējams, 3-180 s
Indikācija par apbruņošanu/atbruņošanu: Jā
Trauksmes signāla nosūtīšanas laiks: 0.15 s
Barošana: 4x CR123A batteries, 3 V
Baterijas darbības ilgums: 5 gadi
Baterijām garantijas nav
Komunikācijas diapazons — 2000 m atklātā vidē
Darbības temperatūra: No -25С līdz +50°С
Aizsardzības klase: IP54
Izmērs: 200 × 200 × 51 mm
Svars: 528g
Uzstādīšanas instrukcija pieejama Ajax lietotnē, kura atvērsies, noskenējot detektora QR kodu uzstādīšanas brīdī. Vienkārša uzstādīšana un pievienošana pie Ajax centrāles Hub.
Pieejams saņemšanai veikalā
Izpārdots veikalā
Pievienots salīdzināšanai
Sasniegts count_product-produktu limits
Pievienots salīdzināšanai
Sasniegts count_product-produktu limits
{"id":41592063721655,"title":"Default Title","option1":"Default Title","option2":null,"option3":null,"sku":"367308694","requires_shipping":true,"taxable":true,"featured_image":null,"available":true,"name":"AJAX Bezvadu drošības ārtelpu sirēna StreetSiren, baltā Krāsā","public_title":null,"options":["Default Title"],"price":12799,"weight":0,"compare_at_price":14997,"inventory_management":"shopify","barcode":"856963007156","requires_selling_plan":false,"selling_plan_allocations":[],"quantity_rule":{"min":1,"max":null,"increment":1}}
AJAX Bezvadu drošības ārtelpu sirēna StreetSiren, baltā Krāsā
SKU: 367308694
€127,99€149,97
Vienības cena
Ajax Bezvadu ārtelpu sirēnaStreetSiren, kas skaļi paziņo par trauksmi detektora aktivizācijas laikā. Tas ir piemērots ārtelpām, lai brīdinātu par briesmām vai atturētu iebrucējus. Sirēna strādā tikai kopā ar kādu no Ajax Centrālēm.
Sirēna ar LED rāmīti. IP54 aizsardzība np -25°С līdz +50°С. Strādā līdz 5 gadiem.
Skaļums: Regulējams, 85−113 dB 1m diapazonā
Trauksmes garums: Regulējams, 3-180 s
Indikācija par apbruņošanu/atbruņošanu: Jā
Trauksmes signāla nosūtīšanas laiks: 0.15 s
Barošana: 4x CR123A batteries, 3 V
Baterijas darbības ilgums: 5 gadi
Baterijām garantijas nav
Komunikācijas diapazons — 2000 m atklātā vidē
Darbības temperatūra: No -25С līdz +50°С
Aizsardzības klase: IP54
Izmērs: 200 × 200 × 51 mm
Svars: 528g
Uzstādīšanas instrukcija pieejama Ajax lietotnē, kura atvērsies, noskenējot detektora QR kodu uzstādīšanas brīdī. Vienkārša uzstādīšana un pievienošana pie Ajax centrāles Hub.
Pieejams saņemšanai veikalā
Izpārdots veikalā
Pievienots salīdzināšanai
Sasniegts count_product-produktu limits
Pievienots salīdzināšanai
Sasniegts count_product-produktu limits
{"id":41613546062007,"title":"Default Title","option1":"Default Title","option2":null,"option3":null,"sku":"367304816","requires_shipping":true,"taxable":true,"featured_image":null,"available":true,"name":"AJAX Bezvadu drošības durvju kontakts DoorProtect Baltā krāsā","public_title":null,"options":["Default Title"],"price":3528,"weight":0,"compare_at_price":4499,"inventory_management":"shopify","barcode":null,"requires_selling_plan":false,"selling_plan_allocations":[],"quantity_rule":{"min":1,"max":null,"increment":1}}
AJAX Bezvadu drošības durvju kontakts DoorProtect Baltā krāsā
SKU: 367304816
(2)
€35,28€44,99
Vienības cena
Bezvadu durvju kontakts DoorProtect, kurš pieslēdzams pie Jūsu AJAX drošības sistēmas.
Atvēršanas detektors, kurš paziņo par ielaušanos caur atvērtām durvīm vai logu. Piemērots jebkura veida durvīm. Trauksmes paziņojumi pie nesankcionēta noņemšanas mēģinājuma.
Baterijas darbības ilgums 7 gadi.
Sastāv no 2 daļām - atvēršanas detektors un magnēts.
Darba temperatūra: no -10°С līdz +40°С
Izmēri: Diametrs: 20 mm, Augstums: 90 mm
Svars: 29g
Baterijām garantijas nav
Uzstādīšanas instrukcija pieejama Ajax lietotnē, kura atvērsies, noskenējot detektora QR kodu uzstādīšanas brīdī. Vienkārša uzstādīšana un pievienošana pie Ajax centrāles Hub
Pieejams saņemšanai veikalā
Izpārdots veikalā
Pievienots salīdzināšanai
Sasniegts count_product-produktu limits
Pievienots salīdzināšanai
Sasniegts count_product-produktu limits
{"id":41613546029239,"title":"Default Title","option1":"Default Title","option2":null,"option3":null,"sku":"367304813","requires_shipping":true,"taxable":true,"featured_image":null,"available":true,"name":"AJAX Bezvadu drošības durvju kontakts DoorProtect Melnā","public_title":null,"options":["Default Title"],"price":3528,"weight":0,"compare_at_price":4499,"inventory_management":"shopify","barcode":"856963007040","requires_selling_plan":false,"selling_plan_allocations":[],"quantity_rule":{"min":1,"max":null,"increment":1}}
AJAX Bezvadu drošības durvju kontakts DoorProtect Melnā
SKU: 367304813
€35,28€44,99
Vienības cena
Bezvadu durvju kontakts DoorProtect, kurš pieslēdzams pie Jūsu AJAX drošības sistēmas.
Atvēršanas detektors, kurš paziņo par ielaušanos caur atvērtām durvīm vai logu. Piemērots jebkura veida durvīm. Trauksmes paziņojumi pie nesankcionēta noņemšanas mēģinājuma.
Baterijas darbības ilgums 7 gadi.
Sastāv no 2 daļām - atvēršanas detektors un magnēts.
Darba temperatūra: no -10°С līdz +40°С
Izmēri: Diametrs: 20 mm, Augstums: 90 mm
Svars: 29g
Baterijām garantijas nav
Uzstādīšanas instrukcija pieejama Ajax lietotnē, kura atvērsies, noskenējot detektora QR kodu uzstādīšanas brīdī. Vienkārša uzstādīšana un pievienošana pie Ajax centrāles Hub
Pieejams saņemšanai veikalā
Izpārdots veikalā
Pievienots salīdzināšanai
Sasniegts count_product-produktu limits
Pievienots salīdzināšanai
Sasniegts count_product-produktu limits
{"id":41592070176951,"title":"Default Title","option1":"Default Title","option2":null,"option3":null,"sku":"367304815","requires_shipping":true,"taxable":true,"featured_image":null,"available":true,"name":"AJAX Bezvadu drošības durvju kontakts DoorProtect Plus ar trieciena un lokācijas maiņas sensoru. Baltā krāsā","public_title":null,"options":["Default Title"],"price":5293,"weight":0,"compare_at_price":6749,"inventory_management":"shopify","barcode":"856963007941","requires_selling_plan":false,"selling_plan_allocations":[],"quantity_rule":{"min":1,"max":null,"increment":1}}
AJAX Bezvadu drošības durvju kontakts DoorProtect Plus ar trieciena un lokācijas maiņas sensoru. Baltā krāsā
SKU: 367304815
€52,93€67,49
Vienības cena
Bezvadu durvju kontakts DoorProtect Plus, kurš pieslēdzams pie Jūsu AJAX drošības sistēmas.
Atvēršanas detektors, kurš paziņo par ielaušanos caur atvērtām durvīm vai logu. Piemērots jebkura veida durvīm. Trauksmes paziņojumi pie nesankcionēta noņemšanas mēģinājuma. Reaģē arī uz triecienu, vibrāciju un lokācijas maiņu.
Baterijas darbības ilgums 7 gadi.
Sastāv no 2 daļām - atvēršanas detektors un magnēts.
Darba temperatūra: no -10°С līdz +40°С
Izmēri: Diametrs: 20 mm, Augstums: 90 mm
Svars: 29g
Baterijām garantijas nav
Uzstādīšanas instrukcija pieejama Ajax lietotnē, kura atvērsies, noskenējot detektora QR kodu uzstādīšanas brīdī. Vienkārša uzstādīšana un pievienošana pie Ajax centrāles Hub
Pieejams saņemšanai veikalā
Izpārdots veikalā
Pievienots salīdzināšanai
Sasniegts count_product-produktu limits
Pievienots salīdzināšanai
Sasniegts count_product-produktu limits
{"id":41592060346551,"title":"Default Title","option1":"Default Title","option2":null,"option3":null,"sku":"367304833","requires_shipping":true,"taxable":true,"featured_image":null,"available":true,"name":"AJAX Bezvadu drošības iekštelpu sirēna HomeSiren Baltā Krāsā","public_title":null,"options":["Default Title"],"price":7496,"weight":0,"compare_at_price":7496,"inventory_management":"shopify","barcode":"856963007286","requires_selling_plan":false,"selling_plan_allocations":[],"quantity_rule":{"min":1,"max":null,"increment":1}}
AJAX Bezvadu drošības iekštelpu sirēna HomeSiren Baltā Krāsā
SKU: 367304833
€74,96
Vienības cena
Ajax Bezvadu iekštelpu sirēnaHomeSiren, kas skaļi paziņo par trauksmi detektora aktivizācijas laikā. Tas ir piemērots iekštelpām, lai brīdinātu par briesmām vai atturētu iebrucējus. Sirēna strādā tikai kopā ar kādu no Ajax Centrālēm.
Apsardzes režīma indikators, regulējams trauksmes skaņas līmenis un ilgums detektora aktivācijas laiks.
Uzstādīšanas princips:
Pieslēgšana pie apsardzes centrāles ar vienu klikšķi.
Sirēnas veids: Bezvadu
Uzstādīšana: Iekštelpu
Savienojamība: ar visām Ajax drošības centrālēm
Paziņojumu veids: Skaņas sirēna
Skaļums: Regulējams, 81−105 dB 1m diapazonā
Trauksmes garums: Regulējams, 3-180 s
Indikācija par apbruņošanu/atbruņošanu: Jā
Trauksmes signāla nosūtīšanas laiks: 0.15 s
Barošana: Divas CR123A batteries, 3 V
Baterijas darbības ilgums: 5 gadi
Baterijām garantijas nav
Komunikācijas diapazons — 2000 m atklātā vidē
Darbības temperatūra: No -10°С līdz +40°С
Aizsardzības klase: IP50
Izmērs: 75 × 76 × 27 mm
Svars: 97 g
Uzstādīšanas instrukcija pieejama Ajax lietotnē, kura atvērsies, noskenējot detektora QR kodu uzstādīšanas brīdī. Vienkārša uzstādīšana un pievienošana pie Ajax centrāles Hub.
Pieejams saņemšanai veikalā
Izpārdots veikalā
Pievienots salīdzināšanai
Sasniegts count_product-produktu limits
Pievienots salīdzināšanai
Sasniegts count_product-produktu limits
{"id":41592060575927,"title":"Default Title","option1":"Default Title","option2":null,"option3":null,"sku":"367304832","requires_shipping":true,"taxable":true,"featured_image":null,"available":true,"name":"AJAX Bezvadu drošības iekštelpu sirēna HomeSiren Melnā Krāsā","public_title":null,"options":["Default Title"],"price":5877,"weight":0,"compare_at_price":7496,"inventory_management":"shopify","barcode":"856963007293","requires_selling_plan":false,"selling_plan_allocations":[],"quantity_rule":{"min":1,"max":null,"increment":1}}
AJAX Bezvadu drošības iekštelpu sirēna HomeSiren Melnā Krāsā
SKU: 367304832
€58,77€74,96
Vienības cena
Ajax Bezvadu iekštelpu sirēnaHomeSiren, kas skaļi paziņo par trauksmi detektora aktivizācijas laikā. Tas ir piemērots iekštelpām, lai brīdinātu par briesmām vai atturētu iebrucējus. Sirēna strādā tikai kopā ar kādu no Ajax Centrālēm.
Apsardzes režīma indikators, regulējams trauksmes skaņas līmenis un ilgums detektora aktivācijas laiks.
Uzstādīšanas princips:
Pieslēgšana pie apsardzes centrāles ar vienu klikšķi.
Sirēnas veids: Bezvadu
Uzstādīšana: Iekštelpu
Savienojamība: ar visām Ajax drošības centrālēm
Paziņojumu veids: Skaņas sirēna
Skaļums: Regulējams, 81−105 dB 1m diapazonā
Trauksmes garums: Regulējams, 3-180 s
Indikācija par apbruņošanu/atbruņošanu: Jā
Trauksmes signāla nosūtīšanas laiks: 0.15 s
Barošana: Divas CR123A batteries, 3 V
Baterijas darbības ilgums: 5 gadi
Baterijām garantijas nav
Komunikācijas diapazons — 2000 m atklātā vidē
Darbības temperatūra: No -10°С līdz +40°С
Aizsardzības klase: IP50
Izmērs: 75 × 76 × 27 mm
Svars: 97 g
Uzstādīšanas instrukcija pieejama Ajax lietotnē, kura atvērsies, noskenējot detektora QR kodu uzstādīšanas brīdī. Vienkārša uzstādīšana un pievienošana pie Ajax centrāles Hub.
Pieejams saņemšanai veikalā
Izpārdots veikalā
Pievienots salīdzināšanai
Sasniegts count_product-produktu limits
Pievienots salīdzināšanai
Sasniegts count_product-produktu limits
{"id":41592068341943,"title":"Default Title","option1":"Default Title","option2":null,"option3":null,"sku":"367304853","requires_shipping":true,"taxable":true,"featured_image":null,"available":true,"name":"AJAX Bezvadu drošības kustības detektors MotionProtect Baltā krāsā","public_title":null,"options":["Default Title"],"price":6399,"weight":0,"compare_at_price":7496,"inventory_management":"shopify","barcode":"856963007200","requires_selling_plan":false,"selling_plan_allocations":[],"quantity_rule":{"min":1,"max":null,"increment":1}}
AJAX Bezvadu drošības kustības detektors MotionProtect Baltā krāsā
SKU: 367304853
€63,99€74,96
Vienības cena
Bezvadu kustības detektors MotionProtect, kurš pieslēdzams pie Ajax drošības centrāles. Paziņo lietotājam par ielaušanos īpašumā. Detektors jāuzstāda pie sienas pretī durvīm vai citai vietai, kur var ielauzties. Tampera trauksme - saņemsiet paziņojumu, ja kāds mēģinās noņemt detektoru. Baterijas darbības ilgums 5 gadi.
Detektors nereaģē uz dzīvniekiem līdz 20 kg un 50 cm. Pasīvas infrasarkanās detektēšanas algoritms, kas samazina viltus trauksmju skaitu. Detektors atkarībā no apkārtējas temperatūras regulē jutības pakāpi, lai efektīvi strādātu aukstajā un siltajā laikā.
Gatavs darbam uzreiz no kastes - baterija ir ielikta iekšā, tikai jāuzstāda uz kronšteina, kurš nāk komplektā ar detektoru.
Darba temperatūra: no -10°С līdz +40°С
Izmērs: 110 × 65 × 50 mm
Svars: 96 g
Baterijām garantijas nav.
Uzstādīšanas instrukcija pieejama Ajax lietotnē, kura atvērsies, noskenējot detektora QR kodu uzstādīšanas brīdī. Vienkārša uzstādīšana un pievienošana pie Ajax centrāles Hub.
Pieejams saņemšanai veikalā
Izpārdots veikalā
Pievienots salīdzināšanai
Sasniegts count_product-produktu limits
Pievienots salīdzināšanai
Sasniegts count_product-produktu limits
{"id":41592067981495,"title":"Default Title","option1":"Default Title","option2":null,"option3":null,"sku":"367304849","requires_shipping":true,"taxable":true,"featured_image":null,"available":true,"name":"AJAX Bezvadu drošības kustības detektors MotionProtect Melnā krāsā","public_title":null,"options":["Default Title"],"price":5877,"weight":0,"compare_at_price":7496,"inventory_management":"shopify","barcode":"856963007217","requires_selling_plan":false,"selling_plan_allocations":[],"quantity_rule":{"min":1,"max":null,"increment":1}}
AJAX Bezvadu drošības kustības detektors MotionProtect Melnā krāsā
SKU: 367304849
€58,77€74,96
Vienības cena
Bezvadu kustības detektors MotionProtect, kurš pieslēdzams pie Ajax drošības centrāles. Paziņo lietotājam par ielaušanos īpašumā. Detektors jāuzstāda pie sienas pretī durvīm vai citai vietai, kur var ielauzties. Tampera trauksme - saņemsiet paziņojumu, ja kāds mēģinās noņemt detektoru. Baterijas darbības ilgums 5 gadi.
Detektors nereaģē uz dzīvniekiem līdz 20 kg un 50 cm. Pasīvas infrasarkanās detektēšanas algoritms, kas samazina viltus trauksmju skaitu. Detektors atkarībā no apkārtējas temperatūras regulē jutības pakāpi, lai efektīvi strādātu aukstajā un siltajā laikā.
Gatavs darbam uzreiz no kastes - baterija ir ielikta iekšā, tikai jāuzstāda uz kronšteina, kurš nāk komplektā ar detektoru.
Darba temperatūra: no -10°С līdz +40°С
Izmērs: 110 × 65 × 50 mm
Svars: 96 g
Baterijām garantijas nav.
Uzstādīšanas instrukcija pieejama Ajax lietotnē, kura atvērsies, noskenējot detektora QR kodu uzstādīšanas brīdī. Vienkārša uzstādīšana un pievienošana pie Ajax centrāles Hub.
Pieejams saņemšanai veikalā
Izpārdots veikalā
Pievienots salīdzināšanai
Sasniegts count_product-produktu limits
Pievienots salīdzināšanai
Sasniegts count_product-produktu limits
{"id":41592061558967,"title":"Default Title","option1":"Default Title","option2":null,"option3":null,"sku":"367307579","requires_shipping":true,"taxable":true,"featured_image":null,"available":true,"name":"AJAX Bezvadu drošības kustības detektors MotionProtect Plus Baltā krāsā ar mikroviļņu sensoru, kas palīdz izvairīties no viltus trauksmēm","public_title":null,"options":["Default Title"],"price":8231,"weight":0,"compare_at_price":10498,"inventory_management":"shopify","barcode":"856963007019","requires_selling_plan":false,"selling_plan_allocations":[],"quantity_rule":{"min":1,"max":null,"increment":1}}
AJAX Bezvadu drošības kustības detektors MotionProtect Plus Baltā krāsā ar mikroviļņu sensoru, kas palīdz izvairīties no viltus trauksmēm
SKU: 367307579
(1)
€82,31€104,98
Vienības cena
Bezvadu kustības detektors MotionProtect Plus, kurš pieslēdzams pie Ajax drošības centrāles. Paziņo lietotājam par ielaušanos īpašumā. Detektors jāuzstāda pie sienas pretī durvīm vai citai vietai, kur var ielauzties. Tampera trauksme - saņemsiet paziņojumu, ja kāds mēģinās noņemt detektoru. Baterijas darbības ilgums 5 gadi. Mikroviļņu sensors, kurš palīdz izvairīties no viltus trauksmēm, ko izsauc gaisa kondicionieti, kamīni, gaismas mirgošana, atspīdumi, aizkari.
Detektors nereaģē uz dzīvniekiem līdz 20 kg un 50 cm. Pasīvas infrasarkanās detektēšanas algoritms, kas samazina viltus trauksmju skaitu. Detektors atkarībā no apkārtējas temperatūras regulē jutības pakāpi, lai efektīvi strādātu aukstajā un siltajā laikā.
Gatavs darbam uzreiz no kastes - baterija ir ielikta iekšā, tikai jāuzstāda uz kronšteina, kurš nāk komplektā ar detektoru.
Darba temperatūra: no -10°С līdz +40°С
Izmērs: 110 × 65 × 50 mm
Svars: 96 g
Baterijām garantijas nav.
Uzstādīšanas instrukcija pieejama Ajax lietotnē, kura atvērsies, noskenējot detektora QR kodu uzstādīšanas brīdī. Vienkārša uzstādīšana un pievienošana pie Ajax centrāles Hub.
Pieejams saņemšanai veikalā
Izpārdots veikalā
Pievienots salīdzināšanai
Sasniegts count_product-produktu limits
Pievienots salīdzināšanai
Sasniegts count_product-produktu limits
{"id":41592061231287,"title":"Default Title","option1":"Default Title","option2":null,"option3":null,"sku":"367304852","requires_shipping":true,"taxable":true,"featured_image":null,"available":true,"name":"AJAX Bezvadu drošības kustības detektors MotionProtect Plus Melnā krāsā ar mikroviļņu sensoru, kas palīdz izvairīties no viltus trauksmēm","public_title":null,"options":["Default Title"],"price":8231,"weight":0,"compare_at_price":10498,"inventory_management":"shopify","barcode":"856963007026","requires_selling_plan":false,"selling_plan_allocations":[],"quantity_rule":{"min":1,"max":null,"increment":1}}
AJAX Bezvadu drošības kustības detektors MotionProtect Plus Melnā krāsā ar mikroviļņu sensoru, kas palīdz izvairīties no viltus trauksmēm
SKU: 367304852
€82,31€104,98
Vienības cena
Bezvadu kustības detektors MotionProtect Plus, kurš pieslēdzams pie Ajax drošības centrāles. Paziņo lietotājam par ielaušanos īpašumā. Detektors jāuzstāda pie sienas pretī durvīm vai citai vietai, kur var ielauzties. Tampera trauksme - saņemsiet paziņojumu, ja kāds mēģinās noņemt detektoru. Baterijas darbības ilgums 5 gadi. Mikroviļņu sensors, kurš palīdz izvairīties no viltus trauksmēm, ko izsauc gaisa kondicionieti, kamīni, gaismas mirgošana, atspīdumi, aizkari.
Detektors nereaģē uz dzīvniekiem līdz 20 kg un 50 cm. Pasīvas infrasarkanās detektēšanas algoritms, kas samazina viltus trauksmju skaitu. Detektors atkarībā no apkārtējas temperatūras regulē jutības pakāpi, lai efektīvi strādātu aukstajā un siltajā laikā.
Gatavs darbam uzreiz no kastes - baterija ir ielikta iekšā, tikai jāuzstāda uz kronšteina, kurš nāk komplektā ar detektoru.
Darba temperatūra: no -10°С līdz +40°С
Izmērs: 110 × 65 × 50 mm
Svars: 96 g
Baterijām garantijas nav.
Uzstādīšanas instrukcija pieejama Ajax lietotnē, kura atvērsies, noskenējot detektora QR kodu uzstādīšanas brīdī. Vienkārša uzstādīšana un pievienošana pie Ajax centrāles Hub.
Pieejams saņemšanai veikalā
Izpārdots veikalā
Pievienots salīdzināšanai
Sasniegts count_product-produktu limits
Pievienots salīdzināšanai
Sasniegts count_product-produktu limits
{"id":46870133211471,"title":"Default Title","option1":"Default Title","option2":null,"option3":null,"sku":"367304862","requires_shipping":true,"taxable":true,"featured_image":null,"available":true,"name":"AJAX Bezvadu drošības sistēmas tālvadības pults SpaceControl baltā krāsā","public_title":null,"options":["Default Title"],"price":2940,"weight":0,"compare_at_price":3749,"inventory_management":"shopify","barcode":null,"requires_selling_plan":false,"selling_plan_allocations":[],"quantity_rule":{"min":1,"max":null,"increment":1}}
AJAX Bezvadu drošības sistēmas tālvadības pults SpaceControl baltā krāsā
SKU: 367304862
€29,40€37,49
Vienības cena
Bezvadu tālvadības pults SpaceControlar trauksmes pogu. ArSpaceControl palīdzību vai ieslēgt un izslēgt apsardzi, ieslēgt nakts režīmu, nodot trauksmes signālu.
Visas drošības sistēmas vadība pieejama Ajax lietotnē viedtālrunī, taču ja Jums ir izladējies telefons, var izmantot SpaceControl pulti.
Uzreiz gatavs darbam: baterija ir pults iekšā. Vienkārša iekārtas pievienošana Jūsu apsardzes sistēmai - noskenējot QR kodu Ajax lietotnē.
Baterijas darbības ilgums 5 gadi.
Darba temperatūra: no -25°С līdz +50°С
Izmērs: 65 × 37 × 10 mm
Svars: 13g
Baterijām garantijas nav.
Uzstādīšanas instrukcija pieejama Ajax lietotnē, kura atvērsies, noskenējot detektora QR kodu uzstādīšanas brīdī. Vienkārša uzstādīšana un pievienošana pie Ajax centrāles Hub.
Pieejams saņemšanai veikalā
Izpārdots veikalā
Pievienots salīdzināšanai
Sasniegts count_product-produktu limits
Pievienots salīdzināšanai
Sasniegts count_product-produktu limits
{"id":41592061165751,"title":"Default Title","option1":"Default Title","option2":null,"option3":null,"sku":"367304861","requires_shipping":true,"taxable":true,"featured_image":null,"available":true,"name":"AJAX Bezvadu drošības sistēmas tālvadības pults SpaceControl Melnā krāsā","public_title":null,"options":["Default Title"],"price":2940,"weight":0,"compare_at_price":3749,"inventory_management":"shopify","barcode":null,"requires_selling_plan":false,"selling_plan_allocations":[],"quantity_rule":{"min":1,"max":null,"increment":1}}
AJAX Bezvadu drošības sistēmas tālvadības pults SpaceControl Melnā krāsā
SKU: 367304861
(1)
€29,40€37,49
Vienības cena
Bezvadu tālvadības pults SpaceControlar trauksmes pogu. ArSpaceControl palīdzību vai ieslēgt un izslēgt apsardzi, ieslēgt nakts režīmu, nodot trauksmes signālu.
Visas drošības sistēmas vadība pieejama Ajax lietotnē viedtālrunī, taču ja Jums ir izladējies telefons, var izmantot SpaceControl pulti.
Uzreiz gatavs darbam: baterija ir pults iekšā. Vienkārša iekārtas pievienošana Jūsu apsardzes sistēmai - noskenējot QR kodu Ajax lietotnē.
Baterijas darbības ilgums 5 gadi.
Darba temperatūra: no -25°С līdz +50°С
Izmērs: 65 × 37 × 10 mm
Svars: 13g
Baterijām garantijas nav.
Uzstādīšanas instrukcija pieejama Ajax lietotnē, kura atvērsies, noskenējot detektora QR kodu uzstādīšanas brīdī. Vienkārša uzstādīšana un pievienošana pie Ajax centrāles Hub.
Pieejams saņemšanai veikalā
Izpārdots veikalā
Pievienots salīdzināšanai
Sasniegts count_product-produktu limits
Pievienots salīdzināšanai
Sasniegts count_product-produktu limits
{"id":41613546651831,"title":"Default Title","option1":"Default Title","option2":null,"option3":null,"sku":"367308948","requires_shipping":true,"taxable":true,"featured_image":null,"available":true,"name":"AJAX Bezvadu drošības tastatūra Keypad Plus Baltā krāsā","public_title":null,"options":["Default Title"],"price":11760,"weight":0,"compare_at_price":14997,"inventory_management":"shopify","barcode":"367304848","requires_selling_plan":false,"selling_plan_allocations":[],"quantity_rule":{"min":1,"max":null,"increment":1}}
AJAX Bezvadu drošības tastatūra Keypad Plus Baltā krāsā
SKU: 367308948
(1)
€117,60€149,97
Vienības cena
AJAX Keypad Plus bezvadu tastatūra, pieslēdzama pie AJAX Hub 2 vai Hub 2 Plus. Ieslēdziet un izslēdziet apsardzi, nakts režīmu ar tastatūras palīdzību.
Baterijas strādā līdz 3.5 gadiem. Izveidojiet katram lietotājiem personīgu kodu, lai zinātu, kurš un kad ieslēdzis vai izlēdzis apsardzi. Lietotāja vārds tiks atspoguļots paziņojumu žurnālā.
Pēc 3 neveiksmīgiem koda ievadīšanas mēģinājumiem tiks nosūtīts trauksmes signāls. Var izveidot trauksmes kodu, ievadot kuru, tiek simulēta apsardzes noņēmšana, ja kāds piespiež lietotāju noņemt apsardzi, taču trauksmes signāls tiek nekavējoties sūtīts apsardzes kompānijai.
KeyPad Plus Jeweller user manual
Updated
KeyPad Plus Jewelleris a wireless touch keypad for managing the Ajax system with encrypted contactless cards and key fobs. Designed for indoor installation. Supports “silent alarm” when entering theduress code.
The keypad manages security modes using passwords andcardsorkey fobs. Indicates the current security mode with a LED light.
The keypad operates as part of the Ajax system by connecting via theJeweller secure radio communication protocolto the hub. The communication range without obstacles is up to 1700 meters. The pre-installed battery life is up to 3.5 years.
SmartBracket mounting plate (to remove the plate, slide it down)
Do not tear off the perforated part of the mount. It is required for actuating the tamper in case of any attempt to dismantle the keypad.
Power button
Tamper button
Keypad QR Code
Operating principle
KeyPad Plus Jeweller arms and disarms the security of the entire facility or separate groups as well as allows activating theNight Mode. You can control the security modes with KeyPad Plus Jeweller using:
Codes. The keypad supports general and personal codes, as well as arming without entering a code.
Cards or key fobs. You can connectTag key fobsandPass cardsto the system. To quickly and securely identify users, KeyPad Plus Jeweller uses the DESFire® technology. DESFire® is based on the ISO 14443 international standard and combines 128-bit encryption and copy protection.
KeyPad Plus Jeweller supports code types as follows:
Keypad code— general code set up for the keypad. When used, all events are delivered to Ajax apps on behalf of the keypad.
User code— personal code set up for a user connected to the hub. When used, all events are delivered to Ajax apps on behalf of the user.
Keypad access code— set up for a person who is not registered in the system. When used, events are delivered to Ajax apps with a name associated with this code.
RRU codeis an access code for the rapid response units (RRU) activated after the alarm and valid for a specified period. When the code is activated and used, events are delivered to Ajax apps with a title associated with this code.
The number of personal, access, and RRU codes depends on the hub model.
Access codes are not supported by theHub (2G) Jewellercontrol panel.
Before entering a code or using Tag/Pass, you should activate (“wake up”) the KeyPad Plus Jeweller by sliding your hand over the touch panel from top to bottom. When it is activated, the button backlight is enabled, and the keypad beeps.
Auto-wake on Delay when Enteringfunction allows automatically activating the keypad whenDelay When Enteringis set up. This function is supported by KeyPad Plus Jeweller with firmware version 6.60.0.6 or higher and hubs withOS Malevich 2.19or higher.
The KeyPad Plus Jeweller is equipped with LED indicators that show the current security mode and keypad malfunctions (if any). The security status is displayed only when the keypad is active (the device backlight is on).
You can use the KeyPad Plus Jeweller without ambient lighting as the keypad has a backlight. The pressing of the buttons is accompanied by a sound signal. The backlight brightness and keypad volume are adjustable in the settings. If you do not touch the keypad for 4 seconds, KeyPad Plus Jeweller reduces the backlight brightness, and 8 seconds later goes into power-saving mode and turns off the display.
If the batteries are discharged, the backlight turns on at the minimum level regardless of the settings.
Function button
KeyPad Plus Jeweller has aFunctionbutton that operates in 3 modes:
Off— the button is disabled and nothing happens after it is pressed.
Alarm— after theFunctionbutton is pressed, the system sends an alarm to the security company monitoring station and all users.
Mute interconnected fire detectors alarm— after theFunctionbutton is pressed, the system mutes the alarm of theAjax fire detectors. Available only if anInterconnected Fire Detectors Alarmis enabled (Hub → Settings→ Service → Fire detectors settings)
KeyPad Plus Jeweller supportsduress code. It allows you to simulate alarm deactivation. TheAjax appandsirensinstalled at the facility will not give you away in this case, but the security company and other users of the security system will be warned about the incident.
KeyPad Plus Jeweller can participate in two-stage arming, but cannot be used as a second-stage device. The two-stage arming process using Tag or Pass is similar to arming using a personal or general code on the keypad.
The Ajax system can connect to the CMS and transmit events and alarms to the monitoring station of the security company inSurGard (Contact ID), ADEMCO 685, SIA (DC-09), and other proprietary protocol formats. A complete list of supported protocols isavailable here. The device ID and the number of the loop (zone) can be found inits states.
Connection
KeyPad Plus Jeweller is incompatible with Hub (2G) Jeweller, third-party security central units, and ocBridge Plus and uartBridge integration modules.
Before starting connection
The hub and the device operating at different radio frequencies are incompatible. The radio-frequency range of the device may vary by region. We recommend purchasing and using Ajax devices in the same region. You can check the range of operating radio frequencies with thetechnical support service.
Install the Ajax app andcreate an account. Add a hub and create at least one room.
Ensure that the hub is on and has Internet access (via Ethernet cable, Wi-Fi, and/or mobile network). This can be done by opening the Ajax app or by looking at the hub logo on the faceplate — it lights white or green if the hub is connected to the network.
Make sure that the hub is not in armed mode and does not start updates by checking its status in the app.
Only a user or PRO with full admin rights can add a device to the hub.
To connect KeyPad Plus Jeweller
Open the Ajax app. If your account has access to multiple hubs, select the one to which you want to connect KeyPad Plus Jeweller.
Go to theDevicesmenu and clickAdd Device.
Name the keypad, scan or enter the QR code (located on the package and under the SmartBracket mount), and select a room.
ClickAdd; the countdown will begin.
Turn on the keypad by holding the power button for 3 seconds. Once connected, KeyPad Plus Jeweller will appear in the hub device list in the app. To connect, locate the keypad at the same protected facility as the system (within the coverage area of the hub radio network range). If the connection fails, try again in 10 seconds.
The keypad only works with one hub. When connected to a new hub, the device stops sending commands to the old hub. Once added to a new hub, KeyPad Plus Jeweller is not removed from the device list of the old hub. This must be done manually through the Ajax app.
KeyPad Plus Jeweller turns off automatically 6 seconds after being turned on if the keypad fails to connect to the hub. Therefore, you do not need to turn off the device to retry the connection.
Updating the statuses of devices in the list depends on the Jeweller settings; the default value is 36 seconds.
Icons
The icons represent some of KeyPad Plus Jeweller states. You can see them in theDevicestab in the Ajax app.
Icon
Value
Jeweller signal strength — Displays the signal strength between the hub or radio signal range extender and KeyPad Plus Jeweller
Displays the status of the ReX Jeweller range extender use.
The field is not displayed if the keypad works directly with the hub.
Pass/Tag Reading
Displays if card and keyfob reader is enabled.
Assigned Group Easy Management
Displays whether or not the security mode can be switched with Pass or Tag and without confirmation by the control buttons,,.
Easy Armed Mode Change
This setting replacesAssigned Group Easy Managementon KeyPad Plus Jeweller with firmware version 5.60.6.3 or higher, operating with hubs withOS Malevich 2.19or higher.
Shows the configuration for theEasy Armed Mode Changefeature:
Off— each arming or disarming attempt should be confirmed by entering the passcode or presenting the access device.
Arm/disarm using access device without confirming action by buttons— allows users to switch security modes of the system using access devices without confirmation by pressing keypad buttons.
Disarm without disarming button— the system or its groups, the security of which is managed with a passcode or access devices, will be disarmed without confirmation by pressing keypad buttons.
A fixed passcode length should be set in the hub settings in the Ajax PRO app.
Permanent Deactivation
Shows the status of the device:
No— the device operates normally and transmits all events.
Lid only— the hub admin has disabled notifications about the body opening.
Entirely— the hub admin has entirely excluded the keypad from the system. The device does not execute system commands and does not report alarms or other events.
Shows the status of the keypad one-time deactivation setting:
No— the keypad operates in normal mode.
Lid only— notifications on the keypad tamper triggering are disabled until the first disarm.
Entirely— the keypad is entirely excluded from the operation of the system until the first disarm. The device does not execute system commands and does not report alarms or other events.
KeyPad Plus Jeweller is configured in the Ajax app:
Go to theDevicestab.
SelectKeyPad Plus Jewellerfrom the list.
Go toSettingsby clicking on the gear icon.
To apply the settings after the change, click theBackbutton
Parameter
Value
Name
Device name. Displayed in the list of hub devices, SMS text, and notifications in the event feed.
To change the device name, click on the pencil icon.
The name can contain up to 12 Cyrillic characters or up to 24 Latin characters.
Room
Selecting the virtual room to which KeyPad Plus Jeweller is assigned.
The name of the room is displayed in the text of SMS and notifications in the event feed.
Group Management
Selecting the security group controlled by the device. You can select all groups or just one.
The field is displayed when theGroup modeis enabled.
If theFollowed groupfeature is configured for groups, their security state can automatically change depending on their settings and initiators’ states.
.
Access Settings
Selecting the method of arming/disarming:
Keypad codes only.
User codes only.
Keypad and user codes.
To activate theKeypad Access Codesset up for people who are not registered in the system, select the options on the keypad:Keypad codes onlyorKeypad and user codes
.
Keypad Code
Selection of a general code for security control. Contains 4 to 6 digits.
Duress Code
Selecting a general duress code for silent alarm. Contains 4 to 6 digits.
Selecting the function of the * button (Functionbutton):
Off— theFunctionbutton is disabled and does not execute any commands when pressed.
Panic— after theFunctionbutton is pressed, the system sends an alarm to the CMS and to all users.
Mute Interconnected Fire Detectors Alarm — when pressed, mutes the alarm ofAjax fire detectors. Available only if anInterconnected Fire Detectors Alarmis enabled.
When enabled, theFunctionbutton should be pressed twice to send a panic alarm.
This setting is available ifFunction buttonis set toPanic.
Unauthorized Access Auto-Lock
If active, the keypad is locked for the pre-set time if an incorrect code is entered or unverified passes/tags are used more than 3 times in a row within 1 minute.
It is not possible to disarm the system via keypad during this time. You can unlock the keypad through the Ajax app.
Auto-lock Time, min
Selecting the keypad lock period after wrong code attempts:
3 minutes.
5 minutes.
10 minutes.
20 minutes.
30 minutes.
60 minutes.
90 minutes.
180 minutes.
Brightness
Selecting brightness of the keypad buttons backlight. The backlight works only when the keypad is active.
This option does not affect the brightness level of pass/tag reader and security modes indicators.
Buttons Volume
Selecting the keypad buttons volume level when pressed.
Pass/Tag Reading
When enabled, the security mode can be controlled with Pass and Tag access devices.
Authorization confirmation with a passcode
When enabled, system authorization using access devices requires confirmation of the action with the user or keypad code. Available if thePass/Tag Readingtoggle is enabled.
This setting is supported when KeyPad Plus Jeweller is connected to hubs with firmware versionOS Malevich 2.20or higher.
Time for confirmation
Selecting the maximum time to confirm authorization with a password after access devices’ confirmation. Available if theAuthorization confirmation with a passcodetoggle is enabled.
This setting is supported when KeyPad Plus Jeweller is connected to hubs with firmware versionOS Malevich 2.21or higher.
Assigned Group Easy Management
When enabled, changing the security mode with Tag and Pass does not require confirmation by pressing thearm,disarm, orNight Modebutton. The security mode is switched automatically.The option is available ifPass/Tag Readingis enabled in the keypad settings.
If the group mode is activated, the option is available when the keypad is assigned to a particular group — theGroup Management field in the keypad settings.
This setting replacesAssigned Group Easy Managementon KeyPad Plus Jeweller with firmware version 5.60.6.3 or higher, operating with hubs withOS Malevich 2.19or higher.
Allows users to arm/disarm the system without confirmation by pressing keypad buttons.
Three options are available:
Off— each arming or disarming attempt should be confirmed by entering the passcode or presenting the access device.
Arm/disarm using access device without confirming action by buttons— allows users to switch security modes of the system using access devices without confirmation with keypad buttons.
Disarm without disarming button— the system or its groups, the security of which is managed with a passcode or access devices, will be disarmed without confirmation by pressing keypad buttons.
A fixed passcode length should be set in the hub settings in the Ajax PRO app.
Arming without Code
The option allows you to arm the system without entering a code. To do so, just click on theArmorNight Modebutton.
Auto-wake on Delay when Entering
The feature is available on KeyPad Plus Jeweller with firmware version 6.60.0.6 or higher, operating with hubs withOS Malevich 2.19or higher.
Activates the keypad afterDelay When Enteringis started by any security device.
The auto-wake feature may also reduce the keypad battery life.
Alert with a siren if the panic button is pressed
The field is displayed if theAlarmoption is selected for theFunctionbutton.When the option is enabled, the sirens connected to the security system give an alert when the * button (Functionbutton) is pressed.
Jeweller Signal Strength Test
Switches the keypad to the Jeweller signal strength test mode.
Opens KeyPad Plus Jeweller user manual in the Ajax app.
Permanent Deactivation
Allows the user to disable the device without removing it from the system.
Three options are available:
No— the device operates in normal mode and transmits all events.
Entirely— the device does not execute system commands and does not participate in automation scenarios, and the system ignores alarms and other device notifications.
Lid only— the system ignores the device tamper triggering notifications.
Allows the user to disable events of the device until the first disarm.
Three options are available:
No— the device operates in normal mode.
Lid only— notifications on the device tamper triggering are disabled while the armed mode is active.
Entirely— the device is completely excluded from the operation of the system while the armed mode is active. The device does not execute system commands and does not report alarms or other events.
Ajax system allows you to set up a keypad code, as well as personal codes for users added to the hub.
With theOS Malevich 2.13.1update, we have also added the ability to create access codes for people who are not added to the hub. This is convenient, for example, to provide a cleaning company with access to security management.
With theOS Malevich 2.17update, codes for the rapid response units are available. The RRU codes are activated after the alarm and are valid for a specified period. See how to set up and use each type of code below.
To set keypad code
Go to keyboard settings.
SelectKeypad Code.
Set the keypad code you want.
To set the keypad duress code
Go to keypad settings.
SelectDuress Code.
Set the keypad duress code you want.
To set a personal code in the Ajax app
Go to the user profile settings (Hub→Settings→Users→Your profile settings).
SelectPasscode Settings(User ID is also visible in this menu).
SetUser CodeandDuress Code.
Each user sets a personal code individually. The admin cannot set a code for all users.
To set up an access code for a person who is not registered in the system
Go to the hub settings (Hub→Settings).
SelectKeypad Access Codes.
Set upUsernameandAccess Code.
If you want to set up a duress code, change settings for access to groups, Night Mode, code ID, temporarily disable or delete this code, select it in the list and make changes.
PRO or a user with admin rights can set up an access code or change its settings. This function is supported by hubs with OS Malevich 2.13.1 and higher. Access codes are not supported by the Hub (2G) Jeweller control panel.
To set up the RRU code
Only a PRO with the rights to configure the system can create and configure the RRU codes in theAjax PRO apps. More information about configuring this feature you can find inthis article.
The RRU codes are supported by hubs (except the Hub (2G) Jeweller model) with OS Malevich 2.17 and higher.
Adding passes and tags
KeyPad Plus Jeweller can work withTag key fobs,Pass cards, and third-party cards and key fobs that use DESFire® technology.
Before adding third-party devices that support DESFire®, make sure they have enough free memory to handle the new keypad. Preferably, the third-party device should be pre-formatted.
The maximum number of connected passes/tags depends on the hub model. At the same time, the bound passes and tags do not affect the total limit of devices on the hub.
Hub model
Number of Tag or Pass devices
Hub (4G) Jeweller
50
Hub Plus Jeweller
99
Hub 2 Jeweller
50
Hub 2 Plus Jeweller
200
Superior Hub Hybrid
50
The procedure for connecting Tag, Pass, and third-party devices is the same. See the connecting instructionshere.
Controlling security via codes
You can controlNight Mode, security of the entire facility or separate groups using general, personal, RRU, and access codes (configured by PRO or a user with admin rights). The keypad allows you to use 4 to 6 digit codes. Incorrectly entered numbers can be cleared with thebutton.
If a personal code or access code is used, the name of the user who armed or disarmed the system is displayed in the hub event feed and in the notifications list. If a general code is used, the name of the user who changed the security mode is not displayed.
Keypad access codesare supported by hubs (except theHub (2G) Jewellermodel) with OS Malevich 2.13.1 and higher.
TheRRU codesare supported by hubs (except theHub (2G) Jewellermodel) with OS Malevich 2.17 and higher.
Arming with a personal code
Theusernameis displayed in the notifications and events feed
Arming with a general code
Thedevice nameis displayed in the notifications and events feed
KeyPad Plus Jeweller is locked for the time specified in the settings if an incorrect code is entered three times in a row within 1 minute. The corresponding notifications are sent to users and to the monitoring station of the security company. A user or PRO with administrator rights can unlock the keypad in the Ajax app.
Controlling security at the object via general code
Activate the keypad by swiping your hand over it. Bring Tag or Pass to the keypad pass/tag reader if theAuthorization confirmation with a passcodefeature is activated.
Enter thegeneral code.
Press thearming/disarming/Night Modekey.
For example: 1234 →
Group security management with a general code
Activate the keypad by swiping your hand over it. Bring Tag or Pass to the keypad pass/tag reader if theAuthorization confirmation with a passcodefeature is activated.
If a security group is assigned to KeyPad Plus Jeweller (in theGroup Managementfield in the keypad settings), you do not need to enter the group ID. To manage the security mode of this group, entering a general or personal code is sufficient.
If a group is assigned to KeyPad Plus Jeweller, you will not be able to manageNight Modeusing a general code. In this case,Night Modecan only be managed using a personal code if the user has the appropriate rights.
Security management of the facility using a personal code
Activate the keypad by swiping your hand over it. Bring Tag or Pass to the keypad pass/tag reader if theAuthorization confirmation with a passcodefeature is activated.
Activate the keypad by swiping your hand over it. Bring Tag or Pass to the keypad pass/tag reader if theAuthorization confirmation with a passcodefeature is activated.
Enter theUser ID.
Press the * (Functionbutton).
Enter yourpersonal code.
Press the * (Functionbutton).
Enter theGroup ID.
Press thearming/disarming/Night Modekey.
For example: 2 → * → 1234 → * → 5 →
If a group is assigned to KeyPad Plus Jeweller (in theGroup Managementfield in the keypad settings), you do not need to enter the group ID. To manage the security mode of this group, entering a personal code is sufficient.
A duress code allows you to simulate alarm deactivation. The Ajax app and sirens installed at the facility will not give the user away in this case, but the security company and other users will be warned about the incident. You can use both a personal and a general duress code. InKeypad Access Codes, you can also set up a duress code for people not registered in the system.
Scenarios and sirens react to disarming under duress in the same way as to normal disarming.
Activate the keypad by swiping your hand over it. Bring Tag or Pass to the keypad pass/tag reader if theAuthorization confirmation with a passcodefeature is activated.
Enter thegeneral duress code.
Press the disarming button.
For example:4321 →
To use a personal duress code of registered user
Activate the keypad by swiping your hand over it. Bring Tag or Pass to the keypad pass/tag reader if theAuthorization confirmation with a passcodefeature is activated.
Enter theUser ID.
Press the * (Functionbutton).
Enter thepersonal duress code.
Press the disarming button.
For example:2 → * → 4422 →
To use a duress code of a person who is not registered in the system
Enter theduress codeset inKeypad Access Codesand press thedisarming key.
For example:4567 →
Using the RRU code
The RRU code is activated after triggering the alarm during the time configured in the hub settings, and it is valid for a specified period. This ensures that such code will only be used in case of risk, unlike keypad or user codes.
Security control of the object using the RRU code:
EnterRRU Codeand press thearming / disarming/ Night Mode activationbutton.
For example: 1234→
Security control of the group using the RRU code:
EnterRRU Code, press*, enterGroup ID, and press thearming / disarming/ Night Mode activationbutton.
For example: 1234 →*→ 2→
Security management using Tag or Pass
Activate the keypad by swiping your hand over it. KeyPad Plus Jeweller will beep (if enabled in the settings) and turn on the backlight.
Note that the keypad can be activated automatically with theAuto-wake on Delay when Enteringfunction ifDelay When Enteringis set up. This function is supported by KeyPad Plus Jeweller with firmware version 6.60.0.6 or higher and hubs withOS Malevich 2.19or higher.
Bring Tag or Pass to the keypad pass/tag reader. It is marked with wave icons.
Enter the required code if theAuthorization confirmation with a passcodefeature is activated.
Press theArm,Disarm, orNight Modebutton on the keypad.
Note that ifEasy armed mode changeis enabled in the KeyPad Plus Jeweller settings, you do not need to press theArm,Disarm, orNight Modebutton. The security mode will change to the opposite after tapping Tag or Pass.
Security control of a single group
Tag or Pass can control the security mode of a single group. This is possible if KeyPad Plus Jeweller is not assigned to any group and Tag or Pass has no group restrictions.
To change the security mode of a single group using Tag or Pass:
Activate the keypad by swiping your hand over it. Bring Tag or Pass to the keypad pass/tag reader if theAuthorization confirmation with a passcodefeature is activated.
Press thearming / disarming/ Night Mode activationbutton.
For example:→ 01→
If the security mode is successfully changed, a short beep will sound, the indicator will change, and a notification with the username will appear in the event log.
Mute Interconnected Fire Detectors Alarms function
KeyPad Plus Jeweller can mute an interconnected fire alarm by pressing theFunctionbutton (if the required setting is enabled). The reaction of the system to pressing a button depends on the settings and the state of the system:
Interconnected Fire Detectors Alarms have already propagated— by the first press of the button, all sirens of the fire detectors are muted, except for those that registered the alarm. Pressing the button again mutes the remaining detectors.
Interconnected alarms delay time lasts— by pressing theFunctionbutton, the siren of the triggeredAjax fire detectorsis muted.
KeyPad Plus Jeweller can report the current security mode, keystrokes, malfunctions, and its status by LED indication and sound. The current security mode is displayed by the backlight after the keypad is activated. The information about the current security mode is relevant even if the arming mode is changed by another device: a key fob, another keypad, or an app.
Auto-wake on Delay when Enteringfunction allows automatically activating the keypad whenDelay When Enteringis set up. This function is supported by KeyPad Plus Jeweller with firmware version 6.60.0.6 or higher and hubs withOS Malevich 2.19or higher.
You can activate the keypad by swiping your hand over the touch panel from top to bottom. When activated, the backlight on the keypad will turn on and a beep will sound (if enabled).
Event
Indication
There is no connection to the hub or radio signal range extender
LEDXblinks
KeyPad Plus Jeweller body is open (SmartBracket mount is removed)
LEDXblinks briefly once
Touch button pressed
Short beep, the current system security status LED blinks once. The volume depends on the keypad settings
The system is armed
Short beep,ArmedorNight ModeLED lights up
The system is disarmed
Two short beeps, theDisarmedLED lights up
An incorrect code was entered or there was an attempt to change security mode by an unconnected or deactivated pass/tag
Long beep, digital unit LED backlight blinks 3 times
The security mode cannot be activated (for example, a window is open and theSystem integrity checkis enabled)
Long beep, the current security status LED blinks 3 times
The hub does not respond to the command — there is no connection
Long beep,X(Malfunction)LED lights up
The keypad is locked due to a wrong code attempt or attempt to use an unauthorised pass/tag
Long beep, during which the security status LEDs and keypad backlight blink 3 times
The batteries are low
After changing the security mode, theX LED lights up. The touch buttons are locked for this time.
When you try to turn on the keypad with discharged batteries, it emits a long beep, theXLED smoothly lights up and goes off, then the keypad turns off
The system requires to confirm authorization with a password after access devices’ confirmation. Available if theAuthorization confirmation with a passcodefeature is activated
The current security status LED blinks during the set time for confirmation
Sound notifications of malfunctions
If any device is offline or the battery is low, KeyPad Plus Jeweller can notify system users with an audible sound. The keyboards’ LEDsХwill blink. Malfunction notifications will be displayed in the events feed, SMS text, or push notification.
To enable sound notifications of malfunctions, use Ajax PRO and PRO Desktopapps:
ClickDevices, choose hub and open its settings: ClickService→Sounds and Alerts
Enable toggles:If battery of any device is lowandIf any device is offline.
ClickBackto save settings.
Sound notifications of malfunctions settings are available for all hubs (except the Hub model) with firmware version OS Malevich 2.15 or higher.
Sound notifications of malfunctions are supported by KeyPad Plus Jeweller with firmware version 5.57.5.0 or higher.
Event
Indication
Note
If any device is offline.
Two short sound signals,MalfunctionindicatorХblinks twice.
Beep once per minute until all devices in the system are online.
Users can delay sound indication for 12 hours.
If KeyPad Plus is offline.
Two short sound signals,MalfunctionindicatorХblinks twice.
Beep once per minute until the keyboard in the system is online.
It’s impossible to delay sound indication.
If battery of any device is low.
Three short sound signals,MalfunctionindicatorХblinks three times.
Beep once per minute until the battery is restored or the device is removed.
Users can delay sound indication for 4 hours.
Sound notifications of malfunctions appear when the keypad indication is finished. If several malfunctions occur in the system, the keypad will notify about the loss of connection between the device and the hub first.
Functionality testing
The Ajax system provides several types of tests that help you make sure that installation points of devices are selected correctly.
KeyPad Plus Jeweller functionality tests do not start straight away but after no more than one hub-detector ping period (36 seconds when using the standard hub settings). You can change the ping period of devices in theJewellermenu of the hub settings.
Tests are available in the device settings menu (Ajax App → Devices→ KeyPad Plus Jeweller → Settings)
KeyPad Plus Jeweller is best placed indoors near the entrance. This allows disarming the system before the entry delays have expired, as well as quickly arming the system when leaving the premises.
When holding KeyPad Plus Jeweller in your hands or using it on a table, we cannot guarantee that the touch buttons will work properly.
It is a good practice to install the keypad 1.3 to 1.5 meters above the floor for convenience. Install the keypad on a flat, vertical surface. This allows KeyPad Plus Jeweller to be firmly attached to the surface and to avoid false tamper triggering.
Besides, the placement of the keypad is determined by the distance from the hub or the radio signal range extender, and the presence of obstacles between them that prevent the passage of the radio signal: walls, floors, and other objects.
Be sure to check the Jeweller signal strength at the installation site. If the signal strength is low (a single bar), we cannot guarantee a stable operation of the security system. At the very least, relocate the device as repositioning even by 20 cm can significantly improve the signal reception.
In places where parts of clothing (for example, next to the hanger), power cables, or Ethernet wire may obstruct the keypad. This can lead to false triggering of the keypad.
Inside premises with temperature and humidity outside the permissible limits. This could damage the device.
In places where KeyPad Plus Jeweller has an unstable or poor signal strength with the hub or radio signal range extender.
Within 1 meter of a hub or radio signal range extender.
Close to electrical wiring. This may cause communication interferences.
Outdoors. This could damage the device.
Installing the keypad
Prior to installing KeyPad Plus Jeweller, be sure to select the optimal location following the requirements of this manual.
Attach the keypad to the surface with double-sided adhesive tape and carry outsignal strengthandattenuation tests. If the signal strength is unstable or if one bar is displayed, move the keypad or use theradio signal range extender.
Double-sided adhesive tape may only be used for temporary attachment of the keypad. The device attached with adhesive tape can at any time be detached from the surface and fall, which may lead to failure.
Please note that if the device is attached with adhesive tape, the tamper will not trigger when trying to detach it.
Check the convenience for code entry using Tag or Pass to manage security modes. If it is inconvenient to manage the security at the selected location, relocate the keypad.
Remove the keypad from the SmartBracket mounting plate.
Attach the SmartBracket mounting plate to the surface using the bundled screws. When attaching, use all fixing points. Be sure to fix the perforated corner on the SmartBracket plate so that the tamper responds to a detachment attempt.
Slide KeyPad Plus Jeweller onto the mounting plate and tighten the mounting screw at the bottom of the body. The screw is needed for more reliable fastening and protection of the keypad from quick dismantling.
As soon as the keypad is fixed on the SmartBracket, it shall blink once with LEDX — this is a signal that the tamper has been triggered. If the LED does not blink after installation on SmartBracket, check the tamper status in the Ajax app, and then make sure the plate is firmly attached.
Maintenance
Check the functioning of your keypad on a regular basis. This can be done once or twice a week. Clean the body from dust, cobwebs, and other contaminants as they emerge. Use a soft dry cloth that is suitable for equipment care.
Do not use substances that contain alcohol, acetone, gasoline or other active solvents to clean the detector. Wipe the touch keypad gently: scratches can reduce the sensitivity of the keypad.
The batteries installed in the keypad provide up to 3.5 years of autonomous operation at default settings. If the battery is low, the system sends appropriate notifications, and theX (Malfunction) indicator smoothly lights up and goes out after each successful code entry.
KeyPad Plus Jeweller can work up to 2 months after the low battery signal. However, we recommend you replace the batteries immediately upon notification. It is advisable to use lithium batteries. They have a large capacity and are less affected by temperatures.
The warranty for the Limited Liability Company “Ajax Systems Manufacturing” products is valid for 2 years after purchase and does not extend to the bundled batteries.
If the device does not function properly, we recommend that you first contact the support service as half of the technical issues can be resolved remotely.
{"id":41613546619063,"title":"Default Title","option1":"Default Title","option2":null,"option3":null,"sku":"367305098","requires_shipping":true,"taxable":true,"featured_image":null,"available":true,"name":"AJAX Bezvadu drošības tastatūra Keypad Plus Melnā krāsā","public_title":null,"options":["Default Title"],"price":14997,"weight":0,"compare_at_price":14997,"inventory_management":"shopify","barcode":null,"requires_selling_plan":false,"selling_plan_allocations":[],"quantity_rule":{"min":1,"max":null,"increment":1}}
AJAX Bezvadu drošības tastatūra Keypad Plus Melnā krāsā
SKU: 367305098
€149,97
Vienības cena
AJAX Keypad Plus bezvadu tastatūra, pieslēdzama pie AJAX Hub 2 vai Hub 2 Plus. Ieslēdziet un izslēdziet apsardzi, nakts režīmu ar tastatūras palīdzību.
Baterijas strādā līdz 3.5 gadiem. Izveidojiet katram lietotājiem personīgu kodu, lai zinātu, kurš un kad ieslēdzis vai izlēdzis apsardzi. Lietotāja vārds tiks atspoguļots paziņojumu žurnālā.
Pēc 3 neveiksmīgiem koda ievadīšanas mēģinājumiem tiks nosūtīts trauksmes signāls. Var izveidot trauksmes kodu, ievadot kuru, tiek simulēta apsardzes noņēmšana, ja kāds piespiež lietotāju noņemt apsardzi, taču trauksmes signāls tiek nekavējoties sūtīts apsardzes kompānijai.
KeyPad Plus Jeweller user manual
Updated
KeyPad Plus Jewelleris a wireless touch keypad for managing the Ajax system with encrypted contactless cards and key fobs. Designed for indoor installation. Supports “silent alarm” when entering theduress code.
The keypad manages security modes using passwords andcardsorkey fobs. Indicates the current security mode with a LED light.
The keypad operates as part of the Ajax system by connecting via theJeweller secure radio communication protocolto the hub. The communication range without obstacles is up to 1700 meters. The pre-installed battery life is up to 3.5 years.
SmartBracket mounting plate (to remove the plate, slide it down)
Do not tear off the perforated part of the mount. It is required for actuating the tamper in case of any attempt to dismantle the keypad.
Power button
Tamper button
Keypad QR Code
Operating principle
KeyPad Plus Jeweller arms and disarms the security of the entire facility or separate groups as well as allows activating theNight Mode. You can control the security modes with KeyPad Plus Jeweller using:
Codes. The keypad supports general and personal codes, as well as arming without entering a code.
Cards or key fobs. You can connectTag key fobsandPass cardsto the system. To quickly and securely identify users, KeyPad Plus Jeweller uses the DESFire® technology. DESFire® is based on the ISO 14443 international standard and combines 128-bit encryption and copy protection.
KeyPad Plus Jeweller supports code types as follows:
Keypad code— general code set up for the keypad. When used, all events are delivered to Ajax apps on behalf of the keypad.
User code— personal code set up for a user connected to the hub. When used, all events are delivered to Ajax apps on behalf of the user.
Keypad access code— set up for a person who is not registered in the system. When used, events are delivered to Ajax apps with a name associated with this code.
RRU codeis an access code for the rapid response units (RRU) activated after the alarm and valid for a specified period. When the code is activated and used, events are delivered to Ajax apps with a title associated with this code.
The number of personal, access, and RRU codes depends on the hub model.
Access codes are not supported by theHub (2G) Jewellercontrol panel.
Before entering a code or using Tag/Pass, you should activate (“wake up”) the KeyPad Plus Jeweller by sliding your hand over the touch panel from top to bottom. When it is activated, the button backlight is enabled, and the keypad beeps.
Auto-wake on Delay when Enteringfunction allows automatically activating the keypad whenDelay When Enteringis set up. This function is supported by KeyPad Plus Jeweller with firmware version 6.60.0.6 or higher and hubs withOS Malevich 2.19or higher.
The KeyPad Plus Jeweller is equipped with LED indicators that show the current security mode and keypad malfunctions (if any). The security status is displayed only when the keypad is active (the device backlight is on).
You can use the KeyPad Plus Jeweller without ambient lighting as the keypad has a backlight. The pressing of the buttons is accompanied by a sound signal. The backlight brightness and keypad volume are adjustable in the settings. If you do not touch the keypad for 4 seconds, KeyPad Plus Jeweller reduces the backlight brightness, and 8 seconds later goes into power-saving mode and turns off the display.
If the batteries are discharged, the backlight turns on at the minimum level regardless of the settings.
Function button
KeyPad Plus Jeweller has aFunctionbutton that operates in 3 modes:
Off— the button is disabled and nothing happens after it is pressed.
Alarm— after theFunctionbutton is pressed, the system sends an alarm to the security company monitoring station and all users.
Mute interconnected fire detectors alarm— after theFunctionbutton is pressed, the system mutes the alarm of theAjax fire detectors. Available only if anInterconnected Fire Detectors Alarmis enabled (Hub → Settings→ Service → Fire detectors settings)
KeyPad Plus Jeweller supportsduress code. It allows you to simulate alarm deactivation. TheAjax appandsirensinstalled at the facility will not give you away in this case, but the security company and other users of the security system will be warned about the incident.
KeyPad Plus Jeweller can participate in two-stage arming, but cannot be used as a second-stage device. The two-stage arming process using Tag or Pass is similar to arming using a personal or general code on the keypad.
The Ajax system can connect to the CMS and transmit events and alarms to the monitoring station of the security company inSurGard (Contact ID), ADEMCO 685, SIA (DC-09), and other proprietary protocol formats. A complete list of supported protocols isavailable here. The device ID and the number of the loop (zone) can be found inits states.
Connection
KeyPad Plus Jeweller is incompatible with Hub (2G) Jeweller, third-party security central units, and ocBridge Plus and uartBridge integration modules.
Before starting connection
The hub and the device operating at different radio frequencies are incompatible. The radio-frequency range of the device may vary by region. We recommend purchasing and using Ajax devices in the same region. You can check the range of operating radio frequencies with thetechnical support service.
Install the Ajax app andcreate an account. Add a hub and create at least one room.
Ensure that the hub is on and has Internet access (via Ethernet cable, Wi-Fi, and/or mobile network). This can be done by opening the Ajax app or by looking at the hub logo on the faceplate — it lights white or green if the hub is connected to the network.
Make sure that the hub is not in armed mode and does not start updates by checking its status in the app.
Only a user or PRO with full admin rights can add a device to the hub.
To connect KeyPad Plus Jeweller
Open the Ajax app. If your account has access to multiple hubs, select the one to which you want to connect KeyPad Plus Jeweller.
Go to theDevicesmenu and clickAdd Device.
Name the keypad, scan or enter the QR code (located on the package and under the SmartBracket mount), and select a room.
ClickAdd; the countdown will begin.
Turn on the keypad by holding the power button for 3 seconds. Once connected, KeyPad Plus Jeweller will appear in the hub device list in the app. To connect, locate the keypad at the same protected facility as the system (within the coverage area of the hub radio network range). If the connection fails, try again in 10 seconds.
The keypad only works with one hub. When connected to a new hub, the device stops sending commands to the old hub. Once added to a new hub, KeyPad Plus Jeweller is not removed from the device list of the old hub. This must be done manually through the Ajax app.
KeyPad Plus Jeweller turns off automatically 6 seconds after being turned on if the keypad fails to connect to the hub. Therefore, you do not need to turn off the device to retry the connection.
Updating the statuses of devices in the list depends on the Jeweller settings; the default value is 36 seconds.
Icons
The icons represent some of KeyPad Plus Jeweller states. You can see them in theDevicestab in the Ajax app.
Icon
Value
Jeweller signal strength — Displays the signal strength between the hub or radio signal range extender and KeyPad Plus Jeweller
Displays the status of the ReX Jeweller range extender use.
The field is not displayed if the keypad works directly with the hub.
Pass/Tag Reading
Displays if card and keyfob reader is enabled.
Assigned Group Easy Management
Displays whether or not the security mode can be switched with Pass or Tag and without confirmation by the control buttons,,.
Easy Armed Mode Change
This setting replacesAssigned Group Easy Managementon KeyPad Plus Jeweller with firmware version 5.60.6.3 or higher, operating with hubs withOS Malevich 2.19or higher.
Shows the configuration for theEasy Armed Mode Changefeature:
Off— each arming or disarming attempt should be confirmed by entering the passcode or presenting the access device.
Arm/disarm using access device without confirming action by buttons— allows users to switch security modes of the system using access devices without confirmation by pressing keypad buttons.
Disarm without disarming button— the system or its groups, the security of which is managed with a passcode or access devices, will be disarmed without confirmation by pressing keypad buttons.
A fixed passcode length should be set in the hub settings in the Ajax PRO app.
Permanent Deactivation
Shows the status of the device:
No— the device operates normally and transmits all events.
Lid only— the hub admin has disabled notifications about the body opening.
Entirely— the hub admin has entirely excluded the keypad from the system. The device does not execute system commands and does not report alarms or other events.
Shows the status of the keypad one-time deactivation setting:
No— the keypad operates in normal mode.
Lid only— notifications on the keypad tamper triggering are disabled until the first disarm.
Entirely— the keypad is entirely excluded from the operation of the system until the first disarm. The device does not execute system commands and does not report alarms or other events.
KeyPad Plus Jeweller is configured in the Ajax app:
Go to theDevicestab.
SelectKeyPad Plus Jewellerfrom the list.
Go toSettingsby clicking on the gear icon.
To apply the settings after the change, click theBackbutton
Parameter
Value
Name
Device name. Displayed in the list of hub devices, SMS text, and notifications in the event feed.
To change the device name, click on the pencil icon.
The name can contain up to 12 Cyrillic characters or up to 24 Latin characters.
Room
Selecting the virtual room to which KeyPad Plus Jeweller is assigned.
The name of the room is displayed in the text of SMS and notifications in the event feed.
Group Management
Selecting the security group controlled by the device. You can select all groups or just one.
The field is displayed when theGroup modeis enabled.
If theFollowed groupfeature is configured for groups, their security state can automatically change depending on their settings and initiators’ states.
.
Access Settings
Selecting the method of arming/disarming:
Keypad codes only.
User codes only.
Keypad and user codes.
To activate theKeypad Access Codesset up for people who are not registered in the system, select the options on the keypad:Keypad codes onlyorKeypad and user codes
.
Keypad Code
Selection of a general code for security control. Contains 4 to 6 digits.
Duress Code
Selecting a general duress code for silent alarm. Contains 4 to 6 digits.
Selecting the function of the * button (Functionbutton):
Off— theFunctionbutton is disabled and does not execute any commands when pressed.
Panic— after theFunctionbutton is pressed, the system sends an alarm to the CMS and to all users.
Mute Interconnected Fire Detectors Alarm — when pressed, mutes the alarm ofAjax fire detectors. Available only if anInterconnected Fire Detectors Alarmis enabled.
When enabled, theFunctionbutton should be pressed twice to send a panic alarm.
This setting is available ifFunction buttonis set toPanic.
Unauthorized Access Auto-Lock
If active, the keypad is locked for the pre-set time if an incorrect code is entered or unverified passes/tags are used more than 3 times in a row within 1 minute.
It is not possible to disarm the system via keypad during this time. You can unlock the keypad through the Ajax app.
Auto-lock Time, min
Selecting the keypad lock period after wrong code attempts:
3 minutes.
5 minutes.
10 minutes.
20 minutes.
30 minutes.
60 minutes.
90 minutes.
180 minutes.
Brightness
Selecting brightness of the keypad buttons backlight. The backlight works only when the keypad is active.
This option does not affect the brightness level of pass/tag reader and security modes indicators.
Buttons Volume
Selecting the keypad buttons volume level when pressed.
Pass/Tag Reading
When enabled, the security mode can be controlled with Pass and Tag access devices.
Authorization confirmation with a passcode
When enabled, system authorization using access devices requires confirmation of the action with the user or keypad code. Available if thePass/Tag Readingtoggle is enabled.
This setting is supported when KeyPad Plus Jeweller is connected to hubs with firmware versionOS Malevich 2.20or higher.
Time for confirmation
Selecting the maximum time to confirm authorization with a password after access devices’ confirmation. Available if theAuthorization confirmation with a passcodetoggle is enabled.
This setting is supported when KeyPad Plus Jeweller is connected to hubs with firmware versionOS Malevich 2.21or higher.
Assigned Group Easy Management
When enabled, changing the security mode with Tag and Pass does not require confirmation by pressing thearm,disarm, orNight Modebutton. The security mode is switched automatically.The option is available ifPass/Tag Readingis enabled in the keypad settings.
If the group mode is activated, the option is available when the keypad is assigned to a particular group — theGroup Management field in the keypad settings.
This setting replacesAssigned Group Easy Managementon KeyPad Plus Jeweller with firmware version 5.60.6.3 or higher, operating with hubs withOS Malevich 2.19or higher.
Allows users to arm/disarm the system without confirmation by pressing keypad buttons.
Three options are available:
Off— each arming or disarming attempt should be confirmed by entering the passcode or presenting the access device.
Arm/disarm using access device without confirming action by buttons— allows users to switch security modes of the system using access devices without confirmation with keypad buttons.
Disarm without disarming button— the system or its groups, the security of which is managed with a passcode or access devices, will be disarmed without confirmation by pressing keypad buttons.
A fixed passcode length should be set in the hub settings in the Ajax PRO app.
Arming without Code
The option allows you to arm the system without entering a code. To do so, just click on theArmorNight Modebutton.
Auto-wake on Delay when Entering
The feature is available on KeyPad Plus Jeweller with firmware version 6.60.0.6 or higher, operating with hubs withOS Malevich 2.19or higher.
Activates the keypad afterDelay When Enteringis started by any security device.
The auto-wake feature may also reduce the keypad battery life.
Alert with a siren if the panic button is pressed
The field is displayed if theAlarmoption is selected for theFunctionbutton.When the option is enabled, the sirens connected to the security system give an alert when the * button (Functionbutton) is pressed.
Jeweller Signal Strength Test
Switches the keypad to the Jeweller signal strength test mode.
Opens KeyPad Plus Jeweller user manual in the Ajax app.
Permanent Deactivation
Allows the user to disable the device without removing it from the system.
Three options are available:
No— the device operates in normal mode and transmits all events.
Entirely— the device does not execute system commands and does not participate in automation scenarios, and the system ignores alarms and other device notifications.
Lid only— the system ignores the device tamper triggering notifications.
Allows the user to disable events of the device until the first disarm.
Three options are available:
No— the device operates in normal mode.
Lid only— notifications on the device tamper triggering are disabled while the armed mode is active.
Entirely— the device is completely excluded from the operation of the system while the armed mode is active. The device does not execute system commands and does not report alarms or other events.
Ajax system allows you to set up a keypad code, as well as personal codes for users added to the hub.
With theOS Malevich 2.13.1update, we have also added the ability to create access codes for people who are not added to the hub. This is convenient, for example, to provide a cleaning company with access to security management.
With theOS Malevich 2.17update, codes for the rapid response units are available. The RRU codes are activated after the alarm and are valid for a specified period. See how to set up and use each type of code below.
To set keypad code
Go to keyboard settings.
SelectKeypad Code.
Set the keypad code you want.
To set the keypad duress code
Go to keypad settings.
SelectDuress Code.
Set the keypad duress code you want.
To set a personal code in the Ajax app
Go to the user profile settings (Hub→Settings→Users→Your profile settings).
SelectPasscode Settings(User ID is also visible in this menu).
SetUser CodeandDuress Code.
Each user sets a personal code individually. The admin cannot set a code for all users.
To set up an access code for a person who is not registered in the system
Go to the hub settings (Hub→Settings).
SelectKeypad Access Codes.
Set upUsernameandAccess Code.
If you want to set up a duress code, change settings for access to groups, Night Mode, code ID, temporarily disable or delete this code, select it in the list and make changes.
PRO or a user with admin rights can set up an access code or change its settings. This function is supported by hubs with OS Malevich 2.13.1 and higher. Access codes are not supported by the Hub (2G) Jeweller control panel.
To set up the RRU code
Only a PRO with the rights to configure the system can create and configure the RRU codes in theAjax PRO apps. More information about configuring this feature you can find inthis article.
The RRU codes are supported by hubs (except the Hub (2G) Jeweller model) with OS Malevich 2.17 and higher.
Adding passes and tags
KeyPad Plus Jeweller can work withTag key fobs,Pass cards, and third-party cards and key fobs that use DESFire® technology.
Before adding third-party devices that support DESFire®, make sure they have enough free memory to handle the new keypad. Preferably, the third-party device should be pre-formatted.
The maximum number of connected passes/tags depends on the hub model. At the same time, the bound passes and tags do not affect the total limit of devices on the hub.
Hub model
Number of Tag or Pass devices
Hub (4G) Jeweller
50
Hub Plus Jeweller
99
Hub 2 Jeweller
50
Hub 2 Plus Jeweller
200
Superior Hub Hybrid
50
The procedure for connecting Tag, Pass, and third-party devices is the same. See the connecting instructionshere.
Controlling security via codes
You can controlNight Mode, security of the entire facility or separate groups using general, personal, RRU, and access codes (configured by PRO or a user with admin rights). The keypad allows you to use 4 to 6 digit codes. Incorrectly entered numbers can be cleared with thebutton.
If a personal code or access code is used, the name of the user who armed or disarmed the system is displayed in the hub event feed and in the notifications list. If a general code is used, the name of the user who changed the security mode is not displayed.
Keypad access codesare supported by hubs (except theHub (2G) Jewellermodel) with OS Malevich 2.13.1 and higher.
TheRRU codesare supported by hubs (except theHub (2G) Jewellermodel) with OS Malevich 2.17 and higher.
Arming with a personal code
Theusernameis displayed in the notifications and events feed
Arming with a general code
Thedevice nameis displayed in the notifications and events feed
KeyPad Plus Jeweller is locked for the time specified in the settings if an incorrect code is entered three times in a row within 1 minute. The corresponding notifications are sent to users and to the monitoring station of the security company. A user or PRO with administrator rights can unlock the keypad in the Ajax app.
Controlling security at the object via general code
Activate the keypad by swiping your hand over it. Bring Tag or Pass to the keypad pass/tag reader if theAuthorization confirmation with a passcodefeature is activated.
Enter thegeneral code.
Press thearming/disarming/Night Modekey.
For example: 1234 →
Group security management with a general code
Activate the keypad by swiping your hand over it. Bring Tag or Pass to the keypad pass/tag reader if theAuthorization confirmation with a passcodefeature is activated.
If a security group is assigned to KeyPad Plus Jeweller (in theGroup Managementfield in the keypad settings), you do not need to enter the group ID. To manage the security mode of this group, entering a general or personal code is sufficient.
If a group is assigned to KeyPad Plus Jeweller, you will not be able to manageNight Modeusing a general code. In this case,Night Modecan only be managed using a personal code if the user has the appropriate rights.
Security management of the facility using a personal code
Activate the keypad by swiping your hand over it. Bring Tag or Pass to the keypad pass/tag reader if theAuthorization confirmation with a passcodefeature is activated.
Activate the keypad by swiping your hand over it. Bring Tag or Pass to the keypad pass/tag reader if theAuthorization confirmation with a passcodefeature is activated.
Enter theUser ID.
Press the * (Functionbutton).
Enter yourpersonal code.
Press the * (Functionbutton).
Enter theGroup ID.
Press thearming/disarming/Night Modekey.
For example: 2 → * → 1234 → * → 5 →
If a group is assigned to KeyPad Plus Jeweller (in theGroup Managementfield in the keypad settings), you do not need to enter the group ID. To manage the security mode of this group, entering a personal code is sufficient.
A duress code allows you to simulate alarm deactivation. The Ajax app and sirens installed at the facility will not give the user away in this case, but the security company and other users will be warned about the incident. You can use both a personal and a general duress code. InKeypad Access Codes, you can also set up a duress code for people not registered in the system.
Scenarios and sirens react to disarming under duress in the same way as to normal disarming.
Activate the keypad by swiping your hand over it. Bring Tag or Pass to the keypad pass/tag reader if theAuthorization confirmation with a passcodefeature is activated.
Enter thegeneral duress code.
Press the disarming button.
For example:4321 →
To use a personal duress code of registered user
Activate the keypad by swiping your hand over it. Bring Tag or Pass to the keypad pass/tag reader if theAuthorization confirmation with a passcodefeature is activated.
Enter theUser ID.
Press the * (Functionbutton).
Enter thepersonal duress code.
Press the disarming button.
For example:2 → * → 4422 →
To use a duress code of a person who is not registered in the system
Enter theduress codeset inKeypad Access Codesand press thedisarming key.
For example:4567 →
Using the RRU code
The RRU code is activated after triggering the alarm during the time configured in the hub settings, and it is valid for a specified period. This ensures that such code will only be used in case of risk, unlike keypad or user codes.
Security control of the object using the RRU code:
EnterRRU Codeand press thearming / disarming/ Night Mode activationbutton.
For example: 1234→
Security control of the group using the RRU code:
EnterRRU Code, press*, enterGroup ID, and press thearming / disarming/ Night Mode activationbutton.
For example: 1234 →*→ 2→
Security management using Tag or Pass
Activate the keypad by swiping your hand over it. KeyPad Plus Jeweller will beep (if enabled in the settings) and turn on the backlight.
Note that the keypad can be activated automatically with theAuto-wake on Delay when Enteringfunction ifDelay When Enteringis set up. This function is supported by KeyPad Plus Jeweller with firmware version 6.60.0.6 or higher and hubs withOS Malevich 2.19or higher.
Bring Tag or Pass to the keypad pass/tag reader. It is marked with wave icons.
Enter the required code if theAuthorization confirmation with a passcodefeature is activated.
Press theArm,Disarm, orNight Modebutton on the keypad.
Note that ifEasy armed mode changeis enabled in the KeyPad Plus Jeweller settings, you do not need to press theArm,Disarm, orNight Modebutton. The security mode will change to the opposite after tapping Tag or Pass.
Security control of a single group
Tag or Pass can control the security mode of a single group. This is possible if KeyPad Plus Jeweller is not assigned to any group and Tag or Pass has no group restrictions.
To change the security mode of a single group using Tag or Pass:
Activate the keypad by swiping your hand over it. Bring Tag or Pass to the keypad pass/tag reader if theAuthorization confirmation with a passcodefeature is activated.
Press thearming / disarming/ Night Mode activationbutton.
For example:→ 01→
If the security mode is successfully changed, a short beep will sound, the indicator will change, and a notification with the username will appear in the event log.
Mute Interconnected Fire Detectors Alarms function
KeyPad Plus Jeweller can mute an interconnected fire alarm by pressing theFunctionbutton (if the required setting is enabled). The reaction of the system to pressing a button depends on the settings and the state of the system:
Interconnected Fire Detectors Alarms have already propagated— by the first press of the button, all sirens of the fire detectors are muted, except for those that registered the alarm. Pressing the button again mutes the remaining detectors.
Interconnected alarms delay time lasts— by pressing theFunctionbutton, the siren of the triggeredAjax fire detectorsis muted.
KeyPad Plus Jeweller can report the current security mode, keystrokes, malfunctions, and its status by LED indication and sound. The current security mode is displayed by the backlight after the keypad is activated. The information about the current security mode is relevant even if the arming mode is changed by another device: a key fob, another keypad, or an app.
Auto-wake on Delay when Enteringfunction allows automatically activating the keypad whenDelay When Enteringis set up. This function is supported by KeyPad Plus Jeweller with firmware version 6.60.0.6 or higher and hubs withOS Malevich 2.19or higher.
You can activate the keypad by swiping your hand over the touch panel from top to bottom. When activated, the backlight on the keypad will turn on and a beep will sound (if enabled).
Event
Indication
There is no connection to the hub or radio signal range extender
LEDXblinks
KeyPad Plus Jeweller body is open (SmartBracket mount is removed)
LEDXblinks briefly once
Touch button pressed
Short beep, the current system security status LED blinks once. The volume depends on the keypad settings
The system is armed
Short beep,ArmedorNight ModeLED lights up
The system is disarmed
Two short beeps, theDisarmedLED lights up
An incorrect code was entered or there was an attempt to change security mode by an unconnected or deactivated pass/tag
Long beep, digital unit LED backlight blinks 3 times
The security mode cannot be activated (for example, a window is open and theSystem integrity checkis enabled)
Long beep, the current security status LED blinks 3 times
The hub does not respond to the command — there is no connection
Long beep,X(Malfunction)LED lights up
The keypad is locked due to a wrong code attempt or attempt to use an unauthorised pass/tag
Long beep, during which the security status LEDs and keypad backlight blink 3 times
The batteries are low
After changing the security mode, theX LED lights up. The touch buttons are locked for this time.
When you try to turn on the keypad with discharged batteries, it emits a long beep, theXLED smoothly lights up and goes off, then the keypad turns off
The system requires to confirm authorization with a password after access devices’ confirmation. Available if theAuthorization confirmation with a passcodefeature is activated
The current security status LED blinks during the set time for confirmation
Sound notifications of malfunctions
If any device is offline or the battery is low, KeyPad Plus Jeweller can notify system users with an audible sound. The keyboards’ LEDsХwill blink. Malfunction notifications will be displayed in the events feed, SMS text, or push notification.
To enable sound notifications of malfunctions, use Ajax PRO and PRO Desktopapps:
ClickDevices, choose hub and open its settings: ClickService→Sounds and Alerts
Enable toggles:If battery of any device is lowandIf any device is offline.
ClickBackto save settings.
Sound notifications of malfunctions settings are available for all hubs (except the Hub model) with firmware version OS Malevich 2.15 or higher.
Sound notifications of malfunctions are supported by KeyPad Plus Jeweller with firmware version 5.57.5.0 or higher.
Event
Indication
Note
If any device is offline.
Two short sound signals,MalfunctionindicatorХblinks twice.
Beep once per minute until all devices in the system are online.
Users can delay sound indication for 12 hours.
If KeyPad Plus is offline.
Two short sound signals,MalfunctionindicatorХblinks twice.
Beep once per minute until the keyboard in the system is online.
It’s impossible to delay sound indication.
If battery of any device is low.
Three short sound signals,MalfunctionindicatorХblinks three times.
Beep once per minute until the battery is restored or the device is removed.
Users can delay sound indication for 4 hours.
Sound notifications of malfunctions appear when the keypad indication is finished. If several malfunctions occur in the system, the keypad will notify about the loss of connection between the device and the hub first.
Functionality testing
The Ajax system provides several types of tests that help you make sure that installation points of devices are selected correctly.
KeyPad Plus Jeweller functionality tests do not start straight away but after no more than one hub-detector ping period (36 seconds when using the standard hub settings). You can change the ping period of devices in theJewellermenu of the hub settings.
Tests are available in the device settings menu (Ajax App → Devices→ KeyPad Plus Jeweller → Settings)
KeyPad Plus Jeweller is best placed indoors near the entrance. This allows disarming the system before the entry delays have expired, as well as quickly arming the system when leaving the premises.
When holding KeyPad Plus Jeweller in your hands or using it on a table, we cannot guarantee that the touch buttons will work properly.
It is a good practice to install the keypad 1.3 to 1.5 meters above the floor for convenience. Install the keypad on a flat, vertical surface. This allows KeyPad Plus Jeweller to be firmly attached to the surface and to avoid false tamper triggering.
Besides, the placement of the keypad is determined by the distance from the hub or the radio signal range extender, and the presence of obstacles between them that prevent the passage of the radio signal: walls, floors, and other objects.
Be sure to check the Jeweller signal strength at the installation site. If the signal strength is low (a single bar), we cannot guarantee a stable operation of the security system. At the very least, relocate the device as repositioning even by 20 cm can significantly improve the signal reception.
In places where parts of clothing (for example, next to the hanger), power cables, or Ethernet wire may obstruct the keypad. This can lead to false triggering of the keypad.
Inside premises with temperature and humidity outside the permissible limits. This could damage the device.
In places where KeyPad Plus Jeweller has an unstable or poor signal strength with the hub or radio signal range extender.
Within 1 meter of a hub or radio signal range extender.
Close to electrical wiring. This may cause communication interferences.
Outdoors. This could damage the device.
Installing the keypad
Prior to installing KeyPad Plus Jeweller, be sure to select the optimal location following the requirements of this manual.
Attach the keypad to the surface with double-sided adhesive tape and carry outsignal strengthandattenuation tests. If the signal strength is unstable or if one bar is displayed, move the keypad or use theradio signal range extender.
Double-sided adhesive tape may only be used for temporary attachment of the keypad. The device attached with adhesive tape can at any time be detached from the surface and fall, which may lead to failure.
Please note that if the device is attached with adhesive tape, the tamper will not trigger when trying to detach it.
Check the convenience for code entry using Tag or Pass to manage security modes. If it is inconvenient to manage the security at the selected location, relocate the keypad.
Remove the keypad from the SmartBracket mounting plate.
Attach the SmartBracket mounting plate to the surface using the bundled screws. When attaching, use all fixing points. Be sure to fix the perforated corner on the SmartBracket plate so that the tamper responds to a detachment attempt.
Slide KeyPad Plus Jeweller onto the mounting plate and tighten the mounting screw at the bottom of the body. The screw is needed for more reliable fastening and protection of the keypad from quick dismantling.
As soon as the keypad is fixed on the SmartBracket, it shall blink once with LEDX — this is a signal that the tamper has been triggered. If the LED does not blink after installation on SmartBracket, check the tamper status in the Ajax app, and then make sure the plate is firmly attached.
Maintenance
Check the functioning of your keypad on a regular basis. This can be done once or twice a week. Clean the body from dust, cobwebs, and other contaminants as they emerge. Use a soft dry cloth that is suitable for equipment care.
Do not use substances that contain alcohol, acetone, gasoline or other active solvents to clean the detector. Wipe the touch keypad gently: scratches can reduce the sensitivity of the keypad.
The batteries installed in the keypad provide up to 3.5 years of autonomous operation at default settings. If the battery is low, the system sends appropriate notifications, and theX (Malfunction) indicator smoothly lights up and goes out after each successful code entry.
KeyPad Plus Jeweller can work up to 2 months after the low battery signal. However, we recommend you replace the batteries immediately upon notification. It is advisable to use lithium batteries. They have a large capacity and are less affected by temperatures.
The warranty for the Limited Liability Company “Ajax Systems Manufacturing” products is valid for 2 years after purchase and does not extend to the bundled batteries.
If the device does not function properly, we recommend that you first contact the support service as half of the technical issues can be resolved remotely.
{"id":46899006177615,"title":"Default Title","option1":"Default Title","option2":null,"option3":null,"sku":"367304827","requires_shipping":true,"taxable":true,"featured_image":null,"available":true,"name":"AJAX Bezvadu Dūmu un Siltuma Detektors FireProtect Baltā krāsā","public_title":null,"options":["Default Title"],"price":7055,"weight":0,"compare_at_price":8998,"inventory_management":"shopify","barcode":"856963007224","requires_selling_plan":false,"selling_plan_allocations":[],"quantity_rule":{"min":1,"max":null,"increment":1}}
AJAX Bezvadu Dūmu un Siltuma Detektors FireProtect Baltā krāsā
SKU: 367304827
€70,55€89,98
Vienības cena
Apraksts
AJAX Bezvadu dūmu detektorsFireProtect ar temperatūras sensoru, kas uzrauga drošību telpā 24 stundas diennaktī un nekavējoties ziņo par dūmiem un straujiem temperatūras lēcieniem.
Var strādāt atsevišķi kā dūmu detektors, pateicoties iebūvētai sirēnai. Neatkarīgi pārbauda dūmu kameru un nekavējoties paziņo par putekļu noņemšanas nepieciešamību.
Ierīce uztver dūmus, izmantojot kameru ar fotoelektrisko sensoru. Bet ja dūmi vēl neizdalās, detektors reģistrē temperatūras paaugstināšanos telpā.
Gatavs darbam uzreiz izņemot no kastes: akumulators jau ir ievietots, tāpēc detektors nav jāizjauc. Ar vienu klikšķi to var savienot ar centrāli mobilajā lietotnē. To var uzstādīt uz SmartBracket kronšteina tikai dažu minūšu laikā.
Detektora tips: Bezvadu
Uzstādīšana: Iekštelpās
Savienojamība: Ar visām Ajax Hub centrālēm, bet var izmantot kā atsevišķu iekārtu
Uztveršanas elements: Fotoelektriskais un temperatūras sensors
Aktivācijas slieksnis: +59°С ±2°С
Paziņojumu veidi: Skaņa/gaisma
Iebūvētās sirēnas skaļums: 85 dB
Trauksmes signāla nodošanas ātrums: 0.15 s
Viltus trauksmju filtrs: Ir
Barošana: Divas CR2 baterijas, 3 V
Rezerves baterija: CR2032
Baterijas darbības ilgums: 4 gadi
Baterijām garantijas nav
Darbības temperatūra: No 0°С līdz +65°С
Mitrums: Līdz 80%
Attālināta testēšana un iestatījumi: Ir
Izmēri: 132 × 132 × 31 mm
Svars: 220 g
Uzstādīšanas instrukcija pieejama Ajax lietotnē, kura atvērsies, noskenējot detektora QR kodu uzstādīšanas brīdī. Vienkārša uzstādīšana un pievienošana pie Ajax centrāles Hub.
Pieejams saņemšanai veikalā
Izpārdots veikalā
Pievienots salīdzināšanai
Sasniegts count_product-produktu limits
Pievienots salīdzināšanai
Sasniegts count_product-produktu limits
{"id":41592065458359,"title":"Default Title","option1":"Default Title","option2":null,"option3":null,"sku":"367304851","requires_shipping":true,"taxable":true,"featured_image":null,"available":true,"name":"AJAX Bezvadu Iekštelpu Aizkara Tipa Kustības Detektors MotionProtect Curtain Baltā krāsā","public_title":null,"options":["Default Title"],"price":7055,"weight":0,"compare_at_price":8998,"inventory_management":"shopify","barcode":"856963007903","requires_selling_plan":false,"selling_plan_allocations":[],"quantity_rule":{"min":1,"max":null,"increment":1}}
Barošanas avots: Baterijas CR123A, 3 V, līdz 3 gadiem
Komunikācijas diapazons ar citām iekārtām: līdz 1,700 m atklātā vidē
Darba temperatūra: No −10°С līdz +40°С
Izmērs: 134 × 44 × 34 mm
Svars: 118 g
Baterijām nav garantijas.
Uzstādīšanas instrukcija pieejama Ajax lietotnē, kura atvērsies, noskenējot detektora QR kodu uzstādīšanas brīdī. Vienkārša uzstādīšana un pievienošana pie Ajax centrāles Hub.
Pieejams saņemšanai veikalā
Izpārdots veikalā
Pievienots salīdzināšanai
Sasniegts count_product-produktu limits
Pievienots salīdzināšanai
Sasniegts count_product-produktu limits
{"id":41613546913975,"title":"Default Title","option1":"Default Title","option2":null,"option3":null,"sku":"367304850","requires_shipping":true,"taxable":true,"featured_image":null,"available":true,"name":"AJAX Bezvadu Iekštelpu Aizkara Tipa Kustības Detektors MotionProtect Curtain melnā krāsā","public_title":null,"options":["Default Title"],"price":7055,"weight":0,"compare_at_price":8998,"inventory_management":"shopify","barcode":null,"requires_selling_plan":false,"selling_plan_allocations":[],"quantity_rule":{"min":1,"max":null,"increment":1}}
Barošanas avots: Baterijas CR123A, 3 V, līdz 3 gadiem
Komunikācijas diapazons ar citām iekārtām: līdz 1,700 m atklātā vidē
Darba temperatūra: No −10°С līdz +40°С
Izmērs: 134 × 44 × 34 mm
Svars: 118 g
Baterijām nav garantijas.
Uzstādīšanas instrukcija pieejama Ajax lietotnē, kura atvērsies, noskenējot detektora QR kodu uzstādīšanas brīdī. Vienkārša uzstādīšana un pievienošana pie Ajax centrāles Hub.
Pieejams saņemšanai veikalā
Izpārdots veikalā
Pievienots salīdzināšanai
Sasniegts count_product-produktu limits
Pievienots salīdzināšanai
Sasniegts count_product-produktu limits
{"id":41613546193079,"title":"Default Title","option1":"Default Title","option2":null,"option3":null,"sku":"367304848","requires_shipping":true,"taxable":true,"featured_image":null,"available":true,"name":"AJAX Bezvadu iekštelpu kustības detektors MotionCam ar fotoverifikāciju Baltā krāsā","public_title":null,"options":["Default Title"],"price":14622,"weight":0,"compare_at_price":17246,"inventory_management":"shopify","barcode":"856963007699","requires_selling_plan":false,"selling_plan_allocations":[],"quantity_rule":{"min":1,"max":null,"increment":1}}
AJAX Bezvadu iekštelpu kustības detektors MotionCam ar fotoverifikāciju Baltā krāsā
SKU: 367304848
€146,22€172,46
Vienības cena
Bezvadu kustības detektors ar fotoverifikācijas iespēju MotionCam.
Strādā tikai ar AJAX centrāliHub 2vaiHub 2 Plus.
Atsūta verifikācijas attēlu lietotājam 9 sekundēs.
Izmantojot MotionCam, Jūs uzzināsiet par faktisko situāciju mājās pat pirms zagļi sapratīs, ka viņi ir noķerti. Animēta fotoattēlu sērija tiek nosūtīta uzreiz pēc kustības uztveršanas.
MotionCam ir paredzēts, lai kontrolētu Jūsu drošību, nevis personīgo dzīvi. Kustības detektors nevar uzņemt attēlus pēc pieprasījuma. Kamera aktivizējas tikai, reaģējot uz kustības trauksmi. Dati tiek šifrēti visā pārraides un uzglabāšanas procesā. Jums nav visu laiku jāvēro videokameras, lai zinātu, kāpēc noskanēja signalizācija.
Detektors nereaģē uz dzīvniekiem līdz 20 kg un 50 cm. Bet, ja kādam īpaši zinātkāram mīlulim izdosies iedarbināt signalizāciju (īpaši kaķim), fotoreportāža apstiprinās, ka māja ir drošībā.
Vienkārša pievienošana, noskenējot iekārtas QR kodu Ajax lietotnē.
Uzstādīšana: Iekštelpās
Kustības uztveršanas attālums: Līdz 12m
Imunitāte pret dzīvniekiem: Svars līdz 20 kg, 50 cm
Barošana: Baterijas CR123A (×2), 3 V, darba ilgums līdz 4 gadiem, vai līdz 2.5 gadiem, ja ieslēgta funkcija “Ieejas aizkāve”
Baterijām garantijas nav.
Darba temperatūra: no -10°C līdz +40°C
Izmērs: 135 × 70 × 60 mm
Svars: 167 g
Uzstādīšanas instrukcija pieejama Ajax lietotnē, kura atvērsies, noskenējot detektora QR kodu uzstādīšanas brīdī. Vienkārša uzstādīšana un pievienošana pie Ajax centrāles Hub.
Pieejams saņemšanai veikalā
Izpārdots veikalā
Pievienots salīdzināšanai
Sasniegts count_product-produktu limits
Pievienots salīdzināšanai
Sasniegts count_product-produktu limits
{"id":46874647560527,"title":"Default Title","option1":"Default Title","option2":null,"option3":null,"sku":"367308964","requires_shipping":true,"taxable":true,"featured_image":null,"available":true,"name":"AJAX Bezvadu Iekštelpu kustības detektors MotionCam PhOD (Attēls pēc pieprasījuma) ar fotoverifikāciju Baltā krāsā","public_title":null,"options":["Default Title"],"price":14816,"weight":0,"compare_at_price":18896,"inventory_management":"shopify","barcode":"4823114014161","requires_selling_plan":false,"selling_plan_allocations":[],"quantity_rule":{"min":1,"max":null,"increment":1}}
AJAX Bezvadu Iekštelpu kustības detektors MotionCam PhOD (Attēls pēc pieprasījuma) ar fotoverifikāciju Baltā krāsā
SKU: 367308964
€148,16€188,96
Vienības cena
Bezvadu kustības detektors ar fotoverifikācijas iespēju MotionCam PhOD. Foto pēc pieprasījuma.
Strādā tikai ar AJAX centrāliHub 2vaiHub 2 Plus.
Atsūta verifikācijas attēlu lietotājam 9 sekundēs.
Izmantojot MotionCam, Jūs uzzināsiet par faktisko situāciju mājās pat pirms zagļi sapratīs, ka viņi ir noķerti. Animēta fotoattēlu sērija tiek nosūtīta uzreiz pēc kustības uztveršanas.
MotionCam ir paredzēts, lai kontrolētu Jūsu drošību, nevis personīgo dzīvi. Kustības detektors nevar uzņemt attēlus pēc pieprasījuma. Kamera aktivizējas tikai, reaģējot uz kustības trauksmi. Dati tiek šifrēti visā pārraides un uzglabāšanas procesā. Jums nav visu laiku jāvēro videokameras, lai zinātu, kāpēc noskanēja signalizācija.
Detektors nereaģē uz dzīvniekiem līdz 20 kg un 50 cm. Bet, ja kādam īpaši zinātkāram mīlulim izdosies iedarbināt signalizāciju (īpaši kaķim), fotoreportāža apstiprinās, ka māja ir drošībā.
Vienkārša pievienošana, noskenējot iekārtas QR kodu Ajax lietotnē.
Uzstādīšana: Iekštelpās
Kustības uztveršanas attālums: Līdz 12m
Imunitāte pret dzīvniekiem: Svars līdz 20 kg, 50 cm
Barošana: Baterijas CR123A (×2), 3 V, darba ilgums līdz 4 gadiem, vai līdz 2.5 gadiem, ja ieslēgta funkcija “Ieejas aizkāve”
Baterijām garantijas nav.
Darba temperatūra: no -10°C līdz +40°C
Izmērs: 135 × 70 × 60 mm
Svars: 167 g
Uzstādīšanas instrukcija pieejama Ajax lietotnē, kura atvērsies, noskenējot detektora QR kodu uzstādīšanas brīdī. Vienkārša uzstādīšana un pievienošana pie Ajax centrāles Hub.
Pieejams saņemšanai veikalā
Izpārdots veikalā
Pievienots salīdzināšanai
Sasniegts count_product-produktu limits
Pievienots salīdzināšanai
Sasniegts count_product-produktu limits
{"id":41713219207351,"title":"Default Title","option1":"Default Title","option2":null,"option3":null,"sku":"367308963","requires_shipping":true,"taxable":true,"featured_image":null,"available":true,"name":"AJAX Bezvadu iekštelpu kustības detektors MotionCam PhOD ar fotoverifikāciju Melnā krāsā","public_title":null,"options":["Default Title"],"price":18896,"weight":0,"compare_at_price":18896,"inventory_management":"shopify","barcode":"4823114014178","requires_selling_plan":false,"selling_plan_allocations":[],"quantity_rule":{"min":1,"max":null,"increment":1}}
AJAX Bezvadu iekštelpu kustības detektors MotionCam PhOD ar fotoverifikāciju Melnā krāsā
SKU: 367308963
(1)
€188,96
Vienības cena
Bezvadu kustības detektors ar fotoverifikācijas iespēju MotionCam PhOD (photo on demand). Ir iespēja jebkurā brīdī nosūtīt pieprasījumu, lai nofotografētu attēlu, kas notiek Jūsu īpašumā.
Strādā tikai ar AJAX centrāliHub 2vaiHub 2 Plus.
Atsūta verifikācijas attēlu lietotājam 9 sekundēs.
Izmantojot MotionCam, Jūs uzzināsiet par faktisko situāciju mājās pat pirms zagļi sapratīs, ka viņi ir noķerti. Animēta fotoattēlu sērija tiek nosūtīta uzreiz pēc kustības uztveršanas.
MotionCam ir paredzēts, lai kontrolētu Jūsu drošību, nevis personīgo dzīvi. Kustības detektors nevar uzņemt attēlus pēc pieprasījuma. Kamera aktivizējas tikai, reaģējot uz kustības trauksmi. Dati tiek šifrēti visā pārraides un uzglabāšanas procesā. Jums nav visu laiku jāvēro videokameras, lai zinātu, kāpēc noskanēja signalizācija.
Detektors nereaģē uz dzīvniekiem līdz 20 kg un 50 cm. Bet, ja kādam īpaši zinātkāram mīlulim izdosies iedarbināt signalizāciju (īpaši kaķim), fotoreportāža apstiprinās, ka māja ir drošībā.
Vienkārša pievienošana, noskenējot iekārtas QR kodu Ajax lietotnē.
Uzstādīšana: Iekštelpās
Kustības uztveršanas attālums: Līdz 12m
Imunitāte pret dzīvniekiem: Svars līdz 20 kg, 50 cm
Barošana: Baterijas CR123A (×2), 3 V, darba ilgums līdz 4 gadiem, vai līdz 2.5 gadiem, ja ieslēgta funkcija “Ieejas aizkāve”
Baterijām garantijas nav.
Darba temperatūra: no -10°C līdz +40°C
Izmērs: 135 × 70 × 60 mm
Svars: 167 g
Uzstādīšanas instrukcija pieejama Ajax lietotnē, kura atvērsies, noskenējot detektora QR kodu uzstādīšanas brīdī. Vienkārša uzstādīšana un pievienošana pie Ajax centrāles Hub.